Overview
All achievements in chronological order, 100% completion list guide, minigame guide, and everything you need in one place! Breaking za warudo one platinum at a time.
Preface

Hello, this is Dashi with another long guide! After Yakuza 0 finally arrived on PC, I had my first chance to play this franchise. While playing through the actual game took less than 50 hours, it took over 130 hours to fully 100%!
Part of the reason it took so long is the lack of many in-depth guides online. My goal is to be your helping hand so you won’t have to play through this blind as a PC player. Getting 100% completion and achievements is possible for anyone but be prepared to spend an equivalent number of hours. Many aspects of the game are rng-based, so if you’re particularly unlucky or have a poor grasp of game mechanics, you may spend an even longer time. Be prepared and be patient. The road to being a real yakuza is never easy!
Kazzy-kun believes in you.
This guide has some parts under construction as it’s such a huge undertaking, it’s taking an exceptionally long time to write. Many of the data tables – especially for telephone cards, substories and equipment parts – exist thanks to people who have already done all the legwork. A lot of credit goes to CyricZ’s writeup on gamefaqs[gamefaqs.gamespot.com] and ゲーム攻略マン, a dedicated game strategy forum[dswiipspwikips3.jp]. If there are any errors, let me know in the comments, and I’ll look into it! Thanks and I hope this helps you guys out!
I. Starting the Game

This guide will be split into two parts, a chronological section for missable achievements throughout the main story, followed by a larger section dedicated to post-game achievements and the completion list. To look up a specific topic, see the sidebar or use CTRL+F to search keywords. Almost all topics are covered in this guide.
First, you should note that Yakuza 0 has its own in-game completion checklist that lead to a 100% game completion score, which in turn unlocks a specific achievement linked to it – “Perfectionist”. It’s the hardest achievement to get in this game. You can find the completion list in the in-game menu options under the “Completion” tab.
To get the 100% completion achievement, you must fully complete this list for both characters in one save file! It does not have to be done during the main story– the game allows you to complete them in a free-game mode called Premium Adventure, which uses your game clear save file to continue the game. Premium Adventure found on the main menu after completing the game once.
_________________________________________________________________________________
You can start your first playthrough on any difficulty. The game is pretty easy to learn and you can change the difficulty anytime, so do what feels right to you! My personal recommendation is to attempt the game on at least normal or hard if you’re planning a follow-up run on Legend difficulty so that you’re better prepared for what’s to come.

Visit Kamurocho in December 1988.
Awarded upon starting the game and completing the prologue.

Complete Chapter 2.
Awarded at the Chapter 2 end screen.

Complete Chapter 4.
Awarded at the Chapter 4 end screen.

Complete Chapter 6.
Awarded at the Chapter 6 end screen.

Complete Chapter 8.
Awarded at the Chapter 8 end screen.

Complete Chapter 10.
Awarded at the Chapter 10 end screen.

Complete Chapter 12.
Awarded at the Chapter 12 end screen.

Complete Chapter 14.
Awarded at the Chapter 14 end screen.

Complete Chapter 16.
Awarded at the Chapter 16 end screen.

Complete the Final Chapter.
Awarded for completing the game. Congrats!
I. Chapter 1
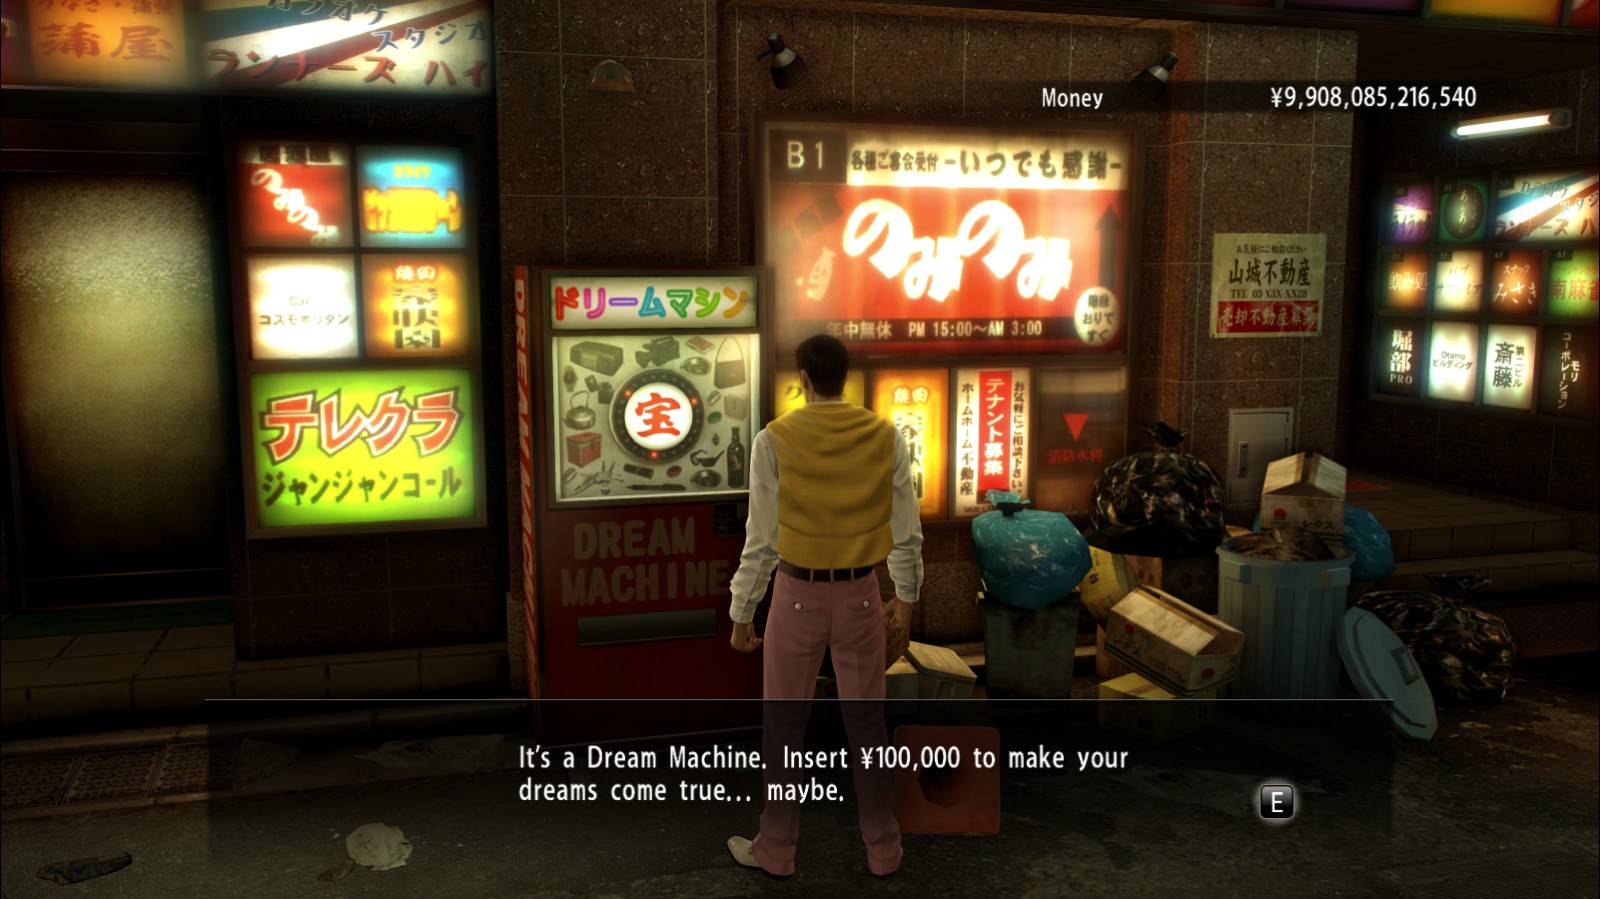
Early on, you’ll encounter these red vending machines on side of street called Dream Machines:
Dear Santa, I’d like the entire Yakuza franchise on PC…

Get a top-grade item from a Dream Machine
This is a luck-based achievement where you need to get a top-grade (10 star) item from a Dream Machine. Whenever you see one, especially the 1 million dollar dream machines, you should consider using it. While the 10k and 100k machines also dispense top-grade items, your chances increase as the value does.
Completion Point Tip:★ Use Dream Machines 50 times in one playthrough.
The Dream Machines spawn randomly and are scattered throughout the city, so it’s best to start sooner than later. Play the story as you will and use them every now and then when you see one. If you don’t get 50 of them by the end of the story, you can continue getting them afterwards in Premium Adventure.
_________________________________________________________________________________
KOWAAAASEEEE

Get five or more play bonuses fighting a single enemy.
This is a very easy achievement that you’ll most likely get early in the game without trying. This achievement is linked to the bonuses that pop up on the right hand side of the screen during a fight. The easiest way to get this is by utilizing heat moves and environmental props while fighting large groups of basic enemies. I got mine during the first part of Kiryu’s escape in Chapter 1, in the conference room packed with enemies, by swinging the table and chairs around.
Completion Point Tip:This is a list of early, easy accumulation completion points that are good to be aware of. Most completion points just come from playing the game slowly and thoroughly. I’ll write more on them again later, in the Completion List section.
★ Travel 100 km on foot.
★ Travel 10 km by dashing.
By pressing the interact key while running (‘e’ on keyboard), you can dash. If you use dash regularly, it’ll unlock on its own. You can also buy dash upgrades and infinite dash at the CP Exchange/Temple.★ Talk to people 300 times
★ Defeat 500 enemies on the street
★ Help 30 attack victims around town
Attack victims spawn randomly throughout the game. You can typically hear them easily as you’re walking past. Regularly interact with them to build up for this completion point.
I. Chapter 2
These pocket tissues were made in Gucci
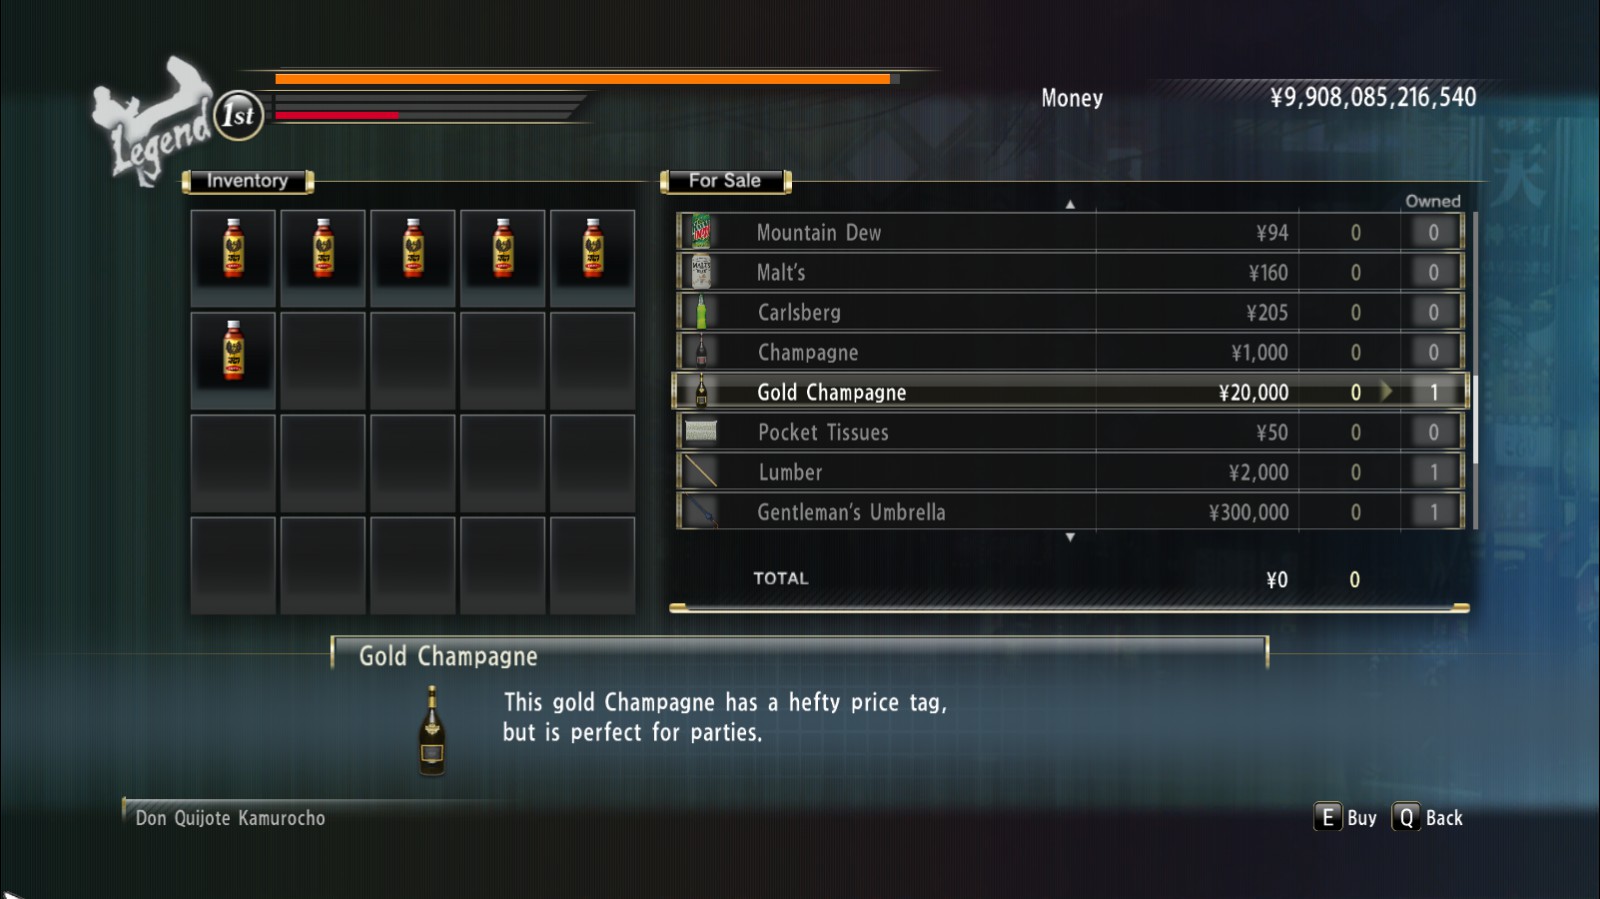

Treat a homeless man to a ¥20,000 bottle of booze.
At some point in the story, you’ll come across a fetch quest for 5 bottles of booze for a group of homeless men. The bottles are located in the following convenience stores:
- Don Quixote
- Poppo Tenkaichi St.
- Poppo Showa St.
- M Store Kamurocho.
Don Quixote happens to sell two types of champagne, regular and gold. The ¥20,000 gold champagne is the one you need to buy to get this achievement.
_________________________________________________________________________________
When I’m bad, I’m better…

Purchase ten or more abilities.
By now, you should have enough cash to buy several skill upgrades. Buy at least 10 to unlock this achievement. Keep saving your money and buy these as needed, as there’s a follow up achievement for unlocking every single ability in all styles.
Completion Point Tip:★ Defeat 200 enemies in the Brawler Style (Kiryu)
★ Defeat 200 enemies in the Rush Style (Kiryu)
★ Defeat 200 enemies in the Beast Style (Kiryu)In Chapter 2, you unlock all three of the main fight styles. I recommend that you use your preferred styles for the more difficult boss fights and switch up styles often on basic enemies. If you’re lacking in a certain style, it’s easy to rack up these numbers in long mission fight scenes and/or running around fighting people on the street.
I. Chapter 3-4
Successfully negotiate ideal terms with Yamagata.
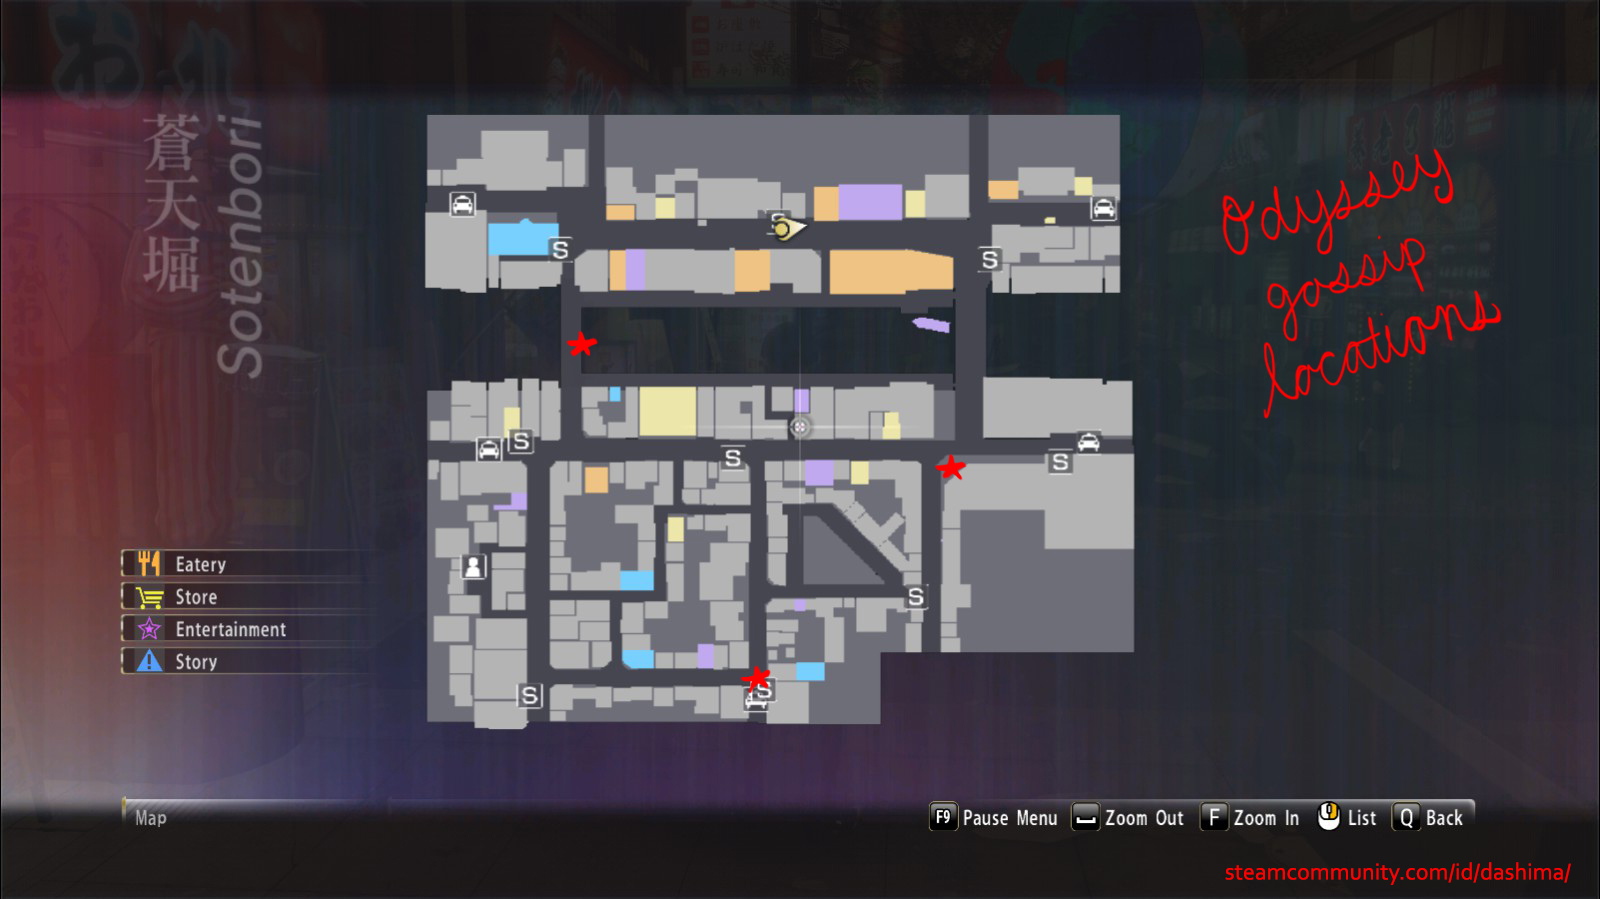
In Chapter 3, you’ll be asked to head over to the Odyssey. Majima will mention something about collecting intel first beforehand.
There are 3 NPCs you have to interact with before you enter Odyssey. They’re marked on the map above: two near the main bridges, and one near the bottom center of the map. After you’ve spoken to all of them, you can continue to Odyssey.
Inside the club, all you have to do is examine the 4 different tables. The achievement doesn’t unlock until Chapter 4, but you won’t miss it if you followed these steps.
_________________________________________________________________________________
Mulan but she’s a debt collector
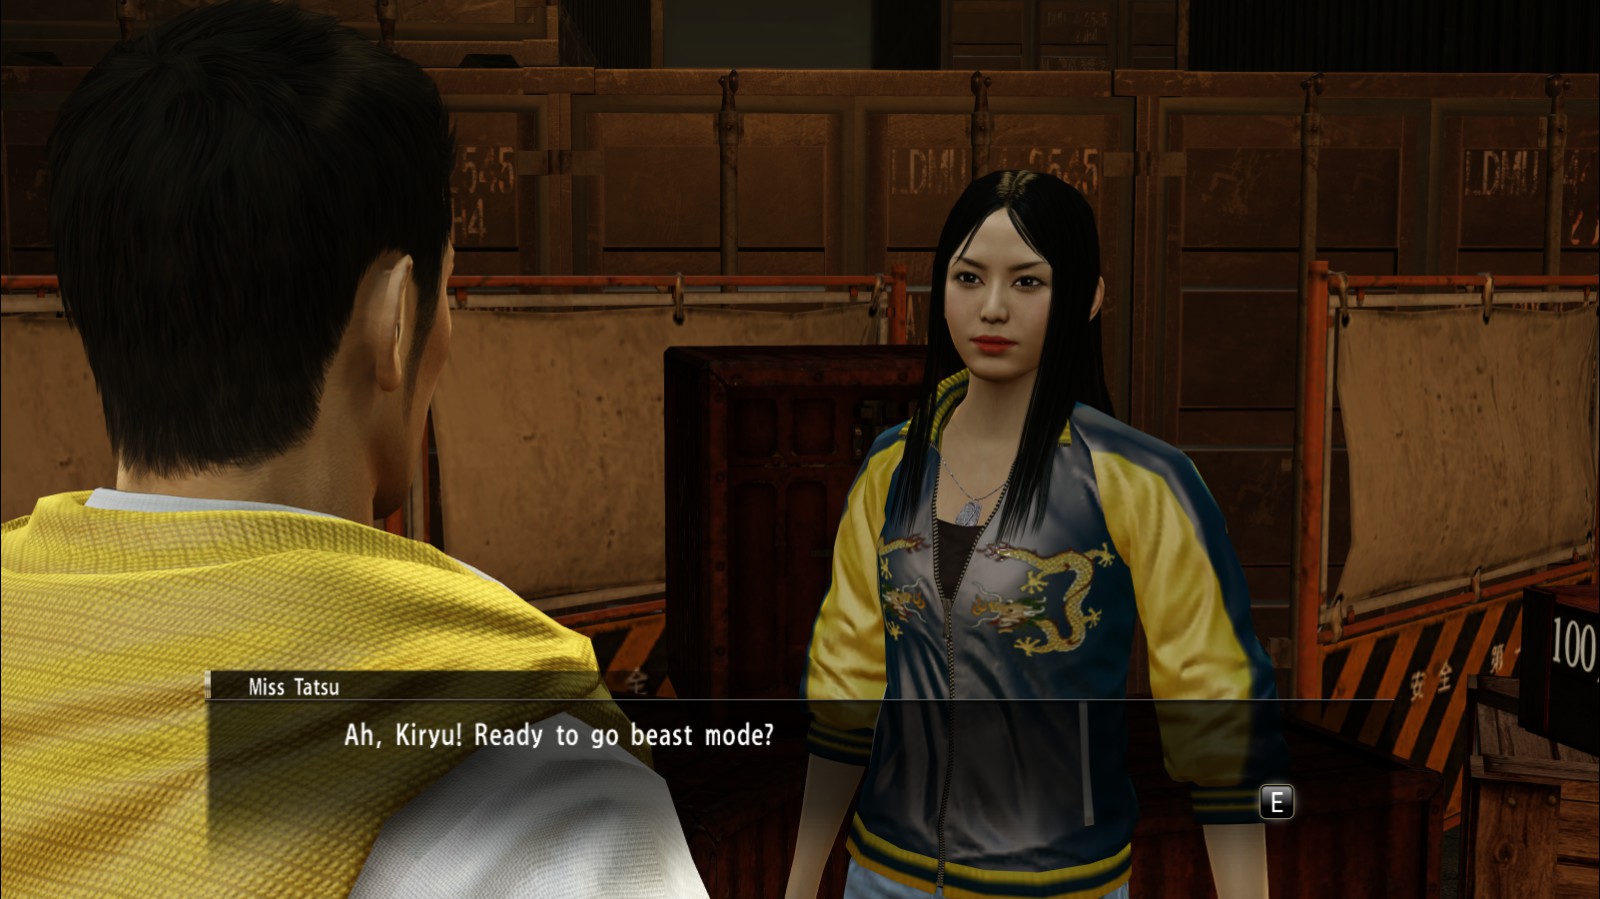

Complete one training mission with each master.
With all 6 training masters available in chapter 4, you can nab this achievement by successfully completing one training mission with them. You can also put this off till late-game or post-game, this is just the first opportunity for you to do it.
Note that Miss Tatsu has multiple paid training sessions followed up by a “job” – the job is what you need to complete, just the regular training is not enough. Regular training involves mannequins, so you’ll know which is which.
Completion Point Tip:★ Defeat 200 enemies in the Thug Style (Majima)
★ Defeat 200 enemies in the Breaker Style (Majima)
★ Defeat 200 enemies in the Slugger Style (Majima)In Chapter 4, you unlock all three of Majima’s main fight styles. Just like with Kiryu’s, switch up the styles every now and then, especially for basic thugs on the street.
I. Chapter 5
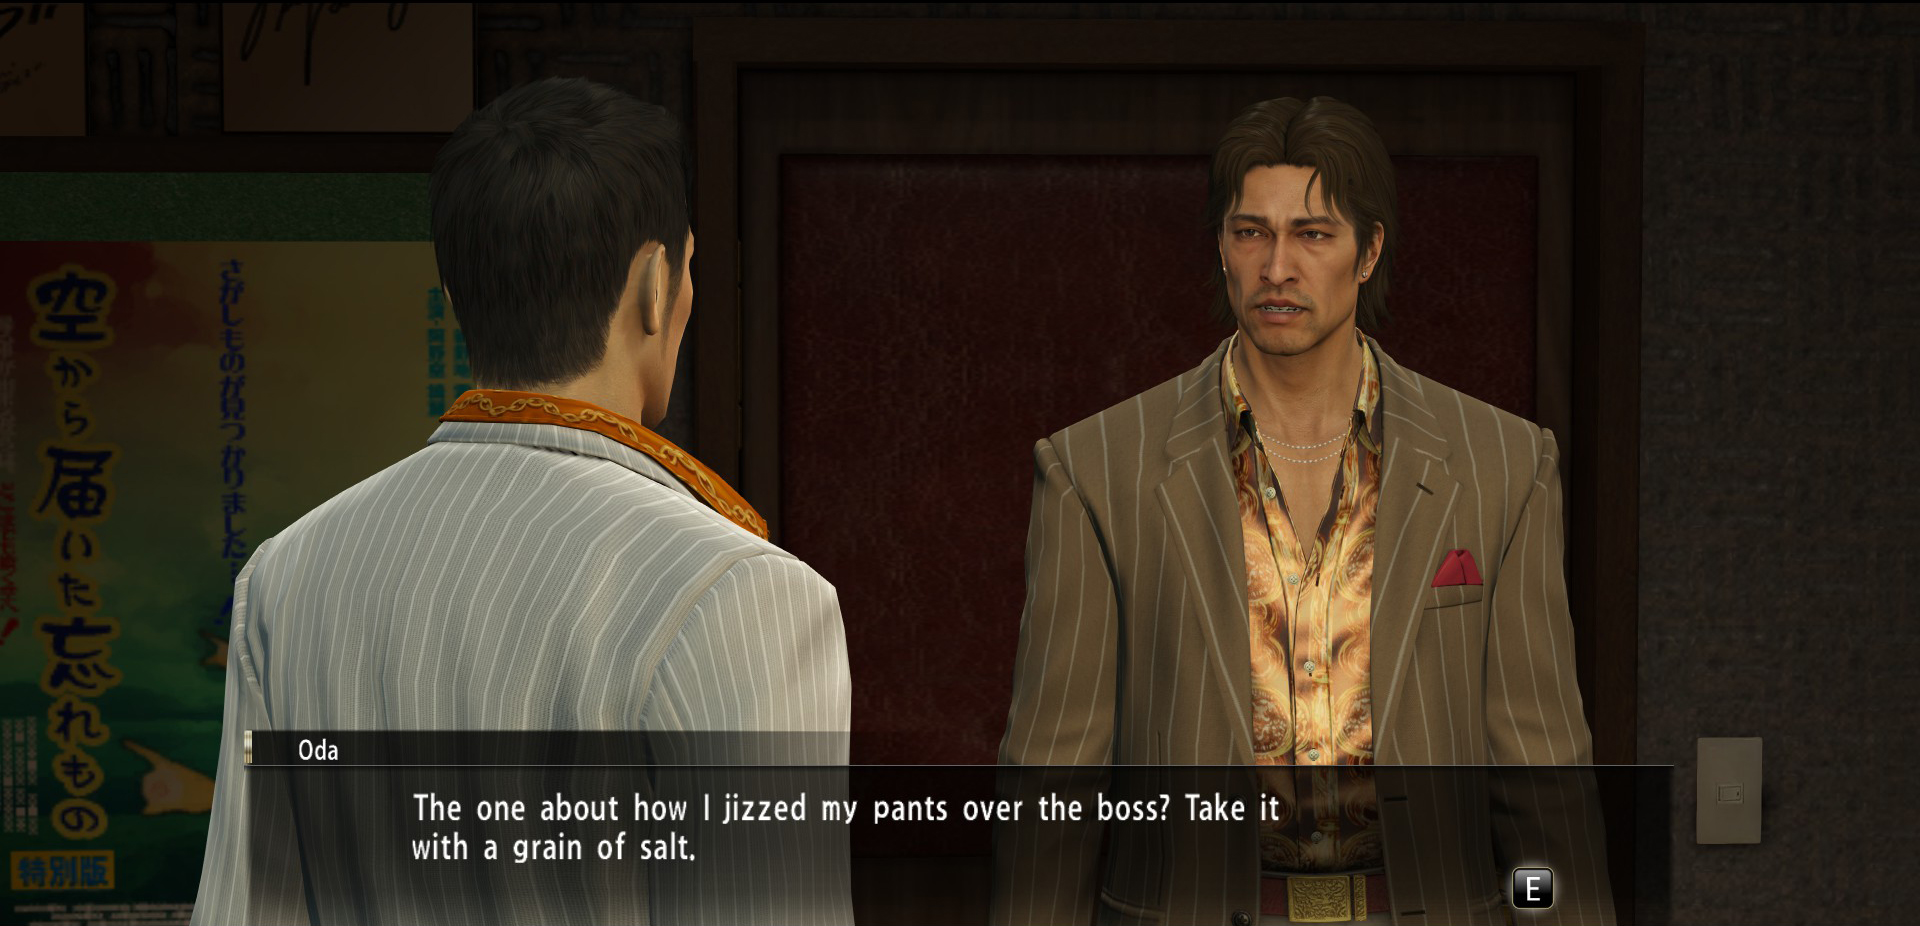

Impress Oda with your perfect manners.
Unless you’re good at QTEs, I highly recommend saving before heading into Cafe Alps with Oda.
The correct options here are:
> Table near the back
> Take the nearest seat
> Order nothing
> Slam that QTE button for the business card
Bonus: It’s also funny to watch Oda berate Kiryu for failing to have good manners, so if you made a save you can always reload to see those scenes or see them during the Legend run.
_________________________________________________________________________________

Get started with Real Estate Royale
Awarded by doing your first collection in Real Estate Royale. Unmissable.
Completion Point Tip:★ Defeat 200 enemies in the Dragon Style (Kiryu)
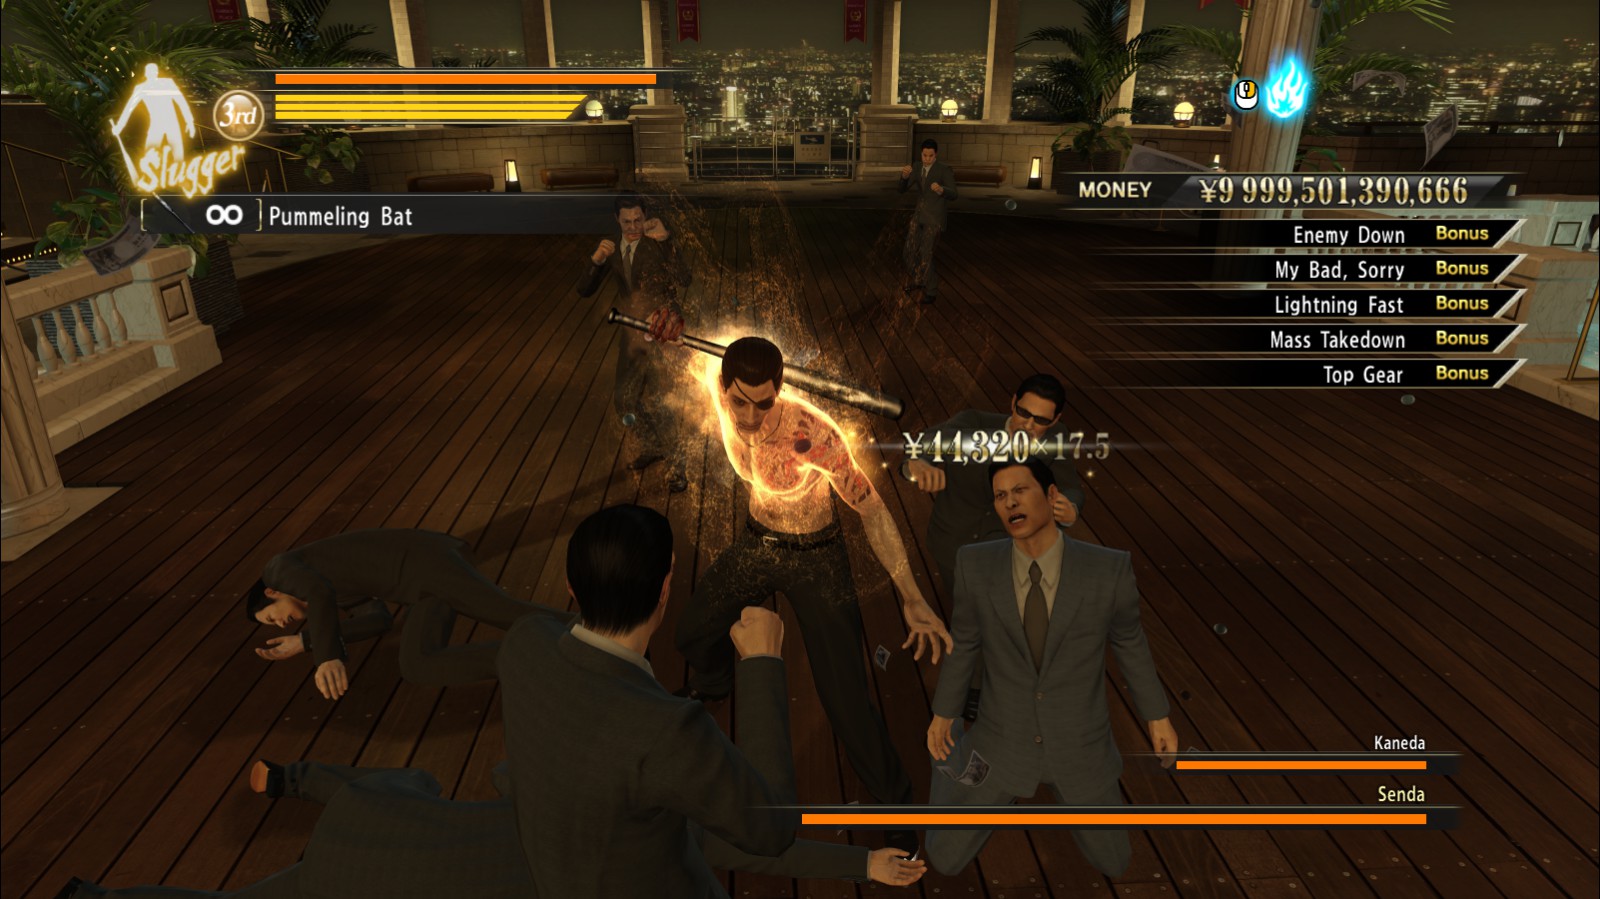
If you complete the Real Estate Royale storyline, you’ll unlock special ability sections in all the styles, as well as a bonus fighting style: Dragon Style. You can access this ability by right clicking the style icon by the healthbar on the pause menu, and change it back the same way.Just like the other 3 main styles, you’ll need 200 KO’s using Dragon Style, so if you’re going for 100% completion points, be sure to add this fourth style to your switch-up list as well!
I. Chapter 6
Singlehandedly crashing the stock market…
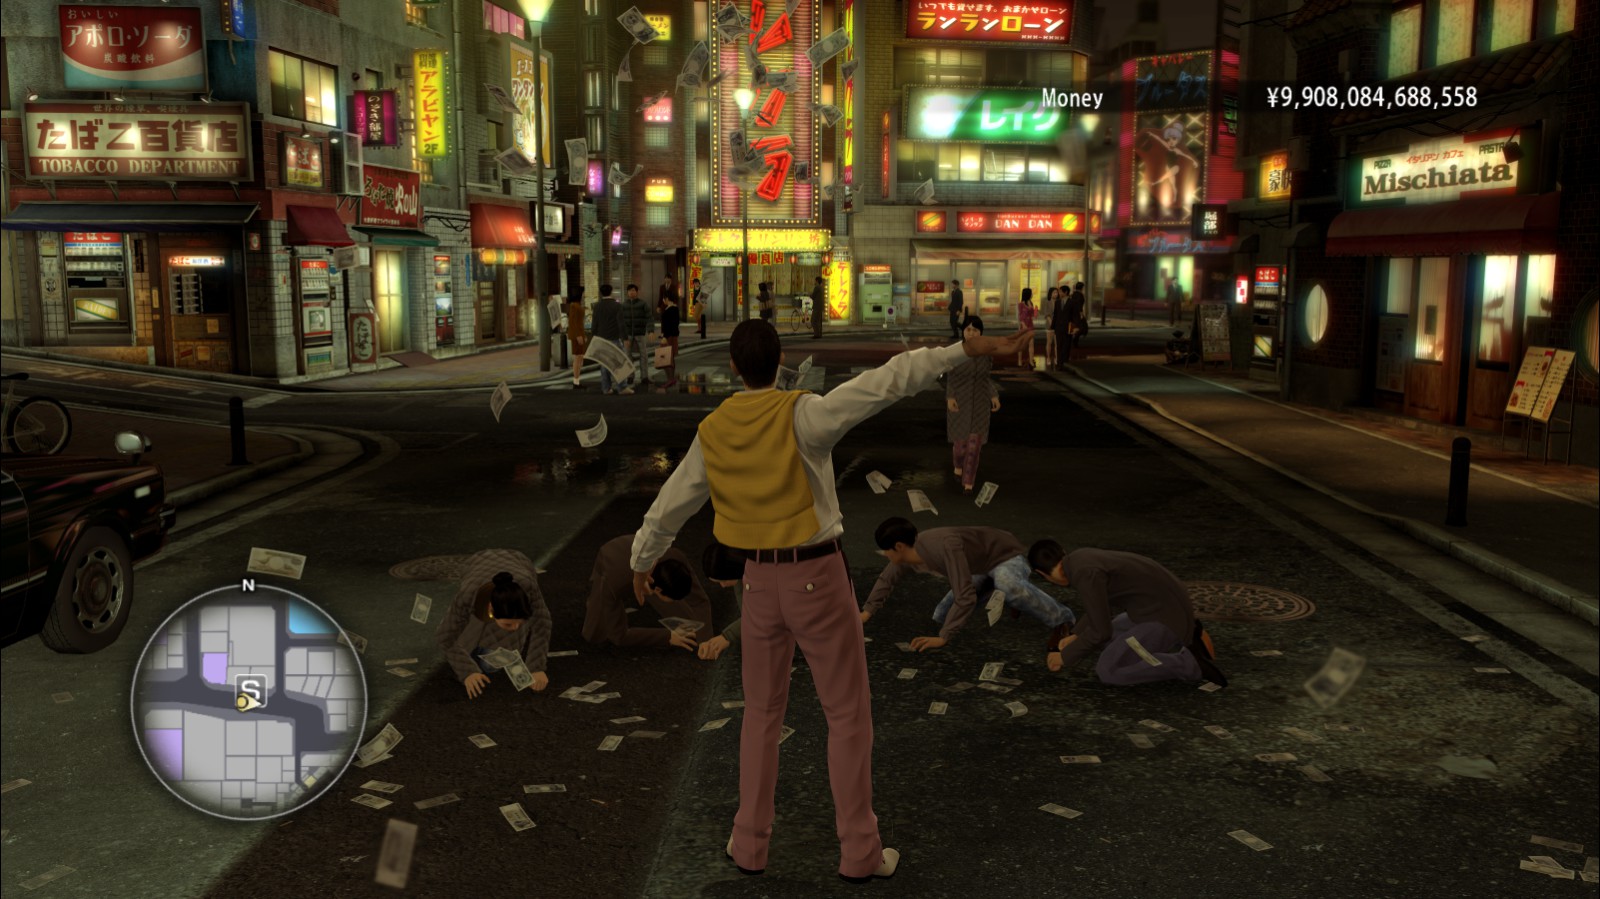

Throw away money on the street
You’ll meet Mr. Moneybags in this chapter, and he’ll teach you a valuable skill… throwing money! Follow the tutorial, then go out on the street to throw and this will unlock.

Throw away a total of five million yen.
Keep throwing money till it pops!
Each throw is 100k, so you have to throw 50 times. /r/theydidthemath
Completion Point Tip:★ Scatter a total of 10 mil yen (SHARED)
Real yakuza slam that motherf*ckin throw button.
_________________________________________________________________________________


Win ten bets on three-round tournaments at JCC.
My honest recommendation to anyone new to this game is to ignore this and save the achievement for the post-game Premium Adventure mode as this is immensely time-consuming. This is one of those rng-reliant minigames where you win once in a blue moon if you’re super unlucky. The mechanics are simple but it’s still pretty annoying to sit through for hours.
For the best odds, pick Jennifer and alternate between rock, scissors and paper depending on the strength of the opponent’s hand.
For example, since Maria has a 4 star in Paper– this means that she is more likely to use Paper in fights. Use Scissors against her. Another example: Momoko has 3 in Rock, 5 in Scissors, and 4 in Paper. Use scissors against her so that you have the least probability to lose.
I. Chapter 7


Take more than 15 minutes bringing the takoyaki.
Majima will go on a trip to buy takoyaki at some point in the story. After buying it, do literally anything other than return to the mission point. Play minigames, punch dudes, do substories, just stand there… anything works. (I believe the game pauses if you minimize the screen window, so just idling around with the game open works.)
After the time is up, the achievement will unlock.
_________________________________________________________________________________
Real yakuza only, no boys allowed

Majima’s minigame, Cabaret Club Czar starts in this chapter.
Completion Point Tip:★ Defeat 200 enemies in the Mad Dog Style (Majima)
After completing the Cabaret Club storyline that starts in this chapter, you’ll unlock extra ability sections for all fighting styles and Majima’s iconic fourth style, Mad Dog of Shimano! Like with Kiryu’s, you can access the new style by right clicking on the fighting style icon next to the healthbar in the pause menu screen.
I. Chapter 10
*Be sure to SAVE and take heat-restoring energy drinks before leaving West Park with Oda!
If 3 real estate agents are going at a velocity of 45 mph in a room measuring 6 thugs per square meter, what is the instantaneous rate of change in radians per second

Defeat 3 foes using co-op moves with Oda or Tachibana.
Following several cutscenes, Kiryu, Oda and Tachibana will fight together in a long mission sequence. Every now and then, Oda and Tachibana will grab an enemy and you’ll have an opportunity to heat move them if you’re near them and have enough heat in the bank.
Hitting the enemy they’re holding WILL disrupt their hold and knock them out of their grasp, so take care not to accidentally defeat all the enemies without performing the co-op move.
I got this without issues on my first try as they grab pretty regularly, but if you’re having trouble, use heat-replenishing items or try waiting out the fight by letting a few enemies live (punch one every now and then to keep heat up or use items) and wait for the other two to grab them.
If you fail, reload a previous save or just die and replay the segment to try again.
I. Chapter 12
Lockpicking increased to 100
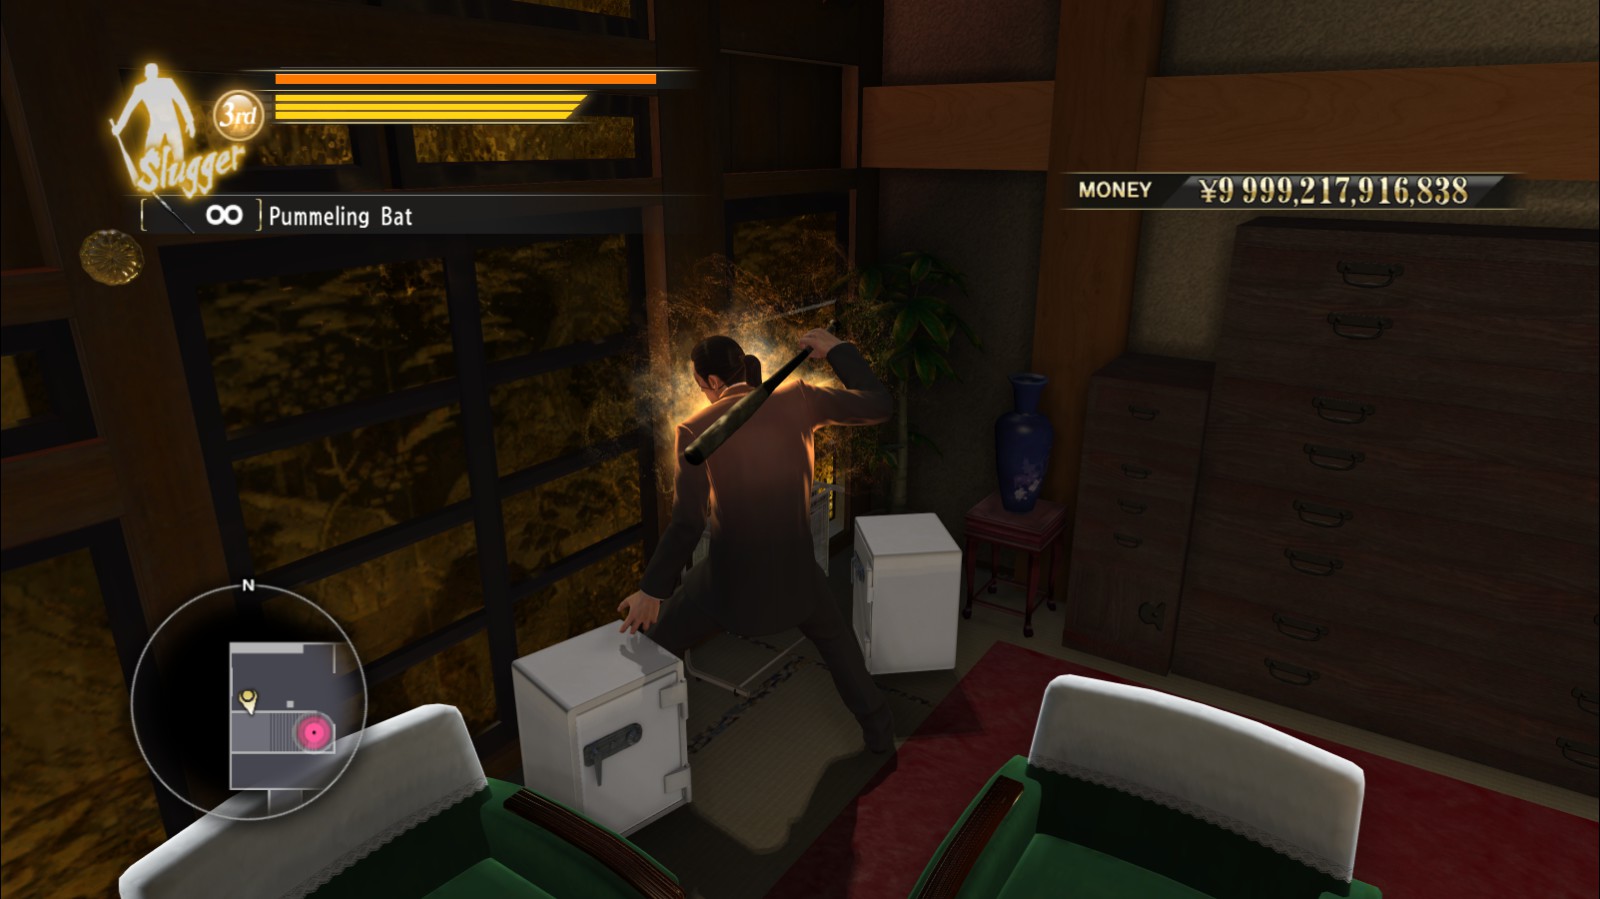

Steal Nikkyo Consortium funds from their safe.
During the long fight scene in Nikkyo Consortium, you’ll come across a fan-throwing enemy standing at the end of the hall. Do NOT go up the stairs just yet as it’s a point of no return.
Nearby those stairs are two small safes that you’ll have to crack open for the achievement. See the image above for reference for where they are and what they look like, as they’re easy to overlook. Kicking them multiple times will eventually pop them open and give you a nice bonus.
I. Chapter 13
A menace to afros and smiling
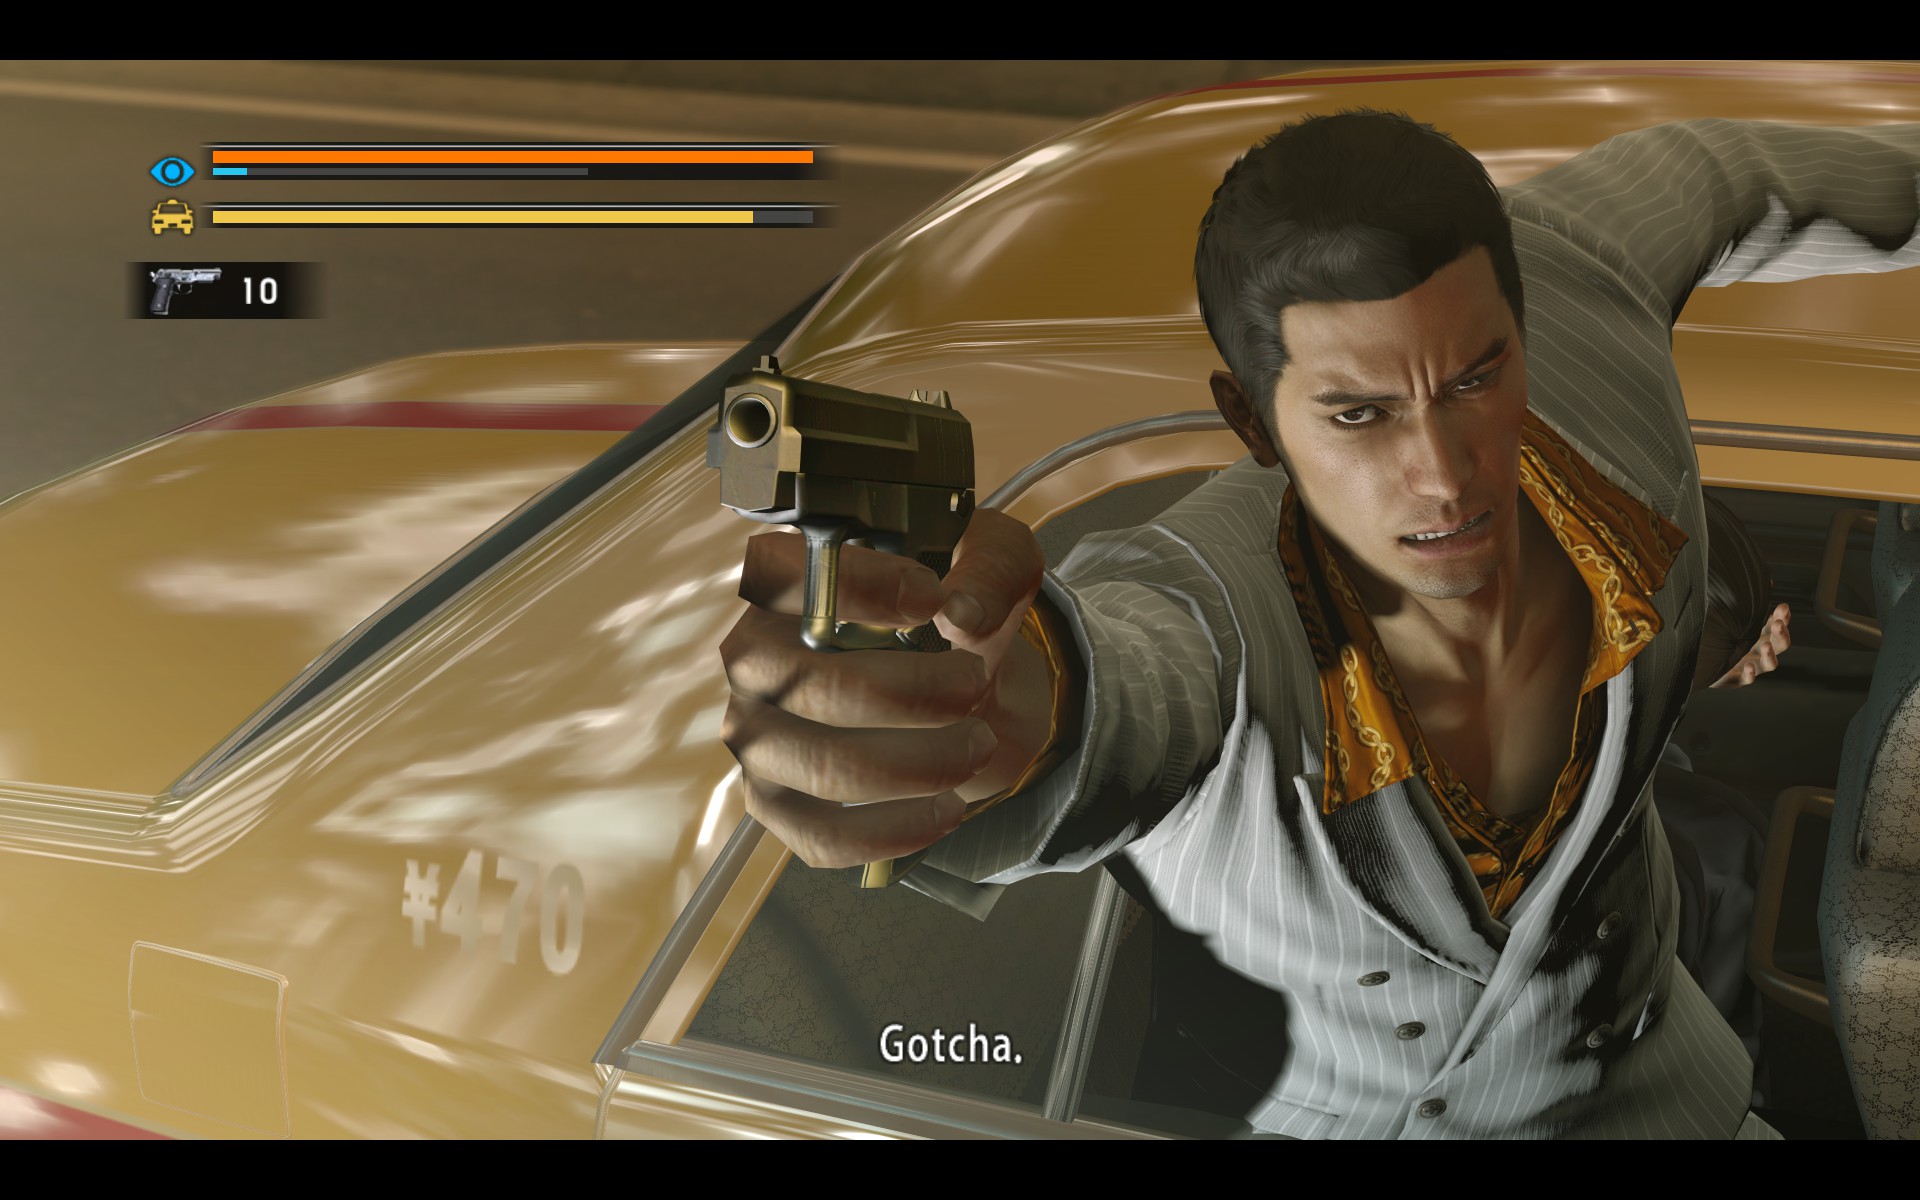

Defeat the yakuza with an afro on the highway.
During a car chase sequence, you’ll have to shoot enemies on the road. Around halfway through, a vehicle with a yakuza with an afro will drive up on the right side. He’s only there for a couple seconds, so use Heat Eye (slow time) and pop that guy in the head once or twice.
If you miss, you can let the other enemies kill you to retry the chase sequence. There’s not really a trick to this one, you just have to aim right.
I. Chapter 15
I have a bottle of whisky with your name on it.

Suffer the full force of Reina’s attack.
There will be a scene where you have to fight in Serena, Reina’s bar. During the first scripted QTE, fail and you’ll unlock this achievement.
II. Post-Game: Achievements
Premium Adventure is accessible through the main menu after completing the game once and you’ll be able to collect all the completion points you missed. The phones in the backroom of the Sunshine Cabaret Club and Kiryu’s office allow you to switch between characters, cities and time of day.
These are miscellaneous non-completion list related achievements that you can generally only get after the end of the game:
1-800-are-you-slappin?
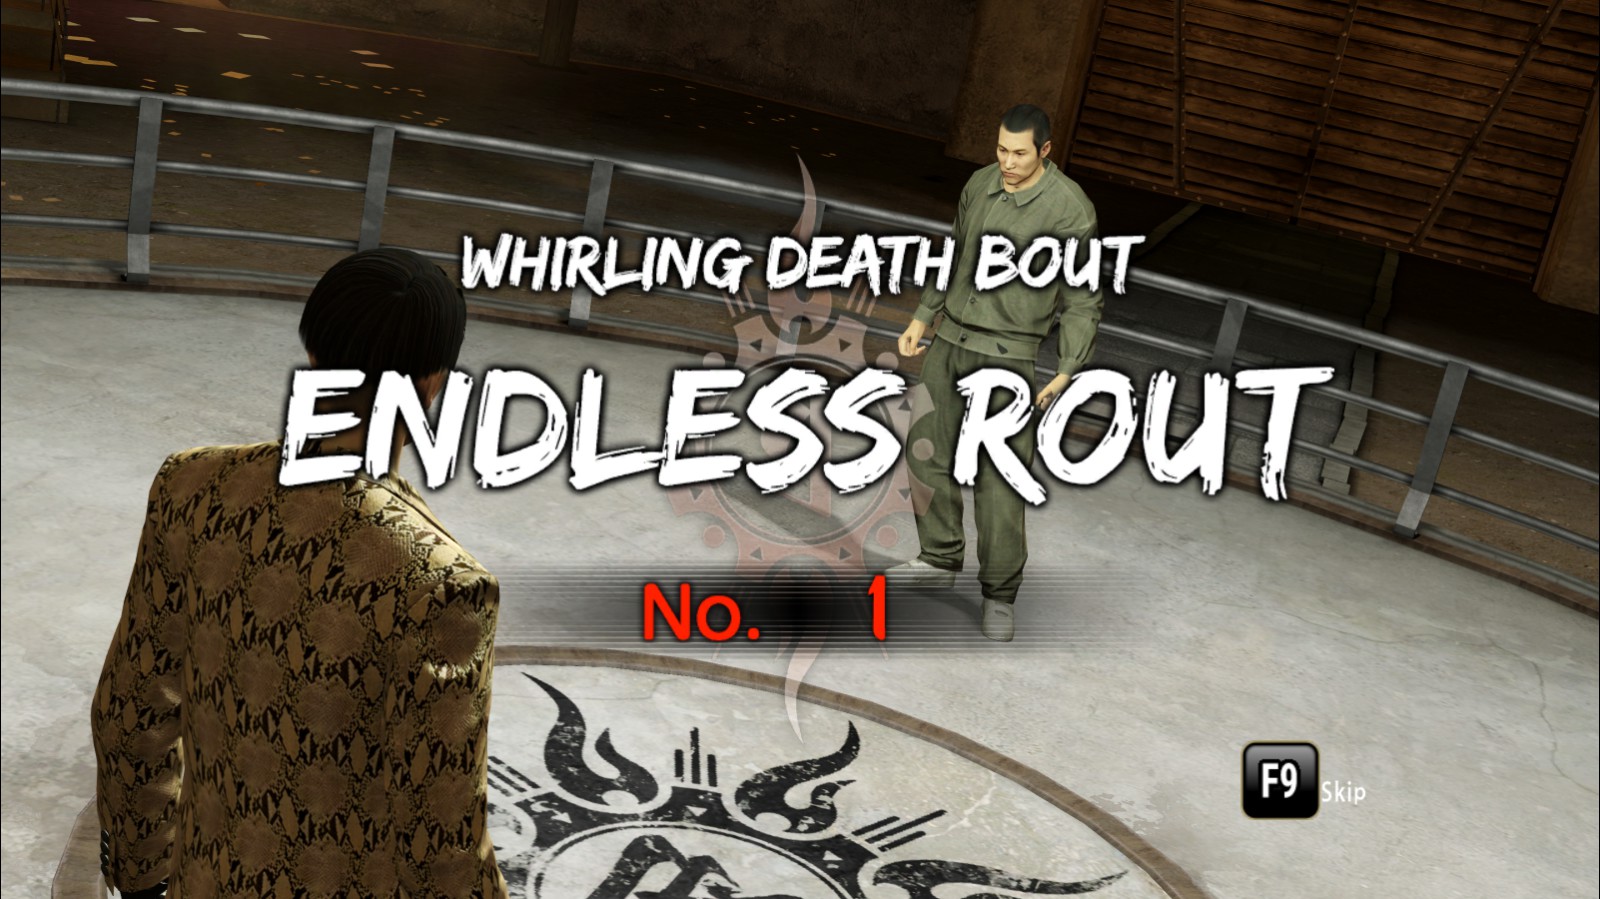

Defeat 30 or more opponents in Endless Rout.
Repeatedly play through battles in the Bed of Styx (Majima’s map, Sotenbori, on that little ship in the river) until you reach Rank B. This is the minimum rank required to access Endless Rout mode, so you don’t have to level up all the way or beat every single battle.
Quick Tip:
An extremely fast way to win battles without even having to fight is to knock your opponent off the edge of the platform if its the falling stage type. Even if you fall with them, as long as they go first, you get an automatic win!
After about 20-25 winning battles, you should reach rank B.
About Endless Rout:
Each stage in Endless Rout has around 5 random enemies and you’ll be able to determine the match rules at the beginning of each. For the easiest experience, you can set the rules and difficulty however you like. Between stages, you get an opportunity to heal in exchange for cash so be sure to take that opportunity if needed. Only 6 stages need to be won to get the achievement. If you play on the default rules, this is just like any other regular fight and should be pretty simple to complete!
_________________________________________________________________________________

Defeat So and Jo Amon.
Once either Kiryu or Majima finish all other respective substories, they will receive an invitation to complete the last substory in the Bullfighting Arena via taxi. Kiryu has to complete 59/60 substories and Majima 39/40 to activate it. You must defeat Amon on BOTH CHARACTERS to get this achievement. Defeating him on one character alone unfortunately isn’t enough.
This is a pretty challenging secret boss, so be sure that you’ve upgraded most of your skills and health bar before attempting it. It’d be wise to bring a full inventory of energy drinks, items, and weapons. If you’re struggling, try turning down the difficulty to Easy.
Below are videos showing both bosses movement patterns:
Strategy:
- The trick to Amon isn’t skill, it’s cheesing the combat system, as he’s purposefully a cheesy opponent that’s difficult to beat by normal means. The idea is that you’ve mastered all the elements of the combat system and should be using all the op moves in a final showdown.
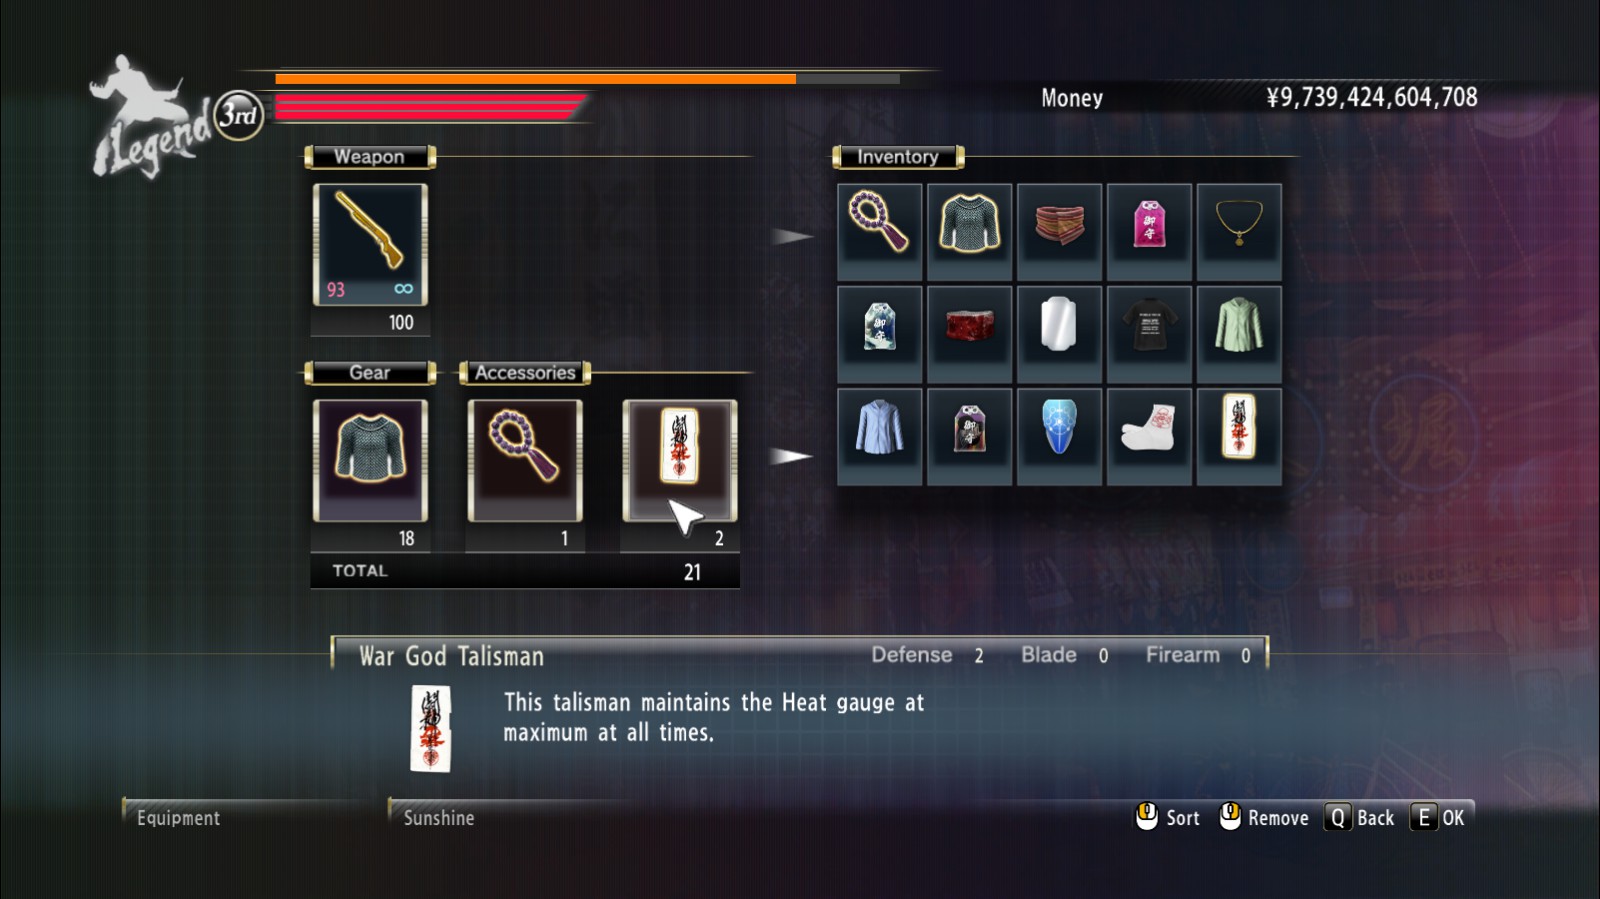
- The first stage of So Amon’s fight is easy if you bring weapons and spam heat moves on him. You can also use Beast mode throw repeatedly to keep him stunlocked and build up heat to spam heat moves. The War God Talisman (maintains heat at the 3rd bar) can also help here.
- His cannon is basically a guaranteed kill if you get hit by it, as the follow-up laser will destroy you in one hit. If you’re having trouble with this, Sacrifice Stones can be equipped mid-battle.
- During the second stage – when the helicopter arrives and starts dropping furniture everywhere – run and dodge around the arena till you pick up one of the dropped invincibility items. It looks like a golden bottle. Once you do, you can resume beating him up.
- TLDR: run in circles > pick up invincibility item > attack Amon > item wears off > repeat this cycle until defeated
- Amon will also attempt to grab the invincibility items, so if he succeeds, keep running and wait him out.
—
- EXTREME cheese way: Knife Amon’s gut repeatedly with Spicy Knives/other high-tier bladed weapons and curb stomp him while he’s down to build up heat again. Doing this with full drunken Brawler perks for fast heat is beneficial. You can also use heat-restoring drinks or use the War God Talisman. You don’t even have to worry about the second stage using this method if you do it successfully.
Strategy:
- For the extreme fast way, see the video. You’ll need to equip the Payback Ring, Thug Necklace, and Blood Binding. Get your health down to 1 HP (Stone of Enduring/Sacrifice Stone might help here), steal his blade and then throw it back at him.
- Jo Amon is a lot easier than So Amon and you could probably just fight him normally if desired. He does not have a helicopter stage like So Amon does, just a huge healthbar.
- The first stage of his fight, he uses his fists and is really easy. You can just punch him around normally here.
- The second stage of the fight is slighter tougher as he equips a blade and is harder to predict. Majima’s Mad Dog Demonfire counter move can help a lot here, as well as blade-resistant Chain Mail.
II. Post-Game: Equipment Parts

Get the best weapon search results report.
At the Dragon and Tiger restaurant in Sotenbori, you can send out agents to find weapons and parts for you. I put this in the post-game section because I highly recommend you have lots of cash to blow to reduce the waiting time to 0 and send out consecutive searches. The report results are random, but the result you’re looking is “Crazy Unbelievable Success!”
Paying extra money will boost the chance of getting a better weapons search report. Regardless, this can take many tries, but if you’re aiming for all the parts this will inevitably happen. It’s best done in conjunction with the following achievement:
WE ARE LONG HUA EXPEDITION

Obtain all equipment parts.
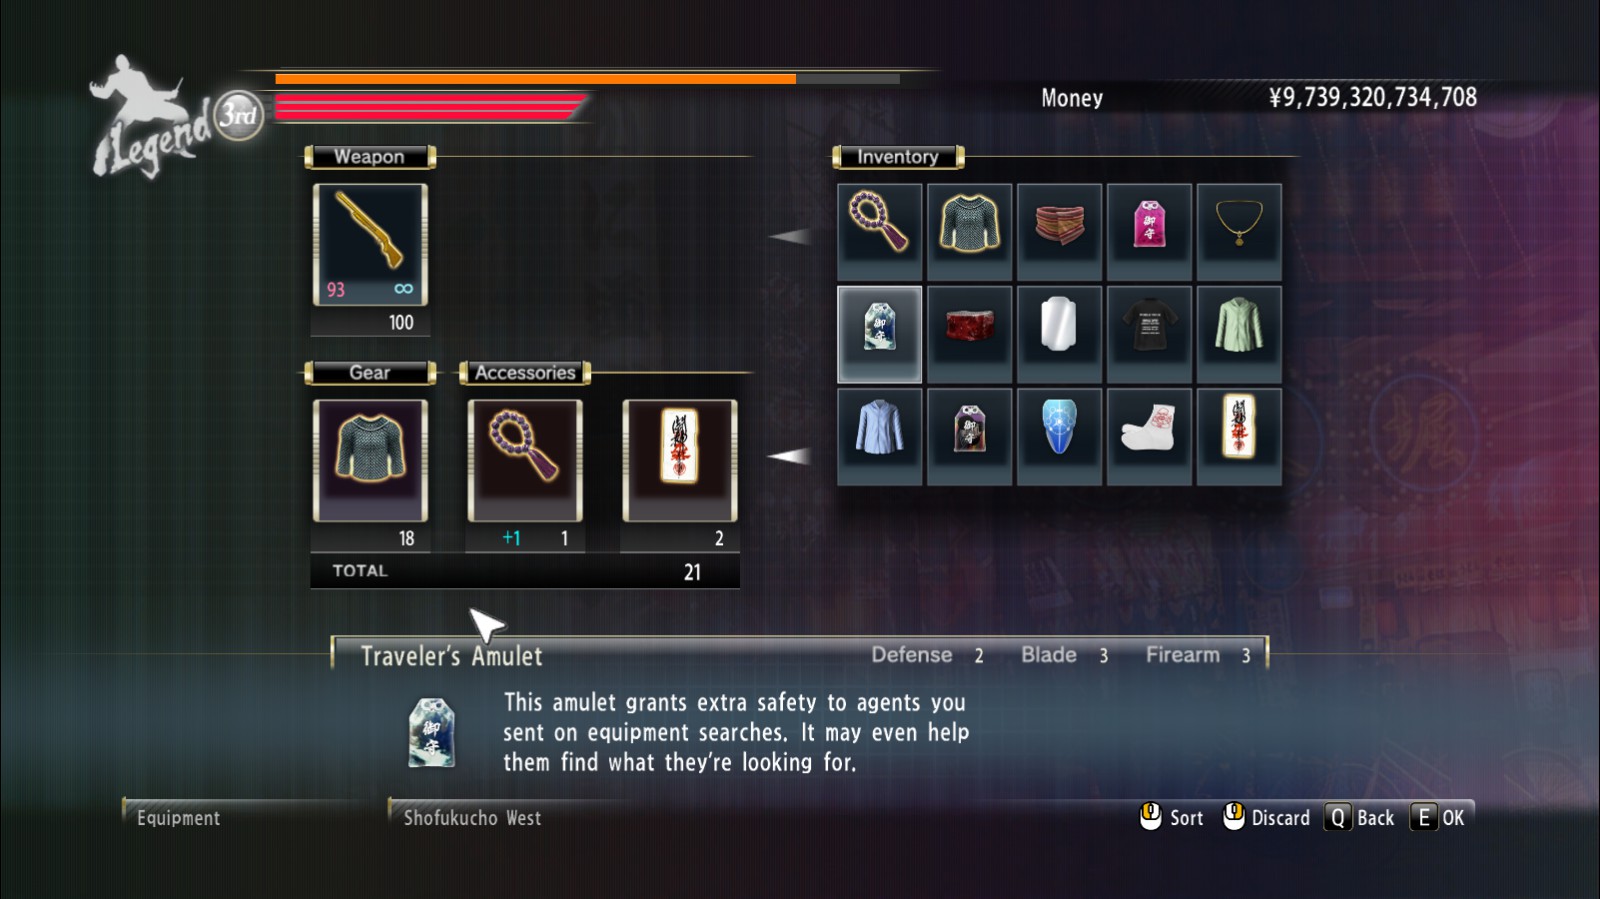
If you can’t get some of the “common” items, try unequipping items that boost item searches. These items work by replacing lower tier parts with higher ones, so sometimes you won’t get the part you need.
II. Completion List (Adventure)
When I was a young boy my father took me into the city
But that’s not all! For those of you who are completionists and/or going for the platinum, you will benefit greatly from the latter section of this guide. This is all personal advice from someone who knew nothing about Yakuza’s gameplay or minigames before starting this game, so I feel that I can explain it to a newcomer in a relatively understandable way.
For clarity’s sake, I’ll list the highest necessary completion point metric. There may be several CP points leading up to it (ie, defeat 50 enemies, 100 enemies, 200 enemies, etc.) that aren’t visible until you fulfill the prerequisite point, so just know that what I’m listing is the FULL list of the minimum stats needed, even if your list doesn’t reflect it yet.
Character-unique completion requirements are marked. Any non-missable achievements that tie along with them will be linked again for convenience, in case you didn’t pick them up earlier.
_________________________________________________________________________________

Get over 50% on your Completion List

Get 100% on your Completion List
These two achievements will unlock as you complete your list. “Perfectionist” is hands down the most difficult and time-consuming achievement in the game. You can keep track of your progress in the Pause Menu > Completion List. There are SEVEN different lists you need to complete, including the two character specific minigame ones. Check your list often to see what you’re missing, and good luck!
★ Talk to people 300 timesIf you didn’t get this by the end of the game, you’ll probably get it while trying to get all the other completion points. You can increase this by talking to literally anyone, including shopkeepers, people on the street, etc. It also includes people you interact with during missions. Stacks well with “Dine at eateries 100 times” as each time you order something, it counts towards this as well.
★ Dine at eateries 100 timesEat at any establishment 100 times. You can buy a perk to eat infinitely at the CP Shrine. It will come in super handy.
Please note that ordering all food items at once will only count as ONE trip. Thus, drinks are considered separate trips because you can only order them one by one. There is no perk to drink infinitely so the bars will have to be done in multiple trips, as after 3 drinks, you need to wait out the alcohol limit. The Alertness Hood accessory, if you have it, can help shorten the waiting period but its generally only a couple minutes so it’s not too bad.
Below is the list of establishments needed to complete the Adventure tab:
★ Complete Yoronotaki
★ Complete Ringer Hut
★ Complete Fuji Soba
★ Complete Akaushimaru
★ Complete Tengokuken
★ Complete Sushi Gin
★ Complete Cafe Alps
★ Complete Kanrai
★ Complete Smile Burger
★ Complete Maharaja
★ Complete Heroine
★ Complete Earth Angel
★ Complete Shellac
★ Complete Vincent
★ Complete Tsuruhashi Fugetsu
★ Complete Ganko Sushi
★ Complete Kinryu Ramen
★ Complete Kani Douraku
★ Complete Zuboraya
★ Complete Kushikatsu Daruma
★ Complete Komian
★ Complete Utahime
★ Complete Shot Bar STIJL
Essentially, order every single item from every single bar/restaurant in the game! This is an easy one.
Get a top-grade item from a Dream Machine
★ Buy from Dream Machines 50 timesIf you’re lucky, this will come hand-in-hand with the achievement. Keep trying them whenever you see one. The 1 million and 100k machines tend to dispense top-grade items at a higher frequency, but it’s really all down to luck.
★ Entertain yourself 100 timesThis will unlock while you work on the minigame portion of the completion list. You can play any game, sing karaoke, dance, watch videos, etc to build up the counter.
★ Eat 30 food itemsFood items are the actual items that go into your inventory that you have to use to eat. Restaurants don’t count toward this. Going to any convenience store and buying 30 of the same item, then eating them all is completely acceptable. If you complete the Errand Boy substory, you can also get free food items, but generally food comes cheap enough that it doesn’t make a difference.
★ Eat 30 medicine itemsLikely will have already unlocked just by playing the game. If not, you can buy any energy drink at a convenience or drug store and use it repeatedly during a fight. Unlike with food items, there is no CP bonus for using energy drinks on max health/heat so keep at least one enemy around to lower your health and drink up when you’re getting low.
★ Travel by taxi 30 timesPay the taxi fare 30 times to any area and this will unlock. ⠀⠀⠀⠀⠀⠀⠀⠀⠀⠀⠀⠀⠀⠀⠀⠀⠀⠀⠀⠀⠀⠀⠀⠀⠀⠀⠀⠀⠀⠀⠀⠀⠀⠀
★ Travel 100 km on footRun Kiryu run!
You should be at least halfway through this point by the time you finish the game. I don’t believe taping down a key to keep him moving works as he stops when he hits any obstacle, but if there’s an area that’s large enough for him to run in circles it might work. The rest of the tasks in the city will usually fill this up without having to resort to that method.
★ Travel 10 km by dashingStacks with the earlier completion point, but this one requires you hold the dash key (E on keyboard, A on 360, X on Dualshock). Be sure to pick up the CP Exchange bonus for unlimited running. It doesn’t take too long to get if you regularly use the dash key while going place to place.
II. Completion List: Farming Money (Adventure)
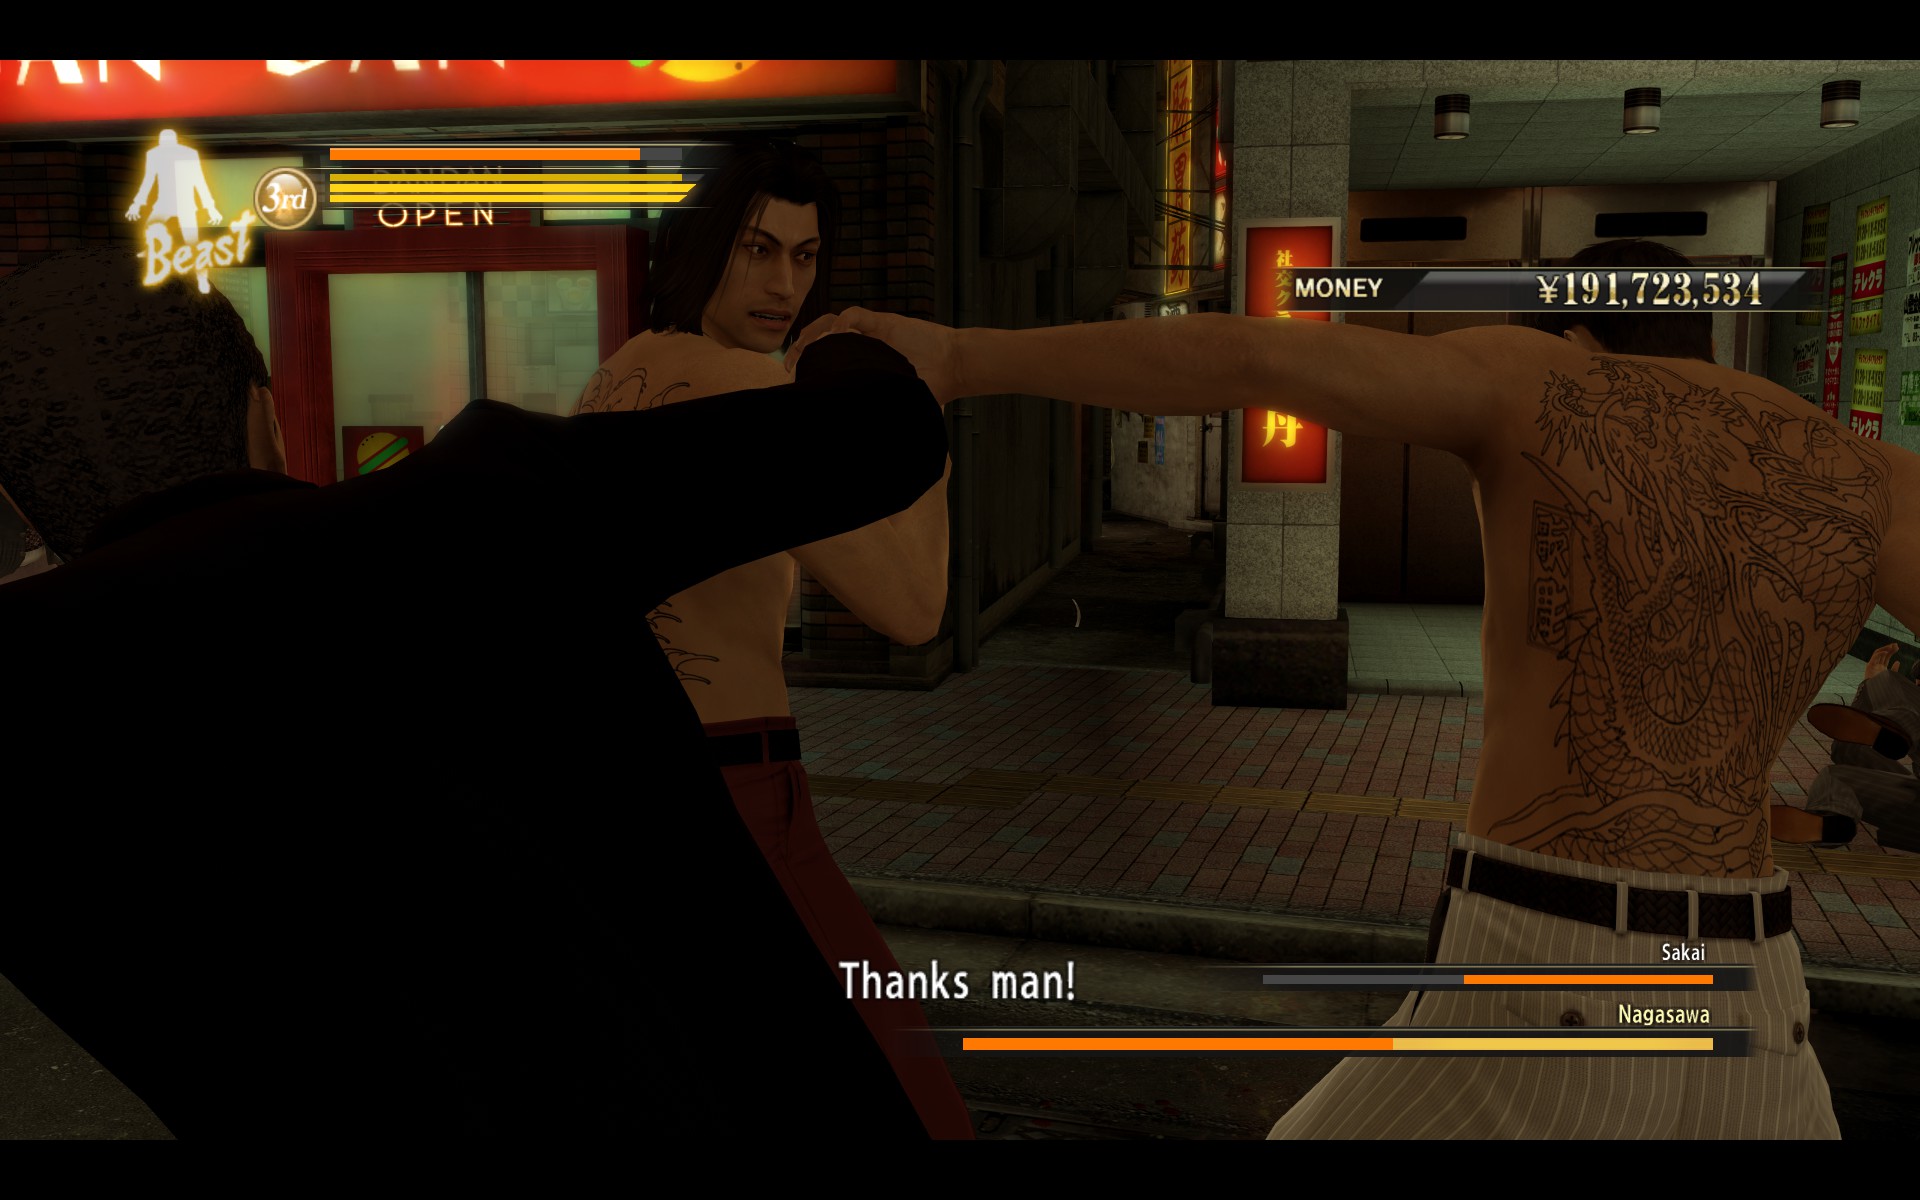
★ Earn a total of 50 billion yenThere’s multiple ways to get lots of money in the game, the most lucrative being Majima and Kiryu’s business minigames and farming Mr. Shakedown. With Kiryu, you can buy a CP bonus for Mr. Shakedown to drop even more money and multiple CP bonuses for faster collections. With Majima, there are money-boosting accessories sold in the Dragon and Tiger.
Excuse me, have you seen a giant man about yea tall, probably buried in several million dollar bills? Asking for a friend.
- Method A: Money from Real Estate Collections
- Get CP upgrades for faster collections, have most of your properties maxed to 100% shares.
- Profit.
- OR Majima’s business works pretty well here as well since you don’t have to spend nearly as much money buying properties, but it’s slightly more effort than Kiryu’s. I didn’t bother to replay either minigame once I finished the story and still got several billion.
You can’t hide from Majima.
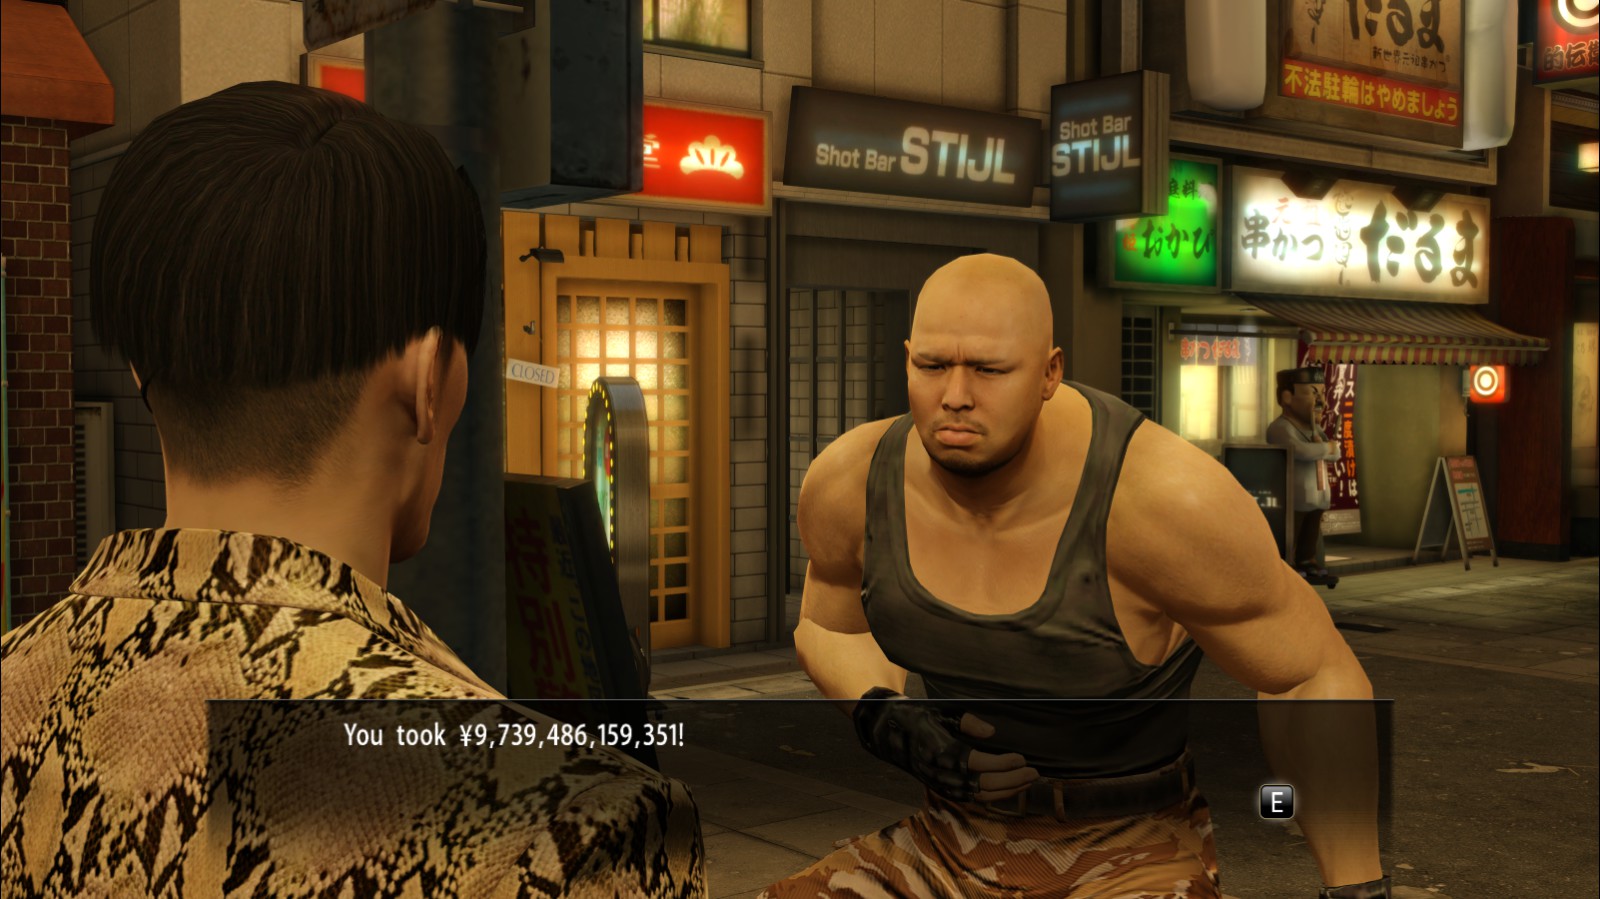
- Method B: Farming Mr. Shakedown
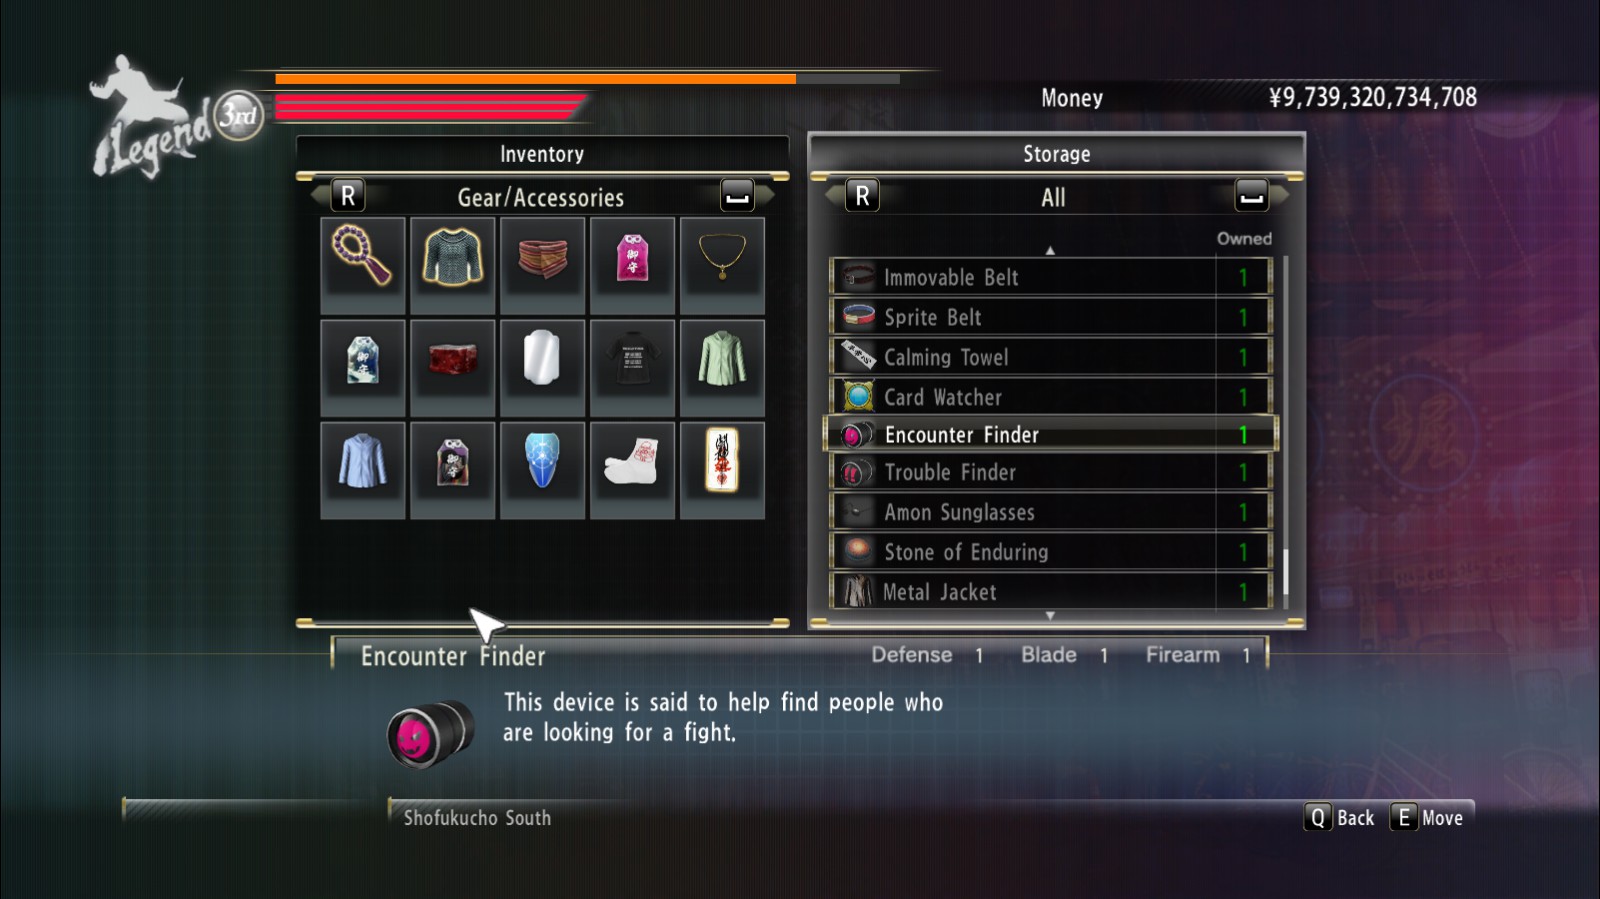
- Get the Encounter Finder on Kiryu’s substory “Miracle in Maharaja” by picking the black box reward. This is different from the similarly Trouble Finder and it’s missable if you picked the other box instead. Encounter Finder will show you on the map where Mr. Shakedown is located.
- Get the CP bonus for Deep Pockets (+50% more from Mr. Shakedown) on Kiryu. You can also stack that bonus with the Avarice Shirt or use the Lucky Binding if playing Majima.
- I enjoyed just beating him up normally, but for the least amount of effort, you can buy zap or slime guns. Zap guns are the superior version of slime guns and both work well against Mr. Shakedown. As Majima, you can get these easily from the Dragon and Tiger. As Kiryu, you can get them from the hidden merchant near the Empty Lot if you’ve finished Majima’s agent missions.
- Lose to Mr. Shakedown.
- Find him again and win.
- Repeat this process until you’re filthy rich.

Spend one billion yen
★ Spend a total of 10 billion yenAs you collect money for the previous completion point, you’ll get this easily from buying skill points, properties, item searches, etc. The skill points you can buy on the fourth tree after unlocking the Dragon/Mad Dog style are infinite so you won’t have a lack of useful things to buy.
Throw away money on the street
Throw away a total of five million yen.
★ Scatter a total of 10 mil yenThe above achievements will unlock as you progress towards this completion point, which can be done by throwing money around 100 times.
II. Completion List: Telephone Cards (Adventure)
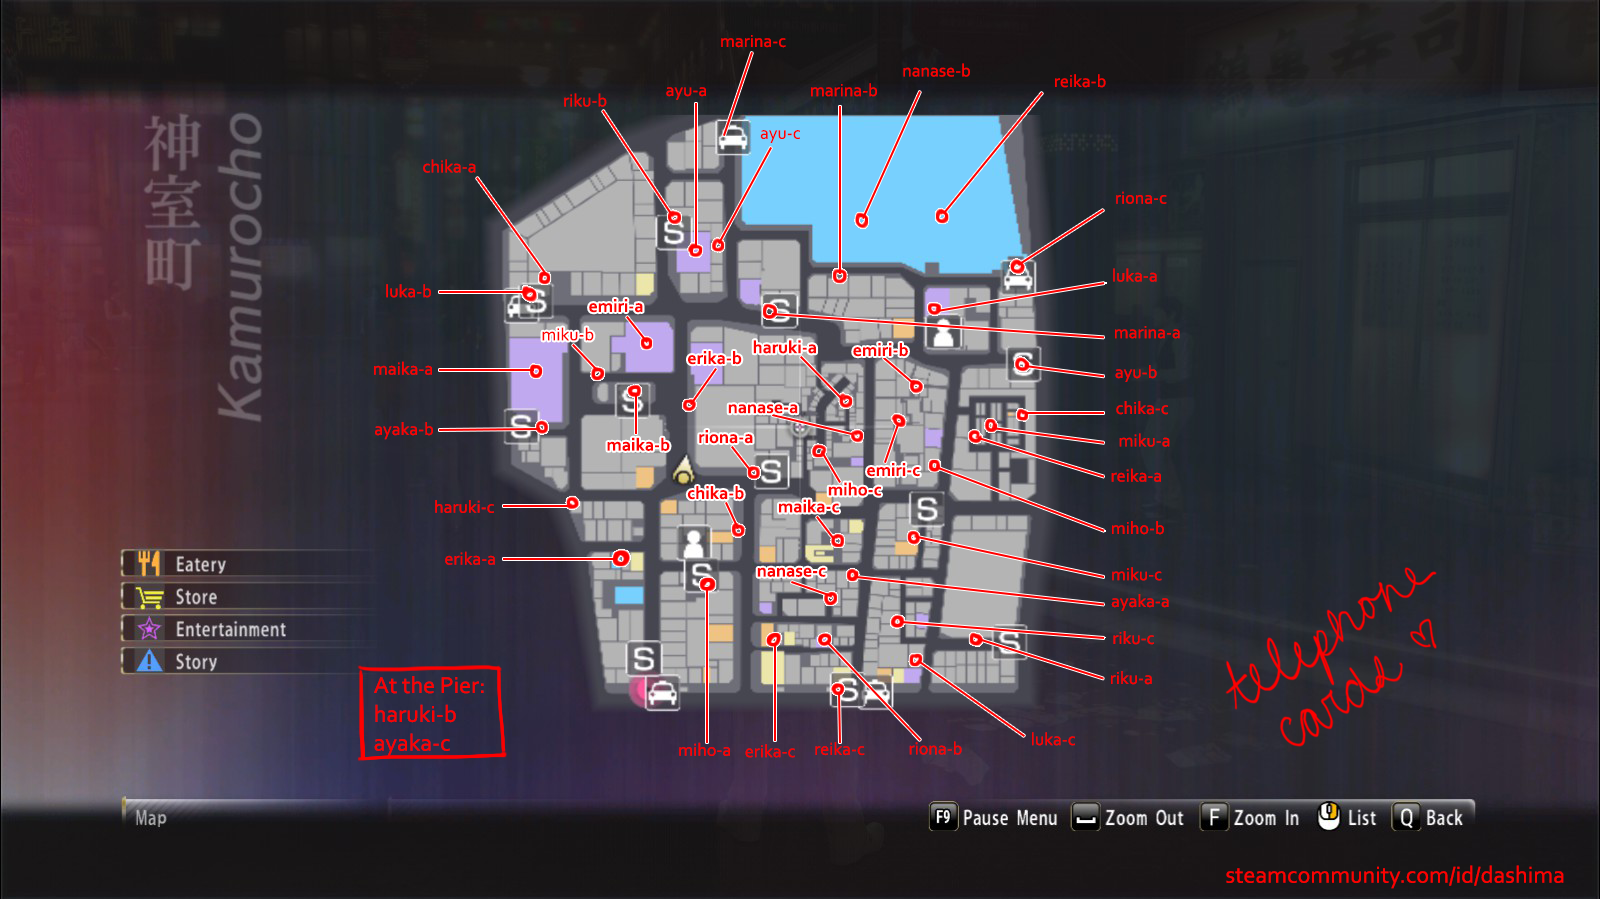

Pick up a telephone card.
★ Collect 45 telephone cards (Kiryu)On the street, you’ll occasionally see a white flashing object on the ground. There are 45 of these scattered throughout Kamurocho. The Card Watcher accessory can help locating these items by alerting you when a card is nearby with a sound. You can buy it at the CP Shrine. Below is a map of the card locations and location descriptions:
II. Completion List: Telephone Cards (Adventure) cont.
_________________________________________________________________________________
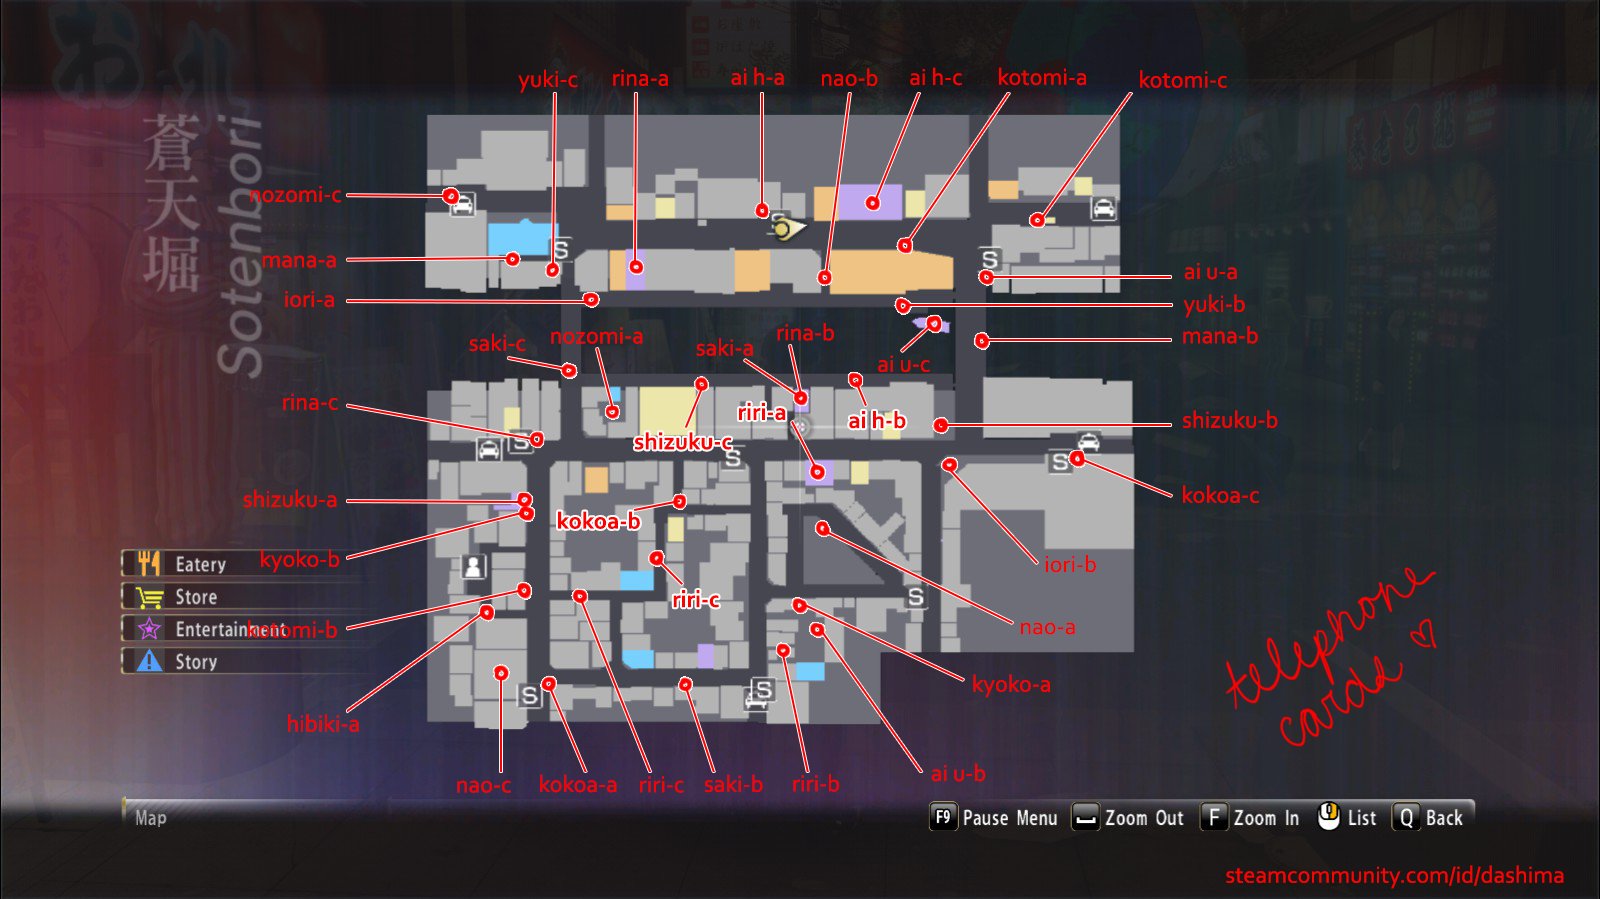
★ Collect 45 telephone cards (Majima)
II. Completion List: Telephone Cards (Adventure) cont.
Steam’s character limitation can go die in a hole.
II. Completion List: “Spicy Videos” (Adventure)

Watch a sexy video.
★ Watch 30 different video clipsWho put these spicy vids in my Christian video game??? These are indeed required for the full 100%… I’m sure many of you are terribly crushed, sorry.
In order to access the videos at Gandhara, you have to interact with some of the NPCs and usually complete a certain story or action. Below is the list of girls and what you must do in order to unlock their vid:
- Chika Arimura
Complete Chika’s Special Training at Club Sunshine. - Mana Sakura
Complete Mana’s Special Training at Club Sunshine. - Ai Uehara
Complete Ai’s Special Training at Club Sunshine. - Hibiki Otsuki
Complete Hibiki’s Special Training at Club Sunshine. - Saki Hatsumi
Complete Saki’s Special Training at Club Sunshine. - Haruki Sato
Befriend Haruki through the Telephone Club. - Ayaka Tomoda
Befriend Ayaka through the Telephone Club. - Riku Minato
Befriend Riku through the Telephone Club. - Marina Shiraishi
Complete Real Estate Royale. - Kotomi Asakura
Complete Cabaret Club Czar. - Ryona Minami
Complete the substory “The Girl in the Video”. - Kokoa Aisu
Complete the substory “Be My Boyfriend”. - Aya Sakurai
Complete the Substory “How To Train Your Dominatrix”. - Nozomi Hazuki
Befriend the chef at Komian. - Erika Kitagawa
Play pool three times at Vincent so you unlock Golden Ball play. You must quit after each play for it to count. - Luka Kanae
Befriend Luka at the SEGA HI-TECH LAND on Nakamichi St. - Kyoko Maki
Befriend Kyoko at the SEGA HI-TECH LAND in Sotenbori. - Emiri Okazaki
Befriend Emiri at the Mach Bowl. - Reika Aiba
Complete the substory “Sugar Daddy”. - Iori Kogawa
Complete the substory “Disciple of the New Order”. - Ai Haneda
Play any Karaoke song at Utahime where you do interjections by yourself. Ai will sing instead. - Nao Mizuki
Complete the substory “A Watery Investment”. - Yuki Natsume
Order alcohol at Maharaja in Sotenbori. You get the video once the > bartender chats with you. - Rina Ito
Complete the substory “Toilet Talk”. - Maika
Order alcohol at Maharaja in Kamurocho. You get the video once the bartender chats with you. - Shizuku Hasegawa
Complete the substory “Crossed Words”. - Nanase Otoha
Befriend Officer Kikuchi in Kamurocho. - Riri Kuribayashi
Complete the substory “From the Heart”. - Miku Abeno
Play any Karaoke song at Heroine where you do interjections by yourself. Miku will sing instead. - Miho Tono
Befriend Miho in the Poppo on Tenkaichi.
…And that’s all she wrote for the Adventure section! Finding all the different cards and videos can be pretty tedious, but this is by far the easiest section to complete and a lot of these things will have unlocked if you completed most of the substories. Now, onto the Battle section…
II. Completion List (Battle)
It’s time to d-d-d-d-d-duel
★ Defeat 500 enemies on the streetAnother easy point that will build up pretty quickly over the course of the game. The Squeaky Shoes and Autograph accessories can help boost the number of fights if you didn’t pick up too many fights previously.
★ Defeat 200 enemies in the Brawler Style (Kiryu)
★ Defeat 200 enemies in the Rush Style (Kiryu)
★ Defeat 200 enemies in the Beast Style (Kiryu)
★ Defeat 200 enemies in the Dragon Style (Kiryu)★ Defeat 200 enemies in the Thug Style (Majima)
★ Defeat 200 enemies in the Slugger Style (Majima)
★ Defeat 200 enemies in the Breaker Style (Majima)
★ Defeat 200 enemies in the Mad Dog Style (Majima)The iconic Dragon and Mad Dog styles are both unlocked after finishing each respective characters business storylines (Real Estate Royale & Cabaret Club Czar). The best place to rack up these numbers is during the long fight scenes during the main story, and in postgame by fighting people on the street and participating in Bed of Styx’s Endless Rout. Highly recommend using your preferred style for difficult enemies and potentially challenging styles for basic thugs.
★ Help 30 attack victims around townSpawn randomly across the map. I find that attack victims spawn pretty regularly on the street next to West Park, along the top of the map, in the Champion district, and around the Park/Temple area in Kamurocho.
★ Win 50 coliseum tournaments
★ Defeat 25 coliseum opponents
The fastest way to win tournaments is during the falling stage type fights, where you can knock your opponent off the stage for an instant win. Even if you fall yourself in the process, if the other guy goes first, you win!!!
★ Defeat 10 nouveau riche enemiesTo get nouveau riche enemies to appear on the street, you’ll have to buy the corresponding CP bonus along with the Celebrity Perfume to increase their spawn rate. These are the shiny, gold suit-wearing guys. They appear randomly so it’s better to start on this early.

Defeat Mr. Shakedown for the first time.
★ Defeat Mr. Shakedown 10 times (Kiryu)
★ Defeat Mr. Shakedown 10 times (Majima)
Defeat Mr. Shakedown 10 times on each character! Ties in with earning 50 billion yen completion point, see the previous sectionCompletion List: Farming Money (Adventure)for the best way to farm Mr. Shakedown. Best done with the Encounter Finder, CP bonuses and zap guns.

★ Defeat Sega 1 timeYet another randomly generated point for defeating an enemy with the last name “Sega.” Likely would have appeared during the story unless you’re super unlucky. Should eventually appear if you are going for the 200 enemies/style and 500 enemies on the street requirements.
★ Earn a total of 100 mil in battleWill come as you’re farming money from Mr. Shakedown or nouveau riche enemies. The Gambler’s Binding and Debt Collector’s Necklace accessories can help you earn more money during regular battles as well.
II. Completion List: Heat Moves (Battle)
Majima has never killed anyone in his entire life
★ Use Heat Actions 300 times
★ Use 40 different Heat Actions (Kiryu)
★ Use 30 different Heat Actions (Majima)Thankfully, you don’t have to complete all heat actions in order to get these points. Most of the unique heat moves are very situational and you can go the entire game without even seeing half of them. A lot of them are the result of equipping different weapons, unlocking skills, and using environmental items. The War God Amulet or Leech Gloves help you keep high heat and can be useful if you’re looking to just spam as many heat moves as possible.
In the skill tree menu, there’s a list of heat moves and the conditions in which they are activated. There are certain heat moves that are shared between both characters, so if you do it with Kiryu, you get credit with Majima too. Below are the shared heat actions in the game:
_________________________________________________________________________________
Must be standing near an enemy on 2-3 heat bar.
Salt – Can be bought or found near the Dragon and Tiger, in the Kamuro Shopping Area
Mysterious Syringe – Can be found in the square lot near the southern entrance of the Champion District
Pliers – Can be found in the lot next to the CP Shrine in Kamurocho
Mystery Bottle – Next to Hogushi Kaikan, near the southwest entrance to Hoganji Yokocho in Sotenbori
Mandarin Orange – Can be bought from M Store Kamurocho
Bat – Can be found by weapon search or stolen from a downed enemy
Golf Club – Can be found by weapon search or stolen from a downed enemy
Bowling Ball – Can be found in front of Mach Bowl
Stun Gun – Can be found by weapon search or stolen from a downed enemy
Dagger – Can be found by weapon search or stolen from a downed enemy
_________________________________________________________________________________
Easiest to perform with Brawler style.
_________________________________________________________________________________
II. Completion List: Heat Moves, Kiryu (Battle) cont.
Most style heat moves require you to purchase their corresponding skill or learn them from a master.
_________________________________________________________________________________
Most style heat moves require you to purchase their corresponding skill or learn them from a master.
_________________________________________________________________________________
Most style heat moves require you to purchase their corresponding skill or learn them from a master.
_________________________________________________________________________________
All heat moves are available to use as soon as you gain the style.
_________________________________________________________________________________
II. Completion List: Heat Moves, Majima (Battle) cont.
Easiest to perform with Thug style.
_________________________________________________________________________________
Most style heat moves require you to purchase their corresponding skill or learn them from a master.
_________________________________________________________________________________
Most style heat moves require you to purchase their corresponding skill or learn them from a master.
_________________________________________________________________________________
Most style heat moves require you to purchase their corresponding skill or learn them from a master.
_________________________________________________________________________________
Available to use as soon as you gain the style.
_________________________________________________________________________________
II. Completion List: Weapons & Gear (Battle)
★ Break 100 objects in battleAll environmental objects and non-sturdy weapons will easily break in battle. This is incredibly simple to do with Kiryu’s Beast Style as he picks up items for you. Pick fights in alleyways with lots of items, like trash cans, signs and bikes and swing away!
★ Acquire 100 different weapons
★ Acquire 70 different gear items((LIST OF EQUIPMENT COMING SOON))A large majority of these will be found through weapon search at the Dragon and Tiger, but some can also be bought or rewarded to you through substories.
★ Defeat 100 enemies using weaponsThis has to be done with weapons from the inventory only. Environmental weapons don’t count. Best done with Majima as he receives a vast number of weapons from the Dragon and Tiger.
_________________________________________________________________________________
Complete one training mission with each master.

Obtain all abilities for every style.
★ Learn all of Bacchus’ moves (Kiryu)
★ Learn all of Kamoji’s moves (Kiryu)
★ Learn all of Miss Tatsu’s moves (Kiryu)★ Finish all bouts with Komeki (Majima)
★ Learn all of Fei Hu’s moves (Majima)
★ Learn all of Areshi’s moves (Majima)Complete all 5 training missions with all 6 masters. All of these are relatively easy to do. Some people who don’t have the dodging mechanic down may have some trouble with Kamoji’s Rush style training, which requires you to dodge in a timed battle without fighting back. If you’re really terrible at dodging, then I recommend upgrading your quickstep skills first. Try kiting the opponent around the edge of the circle and spam quickstep away to the side if he initiates an attack.
II. Completion List: Real Estate Royale (Business)
It’s free real estate

Welcome to Real Estate Royale! This is an extended management minigame for Kiryu in which you literally own Kamurocho. It starts in Chapter 5 and you are free to play it anytime. There is a “cooldown time” aspect to this game, so if you’re looking to play this all in one go or just get it done faster, you can purchase shorter collection time bonuses at the CP Exchange/Temple.

Get 100% share in any area
The first area you receive, Leisure King area, is the cheapest and easiest area to reach 100% share with.
For each new area, you get at least 1 property by default, another 7-9 you have to purchase, and 1-2 properties that require you to level up a friendship or are substory-related. Some of these friendships are pretty tedious, but you don’t actually need to collect all properties to get a 100% share. For more information on Friendships, see the sidebar for the Friendships and Sidestories tab.
Winning money battles, King minigame challenges, and spending money to rank up your owned properties to A or S rank will easily merit you the 100%. Even if you lose the minigame challenges, you can still get 100% with plenty to spare.

After you become undisputed king of an area, get someone to light a cigarette for you on the street.
Once you’ve reached 100% share of an area, for example the Leisure King area, you can have a street bystander to light your cigarette for you when you idle. Look for the people who bow to you as you pass. This can be also done on Majima’s minigame but it’s faster to do Kiryu’s.
The man standing on Tenkaichi Street, nearby Serena, seems to do this pretty consistently. He only appears in the evening so if you’re on Premium Adventure, you can change the time setting to find him.

Purchase the most expensive property
If you’re strapped on cash, the CP Exchange/Temple bonuses for faster collections and larger returns from Mr. Shakedown can help. See the Farming Money guide above for tips on maxing out your money. By the time you have 100% share in all areas, you’ll regularly be getting 1 billion yen every couple minutes, so the investment doesn’t hurt in the long run.

Complete the Real Estate Royale storyline.
Unmissable. Max out all your shares, beat the five Real Estate Kings as they come, and you’ll get this achievement. It’s pretty easy, but it can take some time because of the minigame’s wait times and the amount of money needed to rank up everything.
II. Completion List: Properties & Staff (Business)

★ Collect total proceeds of 1 billionJust keep collecting and upgrading your shares and stores until this pops. It’s just a matter of time and grinding. As you can see above, it’s a walk in the park
★ Buy 7 Leisure King properties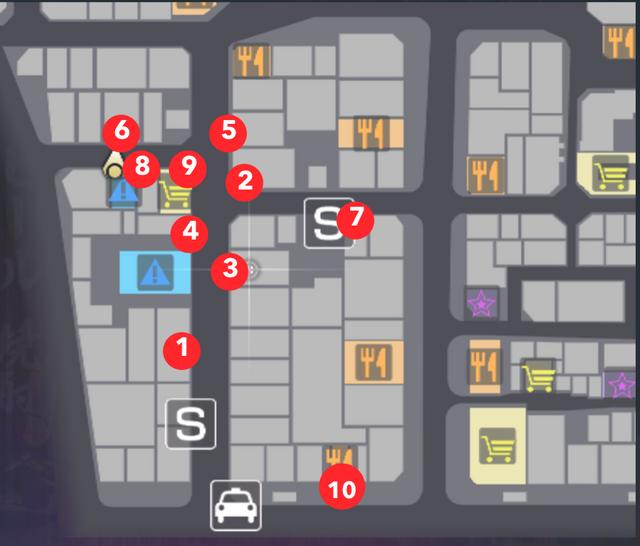
- Pach*nko New Eden (Uhh Steam censored this word even tho it’s not related to the slur, but it’s supposed to be an “i” there)
- Pach*nko Marufuku
- Kamuro Health Plaza
- Sukiyaki Muranaka
- Nyoki-Nyoki Academy
- Health Wild Apple
- Harashima Design
- Yurizake – Default property
- Poppo Tenkaichi St – Requires max Friendship with Miho, the cashier
- Sushi Gin – Requires max Friendship with the chef
★ Buy 8 Electronics King properties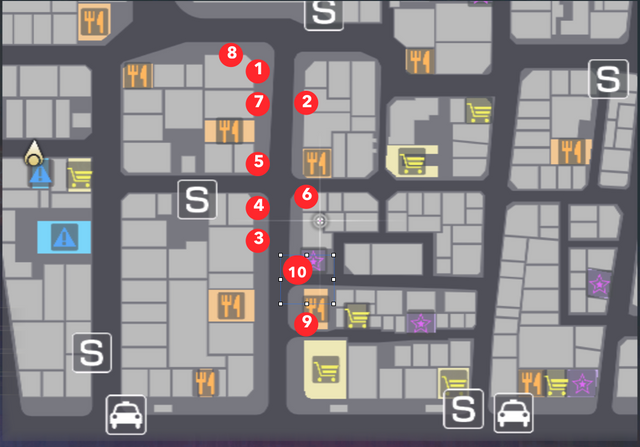
- Shokichi Camera
- Pach*nko Aloha
- Asai Building No. 3
- Pach*nko 777
- Tenpo Sushi
- Lovely Bunny
- Beijing Chinese Eatery
- AMUSEMENT GAME YOU
- DoReMiFa Zone – Default Property
- SEGA HIGH-TECH LAND Nakamichi St – Requires max Friendship with Luka, the employee
★ Buy 9 Pleasure King properties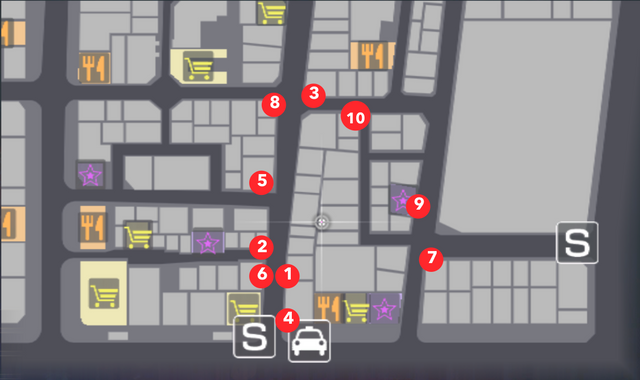
- Sexual Harassment Cop
- Cabaret Valentine
- Tontenshan
- Arabia Records
- Kamuro World Theater
- Quartier Latin
- Ogando Arts
- No-Panties BBQ
- Moscow Western Cuisine
- Hayashi Construction – Starting Property
★ Buy 8 Gambling King properties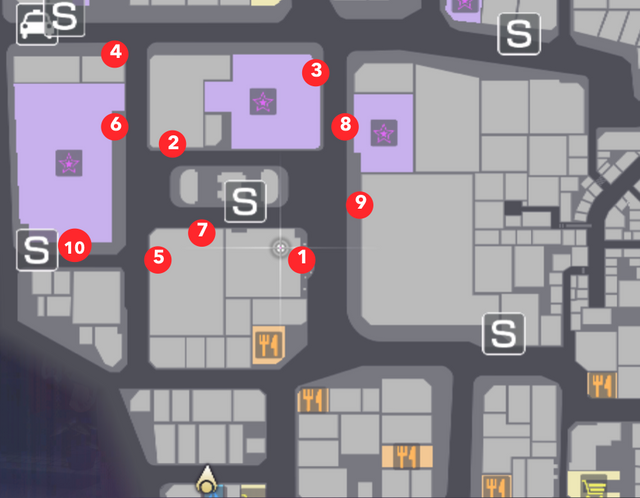
- Pach*nko BIG STAR
- Kamuro La Scala Cinema
- Sanwa Leisure Hall
- New Montmartre
- Pach*nko New Cosmos
- TOKYO POPURI
- Gibson Hall
- NY Hot Dog
- Kamuro Soba – Default Property
- Mach Bowl – Requires max Friendship with Emiri, the employee
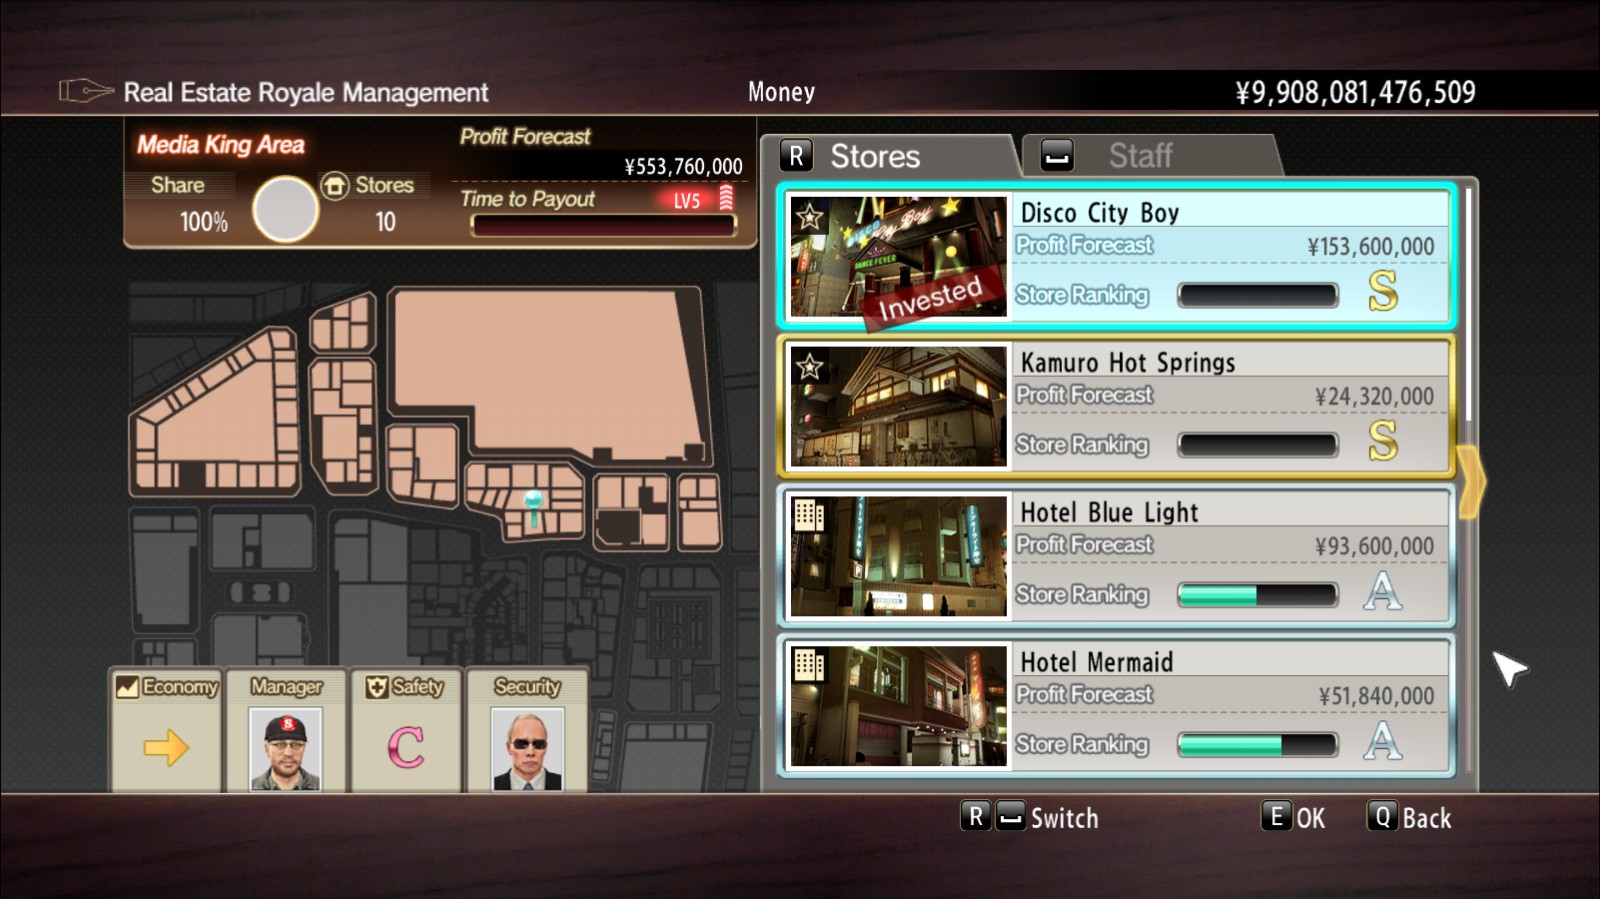
★ Buy 8 Media King properties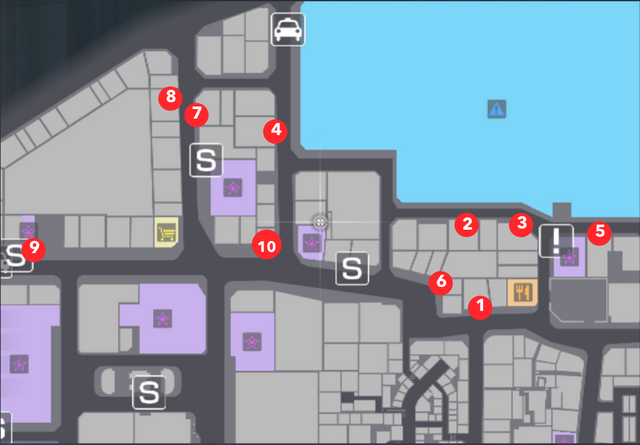
- Disco City Boy
- Kamuro Hot Springs
- Hotel Blue Light
- Hotel Mermaid
- Kogetsu Theater
- Telekura Rinrin-bo
- Hotel Diamond Palace
- Hotel White
- Pocket Circuit Stadium – Requires max Friendship with Fighter AKA best boi
- Tokiwa Restaurant – Default Property
★ Raise 50 shops to Rank SLevel up every single store! This is pretty easy to do considering the amount of money you get, but it’ll still take awhile as you can only level up once per collection. The Media King properties are pretty expensive too and level slowly.
What you’ll want is to use advisors with a double circle icon matching the trait of your property. Some advisors have a high cost, so unless you can afford it regularly, I’d avoid them while taking over the first couple areas.
_________________________________________________________________________________
★ Recruit 8 managersDefault staff do not count towards total. Prevent you from losing in money battles and can modify the amount of cash you receive each collection. Positive number means profit, negative is a loss, but it’s not really a big loss so it doesn’t matter.
- Tsuneo Hirata – Default manager
- Tamotsu Nagaoka – Default manager
- Kasuga – Complete Substory #5 “The Human Trafficking Ring”
- Nugget – Max Friendship with Emiri at Mach Bowl
- Sachiko – Complete Substory #17 “Underneath It All”
- Leisure King – Defeat the Leisure King
- Electronics King – Defeat the Electronics King
- Gambling King – Defeat the Gambling King
- Papillon Kato – Complete Substory #12 “Miracle on Tenkaichi Street
- Spining – Complete Substory #12 “Miracle on Tenkaichi Street
★ Recruit 8 advisorsDefault staff do not count towards total. Help you level up your properties so that you can get more of that $$$.
- Tomomi Takeda – Default advisor
- Hiro Chiba – Default advisor
- Masochistic Man – Complete Substory #7 “How To Train Your Dominatrix”
- Krazy Kyo – Complete Substory #6 “D*mned Yanki”
- Mama-san – Have a drink at Earth Angel
- Marusa Marui – Complete Substory #13 “The Tax Lady”
- Pleasure King – Defeat the Pleasure King
- Media King – Defeat the Media King
- Fortune-teller – Complete Substory #1 “The Visionary Fortune-teller”
- Miracle – Complete Substory #23 “Miracle at Maharaja”
★ Recruit 8 securityDefault staff do not count towards total. These are the folks that keep your properties safe so that you don’t have to step out and save them every couple minutes, though the music that plays during those fights is great.
- Takeshi Taira – Default security guard
- Taka Uematsu – Default security guard
- Video Boy – Complete Substory #24 “The Girl in the Video”
- Koshimizu-kun – Complete Substory #21 “First Impressions”
- Gakuta Takeshita – Defeat the Leisure King
- Namiya Meiden – Defeat the Electronics King
- Jaguar – Defeat the Pleasure King
- Officer Kikuchi – Max Friendship with Officer Kikuchi
- Li Leung – Complete Substory #8 “Password Protected”
- Mafia Boss (Uhh Putin??) – Maxi Friendship with Kitajima the Shroomer
★ Defeat the Leisure King
★ Occupy 100% of the Leisure King area
★ Defeat the Electronics King
★ Occupy 100% of the Electronics King area
★ Defeat the Pleasure King
★ Occupy 100% of the Pleasure King area
★ Defeat the Gambling King
★ Occupy 100% of the Gambling King area
★ Defeat the Media King
★ Occupy 100% of the Media King areaUnmissable if you finish the Real Estate storyline. You do not to buy every single store to get 100% shares so this is an easy point. Winning the minigame battles and money battles will help build share percentage faster, but even if you lose, you can catch up again pretty quickly.
II. Completion List: Cabaret Club Czar (Business)

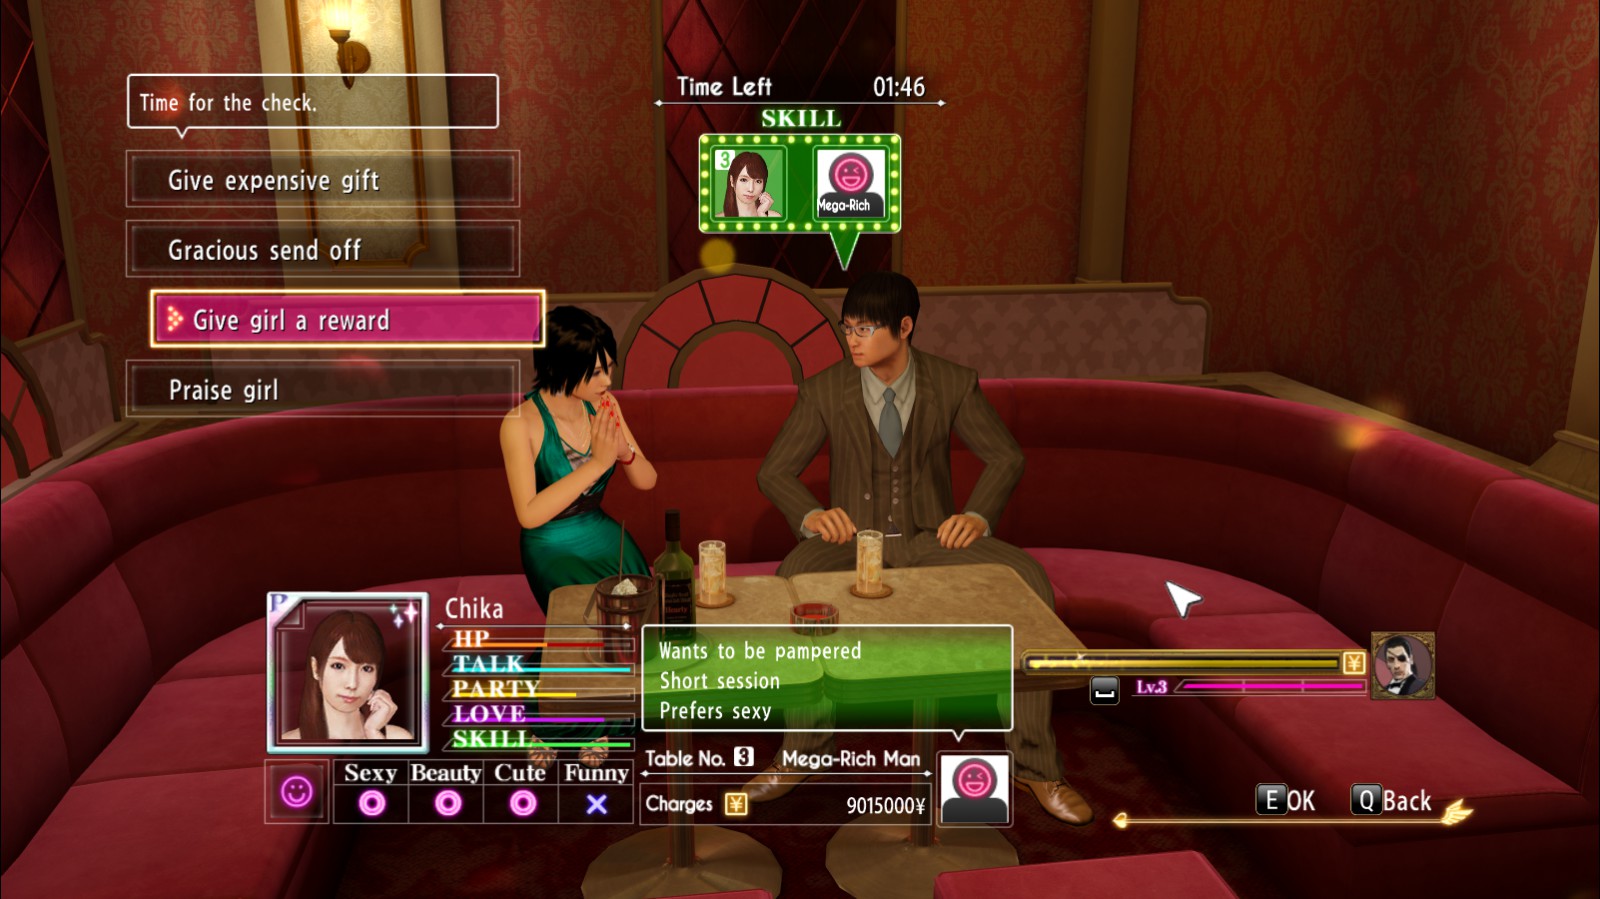
…Dreams do come true! Cabaret Club Czar is a great, super distracting minigame that gets introduced in Chapter 7. It’s more engaging than Kiryu’s minigame, but is still relatively easy and can help you rack up cash early on in the game. Alongside the completion points and achievements, I’ll go over basic hand signs, platinum hostess training, and platinum hostess makeovers (spread out over the next couple sections).

Get over 1,000 fans in any area
Unmissable. You will stumble across this achievement as you complete the minigame. There’s an option to give your guests gifts and gracious sendoffs for bonus fans, but it’s more beneficial to take care of your girls as their stats and health lower if they work too long. Level up your hostesses to keep the guests happy and this will unlock before you finish the Cabaret storyline.
Reward if they’re lacking a lot of health, praise if it’s only a little.

Max out the level of a platinum hostess
Aside from Yuki, you can only get platinum hostesses as you progress in the Cabaret Club storyline. You can easily level up these hostesses by doing training with them before opening for business every night. Each girl has 5 conversations and 2 minigame dates. They also level up after every night they work. Yuki is the easiest to level up, because she’s the first platinum hostess available.

Complete the Cabaret Club Czar storyline.
Unmissable as you finish the minigame. Defeat all Five Stars in rival battles and you’ll get this.
_________________________________________________________________________________
★ Collect total proceeds of 1 billion
Should reach this goal if you finish the storyline and all the special trainings. Focus on the mega-rich Moon Area once you get your leveled up platinum hostesses. The fastest way to earn cash from customers each night is to always hit “Extend session” if they’re in a good mood for a Fever bonus, or using Fever manually when there’s rich people in the room.
★ Complete Yuki’s Substory
★ Complete Chika’s Substory
★ Complete Mana’s Substory
★ Complete Ai’s Substory
★ Complete Hibiki’s Substory
★ Complete Saki’s SubstoryEach platinum hostesses’ substory can be unlocked by completing all of their special training. Each girl has 5 customer service “conversation” trainings and 2 minigame dates. I found that even if you do poorly, you can still get their substory after the final customer service training so none of these are particularly difficult to get. However, since you can only do one training between opening nights, it will take some time. Additionally, a hostess that has called out for the day due to low hp won’t be available for training (be mindful of Hibiki’s low hp).
★ Yuki’s Accessory Collection 30
★ Chika’s Accessory Collection 30
★ Mana’s Accessory Collection 30
★ Ai’s Accessory Collection 30
★ Hibiki’s Accessory Collection 30
★ Saki’s Accessory Collection 30Buy all the accessories for each hostess to get these completion points. The money you get from the minigame will help pay for this.
★ Serve a total of 500 customersAnother unmissable one as you play the storyline and grind between hostess training. If you’re lacking on customers, try not to extend their stay as it’ll get you fewer people cycling through and avoid Mercury Area, as they prefer long sessions.
II. Completion List: Hostess & Shop List (Business)
Note: Substory-connected hostesses will be available to recruit nearby the club after finishing their corresponding substory. You’ll have to talk to them first before they’re hired!
★ Recruit 6 bronze hostessesCP Reward and default hostesses do not count towards total.
- Endo – Default hostess
- Namiko – Default hostess
- Kirara – Default if you got the Smooth Criminal achievement in Chapter 4.
Otherwise, located east of the CP Temple. Buy her Boots or Sandals.- Ume – Default if you got the Smooth Criminal achievement in Chapter 4.
Otherwise, located at the west end of Sotenbori St. Buy her something with leopard print.- Mitsuko – Located at the south end of Bunzaemon Outdoor Mall. Buy her a ring, bracelet, or necklace.
- Fusae – Located on the north end of Iwao Bridge, down the stairs. Buy her perfume.
- Marilyn – CP Reward under Business tab
- Chizu – CP Reward under Business tab
★ Recruit 4 silver hostessesCP Reward and default hostesses do not count towards total.
- Erranda – Complete Substory #63 “Errands on the Run”
- Harumi – Default if you got the Smooth Criminal achievement in Chapter 4. Otherwise, located near Tsuruhashi Fugetsu
- Akemi – Located east of the southwest Save Point
- Hiroko – Near the Taxi Stand on East Shofukucho
- Kiyoko – CP Reward
- Junko – CP Reward
- Shiho – CP Reward
- Shinomi – CP Reward
★ Recruit 4 gold hostessesCP Reward and default hostesses do not count towards total.
- Dolly – Max out Friendship with Doll Girl, from The Doll Girl substory
- Unknown Girl – Max out Friendship with Simon the Mystery Man, from the Mystery Caller substory
- Miss Isobe – Complete Substory #68 “Disco Dancing Goddess”
- Etsuko – Complete Substory #65 “The Obatarian Strikes”
- Seiko – CP Reward
- Akina – CP Reward
- Koizumi – CP Reward
- Shizuka – CP Reward
★ Recruit 6 platinum hostessesAll of the following hostesses are unlocked automatically as the Cabaret Club storyline progresses and you win against each rival Club.
- Yuki – Default hostess
- Chika – Defeat Club Venus
- Mana – Defeat Club Moon
- Ai – Defeat Club Mars
- Hibiki – Defeat Club Mercury
- Saki – Defeat Club Jupiter
★ Partner with 10 shops in Moon area
- Shot Bar STIJL: Requires max Friendship with the bartender
- Fuguno Sakai
- Yokohori Theater
- Meshibugyo
- Tetsuji’s Tripe
- Ka-en Restaurant
- Hama-don
- New Garcia
- Namidazaka Bar
- Akantare
★ Partner with 10 shops in Venus area
- SEGA HIGH-TECH LAND: Requires max Friendship with Kyoko, the employee
- Fuguta
- Gyu-masu
- Sokyu Cinema
- Cakes Marianne
- Winde West
- Yakitori Torikko
- Death Curry
- Kabuki Theater
- Crepe Cats
★ Partner with 10 shops in Mercury area
- Komian: Requires max Friendship with Komian’s chef
- Kokusai Ghetto
- Barber Ashitaba
- Sushi Tsuru
- M Zoku Sotenbori
- Katsu Kin
- The Megalopolis
- Exodus
- Hammurabi
- Ryoshimaru
★ Partner with 10 shops in Jupiter area
- Smart Ball
- Bunza Theater
- Maido Diner
- Kawachi-ken
- Hyotan
- Misuta Realty
- Mikado
- Nishihori Rice
- Sushi Toki
- Yakitori Kabachi
★ Partner with 10 shops in Mars area
- Gandhara: Requires max Friendship with Gandhara employee
- Salon Rose
- Cabaret Ron Ron
- Salon Salary Man
- Sushi Eeyaro
- Rakuen-en
- Iiko Massage
- Izakaya Naniwa
- Nukiya Massage
- Konno’s Meats
★ Take over Moon area
★ Earn 10000 fans in Moon area
★ Take over Venus area
★ Earn 5000 fans in Venus area
★ Take over Mercury area
★ Earn 4000 fans in Mercury area
★ Take over Jupiter area
★ Earn 3000 fans in Jupiter area
★ Take over Mars area
★ Earn 1500 fans in Mars areaAll automatically unlocked as you defeat each rival Club. The number of fans from buying each property, combined with the ones you’ll get while playing the story will net you more than enough fans.
II. Completion List: Hand Signals (Business)
You’ll want to get these right the first time she gives the signal, as it restores their health and lets them continue working night after night!
Click on the images to zoom if needed.
Towel

Guest glass

Ladies’ glass

Menu

Swap ashtray

Refill ice

II. Completion List: Hostess Makeover (Business)
About outfits and accessories:
While customizing your hostesses, the goal is to get 3 separate “double circles” (can be seen in my images below). You can be as creative as you want with these outfits, there are actually a lot of combinations to get the triple double circle.
The minigame is also totally playable with 2 double circles instead of 3 if you’re more into getting a better aesthetic for your girl, I’m only showing you one makeover look out of many that probably exist out there. There’s also another guide on steam for makeover looks, which I’ll link below if you’re interested in seeing different items that might work for you!
[link]
_________________________________________________________________________________
Best girl has arrived.

- Dress: Sexy Dress
- Hairstyle: Trendy Long
- Hair Accessory: Headband
- Earrings: Star Earrings
- Necklace: Royal Necklace
- Nails: Pink Nails
- Ring: Flower Ring
- Bracelet: Pearl Bracelet
- Watch: Designer Watch
_________________________________________________________________________________
Mild Bayonetta vibes…

- Dress: Long Halter
- Hair: Short Hair
- Earrings: Circle Earrings
- Necklace: Triple Necklace
- Nails: Red Nails
- Watch: Simple Watch
_________________________________________________________________________________

- Dress: Long Halter
- Hair: Trendy Long
- Hair Accessory: Headband
- Earrings: Circle Earrings
- Necklace: Triple Necklace
_________________________________________________________________________________
I sense a trend with white dresses…

- Dress: Chinese Dress
- Hair: Braided
- Hair Accessory: Headband
- Earrings: Pearl Earrings
- Necklace: Onyx Necklace
- Ring: Flower Ring
- Bracelet: Onyx Bracelet
_________________________________________________________________________________

- Dress: Mana’s Dress (if you don’t have it, Yuki’s Dress, Miniskirt, and Lovely One Piece also give the same bonus)
- Hair: Trendy Long
- Hair Accessory: Headband
- Earrings: Pearl Earrings
- Necklace: Triple Necklace
- Nails: Pink
- Ring: Heart Ring
_________________________________________________________________________________
Gucci gang

- Dress: Bodycon Dress
- Hair: Princess Curls
- Eyeglasses: Imported Sunglasses
- Earrings: Star Earrings
- Nails: Red
- Ring: 100ct Diamond Ring
- Watch: Gorgeous Watch
_________________________________________________________________________________
II. Completion List: Hostess Training (Business)
- Customer Service Training 1
- Answer 1: “Bonsai?”
- Answer 2: “Try to compliment them.”
- Answer 3: “Older gents, huh?”
- Answer 4: “Y’know, I’m a man too.”
- Customer Service Training 2
- Answer 1: “I think I get you.”
- Answer 2: “A club needs variety.”
- Answer 3: “You’d figure it out.”
- Answer 4: “Those are last names.”
- Customer Service Training 3
- Answer 1: “I like engawa.”
- Answer 2: “That’d be great.”
- Answer 3: “Imagine they’re me.”
- Answer 4: “You’re workin’ hard.”
- Customer Service Training 4
- Answer 1: “Bonsai.”
- Answer 2: “They were clueless.”
- Answer 3: “I’ll work ya hard!”
- Answer 4: “A lady needs sleep.”
- Date: Karaoke
- Get 90+ points in both songs
- Date: Disco
- Beat her score and earn three stars
- Customer Service Training 5
- Answer 1: “You’ve come a long way.”
- Answer 2: “I’m there for ya.”
- Answer 3: “The love of your life.”
- Answer 4: “T-Take care of him.”
_________________________________________________________________________________
- Customer Service Training 1
- Answer 1: “Wanna go together?”
- Answer 2: “A massage, maybe.”
- Answer 3: “I’m glad you’re here.”
- Answer 4: “Just ignore ’em.”
- Customer Service Training 2
- Answer 1: “Older guys fall for ya?”
- Answer 2: “Part of the job.”
- Answer 3: “You were being real.”
- Answer 4: “That’s cute.”
- Date: Disco
- Get three stars at disco (any difficulty)
- Customer Service Training 3
- Answer 1: “A girl like you.”
- Answer 2: “She’s a good cook.”
- Answer 3: “Before I was born.”
- Answer 4: “Put a stop to it.”
- Customer Service Training 4
- Answer 1: “You’re doin’ great!”
- Answer 2: “I feel better now.”
- Answer 3: “Money ain’t everything.”
- Answer 4: “I wouldn’t mind.”
- Date: Pool
- Beat Ai at Nine-Ball.
- Customer Service Training 5
- Answer 1: “Welcome to Sunshine.”
- Answer 2: “Not on my watch!”
- Answer 3: “Too many choices?”
- Answer 4: “Wanna go together?”
_________________________________________________________________________________
- Customer Service Training 1
- Answer 1: “Nah, those’re cool.”
- Answer 2: “I love karaage!”
- Answer 3: “Ya’d make a good mom.”
- Answer 4: “I’ll come squash it.”
- Customer Service Training 2
- Answer 1: “Am I manly?”
- Answer 2: “Make ’em spoil you.”
- Answer 3: “Ya made his day.”
- Answer 4: “I doubt he’d mind.”
- Date: Disco
- Get three stars at disco (any difficulty)
- Customer Service Training 3
- Answer 1: “My drive.”
- Answer 2: “Work every day.”
- Answer 3: “Karaage.”
- Answer 4: “Yes.”
- Date: Pool
- Beat Saki at Nine-Ball.
- Customer Service Training 4
- Answer 1: “Oh yeah, brothers.”
- Answer 2: “Keep me posted.”
- Answer 3: “I’ll miss ya.”
- Answer 4: “Ya need a plan.”
- Customer Service Training 5
- Answer 1: “You’re so girly!”
- Answer 2: “Now you can study!”
- Answer 3: “What if ya got hurt?”
- Answer 4: “Big bro, huh?”
_________________________________________________________________________________
- Customer Service Training 1
- Answer 1: “Use tough love.”
- Answer 2: “Don’t overdo it.”
- Answer 3: “What kinda manga?”
- Answer 4: “Don’t worry.”
- Customer Service Training 2
- Answer 1: “Good deal.”
- Answer 2: “I like your voice.”
- Answer 3: “Baby me instead.”
- Answer 4: “That’s cute.”
- Date: Darts
- Beat Hibiki at Count-Up.
- Customer Service Training 3
- Answer 1: “Kids don’t like me.”
- Answer 2: “About women.”
- Answer 3: “Older women.”
- Answer 4: “They’re fine.”
- Date: Karaoke
- Get 90+ points on both songs.
- Customer Service Training 4
- Answer 1: “I worry about ya.”
- Answer 2: “He’ll understand.”
- Answer 3: “I got my hands full.”
- Answer 4: “I’d try that.”
- Customer Service Training 5
- Answer 1: “It’s too much.”
- Answer 2: “You’re lucky.”
- Answer 3: “A guy with a big heart.”
- Answer 4: “Thank you.”
_________________________________________________________________________________
- Customer Service Training 1
- Answer 1: “A perfect fit.”
- Answer 2: “Opposites attract.”
- Answer 3: “Detours are nice.”
- Answer 4: “Try to smile.”
- Customer Service Training 2
- Answer 1: “Did ya get duped?”
- Answer 2: “I don’t get it.”
- Answer 3: “Don’t change for him.”
- Answer 4: “That’s your talent!”
- Customer Service Training 3
- Answer 1: “A graceful woman.”
- Answer 2: “Especially shopping.”
- Answer 3: “Can’t imagine it.”
- Answer 4: “You’re important.”
- Date: Pool
- Beat Chika at Nine-Ball.
- Customer Service Training 4
- Answer 1: “You’re fine as is.”
- Answer 2: “How passionate.”
- Answer 3: “A family?”
- Answer 4: “That’s bad?”
- Date: Karaoke
- Get 90+ points on both songs.
- Customer Service Training 5
- Answer 1: “I have fun too!”
- Answer 2: “Fun is the job.”
- Answer 3: “I am to you, Chika-chan.”
- Answer 4: “Don’t quit!”
_________________________________________________________________________________
- Customer Service Training 1
- Answer 1: “Gotta reward yourself.”
- Answer 2: “Sounds like you.”
- Answer 3: “Takes one to know one?”
- Answer 4: “We’ll buy tissues.”
- Customer Service Training 2
- Answer 1: “You weren’t lyin’.”
- Answer 2: “Nothing’s wrong.”
- Answer 3: “Get them grandpas.”
- Answer 4: “Okay.”
- Customer Service Training 3
- Answer 1: “I got someone.”
- Answer 2: “M for majima masochist.”
- Answer 3: “We’ll crash.”
- Answer 4: “Go see a doctor.”
- Date: Darts
- Beat Mana at Count-Up.
- Customer Service Training 4
- Answer 1: “No pressure.”
- Answer 2: “That was brave.”
- Answer 3: “Improvin’ themselves.”
- Answer 4: “Ya got serious!”
- Date: Disco
- Get three stars at disco (any difficulty)
- Customer Service Training 5
- Answer 1: “You elevate us!”
- Answer 2: “It’s psychological?”
- Answer 3: “I’m a bit jealous.”
- Answer 4: “Everyone’s important.”
_________________________________________________________________________________
II. Completion List: (Substories / Kiryu)
Nugget for best waifu


Complete 10 substories

Complete 40 substories

Complete all substories
★ Complete 40 Kiryu SubstoriesIn total, Kiryu has 60 substories to complete. The secret boss substory can only be activated after all other 59 substories have been finished.
Many of these substories appear in certain chapters, and pretty much all other guides on the internet are organized in such a way if you prefer to play all the substories as they come. The list below is organized by their order as they appear on the list in-game, as this is intended for people who are going through Premium Adventure.
II. Completion List: (Substories / Kiryu) cont.
★ Befriend Kitajima the Shroomer
★ Befriend Mr. Libido – Akimoto
★ Befriend Mr. Moneybags – Fukushima
★ Befriend Pocket Circuit Fighter
★ Befriend Miho
★ Befriend Emiri
★ Befriend the Sushi Gin Chef
★ Befriend Luka
II. Completion List: (Substories / Majima)
★ Complete 40 Majima SubstoriesMajima has 40 substories. Like Kiryu, the secret boss can only accessed once he’s finished all other 39 substories first.
★ Befriend Mr. Moneybags – Tanioka
★ Befriend Mr. Libido – Habu
★ Befriend Doll Girl
★ Befriend the boss at Komian
★ Befriend the barkeep
★ Befriend the Gandhara staff member
★ Befriend Kyoko
II. Completion List: Telephone Club, Disco (Minigames)
How you won’t feel attempting Yakuza minigames.

Play every minigame.
The minigames in Yakuza are daunting to most and can often completely prevent people from completing their list after getting really, really close. It personally took me almost a month to understand and win all the minigames in Yakuza, leaving me stuck at 98% for awhile. Fortunately, after having wrestled with the AI, I figured that the chances of winning are actually pretty high if you even have a slight idea of how to play. The game will throw you “lucky hands” every now and then, and if you can recognize them, you don’t have to be a pro. You just know how to take advantage of what you get!
_________________________________________________________________________________

Go on a date with a girl you met at the telephone club.
★ Befriend Haruki
★ Befriend Ayaka
★ Befriend Riku3 dates you can get through the Telephone Club
There are 7 substories you can get through the Telephone Club. For each bikini color (blue, white, green), there are 3 girls and only 1 of them will result in a date. For the sake of completion, you’ll not only want to get the dates, but also the ‘failed’ meet-ups with 4 other girls. There are only 7 substories for 9 girls because 3 of the girls in each color is the same person “Sakura”. Once you get her once, you don’t have to do her again.
If you have good voice recognition, you may be able to tell apart the girls when they speak and know which ones you’ve already gotten before. It makes things a lot better as you can just hang up and try again without wasting time on the same girls repeatedly. The video linked above goes over every girl’s voice so you can compare.
You can also tell if it’s a date girl or fake girl by the speed of the QTE when you pick up the phone. A very fast QTE usually means she’s legit.
- Green bikini: Haruki – Sounds young, a little nasally
- Green bikini: Sakurai – “Sakura”
- Green bikini: Sayuri – Overly cute voice, sounds childish
- White bikini: Ayaka – Sultry voice, somewhat breathy
- White bikini: Sakurako – “Sakura”
- White bikini: Maria
- Blue bikini: Riku – Sounds younger than other blue bikini girls, cutesy
- Blue bikini: Asakura – “Sakura”
- Blue bikini: Mirei
_________________________________________________________________________________


Complete every disco song on any difficulty.
★ Friday Night – EASY
★ Friday Night – NORMAL
★ Friday Night – HARD★ Queen of Passion – EASY
★ Queen of Passion – NORMAL
★ Queen of Passion – HARD★ I’m Gonna Make Her Mine – EASY
★ I’m Gonna Make Her Mine – NORMAL
★ I’m Gonna Make Her Mine – HARD★ I Wanna Take You Home – EASY
★ I Wanna Take You Home – NORMAL
★ I Wanna Take You Home – HARD★ Koi no DISCO QUEEN – EASY
★ Koi no DISCO QUEEN – NORMAL
★ Koi no DISCO QUEEN – HARDWin disco with a 3 star rating on every song on all 3 difficulties. If you get a 3 star in Hard, it doesn’t cross over for lower difficulties so each one must be played separately. Playing with a keyboard and mouse here can be challenging because the game uses IJKL with the directional pad, instead of WASD. Gamepad would probably be 10 times easier. I managed to do it without one, but it was rough.
To get high scores on Hard, you’ll want to keep up your combo, add extra steps instead of going from point to point directly, and get Dancing Fever bonuses.
See this video for how to perform with high points ratings. A successful Fever quicktime nets you somewhere around 800 points, so they become vital towards beating the disco substories, where the opponent dancer is actually decent unlike Nishiki here (sorry Nishiki).
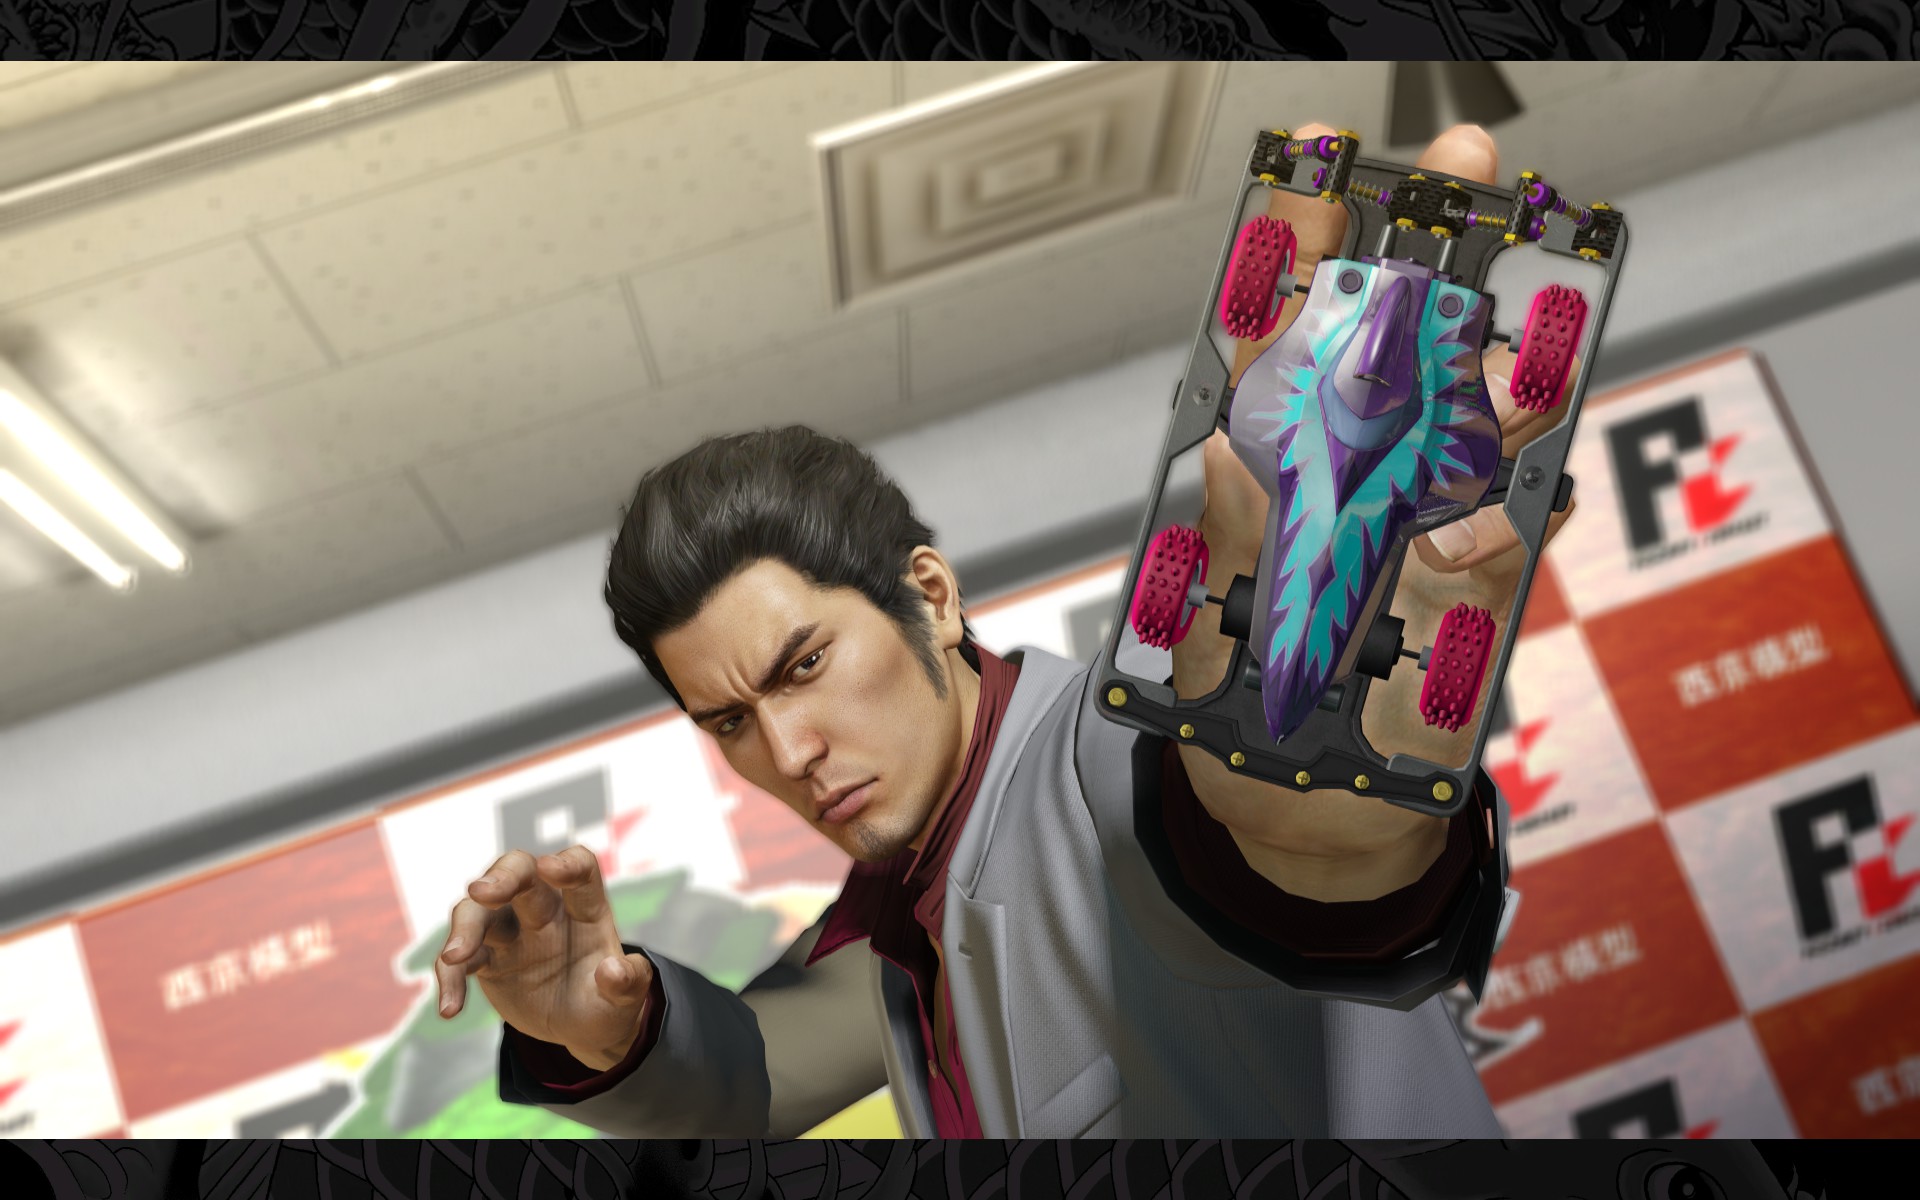
II. Completion List: Pocket Circuit Parts (Minigames)
Gotta go fast (sonic) gotta go fast
★ Collect 20 different tiresA majority of these can be bought at the Pocket Circuit shop after winning each race. A cutscene will occur letting you know whenever new parts are in.
- Slick Tires – Default Item
- Slick Tires Plus – Pocket Circuit shop
- Extra Slick Tires – Pocket Circuit shop
- Super Slick Tires – Pocket Circuit shop
- Ultra Slick Tires – Pocket Circuit shop
- Soft Tires – Don Quijote
- Soft Tires Plus – Pocket Circuit shop
- Extra Soft Tires – Pocket Circuit shop
- Super Soft Tires – Pocket Circuit shop
- Ultra Soft Tires – Dream Machine
- Spiked Tires – Don Quijote
- Spiked Tires Plus – Pocket Circuit shop
- Extra Spiked Tires – Pocket Circuit shop
- Super Spiked Tires – Pocket Circuit shop
- Ultra Spiked Tires – Pocket Circuit shop
- Low Profile Tires – Pocket Circuit shop
- Low Profile Tires Plus – Pocket Circuit shop
- Extra Low Profile Tires – Pocket Circuit shop
- Super Low Profile Tires – Pocket Circuit shop
- Ultra Low Profile Tires – Dream Machine
- Slim Tires – Pocket Circuit shop
- Slim Tires Plus – Pocket Circuit shop
- Extra Slim Tires – Pocket Circuit shop
- Super Slim Tires – Pocket Circuit shop
- Ultra Slim Tires – Pocket Circuit shop
★ Collect 15 different motorsA majority of these can be bought at the Pocket Circuit shop after winning each race. A cutscene will occur letting you know whenever new parts are in.
- Power Motor – Default Item
- Power Motor Plus – Pocket Circuit shop
- Extra Power Motor – Pocket Circuit shop
- Super Power Motor – Pocket Circuit shop
- Ultra Power Motor – Pocket Circuit shop
- Speed Motor – Pocket Circuit shop
- Speed Motor Plus – Pocket Circuit shop
- Extra Speed Motor – Pocket Circuit shop
- Super Speed Motor – Pocket Circuit shop
- Ultra Speed Motor – Pocket Circuit shop
- Balanced Motor – Pocket Circuit shop
- Balanced Motor Plus – Pocket Circuit shop
- Extra Balanced Motor – Pocket Circuit shop
- Super Balanced Motor – Pocket Circuit shop
- Ultra Balanced Motor – Pocket Circuit shop
- High Torque Motor – Pocket Circuit shop
- High Torque Motor 2.0 – Kamuro Dealer after Substory #8
- Godspeed Motor – Pocket Circuit shop
- Godspeed Motor Mark II – 1,000,000 Dream Machine
★ Collect 20 different gearsA majority of these can be bought at the Pocket Circuit shop after winning each race. A cutscene will occur letting you know whenever new parts are in.
- Power Gears – Don Quijote
- Power Gears Plus – Pocket Circuit shop
- Extra Power Gears – Pocket Circuit shop
- Super Power Gears – Pocket Circuit shop
- Ultra Power Gears – Pocket Circuit shop
- Balanced Gears – Pocket Circuit shop
- Balanced Gears Plus – Pocket Circuit shop
- Extra Balanced Gears – Pocket Circuit shop
- Super Balanced Gears – Pocket Circuit shop
- Ultra Balanced Gears – Pocket Circuit shop
- Regular Gears – Default Item
- Regular Gears Plus – Pocket Circuit shop
- Extra Regular Gears – Pocket Circuit shop
- Super Regular Gears – Pocket Circuit shop
- Ultra Regular Gears – Pocket Circuit shop
- Boost Gears – Complete Substory #38
- Boost Gears Plus – Pocket Circuit shop
- Extra Boost Gears – Pocket Circuit shop
- Super Boost Gears – Pocket Circuit shop
- Ultra Boost Gears – Pocket Circuit shop
- Godspeed Gears – Pocket Circuit shop
- Godspeed Gears Plus – Pocket Circuit shop
- Extra Godspeed Gears – Pocket Circuit shop
- Super Godspeed Gears – Pocket Circuit shop
- Ultra Godspeed Gears – 1,000,000 Dream Machine
★ Collect 20 different framesA majority of these can be bought at the Pocket Circuit shop after winning each race. A cutscene will occur letting you know whenever new parts are in.
- Balanced Frame – Default Item
- Balanced Frame Plus – Pocket Circuit shop
- Extra Balanced Frame – Pocket Circuit shop
- Super Balanced Frame – Pocket Circuit shop
- Ultra Balanced Frame – Pocket Circuit shop
- Metal Frame – Pocket Circuit shop
- Metal Frame Plus – Pocket Circuit shop
- Extra Metal Frame – Pocket Circuit shop
- Super Metal Frame – Pocket Circuit shop
- Ultra Metal Frame – Pocket Circuit shop
- Rocket Frame – Pocket Circuit shop
- Rocket Frame Plus – Pocket Circuit shop
- Extra Rocket Frame – Pocket Circuit shop
- Super Rocket Frame – Pocket Circuit shop
- Ultra Rocket Frame – 1,000,000 Dream Machine
- Rubber Frame – Don Quijote
- Rubber Frame Plus – Pocket Circuit shop
- Extra Rubber Frame – Pocket Circuit shop
- Super Rubber Frame – Pocket Circuit shop
- Ultra Rubber Frame – Pocket Circuit shop
- Speed Frame – Pocket Circuit shop
- Speed Frame Plus – Pocket Circuit shop
- Extra Speed Frame – Pocket Circuit shop
- Super Speed Frame – Pocket Circuit shop
- Ultra Speed Frame – Pocket Circuit shop
II. Completion List: Pocket Circuit Races (Minigames)


Win all Pocket Circuit races.
★ Compete in races 10 timesYou will get this if you participate in every single race there is at least once and then race against characters in the Pocket Circuit substories. There’s no pressure to win if you’re looking to find builds for yourself, as it doesn’t matter whether you win or lose for this completion point.
Here is a list of tested and working builds for pocket circuit racing! These aren’t the only viable builds that work, and occasionally, you may have to restart a race if you happen to retire early (even if the build works, sometimes this will just happen anyway).
I’ve also tested the other set of builds posted here on this steam guide, and they work as well!
[link]
On the latter races, do NOT use boost, you will instantly lose because your car will just shoot off the track!
★ Win the Introductory Race

★ Win the Little Racers’ Cup

★ Win the Rookies’ Race

★ Win the Pro-Am Race

★ Win the Experts’ Race

★ Win the Champions’ Cup

★ Win the King of Speed Cup

_________________________________________________________________________________
The following builds are for substory races:
Substory #36 – I am Kazuma-kunVersus: Takuma

★ Substory #37 – The Rocky Road of RomanceVersus: Hideki

★ Substory #38 – Gift of LoveVersus: Mika

★ Substory #39 – Suspicion of PerversionVersus: Satoru

★ Substory #40 – The Prodigious RacerVersus: Sena

★ Substory #41 – The Woman They Call ProfessorVersus: Harumi

★ Substory #42 – The Greatest GloryVersus: Kazuyoshi

★ Substory #43 – The Fighter’s CrownVersus: Fighter

II. Completion List: JCC, SEGA Games (Minigames)
Win ten bets on three-round tournaments at JCC.
★ Win a total of 100 mil in CatfightsThis is one of the rng-reliant minigames where you win once in a blue moon if you’re lucky. The mechanics are simple but it’s still pretty annoying to sit through for hours.
Pick Jennifer as your main. It is possible to win on other girls too, but if you’re looking to get this done in one night, for the love of god pick Jennifer.
Other than that, the game itself is a just like rock-paper-scissors. Pick your hand according to the enemies strengths. For example, since Maria has a 4 star in Paper, this means that she is more likely to use Paper in fights. Use Scissors against her. Another example: Momoko has 3 in Rock, 5 in Scissors, and 4 in Paper. Use scissors against her so that you have the least probability to lose.
There’s really nothing you can do to increase or decrease the odds in this minigame, other than getting lucky and powering through it all. Here’s an easy list of the best default hand to use against each girl to help you out:
- Francisca: Scissors
- Jennifer: Rock
- Maria: Scissors
- Momoko: Scissors
- Rei: Rock
- Sayuri: Paper
- Yuiko: Rock
- Yurie: Scissors
You can adjust as you’d like, but I’ve noted that there’s not really a pattern to anything in this game. Betting higher does not seem to have any impact on the odds. Sometimes you’re defaulted to lose the mash key portions of the match, which pretty much sucks, but you’ll just have to power through it.
After several wins, you’ll get an offer to bet the outcomes of 8 fights. This is the best opportunity to win big in the cat fights and reach the 100 million goal.
II. Completion List: Casino, Gambling (Minigames)
II. Completion List: Darts, Pool, Shogi (Minigames)

★ Perform 10 hat tricks★ Earn a total of 10 million in dartsA hat trick is when you land 3 bulls-eyes in a row. This should be done on Count-Up. Darts can be a little tricky and I feel like sometimes the throws land randomly, but I was able to get more consistent bulls-eye shots by doing the following:
- Hold down the throw button and wait for his hand to hold completely still
- Move the tip of the dart in the position somewhat below the center (sometimes it needs to be slightly to the left as well). Just like the image above.
- Release. May take a couple games for the stars to align.

_________________________________________________________________________________

★ Perform 3 combination shots★ Perform 3 carom shots★ Earn a total of 10 million in poolFor the best chances of getting combination and carom shots, play 9-ball pool solo. This will give you all the time in the world to line up your shots with no other player to worry about. 9-ball rules state that you must hit the next consecutive ball on the table, from 1-9. You can also purposefully foul in this mode (do not aim at the ball, either at empty space or any non-target ball) in order to change the position of the cue ball for better angles.
Both shots involve 3 balls: the cue ball and two numbered balls. To make a legal shot in 9-ball, the ball you hit first has to be the target ball.
Combination Shot

Let’s say you just started a new game, so your target ball is 1. To get a combination shot, you’d have to get the cue ball to hit the 1 ball, so that the 1 ball hits another ball into the hole. In this example, it’s the 3 ball that gets pushed in. +1 Combination shot! This is an easy shot to do if your two balls are nearby a corner, in a straight line so that one can be pushed directly into the other.
Carom Shot

A carom shot, which is much more difficult to do, involves you hitting the 1 ball again, but this time the cue ball bounces off it and hits another ball into the hole. In this example, the cue ball hits the target 1 ball, then hits the 5 ball, which lands the 5 ball in the hole.
So basically, the difference between the two shots is the ball that actually scores the point! Combination shot = target ball hits the ball in. Carom shot = cue ball hits the ball in!
I personally found it easier to just play solo 9-ball and hit the target ball around the table as hard as I could repeatedly, without trying to land it in a hole. The reason it works is because the more balls there are on the table, the higher the chance that one of them will be knocked into the hole. Remember that by using fouls, you can also set up the shots you want. Just be sure to actually hit the target ball when you go for the actual shot, as if you hit the wrong ball first it’ll be a foul and the shot won’t count even if you performed it right.
You can also attempt to set up a carom shot by using this video method, but you have to be very precise.
_________________________________________________________________________________
★ Win 5 shogi games without a take backShogi is just like chess but with the ability to resurrect pieces you steal and “crown” pieces that make it to the opponent’s side of the board like in checkers. Most of the pieces are the same as well, save for the two Generals and the behavior of some of the pieces. This is a game that I struggled to learn because I was accustomed to typical chess strategies. If you wish to actually learn Shogi, please feel free to look up guides about it, as it’s a very simple game to learn but difficult to master and perform well. I found that the Yakuza AI even at lower levels was a bit challenging (possibly because the main audience is Japan, they assume we already know how to play). If you do decide to play it legit, I do recommend going aggressive with your moves as the AI seems to be good at tearing down defense and being reactionary, but not as good at building its own. Crowning pieces and keeping a healthy number of pawns makes winning easier.
For those of you who are like me and only want to get the CP point done, you can do what I did and install a Shogi app on your phone and set the opponent AI to high. Let the opponent in Yakuza move first, then copy whatever they do into your phone and see what the AI does to beat him. For this point, you simply must not use a take back or just disable them altogether before starting the match.
II. Completion List: Batting, Bowling (Minigames)
★ Earn a total of 5 million by battingThe trick to hitting the ball is to watch Kiryu’s arms and bat, not the pitcher. In his default animation, he’s moving his bat in circles to prepare for a swing. As soon as he PAUSES, you should hit swing as fast possible! This is a guaranteed way to hit the ball every time if your hand-eye coordination is any good. Ignore the pitcher’s pacing and concentrate on the animation and you’re sure to get this.
There is virtually no difference between the difficulties. The area you have to aim at is different, but this only requires you to move your mouse a little so that the cursor is pointed at the target. In harder modes, hitting multiple targets will make a new bonus target point pop up. You want to prioritize those targets as they give the most points.
_________________________________________________________________________________

★ Bowl 10 strikesWhile it is possible to bowl strikes just by rolling the ball right down the center, there is also an alternative way by “curving” the ball that will help you get strikes far more consistently. You can see this alternative way above. This set-up requires you to move to one side a bit, aim towards the opposite side of bowling lane, then spin the ball so that the ball will curve back towards the center.
★ Earn a total of 10 million in split gamesFor split games, this method is pretty much necessary to get 5+ frames and get any amount of profit back. The easiest frames to do are for the completion point are: Baby Split, In the Dark, Poison Ivy, Bucket and Picket Fence. The video on the right showcases how to use it in order to win all 10 frames. I’ve copied it and can confirm it works.
II. Completion List: Mahjong Tutorial (Minigames)
100% luck 0% skill 0% concentrated power of will

Just a couple completion points away from 100% and Mahjong is one of them? About to give up because of this stupid minigame? Boi, I am here for you.
Mahjong tends to be the most daunting minigame in Yakuza for a multitude of reasons:
1) the game assumes you already know how to play mahjong
2) you don’t so you look at the help menu. the game does not explain anything.
3) it’s difficult to find information even online on mahjong that actually makes any sense, and plus this isn’t typical Chinese mahjong, it’s the Japanese version
4) the AI is wild even if you try beginner mode games.
Fear not! Your resident Mahjong newbie is here to explain it all in a way that actually makes sense. Because I learned all of Mahjong from scratch, I know your suffering and I will assume you know absolutely nothing about this game.
Mahjong may seem like a difficult game, and like any game it can be incredibly complex at a professional level, but you don’t have to be a neurosurgeon to play Mahjong acceptably well in Yakuza.
First off, think of the Mahjong tiles like a deck of cards. A regular Western deck has suits like Hearts and Spades, in addition to wild cards like the Jokers and Aces.
Mahjong is the exactly same and it has THREE SUITS:
BAMBOO STICKS


DOTS


NUMBERS (JAPANESE)


As you can see, just like the Western deck, each of these suits run from 1 to 9.
The Japanese numbers may require you to look up the number, so I’ve done the homework for you:

Aside from that, there two types of special wild cards, like the Joker, called “Honor tiles.”
The first are called “Winds” and the second “Dragons”
WINDS:


These each have a direction like “East” but you don’t need to actually learn their specific names, just how to tell them apart from the Japanese number tiles and Dragon tiles since they look a little similar.
DRAGONS:


The dragons may look similar to winds, but the winds will always be black and the Dragons come in three colors: “Red” “Green” and “White” AKA the blank tile.
Your goal in Mahjong is to match similar tiles.
Let me reiterate: ALL YOU NEED IN MAHJONG IS PATTERN RECOGNITION!!!
The game’s tutorial shows you lots of fancy hands to confuse you, kind of like how in Poker there are ridiculously lucky hands like a Royal Flush that you will never ever actually experience unless you’re a fictional character or a god.
In fact, there are only 3 simple patterns you need to know to win consistently. Here are the patterns you will ACTUALLY use and should actively look for while playing:
1. PAIR

2. TRIPLET

3. SEQUENCE

Because there are 4 sets of every suit in a game of Mahjong, you can also make quadruplets (4-of-a-kinds), but I found that they’re not worth actively seeking.
To get a winning hand you need:
For example, take a look at this hand:
II. Completion List: Mahjong Tutorial (Minigames) cont.
You can win with this hand, because you have:
- A sequence of bamboos with the numbers 1-2-3
- A triplet of dot with the number 1
- A pair of Japanese 6’s
- A green dragon triplet
- A sequence of dots with the numbers 7-8-9
That’s 4 groups of three and 1 pair!
That’s all you need to win the game.
Remember when I said that there’s 4 sets of each suit in the game? Take all those tiles, mix them all up, and split them into 4 different decks for each player.
As you go around the table, each player gets their turn to automatically draw a tile from their own deck. So, if the rng gods bless you with the tiles you need from your own deck, you can win just like that!
However, you can only keep exactly 14 tiles in your hand at all times, so after gaining a new tile, you have to pick one to discard. Once it’s been discarded, you can’t ever get it back.
For example, let’s say you have these tiles in your hand:
On your next turn, your deck gives you this:

Hey, that completes the Japanese Number 1-2-3 sequence! Now you have a decision to make. You have to let go of a tile so that the new one can replace it (can also be the new tile you picked up, but obviously we want to keep that one). But if you mistakenly throw away a tile that could have won you the game later, that’d suck! There are multiple options, such as:
- Discard the lone Wind tile, since even if you got another Wind tile, it wouldn’t do much for you and you’ve already got a couple pairs and potential triplets.
- Discard the Japanese number 9. Even though we have other Japanese numbers, they’re not even close to that 9 to make any kind of pattern, so unless you happen to get another 9 or 8 in there, it may be useless. In Mahjong, 1s and 9s are more difficult to match because they are what’s called the “terminal numbers” – they can only be matched with one set of numbers in a sequence. 1 can only make a 1-2-3, and likewise 9 can only make 7-8-9. Compare this to a 5: you can make 3-4-5, 4-5-6, or even 5-6-7. THAT’S ADVANCED CHINESE PHYSICS.
- Discard the Japanese number 1. This is the one that I would choose, but it might not seem obvious as to why. Now that you’ve picked up a 2 and completed a 1-2-3 combo, that other 1 is now just extra space! It may be possible to get another 1-2-3 sequence in the same suit, but since you already made one, the chance of it happening again is much lower. The only other possible combination would be a 1-1-1 triplet. You’d be betting on the chance that you will get ALL the Japanese Number 1 tiles in the game. It COULD happen, but knowing this game…. nah.
Then, it’s everyone else’s turn! This add and discard process repeats until either someone wins or everyone’s deck runs out.
Here’s an in-game example of what it looks like to win from your own deck:
On the right side there, you can see the option “Tsumo” which will end the match and give you the win. Tsumo is a winning state that means hidden, or “concealed hand”. This means that you only used tiles from your deck and never stole even once.

As other players discard tiles of their own and lay them out on the table, you have a chance to steal that piece as they discard them ONLY IF it makes one of those special 3-tile (or 4-tile) combinations in your current hand! Likewise, other players can steal from your discarded tiles as well.
Both ways are valid, but I highly, strongly, deeply recommend that you stick with drawing from your own pile for the most part if you’re a player just starting out for the first time. Do NOT attempt to steal other pieces until you’re actually comfortable with the game, because it’ll just be tons of suffering. Not only will you lose out on most points/winning hands, but you will also miss most opportunities for the completion points. If you steal, the game gets somewhat more advanced because you have to figure out what kind of hand will win the game for you (the 3 triplet/sequence – 1 pair sometimes won’t work here).
So let’s say now that you’re playing mahjong and you’ve only drawn from your own deck. This is what you have:
You’re ONE TILE away from winning! You only need either a Japanese Number 5 or 8 tile to complete your hand and win! If you’ve been drawing ONLY from yourself (so no stealing), you can activate a winning state called “Riichii.” The game won’t activate for you automatically, so once you see you’ve gotten close to a winning hand, you actually have to press Right Click to see the “Riichii” option appear.
Activating Riichi does not make you win, but it makes winning 10 times easier. Loosely translated, Riichi means something along the lines of “Hey, I’m such a savage, I’m gonna tell everyone I’m only 1 away from winning. I’m gonna bet my chances on that last tile appearing and mcfkcin’ win.” After declaring Riichi, if ANYONE drops a tile that completes your hand – in this case a 5 or 8 – you automatically win and get big d*ck points. In the meantime, your hand will be frozen and the game will go on auto till someone actually does drop the tile you need, the tiles run out, or someone else wins first. Any tiles that get picked up from your deck are automatically discarded unless it was a winning piece.
If the winning tile drops from your own deck, the “Tsumo” option appears.
If the winning tile drops from an opponent’s deck, an option called “Ron” appears. Ron means you stoled that sh*t to win!
II. Completion List: Mahjong CP (Minigames) cont.

If you’ve played a bit, you may notice that the AI is totally screwy. Sometimes, all 3 opponents will call Riichi within the first 3 turns. Sometimes, you just happen to get a perfect winning hand from the start. It’s all rigged. You just have to be patient and wait for the right moments, or just reload repeatedly till the game decides it’s your turn to win.
Once you’re slightly experienced with Mahjong basics, here are the completion points you need:
★ Go out 10 times
“Go out” means “win”. Win 10 times with any number of points. Obviously, aiming for a higher score is better because there are 2 other completion points tied to getting a high score and they may take multiple tries to get.
Here are the rules you should play with for the easiest experience:
★ Go out with Riichi Ippatsu
As stated before, this is where you declare your hand “Riichii” when you’re one tile away from winning.
Riichi Ippatsu is exactly the same as Riichi, except this time you must win before your next turn. This means that among the next 3 tiles that each of your 3 opponents drop, one of them has to be your winning tile.
This is 100% luck based but I’ve had it happen to me around every 10 games I’ve gotten Riichi, so I believe the rng will lean in your favor if you do it enough times, especially if you call Riichi early before everyone’s already discarded all the tiles you need or taken them for themselves.
★ Go out with Mangan 5 times
Mangan is when you get 5 points after winning. You can sometimes get it on 4 points but only if you have a unique hand, it’s not as common as regular 5. I believe that if you score more than 5 points, you still get credit for a Mangan.
This can be pretty challenging so here is some information on how to make this easier:
In the middle of the game space, there are face-down tiles with only the far left one face-up. This revealed tile is called the “Uradora”, or the tile before the “Dora.”
“Dora” is an extra form of “points”, so to speak. The way it works is that the visible tile isn’t actually the bonus point, but whatever tile comes DIRECTLY AFTER IT sequentially.
So if the tile in the middle is this…
THIS tile will be worth a whole extra point. It will also stack, so getting 3 of that same tile in your deck means 3 more points.The other, face-down tiles usually stay hidden for whole matches but can be revealed when someone announces a 4-of-a-kind. If you’re lucky, having all those Dora stack will boost your score enough to get 5 points even off a simple winning hand. See my image for exactly this.
The order of the Dora is posted in the next tab for your convenience.If you used the rules I recommended, you will also get an additional kind of bonus point tile, called “Red Dora”, named after their literal appearance. The Red Dora tiles will always be the number 5 in a suit and having one in your hand will also net you an additional point.
Both these methods make getting Mangan easier. See the next block for a list of more point opportunities if you’re struggling.


★ Go out with Haneman 1 time
Like Mangan, but this time you need 6-7 points!
This requires you to not only combine Dora AKA bonus tile points, but also have a couple other tricks up your sleeve.Common ways to net additional points:
- Concealed hand – You won by Tsumo and only took cards from your own deck
- Any triplet of Winds or Dragons – 1 point per Wind or Dragon set of 3
- Terminals – All 1s and 9s, and Honor Tiles
- Inside only – Only 2-8s, no 1s and 9s, no Honor Tiles
- No points hand – No triplets or quadruplets. No Honor Tiles.
- All sequences – Only sequences (no three-of-a-kinds) without stealing
- Double sequence – The same sequence with the same suit, without stealing
- Last wall – Win on the very last turn
- Last discard – Win on the very last discard
- Mixed triple chi – Three sequences with the same numbers across 3 different suits (+2 if without stealing, +1 with)
- Full Straight – Complete sequence of 1-9 in a single suit (+2 if without stealing, +1 with)
- All Triplets – Only three-of-a-kinds in any suit

★ Go out with a Full Straight
In my opinion, this is hardest point in Mahjong to get because you can come VERY close to getting a full straight many times, but the game will end either because you ran out of turns or someone else called Riichii and won.
A full straight in Mahjong is getting a complete sequence of 1-9 in one suit, like in the image.
Getting this will not stack well with getting a Mangan or Haneman and you should expect to lose many times because essentially you’ll be giving up a lot of winning tiles in hopes of getting the right ones for the straight.
One method I used to make this faster is change the rules to make the game harder so that the other players would have more difficulty winning.
You can also make a save before starting a match and reload repeatedly in an attempt to get a luckier starting hand. It will be random each time. I find that it’s better to have at least 4-5 unique cards in a single suit. Multiples of the same suit don’t really help as much since with a full straight, you only have room for 1 more triplet and 1 pair.
If you’re confident in your abilities, you may also attempt to win by stealing. Do NOT attempt this if you don’t know what you’re doing. Sometimes opponents will drop the cards you need way more often than your lousy deck, so it can be easier to do it this way. Keep in mind that this means you have to win on your own terms and be aware of what your hand evaluates to.
Stealing Terminology
- Chi/Chow – Stealing to make a sequence of 3. Only works on the player to the left.
- Pon/Pung – Stealing to make a triplet (three-of-a-kind)
- Kan/Kong – Stealing/announcing a quadruplet (four-of-a-kind). Will activate next Uradora.
- Ron – Winning through stealing.
★ Earn a total of 10 million in mahjongKeeping the games short at quarter games will help you keep the profit in games you win so that you don’t lose it in subsequent matches. The top two best performing players both reap most of the reward pool at the end of the game, while the two worst can sometimes even hit negative values. Betting high at the advanced tables if you’re feeling lucky can boost this score, and luckily, the game doesn’t look at net profit. So if you lose 100 million trying to win enough games that add up to 10 million, that’s fine.
II. Completion List: Mahjong Order (Minigames) cont.
Mahjong Uradora and Dora sequencing
Whatever Mahjong tile is being shown in the middle of your screen, the next consecutive tile to the right shown below is the tile that will give you extra points. If the tile is 9 or the last tile in the suit, the bonus point tile is 1 and starts again from the first tile in the set.
II. Completion List: Fishing, Karaoke (Minigames)
★ Collect 15 different freshwater fish
★ Collect 18 different saltwater fishFishing in Yakuza 0 is straightforward and requires only time to collect the full compendium of fish. For the fastest hooks, be sure to use Quality Bait, which can be bought M Store, and the Peerless Pole, from Ebisu Pawn. Different fish have different silhouettes, so aim according to the chart below. When you’ve successfully hooked a fish, the fish will highlight red and the bob will begin to sink. Wait till the red line on the lure starts entering the water before you reel it in. Afterwards will be an easy QTE event.
There are 4 fishing spots, 2 on Tokyo Pier in Kamurocho, and 2 along the river in Sotenbori:
Kamurocho Pier (Saltwater)
Sotenbori Riverside (Freshwater)
_________________________________________________________________________________

★ Get 90+ in Judgement -Shinpan- (Kiryu)
★ Get 90+ in Bakamitai (Kiryu)
★ Get 90+ in x3 Shine (Kiryu)
★ Get 90+ in Heartbreak Mermaid (Kiryu)
★ Get 90+ in Rouge of Love (Kiryu)
★ Get 90+ in 24-hour Cinderella (Majima)
★ Get 90+ in x3 Shine (Majima)
★ Get 90+ in Heartbreak Mermaid (Majima)
★ Get 90+ in Rouge of Love (Majima)In songs with interjections, you must pick Lively Interjections in order to get a 90+ score.
If you’re struggling with hitting the beats on time, you may be in for a rough time because there aren’t any tricks to make it easier. I suggest you try memorizing the song because the notes will line up with the lyrics and beat, and try hitting it SLIGHTLY earlier if you’re just barely missing them. You’re more likely to hit it if you’re ready earlier than later, when the marker has already passed.
III. Climax Battles

Complete all Climax Battles.
((Section in progess…))
Most of these fights are relatively simple and straightforward, but there are one or two that are pretty challenging.
The hardest battle for me was the breaker battle. The trick to this fight is to use the headspin combo to knock the other dancers down, but not spin too close to them else you’ll be knocked down by their wakeup attack. The more knockdowns you have without being knocked down yourself, the higher the money bonuses are. Sometimes you don’t even want to aim at them, just activate the headspin from a distance and then gradually move towards them.
III. Legend Mode

Complete the main story on Legend Difficulty
This achievement requires you to start a New Game on Legend mode. Legend mode only unlocks after having finished the game on any other mode once, but it unfortunately CANNOT be done on New Game+ mode!!! You have to start the game from scratch, without using a cleared game save.
The gameplay is all the same, save for one difference: if you die, you start again from your last manual save. This isn’t a deal breaker if you save frequently.
- Obviously, stock up on Stamina Royales and Sparks before boss fights and long story battle missions. You’ll know it’s coming up when Kiryu or Majima asks the player if they’re sure they want to proceed.
- Save often but ESPECIALLY SAVE before the two Makoto escort missions in Chapter 4 and 8 and the car chase mission in Chapter 13. In my experience, these were the most difficult part of Legend mode. For the Makoto escorts, I highly recommend using Breaker style and using Left Click, Left Click, Right Click for the head spin move. It will interrupt the enemies attempting to grab her… if she gets successfully grabbed 2-3 times, game over.
- Kiryu Beast style and Majima Breaker style help immeasurably in this mode.
- You may want to experiment switching between styles mid-fight. Especially because repeated heat moves scale down in damage, changing to another style or equipping a weapon can really help.
- Either invest in a good dodge, some other skill with a good bullet counter, or use guns yourself. Armed enemies in the last couple missions will easily kill you if you’re not careful.
I ignored most substories while doing my Legend run and didn’t unlock every skill but still got this fairly easily. Kuze’s first encounter can be somewhat difficult because Kiryu is weak at that point, so be familiar with his attack pattern. Sera and Kashiwagi can prove to be challenging as well, so be sure to prepare before you face them.
Fin.

Obtain all other achievements
[Kiryu voice] That’s rad!
Congratulations! You can officially uninstall the game forever with SEGA’s blessing.

Making this took a LOT of time and effort, both to learn the game and to write the guide as thoroughly as possible because there was so much content to cover. Pretty sure I died somewhere writing about telephone cards and mahjong.
So if this guide helped you at all, I’d appreciate if you showed the support! That way, others can find this more easily and hopefully benefit from it too.
PS. The OST for this game is incredible and a lot of songs are criminally underused in the game imo. Should take a look at it, it’s great!
PSS. I’m making a guide for Kiwami.
[link]