DayZ Local Server Guide
DOWNLOAD DAYZ SERVER:
BEFORE GETTING STARTED IT'S HIGHLY RECOMMENDED TO DOWNLOAD A TEXT EDITOR SUCH AS SUBLIME TEXT OR NOTEPAD++ AND OPEN YOUR SERVER FOLDER FROM HERE.
THIS WILL MAKE THINGS MUCH EASIER WHEN EDITING FILES.
1. Download DayZ Server from TOOLS in your Steam LIBRARY.
2. Once the download has finished navigate to: Steam\steamapps\common\DayZServer
THIS WILL MAKE THINGS MUCH EASIER WHEN EDITING FILES.
1. Download DayZ Server from TOOLS in your Steam LIBRARY.
2. Once the download has finished navigate to: Steam\steamapps\common\DayZServer
CREATE BATCH FILE:
1. Create a start batch file. Right click and create a new textfile, rename it to start.bat
2. Place start.bat file into your server folder: Steam\steamapps\common\DayZServer
3. Right click on start.bat click edit, paste this data below into the file and click save.
@echo off
:start
::Server name
set serverName=My DayZ server
::Server files location
set serverLocation="C:\Program Files (x86)\Steam\steamapps\common\DayZServer"
::Server Port
set serverPort=2302
::Server config
set serverConfig=serverDZ.cfg
::Logical CPU cores to use (Equal or less than available)
set serverCPU=2
::Sets title for terminal (DONT edit)
title %serverName% batch
::DayZServer location (DONT edit)
cd "%serverLocation%"
echo (%time%) %serverName% started.
::Launch parameters (edit end: -config=|-port=|-profiles=|-doLogs|-adminLog|-netLog|-freezeCheck|-filePatching|-BEpath=|-cpuCount=)
start "DayZ Server" /min "DayZServer_x64.exe" -config=%serverConfig% -port=%serverPort% -cpuCount=%serverCPU% -dologs -adminlog -netlog -freezecheck
::Time in seconds before kill server process (14400 = 4 hours)
timeout 14390
taskkill /im DayZServer_x64.exe /F
::Time in seconds to wait before..
timeout 10
::Go back to the top and repeat the whole cycle again
goto start
NOTE: MAKE SURE serverLocation MATCHES THE SERVER FOLDER LOCATION ON YOUR PC.
4. If you want to add mods, you would add something like this:
"-mod=@BaseBuildingPlus;@Breachingcharge;@CarCover"
to this file.
(see below for more info on mods)
2. Place start.bat file into your server folder: Steam\steamapps\common\DayZServer
3. Right click on start.bat click edit, paste this data below into the file and click save.
@echo off
:start
::Server name
set serverName=My DayZ server
::Server files location
set serverLocation="C:\Program Files (x86)\Steam\steamapps\common\DayZServer"
::Server Port
set serverPort=2302
::Server config
set serverConfig=serverDZ.cfg
::Logical CPU cores to use (Equal or less than available)
set serverCPU=2
::Sets title for terminal (DONT edit)
title %serverName% batch
::DayZServer location (DONT edit)
cd "%serverLocation%"
echo (%time%) %serverName% started.
::Launch parameters (edit end: -config=|-port=|-profiles=|-doLogs|-adminLog|-netLog|-freezeCheck|-filePatching|-BEpath=|-cpuCount=)
start "DayZ Server" /min "DayZServer_x64.exe" -config=%serverConfig% -port=%serverPort% -cpuCount=%serverCPU% -dologs -adminlog -netlog -freezecheck
::Time in seconds before kill server process (14400 = 4 hours)
timeout 14390
taskkill /im DayZServer_x64.exe /F
::Time in seconds to wait before..
timeout 10
::Go back to the top and repeat the whole cycle again
goto start
NOTE: MAKE SURE serverLocation MATCHES THE SERVER FOLDER LOCATION ON YOUR PC.
4. If you want to add mods, you would add something like this:
"-mod=@BaseBuildingPlus;@Breachingcharge;@CarCover"
to this file.
(see below for more info on mods)
SERVER CONFIG:
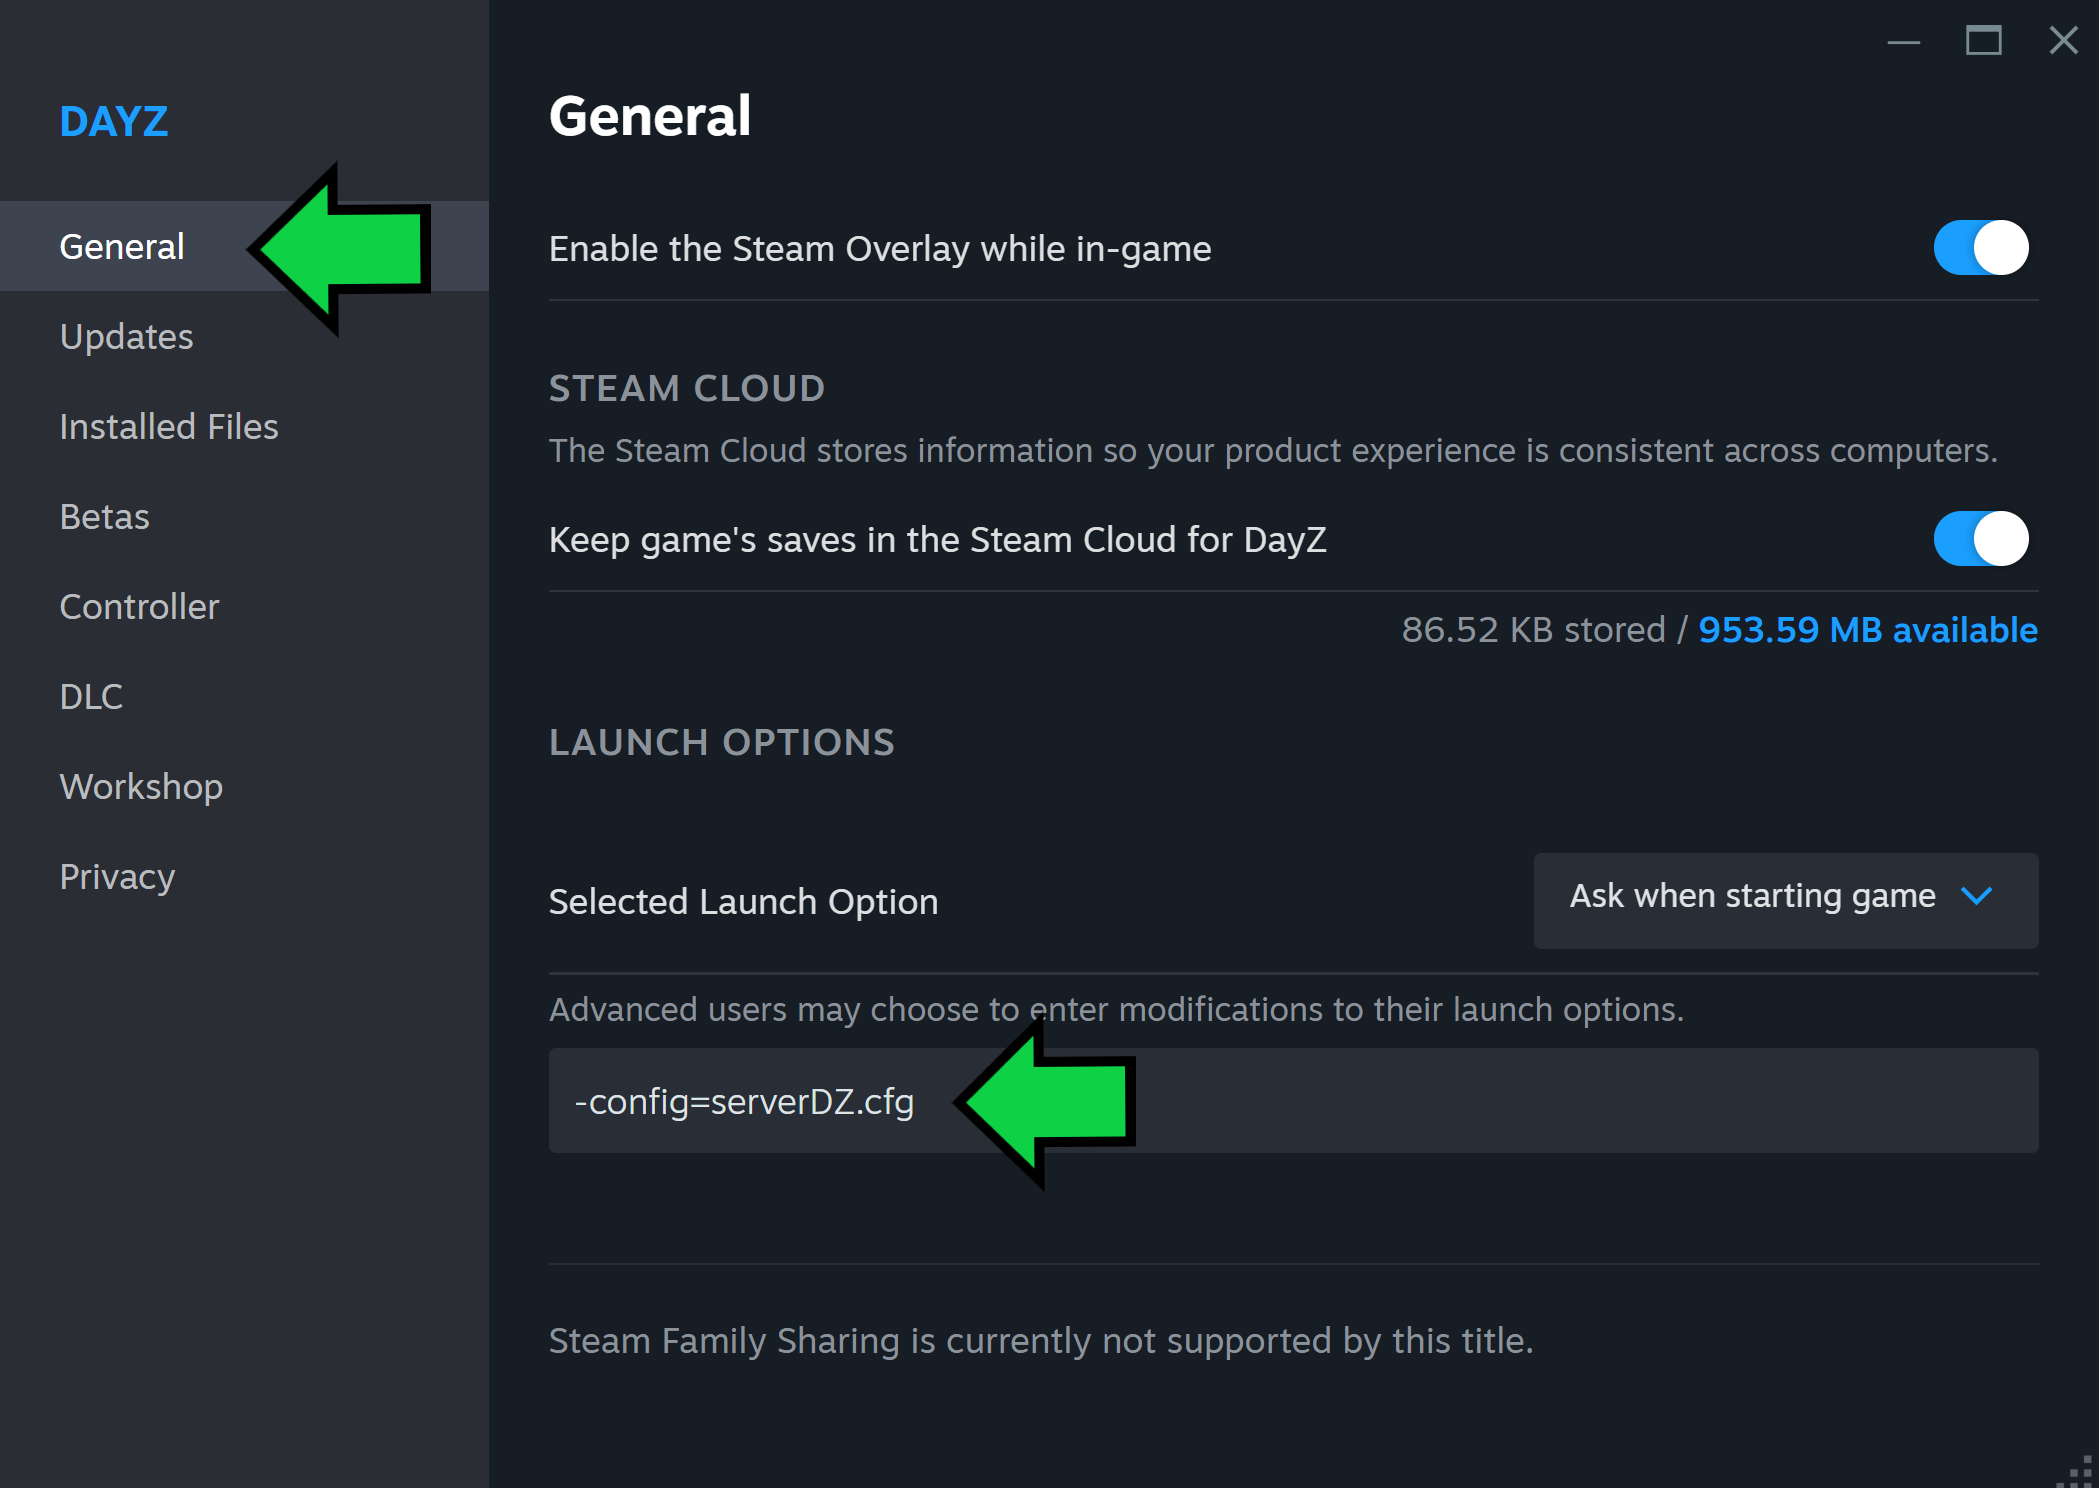
- Go to your Steam LIBRARY
- Find DayZ right click and select Properties then select the General tab.
- Copy & paste -config=serverDZ.cfg into your DayZ launch parameters.
- Open serverDZ.cfg and edit to your preferences such as server name,
password to connect to the server, password to become a server admin, etc.

STARTING THE SERVER:
Double click the start.bat file.
MOD INSTALLATION:
Always test mods one by one as you add them to your server to make sure they are working properly, we'll use "BaseBuildingPlus" mod as the installation example since the process is pretty much the same for each mod. Don't forget to check notes on the workshop page for whichever mod you're installing for further info.
1. Copy the @BaseBuildingPlus folder from !Workshop to your server folder.
2. Copy .bikey file from the keys folder to your keys folder.
3. Add mod "-mod=@BaseBuildingPlus" to your start.bat file launch parameters and to your server launch parameters in DayZ launcher.
4. Merge types.xml provided in the info folder with your server types.xml file.
5. For additional mod config edit the .json file for each mod in its respective folder, found in the ServerProfiles folder.
6. Repeat the process for any additional mods you want to add to the server.
NOTE: Some of the more advanced mods may require you to download dependencies in the form of other mods, for example "Arma 2 Helicopters Remastered" mod will not work without "DayZ Expansion Vehicles" installed. Always read the info provided by the mod creator no matter which mod you install to make sure you don't miss any additional important information that may be required to make the mod work properly on your server.
LAUNCH PARAMETER EXAMPLE WITH MODS IN start.bat FILE:
start "DayZ Server" /wait "DayZServer_x64.exe" -adminlog -netlog -freezecheck -showScriptErrors VerifySignatures=3; -profiles=ServerProfiles -config=serverDZ.cfg -port=2302 -dologs "-mod=@BaseBuildingPlus;@Breachingcharge;@CarCover"
LAUNCH PARAMETER EXAMPLE WITH MODS IN DayZ LAUNCHER:
"-mod=@BaseBuildingPlus;@Breachingcharge;@CarCover"
1. Copy the @BaseBuildingPlus folder from !Workshop to your server folder.
2. Copy .bikey file from the keys folder to your keys folder.
3. Add mod "-mod=@BaseBuildingPlus" to your start.bat file launch parameters and to your server launch parameters in DayZ launcher.
4. Merge types.xml provided in the info folder with your server types.xml file.
5. For additional mod config edit the .json file for each mod in its respective folder, found in the ServerProfiles folder.
6. Repeat the process for any additional mods you want to add to the server.
NOTE: Some of the more advanced mods may require you to download dependencies in the form of other mods, for example "Arma 2 Helicopters Remastered" mod will not work without "DayZ Expansion Vehicles" installed. Always read the info provided by the mod creator no matter which mod you install to make sure you don't miss any additional important information that may be required to make the mod work properly on your server.
LAUNCH PARAMETER EXAMPLE WITH MODS IN start.bat FILE:
start "DayZ Server" /wait "DayZServer_x64.exe" -adminlog -netlog -freezecheck -showScriptErrors VerifySignatures=3; -profiles=ServerProfiles -config=serverDZ.cfg -port=2302 -dologs "-mod=@BaseBuildingPlus;@Breachingcharge;@CarCover"
LAUNCH PARAMETER EXAMPLE WITH MODS IN DayZ LAUNCHER:
"-mod=@BaseBuildingPlus;@Breachingcharge;@CarCover"
UPDATING MODS:
1. Replace the @BaseBuildingPlus (or whichever mod you are updating) folder in your server folder with the new one from !Workshop.
2. Check the Change Notes on each mod you update for any instructions. For example you may need to update your types.xml file if any new items were added.
2. Check the Change Notes on each mod you update for any instructions. For example you may need to update your types.xml file if any new items were added.
EDITING ITEM SPAWNS:
To edit the amount of a select item that spawns on the map, you need to open up and edit your types.xml file. Once inside the file, you will notice various items within the game. Items will be listed alphabetically. Making changes to these values will have different effects. Here is a basis of what each line of an item does:
Useful tool for editing item spawns here[dzsa.tools]
nominal
How many of this item that can be on the map.
lifetime
The lifetime of an item once it is spawned. (Time in seconds).
restock
The amount of time that will need to pass before an item is allowed to spawn again.
min
The minimum amount of an item that will spawn on the map.
quantmin
Dictates the minimum quantity of consumable within the item. Value=(-1.0%(empty) - 100.0%(full) how many bullets are in an Ammo box, or how much water is in a bottle)
quantmax
Dictates the maximum quantity of consumable within the item. Value=(-1.0%(empty) - 100.0%(full) how many bullets are in an Ammo box, or how much water is in a bottle)
Cost
Determines the spawn chance of an item.
Category
The category of an item. Effects on how and where the item spawns. (Weapons, Tools, Containers, Clothes, ect.)
Useage
The group in which area an item will spawn. (Farm, Industrial, Medic, Hunting, ect.)
Value
The value group of an item. Effects on how and where the item spawns. (Tier1, Tier2, Tier3, ect.)
Useful tool for editing item spawns here[dzsa.tools]
FOLDER AND FILE LOCATIONS:
DayZServer FOLDER: Steam\steamapps\common\DayZServer
!Workshop FOLDER: Steam\steamapps\common\DayZ\!Workshop
Keys FOLDER: Steam\steamapps\common\DayZServer\keys
serverDZ.cfg: Steam\steamapps\common\DayZServer
types.xml: Steam\steamapps\common\DayZServer\mpmissions\dayzOffline.chernarusplus\db
.json: Steam\steamapps\common\DayZServer\ServerProfiles
!Workshop FOLDER: Steam\steamapps\common\DayZ\!Workshop
Keys FOLDER: Steam\steamapps\common\DayZServer\keys
serverDZ.cfg: Steam\steamapps\common\DayZServer
types.xml: Steam\steamapps\common\DayZServer\mpmissions\dayzOffline.chernarusplus\db
.json: Steam\steamapps\common\DayZServer\ServerProfiles
WIPING THE SERVER:
Delete players.db file if you only want to remove player data:
Steam\steamapps\common\DayZServer\mpmissions\dayzOffline.chernarusplus\storage_1\players.db
Delete storage_1 folder to wipe the server clean:
Steam\steamapps\common\DayZServer\mpmissions\dayzOffline.chernarusplus\storage_1
Steam\steamapps\common\DayZServer\mpmissions\dayzOffline.chernarusplus\storage_1\players.db
Delete storage_1 folder to wipe the server clean:
Steam\steamapps\common\DayZServer\mpmissions\dayzOffline.chernarusplus\storage_1
ERRORS:
Errors are logged in your ServerProfiles folder:
Steam\steamapps\common\DayZServer\ServerProfiles
The most common errors you'll run into are usually due to mods that need updating. DayZ will also give you an error code when trying to load in which will tell you what the problem is, check error codes here[community.bistudio.com]
Steam\steamapps\common\DayZServer\ServerProfiles
The most common errors you'll run into are usually due to mods that need updating. DayZ will also give you an error code when trying to load in which will tell you what the problem is, check error codes here[community.bistudio.com]
FINAL NOTES:
!!! ALWAYS BACK UP YOUR CUSTOM types.xml FILE ONCE YOU HAVE FINISHED MERGING DATA.
THIS FILE WILL UPDATE ITSELF TO THE VANILLA VERSION EVERY TIME THERE'S AN UPDATE FOR DAYZ.
MANUALLY MERGING XML DATA FROM EACH MOD TAKES TIME AND EFFORT AND YOU WILL HAVE TO DO THIS ALL OVER AGAIN IF YOU FAIL TO BACK UP THIS FILE. YOU HAVE BEEN WARNED !!!
^^(VERY IMPORTANT)^^
INCORRECT XML SYNTAX WILL RESULT IN YOUR SERVER NOT FUNCTIONING PROPERLY.
MAKE SURE THE DATA IN YOUR types.xml IS IN THE CORRECT FORMAT.
VALIDATE YOUR XML FILE WITH A TOOL SUCH AS THIS[www.xmlvalidation.com] IF YOU ARE HAVING ISSUES.
DON'T EDIT FILES OR ADD/REMOVE MODS WHILE YOUR SERVER IS RUNNING.
FEEL FREE TO USE THIS[gist.githubusercontent.com] types.xml FILE AS A TEMPLATE FOR YOUR types.xml FILE.
CTRL + F AND SEARCH <!-- Vanilla End --> FOR THE START OF THE XML DATA FROM THE MODS.
THE FILE IS CONFIGURED FOR MODS:
<!-- @[CrSk] BMW 525i E34 -->
<!-- @[Remastered] Arma Weapon Pack -->
<!-- @Advanced Weapon Scopes Mod -->
<!-- @BaseBuildingPlus -->
<!-- @CannabisPlus -->
<!-- @CarCover -->
<!-- @Chevy_C10_Spurgerado -->
<!-- @Cl0ud's Military Gear -->
<!-- @CodeLock -->
<!-- @CPBWeapons -->
<!-- @Crocos Quadbike -->
<!-- @Dogtags -->
<!-- @MuchStuffPack -->
<!-- @MunghardsItempack -->
<!-- @Survivalists_FacePaints -->
<!-- @Tactical Flava -->
<!-- @WeaponReduxPack -->
<!-- @WindstridesClothingPack -->
📜 DISCLAIMER 📜
Make sure you check the Terms and Conditions of your ISP if your intention is to allow other people to join your server.
The information contained in this guide is to set up your own server for testing and practising in single player only.
Always have a password set so random players can't join, you may be breaching terms of service with your ISP if you ignore this advice.
The information contained in this guide is to set up your own server for testing and practising in single player only.
Always have a password set so random players can't join, you may be breaching terms of service with your ISP if you ignore this advice.
More DayZ guides
- Downloading and Installing DayZ Expansion Mod★ 5 (316)90k views894 ♥5 minUpdated Feb 15
- Всё о болезнях в DayZ (Актуально для 1.28)★ 5 (320)59k views685 ♥5 minRussianUpdated Dec 30, 2025
- Interactive Map for DayZ 1.29 & Workshop Maps★ 5 (894)52k views1.7k ♥1 minUpdated May 29
- DAYZ / Оружие / Патроны / Оборудование / Урон★ 5 (468)51k views751 ♥17 minRussianUpdated Apr 29, 2022
- Постройка базы★ 5 (174)45k views447 ♥6 minRussianUpdated Sep 18, 2024
- Всё про крафт в DayZ (Актуально для 1.22)★ 5 (491)37k views1.4k ♥1 minRussianUpdated Aug 11, 2023




This guide was created by its original author on the Steam Community. Are you the author and want it removed? Request removal.