![Definitive Guide to Fixing & Modding Fallout 3 [2021 UPDATE] for Fallout 3](https://steamsolo.com/wp-content/uploads/2021/07/definitive-guide-to-fixing-modding-fallout-3-2021-update-fallout-3.jpg)
Overview
This guide is an in depth walkthrough of how to fix (and mod) Fallout 3. Be it crashes on startup, crashes in-game, stuttering, or even performance, this guide will walk you through how to get your Fallout 3 running like it should. For both new players, and veterans to the Fallout franchise.
PART 1: Fixing a Broken Game
This section will focus on fixing a broken game using multiple methods. I’ll be noting the methods that worked best for me, and some methods made by other sources.
-NOTE: Throughout this guide please be sure to read the steps carefully and don’t rush yourself. I’ll be happy to answer any question to the best of my abilities.-
—–
GFWL or Games for Windows Live is an outdated and defunct service that unfortunately is still built into the steam version of Fallout 3. Because this ancient software is no longer around, or needed, sometimes the games dependencies on it tend to cause crashing. This tool should help you disable said feature.
Link: [link]
—–
Alright, hear me out. This ones going to sound far fetched, but it works. If you’ve never modded your game, I suggest referring to the “Optimizing your game” section first, so you have the basic premise of modding/ ability to install FOSE. The mod for Fallout New Vegas (New Vegas Anti-Crash) is actually backwards compatible with Fallout 3, and works like an absolute charm in situations when the game simply will not launch. All you have to do is place the mods “nvac.dll” into your “Data” folders “FOSE” folder. Obviously, this method will require you to use Fallout Script Extender, which is why I said if you’ve never modded the game before, it’s almost essential to read that section first.
- 1. Install FOSE by dragging the zip files contents into your main Fallout 3 folder (FOSE HERE)[fose.silverlock.org]
- 2. Download NVAC (NVAC HERE)[www.nexusmods.com]
- 3. Open the NVAC file once downloaded.
- 4. Within the NVAC ZIP, navigate to NVSE > Plugins
- 5. With your Fallout 3 “Data” folder open, create a folder called “FOSE”. If this folder already
exists due to other mods, disregard this step. - 6. Drag “nvac.dll” into your Fallout 3’s “FOSE” folder.
- 7. Launch the game through the FOSE launcher.
—–
Now, I know what you’re thinking. “Why would I delete Fallout 3?! I thought the point of this section was to FIX my game!” Trust me. We’re not deleting the game itself. We’re not uninstalling it. We’re simply deleting a folder that most likely has outdated or conflicting files for your game. This method is the one that got my game working again, so I’m confident it’ll do the same for you.
- 1. Navigate to your computers “Documents” folder.
- 2. Open a folder called “my games”.
- 3. There should be a folder called “Fallout3”. Delete the “Fallout3” folder.
Side notes: If you opened the “Fallout3” folder you will have noticed what seem like vital files such as “FalloutPrefs” and “Saves”. These are vital, however the will re-aquire themselves properly after you delete the original folder and start playing.
—–
This is a mini-guide straight from Bethesda themselves. This method allows the game to run off of multiple cores, which some people seem to have issues with. This is also a known reason to crash your game. I found that this method ALONE did not solve my issue, but when used with other methods it can help. I suggest doing this either way, just to clean up your Fallout 3’s .ini file a little bit.
Fallout.ini Editing Guide from Bethesda:
It is important to note that Fallout 3 was not developed for use on PCs with more than two cores. If your PC has more than two cores, please try the following steps in addition to those above:
- 1. Open your My Documents folder.
- 2. Under My Games, open the Fallout 3 folder and select the fallout.ini file.
- 3. In the fallout.ini file, find the following line: bUseThreadedAI=0.
- 4. Change this line to read: bUseThreadedAI=1.
- 5. Add another line after it that reads: iNumHWThreads=2 .
—–
This method I found to make the problem worse. Some people have reports of this method working however, and making their game run so I’m including it in here. This is another official mini-guide of how to run your game in compatibility by Bethesda.
Compatibility Guide from Bethesda:
You may be able to run it using compatibility mode. To change compatibility settings for Fallout 3:
- 1. Locate the Fallout3.exe application file for the game. This can be found in one of the following folders depending on which version of the game you use:
Retail versions: C:Program Files (x86)Bethesda SoftworksFallout 3
Steam versions: C:Program Files (x86)SteamSteamappsCommonFallout 3 - 2. Right-click on the Fallout3.exe application file and select Properties.
- 3. Click on the Compatibility tab.
*If no Compatibility tab is available and you have Fallout 3 in your Steam Library, please follow the steps detailed below.* - 4. Check the box Run this program in compatibility mode.
- 5. Choose Windows XP Service Pack 3 from the drop-down menu.
- 6. It may also be necessary to check the box for Run this program as an administrator.
- 7. Repeat steps 2-6 for the FallouLaunch.exe file in the same folder.
- 8. Run the game.
—–
Though the goal of this guide is to fixing the Steam version, if you really can’t get Fallout 3 working the best solution might be to just refund it, and buy it on GOG. Why you ask? GOG’s version of Fallout 3 is fixed, no GFWL, no crashing, and great stability. If you must choose this option, THIS[www.gog.com] is the store link. Just be warned, some methods of this guide may need to be referred to to even get that version running, such as the New Vegas Anti-Crash method.
PART 2: Optimizing an Old Game
This part of the guide will walk you through some of the tools and mods to help you optimize your game, and making it a little more reliable. This will all be done through mods and programs. I have used all these mods and programs and I can vouch that all of them are safe.
This simply allows the game to run of of 4gb rather than the 2 originally intended. You’re going to want to patch Fallout3.exe when it asks you what program to patch. You will most likely find that here: C:Program Files (x86)SteamSteamAppscommonFallout 3
Double click on Fallout3.exe and you’re done!
Link: [link]
—–
This mod/program is not only a great resource, but it’s also required for quite a few mods to work if you ever plan on adding mods to your game. I suggest getting this either way, ESPECIALLY if you plan on getting mods. Download the file, and drag the contents of the .zip/.rar file into your Fallout 3 folder.
Link: [link]
—–
This simple FOSE plugin fixes a long standing issue with the game that disallowed more than a certain number of mods to be active. With this plugin, not only can you use more mods, but you may also experience framerate boosts and other positive side effects.
Link: [link]
—–
Another mod/plugin that aims to optimize and streamline otherwise outdated game systems. The heap replacer should decrease load times, and may grant more frames.
Link: [link]
—–
This FOSE plugin aims to help with the stream of high quality textures, even with the 4GB patch. It does this by utilizing your graphics card to rely on texture loading. Either way, this should reduce crashes, and decrease lag.
Link: [link]
—–
Yet another mod aiming to help with Fallout 3’s terrible data management systems. This will help increase performance by changing the initial heap size allocated from 200mb to 400mb. Ideally this will reduce lag in menus.
Link: [link]
—–
This one won’t do too much performance wise, but is nice to have if you’re an active discord user. This will simply allow for rich discord presence, which will display your characters name, level, caps, and location if someone clicks on your profile while you’re playing Fallout 3.
Link: [link]
PART 3: Modding a Dated Game
This section will teach you how to properly mod your game through either manual installation methods, which are my personal suggestion when handling these old games, as you get more control over the files being installed.
*NOTE* Mod Nexus is one of the best modding sites out there, not to mention safest. I use the Mod Nexus on a regular basis.
Fallout 3 Mod Nexus: [link]
I highly suggest you install FOMM, as it’s a tool that let’s you easily manage your mods.
Fallout Mod Manager: [link]
—–
-Note- You’ll need either WinRar or 7zip to open mod files.
When installing any mod manually, it’s important to be careful what you install, and what order you install it in. Some mods may conflict with others, so you’re usually going to want to install mods from biggest to smallest. For example, I use a mod called NMC’s Texture pack. It changes most textures in the game. I also have a mod that changes called Flora Overhaul, it changes the flora and trees, including textures and models. I’d want to install NMC’s Texture Pack first, and then install Flora Overhaul afterwards. This ensures that all of the tree textures and models overwrite the ones from NMC’s Texture Pack.
Use this mod as practice to install mods Manually: [link]
The Steps to Manually Installing Mod’s:
- 1. Browse your local files on steam to get into your Fallout 3 folder.
- 2. Open the “Data” folder. This is where you’re going to install your mods.
- 3. On the Mod Nexus page, click the “Download Manually” button.
- 4. Open the mod file with either winrar or 7zip.
- 5. In the mods zip/rar file, there may be various things. Either a “Data” folder, or a collection of folders such as “Meshes, Textures, Sounds” etc accompanied by an “esp” plugin in some scenarios. Whatever the case, you either want to merge the mods “Data” folder with the one from your install, or drag the variety of files and folders into your games “Data” folder. In the end, the contents of the mod should be within your own installs “Data” folder.
- 6. Overwrite any files if it’s necessary, this will be especially common towards the end of manually installing a mod list which is why it’s important to know what you want to overwrite what.
- 7. Activate the plugin file (ESP or ESM) in either FOMM, or from your games launcher. You should only use your games launcher to manage mods if you don’t plan on using many. Any more that 5 mods should be managed by Fallout Mod Manager.
—–
-Note- ENB’s should only be used on higher end PC’s. I would NOT suggest trying to use or install an ENB on a lower end system, non-gaming laptop, or office PC.
ENB’s come in many shapes and sizes. Some saturate the game, while others make it look more bleak, some make the graphics sharper, while other used Depth of Field (DoF) to blur things out. The ENB you want is based on what you like. There’s plenty of ENB’s to choose from. You can also download Fallout New Vegas ENB’s as they are compatible with Fallout 3 as well, so there’s no shortage of ENB’s to choose from.
- 1. Download the binaries for the ENB. You’ll need this no matter what ENB you decide to install, as it includes all of the files required for ENB to run.
- Link: [link]
- 2. Instead of putting the files in the data folder like we would with any other mod, this time we’ll be putting the files in the “Fallout 3” folder itself. Open the ENB Binaries zip file, and open the “Wrapper” folder.
- 3. Drag the contents of the wrapper folder into your “Fallout 3” folder.
- 4. At this point you can find an ENB that you like. One of my personal favorites is Midhrastic ENB.
- Link: [link]
- 5. Open the ENB zip once it’s installed.
- 6. Drag the contents of the ENB into your “Fallout 3” folder, overwrite any files if it asks you. If you don’t overwrite the files, the ENB won’t work in game.
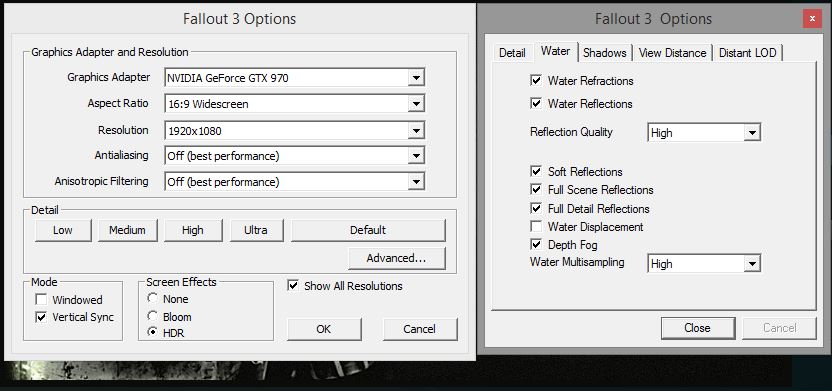
- 7. Start your Fallout 3 Launcher. You’ll want to disable Antialiasing, Anisotropic Filtering, and Water Displacement. You’ll also want to make sure HDR is enabled. It should look something like this:
- The reason we do this is because ENB in and of itself has these graphical settings built in, keeping them enabled in the base game can create visual conflicts.
- 8. Start your game. Everything should be working and you should notice an instant graphical difference.
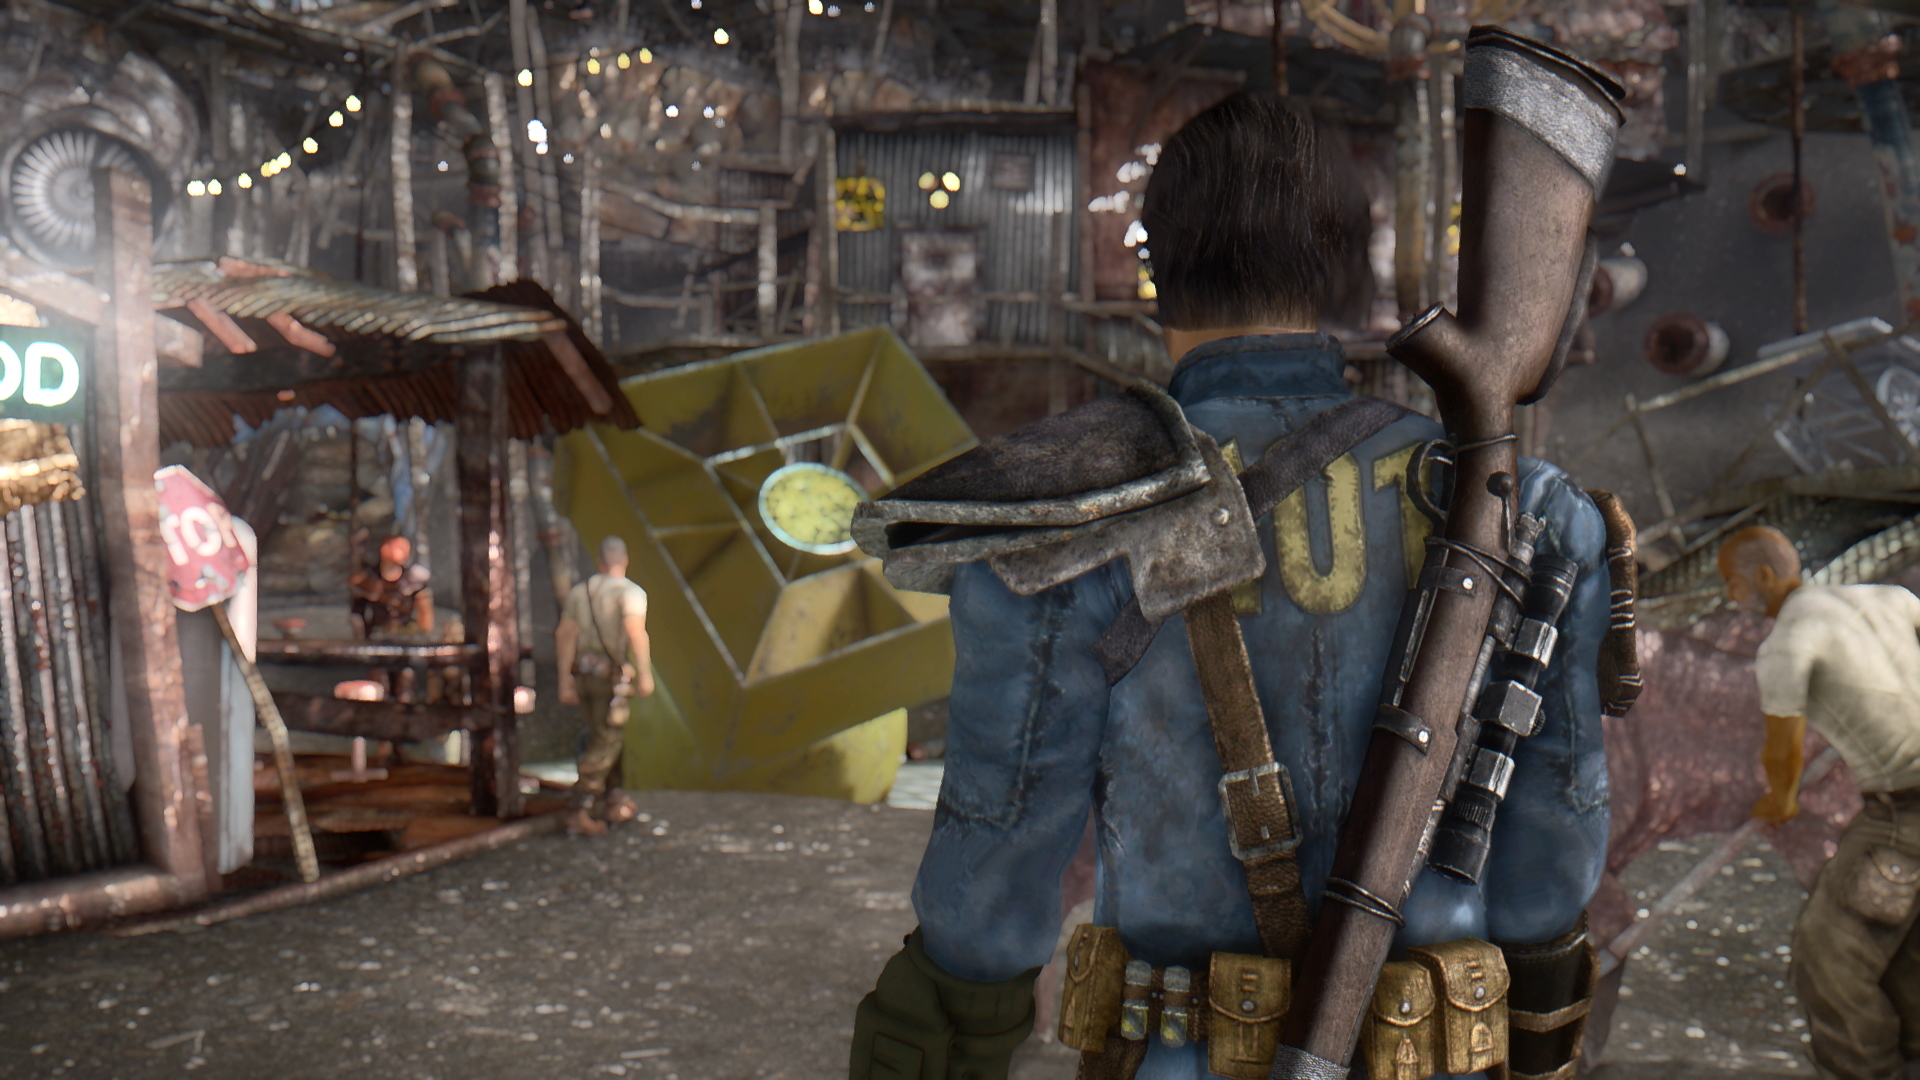
Some Various Images of Fallout 3 with an ENB:


PART 4: A Baseline in the World of Modding
This module of the guide will talk of some vital mods and ENB’s that can be downloaded for Fallout 3. This is a list of suggestions more than anything. All mods will have the proper links.
NMC’s Texture Pack[www.nexusmods.com]
An HD texture pack that covers 90% of the game.
Weapon Retexture Project[www.nexusmods.com]
A weapon texture pack that covers most of the games weapons.
Weapon Enhancement Pack[www.nexusmods.com]
A weapon texture pack that covers even more of the games weapons.
Effect Textures Enhanced[www.nexusmods.com]
A mod that edits and replaces various special FX in the game.
IMPACT[www.nexusmods.com]
A mod that makes bullet impacts and firefights a little more flashy.
Realistic Wasteland Lighting[www.nexusmods.com]
A mod that redoes all of the weathers and lighting in the game to make the Wasteland appear a little more realistic.
Vurts Flora Overhaul[www.nexusmods.com]
Vastly overhauls the trees and grass within the game world, with 3 options.
Fallout 3 Rebirth[www.nexusmods.com]
Redecorates many of the games exterior locations so they look less sparse.
The DC Interiors Project[www.nexusmods.com]
Adds new interiors to many locations which previously had none.
Devastated City[www.nexusmods.com]
Makes the DC core look more run down and in ruins.
Metro Carriage Interiors[www.nexusmods.com]
Simply adds explorable interiors to all of the metro trains in the game.
Atmos Ambient Sound Overhaul[www.nexusmods.com]
Handplaces over 3000 new sound effects in the game, making it feel more alive.
Ambient Wasteland 2[www.nexusmods.com]
Adds various new sounds to the list of random effects that can play when exploring the world.
Collision Meshes[www.nexusmods.com]
Remakes nearly all of the games collision meshes, making for a much more consistent gameplay experience.
Fallout Streetlights[www.nexusmods.com]
Adds many streetlights across the world.
Animated Traffic Lights[www.nexusmods.com]
Replaces traffic lights with ones that still think the world is moving.
Megaton Walkway[www.nexusmods.com]
Adds a walkway right in the middle of megaton for easy traversal.
Essential Caravans and Followers[www.nexusmods.com]
Prevents you from losing companions or caravans to stray bullets.