Overview
Demons make powerful allies when properly controlled. Their ability to deal damage to groups makes them excellent defenders as well as attackers.Learning each Demon troop is key to success, as their behaviour is generally different when compared to the other factions, and some troops have specific behaviours that might throw a first time player for a loop.This guide should give you the required understanding of the Demonic Governance to adequately summon them to battle.
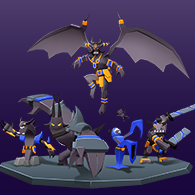
Behemoths: Beastly Brawlers
The Behemoth is a large, fast, and brawny Troop. These creatures have no need for weaponry, as their natural strength lets them deal heavy damage with their bare hands. This loyal Troop will stand by the side of their allies, defending them from incoming foes.

The Behemoth, when alone, will stand by friendly Strongholds and await incoming enemy forces. These dutiful allies will only leave their post when there are nearby enemy threats to attack, or friendly Troops to assist. This behaviour makes them slightly nuanced, and might catch new players off-guard. Behemoths are easily excitable, and will often charge into enemies that come too close, taking them away from their defensive position. This behaviour makes placing Behemoths slightly easier, however. You can place them down first next to one of your Strongholds and allow your Mana to charge up while they are in a defensive stance. Once you have more Mana to spend, you can drop some other more offensive Troops nearby. Your Behemoths will follow friendlies into battle, and assist them when they are attacked.
As mentioned before, Behemoths are always intent on assisting others. Not only will they follow friendly Troops, but they will never attack Structures, focusing all of their efforts on eliminating enemy Troops. They are a bit zealous in this way, as they may sometimes venture into enemy Regions in pursuit of enemies, or if it is the shortest path to reach their nearby allies.

Behemoths have the sole intention or raking their claws over their enemies. Their massive limbs can deal damage to multiple targets at once. A single Behemoth, similar to Giants, can easily wipe out groups of weaker infantry such as Knights. This is particularly effective when helping your Reavers during an assault. Your Reavers are most effective against Structures, and having them attack enemy defending Troops can waste their valuable damage output. So, pairing some Reavers with a Behemoth or two is crucial for effectively pushing through to an enemy Stronghold, reducing the time it takes to stop an eliminate defenders.

Their strength is matched by their constitution. A Behemoth can soak up a lot of damage from other Troops, making them adequate defenders, even when they are alone. When playing against The Undead, Behemoths can help cut down incoming hordes and reduce the risk of being overrun. Pairing this Troop with others that affect an area, such as the Ice Golem can make it exceptionally difficult for enemy Troops to push through your defences. Well placed Behemoths are sometimes enough to dissuade an entire attack, tempting your enemy to try attacking somewhere else.
Behemoths are very powerful, but their objective often leaves players feeling frustrated when they run off from their position to attack enemies and defend allies. Be aware that Behemoths care most about eliminating enemies, and they will choose to divert from their allies when the opportunity to strike presents itself. This means they can be easily distracted by a stray Bomber that slips past your defences in battle. They may turn around and chase the Bomber all the way back to a friendly Stronghold if there are no greater threats.

They gain the benefit of being cheaper than other large Troops. At a cost of 5 Mana, and a Reserve Limit of 4, you can reliably deploy this Troop throughout the battle wherever you find groups of enemies. When they are not busy running from one place to another, they will be dealing a lot of damage, and can prove to be a real problem for your adversary. Likewise, their defensive behaviour makes it easier to “save up”, as you can deploy a few of them without having them advance. This makes it easier for you to assemble a larger group of Troops before finally pushing forward with an attack.
Don’t be afraid to spend a little Mana with this Troop when your enemy poses a threat to one of your Strongholds, as they can prove to be a stalwart defender when they are not following their battle-brothers into combat.
Worms: Vile Bombardiers.
Worms are nasty creatures that launch volleys of offensive spittle at their enemies. With a great range, and the ability to apply damage over time, these gnarly minions stand ready to melt any enemies that come their way. Cheap and numerous, this Troop is your back-line of defence.

Worms are cheap but weak, and are one of the few choices that suffer from a minimum range. Though alone they don’t amount to much, together with other Troops they can cause your opponent a lot of grief. Their long range and high numbers allow them to cover most, if not all, of your Regions. Likewise, when grouped together can deal tremendous amounts of damage.
Like the Flesh Lobbers of the Undead hordes, attacks from Worms deal splash damage. Not only that, but Worm attacks continue to deal damage over time. Pairing this with the splash damage of other Demon Troops, you’ll find that you are able to burn down larger groups of Troops with ease.

Worms are adequately suitable as a defender, but lack the damage with their attack’s initial impact to deal significant damage to Structures. That being said, when your opponent begins the WAR! phase with a Tower Destroyer or equivalent, Worms are a good choice, with their superior range, for taking it down early. Likewise, their cheaper cost allows you to simply deploy more defenders when you place your own Rift Bombard. A Human opponent may opt to place Archers nearby to destroy your Rift Bombard. One of your Worms will be enough to destroy a whole unit of Archers, and since they are cheaper, you should be able to completely defend your Rift Bombard.
Worms are Sentry Troops, and thus, cannot move. They suffer from the same issue as other ranged Troops, such that if they are all placed too far away from the action, your opponent may be able to play around them in such a way that they are stuck in a useless position for the remainder of the round.

Remember that this Troop has a total Reserve Limit of 5, which out numbers all other Sentry Troop Reserve Limits. This, paired with their long range, makes Worms very good at covering large areas. However, their biggest downside is their attack’s initial damage. It will take two volleys from your Worms in order to take down a Bomber, so placing two Worms in such a way that they can defend the same Stronghold is a good idea.
Reavers: Destructive Warriors
Reavers are as numerous as they are strong. These stout fighters are especially effective at breaking Strongholds down to their component parts. Their massive swords deliver damage to multiple enemies at once, and at higher levels, can deal enough damage to destroy groups with ease.

Reavers are your primary source of damage against Strongholds. Though they are siege Troops at heart, Reavers are brutal swordsmen and carry the potential to prove themselves useful in almost any situation. They can be spread thin to apply pressure, or focused entirely into one area to press an assault. They key is knowing when to do what.
Reavers, like Worms are slightly different from other comparable Troops because of their cost and Reserve Limit. At an exceptionally low cost of only 2 Mana, and a hefty Reserve Limit of 8, Reavers are one of the most versatile Troops available to be chosen. In particular, because of their low cost, it’s easy to continuously drop Reavers wherever your opponent has not placed any defences. Likewise, you can potentially waste a lot of your opponent’s Mana by forcing them to deploy their own, more expensive Troops in order stop your pesky invaders from dealing damage to their Strongholds.
Similarly, you can use this cheap Troop to distract enemies that pose a threat to your Strongholds. When your enemy has a sizeable wave attacking one of your Strongholds, consider dropping Reavers nearby to momentarily distract them. This might give you a few more moments until your Spells have recharged, or at least, a few more moments where your Strongholds aren’t suffering damage. This is especially effective against Giants, as they are easily distracted and take a long time between attacks. Be wary, though, because Reavers have relatively little health and won’t last long against swarms.

Reavers, at lower levels, won’t do much damage to enemy Troops. Using them to defend alongside other defenders such as the Behemoth lets them deal some damage more safely, which is one way to level them up. When using them alone, you shouldn’t expect them to tolerate very much damage. You can overcome this simply by summoning more whenever they are defeated. Their low cost will allow you to do this a lot. Combine this tactic with Stasis to give your Reavers even more time to deal damage and simultaneously stop your enemies from dealing damage back.
Reavers are your most direct offence against Strongholds. Because of their singular deployment, you’re going to have to summon more than a single Reaver to deal significant damage quickly. Their lower health makes them vulnerable to splash attacks from Canon Towers or other similar defences. Because of this, using Harden or Dark Shroud to better protect your Reavers can help ensure they reach their destination before being wiped out.

The alternative to this, as mentioned above, is spreading your Reavers across the entire battlefield. Though risky, this strategy may prove effective if your opponent has focused all their efforts to one location. Dealing little bits of damage persistently over the course of the round can add up over the whole game. Likewise, your opponent’s Troops will be more expensive than yours. They will have to spend more Mana to drop a unit to defend against a single Reaver. Keep this in mind through the game, as a few sneaky Reavers can change the balance dramatically.
Otherwise send some other Troops along with them to help their advance. The Behemoth, for example, will follow allies, like your Reavers, into battle. Doing so might reduce the time it takes to stop and defeat defending enemies. After all, you want to maximise the time your Reavers are attacking Strongholds instead of Troops. Likewise, Behemoths are Menacing and will attract attacks away from your Reavers. If your Reavers do reach a Stronghold, your Behemoths will stick around waiting for enemies to approach. When enemies do approach, they will attack the Behemoths first, keeping your Reavers alive even longer. This synergy is key to successful attacks.
Remember, you have strength in numbers. You can deploy your Reavers all over, and you’ll force your opponent to make choices on where they will defend. On the other hand, Reavers are easily defeated when alone. Thus, it’s important to send other Troops along with your Reavers in order to protect them as long as possible to maximise their potential.

Reavers are cheap and versatile. In numbers, they are very strong against Troops and Strongholds alike. Use them to deal damage to both. Likewise, Reavers level up both by attacking Troops and Strongholds. You should find them easy enough to level up, at which point they will become even more effective, specifically against Troops of a lower level.
Reavers are cheap, and as such, can be efficiently used to trigger traps to waste their uses. This is especially useful against Spike Traps. Against Lightning Traps, however, you’ll have to spend a minimum of 18 Mana on Troops in order to deplete all of their uses. This seems daunting, but it is necessary to avoid having your more expensive Troops wasted if they happen to tread over a trap.
Mages: Master Manipulators
Demon Mages are your biggest source of damage of all. Their long range, damage over time, and ability to deliver consistent damage to Strongholds makes them feared by most opponents. Their ability to distort space allows them to bring down hellish flurries of magic that are so powerful that the Mage must take some time to successfully begin casting such a spell. Being excellent defenders and brutal attackers, Demon Mages pay for themselves by delivering unbelievable damage to targets that are foolish enough to come near.

Demon Mages deal tremendous damage. In fact, their spell is so powerful that each time they attempt to use it, there is a brief period where they must charge it up. After which, they will begin a continuous stream of magic that deals damage over time to multiple enemies at once. Once their target area no longer has any valid Troops or Strongholds within it, they must stop channelling their magic, target a new area, and begin the process all over again. This can result in some downtime when attacking moving targets as they continue to leave the target area. If the Mage is targeting a moving Troop, there is a chance that the Troop will leave the target area before the attack begins, causing the Mage stop channelling and start over on a new area.
Demon Mages are very powerful defenders. They are most effective when placed nearby allies or friendly Strongholds. Specifically, they are effective against enemies that are attacking one of your Strongholds, as they will stand still while they attack. This gives your Mages a nice, long window where they can effortlessly begin channelling their magic attack in order to burn the offenders down. You might find that even a single Mage can grind an assault to a halt. Your opponent will be hard pressed to find alternatives to their attack, and will be forced to cast Spells or choose different options to get past your Mages. Don’t be overconfident, though. When enough enemies swarm a Stronghold, it’s going to take more than a single Mage to stop them.

Demon Mages are particularly effective at destroying Strongholds. Their attacks have the option of choosing a Stronghold as the primary target. If you’re able to get a Mage within range to attack an enemy Stronghold, it can do a shocking amount of damage in a reasonably short amount of time. If you’re sneaky, you might be able to get a Mage in for an attack without your opponent noticing while they’re focused on another portion of the table.

If you find you aren’t able to sneak Mages in on their own, you’ll have to provide some cover for them. By placing a couple of Reavers in front of your Mages, they will provide a moderate distraction for enemy Troops. Keep in mind that Reavers are not very tough, and can’t take a lot of damage before being defeated. Because of this, it’s best to use this strategy where your opponent has not already placed Troops. On the other hand, Reavers are cheap, and you can reliably drop them for a brief shield for your Mages. Ideally, you would use a Reaver as well as a Behemoth for a proper distraction.
A third offensive strategy is to make use of your Stasis spell. Mages will likely have to cross into enemy Regions while they attempt to get close to enemy Strongholds. Because of this, your Mages are susceptible to having Troops dropped right on top of them. When this happens, if you’re quick enough, you can use Stasis to freeze incoming Troops before they can harm your Mage. Assisting with other Troops makes this even more effective.
Remember, Mages have a very high potential to deal damage to both Strongholds and Troops. Like other magic wielding Troops, they don’t have a lot of health and are easily defeated by most enemies. Because of this, it’s key to utilise Troops when enemies are mostly distracted. This can be when they are attacking your Strongholds or heavy Troops such as your Behemoths.

Sometimes you might be able to sneak a Mage in by themselves where your opponent has left their defences open. This isn’t always likely, but if you think your opponent is totally distracted, they may be able to squeeze in some valuable damage while your opponent is looking elsewhere. This works mostly when your opponent has committed to an attack someone on the table and has spent a lot of Mana. Keep an eye out for openings.
Demon Lord: Airborne Terror
The Demon Lord strikes fear in those who are found beneath its menacing shadow. Coming down from the skies with fury in their eyes, a Demon Lord will crush the weak beneath them, making way for their servants. Knowing no bound, this terrifying being takes to the skies, scoffing at Traps and obstacles below, moving quickly across the battlefield to strike unsuspecting foe.

The Demon Lord is a masterful Troop that prefers to take to the skies. When deployed, they will immediately leap into the air and take flight. This unique ability, found in only two different Troops, allows them to ignore terrain entirely and fly from one point to another uninhibited. For the Demon Lord, this is crucial in its ability to reach Troops that are too far away for even your Worms to reach. Not only that, but this allows uncanny mobility, and defensive towers such as the Canon Tower will struggle to accurately make effective attacks against the Lord.
When the Demon Lord is deployed, it will choose an enemy Troop somewhere in the battlefield as their next target. Without hesitation, the Demon Lord will jump into the air and begin it’s direct path to the target. Once the Lord reaches the target, it will quickly dive and slam into their target with great force, dealing heavy splash damage to it and nearby enemies. This attack is enough to instantly destroy entire units of Knights, Archers, Skeletons, Flesh Lobbers, and more.

You can use this to gain a huge advantage over your enemy at the beginning of the round. When your opponent begins setting up their defence, they may choose to deploy Ranged Troops strategically to later defend their Strongholds. Deploy your Demon Lord immediately. Your Lord will take flight, fly directly toward the Ranged Troops, and drop onto them mercilessly. The Ranged Troops deal trivial damage to the Lord, and it will waste your opponent’s spent Mana. Likewise, if your enemy has placed their Ranged Troops far enough apart, the Demon Lord will choose to take flight again, rather than walk, to attack the next Troop. This pattern can cause your opponent a lot of issues as they now must wait for their Mana to recharge in order to begin placing additional Troops to deal with your Demon Lord.
Another interesting advantage you have with a Demon Lord is that if there is no enemy Troops on the table to attack, the Lord will then choose to dive onto a Structure, whether it be a Stronghold or a defensive tower. Canon Towers and equivalent have a minimum range and the Demon Lord can easily get too close to it for it to fire. This will allow the Demon Lord to deal some preliminary damage to defences and potentially make it easier for you to attack later.
The best defence against a Demon Lord is to place many melee Troops nearby after it has landed. Lords are particularly weak to melee attacks, and their relatively small pool of health will be depleted quite quickly when attacked by a swarm of enemies. You can combat this with a well timed Stasis to freeze the attackers in place to provide your Lord with brief relief from damage. Likewise, casting Blossom on the enemies can make it easier for your Lord to dispatch them, as defeating one Troop can cause a chain reaction in which the entire unit is destroyed. Demon Lords also swipe multiple enemies at once with their melee attacks, so dealing with groups isn’t normally a struggle – as long as the Demon Lord doesn’t take damage too quickly.

Remember that your advantage with the Demon Lord is mobility. They are very effective when your opponent has placed a lot of Ranged Troops as a defence. They are also effective when your opponent is using a lot of swarming Troops like skeletons when they are spread far apart. Their swiping attacks and diving attack can deal plentiful damage to groups. Their most powerful attack is their initial dive attack, so try to make the best use of that when your enemy has spread their Troops far apart.
Your Demon Lord will always be most effective when your opponent has a small number of Troops on the table, so using them as early as possible in the round is recommended for most situations. It will put pressure on your opponent to spend a lot of Mana to dispatch the Lord quickly. Normally, your Lord will easily destroy a unit with it’s dive. At that point, your opponent will have to deploy a new Troop or two nearby to attack the Lord. This can give you some extra time to deploy Troops elsewhere as your opponent fights the Lord and recharges their Mana.