
Overview
A catalog of all the normal enemies of DMC1 (Not Bosses!), their attacks, and the reccomended strategy against them in DMDCopied from an old DMC resource, Phantombabies.net, sadly the website’s domain expired and the FAQ is no longer accessible. If the creator of the FAQ, Joch, finds this and does not want it posted here, please message me and I will delete this guide, unfortuantely, your email did not work and I was not able to properly ask for permission to repost the guide elsewhere now that the website is down.Most of the text is copied straight up, all the fluff and humor kept intact. However, the Shadow section had to be edited for being too long. Besides that, this is a valuable guide to anyone trying to learn how to deal with enemy encounters in this game. Enjoy!
Beezlebub
First encountered
Hard/DMD mode: Mission 2, small study
Normal mode: Mission 6, rusty key room
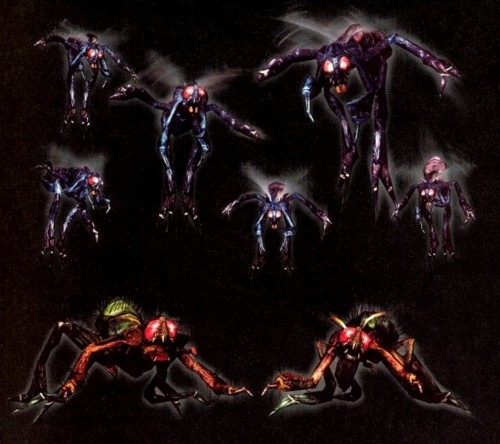
Beezlebubs, as well as being instruments of Satan (:p), are also oversized flying insects, who like to spew out maggots on a regular basis. The blue ones are incredibly weak, but the green ones are somewhat stronger. They are easily defeated with projectile attacks, such as Air Raid or DTed shotgun shots/E&I.; The maggots can cause chip damajavascript:Cancel()ge, so watch out for those.
Blades
First encountered
Hard/DMD mode: Mission 2, fountain room
Normal mode: Mission 9, outdoor field
Blades are agile lizard-like creatures. They like to lunge at you with their sharp claws, plus they can burrow undergound and burst out from underneath you, launching you into the air with an uppercut move. From long-range, they can squeeze blood into their claws and fire it in the form of projectiles towards you.
A group of Blades can be rather tough to deal with, thanks to both their armour (consisting of a shield and a helmet) and their agility. Their armour can be shattered with physical blows, but it takes a while. Their lunges can be an absolute menace, particularly when the camera angles are bad and they come lunging at you from offscreen (yes, Mission 2 fountain room, I’m thinking of you). You can melee Blades with either your trustworthy sword or Ifrit, but it’s very difficult to do without getting hit at some point. The EASY and SAFE way to dispatch of a group of Blades is to use grenade-rolling and/or Vortex Lvl 2.
A harder, but more satisfying, method of dispatching Blades is to exploit their critical hit point: their back. To do this, you must make the Blade land on its belly and then land a downward slash or flame-kick on its back before it can recover – if loads more blood than usual spurts out and the Blade takes forever to die, then congratulations: you have scored a critical hit. You can use any gun to set the Blade up for a critical hit, but the shotgun is the most infallible for doing so. With the shotgun equipped, shoot the Blade at point-blank range to stun it, then quickly get behind it to shoot it in the back before it recovers – it will go rolling through the air and land down on its belly. Quickly jump forwards and do a downward slash to finish it off: you don’t need to be in DT mode. You can also use Ifrit’s flame-kick, but it has an annoying tendency of skew-whiffing.
If you have the grenade gun equipped, then just blasting away will do no good. It will knock the Blades over all right, but they’ll land on their backs, not their bellies. To get a Blade to land on its belly with the grenade gun, get RIGHT behind it – as close as you can get – then shoot. This will usually send the Blade rolling through the air nicely – finish it off in the same way as above.
If you have the Nightmare-Beta equipped, feel free to roll and shoot for a while to rack up those “Stylish” ratings! :p … The NB shots knock the Blades down left, right and centre, but if you want to actually set them up for critical hits you’ll need to be a bit more cunning. You can either wait for one to leap at you, then quickly run behind it and shoot, or you can knock down one from the front, get behind it, wait for it to get up, then shoot it in the back.
The larger brown Blades can be CHed as easily as the smaller green ones. You get about 50 red orbs for a CH kill and 30 red orbs for a non-CH kill. (I can’t remember if the brown Blades drop more red orbs; sorry. If they do, then it isn’t a vast amount more – that’s all I can remember.)
Fetish
First encountered
Hard/DMD mode: Mission 1, room underneath rusty key room
Normal mode: Mission 9, misty woods
These fire-breathing puppets are an elite member of the Marionette family. On Normal mode, they mostly appear with other Marionettes, but on Hard/DMD mode, you’ll see many more groups consisting of Fetishes only.

Like Marionettes, these gangly puppets are fond of shuffling towards you at an inordinately slow speed. They share some moves in common with the Marionettes, such as a swipe at close-range, a long-range spinning dash attack, and – much more rarely – a ‘silent scream’ to immobilize you with invisible strings or a leap onto your back to peck away at you with its beak. Moves which are unique to the Fetish include its ‘yo-yo’ attack and its fiery flamethrower breath.
The moves which are shared with the Marionettes are evaded in the same way as if they were done by the Marionettes. The ‘yo-yo’ attack is where the Fetish throws both of its shurikens at you like a yo-yo – you have to evade the shurikens not only as they travel forwards towards you, but also as they travel backwards to the Fetish. The flamethrower attack is hardly missable: the Fetish bends over backwards, then lunges forwards to send out a long tongue of fire. It’s much better to evade with a roll or jump to the side, rather than a jump backwards…
Fetishes are harder to combo than Marionettes due to their greater parrying abilities – if you combo a Fetish from the front, sooner or later it will raise its shurikens to block you and counterattack with its flamethrower breath – just roll to the side if the Fetish blocks you. A Fetish can’t block you from behind, however, so feel free to launch it with a High Time or Magma Drive, nip round behind it, and begin comboing away ;p … If Dante shifts position too much, then just launch the Fetish again and realign yourself behind it.
Comboing a solo Fetish is fine, but trying to combo an entire group of Fetishes is risky to say the least, what with their yo-yo attacks, flamethrower breaths, spinning dashes, etc. The SAFE way of dealing with a group of Fetishes is to use grenade-rolling or Vortex Lvl 2. An uncharged Meteor 2 will kill a Fetish immediately, but using Meteor does leave you more exposed than Vortex. If you decide to use Meteor, watch out for offscreen attacks.
Finally, we come to DMC1’s equivalent of Jump-Cancelling: Shotgun-hiking. It lays waste to Fetishes and looks as cool as a cat into the bargain. Don’t fret, though, if you can’t master it. Possibly the only thing more unnecessary than shotgun-hiking is using Roundtrip any time outside of Mission 22.
DTed Fetishes, like DTed Marionettes, gain an unholy amount of health. You shouldn’t let a group of Fetishes DT on you, but there are situations where it might happen: I recommend the grenade gun to build DT and Vortex 2 to plug away with until they go down.
Death Scissors
First encountered
Hard/DMD mode: Mission 4, fountain room
Normal mode: Mission 6, sewers
The Death Scissors is the giant scissors-wielding member of the Sin family. It’s probably to safe to say, from its deep hearty guffaw, that it’s a male member too… >_>
The Death Scissors, as with their weaker female brethen, like to take snips at you in various funky ways. They also like to trap you in a cage for the duration of the fight. Interestingly enough, a few people have reported leaving the cage, usually accidentally. It’s NOT easy to do on purpose, though; I’ve tried and failed. All I can say is it somehow involves Air Hike and Vortex and, if you succeed, you’ll have to fight the Death Scissors outside the cage.
Anyway, back to the fight. You’ll want to defeat the Death Scissors as fast as possible, as its huge scissors are a bit nerve-wracking in such a confined space. Luckily, the Death Scissors doesn’t have particularly high defense – three DTed Air-Hiked/enemy-hiked/wall-hiked slashes on its head will kill it. It will, on the other hand, frequently parry your blows, especially wall-hiked ones. To minimize the chances of it parrying your attack, try to Air Hike up as it lunges forwards to take a snip and hit it before it can recover. In both the Mission 4 and 6 encounters, you can get in a slash at the beginning of battle – but in Mission 4 the Death Scissors has a pre-emptive strike immediately after the brief unskippable cutscene is over, which you must jump away from first.
After landing the first slash, try to follow up with a second slash if you can, but it won’t always be possible to do so before the Death Scissors enters its invulnerabilty phase – its skull turns bright pink and it rises up out of sight. Don’t waste your time trying to attack it during this stage, as you can’t hurt it – but you can do a taunt for DT if you like. Shortly after the Death Scissors has disappeared out of sight, it will begin its corkscrew dive attack. This is a daunting attack which is actually rather easy to deal with. Hold R1 to target, so that you know which direction the Death Scissors is coming from, and listen out for the “whooshing” sound – when you hear it, do a roll to the side. Rinse and repeat two more times. The Death Scissors will begin to do a fourth dive, but it never actually finishes it and you can’t get hurt by it on the ground. It takes a little while for the Death Scissors to recover, so feel free to taunt for DT in the meantime. As soon as its skull has turned white, resume attacking it. When both horns have broken off, it’s near death. You should aim to defeat the Death Scissors before it can begin a second corkscrew dive attack.
If you don’t have Air Hike, then enemy-hiking off the Death Scissors’ head is an excellent substitute.
It is actually possible to kill a Death Scissors in TWO hits, but this seems to only work with the one in Mission 4 – the low ceiling in Mission 6 apparently hinders the player too much. To kill a Death Scissors in two hits only, you need to do a triple jump. Stand in front of the Death Scissors, enemy-hike off its head, Air Hike, then do a DTed downwards slash. It will quite often block these slashes, so try to do one just as it’s about to attack, or just keep trying until you get it. Typically, the Death Scissors will go into invulnerabilty mode after receiving such a hit, but occasionally you can defeat it without triggering its invulnerability phase and the subsequent corkscrew dives. I’m not certain how it works, but it seems like you should avoid dealing too much damage with the first slash, and then get maximum damage (presumably over 50%) with the second slash.
When the Death Scissors is defeated, jump away to avoid its falling scissors. Wait around for a mini-eternity for your gauge to refill, too.
With Ifrit, three Infernoes will defeat a Death Scissors. You can exploit a glitch to refill the DT gauge. Evade the Death Scissors, then do a DT-cancelled Inferno against it: the non-DTed Inferno hitting the Death Scissors in several places at once will refill all of your DT runes. Okay, so what if your gauge is refilled after battle, anyway…? >_>
Death Scythe
Hard/DMD mode: Mission 5, staircase tower
Normal mode: Mission 11, garden
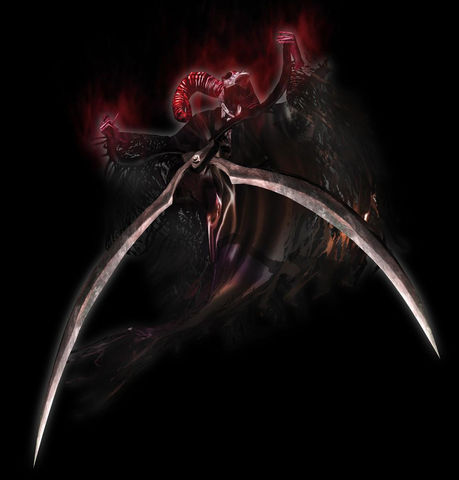
Death Scythes are described in the enemy files as “the strongest, the highest ranking, and the most evil of all the “Sins.”” Absolute bollocks :p

As with the Death Scissors, just three DTed Air Hiked slashes will defeat a Death Scythe. Wait until the Death Scythe swoops down, then lay into it with a downwards slash. It has two types of swoop. The first and most common type is a short sharp swoop, where it stops in front of you and raises its scythe to take a swipe. For this type, you should Air Hike straight up when the Death raises its scythe – the Death Scythe strikes swiftly, so try not to jump up a split second too late and get hit. The second type is a much longer sweeping swoop, where the Death glides along the ground and tries to skewer you like a kebab. The only way you can hit the Death Scythe during this swoop is to do a hop-jump up followed by a downwards slash as early as possible – if you do an Air Hike, you will miss the Death Scythe by miles, although at least you will be in no danger of getting hit.
You can sometimes loop the Death Scythe until it dies – a process which takes about 10 seconds at its fastest. The Death Scythe will quite often descend three times in a row.
Watch out for the bastard-annoying whirlpool traps the Death Scythe lays about the place – fortunately the black circles are usually easy to spot and avoid. If you do get caught up in a tornado, then just keep on jumping forwards in mid-air until you escape from the tornadoes – the Death Scythe will try to swipe at you as you jump, but will keep missing. If you do a downwards slash or flame-kick, I think that enables you to escape instantly, but memory is hazy on this one – sorry.
If you don’t care about damage, 8-9 runes of Air Raid will kill a Death Scythe. I don’t recommend it in an SB game, however, because it’s just about impossible to avoid getting hit by a swipe.
When the Death Scythe is near death, it will pick up its embedded scythes – if you don’t kill it soon after this, expect to be hacked and diced four ways to Monday.
With Ifrit, three Infernoes will defeat a Death Scythe. And, as with the Death Scissors, you can refill the DT gauge! Search for its embedded scythes in the ground, then do a DT-cancelled Inferno against them – if done correctly, your runes will be completely refilled. This method can be something of a pain to do damageless, though, as the Death Scythe has a habit of swooping down in the middle of your Infernoes and taking a swipe. Still, there is something strangely satisfying about Infernoing the scythes over and over again… >_>
Frost
First encountered
Hard/DMD mode: Mission 7, sewers
Normal mode: Mission 17, courtyard
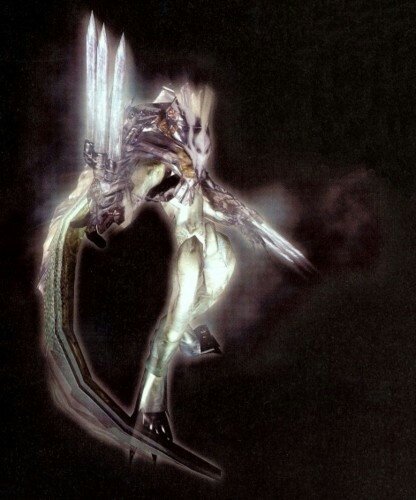
Frosts are beautiful creatures of ice. They are also an elite member of the Blade family, but much nicer than Blades, so there :p
Frosts are heavier than Blades, which may perhaps explain their relative lethargy. They move slowly most of the time, but can do a lightning-fast lunge if you get within range. At close range, you should also watch out for their Icy Inferno: if the Frost does a leap upwards, arms held out horizontally, jump away to evade the blast of the ice which will follow. The ice lasts briefly enough that you can also Air Hike straight up, firing the shotgun or E&I; at the peak of your jump – by the time you land, the ice will have disappeared. If you Air Hike up early enough, you can blast the Frost out of the sky with the shotgun before the Icy Inferno even has time to come out.
At close range, the Frosts will only do their claw swipes or Icy Infernoes, but at mid to long range, they gain other attacks. At mid range, they like to fire needle-thin projectiles from their claws: they’ll cross their arms, then fling them outwards, sending out 1-2 waves of projectiles as they do so. The distinctive ‘wooshing’ sound of the projectiles makes them quite simple to evade – just jump to the side when you hear them being fired (jump twice if two waves are fired). At long range, they will channel a shockwave of ice which travels underground towards you. This homes in on your position extremely accurately and can only be evaded by jumping away at the very last moment – wall-jump, if you are next to a wall. And, finally, Frosts have the ability to teleport. They can only teleport in a straight line, so see which way they are facing and then dodge at a right angle to that – the teleport can hurt you if it goes straight through you.
Frosts tend to come in pairs (although not always) and I, for one, find two Frosts harder to evade than two Shadows. Despite the ability to walk on lava unharmed (Mission 21, SM12), Frosts are still amazingly susceptible to Ifrit, particularly the slightly weaker DMD ones – a fully charged Meteor 2 will kill a DMD Frost outright and drastically weaken a Normal/Hard one. On Missions 7 (Hard/DMD only) and 17, you can align two Frosts together so that you kill both of them with one Meteor – refer to the respective missions for the specifics. Inferno is also a Frost slayer: two Infernoes will kill a Frost on any mode.
A good Ifrit combo to use against a solo Frost is Inferno > Auto-Combo. If you successfully DT-cancel the Auto-Combo, you will recover most of your devil gauge. A good non-DT combo to use is a repeated Kick-13 > grenade one. The grenades aren’t actually necessary (they do effectively no damage), but make the combo a bit safer by keeping the Frost regularly stunned. Personally, I prefer using a combination of punches, Rolling-Blazed jumps, and Magma Drives. It gives the Frost a sporting chance, since it can sometimes counterattack this way. And it’s fun to uppercut a downed Frost ;p
If you use Alastor (as you have to in Mission 7 of a fresh Hard/DMD game), then you will soon find out that Frosts are incredibly more resistant to it. They are quite good fun to fight with a sword, however. Regular 4-Hit combos with a High Time finisher work well – it doesn’t matter if the High Times are grounded or rising, but if you do a rising High Time, follow it up with a downward slash. However, the quickest way of dispatching of Frosts with a sword is to use sword-cancelling: do repeated 2-Hit combos, cancelling the lag after every 2nd slash – the slashes tend to keep them stunned for a long time. They will break away after a while, but occasionally you can keep them stunned for long enough until they die.
Combo both Frosts simultaneously when you can, as it’s safer and makes the battle go by that much faster. Don’t try to herd them together, however, as that won’t work – you simply can’t push Frosts around with Stingers. Instead, start on one Frost; very often the second Frost will creep up to join its mate and get caught up in your slashes (this is where sword-cancelled pairs of slashes works well, as both slashes have a decent range). Combo them together for as long as you can, before one of them gets sent flying backwards with a squeal – there is nothing you can do to prevent this from happening, short of killing the Frost. If a Frost breaks away and you’re next to it as it’s crouching, holding its arms out, a quick High Time will stop it from rising up to do an Icy Inferno.
Never Stinger over to a free-roaming Frost – it can swipe faster than you can recover (the only exception to this is when you first enter a room, as it typically takes several seconds for the Frost to become aware of your presence). If you wish to start comboing a Frost which is roaming around, then the safest thing to begin with is a quick grounded High Time before anything else.
Once a Frost gets close to death, it can freeze itself in a block of ice and regenerate some of its lost health. (If their right arm is missing, that means they are close to death – if you let them heal themselves in the block of ice their right arm will be restored.) The Frost tends to be invulnerable for a few seconds after emerging from the block of ice, so be a bit careful – you don’t want to get counter-swiped whilst trying to hit an invulnerable Frost.
Kyklop
First encountered
All modes: Mission 10, courtyard (They can actually be encountered earlier in SM5 in Mission 7)
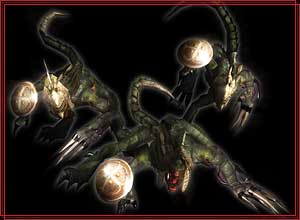
These rather rare giant rock spiders only ever appear in pairs. If they appear to be suspiciously similar to Phantom, that’s because they are – indeed, they even share some moves in common with Phantom, including the claw swipe and a leaping jump – their claw swipe, it should be noted, comes out at the same speed as red Phantom’s, i.e., twice the normal speed of Phantom’s usual swipe. They can also spew rocks from their mouths, which can’t be deflected, but only evaded by jumping away.

Just as the Kyklops have some of the same attacks as Phantom, by the same token they also possess the same weak spots as him: namely, their faces and their rear ends. They have considerably less health than Phantom, though, so 9 runes of Air Raid are sufficient to finish off one DMD Kyklop. (It only takes 4 runes of Air Raid to finish off a Normal Kyklop – oddly enough, Kyklops are the only DMD regular enemy (not boss) which are stronger than their Normal counterparts in non-DT mode.) Before commencing Air Raid, you should wall jump or Air Hike to lift yourself safely up above the rocks which are spewed at you. Once a Kyklop is defeated, your gauge will be refilled, so evade the second Kyklop until you get the refill.
Other attacks you can use are Air-Hiked slashes on the Kyklop’s rear end, Stingers on its face (mind the rocks!), Infernoes, and grenade-rolling. The camera can’t always keep up with the Kyklops, making fighting two of them from the ground rather hair-raising – keep on the move constantly.
Marionette / Bloody Mari
First encountered
All modes: Mission 1, rusty key room; basement
These puppets are the “bread and butter” enemies of DMC1 – the ones that (in Normal mode at least) you will see all over the place. They are, however, no punching bags. They have a surprisingly wide range of attacks for such a basic enemy and will not stand passively by whilst you wail away at one of them.

To begin with, Marionettes are a diverse bunch. They not only come in different colours, but also wield a variety of weaponry. The colours of the Maris are an indication of their defense. In order from lowest health to highest health, the spectrum is as follows: Green > Light Blue > Dark Blue > Red. (Red being the Bloody Mari, obviously.)
For weaponry, there are three types that the Maris can wield: daggers, curved scimitars, and a shotgun. Any colour Mari can have any type of weapon. There isn’t really any practical difference between the daggers and the scimitars, to be honest, but the shotgun is a different beast altogether – any Mari wielding a shotgun is to be feared. Shotgun shots not only do a lot of damage, but are also extremely accurate. To successfully evade a shotgun shot, you need to jump away at the end of the tell-tale ‘twirling’ sound, rather than in the middle. Shotgun-wielding Maris are fairly rare on Normal mode, but become a common sight on Hard/DMD modes.
The Marionettes have a suprisingly large number of attacks, which are easier to list, really, than to try to squeeze them all into a single paragraph:
– A single or double swipe at you with their weapon (even the shotgun Mari can swipe with its shotgun!). Roll or jump to the side to evade.
– A ‘silent scream’ which sends out an almost invisible ripple. If this hits you when you are standing still, you will be strung up by puppet strings and paralysed. To escape the strings, DT, or, if you don’t have DT, rotate the analogue stick until you break free. (If it hits you while you are moving, you will be knocked back and stunned but not strung up.)
– A leap onto your back followed by hacking at your neck with its daggers or scimitars. Evade by moving away as the Mari makes a leap towards you. Try to avoid triggering it in the first place by not leaving your back or side exposed to a nearby Mari.
– Throwing their projectiles or firing the shotgun. Evade the daggers and scimitars with a jump or roll when you hear the distinctive ‘twirling’ sound beforehand – or fire fast with E&I; to deflect them. The shotgun shots, as already mentioned, are extremely accurate and require more precise timing to evade – if in doubt, a wall-jump is safer than a regular jump.
– A fast glide along the ground towards you, finishing off with a swipe. Just jump out of the way or greet the Mari with a High Time as it reaches you.
– A spinning dash, where the Mari begins spinning round and round, gathering speed as it makes its way across the room in a curving trajectory towards you. You can interrupt it with a Stinger or even a regular slash, but it’s safer to run and jump/wall-jump to evade until the Mari finally falls down. If you ever see a group of light blue Maris (which happens mainly in Hard/DMD, I think…), then they are particularly prone to doing spinning dashes.
Despite their large array of attacks, Maris aren’t very difficult enemies to destroy. Use regular sword combos, keeping an ear out for the sound of offscreen projectiles. Later on in the game, grenade-rolling and/or DT abilities such as Vortex, Air Raid, Inferno, etc. will lay serious wastage to groups of puppets. As an amusing diversion, if there is a shotgun-wielding Mari in the group, you can bait it into shooting at its fellow puppets and killing them for you – just stand in between it and another puppet and wait until it twirls its shotgun… then jump aside.
The Bloody Mari is listed as a separate enemy in the enemy files, but I decided to include it with the Marionettes since it is just basically a Marionette with more health. The only other difference is that it will regularly parry your sword slashes, which the other Maris won’t. If a Bloody Mari parries you, roll to the side to evade its counter-swipe. Alternatively, if you hold down R1 whilst attacking, you should be able to recover fast enough to attack again before the Mari can hit you. To stop it from parrying you altogether, however, launch it or knock it down first of all.
DTed Marionettes get one hell of a defense boost. They also become immune to being launched, knocked back or stunned until you DT yourself, whereupon you can do those things to them again. The only time you ever need worry about DTed Marionettes in an SB game is in Mission 1.
Nobody
First encountered
Hard/DMD mode: Mission 17, corridor
Normal mode: Mission 19, mirror world
These denizens of the Underworld used to give me the creeps quite severely. You can truly see Resident Evil’s origins (DMC1 was originally slated to be RE4 until it became its own unique game) in these hooting, somewhat repulsive, creatures.
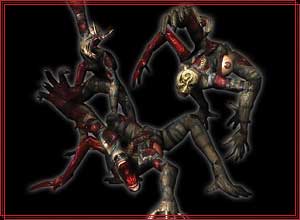
Nobodies come in two forms: small and large. The small Nobodies make themselves large by putting on a mask. To make a large Nobody small, shatter its mask. (Stingers/Kick13s work, but take rather a long time.) You can also try Air Raiding a large Nobody to turn it small, too. But let’s face it: Inferno pawns Nobodies of any size.
Meleeing large Nobodies is insanely annoying due to their jerky, unpredictable jump kick, which is almost impossible to evade. They like to grab you with their ‘arm’ which grows out of their back and bash you about. They also have a charming habit of laying decomposing eyeballs on the ground, which roll around to get closer to you and explode upon impact – you can make them pop from a distance with gunfire or with a partially charged Roundtrip. As if all this weren’t annoying enough, the large Nobody likes to do a hooting jig which drains your DT really fast – however, it will only do the hooting jig at long range or when it’s out of sight.
However, it’s still possible to melee a large Nobody if you can get behind it. When behind it, stun it into submission by raping it repeatedly with Stingers up the arse until it dies: not even a Nobody deserves that fate, but there you go… >_>. Ironically enough, you can also easily get a ‘Stylish’ combo rating this way, despite it possibly being the least stylish thing imaginable… <_<.
The small Nobodies have considerably fewer attacks than the large Nobodies – all they can basically do is a swipe if you get too close to them. They move around in a rather jerky way, though, and can be difficult to hit with a Kick13 or a Magma Drive – use a High Time instead, which rarely misses. The High Time won’t launch them, but it will prop them up on their hind legs – you can stand in front of the propped up Nobody and sword-cancel it until it dies.
As mentioned already, Inferno pawns Nobodies. A single Inferno will always shrink a large Nobody and can just about kill a DMD Nobody – if the first one doesn’t kill it, however, the second one most certainly will. You can also use grenade-rolling or shotgun-twitching against Nobodies of either size – shotgun-twitching takes freaking forever, but it is safe due to the fact that it keeps the Nobody stunned.
Plasma
First encountered
Hard/DMD mode: Mission 6, rusty key room
Normal mode: Mission 16, main hall
These electricity-based copycats come in two forms: human or bat. The human form is the same size as Dante and can mimic some of his moves, such as the 4-Hit combo, High Time, roll, uncharged Magma Drive, and uncharged punch. It can also run up to Dante and do a high kick. From long range, it can fire a white laser which strafes horizontally across the room: if it hits any Plasmas in its way, it will hurt them – it’s cool when you succeed in getting the human Plasma to destroy its fellow Plasmas ;p Fortunately for you, the laser is easy to evade by jumping over it as it passes. A human Plasma will occasionally bend over to plant its right fist on the ground and send out crackles of electricity at short range – I’m not sure what the point of this is, to be honest. I’m not sure if it’s ever hit or hurt me. And, finally, upon receiving a blow, the human Plasma can produce 1-3 copies of itself.

The bat Plasma only has two attacks and charges them both up in the same way – when the charging up has finished, the bat will send out either a curved blade which travels in a straight line or a white laser which strafes vertically from top to bottom. Both attacks can be evaded with a roll or a jump to the side.
Plasmas change freely between human and bat form. You can trigger the change into their bat form by getting up somewhere high (such as on top of the biplane in the biplane room) or, sometimes, running away from them – however, be prepared for the human Plasmas to give chase instead! It’s seemingly harder to trigger the change of the bat Plasmas into their human form, but they will do it eventually. You will never get more than three Plasmas at any one time.
Plasmas are highly susceptible to Ifrit. A single Inferno will lay waste to a group of Plasmas – try to get them bunched together first of all and be careful not to land right next to a human Plasma, as it can do a swipe even in the midst of an Inferno blast. An uncharged Meteor 2 shot will kill a human or bat Plasma instantly. In non-DT mode, Kick-13 Lvl 2 is the most powerful attack – 3-4 of them will finish a human Plasma off.
The enemy files has this to say about Alastor and Plasmas: “Alastor is the form of “Spirit of Lightening”. It only obeys commands of the chosen one. Hence, the powers of the Alastor do not work effectively against the Plasma.” Pfft, bollocks. Plasmas aren’t nearly as resistant to Alastor as Frosts are – in fact, they go down very quickly to DTed 4-Hit combos. The main reason I don’t recommend Alastor is because it is virtually impossible to melee the human Plasmas without them sneaking in an unavoidable hit. Vortex 2 is powerful, but the Plasmas have an annoying tendency of wriggling away from it. Air Raid I’m, uh, not sure about.
If you have no alternative except to use Alastor, then target the human Plasmas first – if you don’t take them out pretty quickly, they will produce copies of themselves upon death. Stinger is a good knockback move – use it to stun the Plasmas and make them stagger back. Then use DTed shotgun or E&I; blasts to finish them off. For the bat Plasma(s), charged DTed Roundtrips or DTed grenades/shotgun shots/E&I; are the way to go.
The human Plasma’s duplication processes remain a mystery, and even seems to vary from area to area. For example, the one in the main hall in Mission 16 never splits apart (if you jump onto the staircase, the bat always turns into a human), but the one in the biplane room splits apart at the slightest touch frequently. At any rate, if you want to kill a group of human Plasmas without any of them splitting, you will have to kill them near simultaneously, e.g., with an Inferno. Also, when a human Plasma splits apart, the original Plasma will retain its current health, but the duplicates will be at full health. (You can tell how near to death a Plasma is by how dark it is – Plasmas get darker as their health decreases.)
Sargasso
First encountered
All modes: Mission 3, underwater
I guess the enemy files sum up these skulls better than I can: “They hide between the edges of the sea and the Underworld, waiting to feast on stray wanderers. The spirits of the victims are destined to wander the endless sea of the Underworld.”

Sargassoes come in two forms: the small white skulls and the bigger patterned skulls; however, the only difference between the two types is that the big skulls have more health. As for attacks, there are only two: a bite at close-range and an icy breath. The icy breath has a rather long reach but is narrow in width, so move to the side to evade it.
Small DMD Sargassoes can be dispatched in one of several ways: a single shotgun shot, a Stinger followed by a shotgun blast or a couple of slashes, a grenade, or an Air-Hiked downward slash. Normal/Hard Sargassoes will require a little bit more to finish them off, e.g., an extra shotgun shot or a couple of extra slashes.
In Mission 3, you can go around in a nice little circle – use R1 to lock on to the nearest Sargasso, do a Stinger (Lvl 2) followed by a couple of slashes, swivel around, do another Stinger followed by a couple of slashes, and so on – as long as you don’t break the combo, you can reach ‘Stylish’ by the last Sargasso. For Nightmare’s Underworld, however, the Sargassoes are too widely spaced apart for you to be able to combo them like that.
Large Sargassoes can be dispatched with a simple grenade > Stinger/Kick13 > grenade combo.
Shadow
First encountered
Hard/DMD mode: Mission 2, hallway
Normal mode: Mission 4, fountain room

Shadows, for all their indisputable greatness, are relatively simple creatures. They look like cats and act like cats. If you don’t madden them by shooting at them, but instead stay still, they will calm down to the point where they circle warily around you – sometimes they will get close to you, only to jump back suddenly. At any rate, here is a brief list of their attacks:
– At close range, they will morph into a giant “glove” and either try to take a huge bite out of you or grab you and smash you several times on the ground. Jump or roll away to evade.
– They will melt into the ground and send several vertical black spikes coming up out of the ground, one after the other. To evade, just keep running without doubling back on yourself.
– At mid to long range, they will send out a very long horizontal spike – just jump away to evade. Much more will be spoken about this attack shortly.
– At mid to long range, they will leap up into the air, out of sight, and morph into a giant sickle. They will then hurl themselves at you with tremendous force. Jump or roll to the side to evade, but not too early.
Whenever the Shadow melts into the ground and becomes a “puddle”, watch out – it will either stay put and send out the vertical spikes or it will travel towards you and then rise up out of the ground to try and grab you. The Shadow is invincible in puddle form, so don’t waste any time shooting at it.
Exposing/attacking a Shadow’s core:
To expose the core, go nuts with your guns, evading the Shadow’s frequent attacks as you do so. With E&I;, DT to expose the core faster. With the shotgun, use shotgun-twitching to fire more shots. With the Nightmare-Beta, get used to rolling a lot – it’s quite effective against Shadows, but it does drain your DT, which is a bit of a bummer when it comes to the core.
Once enough shots go in, the core will be exposed. Once it is, you can use Alastor or Ifrit to melee it. For Alastor, there is nothing which works better than Stinger – it takes two DTed Stingers to turn a Shadow red. For Ifrit, a DTed Auto-Combo or a few non-DTed Kick-13s work best. The Shadow actually isn’t entirely defenseless while its core is out: when you attack the core, a vertical black spike will come up with each hit. As long as you use attacks which propel you forwards (as all the above do), then the black spikes can’t hit you – just don’t double back on yourself. Once the Shadow has been turned red, you can run away to safety – or stay to do a taunt. (Yes, there is time.) Move a couple of steps forwards or roll to the side first to throw off the defensive spikes, then do a double taunt. If another Shadow is close by, you may need to break off the taunt to evade, but otherwise you should get time to complete it.
Getting a Critical Hit:
Before I go any further, let me just say you cannot get a critical hit in DMD mode. However, the technique is still useful, especially for fighting DTed Shadows at long-range.
To prepare for a CH, do not shoot at all, as that will just make the Shadow rush towards you, which is what you don’t want. Instead, walk around at mid-range distance from the Shadow, holding down R1. This will calm the Shadow down to the point where it will only do its two long-range attacks: the horizontal spike or the sickle attack. If it does the latter, just evade. If it does the former, then get ready – the Shadow will stop and its face will start to dissolve. Get in front of it, wait 1-2 seconds, then – just before the spike is sent out – jump straight up. If your timing was correct, you’ll land down on the horizontal spike underneath you. On the spike, remain where you are (it’s hard to walk along it without falling off) and fire E&I; as consistently fast as you can (DTing doesn’t give you any advantage here – if anything, more of your bullets seems to miss in DT mode). If enough bullets have gone in, the Shadow will turn red then and there, while you are still on the spike. One final thing to note is that it mostly doesn’t matter where you stand on the spike, but you shouldn’t be too far at either end, as you might not be able to turn the Shadow red – aim to be somewhere in the middle third of the spike.
It is easier to get the critical hit on Normal mode than it is on Hard mode. On Normal mode, the vast majority of Shadows can be turned red in one go upon the spike (although you do get the occasional resistant one). On Hard mode, at least half of all Shadows will require multiple standings upon the spike to be turned red. It’s worth the effort, however: you get 290 red orbs for a critical hit kill, as opposed to around 50 red orbs for any other type of kill. Interestingly enough, you get 10 extra red orbs for every time you stand on the spike and shoot.
The horizontal spike technique can be used against DMD Shadows as a means of weakening them: if you stand upon the spike and fire E&I;, then DT as the spike retracts and fire DTed E&I;, the Shadow should expose its core almost immediately afterwards. This is the safest method for taking on multiple or DTed Shadows.
Evading a dying Shadow:
You run! Air Hike isn’t a necessity: whenever the Shadow lunges forward to grab you, just jump over it rather than away from it. That’s because the Shadow can’t grab you while you are jumping over it – it will just go harmlessly through you instead. To make it even easier, you can fire a few E&I; shots to suspend yourself – again, the Shadow won’t be able to grab hold of you. (This actually comes in very handy if you’ve slightly misjudged a jump.) Heck. And, finally, just making a run for it will sometimes work – if you get far enough away, the Shadow ‘forgets’ you and just waits around to explode instead.
Fighting multiple Shadows:
Really, everything I’ve said above also applies here. It’s just that it’s harder now because you’ve got more than one Shadow to deal with. I would say their most dangerous attack is the one where they turn themselves into a sickle and hurl themselves at you – it’s quite easy to get hit by an-out-of-sight Shadow throwing itself at you whilst dealing with the Shadow that you can see. I don’t have any surefire remedy for this, except to keep a track of the Shadows at all times – depending on where you are fighting, however, the camera angles can make this next-to-impossible. Sometimes you just have to develop a ‘sixth sense’ in evading Shadows’ offscreen attacks. If in doubt, just keep running and jumping. Luckily, most attacks are fairly straightforward to evade, even with two or three Shadows on the go.
Turning one Shadow red while another Shadow is prowling around can be rather tricky: the auto-targeting system loathes and despises you. If you are attempting to stand on the spike of a Shadow, you will find that the other Shadow frequently wanders in close and draws your fire away. There There is no other way of dealing with this, other than to just keep on trying to jump on the spike of the Shadow closest to you and hoping that the other one doesn’t interrupt.
When one Shadow has its core exposed, have a look to see what the other Shadow is doing first before rushing in to attack the core. You may need to evade a long-range attack before you can attack the core. Alternatively, if the other Shadow is too close by, you may not even be able to attack the core at all – in which case you will have to let the first Shadow recover. Sometimes you can maneouvre yourself into a better/safer position for attacking the core – if that’s the case, don’t hesitate to do so.
Evading one dying red Shadow and one normal Shadow is fun! Good luck!
EDITOR NOTE: I had to edit this section a lot due to it going over the character limit so some of the original text is missing, however, only fluff was removed, actual strategy is kept intact.
Sin Scissors
First encountered
All modes: Mission 2, library
These cackling scissor-wielding ghosts are the much easier cousins of the sub-boss, the Death Scissors. They are fond of trying to snip at you with their scissors in various ways.
Wall-jumped or Air-Hiked DTed downward slashes will soon dispatch the Sin Scissors. Or you can blast away with the shotgun to stun a group of Sins and eventually kill them. And, finally, you can get a critical hit on their weak spot: their masks. Indeed, mastering the critical hit method is VITAL for success in Secret Mission 1 in Mission 3. The below is a step by step guide to CHing Sin Scissors:
– Wait for the Sin to open up its scissors horizontally, then, in non-DT mode, slash once at the inside of the scissors. This will send the Sin into a stunned pose.
– When the Sin is stunned, run forwards, swivel clockwise, then take a single shot with whichever gun you have equipped: E&I;, shotgun or grenade gun.
– Alternatively, when the Sin is stunned, run diagonally left (from Dante’s POV), and then take a single shot without swivelling first – Dante will automatically swivel to target the Sin’s mask. This method gives you a teeny bit more time.
– Yet another method is to walk diagonally left, strafing the Sin with E&I; gunfire as you go
– You will know if you have got the CH if 4-5 small red orbs appear before the Sin’s body disintegrates.
– If you fail to get the CH, then you can keep trying until you do. It doesn’t matter if you damage the Sin. It can be at the brink of death and it doesn’t matter; only the finishing blow needs to be a critical one.
– It doesn’t matter if the Sin DTs in DMD mode; it’s still just as susceptible to the CH.
– You will get ~43 red orbs for a CH kill instead of the usual 20. Woot…? >_>
Sin Scythe
First encountered
Hard/DMD mode: Mission 2, fountain room
Normal mode: Mission 5, staircase tower
These cackling scythe-wielding ghosts are found throughout Normal mode, but there is a dearth of them in later difficulty modes – they have tended to have been replaced by their stronger cousin, the Death Scythe.

Anyway, they are almost stupidly easy to kill with shotgun shots or Air Raid. Which is just as well, since their scythe attacks are infuriatingly difficult to avoid. Having said that, though, they can still cause problems in areas where there is little room for maneouvre and they can hide behind the walls; namely, the spike trap area in Normal Mission 15.
Interestingly enough, you can get a critical hit against Sin Scythes in exactly the same spot as you can with their close relatives, the Sin Scissors. (See above.) However, the only worthwhile reason for doing so is to fill out the last paragraph in your Sin Scythe enemy files, since getting a CH against a Sin Scythe is an incredibly frustrating business – deflecting their scythe isn’t particularly difficult; deflecting it close enough to the Sin Scythe so that you can get a shot at its mask is. Although not certain, I don’t think you even get any more red orbs for a CH kill, unlike with Sin Scissors.
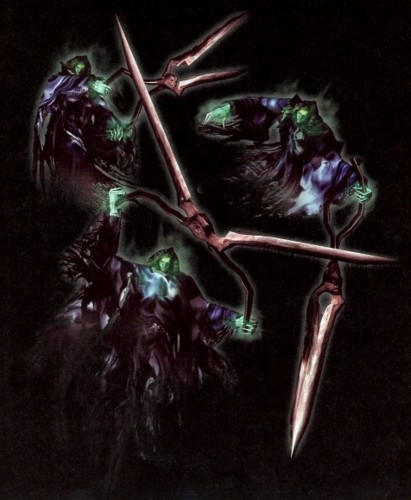
Underwater Blade
First encountered
All modes: Mission 12, Ghost Ship
Underwater Blades don’t have any other attack except firing projectiles made out of blood from their claws. If you keep shooting at the Blades which are in front of you, your shots will deflect their projectiles and prevent you from getting hit.
You can’t get a critical hit against Underwater Blades. In fact, you can’t do anything except swim around and shoot. The Blades can bear down on you rather quickly; if this happens, swim backwards by holding down R1 + triangle + analogue stick back, then start firing once you’ve put some distance between yourself and the Blade.
Underwater Sin Scissors
First encountered
All modes: Mission 18, flooded basement
These are probably the rarest enemy in the game, given that you only get them in one mission for all difficulty modes. Generally speaking, just swim and shoot until they die. More specific info is given in Mission 18, though, as, on DMD mode, it’s important to take out the underwater Sins before they DT. Fortunately, Blades and Sin Scissors are the only enemies you encounter underwater, as DMC1’s underwater sections aren’t that great really.