Overview
Here’s is a detailed guide for Deedlit in Wonder Labyrinth that includes full maps for each stage with all item locations, a list of all shop items, and a list of all enemy drops. There are general game tips and further details for finding various items.
Introduction
Welcome to the Deedlit Guide! The Wonder Labyrinth is a beautiful place to explore and I encourage you to do so without the help of this guide. However, if you’re lost, curious or a completionist, I’ve got you covered. Below are some tips and maps of each stage that outline all collectible items. Locations are color coded for easy recognition and numbered for ideal flow.

Gameplay Tips
Here are some tips to help with your exploration of the Wonder Labyrinth. Any item that is numbered with # represents a location on the maps below.
-
Breakable Walls
To find most hidden locations, marked red on the maps below, look for cracks in the walls (pictured). There are 11 breakable walls with weapons and upgrades hidden within. 2 hidden areas are not behind broken walls and are in the floor (#5) and ceiling (#37).
-
Ghim’s Shop
Be sure to visit all of Ghim’s shop locations as his stock will not update with new items for each stage without doing so.
-
Sylph (#2)
You are able to attack while using Hover when the Sylph (Wind) element is selected. Meaning you can float and attack simultaneously.
-
Salamander (#3)
Using Slide with the Salamander (Fire) element selected will allow you to pass through enemies unscathed. Very useful for avoiding confrontations.
-
Mana
Mana is a resource that is consumed by using spells and your equipped bow. If you’re not paying attention, you may find yourself running out of mana frequently! Thankfully, there are a couple of ways to gain MP. Firstly, but not the most convenient in some cases, save points will replenish your MP to full, useful if you’re near one. Secondly, and the main source of regaining MP, is absorbing the same element you’re currently using. So if an enemy or boss throws wind (blue) spells at you while you are using Sylph, Deedlit will absorb the spell and convert it to MP. Likewise, if you find yourself near an elemental chain that is blocking your path, Deedlit can stand in them to gain MP.
-
Wind and Fire Power
Deedlit’s spirit (elemental) power effects her overall damage output with swords, bows, and Deedlit’s elemental buddies, Sylph and Salamander, ranging from levels 1 – 3, with 1 being the weakest and 3 being the strongest. This power can be increased by finding Spirit of Wind Up and Spirit of Flame Up viles at locations #28, #31, #38, and #51. These upgrades will not increase how many spirit levels you can have, instead they simply increase it’s effectiveness passively. On the pause menu, you can see how many wind and fire upgrades you have acquired.
-
Killing Monsters for Money
Killing monsters obviously grants Deedlit with experience points for gaining levels and as described once you’ve acquired Sylph (#2) and Salamander (#3), elemental levels that increase damage output. But what may not be apparent initially, killing monsters also gives you gold, which is shown in the pause menu or at the top center of the screen during game play.
-
Level Up
Leveling up is a common mechanic and in Deedlit it’s not a complex issue, however, some clarification may be beneficial. An increase in level will not increase HP or MP. Those upgrades are found throughout the Wonder Labyrinth, namely in hidden rooms behind breakable walls. What levels will increase though, is damage output and defense, making it easier to defeat enemies and helping to mitigate damage from said baddies. Deedlit’s level number in the top left will fill up as she gains EXP and yes, the level cap is 99.
Max level 99. Max HP/MP 150. Max Attack/Defense 29.7. Max Fire/Wind up 3. Max map 100% -
Enemy Dice
When attacking an enemy, you may notice in the lower right corner a text field appears with the enemies name and dice with symbols. This displays the enemies weaknesses and strengths. Blue dice, 1 – 3 are weaknesses and red dice, 4 – 6 are strengths. The elemental symbol above that dice signifies what the strength or weakness is. So, an enemy with a red 4 or 5 with fire means that using Salamander will not be as effective against them and an enemy with a red 6 fire means that enemy will not take damage from fire at all.
Simple, yet complex. If all else fails, just keep hitting them. -
EXP Grind Dialog
Fun dialog that was introduced in the Stage 3-4 update. There is an area before Boss 2 (#15) with 7 Dragon Tooth Knights that respawn indefinitely. It is possible to gather them up and simple kill them over and over for easy XP and levels. Now, if you do this, Deedlit will stop to say, “This is not how I should be gaining experience for levels. I should reflect on that.” This doesn’t hinder progress, just a cheeky nod from the devs. This will also happen when farming the Oak enemy, in Stage 6, for the Soul Crusher.
NOTE: EXP grinding seems to have changed as respawning mobs don’t offer as much EXP now, nor do the large plant mobs that made it easy to level. -
Stonks!
More fun dialog and easy money gains. Courtesy of @fredfig, there is an easy way to farm up piles of gold, way more than you could ever use. Go to the Gambler, Woodchuck, in Stage 2 and put in large bets on numbers 9, 10, 11, and 12. If you win, get a massive profit (be sure to save after winning). If not, reset game and try again. As of update 0.6.2.9, if you reset the game to gamble again too many times, the Gambler will comment on you cheating and if you continue to do this even more, the gambling game will go on cool down for a while.


Item Acquisition and Tips
Here is some additional information on how to acquire some of the more hard-to-find weapons along with some tips to accompany them.

-
Soul Cruncher (#5)
The Soul Cruncher is a hefty upgrade if you grab it asap! The center tile of the floor above this location has to be jumped on 50 times in order to gain access. After 40 jumps, the floor will begin to shake letting you know that what you’re doing is working.
-
Iron Claw (#30), Katar (#26) and Boss 4
Either of these items will make short work of Boss 4 (#32), but the Katar does a fair bit more damage. To damage this boss you have to be using the Sylph (Wind) elemental, but if you hover (hold jump) and attack at the same time, you will avoid almost all attacks from the boss. Easy mode.
-
Invisibility (#37)
This one can be tricky, but is relatively easy. The access point is in the room below. Look up and you’ll see that the UI in the top left is blocking the ledge and entrance in the ceiling.
-
Kashue’s Bow (Stage 3 Bow Challenge)
With 34 attack power, this bow is one of the strongest bows in the game and can be obtained by completing the Bow Challenge with an S ranking: The Bow Challenge is located near King Kashue in Stage 3. The challenge is a seemingly daunting task at first, however, with practice it becomes achievable. Alternatively, there is a video (By Christian) that shows how to get an S rank easily. Watching this I learned that you can jump up onto the steps to change your shooting angle.
-
Fire storm (#71)
This item appeared after hotfix update 0.6.2.9 and is obtainable early by using some tricky strats in a video made by BlackCat7788 showing how to do this . The legit way to get this item, however, is with the enhanced doublejump, Windstorm (#67) that is found in Stage 5, which will make getting Fire Storm an easy task.
-
Soul Crusher – Kill 100 Oak
The Soul Crusher is the real legendary sword that the Soul Cruncher wish it could be! This item drops off of the Oak enemies, which are the wood mannequins in Stage 5 that will resurrect shortly after being defeated. In Stage 5, there is a long hall with 6-7 of these Oaks and if you gather them up, killing them over and over, the Soul Crusher will be yours once you’ve killed 100 Oak.
-
Vampire – The Lifeless King – Best Weapon!
The Vampire is a pink scythe that drops off the Lifeless King (the wraith enemies) in stage 6 and is the best weapon you can get and is well worth the effort. It has 5 less power compared to the Soul Crusher, however, it has 2 additional speed making it the better weapon of the 2. This weapon’s speed and reach make it the best weapon, hands down.
-
Parn’s Sword – Memory
This is the final weapon you can get in the Wonder Labyrinth and is quite powerful. Though boasting high attack power, it still cannot best the Vampire’s speed and reach. Parn’s Sword can only be acquired by defeating the first form of the final boss, Memory, without taking any damage. So if you’re farming for this item, reset if you get hit. If you succeed, the weapon will drop and needs to be picked up after the boss’s final form spawns in. Once acquired, beat the game and upon reloading your save, Deedlit will have this weapon to use.

Weapon Types
In total, there are 67 (39 melee and 28 bows) weapons in the game that can be acquired. Melee weapons come in 5 different types that affect speed, power, and range. Bows do not have any distinct traits other than their speed, attack, and elemental properties; there are a couple that shoots more than one arrow. Listed below are the different types of melee weapons.
Ghim’s Shop


Item Drops

Map Weapons

Full Map 100%
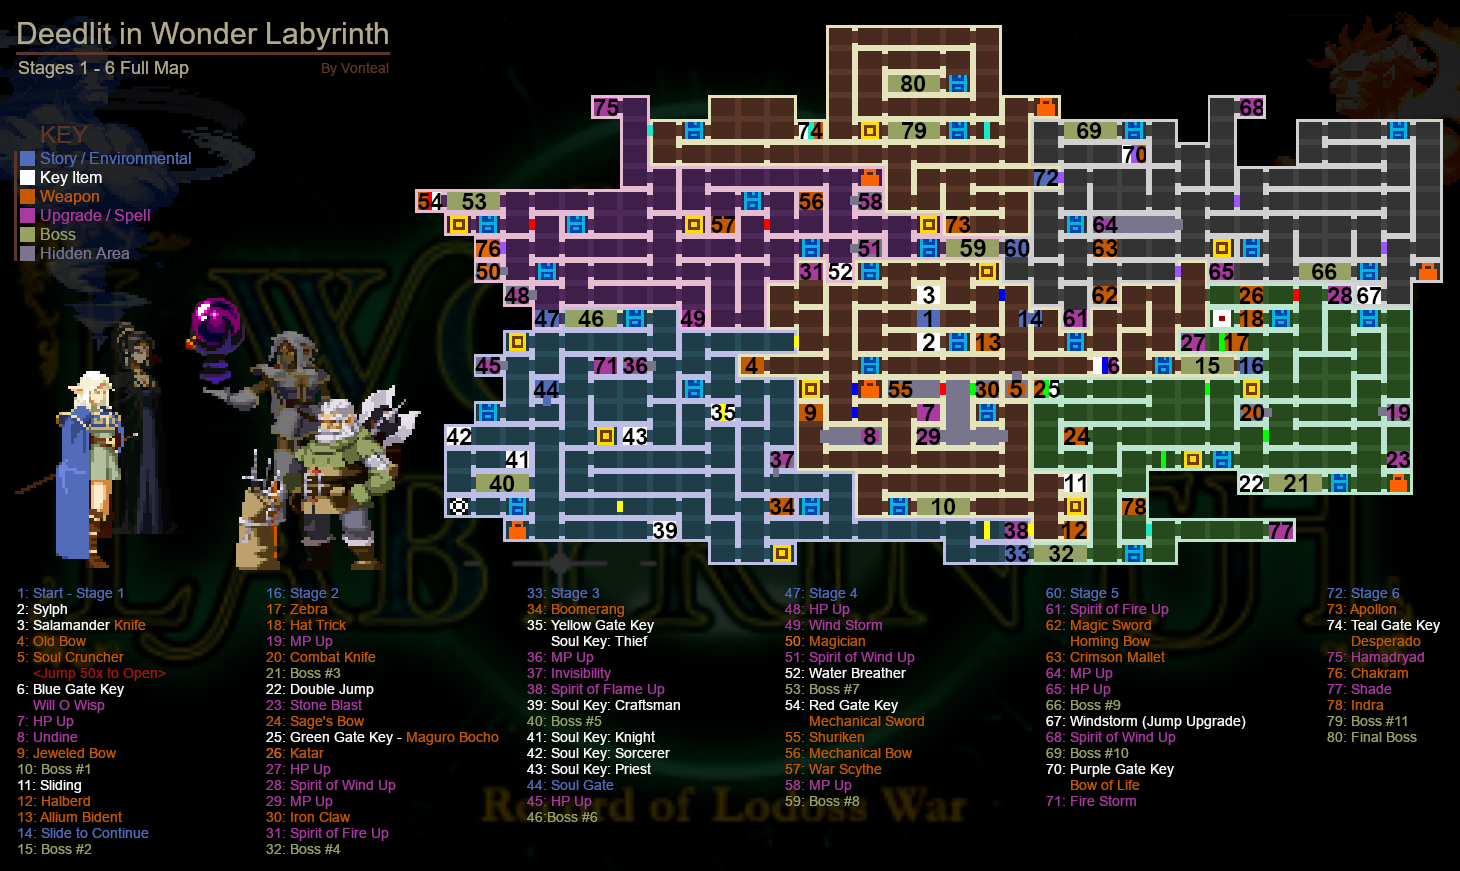
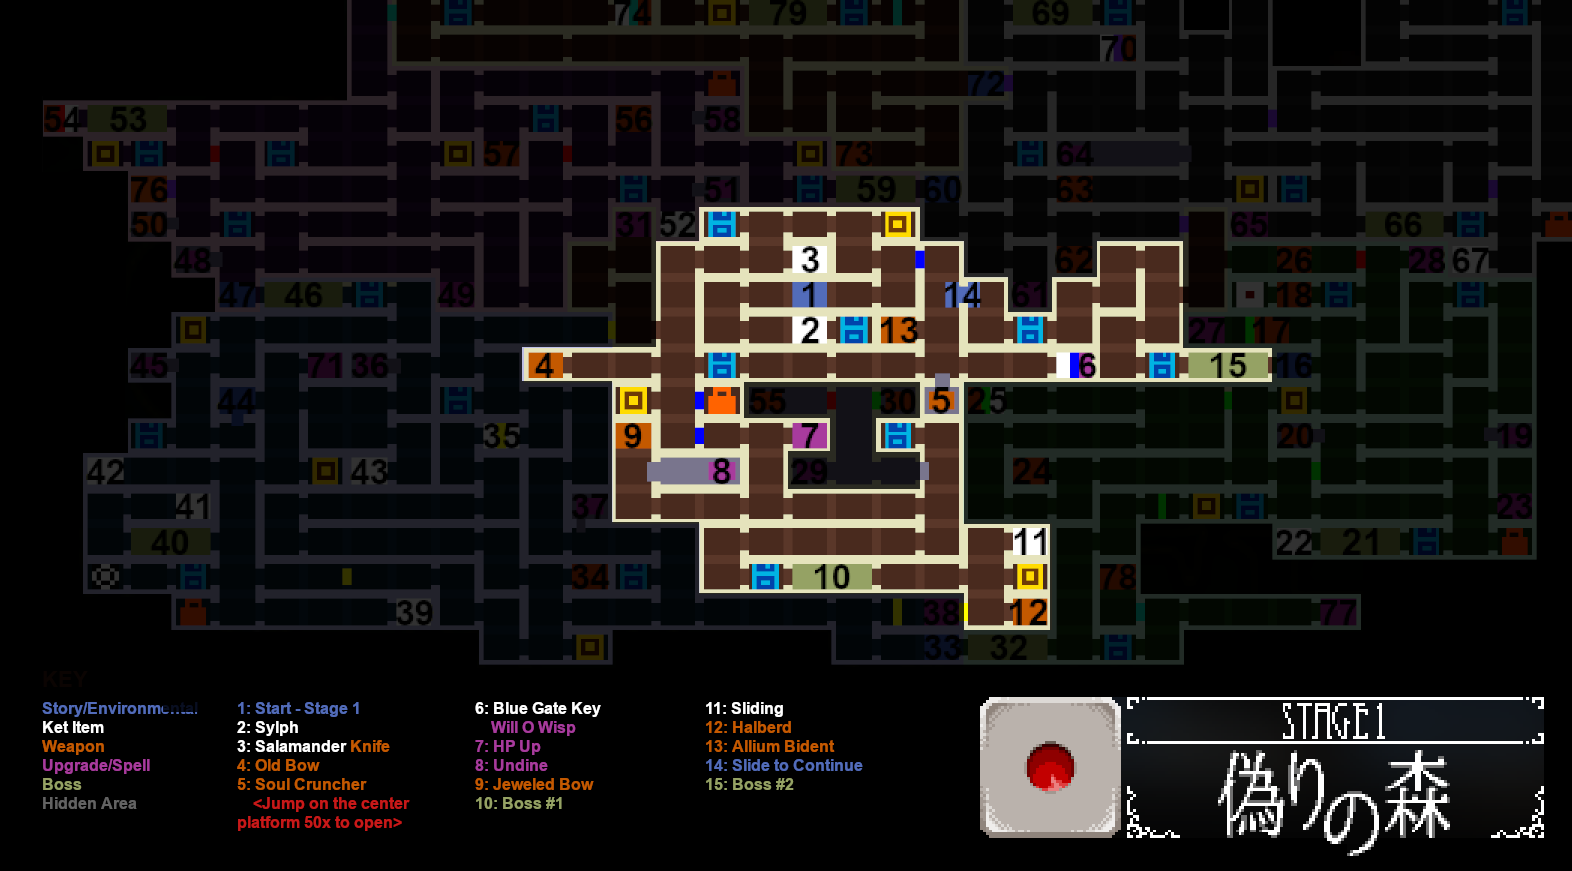
Stage 1 Map
Stage 1 is pretty straight forward overall. Take a moment to jump into #5 for a quick upgrade and obtaining Slide (#11) allows you to gain access past #14.
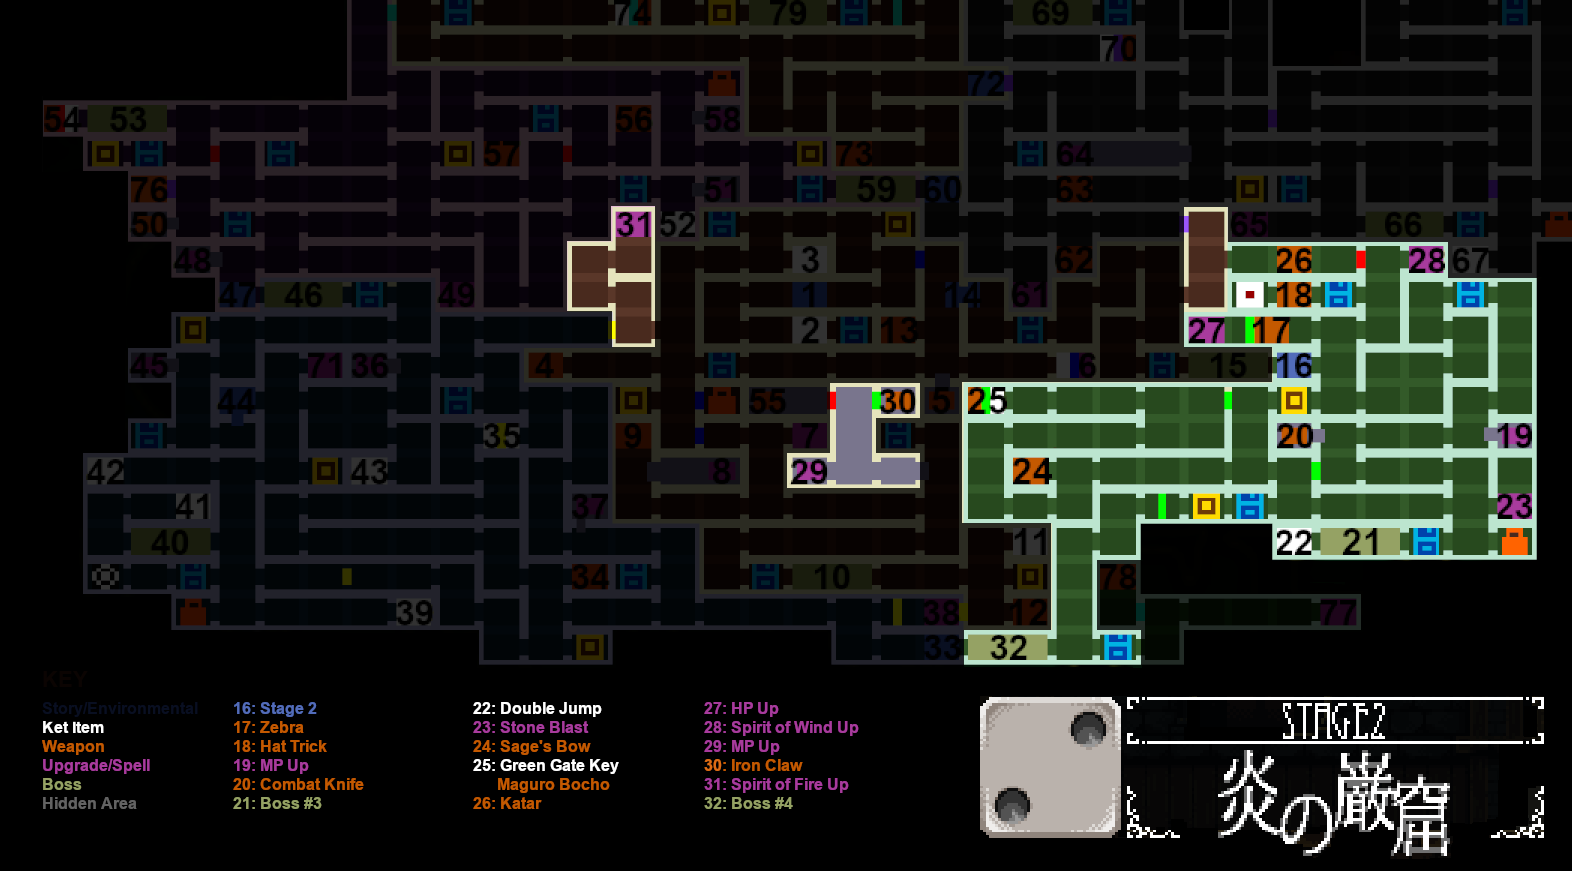
Stage 2 Map
With the Green Gate Key and Double Jump, you can backtrack some to access 26 thru 31.
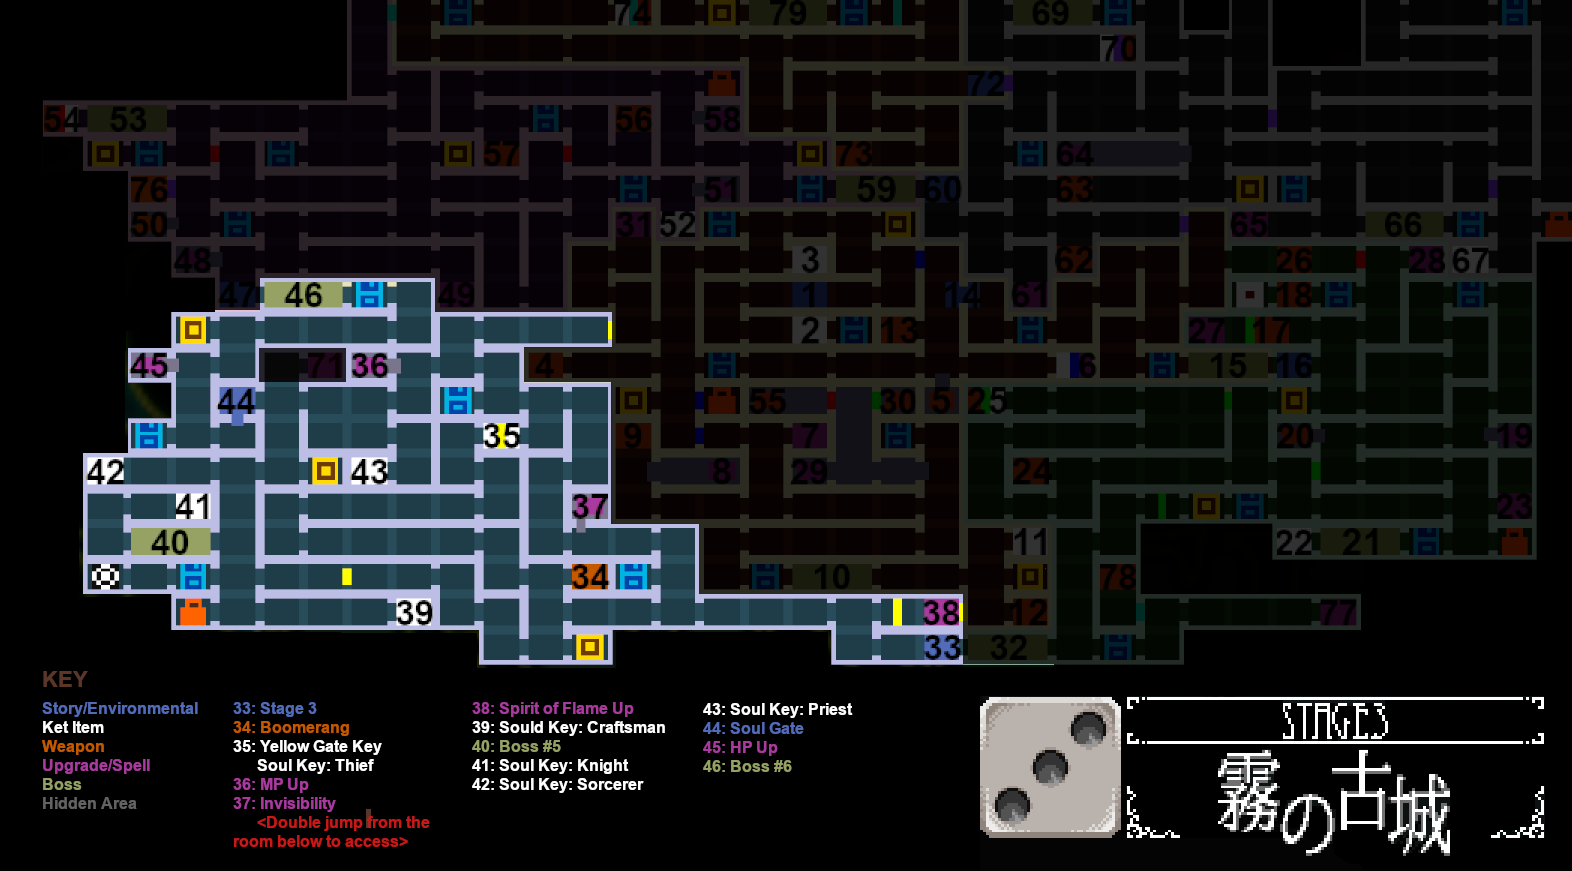
Stage 3 Map
In Stage 3, you must collect all 5 Soul Keys to access the Soul gate at #44.
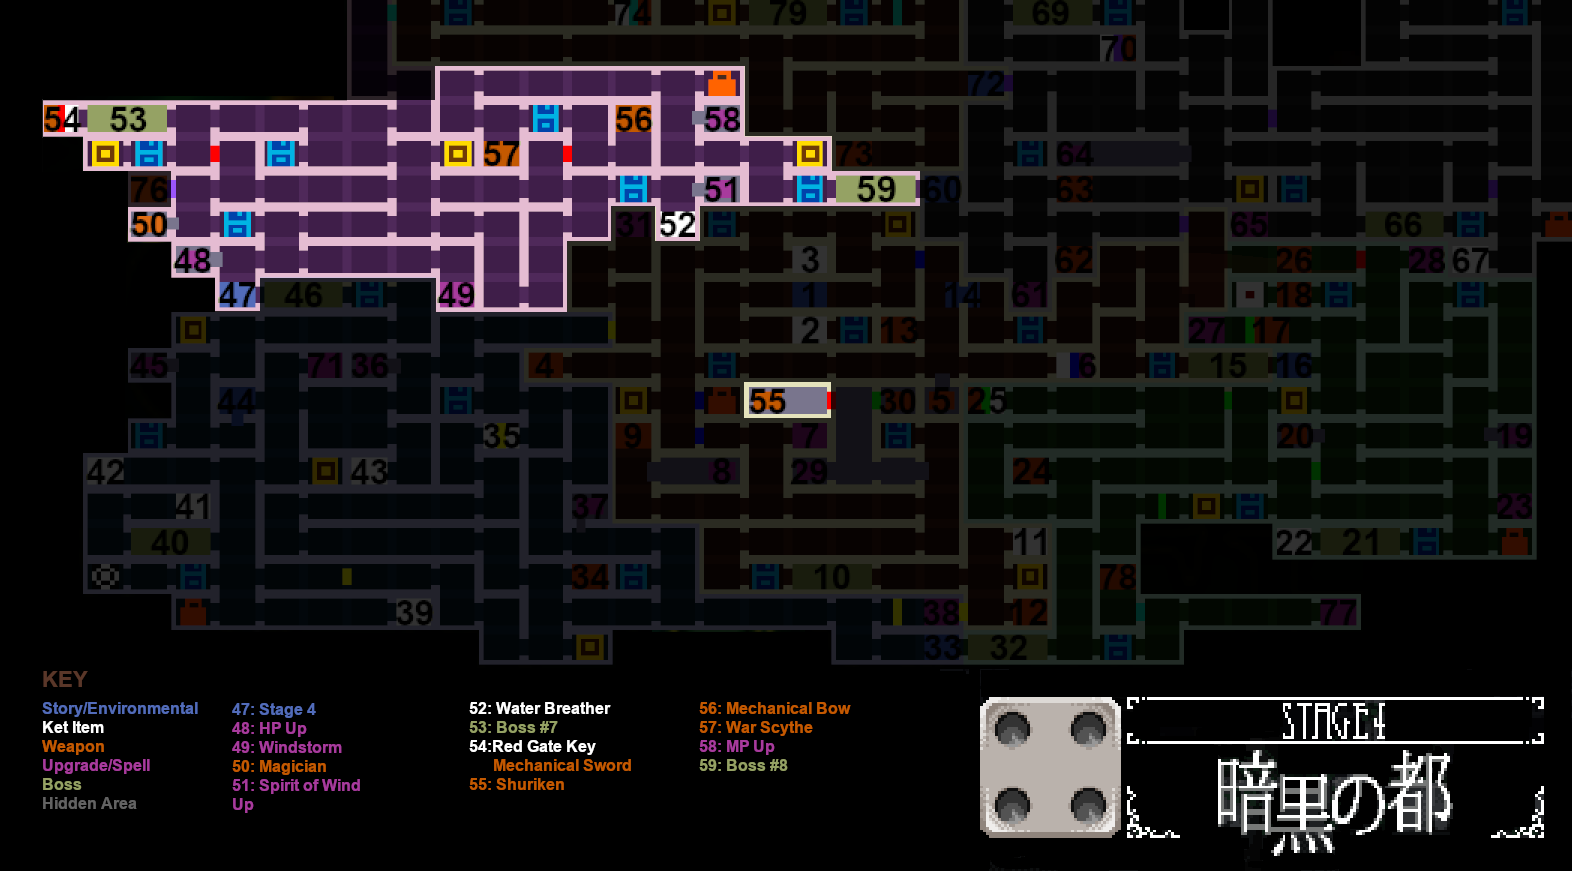
Stage 4 Map
We will gain Water Breathing allowing us to explore more of the labyrinth and with the Red Gate Key, finally gain access to #55.
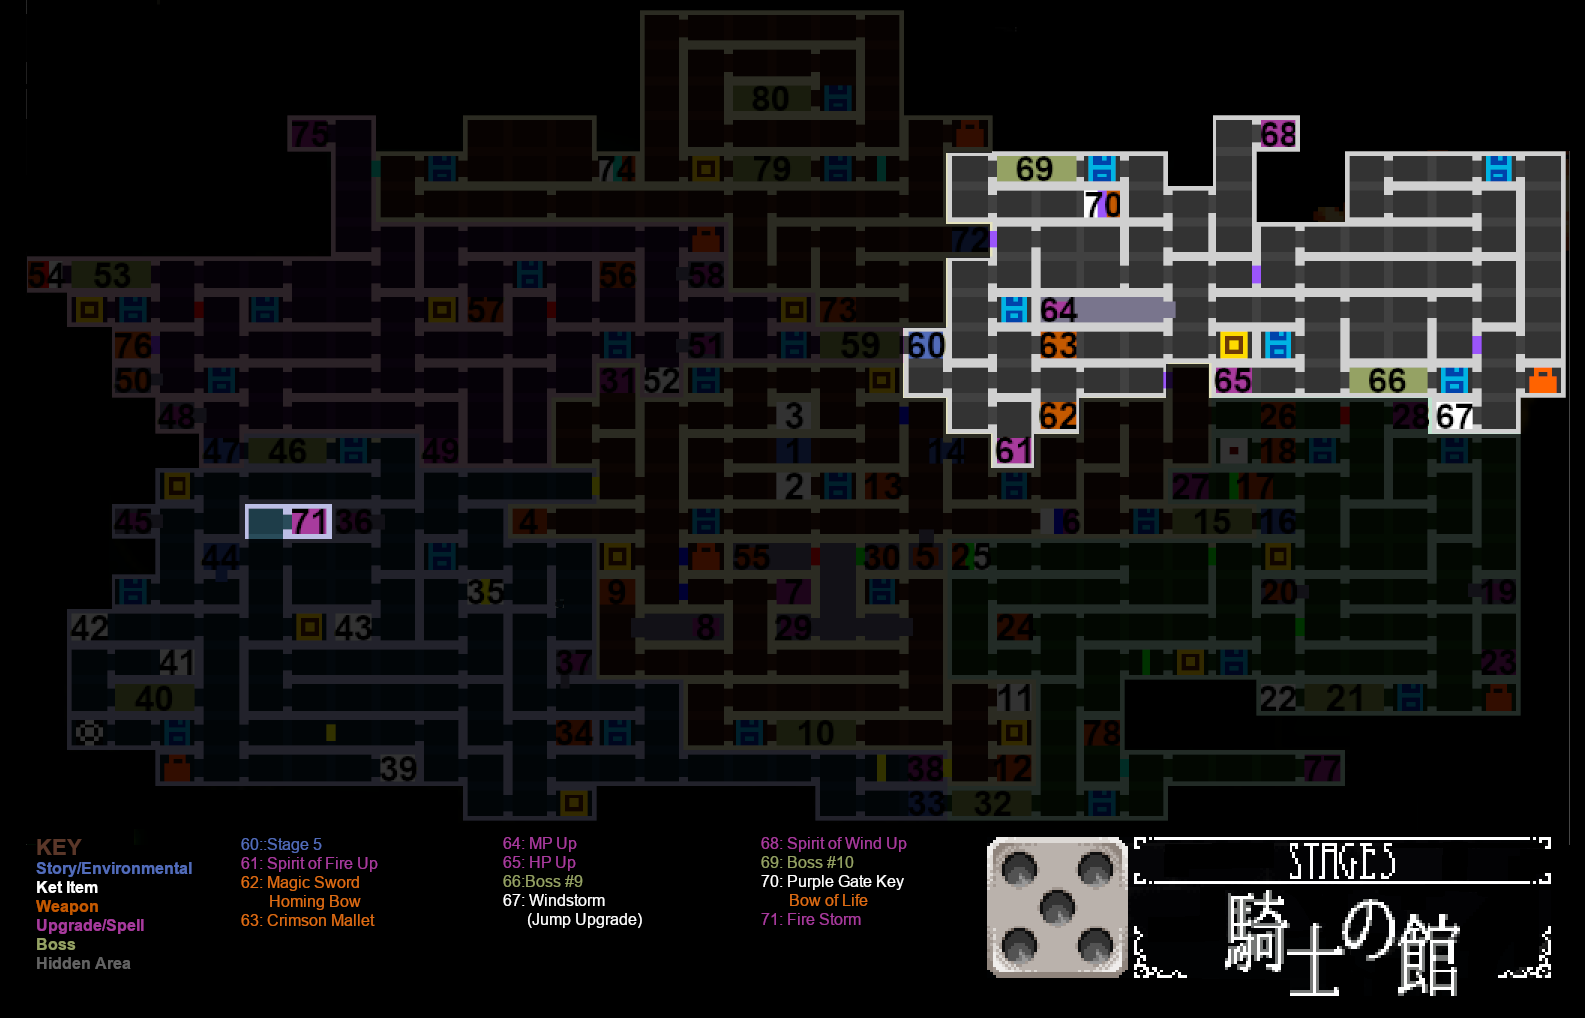
Stage 5 Map
Deedlit gains access to Windstorm (#67) which enhances double jump, allowing her to jump even higher. With this, we can go up to #71 to grab Fire Storm.
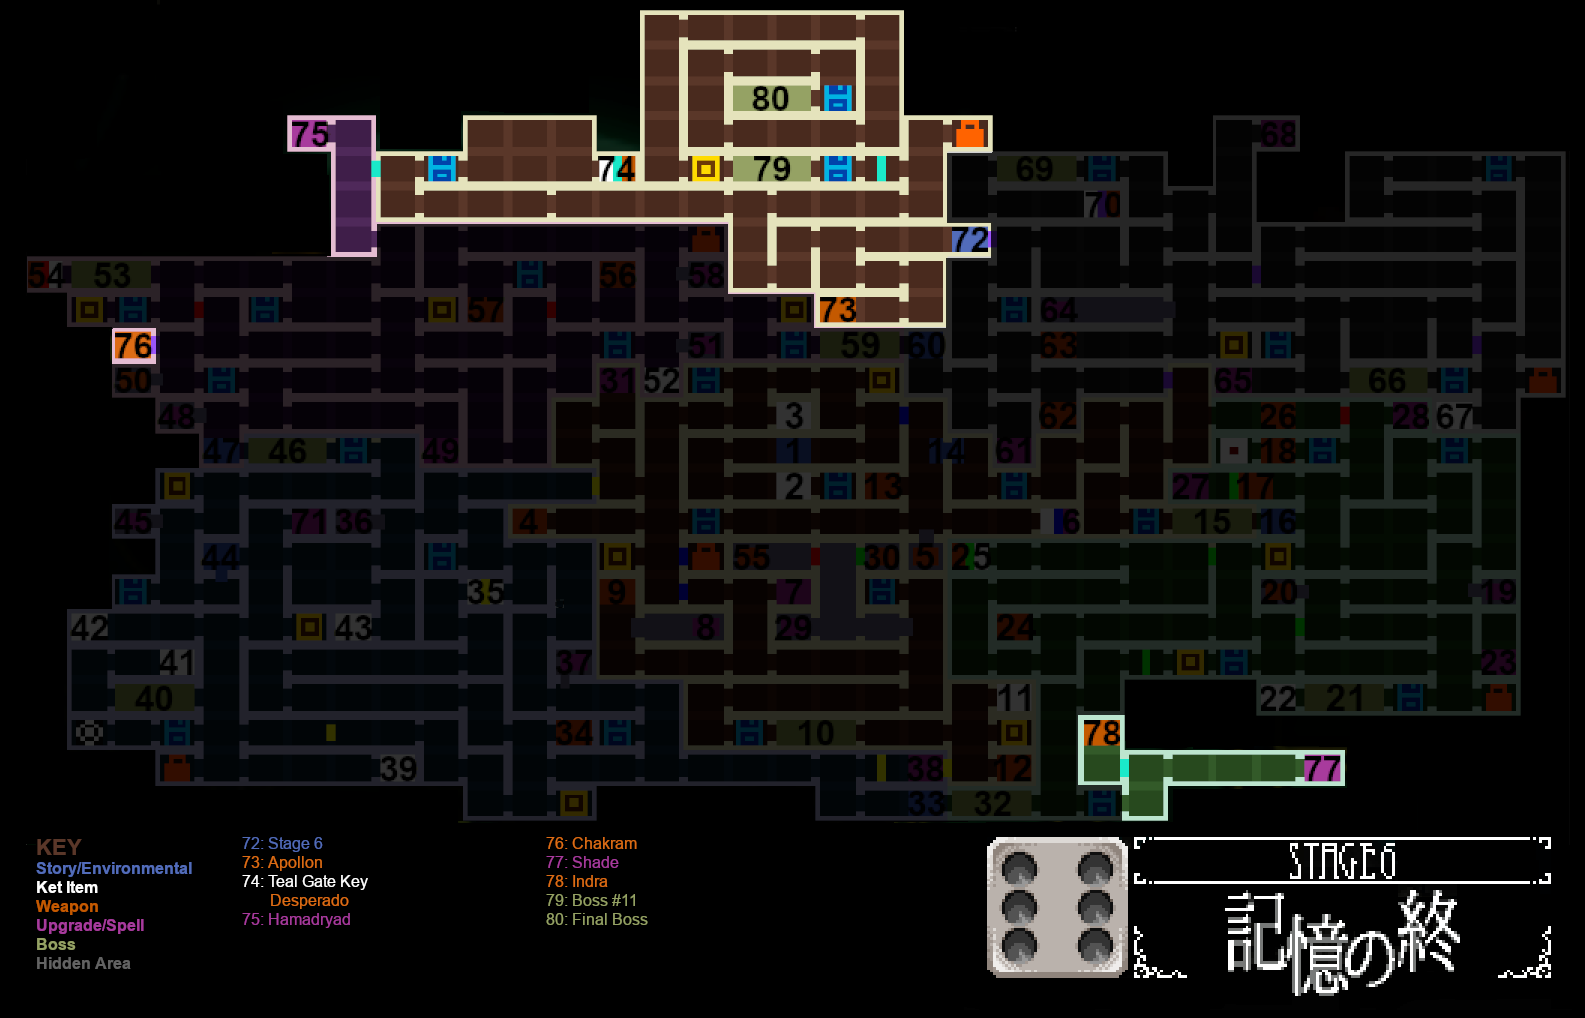
Stage 6 Map
The final push through the Wonder Labyrinth! With all upgrades available, go back to previous areas to gather up any items missed along the way.
This is an alternate ending image when beating the Wonder Labyrinth and have 100% map completion.

After you beat the game, load that save and go back to the starting location for some additional dialogue from Deedlit, who is having difficulty remembering that place.
Thank You…The End
I’d like to thank all of you that helped with the guide, giving various useful tips and information about item drops and their locations. And I’d like to thank all of you who have liked, awarded, and made this guide a favorite! Also, I’m am grateful for all that have used this guide to help them along the way.
This guide was a lot of fun to build and I will continue to update it when new information is gained. Here’s to hoping for additional content to be added in the future. Deedlit in Wonder Labyrinth has been a real treat to play, I have 50 hours played so with many more on the horizon. I hope the devs know that they have made a masterpiece, a game truly enjoyable to behold! Thank you Team Ladybug, Why So Serious?, and Playism for bringing Deedlit in Wonder Labyrinth to life.