
Overview
Walkthrough guide with anything handy I’ve found to complete the gameLinks to other guides rather than repeating information
Basics
*** SPOILERS — This guide contains walkthroughs and screenshots. I’m hoping to only give enough information to prevent you from getting stuck, but things are still a bit spoiled.
- You can use WASD and the mouse (see the menu – Esc, Controls – for more control information)
- You can also use a controller (such as an XBox 360 controller). Still, though this is my preferred method, in some areas, I find I still need to use mouse clicks (for example, picking up Collectibles) and the Control button for Crouch.
- Unfortunately, you cannot fully map your controls to a controller, in many ways this area seems to be bugged.
- Subtitles can be found in the menu (Esc) and work for all dialogue in the game. Some dialogue is not an *exact* match, and sometimes there are very slight typos/glitches in the subtitles (random characters), however, they work quite well.
- There is no option to manually save. The game will autosave for you in certain areas (you will see a cube spinning in the corner when this is happening). When you restart the game, you may not be where you were when you quit, but you should at least be in the same level/dream/nightmare.
- In some areas it can be handy to take screenshots and reference them again. Using the Steam desktop app with Steam Overlay turned on, you can press F12 in-game to take a screenshot.
- You can view these screenshots in-game (even if you just took them) by using the shift-tab menu and opening the Screenshots section.
- When you quit the game, you have the option of uploading them to your profile.

- There is another guide listing the locations of all of the Dream Journal entries here.
- I will link to it in each section for more information. For organization, I will list the dream journal entries found in each area in that area with a link to the guide.
- I have not listed all of the achievements in this guide – only the ones you can obtain in each level. There are a few you can get depending on how you complete the game, etc.
- For more information, see this guide.
Progression of Levels
It can be somewhat confusing at first to grasp how the levels work in Dream.
- You begin the game “awake” (in Howard’s house).
- Clicking on the bed will put you into the “Dream Hub” (a room full of white cubes, your collectibles, and 1-4 portals to the Act dreams).
- Going through a portal in the Dream Hub will put you in the “main dream”.
- From the “main dream” you can access the “side dreams”.
- After completing the “main dream” (and leaving through its exit portal) you will enter the “nightmare”.
- After completing the “nightmare”, you will again be “awake”, and have to enter the “Dream Hub” and choose the Act again.
Howard’s House (“Awake”)
- Eco-Terrorist – turn on all the lights in the house, then go to sleep
- Musician – See this guide here on Steam – play a few notes of a specific song on the piano
- Decorator – open the attic stairs. Once upstairs, click on either box of decorations
- Gamer – click the game in Howard’s room
- Backer – click the Oculus Rift in Howard’s room
- if you want the achievements, get them – see above.
***Note: You don’t need to do them all the first time – You will return to the house many times throughout the game and have the opportunity to get any achievements you missed then.
To start the first dream:
- Walk upstairs to the end of the hall.
- The room with all the posters is Howard’s room (your character).
- Click the bed to start a dream.
Act 1: Desert Dream
- Navigator – complete this dream
- Tear-Jerker – finding the robot toy. See this other achievement guide here on Steam for more information
- Mastermind – complete the graveyard puzzle in ten moves or less
- Runner – turn off all of the lights in all of the mazes without being caught by a smoke
- Coin
- Desert map
- Desert – Near some benches on a hill
- Grave – In the graveyard
- Arcade – Near the piles of TVs
- Smoke – In the rock maze
- Candle – Near a candle in a cave
- Reading – Near a maze entrance that you cannot use
- Cliff – A short hop down from the top of the cliff
- Cave – In a cave near an entrance to a side dream
- Computers – After the computers raise into the air, one platform will extend and retract. Follow it
- Snow – In the Candle cave, once it’s snowing.
- For locations and information, see this guide
- Garden – Get to the Garden by solving the Graveyard puzzle. Follow the signs to the Graveyard. Then solve the puzzle to open the portal. This discussion thread here on Steam goes over several solutions to the Graveyard.
- The Hollow – Follow the signs to The Hollow. You will see a portal in the cave.
- See the map of the Desert at this other Steam guide
- If you are interested in completing the side dreams, achievements, etc, complete those – see above, as well as the sections on Garden and The Hollow for more information.
To complete the dream,
- Use the map of the Desert at this other Steam guide to locate the entrance to the Rock maze
- This other Steam guide has maps of all of the mazes in this level.
- Go through the Rock maze.
- Eventually you will find an exit with many computers in a circle.
Maze Light Puzzles and “Smokes”
- Your goal is to switch off all of the lights in the maze, which is done by simply walking through the lights.
- The “smokes” (ghost things) can be heard and seen. They move in specific paths, and if you watch these paths you may find a pattern and be able to avoid them. You can also simply allow them to “get” you – Howard won’t die, you’ll just restart outside the maze, with any lights you shut off previously still off.
- In the Sand maze, you will have to crouch in some areas (default is Ctrl to trigger Crouch, even if you’re using a controller). In the Rock maze, you can jump over low-lying rocks that Howard doesn’t automatically walk over.
- After some poking around on the only working computer, you will be able to run a program.
- Enter any of the mazes.
- You can use the maps at the other guide., or the method that I used below.
My Maze Method
- Follow the exterior walls to the right. For example, when you enter the maze, make only right turns, and follow the walls to Howard’s right.
- For most of the mazes, this will hit most of the lights.
- If you are reset by a smoke, start taking right turns again until you no longer see any lights to hit.
- At this point, there should only be a handful of lights left. If a smoke grabs you again, start taking turns to the left instead.
- For at least two of the mazes, this will easily get you all of the lights. For the others, you will have to wander around a bit to find the rest (fairly easy for the Gas maze due to its open layout, a bit more of a challenge for others).
Continuing the game
- After completing the mazes, go back to the computer and finish the program. The computers will raise into the air, with you on board. Two of the walkways will lead right up to a clearing where a new dream portal will appear. This leads to the first nightmare.
Side Dream: Garden
- Gardener – Finish the puzzle
- Glowing Stone thing – Stuck in the overturned lawnmower
- A vinyl appears near the entry portal when you complete the puzzle
See this guide here on Steam for a walkthrough!
Side Dream: The Hollow
- (???)
- (none known)
- Vinyl #5 – see walkthrough
Walkthrough
This other guide here on Steam talks more about getting to some special areas in this level.
Because this is a somewhat confusing level, I’ve only included what you need here to get the Vinyl and get out.
- You will pass a wall that says “When the path looks agreeable…”
- Continue straight, then right. You will see another quote (“If enjoyment never falters…”), a chair, and lots and lots of books.
- (skip this if you don’t care about Vinyls) Take a left down to a green-tinted room. Then take a left up an incline. The room is a dead end, but when you return back to where you came from, the hallway will be barred off, with Vinyl #5 sitting on the floor in front of it. Pick it up, return to the dead end, then retrace your steps again to continue.
- From the room full of books, take a right (you will not go up or down). You will reach another quote beginning with “There will be nobody to help them…”, and you will reach what I call the “firefly room”.

- There is a red exit with bars here. See the other guide for more information on this.
- Take the blue-tinted exit, it will lead to a green-tinted room and the floor slopes down again.
- You will reach another quote, beginning, “Keep an eye for the dream dweller…”
- This room is a slight maze, but there is only one way out. Continue to the next room.
- “Keep an ear for the dream dweller…” Go up, then up again, and press the button. “Then pondering while wondering…”
- “He could lay in cot…” Room with bed and black bars – exit is generally by going to the left
- “Then when clarity…” At this point you should reach the exit (blocky dream portal).
- Near the exit is an endless hallway. The endless hallway is also mentioned in the other guide.
Nightmare #1
- Operator – Complete the nightmare
To avoid spoiling everything, I’ll only include what you need to get through.
There is also another guide with more detail and screenshots here on Steam.

- There is a switch in Howard’s bedroom under the clock. Switch it.
- Listen to the answering machine message in the living room.
- Click the phone again. Howard will make a phone call.
- Switch the first and last switches on the music box on the mantle in the living room to “I”.
- Upstairs, in the office, there is a book on the bookshelf that can be tilted towards you.
- Open the three books laying around in this room to the first page.
- The suitcase on the dresser in Howard’s uncle’s bedroom has a combination lock. You should have some numbers to unlock it with by this point.
- A room downstairs has unlocked. Go check it out.
- Is that a trapdoor on the floor?
Act 2: Office Dream
- Problem Solver – Complete the dream
- Cleaner – Look in the last toilet in the men’s restroom on the floor labeled “1”
- Compass – on the executive’s desk
- Blue-white plumbbob crystal – Upon entering the basement (appears directly in front of you)
- Stairs – Take the stairs from the ground floor up (or down to the ground floor)
- Elevator – In front of the elevator on floor 2
- Toilet – In the women’s restroom on floor 2
- Office – In one of the offices on floor 2
- Windows – Crouch through a grate on floor 1
- Kitchen – In the break room
- Pipes – Top floor on the right staircase
- Storage – In the storage room on floor 3
- Laboratory – In the computer room with the portal challenges
- Basement– In front of the elevator in the basement
- See this guide for more information and screenshots
- Roller coaster – Somewhere on floor 1 or floor 2. Search the offices and you will find the portal.
- M.C. Escher World – Take the elevator to the third floor, and go all the way through storage to find the portal.
- If you’re interested in the side dreams and collectibles, see above for completing those things.
To complete the dream
- Get the username and password off of the receptionist’s desk. There is also another guide here on Steam about this.

- Take the elevator to the third floor.
- Explore a bit here and eventually you will find a room full of pipes with a desk in the middle. Howard will comment something about “the pipes seem to culmanate here”.

- Use the logins to log in to the computer, and open the portal program.

- Click a door in this program, then use start > “Back Out” to leave the computer area. Climb the stairs for the portal challenges.

- There are two buttons for each ring on the screen. One turns the ring one way, one turns the ring the other way. Turn each ring until the image lines up.
- Hint: It is probably easiest to start from the outside (the outermost ring cannot be moved), using the buttons on the far right, and work your way left.

- The planets need to be aligned to complete the puzzle.
- To control the planets, have Howard crouch under a dome, then stand. You can then click on the blue-white rectangles to control the planet’s movement.
- The left-most dome only controls the yellow planet. All of the others control two planets. You can see which planet(s) are controlled by the color(s) inside the dome.
- Hints: Start with the dome farthest to the right. Try to align the red planet with the purple (unmoveable) planet. Then try to align the blue and red. Then green and blue (red should be aligned by now), then green and yellow (red and blue should be aligned by now). Then align the yellow planet.
- Honestly, for this puzzle, I kept clicking around until it was solved 🙂
- The screen you click and any immediately next to it will “switch” – if the screen was previously on, it will turn off, and vice versa.
See this Steam guide for more information!

- The objective of this puzzle is to line up the laser lines so that one continuous path goes from the left to the right, for each color.
- The screenshot above shows it solved.
- This challenge has 10 screens on the wall and a button closer to the entrance.
- Press the button and the screens will light up in a certain order…

- Click on the screens in that order to solve the puzzle.
See this other Steam guide for screenshots on how to solve it
Side Dream: MC Escher World
- Master of Ceremonies – Complete the side dream
- Telescope – in the last room with the dream portal on a box – See this guide for more information.
- Follow the stairs – your perspective will change several times over the course of the dream
- In some areas (including the beginning after climbing the first set of stairs) – you will need to crouch under things in order to progress

Side Dream: Roller Coaster
- Thrill-seeker – Finish the side dream
- The vinyl may appear at the end of the ride. If not, see this guide for information on how to get it.
- Follow the path to the roller coaster turnstiles and this sign:

- Use the boards just to the right of the sign (visible in the screenshot) to climb over the barrier. Follow the queue to the roller coaster car. Ride the coaster.
- It will let you out near the benches. Follow the path back to the entrance and exit. Easy peasy!
Nightmare #2
- Minder – Complete the nightmare
- Gourmand – Eat all the cupcakes
Again, to avoid spoiling too much, I’ll just give you enough to get through the side dream.
If you’re okay with some more spoilers, there is another guide here on Steam with more information.
- The footprints will help guide you as to where you need to go in this side dream.
- There are three machines in the house. Press a button on each one (whichever you like).
- Upstairs, have a cupcake.

- Go up in the attic and stop that racket.
- Leave the attic.
- Shut it off again…
Act 3: Resort Dream

- Easter Island Dream – This portal only appears if you first straighten the painting in Howard’s uncle’s bedroom in his house while “awake” (screenshots in this guide). You will see it appear just before the start of the third area in the level.
- Hospital Dream – You must get the teleporter from the safe in the third area first. Use it several times and you will eventually appear at this portal.
- Viewmaster – in the sand near the loungers
- Teleporter – In the safe – using the code from the ringing telephones
- See screenshots and more information at this guide
- Ocean – In the computer room
- Resort – In front of house #14 in the bar/taps puzzle
- Bar – In the room in the middle of the bar
- Beach – In a stall on a “lounger” beach
- Food – In the chalkboard room at the conveyor belt puzzle
- Church – Behind the church altar
- Pier – At the end of the long pier, accessible near the church
- Staff – In the middle of the staff houses in the telephone puzzle
- Stars – After crossing the fourth bridge
- Writing – In the house on the left before the exit
- See this guide for more information and screenshots
When you first begin the level, go straight ahead. This room has a computer inside.
In the computer room, there is a book on the nightstand. Look at the back of the book for the computer login. On the computer is a map of the resort.
After some exploring, you can convert this into a usable map:
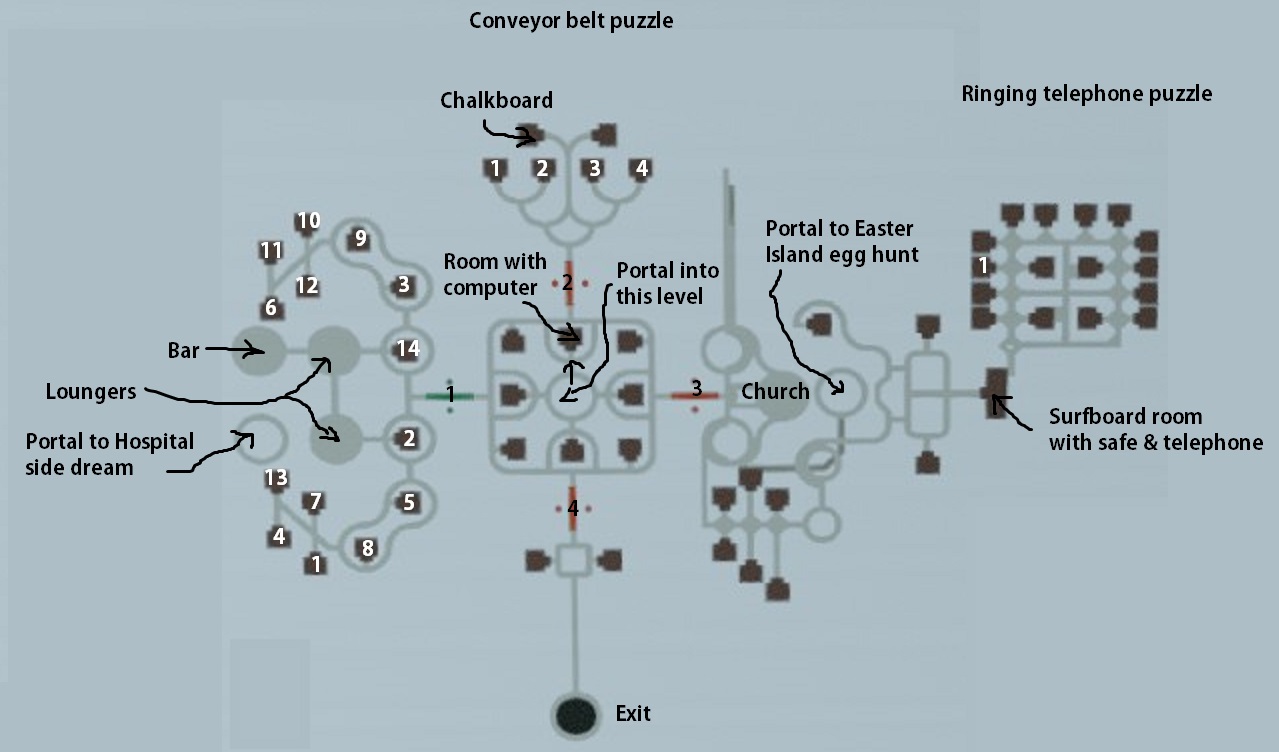
- Locate the Bar. If you’re using the map above, from the level entrance, you will cross the bridge labeled “1” to get to the bar area. You will see 14 numbered beer taps around the bar
- Around this area, there are 14 numbered rooms. Somewhere in each room (including in rooms 4 and 13, though they are hard to find) there is an arrow pointing up or down.
- The arrows correspond to whether the tap should be left alone (up) or pulled down (down).
- To solve: pull down taps 2, 4, 5, 7, 8, 10, and 11.
- Locate the Conveyor Belt Puzzle. If you’re using the map above, from the level entrance, you will cross the bridge labeled “2” to get to the area. Locate the 4 numbered rooms with a conveyor belt between rooms 2 and 3.
- Behind the rooms there is a room with a chalkboard inside, listing the orders:
- Room 1 – Needs champagne, Room 4 – Burger and Drink, (blank) – Wants just sushi, Room 2 – Order is missing
- In each room, there are 2 stacked conveyors and 2 spaces for food (except for room 3, where the bottom space is broken). You can use the up/down buttons to move things in and out of the holding space, and the left/right buttons to move things between rooms.
To solve the top conveyor:
- Move the Burger from Room 2 to Room 4 (it will sit on the conveyor with the Cake in the holding space)
- Move the Champage from Room 3 to Room 2 (put it in the holding space)
- Move the Sushi from Room 1 to Room 3 (put it in the holding space)
- Move the Champagne from Room 2 to Room 1 (put it in the holding space)
- Move the Burger from Room 4 to Room 1 (it will sit on the conveyor with the Champagne in the holding space)
- Move the Cake from Room 4 to Room 2 (put it in the holding space)
- Move the Burger from Room 1 to Room 4 (put it in the holding space)
To solve the bottom conveyor:
- Move the Soup from Room 2 to Room 3 (it will sit on the conveyor because there is no holding space)
- Move the Drinks from Room 1 to Room 2 (put in the holding space)
- Move the Soup from Room 3 to Room 1 (put in the holding space)
- Move the Berries from Room 4 to Room 1 (will sit on the conveyor with the Soup in the holding space)
- Move the Drinks from Room 2 to Room 4 (put in the holding space)
- Move the Berries from Room 1 to Room 3 (will sit on the conveyor because there is no holding space)
- Move the Soup from Room 1 to Room 2 (put in the holding space)
- Move the Berries from Room 3 to Room 1
For another solution, see this guide.
At the end of all that you should have the following:
- Room 1 – Champagne, Berries
- Room 2 – Cake, Soup
- Room 3 – Sushi, (nothing)
- Room 4 – Burger, Drinks
- Locate the Safe and Telephones Puzzle. If you’re using the map above, from the level entrance, you will cross the bridge labeled “3” to get to the area. From the Church, go towards the houses (not the pier), and continue to follow the path away from the Church. You will then find the room with many surfboards, a safe, and a telephone.
- Prepare yourself for sprinting. I was unable to successfully keybind “Sprint” on my controller, so you may have to use WASD and the Sprint button (default Shift) here as well.
- Go to the next area and open all of the rooms’ doors.
- Go back to the telephone on the counter in the room full of surfboards and click it.
- Sprint back to the rooms – and listen. You will hear a phone ringing. Figure out which room it’s coming from and click the phone in that room to answer it.
- After answering the first phone, and receiving the first number of the safe combination, you will immediately get another call on another phone. There are 4 numbers in all.
- If you miss a call, you will have to restart.
- *** If you don’t want to run around answering phones – The safe combination is 2830.
- Update: The safe combination is randomly generated each game. 2830 was the code in my playthrough, but it may differ for you.
Side Dream: Hospital

- Warden – Complete the side dream
- On the chair in the last room
You must get the teleporter from the safe in the third area first. Use it several times and you will eventually appear at this portal.
- No tips necessary – simply walk through the level.
Side Dream: Easter Island
- Hunter – Find all the eggs.
- Black cube – Complete the egg hunt and it will appear on top of the white cubes near the Easter Island heads
- Leaning against a fence

This portal only appears if you first straighten the painting in Howard’s uncle’s bedroom in his house while “awake” (screenshots in this guide). You will see it appear just before the start of the third area in the level.
- Locate the tree with pink blossoms. A note is on the tree. Click the note to read it.
- Seven eggs are now hidden around the place. See this guide for information on finding them.
- I found the last egg particularly hard to find, so here are a few additional screenshots of it:


Nightmare #3
- – Complete the nightmare
- No walkthrough necessary – Howard’s dialogue will give you some clues of where to walk next, but as you move about the house the nightmare will progress.
End of Game
- Explorer – Visit all the side dreams
- Collector – Collect all Collectibles and Vinyls
- Writer – Collect all Collectibles and complete all side dreams and you will get this ending (Both may not be required).
- Worker – Do not enter the last two side dreams (thanks @Samraidho!)
- Bedlamite – Do not collect all Collectibles, do not visit all of the side dreams. (Both may not be required)
- For more information, see this guide.
- After completing the final nightmare, you will “wake up” again.
- Click the bed again to enter the white cube area with the dream portals again.
- Where the fourth portal should have appeared, there is a curvy walkway leading to a black portal.
- Go through it to end the game.
Thanks!
In a future playthrough, I do hope to add some more things. But that’s it for now!
Hope you’ve enjoyed it!
Let me know in the comments if you have any questions, suggestions, or other things you’ve found that I can add!
