
Overview
Need help figuring out how-to and where-to start when creating a mod for Dying Light? Take a look here then…
What we’ll do in this guide…
We will not only go over the basics of how to set up a file system for modding Dying Light, but we’ll also go over how to disarm VAC in Dying Light so that we don’t get an unnecessary VAC Ban as well as create our own, custom, real-time mod! We’ll also briefly discuss downloading a mod that will actually help us determine if our mod is doing what it’s suppose to be doing. So, to list it all off:
- Disarm VAC
- Set up a file system for modding
- Create a simple “real-time mod”
- Dowload a companion mod for our mod
Buckle up, this guide is for those ready to go the distance and learn how to mod Dying Light from the ground up.
Away we go on the long haul!
Security and File System Preparation
First and foremost we’ll have to set up some things on our computer and in Dying Light to ensure that we don’t totally screw things up in this game and on our Steam profile.
See, creating a mod for Dying Light in a public sense registers to Steam as a cheat resulting in a Valve Anti-Cheat Ban (VAC Ban) so we’ll first set up our Dying Light game to tell VAC to ignore our copy of Dying Light. This will allow us to mod Dying Light any way we want and Steam won’t get mad at us for doing something that the developer wants us to do anyways. Special thanks to Techland for setting that option up for us by the way; I think that was really cool and thoughtful for them to do that for us (aspiring)modders.
Next, we’ll take a look at the file system that Dying Light uses and create a setup that will not only optimize our ability to create mods for Dying Light, but will also ensure integrity of the original game files.
Disarming VAC
As previously mentioned, modding Dying Light can trigger a false-alarm VAC Ban. Which, if you’ve done any kind of research on VAC Bans you know that they’re nigh impossible to get rid of. Thankfully, Techland was awesome enough to add a “disarming” feature inside of Dying Light itself so that a modded copy of their game can be ignored by VAC at the request of the user.
This is not only important to the modder, but also to the mod-customer who wants to use your mod. So, it’s highly recommended that when you publish your mod either on the Steam Workshop or Nexus that you make a strong mention and recommendation that your mod-customers do this step as well.
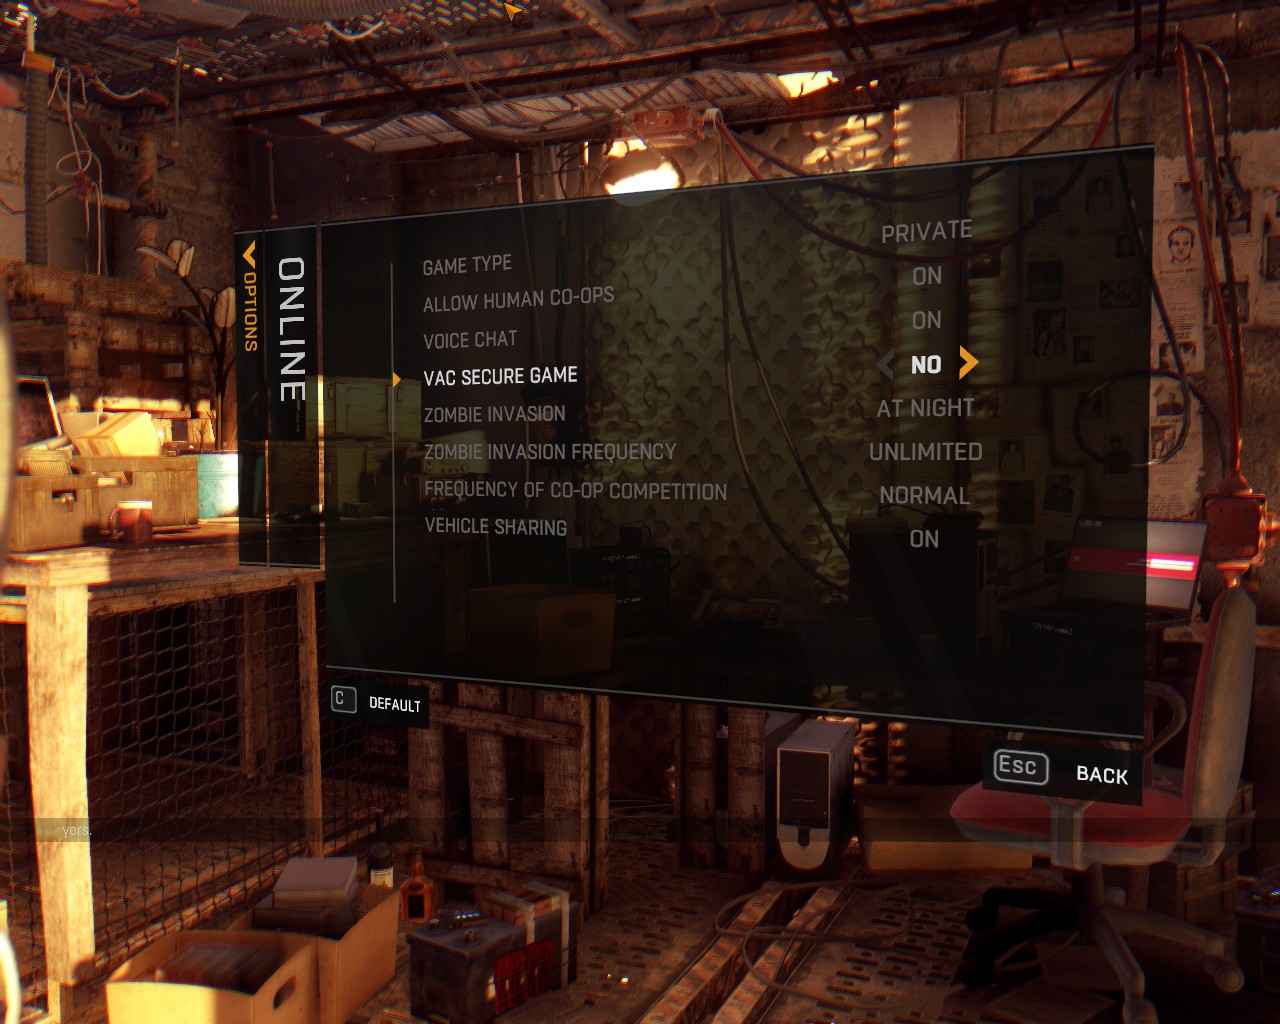
As soon as Dying Light starts, go to Options -> Online -> VAC Secure Game: No. It’s also not a bad idea, if you’re still worried about being flagged for cheating to set your Game Type to Private. Given that Dying Light doesn’t like mixing users with different mods or modded/unmodded game users anyways, it’s only serves productivity to do this. Moreover, setting your Game Type to Private still allows you to invite people to your game so you can set them up with the same mods as you have and troubleshoot any other/further connection problems.
Here’s a screenshot of the VAC Secure Game options:
Required Software
Usually when people realize that they’re going to need additional software to do something like this they become afraid or frustrated and walk away from the idea of the project. Thankfully, you’re only required to use 1 additional program for modding Dying Light, but I recommend a second for its ease-of-reading feature in its use.
The two programs are 7zip and Notepad++.
7Zip
Now, if you use another zip program like WinRar or WinZip I’m pretty sure they will work just fine, but I cannot 100% guarantee that. I personally use 7zip and I use it for these projects here, so I can more confidently say that it will work.
Notepad++
This program is not necessarily required, but it does hold the original formatting that the folks at Techland used when coding Dying Light. Window’s Notepad holds some formatting, but not like Notepad++. I can’t speak to those of you that use Linux or Mac systems and their equivalent text reading programs, but either way I’d still recommend Notepad++ as well. This makes reading and editing the codes/scripts a lot easier and more understandable.
Here are the links that I use to download and subsequently install both of these programs:
[link] [link]Now, as with all software/program installations you should always read or at least vigilantly scan each dialogue and check box. The download and installation of secondary software such as these programs are completely at your allowance. So if you don’t use the provided links or unintentionally install something you didn’t want to install while attempting this process, that’s on you; don’t blame me or anyone else for you not reading the fine print.
File System Preparation
First and foremost you’re going to want to know how/where to get to your Dying Light game files. Atypically all Steam game files are kept at this file pathway:
Local Disk (C:) -> Program Files (86x) -> Steam -> steamapps -> common
From there you’ll just navigate to:
Dying Light -> DW
Now, you’ll see a whole laundry list of folders and files here in this location. The only 3 files we’re going to focus on here are Data0.pak, Data1.pak, Data2.pak, and Data3.pak. These are the essential game files for Dying Light and are required for Dying Light and our mod to work. So, at this point we’re going to create a couple of folders to help us keep things straight.
First we’re going to create a Dying Light Mod Files folder that will hold ALL of the game’s files as well as our own, custom, mod files in it. This folder will be a good location to keep any of your mod files that you download as well. Y’know, just to ensure what mods are downloaded and what files they have in them in the event that you need to go back and “reset” something.
Inside of this folder create 2 more folders named: “Native Mod Files” and “Original Files (Do NOT edit).” When we create a mod we’ll save the changed file in Native Mod Files; we’ll also keep a backup set of files that will never be changed or edited for in the unfortunate event that we have to reset our game back to default. In the following screenshot you will also see some downloaded mods in this same folder. Directly after downloading a mod, I move them to this folder so that in the event that I need to reset or edit the file that was changed, I can know exactly what file it was that the downloaded mod changed.

Of course, if you’ve already began modding or installing mods without having backed up your files, you can always uninstall/reinstall Dying Light. Your saved game files are kept elsewhere so they should remain untouched.

Now, once you have these folders set up, you’re ready to start getting into the meat and potatos of this project.
Remember those Data#.pak files I mentioned earlier in your Dying Light game folder? Starting at Data0.pak, select the file, right click it, then choose “copy.” Now, go back to your mod folder and inside of the “Original Files (Do NOT edit)” folder, right click and choose “paste.” Do this for Data0, Data1, Data2, and Data3.
Now, you may notice that the icons for my Data# files are different than yours; that’s simply because I’ve chosen to make 7zip my default program for dealing with .pak files. It’s not necessary or required for you to do the same, but I found that it speeds up the process considerably when modding.

Creating Our First Mod
If you’ve made it this far, you’re awesome and your dedication is worthy of mention. Setting up the file system and such is pretty boring, but entirely necessary. Let’s have some fun now, shall we? So now, let’s see how this whole process works.
We’re going to do 2 things for our first mod:
- Create a mod that makes time real in Dying Light (1 hour in game = 1 hour in real life)
- Download a mod that allows us to use our wristwatch in-game
First right-click the Data0.pak file, this is the file archive we’re going to be modifying. Under the sub menu, naviage to: 7-Zip -> Extract Files…
Then choose to Extract Files to the Native Mod Files folder. This will extract the contents of the .pak archive (a folder named Data) into the Native Mod Files folder. When an archive is “extracted” it’s essentially just being copied/pasted for you in one command. So, don’t worry, all of the original contents of the Data0.pak archive is still intact.

Now that you have the “data” folder in your Native Mod Files folder, it’s best to go ahead and nest it in a folder called, “Data0.” All of the Data#.pak archives extract a folder called, “data,” so modding multiple, extracted, archives will eventually lead to serious confusion.

Inside of Data0’s “data” folder, go to the folder called, “scripts.” In the scripts folder, find a file called, “dw_weather_def,” this is the file (although its name doesn’t suggest as such) that keeps the time in Dying Light. This is what we’re going to change.

Now, right-click the file and choose, “Edit with Notepad++.” This is the screen you should be looking at now at this point:

We’re going to modify lines 19 – 21 which define how long a span of time in the day, night, and inside is. This also means that these lines define how quickly a day passes in-game.

Now, we could rack our brains and break out calculators to find out how the float value of 5760 relates to 4 minutes in real time, but looking at line 21 we’re given a little bit of a break actually. Line 21 states that value 8640 is relative to 6 minutes of real-life time. So since 6 minutes is 1/10 of an hour and we want to make 1 hour of game time equal to 1 hour real time, we only need to multiply 8640 by 10. This gives us the float value of: 86400; so if we change all the float values to 86400, then no matter if it’s daytime, nighttime, or if we’re inside, one minute will equal one minute, one hour will equal one hour and so forth.

Now, after saving the file, we’ll make a copy of the dw_weather_def file and paste that copy in the Data0 folder. Again, this is done so that we know in the future what files we’ve modded; it’s not necessary to getting the mod to work, but it is best-practice so that you know where to go if something goes wrong later. Here’s what your Data0 folder should now look like:

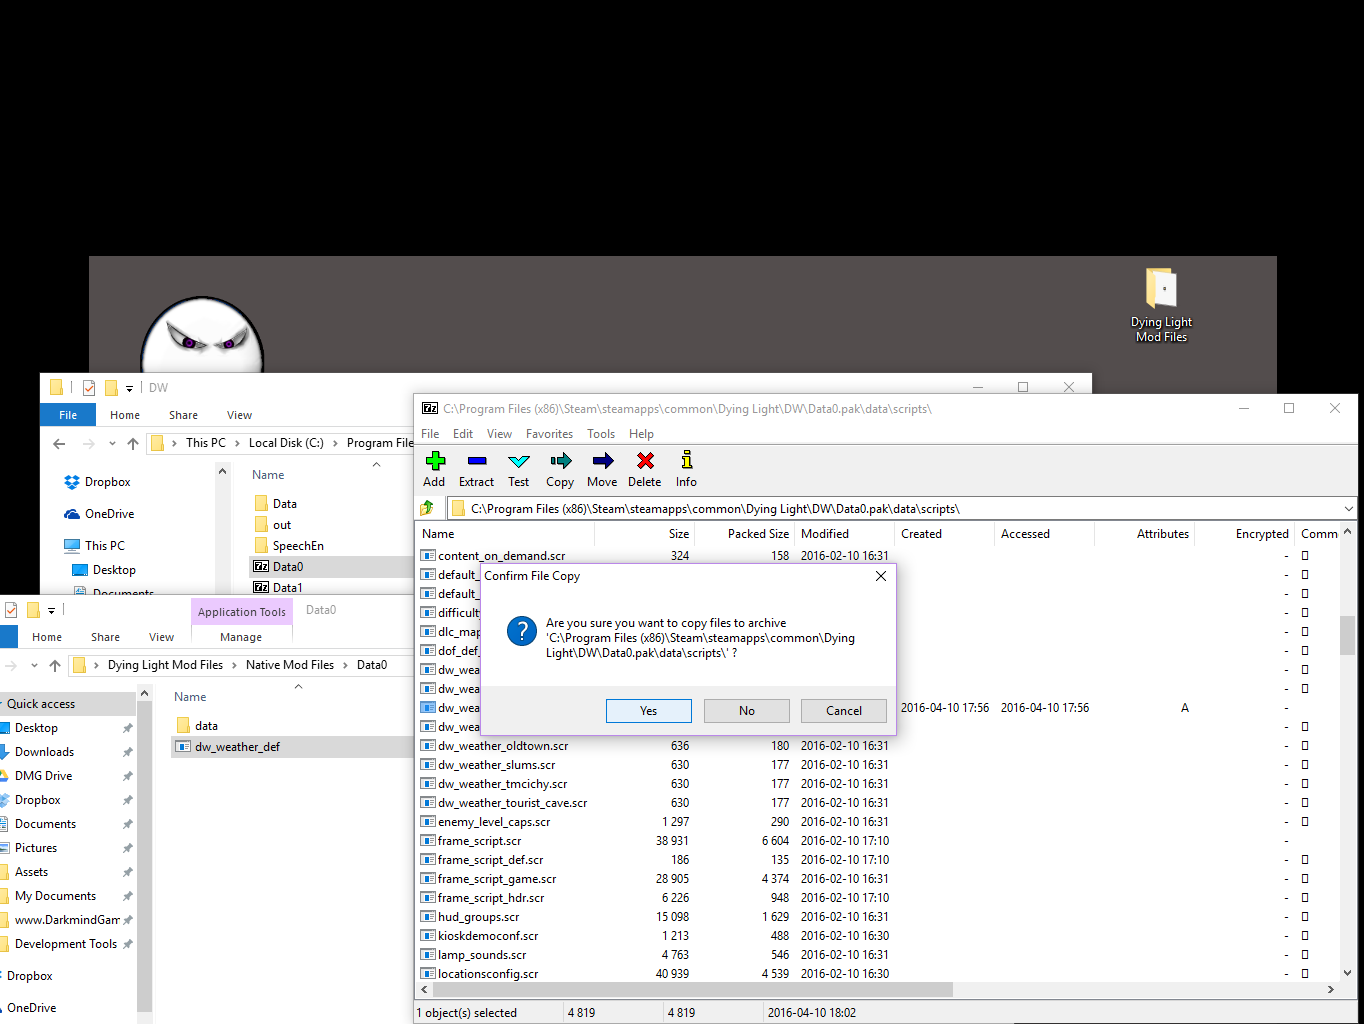
That’s it! You have successfully modded the game file! Now we just need to implement the mod so that Dying Light will use it! So, go back to your Dying Light game files. (Side note: from this point on your Dying Light game files will never be the same again, this is why we made the backup files and put them in our custom location with the rest of our mod stuff.) We’re going to put this new “dw_weather_def” file into Dying Light’s Data0.pak archive.

Again we’ll use 7-Zip to open the archive.
Then we’ll navigate to the location where the current, unmodded, dw_weather_def file is located inside 7-Zip.

Lastly, we’ll drag our modded file from our mod folder and drop it into the .pak archive and overwrite the file that is currently there.

You’ve done it, you have successfully modded Dying Light, but there’s a catch…you won’t know you’ve modded the game successfully at this point. Why? Because the time will pass too slow for you to recognize significantly. Now, while the time passing slower could be enough evidence for you, it truly is better to have a way to check the time in-game and see if the mod is working like it should.
Alas, this brings us to downloading a mod called Timepiece by Impus. Here’s the link for his/her mod and there are instructions on how to install this mod as well so I won’t bother explaining how to do that. I will say that it’s MUCH easier than what you’ve already done so don’t sweat it.
[link]This is a mod for those of us that use a mouse and keyboard to play Dying Light. If you use a gamepad or XBox controller, there are identical mods for those devices available as well on Nexus. Once you download the mod, before you install it, be sure to move the mod file to your mod folder so that you can self-confirm what mods you have implemented.
Playing/Testing your mod
I cannot stress enough that if you have not turned off VAC in Dying Light stop right now!
If you skipped the very first step in this tutorial, do not skip it now. Reset your files to their default archives and ensure that your mods are removed fully before starting Dying Light. If you’re not sure if the mod(s) are completely removed, reinstall Dying Light.
If you DID turn off VAC, please ignore the aforementioned warning and continue onward to glory…
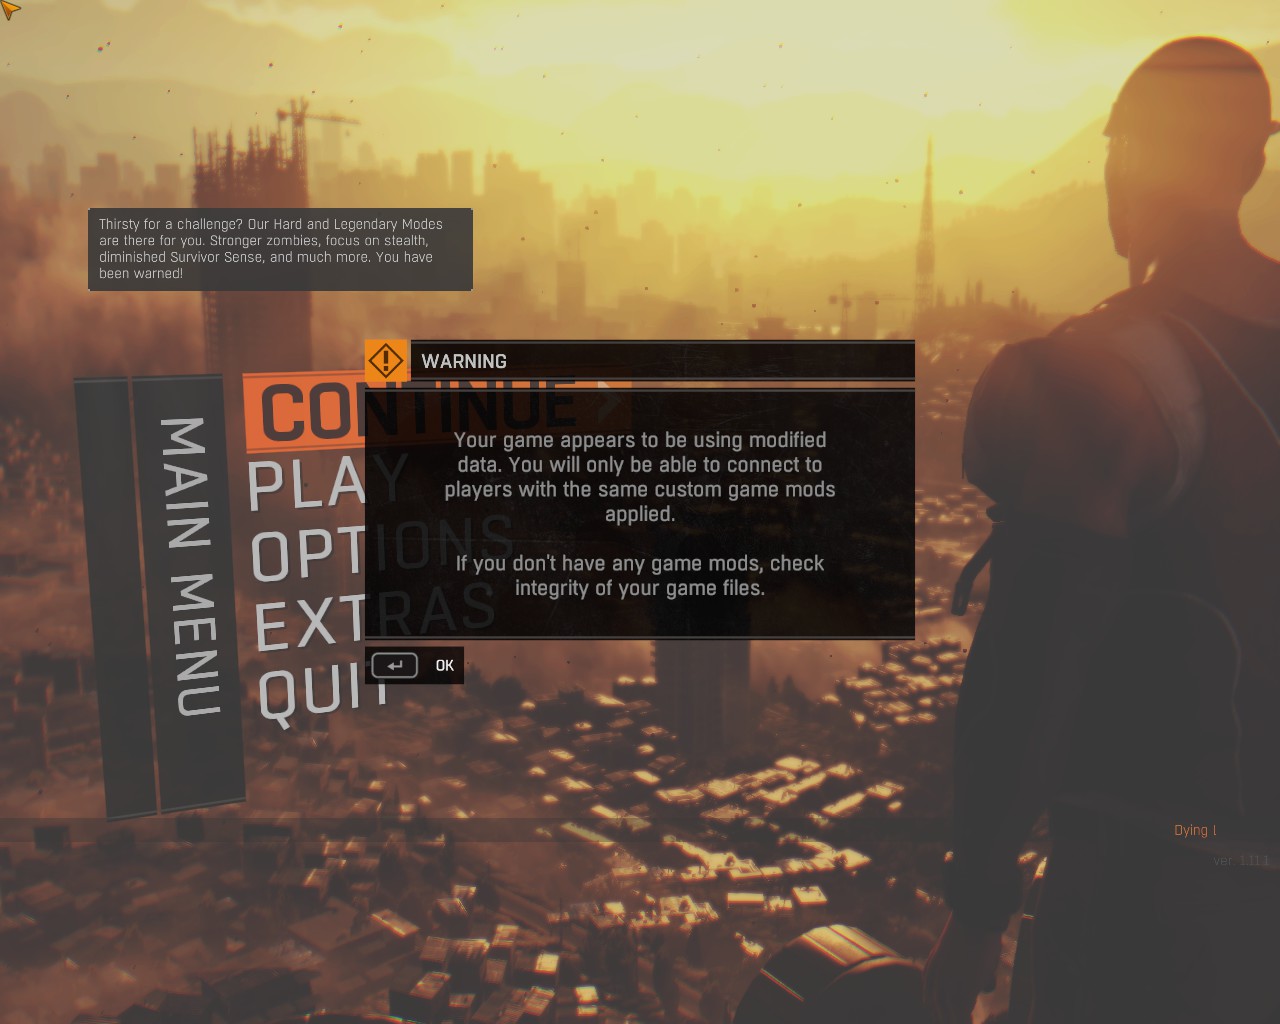
Now, you’ll notice that when you start up Dying Light this time you get a warning. This is completely normal and can be ignored.
So now you’ve got your mod scripted, implemented, and working; and you should have Impus’ Timepiece mod installed as well. So now, you can see if 1 min actually last 1 min in real time while in-game. It’s truly best and the most obvious to test this setup at night honestly. This is because during the nighttime on Dying Light’s default settings, time moves at 1 min (in game) = 1 sec (real time) so if time moves any slower than that, then your modification is working.

Thanks for reading
It occurred to me recently that there was no guide out there for creating a mod from scratch. There was no real direction in knowing which file(s) to modify and which one(s) not to modify for favorable results. So, after having asked for help and ultimately figuring it out myself I decided to write this extensive guide.
It wasn’t easy either to say the least, but I really do appreciate you taking the time to read this and I hope it at least helps point you in the right direction in knowing how to mod Dying Light. If you have feedback or further suggestions for this guide please let me know. Thanks again for reading, I truly appreciate it and keep modding!
Sincerely,
~[DarkmindGames]SLIVER