Overview
Compact production chain layouts for most common products that need to be made indefinitely
Updates
2021-02-22
– Rewrote Description section as the guide is now more or less content-complete
– Added some info about combining Solar Sails into the Rockets layout
– Working through layouts to add power draw and dimensions where applicable
– v8 mall might take a while yet to publish due to some more tweaking, but can be seen in the video playlist (specifically pt15 which is a clean build on a new planet)
– Probably the last update for a while, although i wanna eventually get to some smelter setups and a Deut rod cheat sheet. Satsifactory U4 here we come!
========
2021-02-17
– Added video playlist to Description
– Added special-case 1/s Frame Material Tileable using Spiniform Stalagmites
– Added 1/s Antimatter Fuel Rod layout
========
2021-02-14
– Fixed tileable Solar Sail circuit assembler label
========
2021-02-09
– revamped Red+Yellow so all inputs come from the same direction, added Storage Tank loopbacks.
– I’ve moved the old giant 6/s layouts for Turbines and Processors to the same Old Layouts section. They really were less efficient to build and much harder to plan partial builds. Same for old Mall stuff.
=========
2021-02-03
– Added 4/s Graphene Tileable
– Added 1/s Titanium Alloy Tileable + alt w/ Sulfuric Ocean rare
– Added 1/s Organic Crystal Tileable
– Added 4/s Solar Sail Tileable
– Maintenance edit of 4/s Solar Sail; clarification of Stone Ore (…lol), not Stone
=========
2021-02-02
– Added 1/s Turbine Tileable (rip old layout lol)
– Added v7 mall
=========
2021-02-01
– Added lategame 1/s Processor Tileable
=========
2021-01-31
– Added Zanthra’s tileable Fractionator layout
– Fixed wrong Assembler/Smelter recipe labels in 1/s Graviton tileable layout
Heads up that the mall has gone through a rather significant redesign to be more maintainable. Sorry to all the folks who’ve started on this current layout. It did serve me well, though!
Not posting till I take it out for a spin on a new playthrough to catch clerical errors via retracing the layout diagram itself, might be a day or two.
=========
2021-01-30
– Posted my own progression notes because why not. YMMV regarding playstyle, etc.
– Added 1/s (lol) Graviton Tileable
– Added 1/s Frame Material Tileable
– Added 1/2s Small Carrier Rocket Tileable. It’s late, expect some errors
=========
2021-01-29
– Added 1/s Particle Broadband upgradeable to 3/s
– Added 1/s Plane Filter Tileable
=========
2021-01-28
– Added tileable Refined Oil/Hydrogen layout
– Added mall ideas
– Fixed mk3 sorter requirement on iron ingot belt -> circuit in 6/s processor setup
=========
2021-01-27
– Fixed 6/s Processor layout not having any output sorters (rofl)
=========
2021-01-26
– Fixed 4/s Sails layout having 3 Graphite smelters instead of 6
– Fixed 4/s Sails layout again
– Added 6/s Electromagnetic Turbine layout
– Fixed Yellow/Red using Assemblers instead of Smelters for diamond (lol)
– Added 6/s Processor layout
Description
I made these for my own use but thought I might as well throw them up with a little formatting
There are a few ways to approach production-line games in general- in-line production, where everything for a particular part is integrated into the chain building it, or modular, where each part is manufactured individually then sent to wherever it needs to go. Factorio, for example, following a Main Bus method of play is largely modular, as things that need to be scaled up are done so perpendicular to the bus.
This guide corresponds to a specific method of play that falls somewhere in-between on these pretexts:
– Having everything in-line all the way down to raw materials leads to unwieldy, massive layouts for end-game parts.
– Having everything completely modular being shipped around by ILS is a needless draw on power and complexity as there are many parts that are ever only used in 1-2 things or buildings which are an inconsistent usage.
– On the note of additional things being belted or shipped around vs direct insertion, I feel that regardless of how much optimization the game gets during and after Early Access, it still is a Unity game written in C# and not coded to the metal like Factorio, so UPS will become an issue sooner or later. Direct insertion where possible should (theoretically) mitigate this to some extent in ultra-late game.
By breaking down the production chains in the game into a number of tiers, and having later tiers only use inputs corresponding to the outputs of prior tiers, we keep layouts to a manageable size while taking advantage of direct insertion to mitigate the potential issue above with regards to completely modular builds.
Tier 1:
Raw ores, Crude Oil
Tier 2:
Iron/Copper Ingots, Titanium, Glass/Stone, Graphite, HP Silicon, Refined Oil, Hydrogen, Deuterium
Tier 3:
Processor, Turbine, Titanium Alloy, Organic Crystal, Graphene, Solar Sail, Deuteron Rod
Tier 4:
Frame Material, Particle Broadband, Plane Filter, Graviton, Antimatter Rod
In addition, having e.g. Organic Crystals or Graphene being an input rather than in-line also allows for rares (Organic Crystal Veins, Fireice) to integrate into the overall topography without massively affecting the layouts.
One of the nicest advantages of this hybrid approach is cutting down the amount of ‘things that can go wrong’ to the above aforementioned list of parts. For example, since gears are only ever used (discounting the mall) in-line to engines which are used in-line to Turbines, with the layouts being ratio-accurate, production bottleneck issues can completely ignore gears and engines. If Turbines are short, it either means you need more Turbine production, or one of its inputs (iron ingots, copper ingots, magnets) ran out. There never will be a case of specifically gears or engines running short and needing to go to wherever those are being made to scale up.
The same is true for the other parts. If Plane Filters run short, it means either needing to scale up Plane Filters, or one of the inputs to that layout ran short- it’s never specifically a problem with not enough Casimir Crystal, Titanium Crystal or Titanium Glass assemblers.
This makes monitoring things via the production tab a lot more manageable.

Hence in this guide l break down production chains into layouts that make those specific parts, and then assume more complicated parts will have that readily available as an input.
Early-game layouts (e.g. Red+Yellow, initial Solar Sail) will ignore these and do the full chain with tier 1 as an input, as a consideration that the access to logistics and other planets are limited, but the most efficient layouts really want to modularize, so thinking of centralizing smelters and refineries relatively early on is a good idea, and segregated into their own massive smelter farms late game.
Now, all this being said, this is obviously my own opinion and there really is no wrong way to play the game– the fundamental truth is, the factory must grow and how it gets there is relatively irrelevant. If it feels easier to just completely modularize everything and solve bottlenecks when they crop up, by all means do so! I won’t be having layouts outside of my specific tiers simply because there’d be way too many possible permutations on how to divvy things up.
Playthrough of 0.6.15 (now 0.6.16) highlighting many of the layouts in this guide as well as overall organization/structure of base and outposts
DSP Grid Shenanigans
Since the game exists on a square-ish grid mapped to spherical surfaces, the grid is mostly square but exhibits ‘grid crush’ closer to the poles.
Many buildings have two different bounding boxes in practice- how closely you can squeeze buildings together, and how close you can place belts.
e.g.
– Smelters occupy a 3×3 grid, and you can place belts around them in a 5×5 square.
– Assemblers are ‘larger’ in that they occupy a 3×3 grid and you can place belts around them in a 5×5 square, but the closest you can place adjacent Assemblers are 4 tiles apart. You can also place power poles in this space.
Regarding grid crush vs layouts
– The ‘grid crush’ effect affects these bounding boxes and in common cases anywhere but the equator, you e.g. cannot place north-south running belts in that mandatory gap between Assemblers.
– The vertical axis generally does not suffer from grid crush- sorters will always be able to reach 3 tiles away running north-south.
– These layouts therefore are best placed closer to the equator. I made it so most sorters straddle vertically, so orienting the top of the image to North or South works best to guarantee sorters can reach the things they need to reach
– Therefore, since most sorters are aligned this way, it’s generally not necessary to build as compact on the east-west dimension. Just space things out a little more if affected by grid crush
Red & Yellow Research
1:1 correlation to match research requirements.
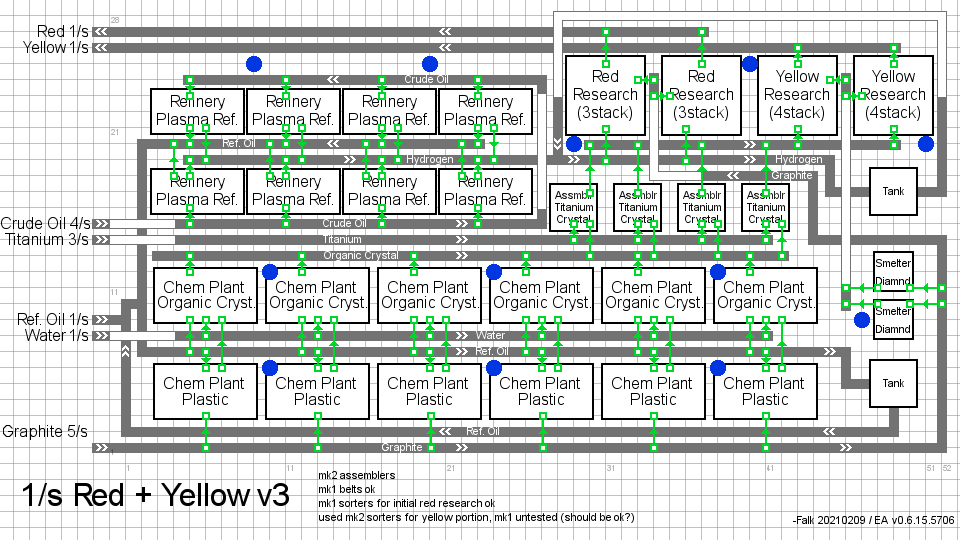
v3 is a revision of the early-game setup which takes Crude Oil input. It’s probably a little bit harder to parse at a glance than the previous version (see: Old Layouts section), but does away with the sorter-splitters to save on kW and incorporates tank loops for both Refined Oil and Hydrogen.
When teching to Red, only the Refineries and Red labs are required. It’s probably a good idea to trace the Refined Oil line all the way to the tank just to save time on rebuilding later on, but that tank can be left alone. The Hydrogen tank should be looped back because even mk2 sorters can have problems grabbing all Hydrogen off the belt fast enough.
The general idea here is that 1/s Red alone generates 4/s Refined Oil, while 1/s Red + Yellow uses 1/s extra Refined Oil (as per the layout’s inputs). Therefore, time spent generating Red science while storing up Refined Oil translates into 4x as long where Red+Yellow can use the stored Refined Oil to support itself while the main base’s Oil setup is centralized. For example, if 2 hours are spent only on Red cubes, that translates to 8 hours worth of stored Refined Oil for Red+Yellow without any additional input.
The belt pattern where Refined Oil feeds back into the line from Refineries is important- it lets Refinery output have priority over the tank, which has priority over additional input.
My runs typically end up with one full Red+Yellow setup, and then an additional Red with the Yellow left unfinished a while longer, and the stored Refined Oil from the 2nd block gets used for Titanium Alloy and Graphene while teching Logistics etc to make Oil management easier.
Late-game after all other tech is set up and things scale beyond 2/s strongly consider finally demolishing this layout for a centralized Oil system with the labs being supplied Graphite/Hydrogen/Diamond/Titanium Crystal directly, but up to that point, this layout works very well up through warps.
Purple Research
See Particle Broadband + Processor layouts. 1/s Purple = 10 labs, with 2/s Processors and 1/s Particle Broadband feeding them
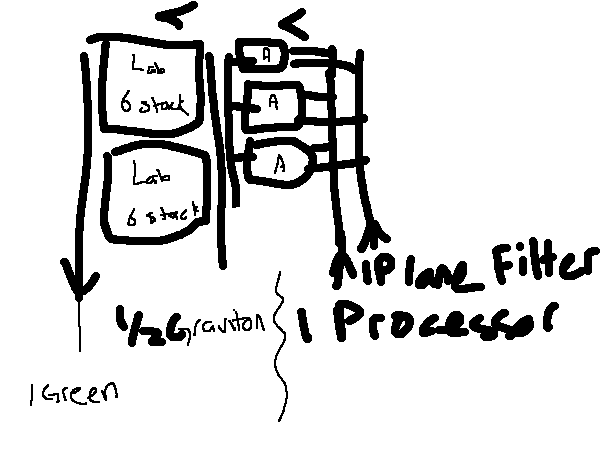
Green Research
See Plane Filter and Graviton
1/s Green Research is 12 labs supplied by 1/2s Graviton, and 3 Quantum Chip Assemblers being fed 1/s Processor and 1/s Plane Filter
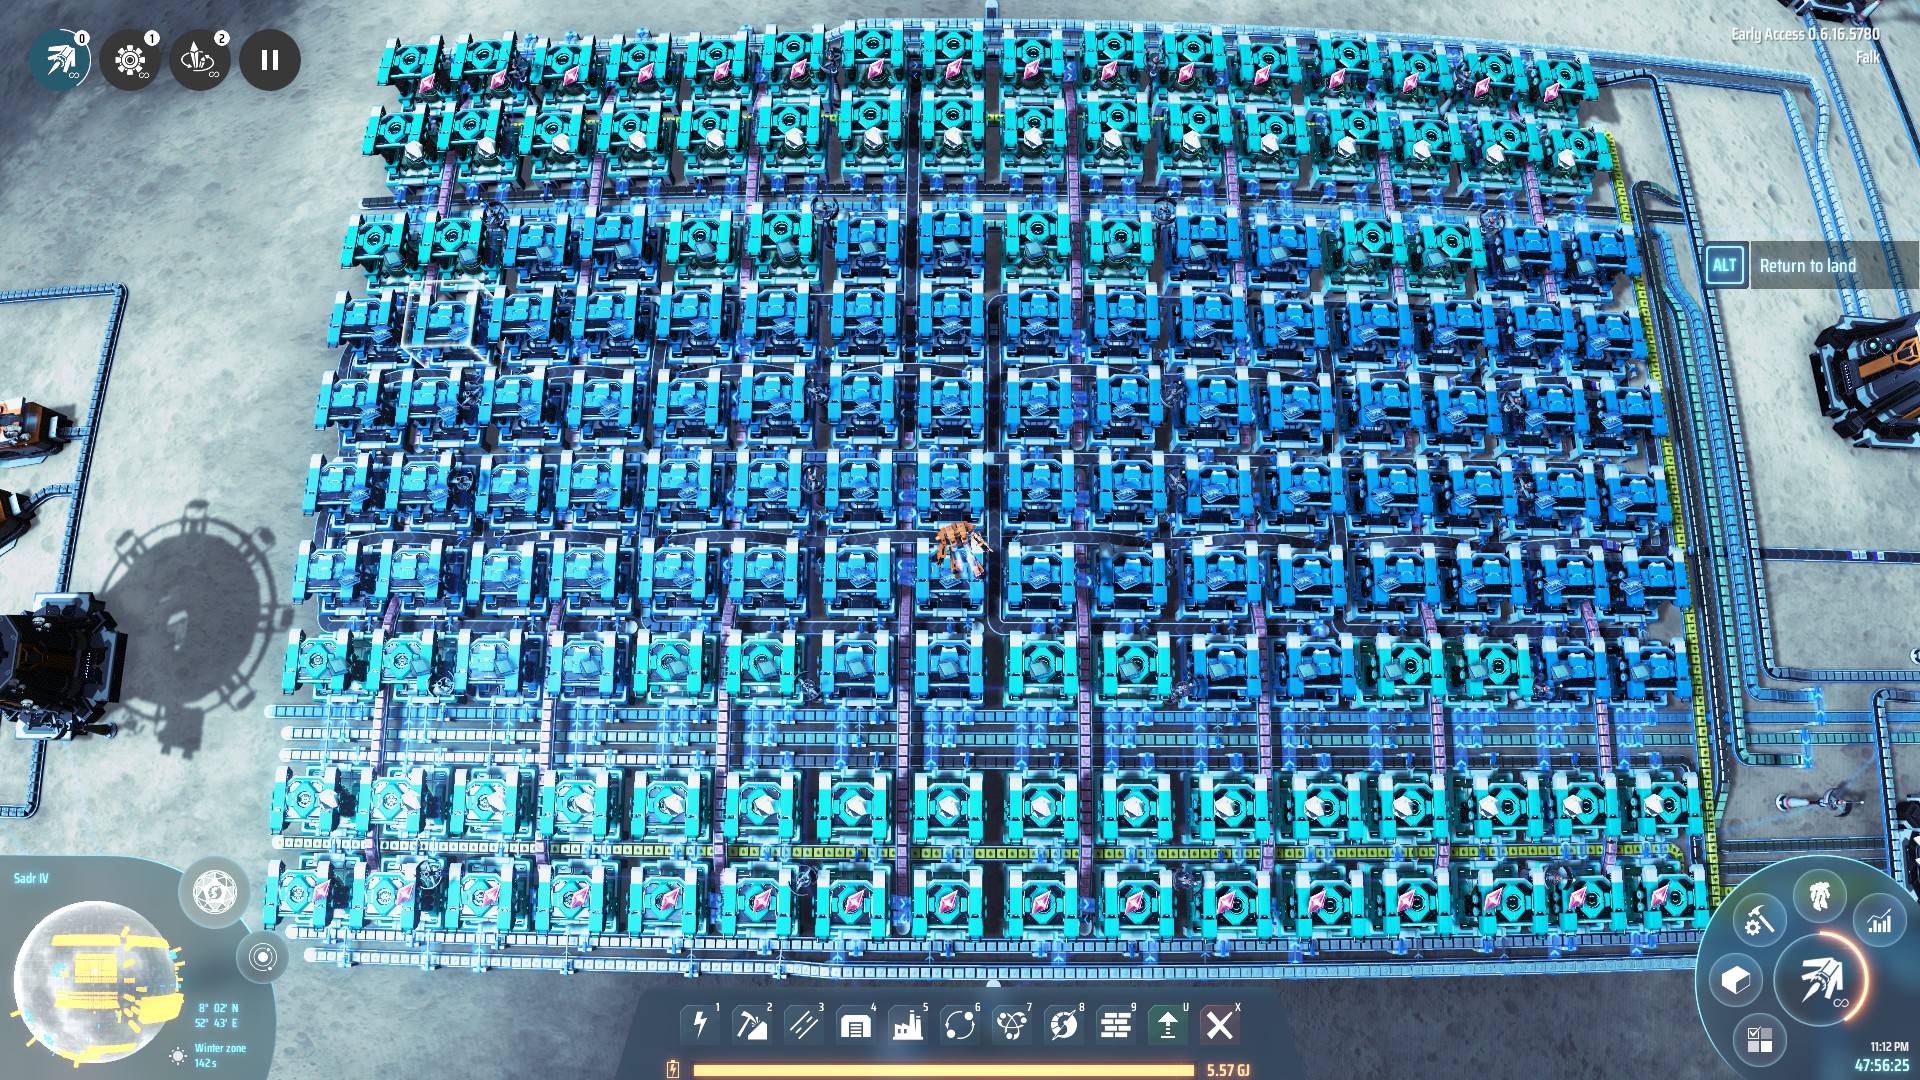
Electromagnetic Turbine
Turbines are used in a lot of medium and lategame recipes as a part and thus make for a good candidate for manufacturing en-masse on a different planet. Pick one with lots of iron ore.
update: Tileable version is way better/faster to get up and running while smelting elsewhere, even with mk1 Assemblers. Upgradeable later too.

Example demonstrating tiling horizontally

2nd example demonstrating vertical tiling- the Processor and Copper Ingot lines overlap and make a neat N/s matching the Magnets and Iron Ore so the whole system still can run off the same belt tech.

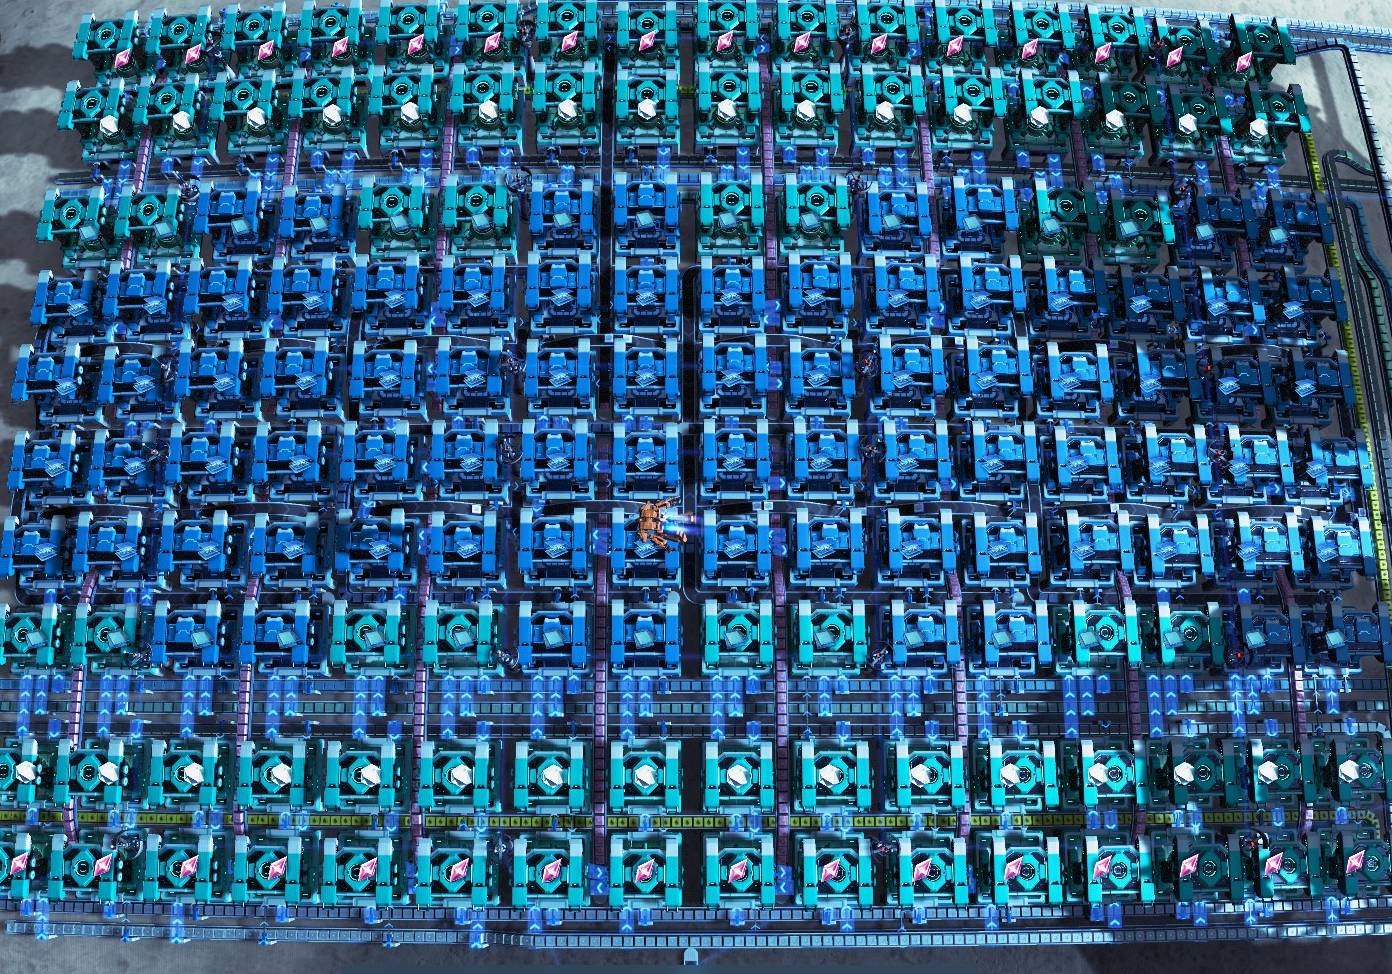
Processor
Large-scale processor manufacturing meant to be made on a planet with lots of silicon for exporting elsewhere
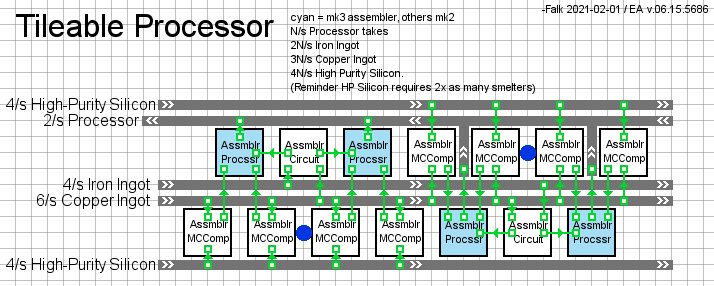
It’s possible to just use mk2 assemblers (or even mk1) earlier on and take the temporary output tax for the sake of building this quickly, and for maintenance/expansion later.
This setup can also be tiled vertically, and the right side Processor Assemblers can just output downwards instead.
Refined Oil + Hydrogen
As Crude Oil is an infinite resource but a finite rate (which is clearly shown on the map display*) one of the most useful mid-game tasks is to tap every single node and siphon the oil to a single location, whether a massive processing plant or a main bus or a belt running completely around the world, or simply mid-game after logistics are unlocked. Since there’s only one thing Crude Oil can be processed into, that gives an understanding on the upper cap for Refined Oil the planet yields, which also then translates into how much Sulfur, Organic Crystals and Particle Broadband can be made (and eventually Graphite, if/when Coal has completely run out) combined*, which then helps plan what can be produced at the same time from all the major branches off Organic Crystals (Titanium Crystals) and Sulfur (Titanium Alloy, Graphene)
In terms of overall layout on the home planet, when Logistics has been unlocked and it’s time to centralize production chains for Oil products rather than having layouts take Crude Oil input, it’s probably best to plan for Refined Oil + Hydrogen, Titanium Alloy, Graphene and Organic Crystal all in similar areas just to make logistics and belting easier, with Hydrogen processing and disposal (i.e. Deuterium Fractionator loops, Fusion Power, etc) a straight shot from this cluster.
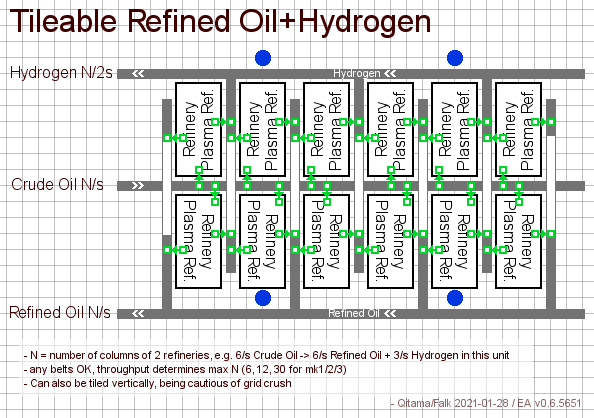
Extensible setup based on belt speed
Full credit to Qitama for the layout idea
*For reference, Research Cube numbers
Blue: Doesn’t use
Red: Doesn’t use Refined Oil (Hydrogen can be obtained from other sources)
Yellow: 5/s Refined Oil per 1/s
Purple: 4.25/s Refined Oil per 1/s
Green: 8/s Refined Oil per 1/s (via Graviton 1.5/s Plane Filter 6.5/s)
Therefore every 1:1:1:1:1 uses 17.25/s Crude Oil total, and the home planet most likely can comfortably do 2:2:2:2:2 after tapping all Oil nodes, before taking Vein Utilization bonus into account. This number is of course without counting any rares- Fireice, Organic Crystal, Sulfuric Ocean remove a lot of that dependency.
However barring any rares, a 2:2:2:2:2 setup for endgame tech and White Matrix leaves comparitively little for Solar Sails, Rockets, and various other things (mall, etc) so if the home system really does lack rares, it’s advisable to start tapping other systems sooner rather than later to reduce Oil dependency.
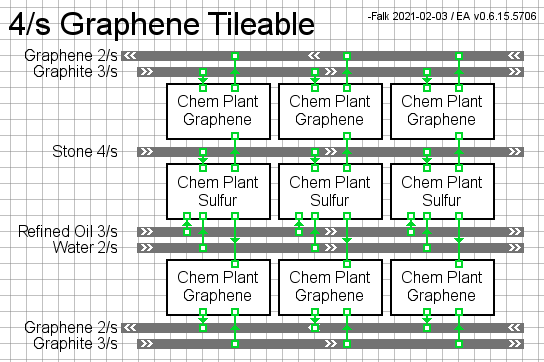
Graphene
Very, very simple layout, uploading anyway as a quick-reference cheat sheet for input/output ratios and building count.
Organic Crystals
Ditto.

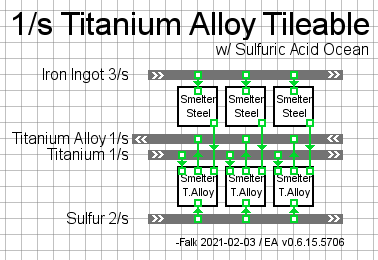
Titanium Alloy
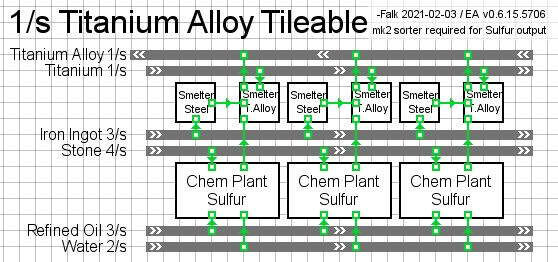
In case Sulfuric Acid production is centralized or there’s a Sulfuric Acid ocean available, production becomes much easier and compact
Solar Sails
4/s is plenty to get a swarm going. If you have enough guns to shoot them all into space it should result in ~6k active sails in the swarm, going up to ~10k and beyond as research extends their lifespan.
Sails eat a planet’s stone supply very very fast.
Here’s an early-mid game setup that takes raw material input
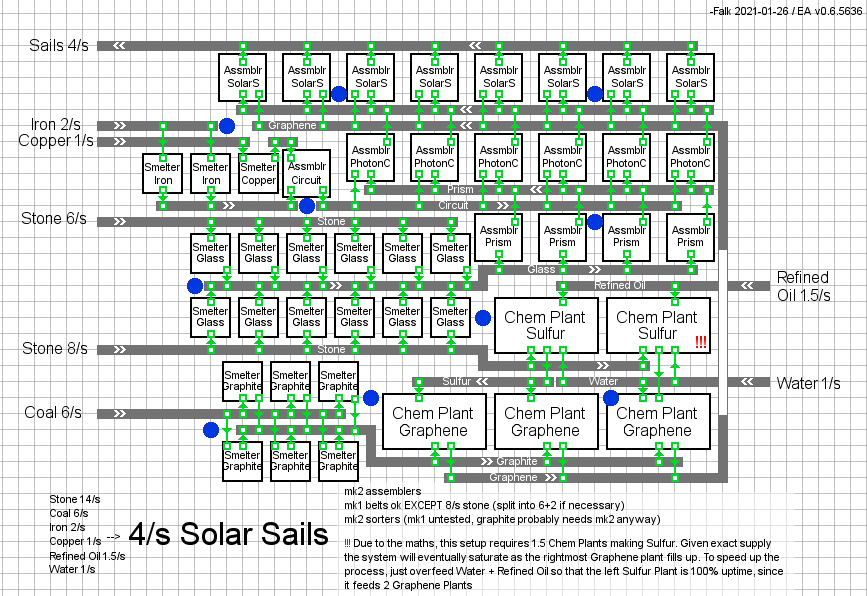
Here’s a tileable version for lategame with the assumption of mk3 assembler availability and centralized production of Graphene, Graphite, Ingots, Glass

Deuterium Farm (via Fractionators)
Full credit goes to Zanthra for this layout. Used with permission

Tileable both horizontally and vertically, with each unit processing roughly 2.4/s Hydrogen into Deuterium with mk3 belts. One space of padding is needed when tiling vertically to fit the Tesla Towers.
Turning Hydrogen into Deuterium into Deuteron Fuel Rods is a good way to scale power early-mid game.
Particle Broadband
Particle Broadband is a bit of a weird bottleneck since automating some makes mk3 assembler production much easier, but at the same time the large number of Assemblers can also make use of mk3’s higher production rate.
Hence, this layout comes in two stages. An early 1/s layout with very specific spacing
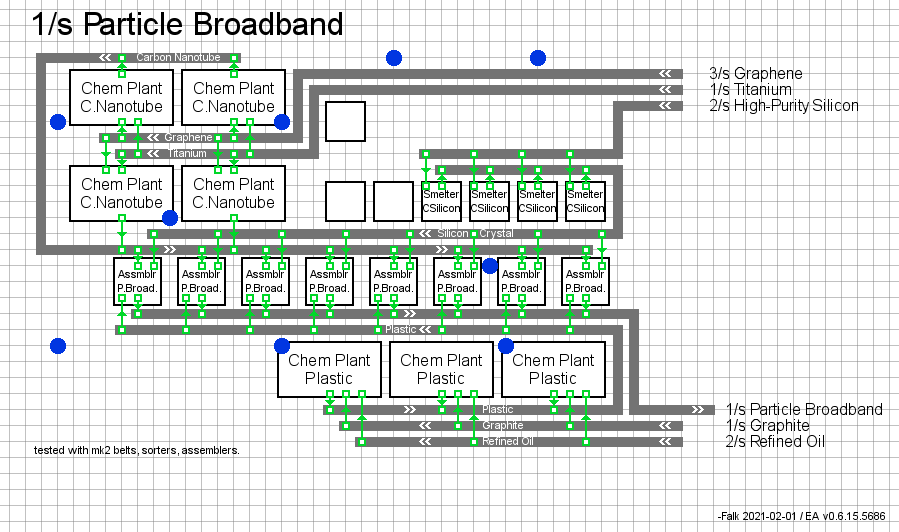
Followed by a direct upgrade (leave space on the left) to 3/s layout

cyan = mk3 assemblers
The reason the plastic exits downwards and loops around is that with mk3 assemblers, for a good part of the belt each Plastic Chem Plant is making 0.333/s but ends up trying to feed two mk3 assemblers that use 0.375/s combined, eventually underfeeding them while uselessly backing up plastic production towards the left of the row. Having them all exit onto a belt before hitting the first Assembler rectifies that.
Plane Filter
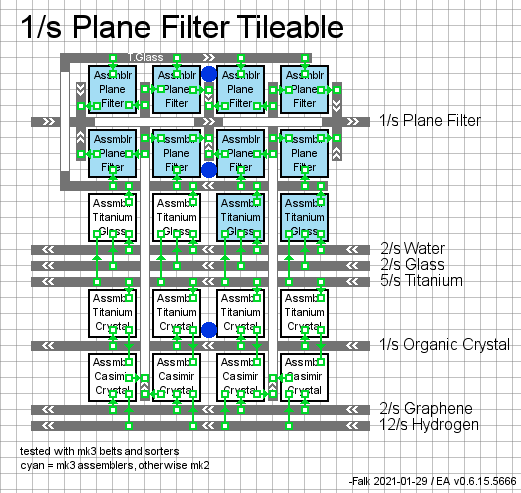
Tileable with 1 extra column for the Titanium Glass belt bridge per 1/s Plane Filter. Cyan = mk3 assemblers, otherwise mk2
Hopefully this helps to make the ridiculous number of assemblers neater.
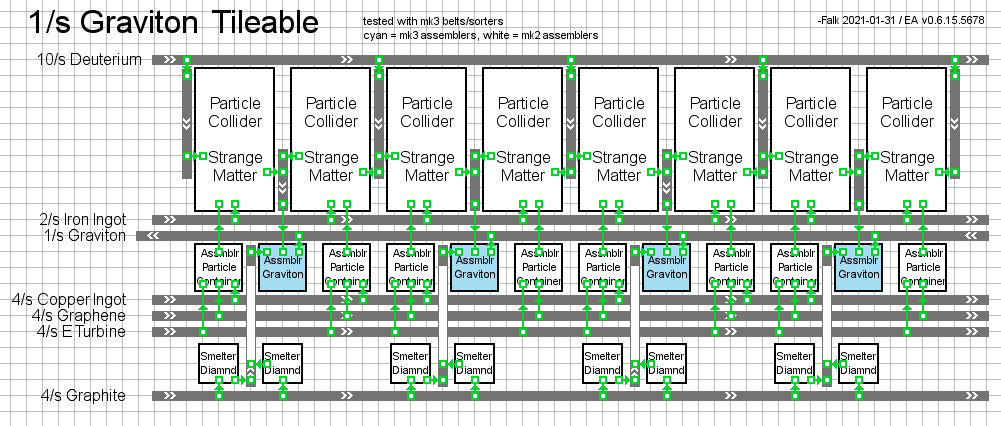
Graviton
This is probably way too much power draw when first teching into Green research.
Remember 1/s Green only requires half as much Graviton, which is half of this layout.
Frame Material
Aside from centralizing Carbon Nanotube production or just running it parallel to Frame Mats, this is the most compact a layout using Graphene can get. It’s probably the weakest layout in the guide in that there’s no real benefit to doing it this way, but included for completion’s sake in the absence of any better ideas.
edit: diagram is still missing the sorters to split to the vertical belts for Titanium.
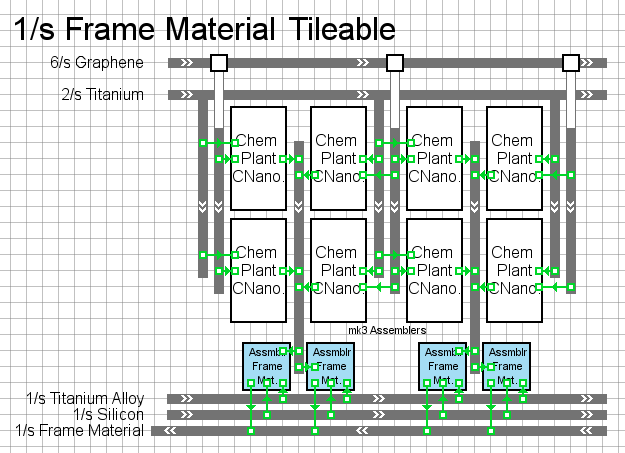
1/s Frame Material is essentially equivalent to 1/6s Rocket, for quick calculations.
However, if Stalagmites are available, there’s a very specific conditioning that allows for a relatively compact in-line build for Frame Materials with the Nanotubes.
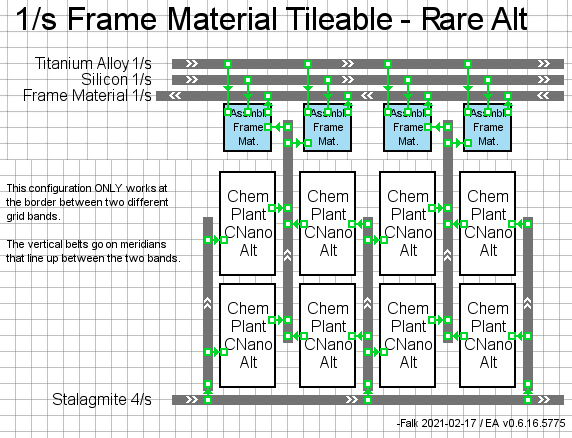
Since this only works at very specific latitudes and cannot really be tiled vertically, it might be a good idea to reserve a long stretch or ring around the planet where this can be done for scalability.
Small Carrier Rocket
gonna take a moment to appreciate we’re now mass-launching rockets into space to build a megastructure that literally drains the sun and yet still using mk1 power poles.
Probably best to scale up slowly with this one. See also: Frame Material and Plane Filter
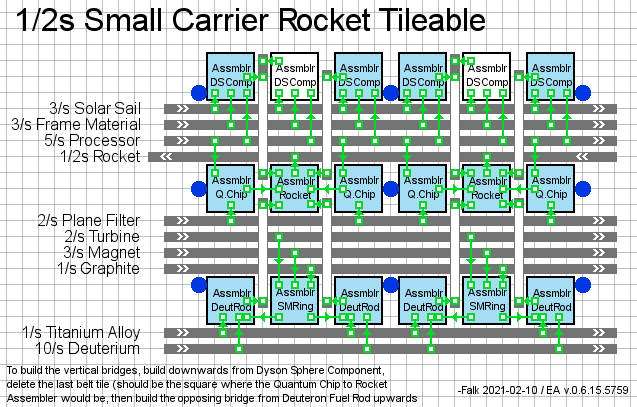
Also if it helps any, what I did was assign a big open area to be my rocket building area, divided by the equator (where my railguns also are)
The four main sections represent quads and extend outward as much as power and incoming supplies can handle, with more stuff coming in through the supply line north and south and topped up by offworldlogistics (processors, turbines, etc)

(if you’re wondering why my Plane Filter tiles right to left, this is actually why, lol- the rocket quadrant tiles “left to right” because it’s flipped upside down with “up on the diagram” pointing south since it’s on the other side of the equator)

this is a relatively bad location (blocked by ore and some other stuff lol) but I built here off my frame material layout experiment location to illustrate.
The spaghetti in the center can probably be cleaned up a lot but it works so I don’t feel the need to touch it for this run.
—-
Note re: Solar Sails
They’re a separate chain and an input in this layout because there’s a practical need for more sails than specifically what rocket production consumes, since sails are used to create Dyson shell (or swarms for looks, or whatever). However, the ratios and building sizes actually work out that the Tileable Solar Sail layout can be appended to the top of the Rocket layout and supply exactly enough sails as needed via direct insertion.

Note how the sail belt is omitted from both in favor of direct insertion. In this setup, each sail assembler must insert into two adjacent DS Component Assemblers, so it averages out between the mk3 and mk2 DS Component assemblers. Similar to the end Mag Coil in Turbines, the end Sail assemblers in this layout will eventually saturate and then only consume the expected amount of input.
Antimatter Fuel Rod
It’s probably useful to keep in mind that the power generated from Antimatter Stars is equivalent to the power drawn directly from Dyson via Ray Receivers in Energy mode, but with a much smaller footprint and with a small overhead of resources and power draw needed to make the rods. That is to say, 1GW of available Dyson power could become ~500-800MW of energy (based on efficiency tech) directly via Ray Receivers, or the same amount out of a smaller number of Ray Receivers via photon generation.
This layout is completely improbable and bottlenecked by Critical Photon generation until extreme late-game. However, it serves two purposes- a rough idea on how much space to leave for extensibility even while building a small fraction of it, and a demonstration of how little other resources it takes to keep Antimatter production going, which really makes it a virtually renewable power source to ship to larger outposts, etc. in systems without their own Dyson sphere.
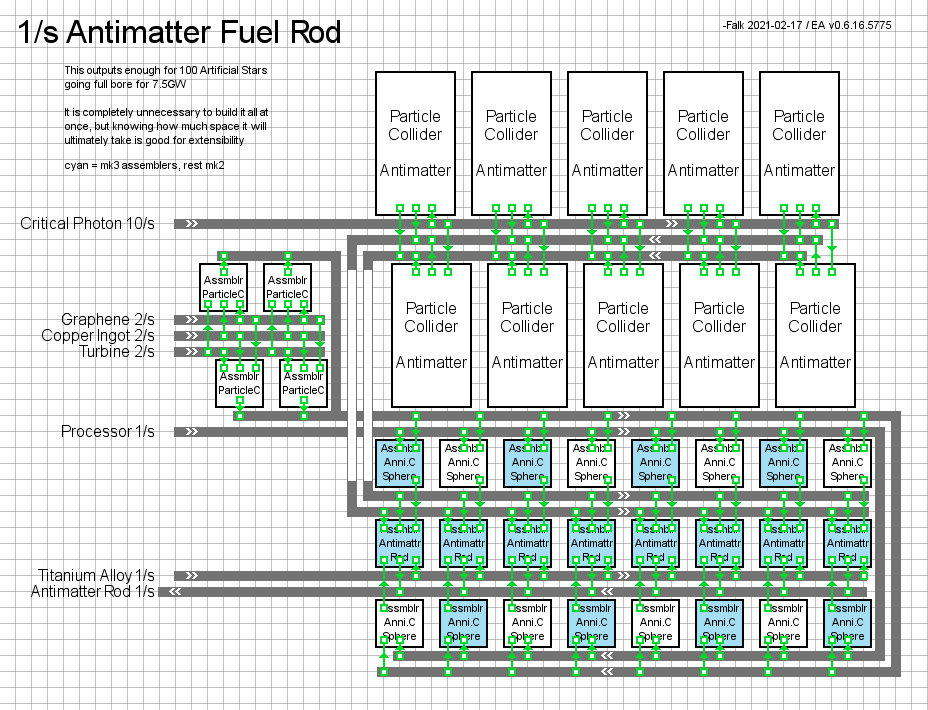
As mentioned, Critical Photon is going to be the big bottleneck- 12 Ray Receivers going full tilt with 100% Continuous Generation bonus will hit roughly 1/s Critical Photon, which is enough for 1/10s Antimatter Fuel Rods, which feeds 10 Antimatter Stars for 750MW of power. And that would need ~1GW from the Sphere depending on receiver efficiency tech.
For scale comparison, 1/s Antimatter Fuel Rod literally is enough to sustain up to 100 Antimatter Stars, i.e. practically entire solar systems by shipping out rods and still have leftover for Icarus.
Mall
I generally only group buildings together for the mall. Parts/products do exist in storage boxes but are generally all over the map closer to where they might be needed, which admittedly is probably a bad idea vs having it onhand to quickly grab stuff for handcraft newer buildings.
Here are layouts for the mall setup I’m currently using, showing roughly how much space the entire thing will take up. Try to leave the right hand side empty for some minor spaghetti as the mall develops and it becomes more important to keep some belts flowing constantly (SM Rings looking at you)
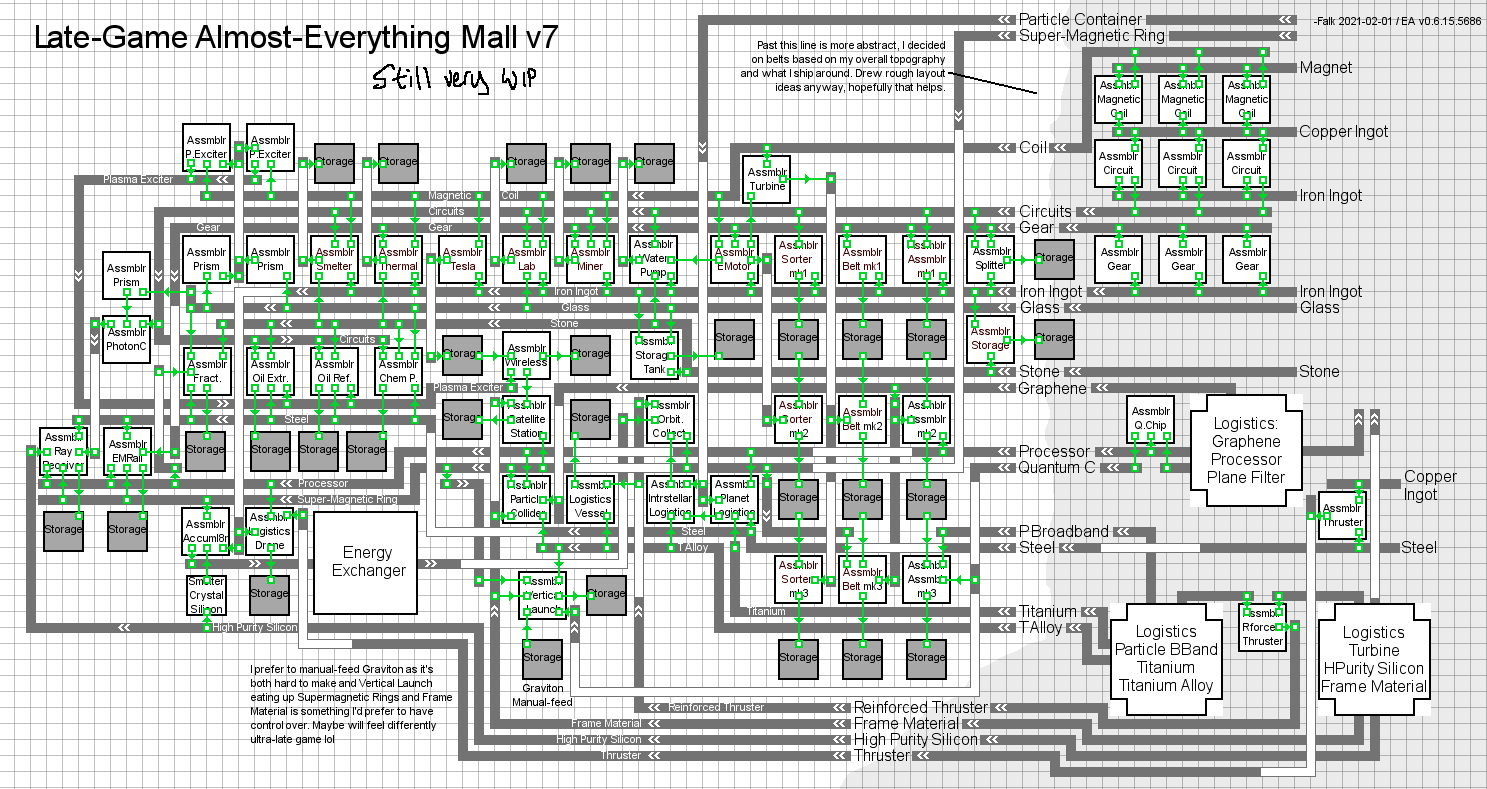
To break it down into digestible sections, start with this highlighted area then work the general directions here
edit: Blank belts on the right out of Logistic towers should read “Graphene and Turbine heading up to make Particle Container and SM Ring”, but it’s in the midst of an iteration where they’re just made down south instead to make it easier to deliver. Whoops.
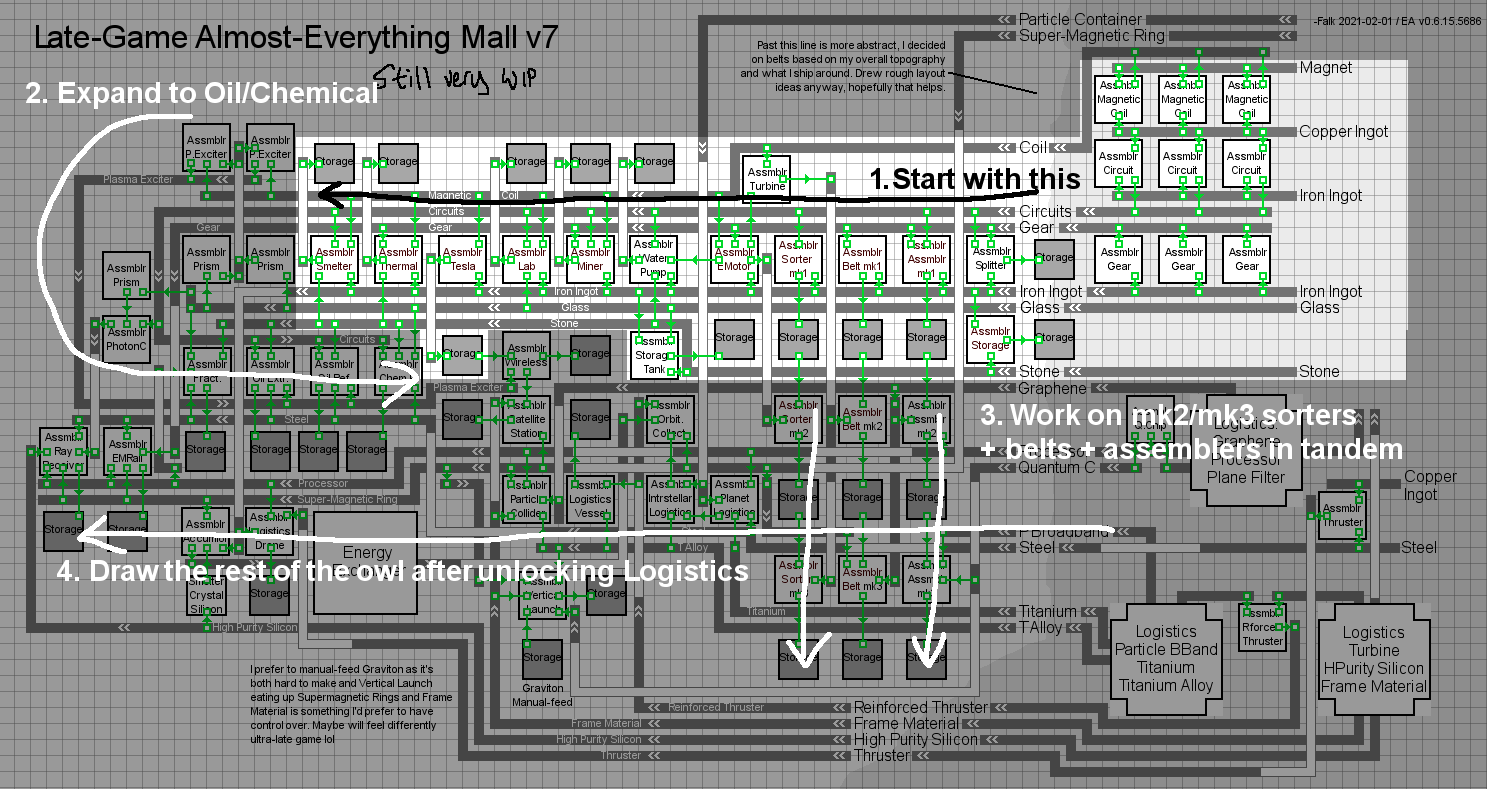
As with Factorio, during early game it’s a very good idea to keep the inputs for these completely separate from other production lines. As tempting it may be to e.g. pull the ends of the lines here to start making more parts, it usually ends up a bottleneck or other problem. Later on when shipping parts en-masse around via Logistics this becomes much less of an issue, and the mall’s primary goal remains to centralize expansion pickup with as little moving around as possible within the area since we don’t have an analog for Drone resupply (yet??)
As with Factorio, good idea to limit the storages to a few stacks so the Mall isn’t constantly burning parts/energy which is impractical to use all at once anyway.
It probably is worth upgrading the mall with mk2 belts, mk2 sorters and mk2 assemblers when they become available, but as the game does tend to want you to move to a better location than the home planet, a better plan may be to just leave it be and then redo the mall on a new home system with full mk3s and call it a day.
This current v7 layout is still WIP with a few improvements I can already see (e.g. moving Steel further up, making Particle Containers from the bottom, adding Fusion Plants, Artificial Star near the bottom with Annihilation Sphere being automated at some crosshash, but as-is it works up through lategame and grabbing a stack of Nanofiber from somewhere to handcraft Fusion plants isn’t the end of the world. At that point a little bit of spaghetti to add in the missing buildings is totally fine with this layout as-is.
edit: There’s a missing sorter feeding into Logistic Vessels from the Processor belt.
General Build Order
These are my own notes- was asked by a couple folks to post it but I don’t plan to really maintain it like the layouts themselves lol. How suitable they are depends on your own playstyle. I generally do not main-bus except for oil and oil products as a little concession to hydrogen management and disposal
Hopefully they help SOME folks though!
updated 2021-02-17
– place wind turbines, place miners + storage on copper/ore/coal/stone, preferably with copper – iron – stone in that order for starter mall
– place assemblers to make magnet, circuit, gear, glass, stone, also temporarily place storage
– build starter mall, set up Blue research, set up coal gen,
– tech to Red, setup mall for Oil Extractor/Refinery/Chem Plant
– tap oil, send oil to equator bus, pick a spot for oil refining (see tileable layout), turn ALL combined crude oil minus 8/s (for Yellow+red) that’s tapped to fuel/hydrogen, burn excess in thermal gens for now (this should be power positive to tap more and more crude oil nodes in range)
– Setup Red research using Yellow+Red early game layout (ignore the Yellow part) while also teching to Yellow
– Research Drive 2, finish Yellow+Red layout, tech Universe Exploration to see what minerals the other planets have.
– Fly to Titanium planet, setup coal burners for power, setup 6/s Titanium worth of smelters, build lots of storage
– Fly to Silicon planet, setup coal burners, setup 6/s High Purity Silicon, build lots of storage
(if one planet has two it’s OK to just do both on one for now)
– Hand carry Titanium back, dump into Yellow+Red setup, beeline Interstellar Logistics
– setup automated transport for Titanium then Silicon in that order
– Expand Red to 2/s, Yellow to 1/sec
– Designate sites on other planets for mass-production of Turbines (copper+ore planet) and Processors (silicon planet, pref. with copper/ore) For now, build 1/s each
POWER should be 120MW on home planet, 50MW on outpost
Logistics
– Plan on interplanetary mass production and shipping of:
Copper Ingot
Iron Ingot
Magnet
Graphite
High Purity Silicon (first)
Titanium (first)
Glass
Stone
Electromagnetic Turbine (first)
Processor (first)
other than (first) label, necessity is dictated by availability of ore combinations. If one planet has no copper and the other has no iron it’s a big doo doo for processors.
– Tech to Deuterium Fractionator and Fusion plant
– setup automation for logistics + drones (will be placing a lot of these)
– automate Graphene and Titanium Alloy
– hydrogen “exhaust” all gets belted towards Fract farm
– get mk3 belts to run 10 fracts for 3/s Deuterium
– target Orbital Collector, set up a couple before stockpiled Hydrogen runs out, to dump into Fusion plant. Need 2 collectors minimum before fusion. In meantime expand Turbines to 4/s
– setup Titanium Alloy automation
– ship Titanium Alloy, Magnet, Turbine, Graphite to Hydrogen belt, automate fusion power cell x2, setup Fract line near Hydrogen tank, build 20 Fusion plants. 180MW should be plenty for now. Scale up later to 360MW and remove all fossil fuel burning (conserve coal, divert all oil back to oil products rather than burning)
– setup rest of mall- with abundant logistics, possibly rethink planet layout, remove unnecessary belts, drones will carry stuff that’s inconvenient to belt. Overall topography is still important as travel time is a factor along with power draw
– tech to purple, setup Particle Broadband automation, make 2/s purple
– setup more Orbital Collectors, setup Deuterium Rod shipping to other planets for cheap power.
– finish 6/s Turbine and Processor outposts
– Setup Organic Crystal automation in prep for Plane Filters
– Bump fractionators & fusion plant to 60 generators for 540MW (or 80 for 720 provided there’s enough fractionators)
– tech to green, setup Plane Filter and Graviton automation, make 1/s green (edit: down from 2/s due to power constraints)
– tech to Dyson sphere, setup Frame Material automation, design sphere and start launching some rockets
– start seeing what rares nearby systems have
– calculate maximum throughput of home planet’s oil products. Crude Oil rate (viewable on map) = Sulfur + Organic Crystals, which limits graphene vs titanium alloy vs solar sail rate, discounting rare ore, figure out good tech rate
– Tap Organic Crystal and Sulfur from nearby systems if possible. This helps ease production lines massively. Stalagmites are nice but don’t really help much if Fire Ice is available from Giant.
– start generating Antimatter for Research. The target is 2/s (and 2/s Green as well) which will take 24 Ray Receivers w/o Graviton and ~2GW from the sphere. Dyson should probably be divided between this and boosting power on both home planet and outposts to scale up production depending on where research is.
– Scale outposts up. 15-18/s Turbines and Processors should be plenty for getting 2/s white cubes and 1/s Rockets.
– start transitioning to Artificial Sun/antimatter power as Dyson sphere completes past 2G or so. Prior to that just spamming more Ray Receivers while focusing on research for Antimatter consumption is probably a better idea.
– Abandon the home planet for a better star (lol) while leaving it generating 2/s research. Ship sails and rockets out to jumpstart a Dyson in better system (preferably O, but good B or A star with rares in range and 8 digit resources are a good bet)
Old Layouts
Old Red+Yellow

Old v2 Mall


Old 6/s Turbine

Old 6/s Processor
