Overview
I have about 200 controller hours logged for Creativerse. Here’s how to set up a controller and use a good mapping.
Introduction
I’m making this guide because I’ve noticed a lot of people asking if Creativerse has controller support. The answer is YES****! Where **** means that Steam has built-in mapping for most controllers now.
Ok, it’s not idea. Some times you have to revert to moving the mouse with an analog stick to click on something in a menu or you might have to use the very nice on-screen Steam controller keyboard but it works pretty well.
In fact, I started playing Creativerse when I noticed my kids (6 and 4) were watching a lot of videos of people playing video games like Minecraft. I wanted something to help them be creative and that we could all play together and have fun. With so many buttons on a keyboard to accidentally hit, it made sense to have them learn to use a controller.
And it really helped that 3 copies of Creativerse was a total of a whopping $0. They do just fine without the Pro features and we’ve actually bought the Welcome pack and spent the coins on some other sets of recipes that we thought looked cool. This has been a great summer!
Step 1: Plug in a controller
Steam first developed their own controller that could be mapped to games. The Steam recently added XBox and PS4 controller support to the same mapping tool. Now they’ve added support for any game controller through a controller setup tool. You should be able to try out most controllers so go ahead and grab one and plug it in to your computer.
Make sure that Windows can recognize the controller. The Game Controllers control panel should let you see and test what is currently connected.
If you are thinking about buying a controller, check around online to see if other people have had success using it with Steam. An obvious first choice would be a Steam Controller. But they are kind of expensive and get your hands on quickly so a new or used XBox or PS4 controller also is a good choice. I ended up going with two Rock Candy XBox 360 controller from Walmart for $20. I liked the size and since it’s meant to work the the 360 I figured it would probably work just fine.
Step 2: Set Steam to recognize the controller
In normal mode, open the menu View->Settings and then go to the Controller tab and click the General Controller Settings button. In Big Picture Mode, you can get to the same thing by using the gear icon then opening Controller Settings.

Either way, turn on the appropriate Configuration Support for the controller you have plugged in. My third-party XBox 360 controller is only a Generic Gamepad as far as Steam is concerned. If you don’t see these menu items or don’t see your controller in Detected Controllers section of the page something went wrong with Step 1.
Step 3: Map Buttons to normal buttons (some controllers)
I first used a Saitek P2600 with Steam (don’t get one, they don’t have buttons on the controller sticks). When I plugged it in for the first time I was asked to map the buttons on the controller to the cartoon outline of a controller. Basically, what axis should be used as the left stick, what button should be the trigger, etc. Alternatively the community might have a mapping for your controller already.
The Rock Candy XBox 360 controller I currently used didn’t require any mapping and corresponds to the expected buttons.
Step 4: Setup Mapping for Creativerse
In either mode, you can start Creativerse and press the Guide Button then click Controller Configuration to bring up the game-specific configuration. The Guide Button is usually the Steam, XBox, or PS4 logo on the controller. If you don’t have one, you probably mapped a button to this function in Step 3. Alternatively, in Big Picture Mode, select Creativerse in your library and then go to Manage Game and click Controller Configuration.
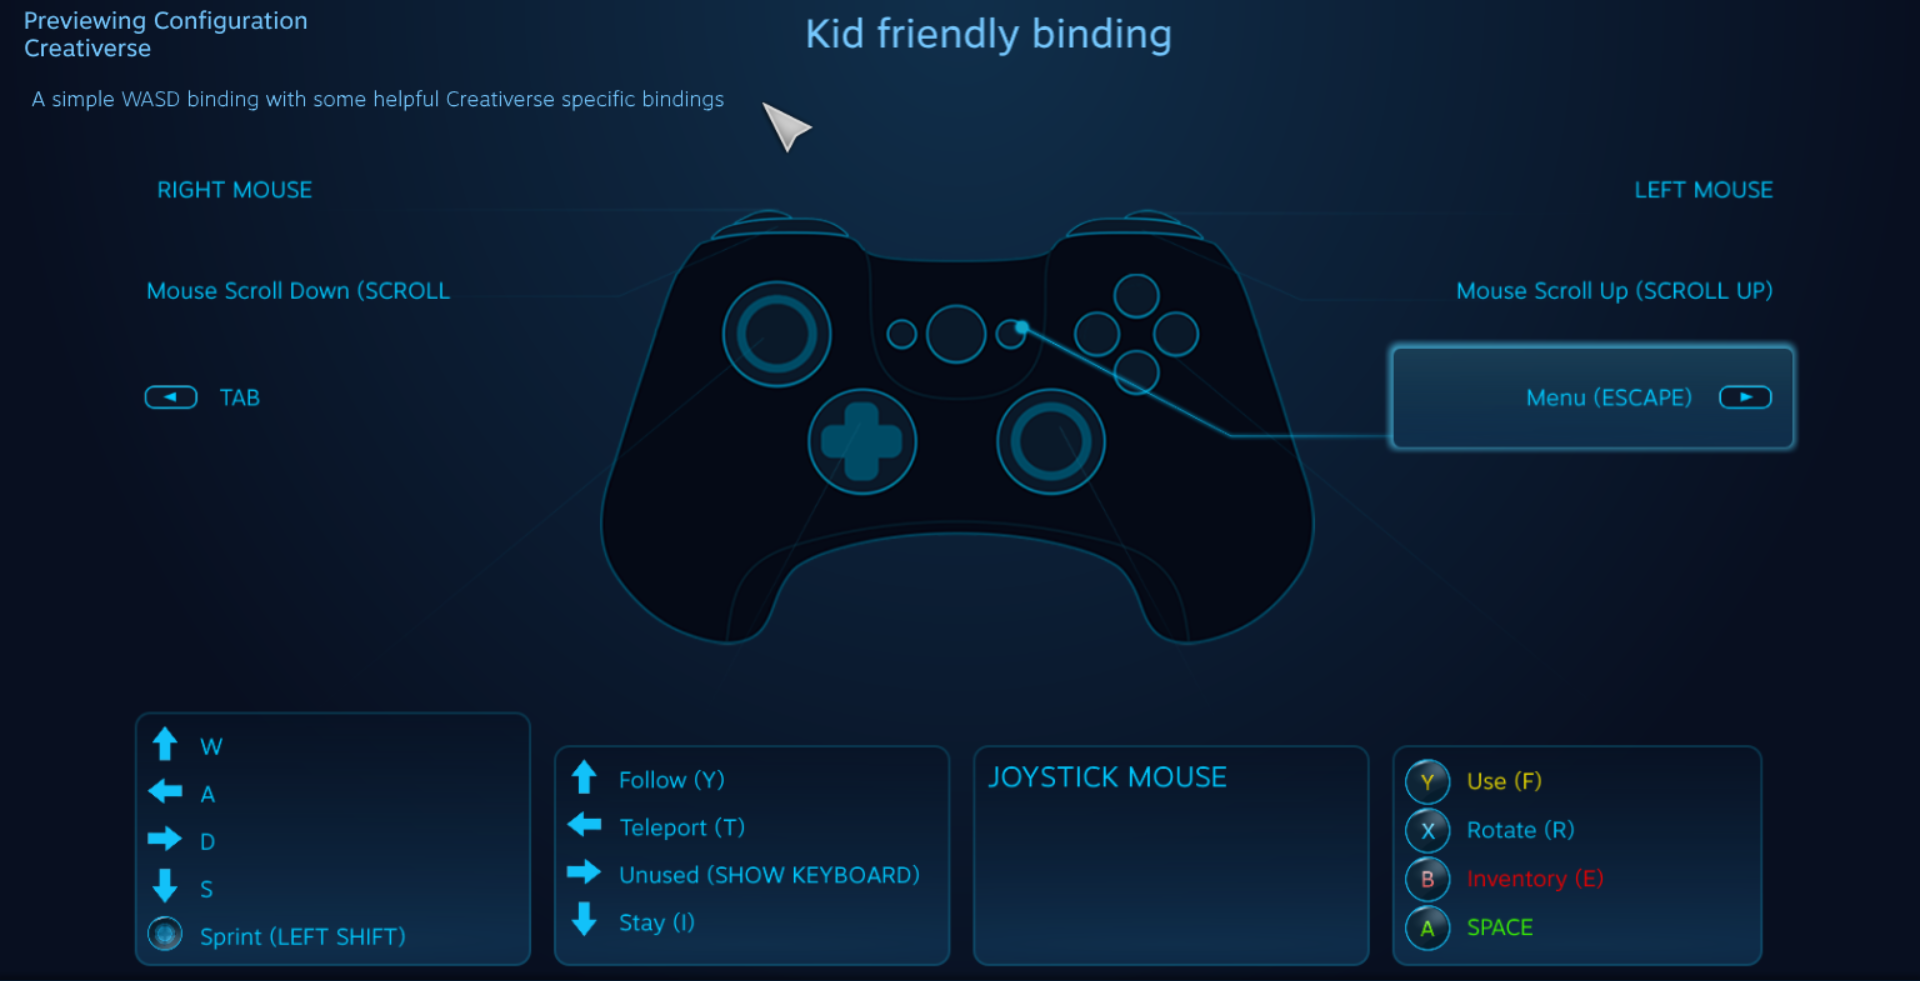
You should see the binding screen:

From here you can select what each of the different buttons on your controller does. You will probably want to start with the default WASD setup on the left-stick and joystick mouse on the right, triggers for clicking. Some other buttons to consider, depending on your play style:
- F – Interact
- Tab – Switch tools
- Space – Jump
- Shift – Sprint
- R – Rotate
- E – Inventory
- Mouse Scroll – Scrolling and switching quickbar selections
- Esc – Menu
- N – Detach Wiring
- V – View Wiring
- C – Crouch
- Full Keyboard – See Below
Steam actually has a really nice keyboard for controllers. It took a minute to wrap my brain around but after that typing with it is significantly faster than using arrows to select a letter. Essentially the keyboard is divided into two halves, one for each stick. A small circle hovers over the middle of each half. The further you move the stick from the center, the further the circle moves. When you pull the left or right trigger it enters the key that is below the circle for that half. The hard part is moving the stick just the right distance but it gets easier with practice. You might want to use a button to open the keyboard for typing into the few text boxes in the game or for pushing rarely used buttons (like N,V or C).
In the next step we will show you how to use a pre-made configuration.
Step 4 (alternative): Pre-made configuration
Opening the Controller Configuration for Creativerse again like in Step 4, the bottom has a Browse Configs button. Selecting this will let you choose a configuration uploaded by another player.
You can find the configuration for this guide titled Kid friendly binding.