
Overview
This is a control scheme for Elite Dangerous CMDRs who are rocking the keyboard and mouse, yet feel as if the default controls are lacking and inefficient.
Patch Notes
Elite Dangerous — Fleet Carrier Update Patch 9
Jan 6th – Visual overhaul and many typos squashed, along with some additional information added. Much of the guide was revised a bit to make viewing of the content easier.
Feb 16th – Added some other comments and revised sections. Split a few sections for easier reading. Fixed a few keybinds. The scroll-wheel for increasing and decreasing throttle speed is not working, hopefully I’ll be able to see to it in the future.
A 60% Keyboard layout to be considered in the future for those without a NUMPAD. Although it will be a bit difficult considering how many of these keybinds are a bit vital for much of the experience later on.
As I make adjustments the keyboard graphic will become outdated for the time being.
Introduction
When I first started out, I had a lot of trouble piloting with a mouse and keyboard out of the box with this game, so I decided to share a guide on what controls I thought worked the best. Elite Dangerous may be frustrating at first, but it becomes a whole different experience once you get the hang of controlling flight and combat that suits you. However, learning to pilot is only the beginning of the learning curve in the game.
I’ve tried out many different combinations that have been recommended to me. I believe that while the implementation of joystick emulation that comes as default is actually quite good, people who are used to pitch/roll flying will find them okay. However, if you’re already familiar with FPS and MMOs, probably the best and all-around layout will be this guide. (Hopefully)
Controls Layout
Keyboard Visual (With Numpad):
This keyboard shows the version as demonstrated in the pictures below and may vary based on your own changes. Otherwise this visual reflects this the keybinds in this guide.
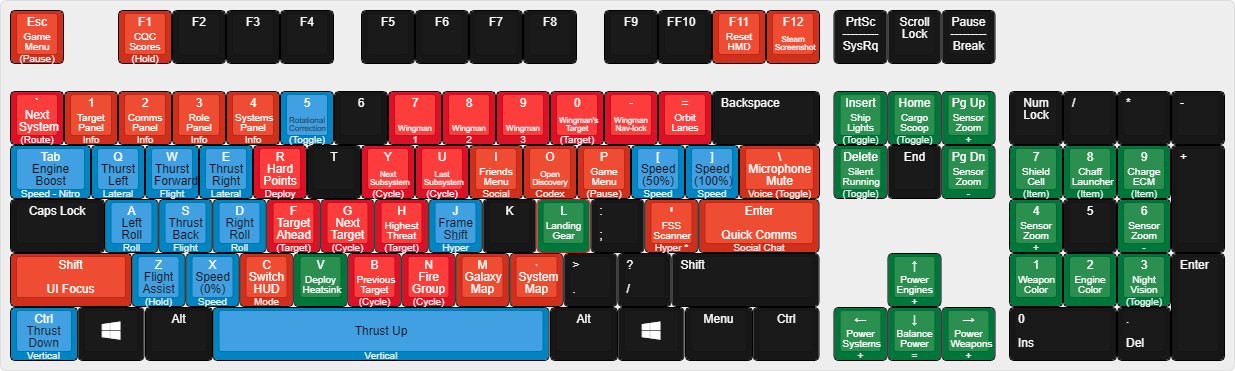
Be sure to check the defaults out by selecting the preset: “Keyboard and Mouse with Yaw”.
Legend:
Blue – Flight Controls
Red – Combat & Targeting
Orange – Menu’s & Ship HUD
Green – Miscellaneous Ship Controls
Another version of the visual:
[link]
Keybinds Location
To find your Keybinds file go to:
C:UsersUSERNAMEAppDataLocalFrontier DevelopmentsElite DangerousOptionsBindings
Your Keybinds file will look something like this: Custom.binds
Download the Keybinds file below and replace it with your file:
Google Drive[drive.google.com]
Note: Firefox may have an issue viewing the text or have an odd font when viewed, but copying or downloading should work without any issues. Chrome doesn’t appear to have these issues.
List of Keybinds:
[link]
Guide Basics
The menu may seem overwhelming at first, but there are lots of things you shouldn’t worry about for now. You can always experiment and go back to change certain user-specific settings and miscellaneous options for your own sake.
As you read through each section you should be aware that some categories marked with “Optional”, which are not required for an efficient M&K setup. Those options are based on preference and are left at your own discretion.
Be sure to check the defaults out by selecting the preset: “Keyboard and Mouse with Yaw”. As we will be using Yaw with the mouse.
Remember to select your preset in-game to Custom first before continuing onto this guide.
Flight Controls
Before we name off the other controls, I would like to name off the two types of presets used for flying. These will depend on your preference, so try them out both.
Preset 1 (Rotational):
Roll Left/Right to [A/D]
Lateral Thrusters Left/Right to [Q/E]
Preset 2 (Strafe):
Roll Left/Right to [Q/E]
Lateral Thrusters Left/Right to [A/D]
With the Rotational Preset, I find it more comfortable as I am able to rotate at any given time to change my direction and look around easier. However, it may be tougher to get used to strafing when using this preset. Although the Strafe Preset makes strafing much easier and normalizes the flying experience, I’m usually in open-space, so the former suits me more.
Skipped Sections:
Alternate Flight Controls – (Unnecessary)
Flight Landing Overrides – (Unnecessary)
Change the Mouse X-Axis to Yaw
Remember to adjust your “Mouse Sensitivity” to your desired settings.
Deadzone
What is a Deadzone? It’s an area from the center point which moving inside won’t register any inputs. This allows you to precisely adjust any micro-movements that might occur. Usually, for me, I will instead adjust my DPI to a lower setting when needed, especially when docking or landing.
Optional:
You may want to adjust “Mouse Power Curve” to help your mouse cursor to properly center and have less wobbling after extreme maneuvers. Should you be having these issues.
If you’re looking for a more minimal experience you can switch Mouse Widget to OFF. I would recommend it to be on versus off, since I like to know what I’m doing with a visual.

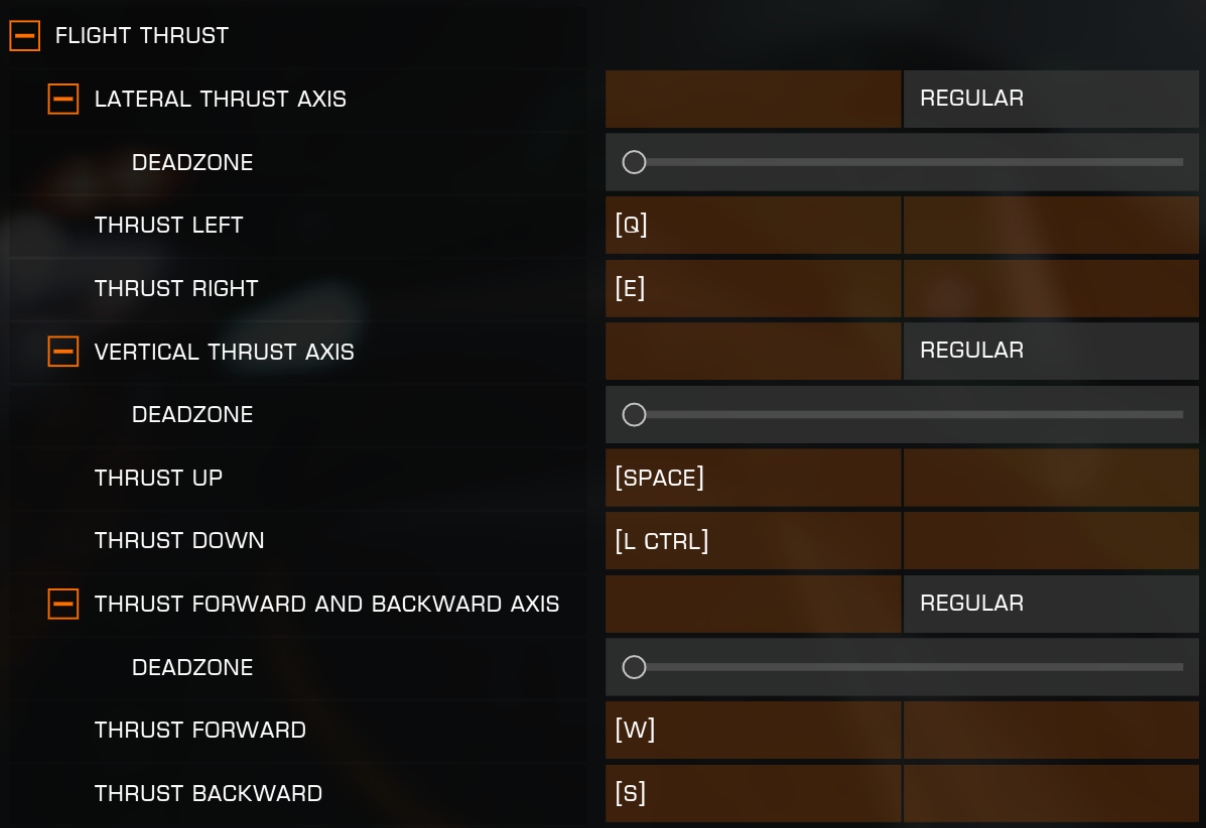
Set your Roll Left/Right to [A/D] or [Q/E] on your keyboard.

Set the Lateral Thrusters Left/Right to [Q/E] or [A/D] on your keyboard
Set the Vertical Thrusters Up/Down to [W/S]
Set the Forward/Backward Thrusters to SPACE and LEFT CTRL
Set Forward/Backward Throttle to the Mouse Wheel.
Depending on your type of mouse and its button placement, you may prefer this option instead.
The handiest increment is 0%, used for stopping while in supercruise. You also might want to consider setting the key you would normally have set to “autorun” in games set to 50% Thrust (Which is usually “R” I presume). This way, you will default to the “sweet spot”, and “pump” forward with forward thrust, and “ease back” with reverse thrust.

The key to learning these controls essentially boils down to you learning to “circle strafe” (similar to other games), however since lateral movement is much faster with Roll followed by Pitch, circle-strafing is better handled in the vertical direction as well. Although this can be achieved laterally, it’s a bit trickier because the flight model is actually modeled off Roll/Pitch. Using WASD as your keys (similar to FPS games) soon will make flying become second nature on this system.
Now, you might think that binding the Roll keys to A/D and then placing pitch on the mouse would seem strange. However, it’s actually quite intuitive and easy to pitch with the mouse while rolling with A/D; as the left and right-hand works together to compensate each other.
Since Roll is the fastest type of movement in the game, there’s no special advantage to having it controlled analog-style (as you do it with Pitch anyways, which is a bit slower). On the keyboard, you can only roll as fast as your key-press. Therefore, you need only to hold down the key for as long as you need until you reach your desired position.
With both pairings (rolling and strafing), you have all the essential controls on the most familiar keys (WASD), right under your fingers at all times. Yaw is “weak” in this game, but it’s still essential to fine-tune your aim, especially for FPS-MMO player. It’s intuitive to have it set as the X-Axis on the mouse, as you’d normally would in an FPS/MMO.
Editor’s Note: This section is meant to make flying in Elite Dangerous as familiar as possible to Mouse & Keyboard users in general. There are so many dangerous ways to fly, so be sure to experiment to your own ends!
Flight Miscellaneous
Change Toggle Flight Assist [ Z ] to Toggle
This option is recommended only for commanders who have full control over their Yaw and Pitch controls. However, I recommend you set this to “Toggle” if you use FA-Off as it will be less of a hassle to use.
(Visit Tommyttk for more on Flight Assist Off, who gives an excellent explanation.)
Toggle Frame Shift Drive is often confused. It actually performs both Supercriuse and Hyperspace Jump. These are legacy options after Frontier merged the two actions into one. You may use the two key setup instead if you desire, but you could also have all 3 options binded and fly both ways. The option is yours as this keybind was created for convenience.
Rotational Correction (Optional)
For commanders that want a bit of a challenge. This option basically turns off/on Rotational Correction, which allows your ship’s rotation to automatically align with a rotating station’s hanger.

Targeting & Weapons
Select Target Ahead add [ F ] as an alternative or entirely replacing [ T ]
If you have chosen the latter, this means we won’t be needing the [ F ] key for throttling down anymore. I decided to use it as my main targeting button since it was much easier for me to access; being right next to the WASD controls. A general tip is that you always want to be able to quickly target objects to identify them or perhaps shoot them down first.
[ Y ] to Cycle Next Subsystem
[ U ] to Cycle Previous Subsystems
Our option here allows you narrow through another ship’s subsystems quickly to target a specific subsystem. However, it’s recommended for you to use the panel for targeting instead to save time. A more experienced commander who knows their layout, however, will gain an advantage.
Set Cycle Previous Ship to [ B ]
This is an extra option that lets you scroll back and between targets.
Cycle Next/Previous Hostile Ship
This is also an option if you want to maybe avoid accidentally targeting friendly ships. Personally, I don’t use it. You won’t need to cycle between all ships though, in most cases Cycle Highest Threat is sufficient enough.
Set Target Next System in Route to [ ` ]
This option is great for traveling. Having it set to this place allows it to relatively be easy to access with a shift of your finger upwards.
Note: There isn’t Wingman cycling, so if there’s the case where you know you won’t have wingman. You can use these keybinds for elsewise. Otherwise, there is really not reliable way in making those 3 keybinds into 1.

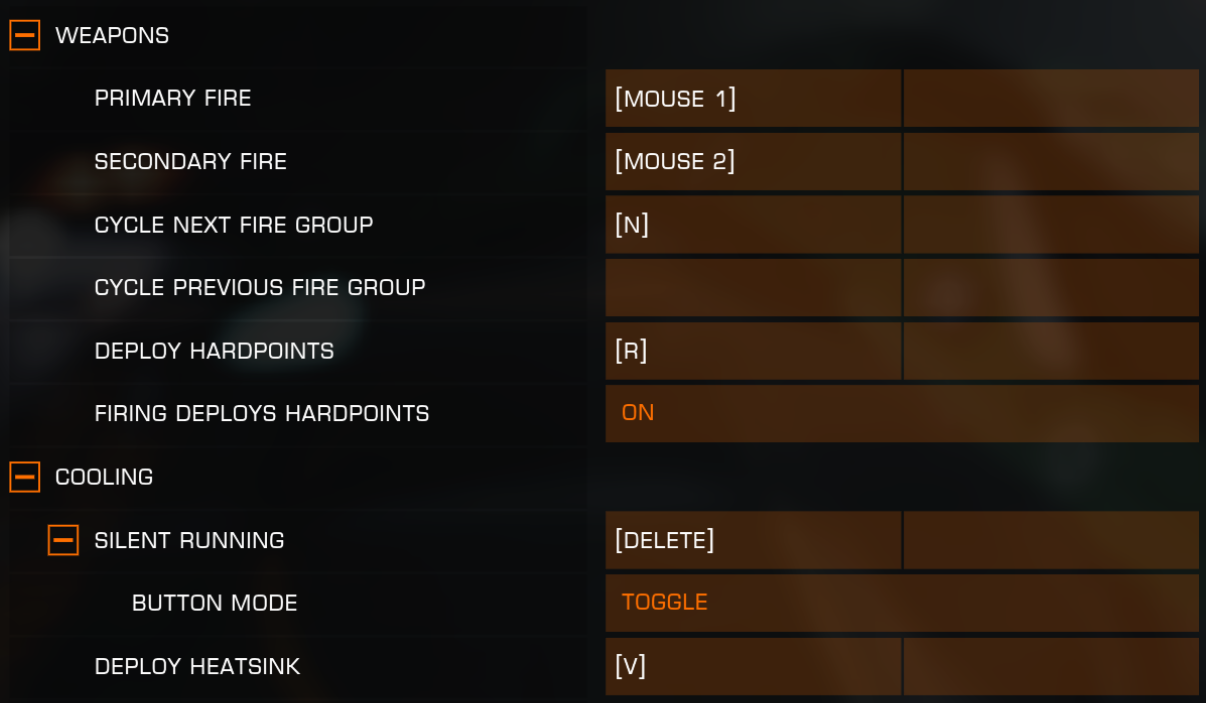
This section is very straightforward and requires no change unless you see something that works better for you. I have added [ R ] as an alternative to Deploy Hardpoints for easy access. It’s right next to the movement keys which should allow easy access. I prefer it over the default [ U ] as it’s less awkward for my fingers to reach across over to.
Silent Running
There’s a bit to this mode, but I won’t go too deep into it. Silent Running is a mechanic that reduces your visibility to other ships by reducing your ship’s heat signature allowing you to be stealthier. However, during this phase, your shield will be deactivated along with your ship’s cooling vents. Your ship will continue to build up heat as long as it is on. Unbind Silent Running if it is unnecessary for you as it will build up heat to dangerous levels if it goes unnoticed.
Heatsink
Heatsink Launchers are a utility module you can fit onto your ship used to quickly reduce heat levels of your ship and then ejected from your ship. This is a popular module to be fitted on Silent Running routines or larger ships that emit larger amounts of heat.
Miscellaneous
The Miscellaneous section shares a catalog of both necessary options and those that aren’t. Most of these options should be a toggle. Set them to toggle if not.
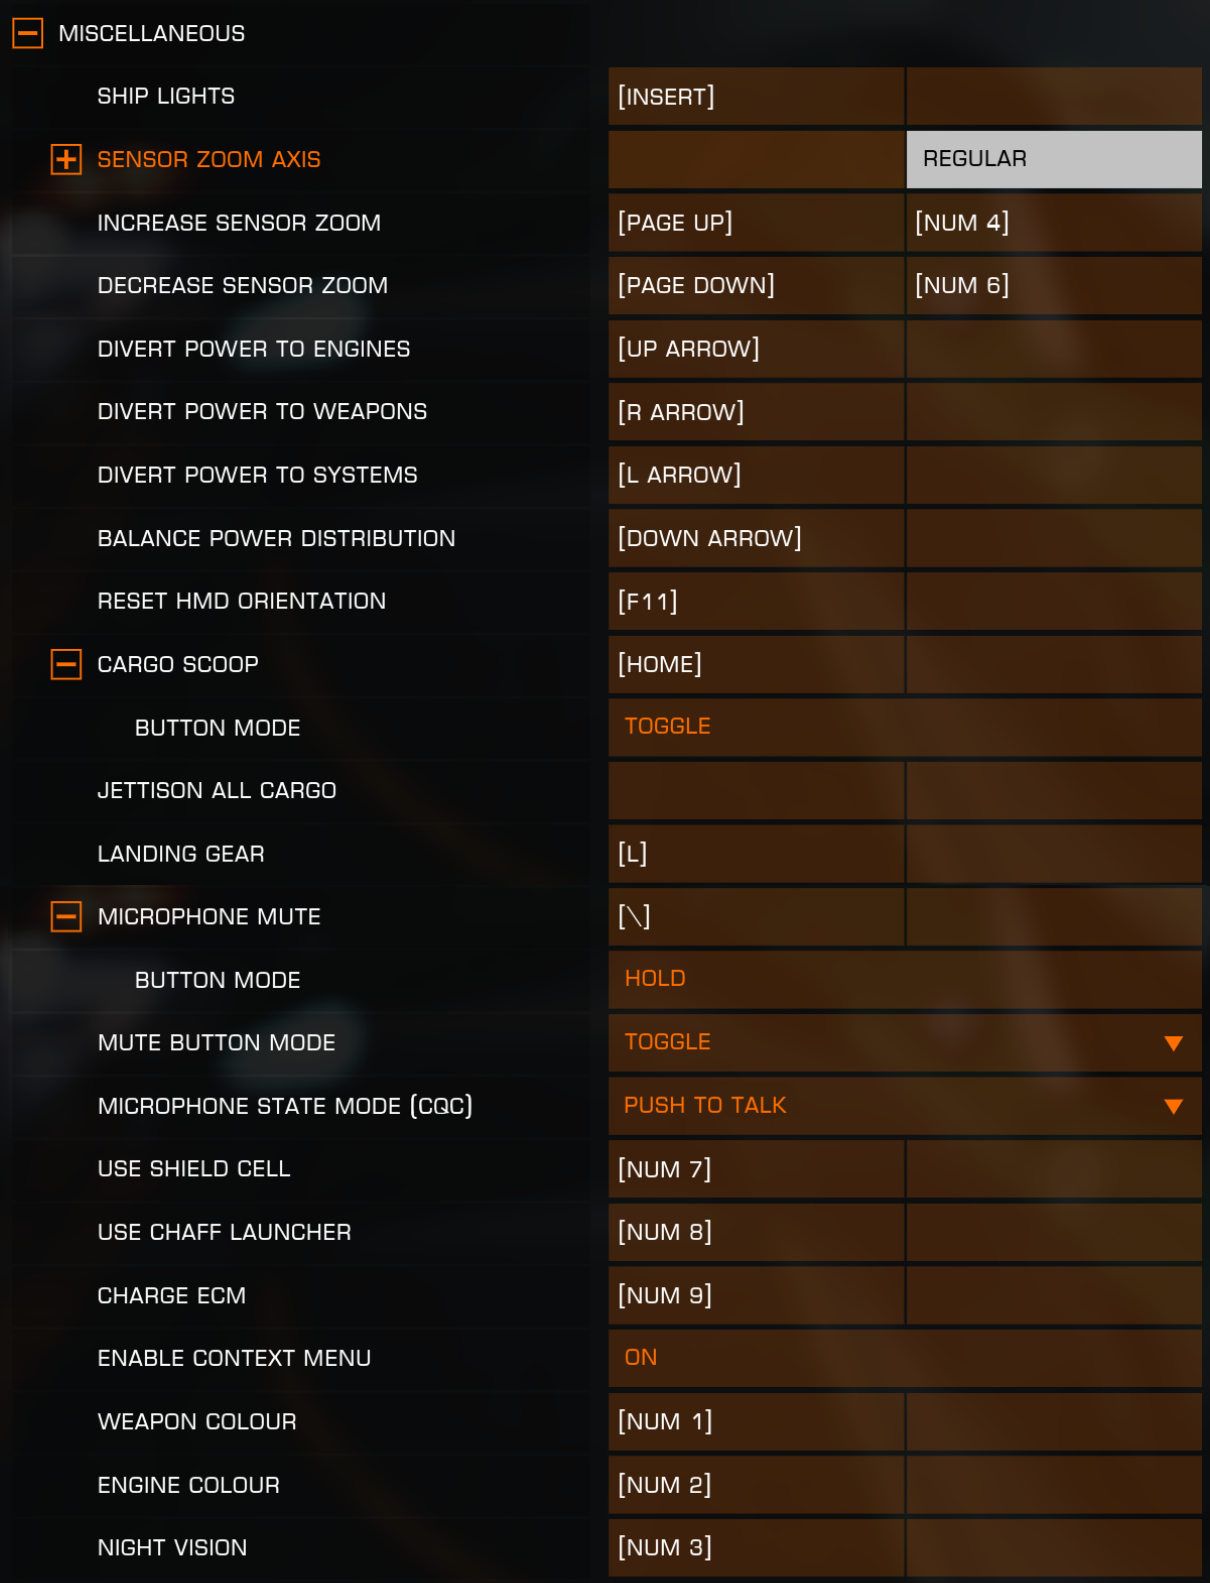
You will be using [Insert], [Home], [Page Up], [Delete], [End], [Page Down], and your [Arrow Keys].
It’s probably best you change your Push to Mute to Toggle or else you would have to hold it to mute the entire time or everyone would hear you throughout the whole trip. To get past this, I recommend using a different application for Voice Comms, since this game doesn’t feature a “Push to Talk” option. Now it does have “Push to Talk“.
Reset HMD Orientation is set to [ F11 ] as my Steam screenshot is set to [ F12 ].
(F12 is also the Steam default for screenshots)
Don’t bind anything to Jettison All Cargo. This will cause you more issues than convenience, instead, use the actual panel to manage your inventory and dump out your cargo when needed. If you do bind it, be aware of it, it is still very useful to immediately dump all your cargo should you need to escape to another galaxy.
Sensor Zoom
These are used as additional aid when you aren’t holding onto your mouse.
[NUM 4] – Increase Sensor Zoom
[NUM 6] – Decrease Sensor Zoom
Utility Keys
[NUM 7] – Shield Cell
[NUM 8] – Chaff Launcher
[NUM 9] – Charge ECM
[NUM 1] – Weapon Colour
[NUM 2] – Engine Colour
[NUM 3] – Night Vision
You may also set an option for your cosmetics, if you have purchased them. Right beside those two, I have also set [ NUM 3 ] for Night Vision.
Also, switch Enable Context Menu to ON.
HUD / Mode Switches
Your ship’s HUD (Heads Up Display) is something you best get used to in Elite Dangerous.
Skipped Sections:
Interface Mode – Unnecessary
Headlook Mode – Unnecessary
Galaxy Map – (User Dependent)
Camera Suite – (User Dependent)
Free Camera – (User Dependent)
Store Camera – (User Dependent)
Playlist – Unnecessary
Detailed Surface Scanner – (User Dependent)
Not many modifications were made here except adding in a few potentially vital binds.
Galaxy Map is set to [ M ] and System Map is set to [ , ]
Switch HUD Mode is bond to [ C ] to make it easier for me to access below my movement keys.
(This option will take out Next Page on the Interface section, but it isn’t important along with the fact that they have a backup pair of binded keys.)
The Friends Menu — [ I ] now has a bind of its own too.

+ Added extra bind to Target Current Signal — [ F ]
Credits
The original writer of this guide helped me get into Elite Dangerous and play with M&K.
I haven’t been playing Elite Dangerous for quite a while now, but I enjoyed my time exploring the galaxy. I’m glad I still have the chance to help out other commanders fly.
We both thank everyone who has helped contribute to the guide and recommend different changes throughout its time.
Honestly speaking, this guide could use some more work, but it’s just a simple guide after all.
There are many videos out there that explain some of these topics more clear and hopefully this guide has helped you out in some way.