Overview
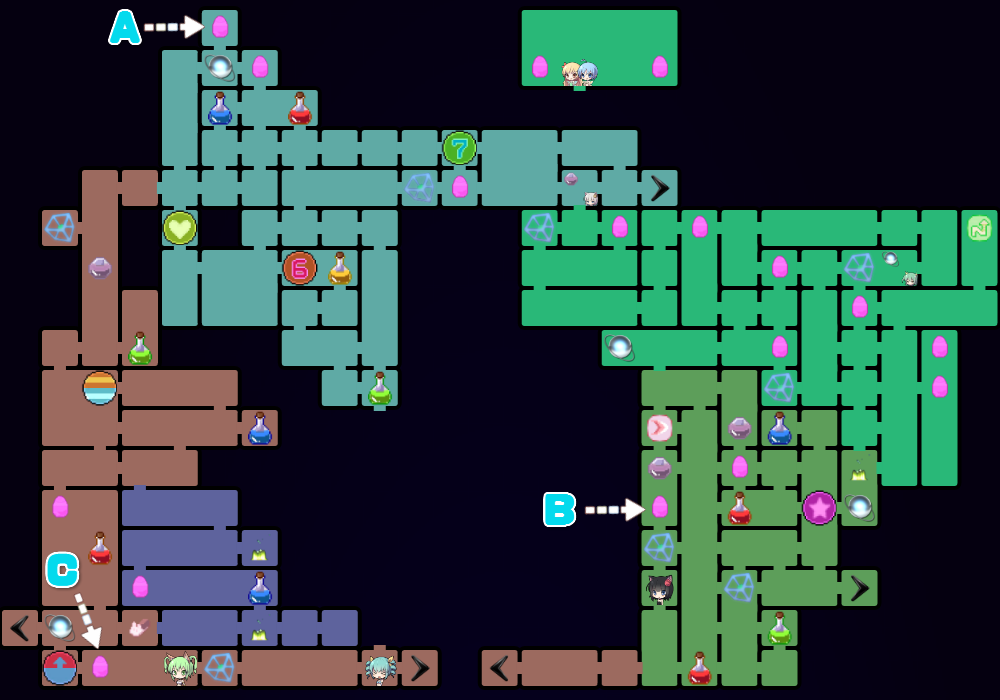
This guide will show you the locations of the eggs that can be obtained in 0% items run.
Note
The “Actually Erina is the one who reaches the eggs…” achievement asks you to get 20 eggs in a 0% items run.
So this guide will simply tell you how to achieve it.
Currently there are 25 eggs in this guide. If by any chance you find an egg that is not listed in here, feel free to tell me. I’ll rather appreciate that. Expecting some crazy ones that require lucky knockback though.
Southern Woodland
A – Found in Forgotten Cave
Requirement: Hidden Tech.
B – Found in Starting Forest
Requirement: Hidden Tech; Speedy buff.
You’ll need the Speedy buff to use Reversed Wall Jump to reach that area.
C – Found in Forgotten Cave II
Requirement: Rumi defeated.
Once the boss battle is over, head left and you’ll see it.
D – Found in Forgotten Cave – Credit to かずねちゃん
Requirement: None.
Lure the RED UPRPRC Enemy into bombing that tile.
Western Coast
A – Found in Floating Library
Requirement: None.
B – Found in Rabi Rabi Beach (or Golden Pyramid?) Credit to speckticuls.
Requirement: Hidden Tech; Speedy buff; Amulet Cut buff (Optional).
This one is very tricky and probably needs a lot of practice. Use Quick Drop near the right wall and use Reversed Wall Jump to reach that platform. Use Bunny Amulet to extend your jump if necessary.
YouTube is somehow blocked in my region, so I can only add an image tutorial.
However Demon_of_murder_Rena is very kind to offer a video guide[www.bilibili.com]for this egg.

Island Core
A – Found in Sky-High Bridge
Requirement: Hidden Tech.
Let Ribbon aim upwards and shoot, and you should find a hidden path. Jump up there and keep shooting, a spring board should appear. The egg is hidden inside the ceiling, which can be reached with the help of that spring board.
B – Found in Rabi Rabi Ravine
Requirement: Speedy buff.
Hug the right wall while falling and you should get this one.
C – Found in Rabi Rabi Park Credit to Doctor Flippers PhD.
Requirement: Hidden Tech, Amulet Cut buff (Optional).
Lure the Rock enemy into hitting you and giving you a speed boost, then use Reversed Wall Jump. Use Bunny Amulet to extend the range if necessary. Easier said than done though.
Northern Tundra
A – Found in Aurora Palace
Requirement: None.
Jump from the edge and keep moving right, and you’ll get this one. Speedy buff can help but is not necessary.
B – Found in Azure Snow Land Credit to speckticuls.
Requirement: Hidden Tech; Speedy buff; Amulet Cut buff (Optional).
Jump from the highest part of Aurora Palace and keep moving right, use Bunny Amulet to extend your jump if necessary. I recommend you to save before you jump, just in case you mess up.
C – Found in Icy Summit
Requirement: None.
D – Found in Natural Aquarium
Requirement: Seana defeated.
After beating Seana, keep going left and when you see it, use Ribbon to destroy the blocks.
E – Found in Azure Snow Land Credit to Demon_of_murder_Rena.
Requirement: Hidden Tech; Speedy buff; Amulet Cut buff (Optional).
Quick Drop near the edge and use Reversed Wall Jump, then use Bunny Amulet to extend your jump to reach that platform. Make sure you don’t accidentally get that Regen Up.
Here’s the video guide[www.bilibili.com] by Demon_of_murder_Rena.
Eastern Highlands
A – Found in Evernight Peak
Requirement: None.
Eh, you need to let Saya use the block-summoning attack, with a bit of luck, you can jump to that pillar with the help of her blocks.
B – Found in Exotic Laboratory
Requirement: Hidden Tech.
I think you already got this.
C – Found in Golden Riverbank Credit to Doctor Flippers PhD.
Requirement: Hidden Tech, Amulet Cut buff (Optional).
You’ll need the speed boost from enemy projectiles, then use Reversed Wall Jump. Spam Bunny Amulet for longer range if necessary. Easier said than done though.
A little known fact about the egg right before Exotic Laboratory: You can actually pick that one up in a 0% items run. But that requires the use of a glitch. See for more detail.
Plurkwood
A – Found in Plurkwood
Requirement: None.
Keep moving leftwards when you reach that room.
B – Found in Plurkwood
Requirement: Hidden Tech.
Not much to add, this one isn’t hard.
Subterranean Area
A – Found in Volcanic Caverns
Requirement: None.
Well, you need to trick those enemies into bombing the blocks that hiding the egg.
B – Found in Volcanic Caverns Credit to speckticuls.
Requirement: Speedy buff; Amulet Cut buff (Optional).
Keep moving leftwards, and use Bunny Amulet to extend the range. Since you have to go through the entire Hall of Memory all over again, it’s recommended to leave this as the last one.
C – Found in Volcanic Caverns Credit to Demon_of_murder_Rena.
Requirement: Hidden Tech.
I do think this one is even trickier than the one in Golden Pyramid. You need to let the dog enemy hurt you to bounce you upwards while jumping, and then use Bunny Amulet to extend your jump.
Here’s the video guide[www.bilibili.com] by Demon_of_murder_Rena.
Warp Destination
A – Found in CreSpirit Base
Requirement: 3rd Warp Trip.
Just enter the CreSpirit Base.
System Interior
A – Found in System Interior (Blue Area)
Requirement: None.
Jumping back from that point is a bit tricky, but isn’t that hard.
B – Found in System Interior II (Red Area)
Requirement: Hidden Tech.
Not much to add.
Thanks and hopefully this helps you out~!
Special thanks to speckticuls, かずねちゃん, Demon_of_murder_Rena and the whole Rabi-Ribi Database Community.


