Overview
This is the offical Entropy Rising editor guide. Please don’t hesitate to ask anything that is not clear, and we will try to answer your questions and extend to guide where possible.
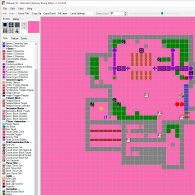
Editor Window
The editor has two windows. Most things in the editor have tooltips. First, lets talk about the editor window:


If you want to select a tile for placing, click on it, and you will see that the currently selected tile window now displays the tile you selected:

If you want to place tiles, use the right mouse button on the level. You can also hold down the right mouse button to place tiles continuously. You can also select different brush sizes:
The fill tool (paint bucket icon) works like in MS paint and fills out everything you click on which is the same tile type. The buttons showing +0 and -0 mean that when you paint, only the current layer will be affected. If you click on +0, it will change to +1, meaning that when you draw, you will also draw on the layer above the currently selected/visible one. Right-click decreases the number, left-click increases it. If, e.g., +2 is selected, you will draw on the current layer and two layers above, which means that you draw on 3 layers in total.
If you want to erase tiles, you can either select “Empty” as tile, and replace the tiles you want to remove, or you can hold CTRL while right-clicking on the tile in the level window.
You can revert your changes at any time by using “Undo” in the toolbar. You can also use CTRL+C to Copy a tile you have selected in the level window, or use CTLR+X to cut the selected tile. To place the tile again, simply right-click where you want it.

In the markers tab, you can place markers, which are red crosses are visible on every layer. They are useful to help you remember where things are on different layers. They are not saved and don’t influence the level. Don’t forget to switch back to one of the other tabs once you are done placing markers.

In the textures tab you can select different textures which you can apply to solid blocks. Applying textures works just like normal tile placement, however, no tiles will be placed, only existing ones will get the selected texture.

If you want to move or copy some tiles (e.g. so you don’t have to redo patterns over and over), you can use the Copy/Move Areas tool. Mark out the outermost corners of the area you want to copy (e.g. top left to bottom right, the order does not matter as long as an area or cube is defined by the numbers).
Action defines what should happen with the area you selected. You can move it, copy it, or copy it to the clipboard in order to move areas between different levels (e.g. you want to copy something from a completely different level). The numbers for X, Y, and Z define the offset of coordinates where the copied area should be copied or moved to (if you chose Move or Move+Copy). E.g. “-1” for X will move the area one tile to the left (reduce X coordinates by 1),
Most tiles have various properties which can be changed by clicking on the tile, and then editing the values in the view on the far right of the screen. Available properties depend on the selected tile.
Game window

Note: if you are getting poor performance while in the editor, press the windows key twice. (Loose/Regain focus of the editor window).

The most important thing to know is how the focus of the window works. In order to be able to walk around and use the mouse for controlling the player, the game window needs to capture your mouse. To start this mode, click in the middle of the game window, then press C. Now, your controls are captured as if you were playing the game in windowed mode. To exit this mode, simply press C again. It is a common cause for confusion to be trapped in this mode. Simply remember to use the C key.
Toggles the physics engine. This doubles as a no-clip mode in which you can fly around and pass walls and obstacles. Simply move while in this mode, jump to “levitate” higher. To fall down, you need to enable physics again.
Toggles Godmode, which makes the player invulnerable. Useful while flying around “hazardous” environment when inspecting the level, or for shortcuts to test later parts of a level without the need to solve the first parts.
Resets the level, but the player will remain at the same position. This is the normal behavior when you place something in the level window and the game auto-refreshes the scene.
Resets the scene, and also resets the position of the player (back to spawn).
Game speed multiplicator. Only works in the editor. This allows you to speed up the game (so you can move around faster, or test your level faster), or slow it down (e.g. letting it run at half speed if you choose 0.5 here).
Switches between quality levels of the game. Useful for developing on systems with weaker graphics card, but better don’t use the worst quality level, you might not get a feeling for some simple details.
Turns the sound on or off.
A simple level


Select solid blocks and change the height of your brush( e.g. +5), so you will draw walls with a heigth of multiple blocks. Now, go along the tiles of the level outline and place a wall along these tiles.


Let’s add a small puzzle. First, let’s build a weight sensor and display. Cut out a 3 by 3 hole in the ground where the Weight Sensor will go. Then place a Weight sensor on the top right corner, and in its properties to the right, change its scale to 3 (meaning it will fill up 3 by 3 blocks in size). The scale needs to know what display will display its values, so add “demo_display” in the targetID field.


Place a few Power Lines where ever you think they fit and can be connected to other blocks that should be activated by them. One of them needs to get the ID entered as target for the display/trigger – “demo_pipe”. Now the trigger we placed previously will output power to this pipe when it is activated.

Now lets power something with the Power Line. Lets place a Teleport Block Controller at the end of the pipes. at least one power line must be connected to a Teleport Block Controller. All incoming connections from power lines have to be powered for the Block to activate the Blocks it is responsible for. This again works using ID’s – so we add an ID that a group of teleport blocks will share (IDs dont have to be unique). so lets add “demo_group” to the teleport block controllers’ “MovableBlockID0” field.

Teleporter blocks teleport somewhere (by default nowhere) when they are activated by a Teleport Block Controller. They simply have to have the right ID, in our case “demo_group”, in order to be triggered. Lets place a single teleporter block, change its ID to “demo_group”, then copy it, and place it multiple times (after CTRL+C on the tile, simple klick right where you want to place it as often as you want). In our example we created a wall blocking the exit.


If you want to use inverse logic (blocks appearing instead of disappearing when powered) you can use Teleport Block Targets. The idea is as follows – You place a normal Teleport Block somewhere, and enter something as targetID, eg. “demo_target_1”. Then you create a Teleport Block Target, which has this ID. When the Teleport Block is activated, it will reappear at the Teleport Block Target, and appear back at the original position when the power is gone. At the moment, each Teleport Block Target has a 1:1 relationship with one Teleport Block, which means each Teleport Block Target needs a unique ID and one Teleport Block having this ID set as target.
Creating a level pack and publishing to the workshop
Levels are grouped in Level Packs.
For uploading a level pack to the steam community, make sure to have screenshots or other pictures ready to be used as preview and ingame level icons. You can still upload your pack without them and update it later, but you likely forget to make some decent screenshots until you want to update the levelpack.
You need a short description for your level pack and use at least three of the provided categories (best is one of Easy/Medium/Hard and two or more of the puzzle elements like Electricity, etc.)
You can add a short description of changes, this is interesting for updating your levelpack and to provide some information to other players like “bug […] fixed” or “level was too easy, made it more challenging”.
In addition you need to define whether your level pack should be visible and playable only for you “private” (and the developers), for you and for your steam friends (and the developers), or for everyone.
When uploading your level pack, a browser window will open, and you need to accept the Steam Licence Agreement for the Steam Community stuff.
If you don’t agree to this, the pack still gets uploaded, but no one can use you level pack until you access it on steam and agree to the agreement.
Later, you can always update your levelpacks (your editor will automatically check the according option when you try to upload the according levelpack again).
More detailed information and updates will follow soon.