Overview
Official Documentation for the Episode Editor.Last updated on February 18th 2018
Introduction
Hello and welcome to the Episode Editor. This guide will detail all of the available actions you can use for your custom Episodes, as well as explaining all of the screens.
If you want to watch a practical video Tutorial with step-by-step guidance and examples, you can find it here:
Download the files for the Example Episode “Mark’s Wedding”:
https://www.dropbox.com/home/Mark%20Venturelli/Public/Mark’s%20Wedding
Please be aware that this tool is meant for advanced users and is absolutely not error-proof. Chroma Squad episodes are complex and we can not afford to treat every possible mistake on the part of the creator.
If the Episode is behaving strangely or outright not working, please verify if you are not doing something wrong first!
Examples of things that might crash the Editor when testing an Episode are:
- Starting an Episode with a Fight but no player characters spawned;
- Leaving Dialogue or other events that refer to a character, but deleting the event that spawned that character in the first place;
- Creating ridiculously long Episodes with hundreds of Events and/or dozens of Fights;
- Etc.
0 – Access to the Episode Editor
Make sure you are using the Steam version of Chroma Squad and that you have the latest update.
You will also have to get the Free DLC “Episode Editor” from the Steam store:

After that, you should find the button to access the Episode Editor on the Main Menu.
1 – The Director’s Dashboard
This is the starting screen of the Editor.

Create a new episode from scratch.
Permanently delete a previously-created Episode file. Be careful, this cannot be undone!
Load a previously-created Episode file to make changes.
2 – Episode Info
This is basic information that all Episodes must contain in order to be playable. If you are creating a new Episode, this will be the first screen that will pop up.
You can access the Episode Info again at any time by clicking on the Menu on the top left of the screen and selecting the second option, “Episode Info”.

This is the name of your Episode. It shows up on the Episode Selection screen as well as in Steam Workshop.
Write something short and funny about your episode. It shows up on the Episode Selection screen as well as in Steam Workshop.
Click the name or the image to select. This is the starting location of your Episode. It also determines which background image will be used for your Episode on the Episode Selection Screen.
You can create a funny and/or informative name to describe the Episode’s location. This appears on the Episode Selection Screen.
Click the big gray square to select. This will be the main Boss of your Episode and will appear on the Episode Selection Screen. You can determine if the Boss will be fully rendered or show up just as a black silhouette by clicking the “Secret Boss” tickbox.
Tick the box to make the Boss appear as a black silhouette on the Episode Selection screen. Leave it unticked to fully render the Boss’ image.
This determines the minimum Season at which your Episode will show up to players. If you set a Minimum Season of “3”, for example, players will only see your Episode and be able to play it when they reach Season 3.
New Game+ and New Game++ players can access all custom Episodes.
Please note that players need to Subscribe to your episode first on Steam Workshop before they are able to see it on their Episode Selection Screens and play it, even if they have the minimum required Season unlocked.
It is highly recommended to include the Minimum Season as the first information on your Episode Description, as it will let players know if they will be able to access your Episode right away or not.
3 – Episode Timeline
This is the main screen of the Editor, where you can create every single thing that players will experience.

Think of each episode as a series of Events that happen one after the other. The Timeline screen will show these Events in order, with the earliest on the top. An Event will start only after the previous one is finished.
Create a brand new Event. For a full list and explanation of available Event types, please refer to sections 4, 5, 6 and 7.
Duplicates the selected Event. This is useful for multiple repeating/similar events, such as character dialogue.
Moves the selected Event up on the Timeline, so that it happens earlier.
Moves the selected Event down on the Timeline, so that it happens later.
Completely removes the selected Event and all information it contains. Please be careful, as this cannot be undone!
4 – Story Events

Choose a previously spawned character (or the narrator), and write what they are going to say.
We don’t recommend making each balloon too long. It’s almost always better to break long lines from the same character into multiple balloons.
You can also use dynamic commands in the middle of your text that can be replaced by the player’s own custom names, such as the name of their Studio, Actors or shouts!
{0} – Assist’s name;
{1} – Techie’s name;
{2} – Lead’s name;
{3} – Assault’s name;
{4} – Scout’s name;
{squadname} – custom name of the Chroma Squad
{studioname} – custom name of the Studio
{mecha} – custom name of the Mecha
{mechaquote} – custom Mecha summoning shout
Example: If you type in “I hope we can summon our {mecha} this time!”, and the player’s Mecha name is “Gigantor”, the speech balloon will show up as “I hope we can summon our Gigantor this time!”.
Finally, you can set how the line will read for each Language. See Section 15 of this Guide for more details.
Change the map to a different one. This removes all spawned characters from the current map.
Change all of the spawned actors into their “suit” form, with all their skills and powers.
Change a specific spawned actor into their “suit” form, with all their skills and powers.
Transform one or more actors back into their “human” forms, with no skills and powers.
Revive a Boss that was defeated in combat.
Explodes a Boss.
Deal 9999 damage to all actors, knocking them down to the ground.
Revive all actors that have been knocked down.
Destroys all monsters on the screen with a puff of smoke.
5 – Spawn & Movement Events
All Spawn & Movement Events require that you setup a Grid Event by clicking on “Setup Characters” (see section 8 of this guide for help).

Spawn one or more members of Chroma Squad.
Remove one or more members of Chroma Squad.
Spawn a guest character.
Remove a guest character.
Move a previously spawned character (except Minions).
Spawn Minions of evil.
Spawn a Boss. The Boss will come running from a specific waypoint.
Remove a Boss. The Boss will leave running from a specific waypoint.
Spawn a Boss. The Boss will teleport from a specific waypoint.
Remove a Boss. The Boss will teleport from a specific waypoint.
6 – Combat Events

Start a combat involving all spawned characters that are currently on the map. The combat will end when either all enemies or all actors have been defeated.
You can also choose up to 2 Director’s Instructions for this Fight. We highly recommend you choose two different Director’s Instructions, or it will be just weird.
If you try to include a Fight that starts without any spawned player character (Squad or NPC), the Editor will crash.
Start a Mecha combat against a specific Monster. The combat will end when either the Mecha or the Monster is defeated.
You can also choose up to 2 Director’s Instructions for this Mecha Fight. We highly recommend you choose two different Director’s Instructions, or it will be extra weird.
7 – Camera & Effects Events

Removes the black screen that is added with the “Fade To Black” event.
Fades the entire screen to black. Speech balloons will still appear.
Blinks the camera with a white effect.
Returns the background to normal after using the “Background Fade To Black” event.
Fades the background to black. All characters and speech balloons will still appear.
Play a selected music in a constant loop. Use it again to crossfade between music tracks, or use the “Stop Music” event to stop completely.
Plays a selected sound effect once.
Plays a constant ambient loop.
Stops any music that is playing from the “Play Music” event.
8 – Grid Events
Some of the Spawn & Movement Events will require that you set up a Grid Event by clicking on the “Setup Characters” button. Grid Events are information about which characters are involved in the Spawn & Movement Events, as well as needed positions in the game world.
Please take into consideration that when you first open the Grid Event screen (especially on big maps) it might take a few seconds to load, depending on how powerful your PC is.

The Grid Event screen will load up the current Map on you Episode’s Timeline. A Grid Event might require different information from you. Let’s go through all of it:
You can navigate the map by click and dragging it with your mouse. You will see little grey boxes with text in them (sometimes overlapping text). These are the Waypoints, and might be used by some Grid Events.
Usually a Waypoint is the point of origin of an Event. For example, if you are setting up a Spawn Squad event, the Waypoint will determine where your character will come running from. Some Waypoints have their own animations when a character uses them, such as opening manholes and doors.
Setup a Character to be used on the Grid Event. Select the Character you need from the Entity List and press Confirm.

Additional information may be required, depending on the type of the Grid Event. To provide and/or change this information, click the respective blue underlined text.
9 – Saving Your Episode
Please save your Episode often. There is no auto-save function.
To do this, after opening your Episode, click on the top-left menu on the Timeline screen and select “Save”.
10 – Testing Your Episode
When you want to see how your Episode is shaping up, just press the big “REC” button on the bottom right of the Timeline screen.
Please remember to Save your Episode first!
A default squad configuration will be used when testing episodes in the Editor. To use your own custom squad from one of your Save files, you will need play the game normally and select your Episode on the Recording Screen of your Studio.
Please keep in mind the “Minimum Season” you’ve set for your episode.
11 – Uploading your Episode to Steam Workshop
In order for other players to be able to play your Episode, you will need to Export it to Steam Workshop.
You need a stable internet connection for this. You will also need to be logged into your Steam account.
The first thing you will need to do is to create a Steam Workshop page for your Episode.
To do this, click on the top-left Menu button (or press ESC) to access the Pause menu, then click on “Export”.

If you have never created a Page before, you will see a message stating “Missing Steam Workshop Page”. Click on “CREATE”.
Wait for the process to complete. If your internet connection is stable, you will soon see the following dialogue:

Press “OK” to continue.
Now you should be ready to upload your Episode. Click on the “UPLOAD” button.

On this screen you can add Change Notes. This is only useful after you have already uploaded your Episode and are making changes to it. When you are done, press “SUBMIT” and wait for the process to complete.
To update your previously uploaded Episode with any changes, just repeat the process above (there is no need to create the Steam Workshop Page again). Make sure to include Change Notes to keep your updates organized.
To verify that your Episode has been correctly uploaded, go to Steam itself and find your Workshop Items under the Community -> Workshop tab.
Your Episode should be there. You will notice that its visibility is set to “Hidden” by default. This means that only you, the developers and other people that you add as your co-creators can see it.

To change Visibility, scroll down the page until you see the Change Visibility drop-down menu on the right side. Click it to select the Visibility you want.

Friends-only Visibility means that only your Steam Friends will be able to view your page, Subscribe to your Episode and play it.
Public Visibility will allow all Steam users to view your page, Subscribe to your Episode and play it.
Refer to Section 13 of this Guide for more information on how to further customize your Steam Workshop page and make it more appealing.
12 – File locations for the Episodes
Your saved Episode files stay recorded in disk, as can be backed up, copied, and moved around from machine to machine.
We recommend keeping a backup of your completed or near-complete Episodes. If you are working with a team of collaborators, we recommend using some kind of shared folder (such as Dropbox or Google Drive) to store your Episode files.
C:Users<username>AppDataLocalLowBehold StudiosChroma SquadMyCustomEpisodes
For Mac OSX there are two possible file locations, depending on the version of your operating system:
~/Library/Application Support/Behold Studios/Chroma Squad/MyCustomEpisodes
or
~/Users/<username>/Library/ApplicationSupport/
Steam/steamapps/common/ChromaSquad/chromasquad.app/Contents
(Steam Guides automatically thinks the above address is an hyperlink for some reason, please don’t click it)
13 – Changing the Featured Image of your Steam Workshop Page
One of the most important things you can do to make your Episode stand out on Steam Workshop is to make a custom Featured Image.
To so, navigate to the File Location of your Episode on your operation system (refer to Section 12 of this Guide for the correct File Location on your operating system).

Each Episode that you upload to Steam has an ID number, and you will also notice the default Feature Image being used with the same ID number. In the picture above, you can see each episode has their accompanying screenshot file with the same ID.
To use a custom image, all you have to do is replace this file with your image file and then re-upload the Episode to Steam Workshop.
Use image editing software such as Photoshop or Gimp to create and export your own image in the following format:
- JPEG Format
- 512×512 image size
- Preferably under 20kb of file sile
If you confused about which ID refers to each of your Episodes, you can confirm an Episode’s ID by checking their Page on Steam (see the image below).

14 – Further customization of your Steam Workshop page
After your Episode is up-and-running on Steam (and maybe before you set the Visibility to ‘public’) you might want to make some additional tweaks on your Page.
Please refer to Section 13 of this Guide
When you go to your Episode’s Page on Steam Workshop, if you are logged in, you should see the “Owner Controls” on the right side of the screen (pictured below)
Here you can add videos and screenshots for your Episode, as well as updating its Description and Title.

Please be aware that the Description and Title on Steam will automatically be changed when you Upload an update for your Episode.
15 – Localizing your Episode to different Languages
When adding text to your episode with the “Talk” Story Event, you can translate it to any of the supported languages.
By default, all text inserted on the Editor will be in English. You can change the target Language by clicking the little flag on the bottom right part of the Talk event window (pictured below)
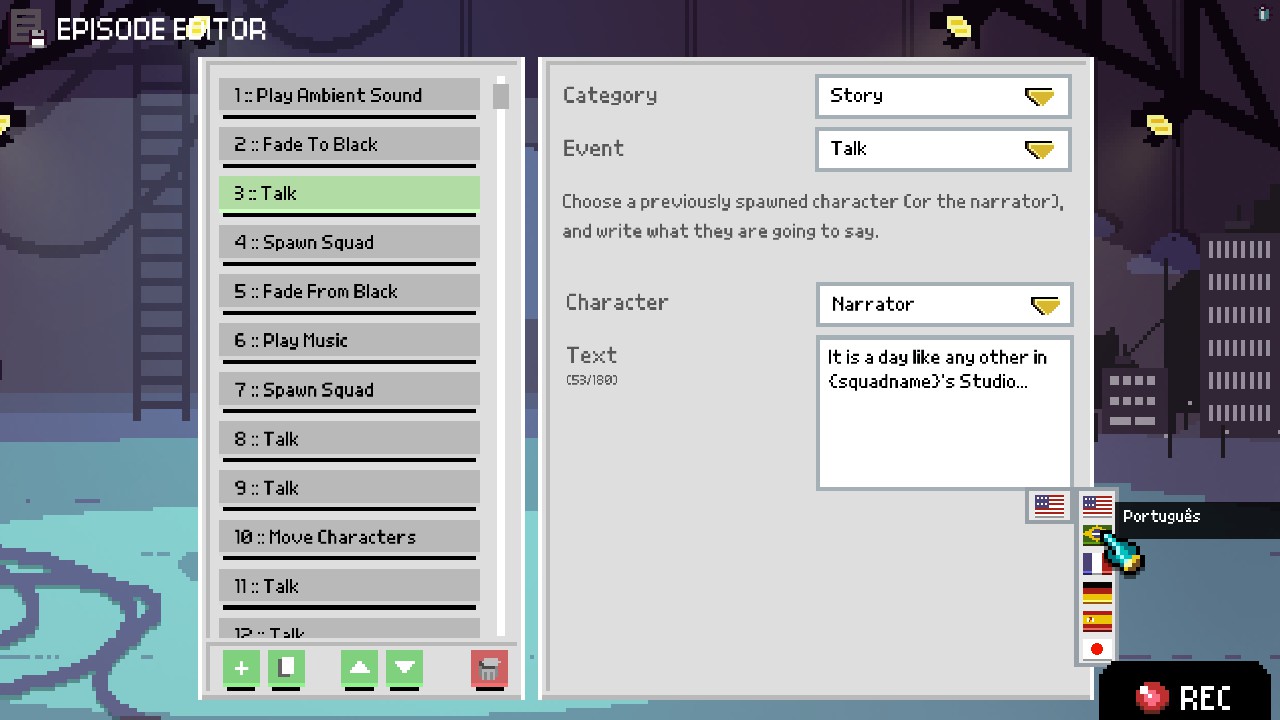
To translate, just choose the flag of the Language you want to translate to, and change the text.
If you do not translate a line to a user’s set Language, it will show in English by default.
Chroma Squad supports the following languages:
- English
- English
- Brazilian Portuguese
- French
- German
- Spanish
- Japanese