EVE New Player Guide - ENGLISH v1.9
CHAPTER 1: ACCOUNT CREATION AND FIRST CHARACTER
At this point, there are two possibilities:
1. You have already created an account
2. You need to create your first account
If you find yourself in step 1, well, you were wrong. If you find yourself in point 2 instead, great.
Why did you go wrong? Because EVE online has long since created a “Buddy Program”, that is, a program that gives new players a welcome gift when introduced by players currently present in-game.
Basically by registering your new account through this link you will get 1'000'000 (Million) of free Skill Points.
https://www.eveonline.com/signup?invc=7c51d5e1-7fba-4898-ba18-be89c1724464
Consider that an account, without implants, Alpha (Free) generates 18.75 Skill Points per minute. An Omega account (Subscription) 37.5 per minute. Which means you save on training:
- Alpha: 37 days
- Omega: 18.5 days
The Skill Point (SP) are generated automatically even when you are not logged in.
Why is having 1 Mil SP a great start?
Simple, because it opens the doors immediately to all the careers you can find on EVE and that will allow you to appreciate EVE in its entirety.
If you clicked on the link, you will find yourself in this screen:
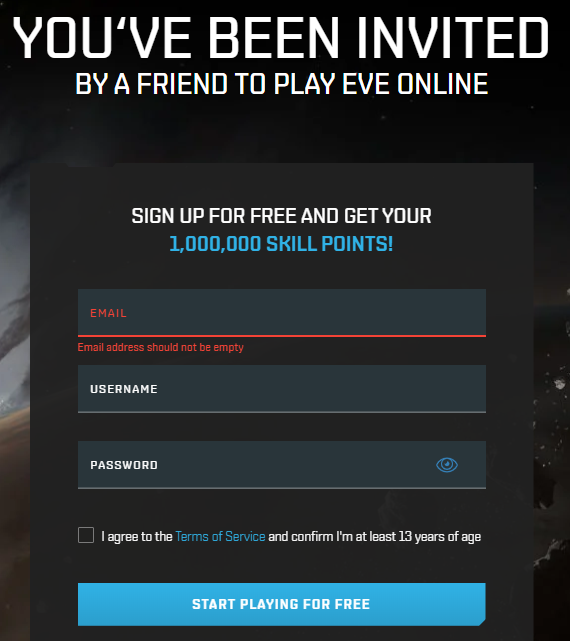
Insert, email, user and password and you're ready.
Now you will have to create the new character, you are probably wondering (or you have wondered if you have previously created the character) if the various races combined with the lines of specialization will affect your gaming experience.
The answer is YES, they are used to define where your character points will initially end up (you can remap them later but only once every year, but with a well-defined skill plan) and to guarantee you race bonuses for ships.
Once you have finished the selection you will find yourself in your departure station, which, depending on the race-line combination, will take you to the following stations:
Amarr Empire:
Chaven = Imperial Academy
Sehmy = Hedion University
Emrayur = Royal Amarr Institute
Caldari State:
Kisogo = State War Academy
Todaki = School of Applied Knowledge
Amsen = Science and Trade Institute
Gallente Federation:
Duripant = Federal Navy Academy
Bourynes = University of Caille
Cistuvaert = Center for Advanced Studies
Minmatar Republic:
Ammold = Republic Military School
Ryddinjorn = Pator Tech School
Hulm = Republic University
1. You have already created an account
2. You need to create your first account
If you find yourself in step 1, well, you were wrong. If you find yourself in point 2 instead, great.
Why did you go wrong? Because EVE online has long since created a “Buddy Program”, that is, a program that gives new players a welcome gift when introduced by players currently present in-game.
Basically by registering your new account through this link you will get 1'000'000 (Million) of free Skill Points.
https://www.eveonline.com/signup?invc=7c51d5e1-7fba-4898-ba18-be89c1724464
Consider that an account, without implants, Alpha (Free) generates 18.75 Skill Points per minute. An Omega account (Subscription) 37.5 per minute. Which means you save on training:
- Alpha: 37 days
- Omega: 18.5 days
The Skill Point (SP) are generated automatically even when you are not logged in.
Why is having 1 Mil SP a great start?
Simple, because it opens the doors immediately to all the careers you can find on EVE and that will allow you to appreciate EVE in its entirety.
If you clicked on the link, you will find yourself in this screen:
Insert, email, user and password and you're ready.
Now you will have to create the new character, you are probably wondering (or you have wondered if you have previously created the character) if the various races combined with the lines of specialization will affect your gaming experience.
The answer is YES, they are used to define where your character points will initially end up (you can remap them later but only once every year, but with a well-defined skill plan) and to guarantee you race bonuses for ships.
Once you have finished the selection you will find yourself in your departure station, which, depending on the race-line combination, will take you to the following stations:
Amarr Empire:
Chaven = Imperial Academy
Sehmy = Hedion University
Emrayur = Royal Amarr Institute
Caldari State:
Kisogo = State War Academy
Todaki = School of Applied Knowledge
Amsen = Science and Trade Institute
Gallente Federation:
Duripant = Federal Navy Academy
Bourynes = University of Caille
Cistuvaert = Center for Advanced Studies
Minmatar Republic:
Ammold = Republic Military School
Ryddinjorn = Pator Tech School
Hulm = Republic University
CHAPTER 2: NEW EDEN
 Set more than 21,000 years into the future, New Eden is the name of the star cluster inhabited by the human race.
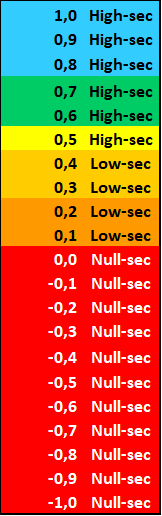
 It is structured in over 5000 star systems as well as 2500 randomly accessible Wormhole systems. Systems are classified according to their safety status, on a decimal scale from -1.0 to 1.0.
High-sec systems are those with a security level between 0.5 and 1.0.
The CONCORD (is the police, the law. The CONCORD acts firmly against anyone who breaks the law in High-sec systems) will react to hostile actions between the pilots, with a response time ranging from "almost instantaneous" in 1.0, up to 19 seconds in 0.5.
WARNING: the concord does not defend the players, but merely punishes those who break the laws.
Gamers also commonly use the terms High, High-sec, Highsec, Hi-sec, and Hisec.
In these systems, CONCORD NPCs and/or faction ships can patrol stargates (that are armed with cannons called "Sentries").
The assault (i.e. the commission of a criminal offense) will provoke a response from CONCORD and any nearby sentry guns.
Aggression with consequent destruction of another player’s ship and/or pod will result in a loss of standing (“security status”).
Generally, the Highsec space is considered the safest space, where your adventure in EVE begins and where the majority of trades takes place in the 5 main Trade Hubs: Jita, Amarr, Rens, Dodixie and Hek.
In High-sec, new players can familiarize with the game mechanics and explore the thousand careers that EVE can offer without worrying too much about hostilities. While protected by CONCORD, there are ways in which players can have green lights to attack you, especially if you are piloting expensive ships or carrying a high-value freighter. Entering to Low-sec and Null-sec systems is not recommended for new players.
IMPORTANT: NEVER accept fleet invitations from people you do not know, they will be able to "warp you" (send you) away from the gates and kill you easily before CONCORD can react and protect you.
Low-sec systems are those systems with a security level between 0.1 and 0.4. Players also commonly use the terms Low, Low-sec, Lo-sec, Lowsec, and Losec.
In these systems the sentries are anchored on stargates and stations (although less than in the Highsec) but the CONCORD will not react to hostile actions between the pilots (even if any nearby sentries will open fire on the attacker, or attackers) and any attacks will cause the loss of points in the security status of the pilot.
Finally, null-sec security systems are those with a security level between -1.0 and 0.0. Players also commonly use the terms Null, Null-sec, Nullsec and 0.0 (pronounced, "zero zero”).
These systems are essentially the "far west" and no NPC organization will respond to player aggression, nor will any actions of any kind result in a loss of points in security status. In nullsec, everything is valid: stealth bombers can use bombs and players can anchor bubbles to prevent you from warping; players often fly by non-blue-shoot-it ("NBSI") rules of engagement.
Living in zero zero means joining corporations and alliances with their own regulations, interactions and declarations of war. When a player is classified as an "Ally”, it appears in the overview on the right highlighted in blue (generally) hence the NBSI rule. Any player not belonging to allied guilds will be chased, hunted and neutralized. This is why new players are strongly discouraged from entering null-sec space. Even if they do not belong to some corporations, they will be identified as NEUTRAL and with the possibility of fire on sight.
The null security space can be further divided into null and void NPCs.
Null NPC: space belonging to NPC factions that cannot be claimed by players.
Claimable null: generally belonging to guilds and alliances of players. They can pass ownership through wars and / or agreements (rent / exchange).
Wormhole
The space W needs a separate paragraph; in terms of mechanics, Wormhole Space ("W-space or J-space ") is similar to the nullsec one: CONCORD does not control what happens in wormholes, players can use bombs and bubbles at will, and aggression will not affect the security status of the player.
W-space also works differently from the known space ("K-space ") in that players do not appear in the local chat channel until they write to it. This means there could be 1 player or 100 players in a wormhole system and you wouldn't be able to tell the difference just by looking at the local chat window!
The wormhole differ from each other depending on the size and systems that connect.
Very not recommended for new players.
CHAPTER 3: BASIC RULES BEFORE YOU START
- Never fly anything you can’t afford to lose or replace! (Not even in hisec!)
- Death and losing your ship is part of the game, accept it, learn from it and carry on.
- Trust no one. Eve High security local chats are plenty of scammers, thieves, gankers and people who try to bait you into a fight or lure you into a trap! Check every contract; specially the prices. In some cases, when someone paste multiple contracts in one single message, check all contracts; for sure 1 out of 3 is asking you to pay a BILLION!
- Better to play for fun than to grind for ISK or PLEX, do what you enjoy! When a game becomes a second job it is no longer a game.
- Never autopilot (even in hisec).
- Use bookmarks (see related chapter)
- After you enter a wormhole bookmark its entrance location!
- Type “gf” (good fight) after a fight.
- “o/” and “o7” are the EvE form to say “Hi!” and “Roger!”, use them.
CHAPTER 4: CAREER & SKILLS - MAGIC 14 + DRONES (basic)
Once the character is created, you need a plan, an idea of what you will want to do on EVE.
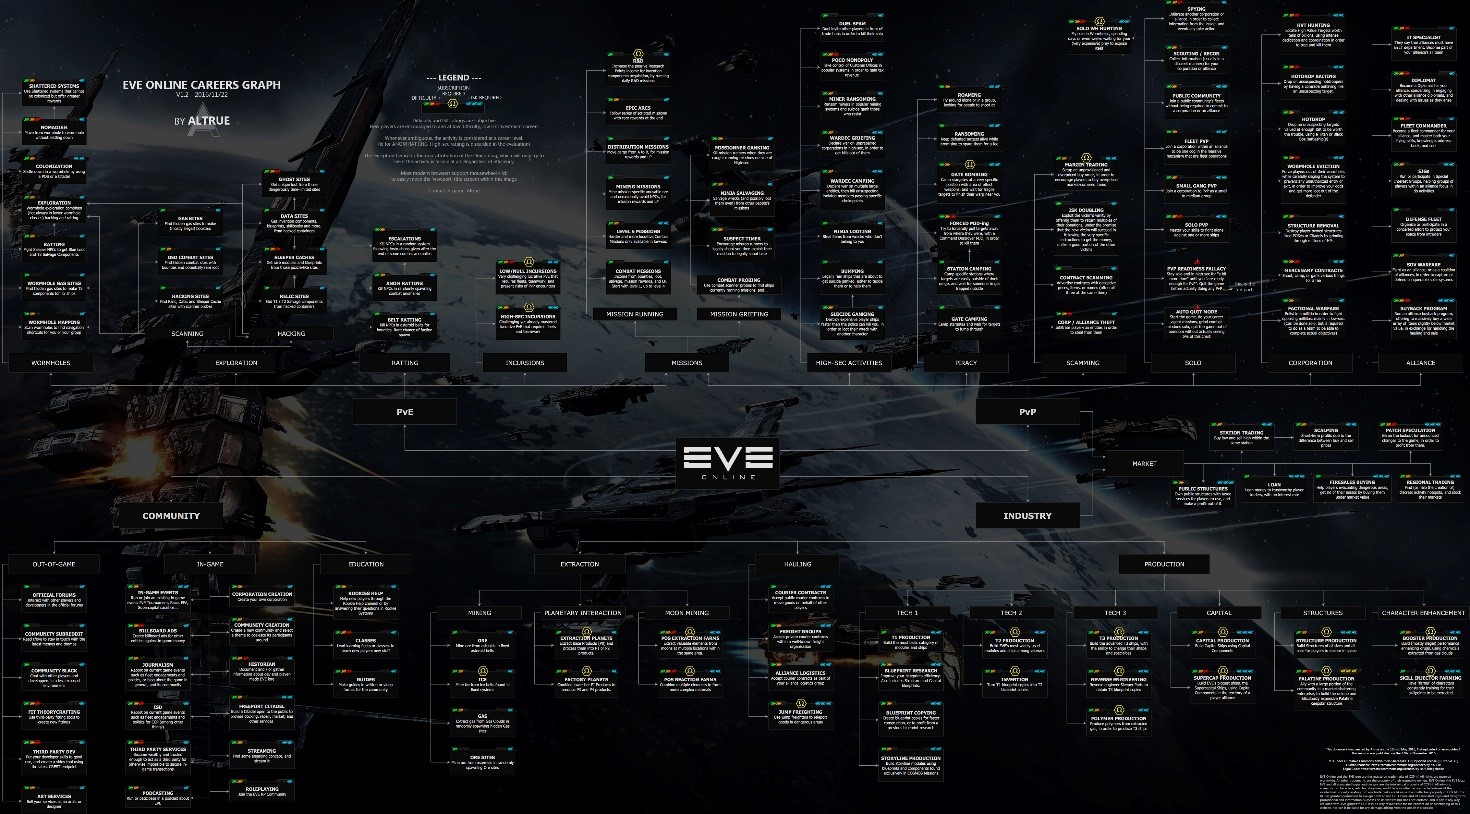
The three main categories are:
https://eve-guides.fr/images/wtd.jpg
Before talking about skills, we need a little note.
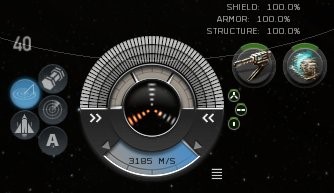
Each ship has three defense systems to resist, absorb or mitigate incoming damage, thus preventing or delaying the destruction of your ship.
1. Shields
2. Armor
3. Structure
Each with four types of resistors:
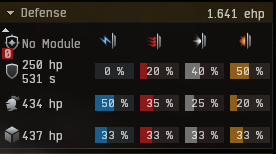
1. EM
2. Thermic
3. Kinetic
4. Explosive
There are therefore modules and skills that increase their respective performance and allow their regeneration.
You can find your ship's values on the FIT page, while you can keep track of them during the flight in the HUD.
Skills and learning
Skills in EVE govern your character's skills. They determine which ships you can pilot, which modules you can use, how effectively you can use those ships / modules, and much more.
To set your skill queue you have to go in the character section (character sheet) and select the "SKILLS"; you just have to look for the skills of your interest and drag them to the box below.
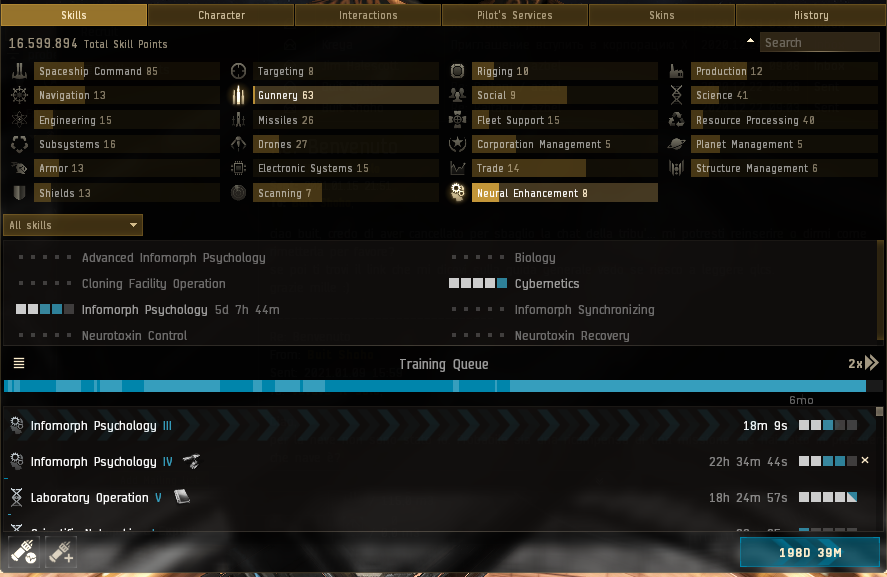
The skill plan can vary based on your career and what you are interested in piloting. However, it is important to train some specific skills because they cross all the ships in the game. Those grant bonuses and give the possibility to fit better modules on each ship (from the shuttle to the titan). In EVE we refer to this group of skills as: Magic 14.
Magic 14
When we talk about MAGIC 14 we refer to fourteen fundamental skills that apply to every single ship that a player can pilot in game, from a Shuttle to a Titan.
Each of these skills is useful, if not essential, for any new character.
This is a list of "support" skills that affect all ships you will fly on. Train these skills is important but doesn’t makes sense to train only these support skills without having first trained the skills necessary to USE and fly ships and modules.
As suggested, I advise you to train these skills having trained the minimum skills necessary to effectively use the ships that want to drive.
Or, at least, to find a good balance between them. Before maxing the skills to 5, training them to 3/4 is a good choice, as it will allow you to use different ships right away, while maintaining good levels of support skills.
The skills are as follows: (* you can find the details in a dedicated chapter later)
Engineering
CPU Management (1x, 30k ISK)
Power Grid Management (1x, 30k ISK)
Capacitor Management (3x, 200k ISK)
Capacitor Systems Operation (1x, 60k ISK)
Armor
Mechanics (1x, 30k ISK)
Hull Upgrades (2x, 85k ISK)
Shields
Shield Management (3x, 170k ISK)
Shield Operation (1x, 55k ISK)
Targeting
Long Range Targeting (2x, 100k ISK)
Signature Analysis (1x, 100k ISK)
Navigation
Navigation (1x, 30k ISK)
Evasive Maneuvering (2x, 35k ISK)
Warp Drive Operation (1x, 45k ISK)
Spaceship Command
Spaceship Command (1x, 30k ISK)
A very useful suggestion for those who start from scratch is to start training Drones skills.
This is because missions (PVE) will require a minimum of investment in ammunition, thus reducing the final ISK gain. Drones doesn’t use ammos.
They will not completely eliminate the use of ammunitions, as the DPS will never be enough, but they will guarantee you a considerable support and a saving in terms of ISK and substantial ammunition.
You can find a dedicated chapter later.
The three main categories are:
- PVP (Player vs Player)
- PVE (Player vs Enemy)
- Industry
https://eve-guides.fr/images/wtd.jpg
Before talking about skills, we need a little note.
Each ship has three defense systems to resist, absorb or mitigate incoming damage, thus preventing or delaying the destruction of your ship.
1. Shields
2. Armor
3. Structure
Each with four types of resistors:
1. EM
2. Thermic
3. Kinetic
4. Explosive
There are therefore modules and skills that increase their respective performance and allow their regeneration.
You can find your ship's values on the FIT page, while you can keep track of them during the flight in the HUD.
Skills and learning
Skills in EVE govern your character's skills. They determine which ships you can pilot, which modules you can use, how effectively you can use those ships / modules, and much more.
To set your skill queue you have to go in the character section (character sheet) and select the "SKILLS"; you just have to look for the skills of your interest and drag them to the box below.
The skill plan can vary based on your career and what you are interested in piloting. However, it is important to train some specific skills because they cross all the ships in the game. Those grant bonuses and give the possibility to fit better modules on each ship (from the shuttle to the titan). In EVE we refer to this group of skills as: Magic 14.
Magic 14
When we talk about MAGIC 14 we refer to fourteen fundamental skills that apply to every single ship that a player can pilot in game, from a Shuttle to a Titan.
Each of these skills is useful, if not essential, for any new character.
This is a list of "support" skills that affect all ships you will fly on. Train these skills is important but doesn’t makes sense to train only these support skills without having first trained the skills necessary to USE and fly ships and modules.
As suggested, I advise you to train these skills having trained the minimum skills necessary to effectively use the ships that want to drive.
Or, at least, to find a good balance between them. Before maxing the skills to 5, training them to 3/4 is a good choice, as it will allow you to use different ships right away, while maintaining good levels of support skills.
The skills are as follows: (* you can find the details in a dedicated chapter later)
Engineering
CPU Management (1x, 30k ISK)
Power Grid Management (1x, 30k ISK)
Capacitor Management (3x, 200k ISK)
Capacitor Systems Operation (1x, 60k ISK)
Armor
Mechanics (1x, 30k ISK)
Hull Upgrades (2x, 85k ISK)
Shields
Shield Management (3x, 170k ISK)
Shield Operation (1x, 55k ISK)
Targeting
Long Range Targeting (2x, 100k ISK)
Signature Analysis (1x, 100k ISK)
Navigation
Navigation (1x, 30k ISK)
Evasive Maneuvering (2x, 35k ISK)
Warp Drive Operation (1x, 45k ISK)
Spaceship Command
Spaceship Command (1x, 30k ISK)
A very useful suggestion for those who start from scratch is to start training Drones skills.
This is because missions (PVE) will require a minimum of investment in ammunition, thus reducing the final ISK gain. Drones doesn’t use ammos.
They will not completely eliminate the use of ammunitions, as the DPS will never be enough, but they will guarantee you a considerable support and a saving in terms of ISK and substantial ammunition.
You can find a dedicated chapter later.
CHAPTER 5: "HUD" INTERFACE (basics)
Before moving on to the flight bases, we need a little introduction to your in game interface and the commands available.
HUD (heads-up display or head-up display) is the term used to indicate the information constantly visible during the game overlay.
When organizing your HUD, always follow 4 basic points:
It is important for new players who want to avoid venturing into Low and Null sec systems, to select "PREFER SAFER"
With the latest update, the EDENCOM and TRIGLAVIAN factions have been added.
In case of negative standing towards one (or both) it is advisable to "flag" the respective boxes.
HUD (heads-up display or head-up display) is the term used to indicate the information constantly visible during the game overlay.
When organizing your HUD, always follow 4 basic points:
- ALWAYS keep the LOCAL chat visible
You will always know who is present in the system, except in a WH (wormhole) where the local is obscured. - Minimize mouse movement
Less travel means faster commands to the ship - Minimize eye movement
See above, you will have more reaction time - Simplify your overview
Avoid useless information, they could confuse you.
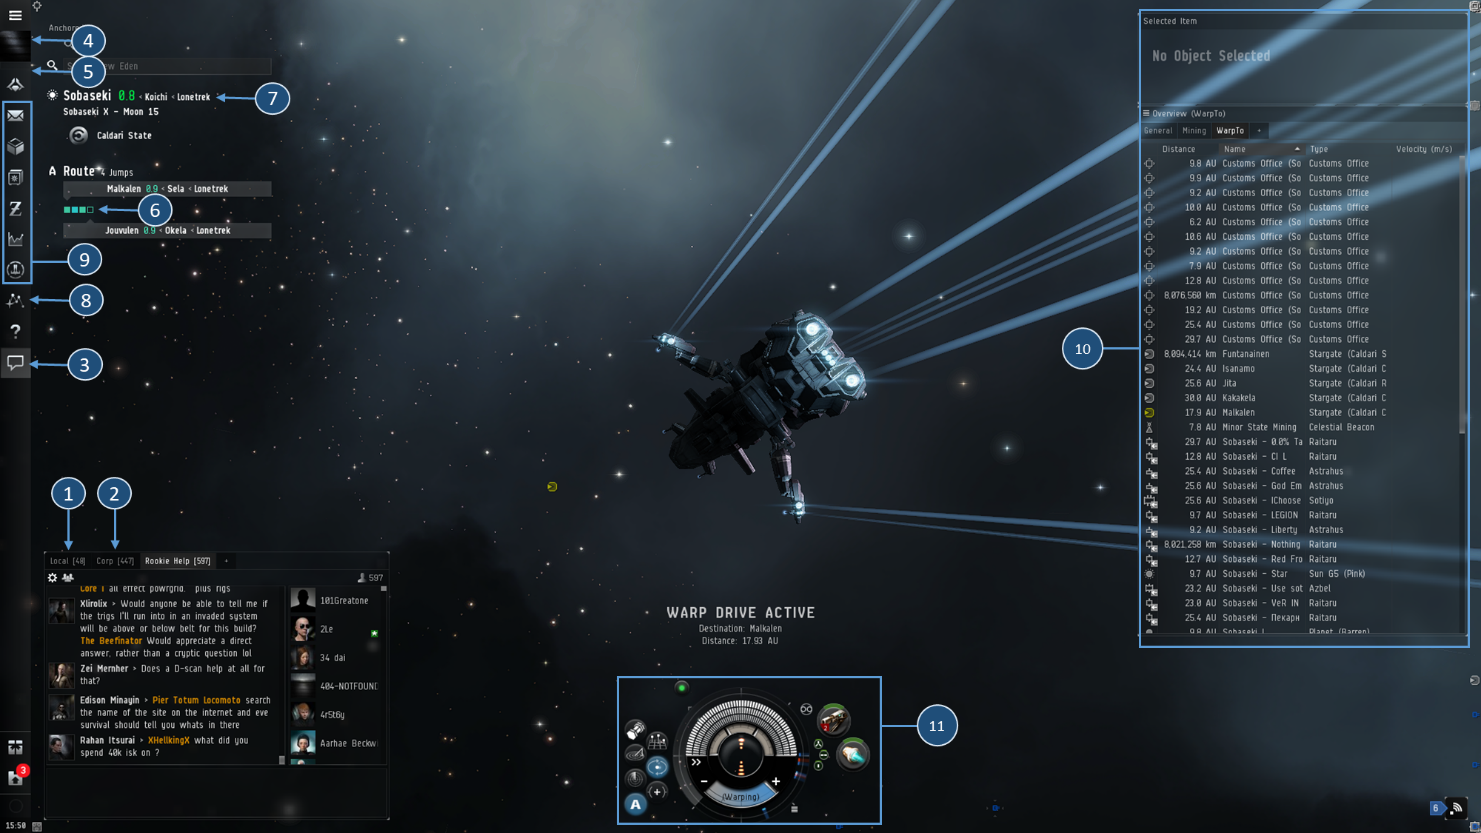
- LOCAL Chat (1): As recommended, keep it always visible, click on the label and drag it to the space. Doing so will remove it from the group and you will have two chat boxes. One always active on the local and another with the other different chats " 2 " (intel, corp, alliance, trade, etc...)
- Chat menu (3): if happen to close a chat box, you can reopen it from here. You can search for existing ones or create a new one.
- Character menu (4): here you can check your stats, set your skills and check combat logs / killmails
- Skill progress bar (5): the blue bar under the character marks the progress in the skill in training. It takes you directly to the skill plan / queue menu.
- Route planner (6): Here is shown how many systems are missing at your destination (and their respective security status based on colors).
To set the destination, just right click on the system concerned and select “Set destination”.
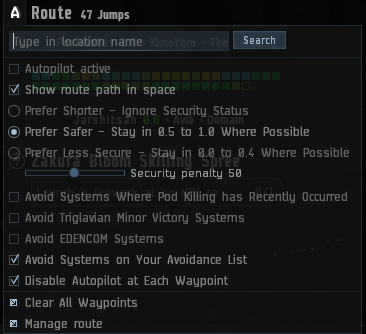
IMPORTANT: by clicking with the left button (mouse) on the "A", will open the menu.
Here you can set the various ways in which the computer will "automatically" set the route to follow.
It is important for new players who want to avoid venturing into Low and Null sec systems, to select "PREFER SAFER"
With the latest update, the EDENCOM and TRIGLAVIAN factions have been added.
In case of negative standing towards one (or both) it is advisable to "flag" the respective boxes.
- System name, constellation and region.
- Map
- Shortcuts for:
- Mail
- Inventory (Cargo) ship / station
- Personal assets menu in the space (view all your modules / ships present in the various stations)
- Wallet
- Market
- Fitting menu (ship)
- Mail
- Overview
- HUD Ship with active and passive modules
CHAPTER 6: FLIGHT COMMANDS (basics)
Before moving on to the commands, it is good to define what is meant by WARP and / or WARPING.
The warp is the main method of travel, faster than light, used by ships in New Eden. The warp, is limited to places within the same solar system and can only be started if those “points” are at least 150km away each other or from your ship (UNDER 150km YOU CANNOT WARP!). The warp exit point is determined by the pilot's command. This is important to consider, especially if you are a part of a fleet. Also, you do not exit the warp at an exact point, but in a 3km sphere around the selected point. This means that sometimes, it can happen that you get out of the warp outside the docking area of a station. This is why it is good to create instadock bookmarks (Chapter 6).
To enter warp, it takes more or less time depending on the agility of your ship. A frigate will likely enter warp faster than a carrier / freighter. It is a good idea to have a low "inertia" value to ensure the shortest possible allign time at destination.
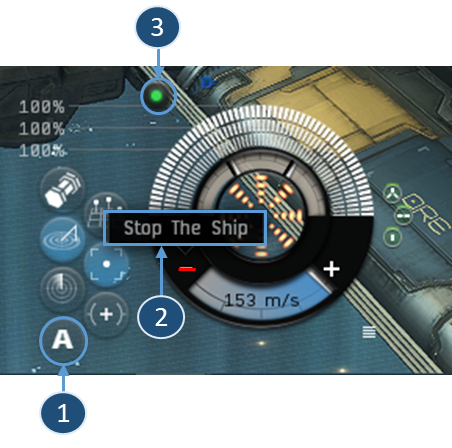
To pilot the ship you can basically use two methods:
a) Autopilot
b) Manual controls
In the first case, to activate the autopilot, simply select the “A ” key on the ship's HUD (1).
By doing so, the computer will guide the ship through the route set in the route planner.
WARNING: The autopilot will ALWAYS warp you at 10Km from the gate (see picture below), then slowly approach and finally Jump. This will make you an easy prey to the gates. Avoid using the autopilot, except to set the course in case of need.
NEVER USE THE AUTOPILOT IF YOU ARE DOING TRANSPORT MISSIONS, IN ANY SYSTEM!!!
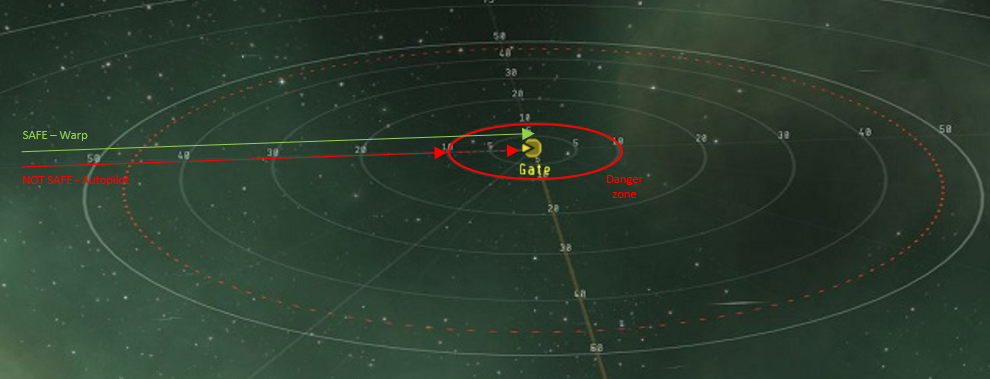
To manually pilot you'll have to double click the left button of the mouse in the space around you (the ship will change direction and point where you clicked (moving at the set-up speed), use the keyboard commands and / or from the right click menu (see figure)
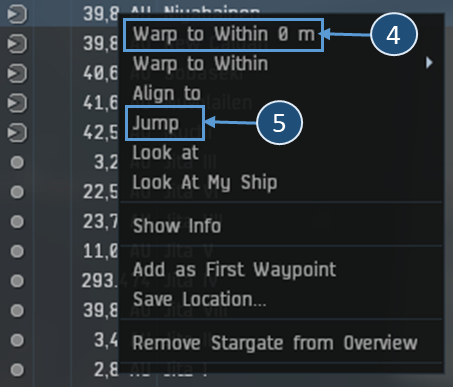
From the menu, you will find:
A command that does not show in the drop down menu but is useful to remember is Stop the ship (2).
Clicking with the mouse on the "-" of the HUD will stop the ship instantly (not when in warp) and all commands will be interrupted. A shortcut for this command is “ctrl + space”.
Learning to use ctrl + space can often make the difference between exiting the warp quietly or in a bubble surrounded by enemies.
Finally, clicking on the Safety button (3) will open the menu:
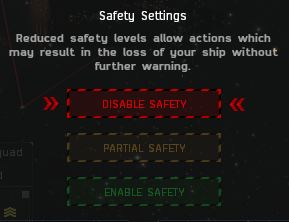
By staying in High-sec and setting the safety to “Enable”, you will avoid running into problems. Any incorrect actions will not be allowed; thus limiting the number of mistakes that could cause you to lose your ship.
If you live in Null-sec, set the safety to “disable”.
The warp is the main method of travel, faster than light, used by ships in New Eden. The warp, is limited to places within the same solar system and can only be started if those “points” are at least 150km away each other or from your ship (UNDER 150km YOU CANNOT WARP!). The warp exit point is determined by the pilot's command. This is important to consider, especially if you are a part of a fleet. Also, you do not exit the warp at an exact point, but in a 3km sphere around the selected point. This means that sometimes, it can happen that you get out of the warp outside the docking area of a station. This is why it is good to create instadock bookmarks (Chapter 6).
To enter warp, it takes more or less time depending on the agility of your ship. A frigate will likely enter warp faster than a carrier / freighter. It is a good idea to have a low "inertia" value to ensure the shortest possible allign time at destination.
To pilot the ship you can basically use two methods:
a) Autopilot
b) Manual controls
In the first case, to activate the autopilot, simply select the “A ” key on the ship's HUD (1).
By doing so, the computer will guide the ship through the route set in the route planner.
WARNING: The autopilot will ALWAYS warp you at 10Km from the gate (see picture below), then slowly approach and finally Jump. This will make you an easy prey to the gates. Avoid using the autopilot, except to set the course in case of need.
NEVER USE THE AUTOPILOT IF YOU ARE DOING TRANSPORT MISSIONS, IN ANY SYSTEM!!!
To manually pilot you'll have to double click the left button of the mouse in the space around you (the ship will change direction and point where you clicked (moving at the set-up speed), use the keyboard commands and / or from the right click menu (see figure)
From the menu, you will find:
- Warp to within 0 m (4): Use this command only if you are alone in the system or if you are in friendly territory. However, use the D-Scan (dedicated chapter later) to make sure there are no bubbles at the gates.
Warp to within …: This command allows you to select how far to warp from the selected gate / object. Use it often; you will not give reference points to enemies.
Align to: You will align to the target but will not enter warp. It is extremely useful for assessing whether the gate / object is free from enemies / bubbles. As soon as you give the warp command, you will start immediately, being already aligned. - Jump (5): manual command to jump to another system via gate
A command that does not show in the drop down menu but is useful to remember is Stop the ship (2).
Clicking with the mouse on the "-" of the HUD will stop the ship instantly (not when in warp) and all commands will be interrupted. A shortcut for this command is “ctrl + space”.
Learning to use ctrl + space can often make the difference between exiting the warp quietly or in a bubble surrounded by enemies.
Finally, clicking on the Safety button (3) will open the menu:
By staying in High-sec and setting the safety to “Enable”, you will avoid running into problems. Any incorrect actions will not be allowed; thus limiting the number of mistakes that could cause you to lose your ship.
If you live in Null-sec, set the safety to “disable”.
CHAPTER 7: SAVE LOCATION AND CREATE BOOKMARK
You will often have to save your position in space.
To escape to a safe place, to re-enter an incomplete anomaly, for forgetting to recall the drones and / or even just to approach a gate and check that no "bubbles" have been installed (Mobile Warp Disruptor, see figure below, they will be explained in a later chapter)
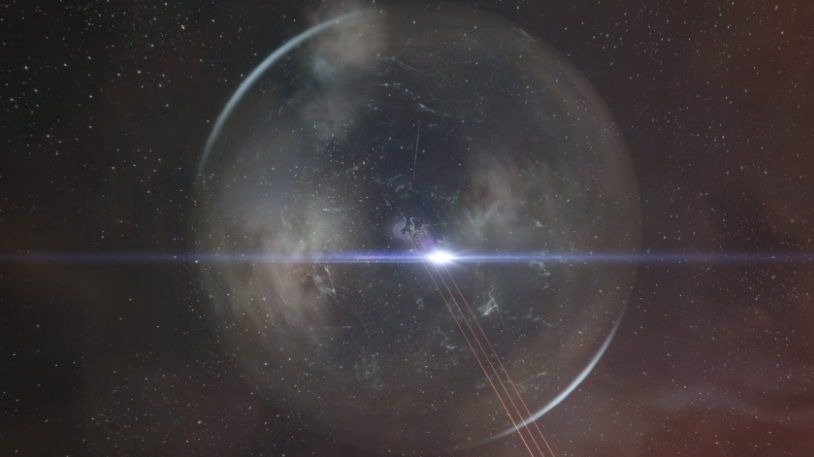
To save a specific point in space, we need to create a BOOKMARK.
While you are in warp or just navigating the void, press "ctrl + B" on the keyboard.
This window will open:
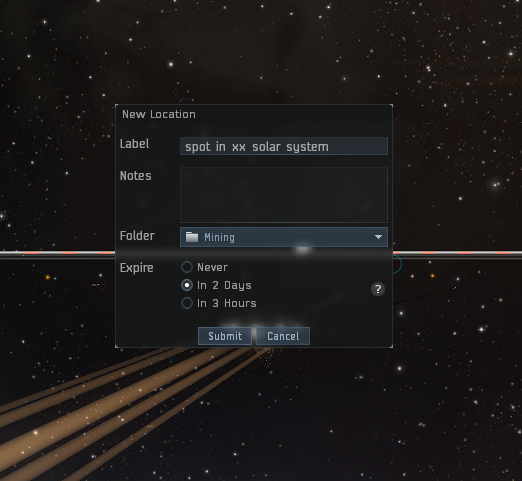
You can assign a name, write notes and organize it in a specific folder by setting the time before the expiry.
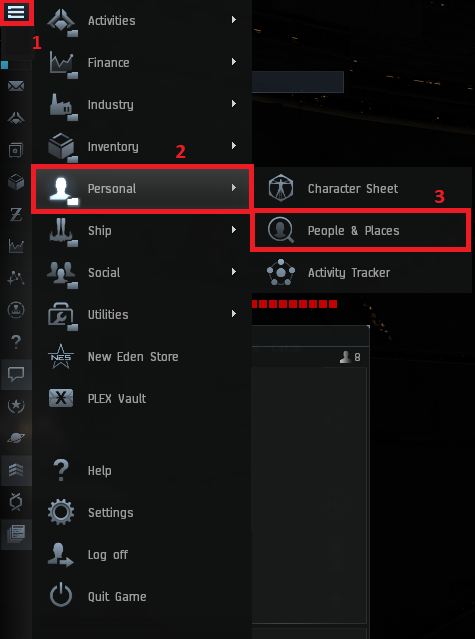
To organize the bookmark folders you need to enter the “PEOPLE & PLACES” menu (see below) and select the “Locations” label.
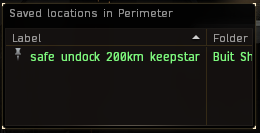
Finally yet importantly, by pressing the "L" key (from the keyboard) a window will appear with your bookmarks in the system you are in.
It is very useful during the exploration to always have the bookmarks of the “Safe-Spots” available on which to warp in case of problems.
Safe-Spot
What is a safe-spot?
A safe-spot is a point in space away from any celestial object and over which pilots move for the purpose of evading enemies or hiding their valuables (jetcan, etc.). It is important that safe-spots are not located at or immediately next to no object heavenly because the enemies could promptly warp those places and can easily get you there.
Before explaining how to set a good safe-spot, there are three rules that you should always follow when flying in low-sec space, but especially in null-sec:
IMPORTANT: the only way to locate yourself while you are in a safe-spot is by using the “Combat Scanner Probes”. Use the D-Scan and if you notice any Combat Scanner Probes in space, it is likely that they are trying to locate you and then warp on you.
In this case, triangulate to another safe-spot and return to where you were. By doing a continuous "ping-pong", always remaining in movement, you will never give your position to your opponent, thus preventing him from locating you.
How do you create a safe-spot?
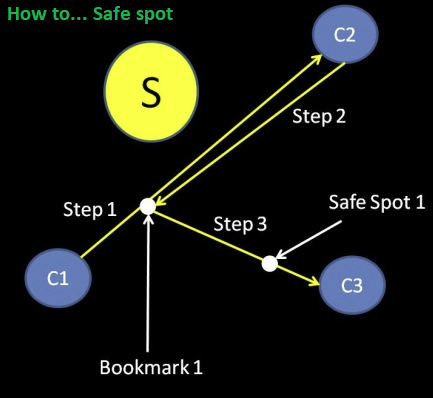
S: Sun
C1, C2, C3: Celestial 1, 2, 3
Each of these items can serve as a target for the warp. To get an idea of the layout and distances of your current solar system, use the navigation panel, press F11.
To create a safe-spot, follow this procedure:
Remember, the best bookmarks are in an open space that is not in the path of two celestial objects in the system.
To escape to a safe place, to re-enter an incomplete anomaly, for forgetting to recall the drones and / or even just to approach a gate and check that no "bubbles" have been installed (Mobile Warp Disruptor, see figure below, they will be explained in a later chapter)
To save a specific point in space, we need to create a BOOKMARK.
While you are in warp or just navigating the void, press "ctrl + B" on the keyboard.
This window will open:
You can assign a name, write notes and organize it in a specific folder by setting the time before the expiry.
To organize the bookmark folders you need to enter the “PEOPLE & PLACES” menu (see below) and select the “Locations” label.
Finally yet importantly, by pressing the "L" key (from the keyboard) a window will appear with your bookmarks in the system you are in.
It is very useful during the exploration to always have the bookmarks of the “Safe-Spots” available on which to warp in case of problems.
Safe-Spot
What is a safe-spot?
A safe-spot is a point in space away from any celestial object and over which pilots move for the purpose of evading enemies or hiding their valuables (jetcan, etc.). It is important that safe-spots are not located at or immediately next to no object heavenly because the enemies could promptly warp those places and can easily get you there.
Before explaining how to set a good safe-spot, there are three rules that you should always follow when flying in low-sec space, but especially in null-sec:
- A moon is not a safe spot. Never warp on a moon.
- Never warp within 0km of any celestial body. Always at 70 and / or 100km.
- Never warp at 0km from / to a gate in null-sec space. Triangulate, use safe-spot, use intel and / or use D-Scan; in case of bubbles on the gate there is low chance of survival.
IMPORTANT: the only way to locate yourself while you are in a safe-spot is by using the “Combat Scanner Probes”. Use the D-Scan and if you notice any Combat Scanner Probes in space, it is likely that they are trying to locate you and then warp on you.
In this case, triangulate to another safe-spot and return to where you were. By doing a continuous "ping-pong", always remaining in movement, you will never give your position to your opponent, thus preventing him from locating you.
How do you create a safe-spot?
S: Sun
C1, C2, C3: Celestial 1, 2, 3
Each of these items can serve as a target for the warp. To get an idea of the layout and distances of your current solar system, use the navigation panel, press F11.
To create a safe-spot, follow this procedure:
- Warp from C1 to C2, setting bookmark 1 somewhere between the two objects with ctrl + B (or in more places);
- Warp from C2 to bookmark 1;
- Warp from bookmark 1 to C3, setting the “Safe Spot 1” bookmark along the way with ctrl + B (or in more places).
Remember, the best bookmarks are in an open space that is not in the path of two celestial objects in the system.
CHAPTER 8: BUBBLES - WARP DISRUPTION FIELD
The warp disruption fields (often called ”Bubbles” because of their appearance) are areas of interdiction that prevent the warp of almost all ships. They can also affect the end point of the warp and move it to the edge of the bubble, where the alignment vector (500 km in each direction) passes through the area of the disturbance field. It works on both the warp and exit entry points.
Bubbles are mainly used on gates to trap passing ships and make them easy prey.
The warp disruption fields can be activated in 3 ways:
- Anchoring a Mobile Small / Medium / Large Warp Disruptor: The classic bubbles.
Can be anchored in space by players.
Their range vary from 5 to 40km (10 - 80km in diameter) and have a duration, if not destroyed or unanchored, which varies from 2 days for T1, 7 days for T2 to 14 days for ”Factions”.
There are two types:- Blocking: blocks the warp at the edge of the bubble. When anchored to the gates, it stop you at a distance from the gate, preventing you from immediately jumping and giving time for enemies to shoot you.
- Dragging: Anchored near the gates, it drag you away from your warp exit point.
- Blocking: blocks the warp at the edge of the bubble. When anchored to the gates, it stop you at a distance from the gate, preventing you from immediately jumping and giving time for enemies to shoot you.
- Through an Interdictor (ship) in which an Interdiction Sphere Launcher is installed with the Warp Disrupt Probes: it is a ship specialized in the “launch” of bubbles.
These bubbles have a range that varies from the 10 to 20 km (20 - 40km in diameter) and last, if not destroyed, 2 minutes. - Through a Heavy Interdictor (ship) in which a Warp Disruption Field Generator is installed and activated: it is a ship specialized in the “creation” of bubbles (a field is generated around the ship. It moves with the ship and has the same properties as the others ”bubbles").
This field have a range that vary from 16 to 24 km (32 - 48 km in diameter, depending on the skills of the pilot) and have an infinite duration, if not deactivating the module and/or destroying the ship)


WARNING: The warp disruption fields can ONLY be anchored in null-sec, therefore in sectors with a security level equal to and/or lower/equal than 0.0.
However, ships belonging to the Heavy Interdictors category can use a Focused Warp Disruption Script or a Focused Warp Scrambling Script (a ”script” is a modification to be applied to the installed module that changes its properties depending on the intended use) in the module Warp Disruption Field Generator to turn it into a Warp Disruptor/Scrambler with an infinite disrupting power.
IMPORTANT: All bubbles, including the one thrown by an interdictor, can be destroyed. However, the bubbles launched by an Interdictor are not targetable, so they can only be destroyed with smartbombs.
UPDATE:
 The Howling Interdictors update on October 27 (2020), added another probes variant: the Stasis Webification Probe, or "Wubble".
 When launched, a Wubble remains idle for 3 seconds, and then explodes, by applying a 30% reduction of the speed to all ships within 10 km from the point where it has been deployed. Unlike normal bubbles, the Wubble will not persist after the explosion and will not otherwise interfere with the warp units of the affected ships. However, the Wubbles can be used in combination with normal bubbles to tackle and stop an enemy fleet.
CHAPTER 8.1: HOW TO AVOID BUBBLES
The first, and best, weapon of defense against bubbles is learning to AVOID them.
To do this you must use the celestial bodies of your system and learn how to use bookmarks (previous chapter).
A very useful “tool” to avoid “camp-gates” when flying is the directional scanner or D-SCAN, but we will talk about this in a later chapter.
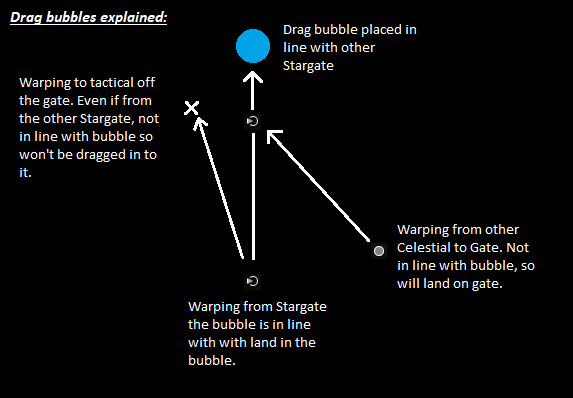
As mentioned, the bubbles will be able to block or drag you depending on whether or not you are on the vector aligned with them.
To avoid this you will need to change your gate alignment vector as shown in the image below.
Using a permanent bookmark within the system will allow you to warp near the gate, check for bubbles, and then warp at the gate for the jump.
IMPORTANT: There are ships like the “Interceptor” frigates and T3 cruisers (if equipped with the interdiction nullifier subsystem) that are immune to bubbles.
To do this you must use the celestial bodies of your system and learn how to use bookmarks (previous chapter).
A very useful “tool” to avoid “camp-gates” when flying is the directional scanner or D-SCAN, but we will talk about this in a later chapter.
As mentioned, the bubbles will be able to block or drag you depending on whether or not you are on the vector aligned with them.
To avoid this you will need to change your gate alignment vector as shown in the image below.
Using a permanent bookmark within the system will allow you to warp near the gate, check for bubbles, and then warp at the gate for the jump.
IMPORTANT: There are ships like the “Interceptor” frigates and T3 cruisers (if equipped with the interdiction nullifier subsystem) that are immune to bubbles.
CHAPTER 8.2: HOW TO DEFEND YOURSELF AND / OR ESCAPE FROM BUBBLES
Lets suppose you ended up inside a bubble.
There are two possible scenarios:
In both cases the first rule is “DON'T PANIC!”.
CASE 1:
You have an advantage:
the enemy does not know where you are as you may have entered anywhere around the gate and you are affected by the ”Jump Cloak”.
The Jump Cloak is an automatic timer that applies to every ship that enters a system. It makes the ship invisible and invulnerable until it expires. A ship protected by Jump Cloak cannot be decloak, damaged or moved by any external action. The Jump Cloak lasts 60 seconds. It is only interrupted if time runs out or when the cloaked ship attempts to move or warp. The remaining time is visible via a blue icon in the top left, as shown in the image below.
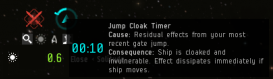
That said you have 60 seconds to figure out which strategy to adopt.
Look in the overview for the presence of enemies, zoom out with the camera, and observe their position.
After a careful evaluation of the possible enemies select the entrance gate and get ready to give the “Approach” command.
Once given the command you will become visible to enemies.
Activate all the defensive modules (Shield and armor), activate the propulsion (Microwarp drive or Afterburner) and start clicking on the jump command as soon as become visible.
As soon as you enter the other system (hoping not to fall into another bubble) immediately give the warp command to a random celestial body, make a bookmark during the warp and as soon as you exit the warp, warp the bookmark you have saved. Proceed to create a safe-spot (previous chapter) and as soon as you arrive at the safe spot check with the D-SCAN that there are no Combat Scanner Probe on you. If yes, start “ping-ponging” between bookmarks. If not, wait for the waters to calm down and get back to your way.
Sometimes it will be necessary to logoff to make the enemy desist.
If you do not have active aggression timers, once offline your ship will disappear from the system and will not be locatable.
All of this is obviously avoidable if there are no enemies at the gate. In that case, align yourself with a celestial object, activate the propulsion (Microwarp drive or Afterburner) and as soon as you’ll be outside the bubble give the warp command.
CASE 2:
This is the worst case.
Whether you have been dragged or blocked, the gate is far away and you do not have 60 seconds to decide what to do.
If you are stuck on a gate, you must immediately give the gate approach command, activate the defensive modules and propulsion.
As soon as available, give the jump command.
If, on the other hand, you have been dragged away from the gate, align with the first celestial body and activate the defensive modules and the propulsion.
As soon as available, give the warp command.
If the enemy has a ”scrambler” module (see next chapter), there is a chance that he will turn off your microwarp drive propulsion module, slowing you down further and applying more DPS.
If you have an Afterburner as a second propulsion drive, activate it.
Most of the time it all ends with the loss of the ship / capsule.
If you have a fast ship with a good fit you might be able to get away with it, but a lot depends on the quantity/quality of enemies around you.
There are two possible scenarios:
- You entered a system and found yourself inside the bubble
- You landed on the bubble because you were not paying proper attention when giving the warp command.
In both cases the first rule is “DON'T PANIC!”.
CASE 1:
You have an advantage:
the enemy does not know where you are as you may have entered anywhere around the gate and you are affected by the ”Jump Cloak”.
The Jump Cloak is an automatic timer that applies to every ship that enters a system. It makes the ship invisible and invulnerable until it expires. A ship protected by Jump Cloak cannot be decloak, damaged or moved by any external action. The Jump Cloak lasts 60 seconds. It is only interrupted if time runs out or when the cloaked ship attempts to move or warp. The remaining time is visible via a blue icon in the top left, as shown in the image below.
That said you have 60 seconds to figure out which strategy to adopt.
Look in the overview for the presence of enemies, zoom out with the camera, and observe their position.
After a careful evaluation of the possible enemies select the entrance gate and get ready to give the “Approach” command.
Once given the command you will become visible to enemies.
Activate all the defensive modules (Shield and armor), activate the propulsion (Microwarp drive or Afterburner) and start clicking on the jump command as soon as become visible.
As soon as you enter the other system (hoping not to fall into another bubble) immediately give the warp command to a random celestial body, make a bookmark during the warp and as soon as you exit the warp, warp the bookmark you have saved. Proceed to create a safe-spot (previous chapter) and as soon as you arrive at the safe spot check with the D-SCAN that there are no Combat Scanner Probe on you. If yes, start “ping-ponging” between bookmarks. If not, wait for the waters to calm down and get back to your way.
Sometimes it will be necessary to logoff to make the enemy desist.
If you do not have active aggression timers, once offline your ship will disappear from the system and will not be locatable.
All of this is obviously avoidable if there are no enemies at the gate. In that case, align yourself with a celestial object, activate the propulsion (Microwarp drive or Afterburner) and as soon as you’ll be outside the bubble give the warp command.
CASE 2:
This is the worst case.
Whether you have been dragged or blocked, the gate is far away and you do not have 60 seconds to decide what to do.
If you are stuck on a gate, you must immediately give the gate approach command, activate the defensive modules and propulsion.
As soon as available, give the jump command.
If, on the other hand, you have been dragged away from the gate, align with the first celestial body and activate the defensive modules and the propulsion.
As soon as available, give the warp command.
If the enemy has a ”scrambler” module (see next chapter), there is a chance that he will turn off your microwarp drive propulsion module, slowing you down further and applying more DPS.
If you have an Afterburner as a second propulsion drive, activate it.
Most of the time it all ends with the loss of the ship / capsule.
If you have a fast ship with a good fit you might be able to get away with it, but a lot depends on the quantity/quality of enemies around you.
CHAPTER 9: TACKLING, THE FUNDAMENTALS OF PVP
Before talking about modules, it is good to point out that, inside EVE, we use the word “tackling” when we refer to the act of blocking (literally tackling) a ship so that it cannot escape.
Tackling is the fundamental of PvP in EVE.
The term "tackler" refers to the type of ship and the players within a fleet who dedicate themselves to block the enemies.
A tackler, therefore, is a pilot whose job is to block a ship so that other players can apply DPS and destroy it.
There are ships specially designed for this purpose. Depending on your need you can choose between:
IMPORTANT: The interceptors are essential for the success of a fleet; fast and practically impossible to block, they offer excellent support having a central role as a scout, as a tackler and as a safe spot on which the fleet commander can warp in case of danger and / or plan changes.
It is good that anyone who decides to join a corporation / alliance located in the null-sec region can pilot (or start to train) an interceptor of his specific race (you’ll find a dedicated section with fit samples ahead).
Whether you fly in a fleet or solo, the success (or failure) of your fight will come from the right combination of the modules you'll see next.
Having a high DPS but not being able to apply it to the target makes any attacking / or defensive strategy useless.
Tackling is the fundamental of PvP in EVE.
The term "tackler" refers to the type of ship and the players within a fleet who dedicate themselves to block the enemies.
A tackler, therefore, is a pilot whose job is to block a ship so that other players can apply DPS and destroy it.
There are ships specially designed for this purpose. Depending on your need you can choose between:
- T1 and / or T2 Tackle frigates
- T2 Interceptors
- T2 Interdictors
- T2 Heavy Interdictors
- Specific T3 cruisers and faction ships
IMPORTANT: The interceptors are essential for the success of a fleet; fast and practically impossible to block, they offer excellent support having a central role as a scout, as a tackler and as a safe spot on which the fleet commander can warp in case of danger and / or plan changes.
It is good that anyone who decides to join a corporation / alliance located in the null-sec region can pilot (or start to train) an interceptor of his specific race (you’ll find a dedicated section with fit samples ahead).
Amarr
Caldari
Gallente
Minmatar
Malediction
Crow
Ares
Stiletto
Whether you fly in a fleet or solo, the success (or failure) of your fight will come from the right combination of the modules you'll see next.
Having a high DPS but not being able to apply it to the target makes any attacking / or defensive strategy useless.
CHAPTER 9.1: WARP DISRUPTOR / SCRAMBLER / CORE STABILIZERS
To tackle enemies, as well as bubbles, there are even specific modules such as the warp disruptor and warp scrambler.
 The warp disruptor (also called "point" or "long point") disrupts the warp of an opposing ship, make it unable to warp away.
The base range of the warp disruptor is 20 km (for a T1 module) and 24 km (for a T2 module). The warpcore disable strength for this module is 1 point.
 The Warp scrambler (also called "scram" or "short point") works on the same basic principles as warp disruptor; it disables the opposing ship's warpcore. However, in addition to stopping its warp, it prevents the ship from using the microwarp drive modules, micro jump drives and micro jump field generators. These propulsion modules will be disabled regardless of the ship's remaining warp core strength. This makes scramblers vital for capturing certain ships.
The base range of a warp scrambler is significantly less than that of a warp disruptor. 7.5 km (for a T1 module) and 9 km (for a T2 module). The warpcore disable strength of this module is 2 points.
 The warp core stabilizer (also called "stab") is a module designed to compensate for the fluctuations and interruptions of the ship's warp core.
At the cost of a reduction in targeting range and scan resolution, this module subtracts 1 point from all possible warp disruptor / scrambler effects.
The more stabilizers you install, the less chance you will have of being "tackled".
Some examples of how the previous modules can interact:
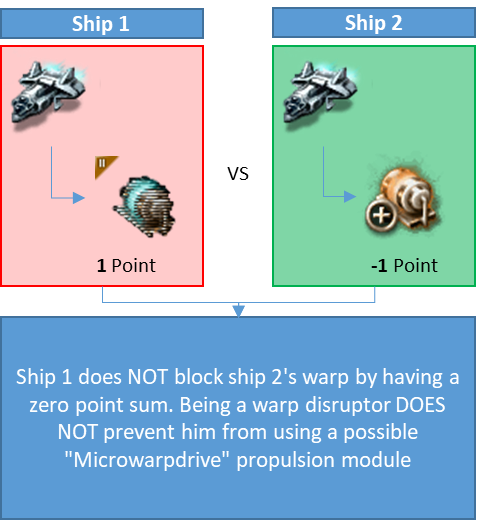
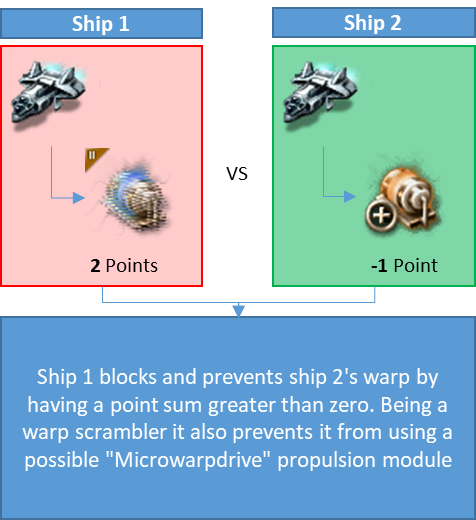
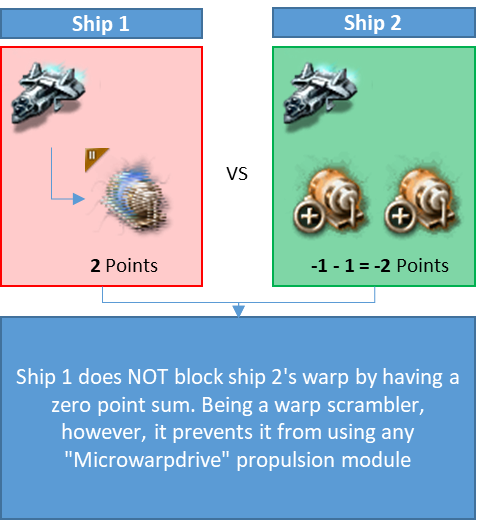
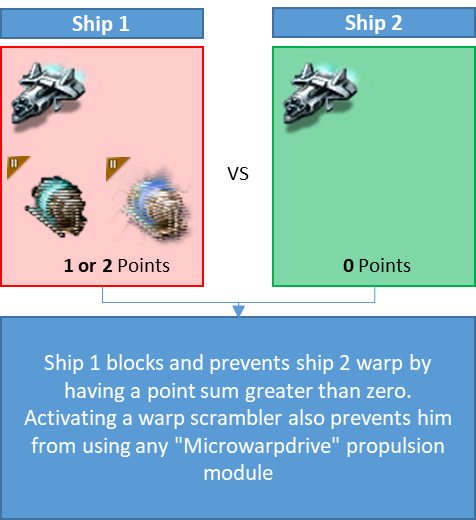
The warp disruptor (also called "point" or "long point") disrupts the warp of an opposing ship, make it unable to warp away.The base range of the warp disruptor is 20 km (for a T1 module) and 24 km (for a T2 module). The warpcore disable strength for this module is 1 point.
The Warp scrambler (also called "scram" or "short point") works on the same basic principles as warp disruptor; it disables the opposing ship's warpcore. However, in addition to stopping its warp, it prevents the ship from using the microwarp drive modules, micro jump drives and micro jump field generators. These propulsion modules will be disabled regardless of the ship's remaining warp core strength. This makes scramblers vital for capturing certain ships. The base range of a warp scrambler is significantly less than that of a warp disruptor. 7.5 km (for a T1 module) and 9 km (for a T2 module). The warpcore disable strength of this module is 2 points.
The warp core stabilizer (also called "stab") is a module designed to compensate for the fluctuations and interruptions of the ship's warp core.At the cost of a reduction in targeting range and scan resolution, this module subtracts 1 point from all possible warp disruptor / scrambler effects.
The more stabilizers you install, the less chance you will have of being "tackled".
Some examples of how the previous modules can interact:
CHAPTER 9.2: STASIS WEBIFIER / STASIS GRAPPLER
In combination with the warp scrambler / disruptor it is good practice to also use a "stasis webifier".
The stasis webifier are excellent modules as they reduce significally the speed of a targeted ship.
It has a fairly short range, with only slightly longer range than a scrambler.
This makes the stasis webifier a good choice if the rider is already using a warp scrambler.
 The Stasis webifier (also called "web") is different from the warp disruptor and the scrambler. As mentioned above, the web focuses on reducing a ship's sub-warp speed. Sub-warp speed is the speed at which you normally fly.
The sub-warp speed reduction depends on the module type. The T1 version returns a 50% speed reduction, the T2 version a 60% reduction. Both modules have a maximum range of 10 km. There are faction variations of this module and they are available in different levels of increased range and speed reduction of 50%, 55% or 60%.
IMPORTANT: During the fight, a tackler should always use a warp disruptor / scrambler before the web. Reducing the maximum speed of a ship with the web will make it easier to enter warp; in this way it can therefore reach 75% of the maximum speed necessary to initiate the warp and escape more quickly.
So, first the point, then the web.
 The stasis grappler is the big brother of the web. It has a much greater speed modifier than the regular webifier.
However, unlike the web, the grappler has only 1 km of optimal range and a falloff of 8-12 km.
The grappler also requires a significant amount of power grid and can only be mounted on battleships and above.
The stasis webifier are excellent modules as they reduce significally the speed of a targeted ship.
It has a fairly short range, with only slightly longer range than a scrambler.
This makes the stasis webifier a good choice if the rider is already using a warp scrambler.
The Stasis webifier (also called "web") is different from the warp disruptor and the scrambler. As mentioned above, the web focuses on reducing a ship's sub-warp speed. Sub-warp speed is the speed at which you normally fly. The sub-warp speed reduction depends on the module type. The T1 version returns a 50% speed reduction, the T2 version a 60% reduction. Both modules have a maximum range of 10 km. There are faction variations of this module and they are available in different levels of increased range and speed reduction of 50%, 55% or 60%.
IMPORTANT: During the fight, a tackler should always use a warp disruptor / scrambler before the web. Reducing the maximum speed of a ship with the web will make it easier to enter warp; in this way it can therefore reach 75% of the maximum speed necessary to initiate the warp and escape more quickly.
So, first the point, then the web.
The stasis grappler is the big brother of the web. It has a much greater speed modifier than the regular webifier. However, unlike the web, the grappler has only 1 km of optimal range and a falloff of 8-12 km.
The grappler also requires a significant amount of power grid and can only be mounted on battleships and above.
More EVE Online guides
- Начинаем играть EvE:Online★ 5 (521)25k views694 ♥15 minRussianUpdated Aug 17, 2023
- Quick guide to EVE Online★ 5 (376)25k views689 ♥20 minUpdated Feb 20
- 33 Совета начинающим игрокам★ 5 (322)17k views480 ♥10 minRussianUpdated Aug 17, 2023
- How to safely mine in Nullsec [Alpha Friendly]★ 4 (118)6.3k views144 ♥3 minUpdated Aug 9, 2021
- Gallente Factional Warfare★ 4 (96)6k views121 ♥10 minUpdated Jan 18, 2013
- Gnosis guide (α, PvE, hi-sec)★ 4 (74)5k views101 ♥35 minUpdated Feb 20, 2018




This guide was created by its original author on the Steam Community. Are you the author and want it removed? Request removal.