Overview
Excalibur VIII is a Mini Castle Blood(MCB) Custom Scenario map that relies on teamwork and strategy. This guide is to introduce new players to Mini Castle Blood(MCB) and give you the basic information about the units and general game play. Mini Castle Bloods(MCB) may seem complex to new players at first, but once you understand the basics then it will become a lot easier to understand how to master the map.
Introduction
In Excalibur VIII each player starts with a base that includes 2 castles and 2 guard towers, along with multiple heros and units. Each hero has it’s own strengths and weakness that can be very useful if it is used correctly. You also have a guard tower & a bombard tower in the middle of the map, it is important to send your units out to defend your middle area as soon as possible. Map control is a crucial part in being able to assemble with your allies, so you want to control as much of the middle of the map as possible.
Base Units and Heros
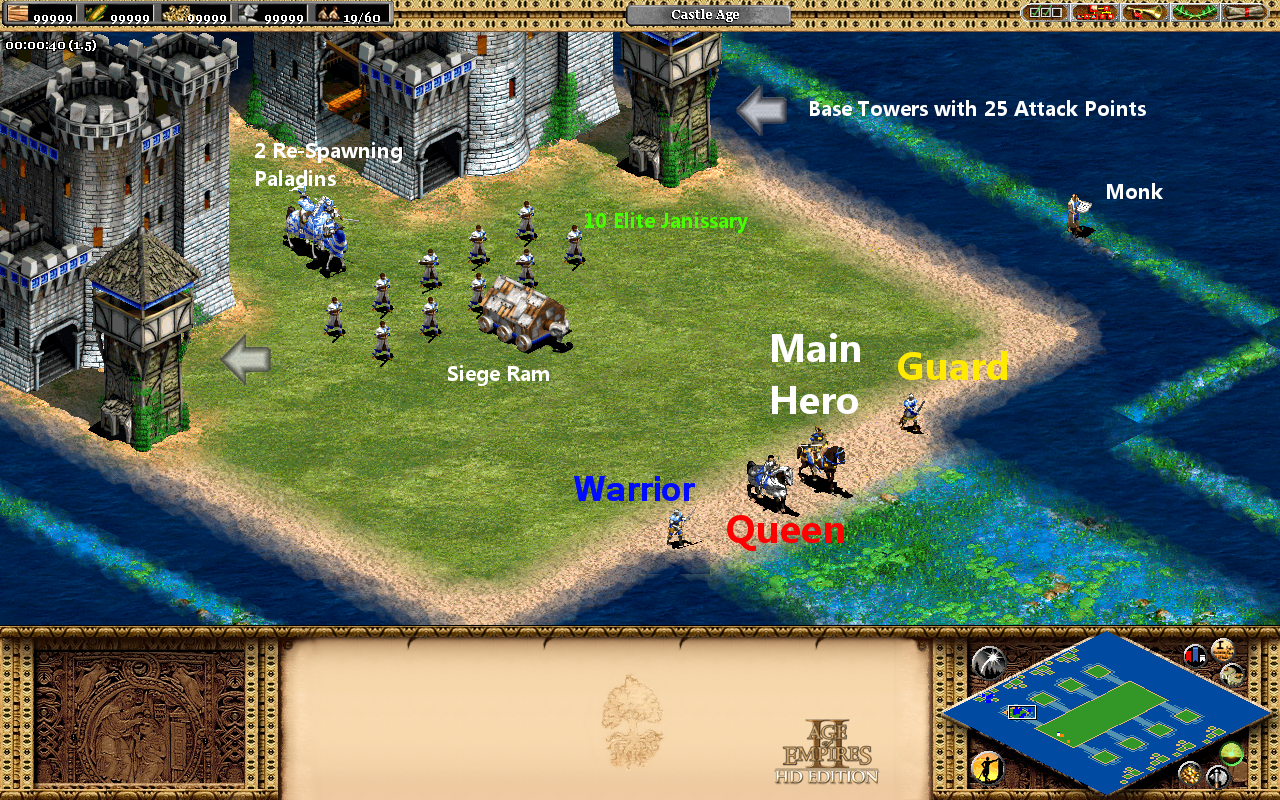
Your base has 2 castles, 2 guard towers, 4 heros, 10 elite janissary, 1 siege ram, 1 monk(20,000 Hit Points) and 2 paladin that re-spawn when they die.
The Heros:
- Main Hero – The Main Hero(Genghis Khan) is the most important hero you have, it starts with 300 Hit Points(+20 if you have bloodlines) and 25 Attack Points, but unlike other heros your main hero gains strength over time(+2 HP, +2 AP every 20 seconds). This hero can be the difference in winning and losing a game!
- Guard – The guard has 150 Hit Points and 500 Attack Points, this hero is useful in many ways. It is mostly used to take down the enemy’s towers in the middle, also you can use it to defend your base or put him in your ram for a surprise attack on your enemies castle.
- Queen – The Queen is a fast hero with 25 Attack Points and 1500 Hit Points, she is mostly used to scout the enemy’s middle and can be patrolled to draw the fire of enemy ranged units during a battle. She can also be used to chase down and kill small sabs.
- Warrior – The Warrior is the lowest of the 4 heros, but with 400 Hit Points and 21 Attack Points it can still be useful. You can patrol it and draw the enemy’s fire or group it in with your other units to get an advantage in a battle. It also acts as a nice decoy when used together with the Guard.
Units:
- Siege Ram – The Ram can be useful to take down the Enemy’s towers in the middle. It is also a good idea to put your Guard inside and release it when you reach the base of the towers.
- Elite Janissary – These can be used several ways, the most common is by placing them around and inside your towers in the middle to defend against an enemy rush. By garrisoning 3 Janissary inside your Watch Tower it will cause your Tower to inflict additional damage to enemy units. However if you are a ranged civilization, such as Britons you can use longbows to power up your towers and use the Elite Janissary to fight along with your normal units.
- 2 Paladins – The Paladins(pallys) always re-spawn after they die as long as you have a castle and are used mostly as a shield, also they are good for scouting and killing rams. You will find other useful purposes for them as you learn the game.
- The Monk – The Monk has 20,000 HP and can take a lot of fire from enemy ranged units, this can be useful when you are being rushed, because it draws the enemy’s fire away from your units. Also do not forget to convert enemy units as much as possible, every 5 converts you make you will receive 3 Archery Ranges. Another thing to note is that if you convert an enemy’s Unique Unit and garrison it in one of your buildings you will get Imperial age at their required Imperial time. An example is Vikings get Imperial at 100 kills, if you are Britons and you convert and save a Berserker, then you will receive Imperial at 100 kills instead of the normal 400 kills.
Reward Units:
- Saboteur – The first saboteur arrives when you reach 75 kills(same amount for every civilization) and is commonly referred to as a “normal sab” or “small sab”, the most common use of this sab is to get kills against an enemies army. A well placed sab can get you 40+ kills.
- Second Saboteur – The second saboteur is rewarded to you when you reach 125 kills. This sab is referred to as an “SS” or “Super Sab”. It can be used for kills like the small sab, but generally it is more useful to use the SS to kill an enemy’s Main Hero.
- Lancelot – The Lancelot hero(Lance) is a paladin with 680 HP and 350 AP that you receive when you reach 100 kills. This hero is used in many ways, it is good for razing buildings when you rush an enemy’s base or middle, but it can also be used to kill main heros(2 hits from a Lance will kill a main hero).
- Wolf – The wolf hero has 2000 HP and is received when you reach 200 kills. The main purpose of the wolf is to raze buildings such as an enemy’s castle or siege workshop. Also if you are being rushed you can use your wolf to kill the enemy’s Lancelot or wolf that are rushing you.
Kills and Rewards
Kills Upgrades
25 Kills – Blacksmith AND 5 Elite War Elephants in middle of base
50 Kills – Monastery AND Accursed Tower inside base
75 Kills – Saboteur AND 1st House inside base
100 Kills – Lancelot AND 2nd House inside base
125 Kills – Super Saboteur AND Outpost outside of base
150 Kills – Subotai AND Watch Tower outside of base
175 Kills – University AND non-power up Genghis Khan
200 Kills – Ornlu The Wolf AND House outside of base (2,000 HP)
250 Kills – Two More Houses AND Bombard Tower outside of base
300 Kills – Furious The Monkey Boy AND Tower Of Flies outside of base
350 Kills – Two More Houses Again AND Accursed Tower outside of base
400 Kills – Jean Bureau AND Bombard Tower inside base
500 Kills – 1st Villager (1500 HP) AND Town Center (can’t create villagers)
600 Kills – 2nd Villager (1500 HP) AND 3rd Castle (between castles)
700 Kills – HEAVY ESCORPION (500 HP & 700AP)
800 Kills – MERLIN Missionary (5,000 HP)
900 Kills – TREBUCHET
1000 Kills – King Arthur (10,000 HP & 1,000 AP) Saboteur (45 HP & 5,000 AP)
1500 Kills – Master of the Templar (10,000 HP & 1,000 AP)
Imperial Ages:
IMPERIAL AGE BONUS – Merlin’s Apprentice Monk AND Auto-SPIES
Aztecs – 150 Kills
Celts – 200 Kills
Goths – 200 Kills
Huns – 200 Kills
Japanese – 300 Kills
Teutons – 150 Kills
Vikings – 100 Kills
Franks – 250 Kills
Chinese – 250 Kills
All other civilizations – 400 Kills
Additional Rewards:
EVERY 5 Converts – 3 Archery Ranges in your base. (same spot)
EVERY 10 Razings – Camelot castle outside your base entrance. (same spot)
Main Hero Dies – 1 Siege Workshop outside your base entrance (Same place as the Camelot!). Onagers and Bombard cannons are disabled.
Spawn Areas
Your base has multiple spawn areas that produce different units and buildings during key points in the game. You need to keep the spawn areas clear of all units when your buildings and units are spawning or they will get blocked.

Base Spawns:
- Main Spawn – This is the area behind the castles and where you receive various units, such as Lancelot, Sabs, Wolf, Monkey Boy and Villagers.
- 3rd Castle Spawn – The area between the 2 castles is where your 3rd castle spawns when you reach 600 kills.
- Front of the Castles – When you reach 25 kills you receive 5 Elite War Elephants in front of your castles.
- Archery Ranges Spawn – When you make 5 converts of an enemy you receive 3 Archery Ranges in your base, you can then use those to make archers to use with your army. If they get destroyed you can get 3 more with 5 additional converts(no limit on how many times you can get these).

There are also some buildings that will spawn at the entrance of your base, some of these can be very useful in certain situations.
Base Entrance:
- Large Entrance Area – This is where your siege workshop spawns if your main hero dies, it is also the place where you receive a Camelot for 10 razes.(you cannot have both buildings at the same time)
- Right Side Torch Area – This is where your Watch Tower appears at 150 kills.
- Left Side Torch Area – You receive a Bombard Tower at 250 kills.
- Front of the Watch Tower – You receive a Tower of Flies in front of your Watch Tower at 300 kills.
- Front of the Bombard Tower – You receive an Accursed Tower in front of your Bombard Tower at 350 kills
- Middle of the Torches – In between the left and right torches you receive an Outpost at 125 kills.
- Left of the Bombard Tower – This is where you receive a House at 200 kills.
Middle Map Area
The middle area is set up so that 1 player is directly across from another player, this creates 4 middle areas with 2 players having towers in their own middle area. Depending on how the teams are divided you can have a middle with an enemy or an ally. If your middle area is shared with an ally and another ally has an enemy in his middle area then you should go and help him to clear his from the enemy if it is possible.
Player’s Middle Area:
- Player 1 & Player 8
- Player 2 & Player 7
- Player 3 & Player 6
- Player 4 & Player 5
Powering Up Your Towers:
It is important to remember to Power Up your towers if your middle area is rushed. By placing ranged units inside your Watch Tower you will get up to 4x the amount of damage against the enemy’s army. Remember you can aim your towers at enemy heros too, with a bit of luck you can kill an enemy’s hero this way.
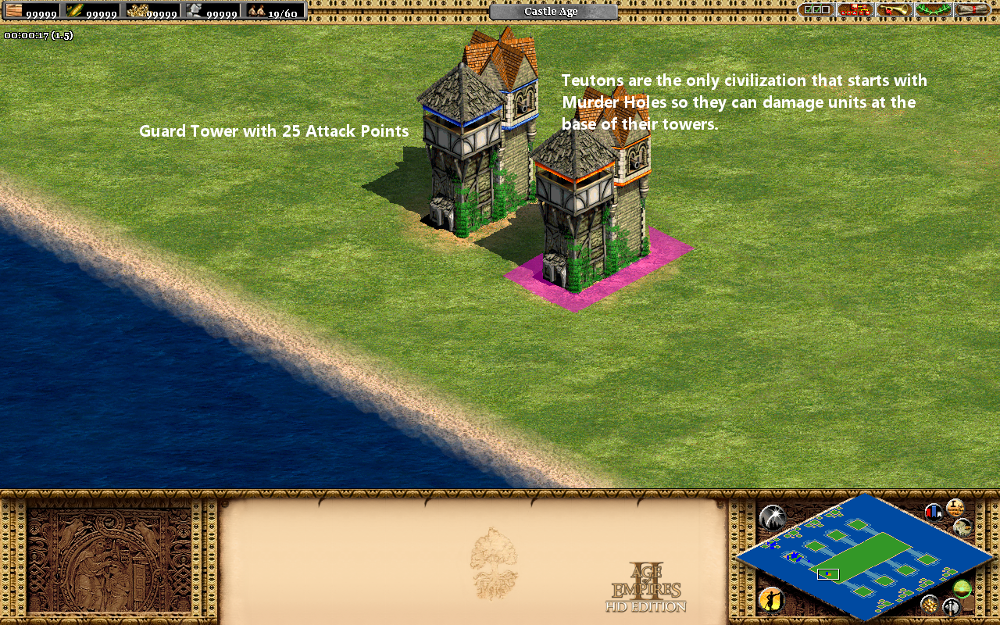
Teuton’s Towers:
Teutons are the only civilization that start the game with Murder Holes, this gives them the ability to attack units at the base of their towers, all other civilizations cannot do that at the beginning. The Teuton’s towers have a higher garrison limit which means they are able to have a higher power up with increased damage. Another advantage of their towers are that with 10 Elite Janissary garrisoned the Teuton’s bombard tower it will fire 3 cannon balls at once.(1 hit will kill a main hero early in the game)