
Overview
A fun little Claptrap build I made while playing through The Pre-Sequel. Complete with suggested and not-recommended skills and what I consider to be the guns that work best with Claptrap’s strengths.
Build Overview
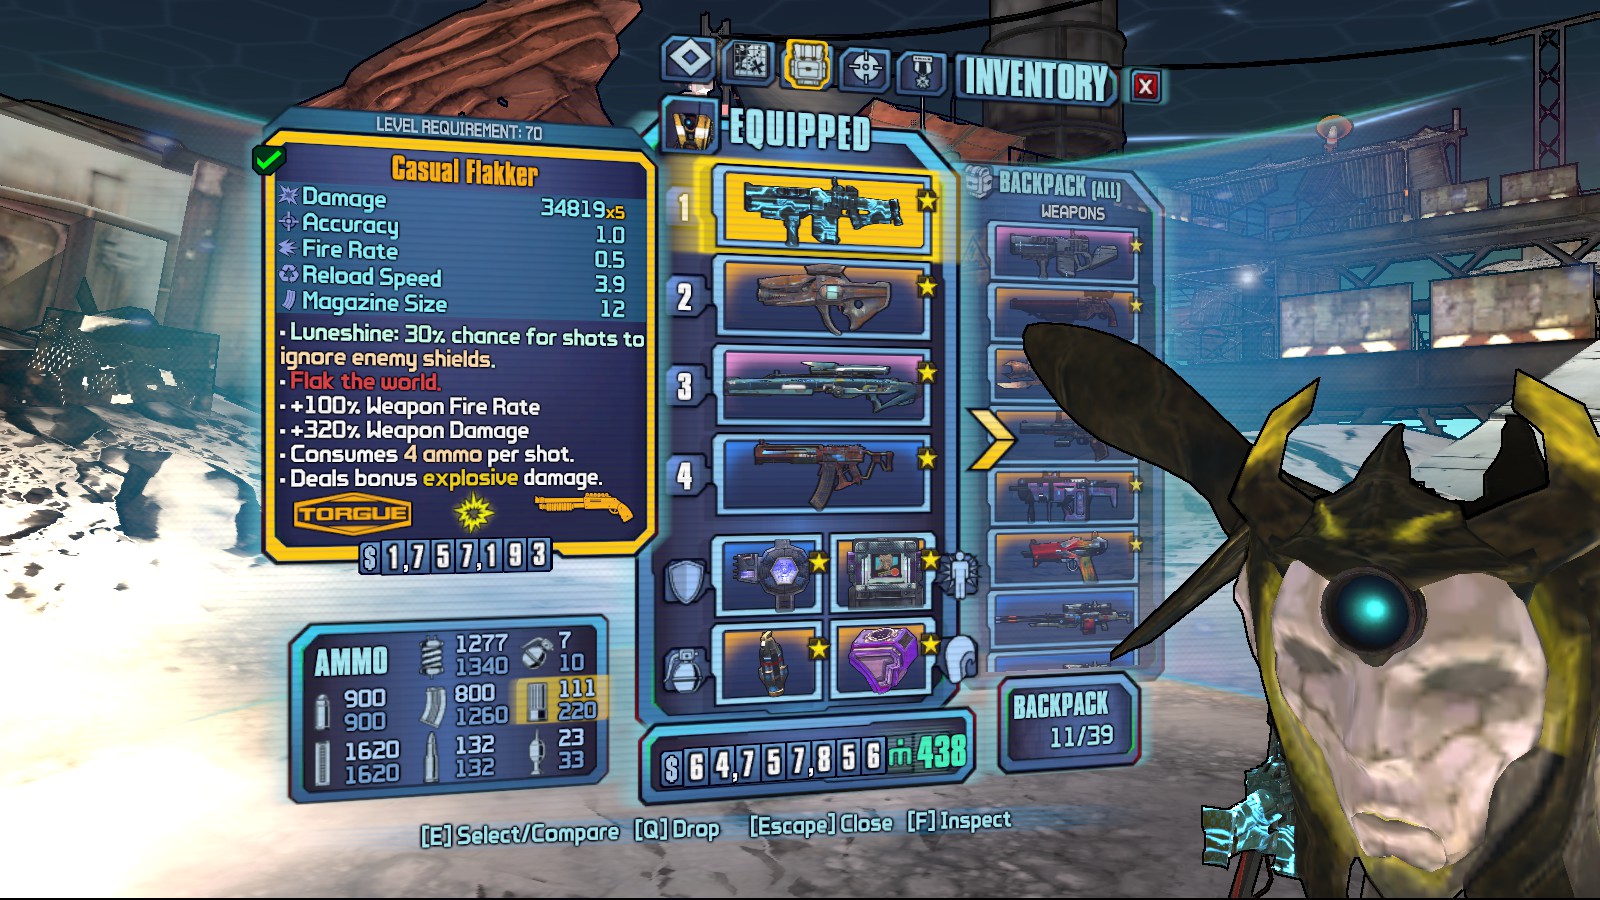
A simple screen-cap of the build with all of the invested skill points with the chosen class mod’s boosts and another one with the equipped gear. I tend to put 1 point into some skills just to get the bonus from my class mod, sacrificing a single point while gaining an additional 5 for free is something you shouldn’t overlook.
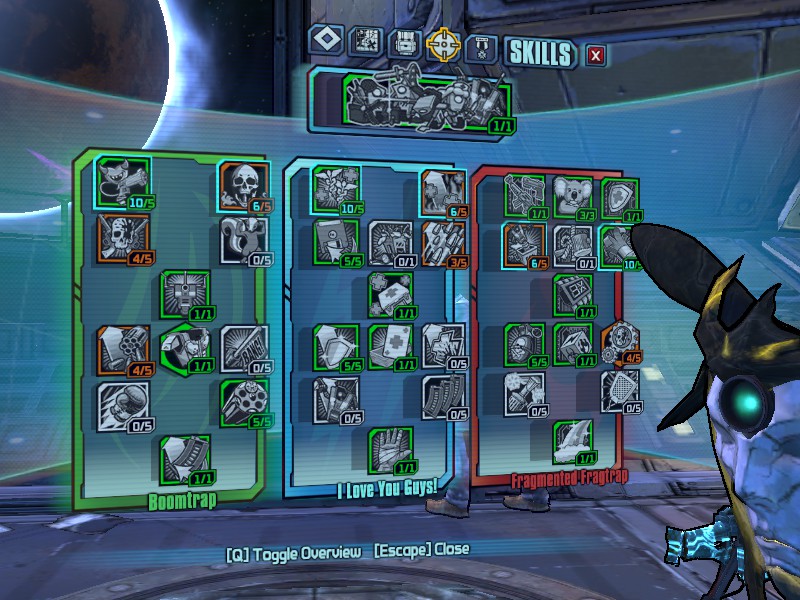
Boomtrap
Maxing out Drop the Hammer allows us to have a bonus +50% fire rate and reload speed after reloading with only a small penalty to our accuracy. Only 1 point is put into Killbot as our class mod gives it a big enough boost. I do not recommend maxing out Killbot as you have enough methods of health regeneration without draining your shield.
Coincidental Combustion is just a small damage boost to our non-explosive guns and a moderate damage boost to our cryo weapons. It only has 4 points in it because it really isn’t that great of a skill, it’s just that Repulsive is one of Claptrap’s near useless skills. The shock-wave knock-back might screw up your aim and it only ever applies to melee enemies.
Second Wind [by Tediore] is a cheap 1 point skill that gives you a good damage boost while in Fight For Your Life. Combined with your other FFYL skills, Claptrap has huge DPS potential while downed. Also, the little Claptrap suicide clone helps.
I am Rubber, You are Glue gives us a chance at bullet deflection after we get a kill. But the real meat of this skill is the ability to roll Torgue Fiesta when using our action skill. Torgue Fiesta regenerates grenade ammunition for your buddies, but not you. Since Torgue Fiesta’s value is increased depending on how many people you’re playing with, don’t spec into it if you are going solo. Load ‘n’ Splode gives us around 64% more explosive damage, as you’ll rarely make it to 5 stacks and keep them all for a long time. I’ve avoided using Start With a Bang because the small damage can kill you rather quickly with Claptrap’s top gear and especially if you invest heavily into the skill. Also, the visual effect made by SWaB is really annoying.
One Last Thing is an amazing skill because it’s the exact same thing as Money Shot from Borderlands 2. Since Claptrap already likes low magazine size and fast reload weapons, it’s a great skill to invest your point into. Hyperion Punch is completely useless as it is a melee skill on a non-melee character that deals fire damage, which does nothing in half of the game’s locations.
Living’ Near the Edge is the best capstone Clappie here has. Considering that the low health dps boost also applies to when you’re bleeding to death, this skill makes shredding bosses easier when you are incapacitated. Putting a point into LNTE also let’s you roll the dice for a chance at using Pirate Ship Mode. Pirate Ship Mode just gives you a little more damage as long as you don’t let anything to get to close or else the cannonballs might hurt you.
I Love You Guys!
Best Buds 4 Life gives you more damage per shot when you enter Fight For Your Life and more time to get back in the fight. The small damage resistance and health regeneration for you and another player after reviving also help prevent repeated downs that would cause immediate death. Maniacal Laughter gives you some health regen whenever you have an elemental damage-over-time on an enemy and it also increases the chances of you applying a dot. If it weren’t for the class mod boosting this skill, I’d suggest avoiding it.
Through Thick and Thin increases your action skill cooldown rate. This is applied to your friends while you’re running VaultHunter.EXE. In simpler terms: more action packages and more health regeneration from using them. Kick Him While He’s Down is a great skill that helps make it easier to get a Second Wind, but it also unlocks Clap-in-the-Box, making it something to avoid. This is because Clap-in-the-Box can automatically put you into Fight For Your Life and it leaves you unable to deal damage for a few seconds. All the Things are Awesome! gives you a small boost to fire rate, swap speed, and max health. You can swap the points pooled into ATTAA into any other skill in the blue skill tree if you desire. However, I highly recommend this skill if playing 4 player co-op.
You’re… GOING TO LOVE ME!! gives a good amount of health restoration for you and any of your friends after Claptrap gets a kill. That alone is worth the 1 point investment, but this skill unlocks Gun Wizard. Get this skill even if it’s just for Gun Wizard. Gun Wizard makes everything about your guns better and restores their ammo pool at the start and end of it.
Wax Off, Wax On just gives you general shield bonuses, so get it to have a slightly better shield. Pain Simulator is Painful does the same exact thing but with your health, only really pick this up if you find yourself dying a lot. It’s a Trap… Card gives you some health restoration for you and any pals while also giving you a free damaging nova. Pick it up, especially if you have any friends to join you.
Organized Guns are Happy gives a very tiny boost to your entire team’s mag size. I suggest avoiding it unless you have a lot of Tediore guns and want to boost their damage per throw. Kick Him While He’s Up is another small damage-per-second boost after getting up after a Second Wind. Since it’s temporary and not that big of a boost, I suggest not picking it up.
HIGH FIVES GUYS is a bad capstone. The bonus is rather incredibly tricky to pull off as 2 people have to stop shooting for a second to get it or you have to find a melee enemy and let him punch you for a bit. I only have it for the purpose of making the first few seconds of a co-op encounter slightly easier.
Fragmented Fragtrap
All the Guns and Safety First pave the way for Subroutines. Get ready for swapping out your gun every 100 seconds for a bonus reload speed, fire rate, and damage. Also, prepare to occasionally become somewhat more of a tank every now and then. Fuzzy Logic is worthless but is necessary to progress through the skill tree.
Blue Shell is yet another massive boost to your Fight For Your Life damage potential and it also increases the amount of time you have while downed like BB4L. Surprised? Stabilize! increases your accuracy and recoil reduction after taking some damage, helping negate the penalty from Drop the Hammer. Don’t put too many points into it because the Celestial Fragtrap COM boosts it. Rope-a-Derp should be avoided unless you want to meme with a melee build.
Tripleclocked multiplies those subroutine bonuses and penalties by up to three. Make sure you maximize your bonuses by constantly swapping to the correct weapon if you pick this up. One Shot Wonder is also gained by picking up this skill. Not a lot of the guns in this build really benefit from firing every bullet in the magazine instantly, so I advice you try to die to lose this.
Grenade Vent boosts your grenade damage and allows you to keep a subroutine for a bit longer just by chucking a grenade. The damage bonus also applies to your explosive guns, so it just further increases the Flakker’s total damage output. Death Machine gives you a significant damage per second boost and movement speed bonus after getting a kill, making it really good when mobbing. Then we have Element of Surprise, which makes it so that you might not have to swap out your gun depending on its element. Keep in mind, non-elemental weapons will not be affected at all by elemental subroutines. The extra nova also helps a tiny bit.
Cryogenic Exhaust Manifold is useful for getting rid of a subroutine you don’t want, however, I’d rather spend those points into keeping subroutines I do want with Grenade Vent. Float Like a Bee is a waste of skill points as you’re never going to get the melee kills without a melee build.
Rainbow Coolant is the last capstone and it is decent. The nova released from the end of a subroutine heals a lot of health for you and your buddies. While it lacks damage, the elemental nova can also give you around 50 stacks of Maniacal Laughter. And the now unlocked Laser Inferno can easily get you to max stacks of Maniacal Laughter in a few seconds, plus the disco ball’s damage is increased by laser damage buffs. This capstone is perfect for some easy health.
Guns
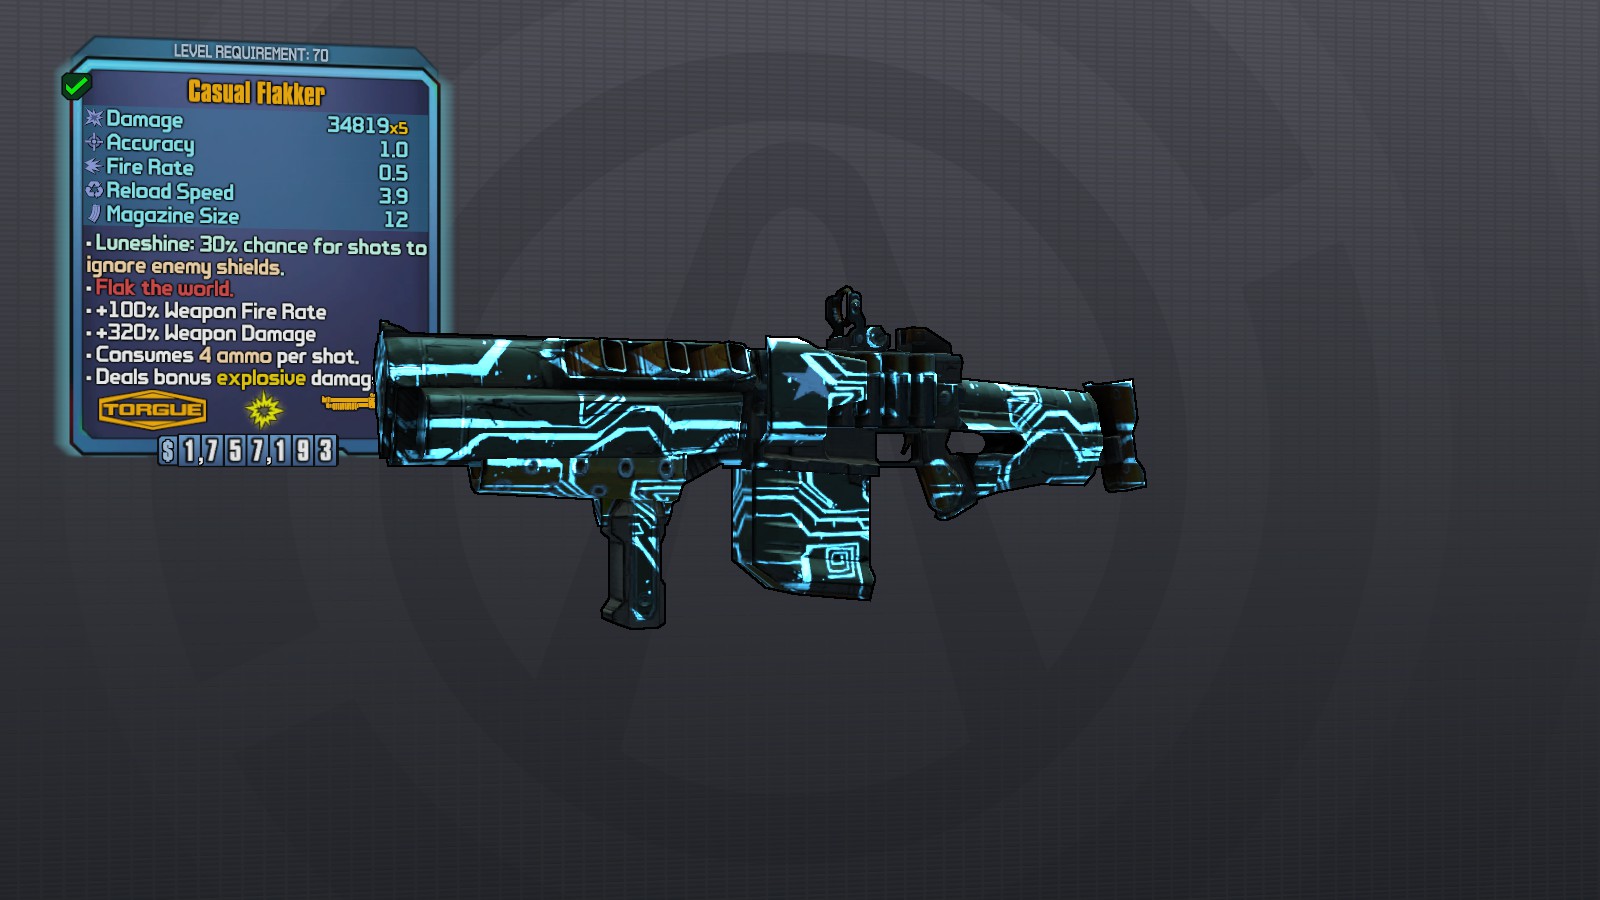
The Flakker:
The Flakker is the perfect gun for Claptrap. This Torgue Shotgun benefits from straight damage upgrades like Load ‘n’ Splode and Grenade Vent, actually gains the massive last shot bonus from One Last Thing on the second to last shot, and Fragtrap’s numerous fire rate and reload speed bonuses generally boost its overall dps. However, the Flakker is an incredibly unique gun due to it’s set firing distance. Spend some time learning how far and how close you have to be to deal some
The Absolute Zero:
The Absolute Zero is another one of Claptrap’s best guns in general. Low magazine and fast reload means that this laser can get to One Last Thing and activate Start With a Bang incredibly fast, build stacks of Load ‘n’ Splode easily, and always have Drop the Hammer active. Additionally, the Absolute Zero is a cryo weapon with a high fire rate, making it perfect for procking Coincidental Combustion and stacking Maniacal Laughter. This thing will shred threw normal enemies and Badasses with ease, but it isn’t very effective against bosses.
The Luck Cannon:
While this Jakobs pistol has magazine size of one, that doesn’t mean much considering it’s insanely fast reload and damage potential with Claptrap. That fast reload speed and puny clip make the Luck Cannon great for stacking Load ‘n’ Splode and keeping Drop the Hammer active. The Luck Cannon also has a chance to deal a massive amount of explosive damage that gains buffs from Grenade Vent, while also still being able to have Coincidental Combustion go off. It also gets a small damage boost from One Last Thing on every single shot. Make sure to watch your health if your using Start With a Bang because this gun will have you always seeing an explosive nova emitting from you.
The Hail:
This Vladof Assault Rifle has a active health restoration when dealing damage with it out, making it perfect for making Claptrap slightly better at surviving. The splash pellets that shoot out gain a damage bonus from Grenade Vent and the fast fire rate make the Hail prock Coincidental Combustion often. Drop the Hammer will always be active and it’s pretty good for stacking Load ‘n’ Splode. Crits deal insane damage with this thing, so your COM and Fuzzy Logic will help you out quite a bit. Finally, All The Things Are Awesome makes the fire rate simply amazing.
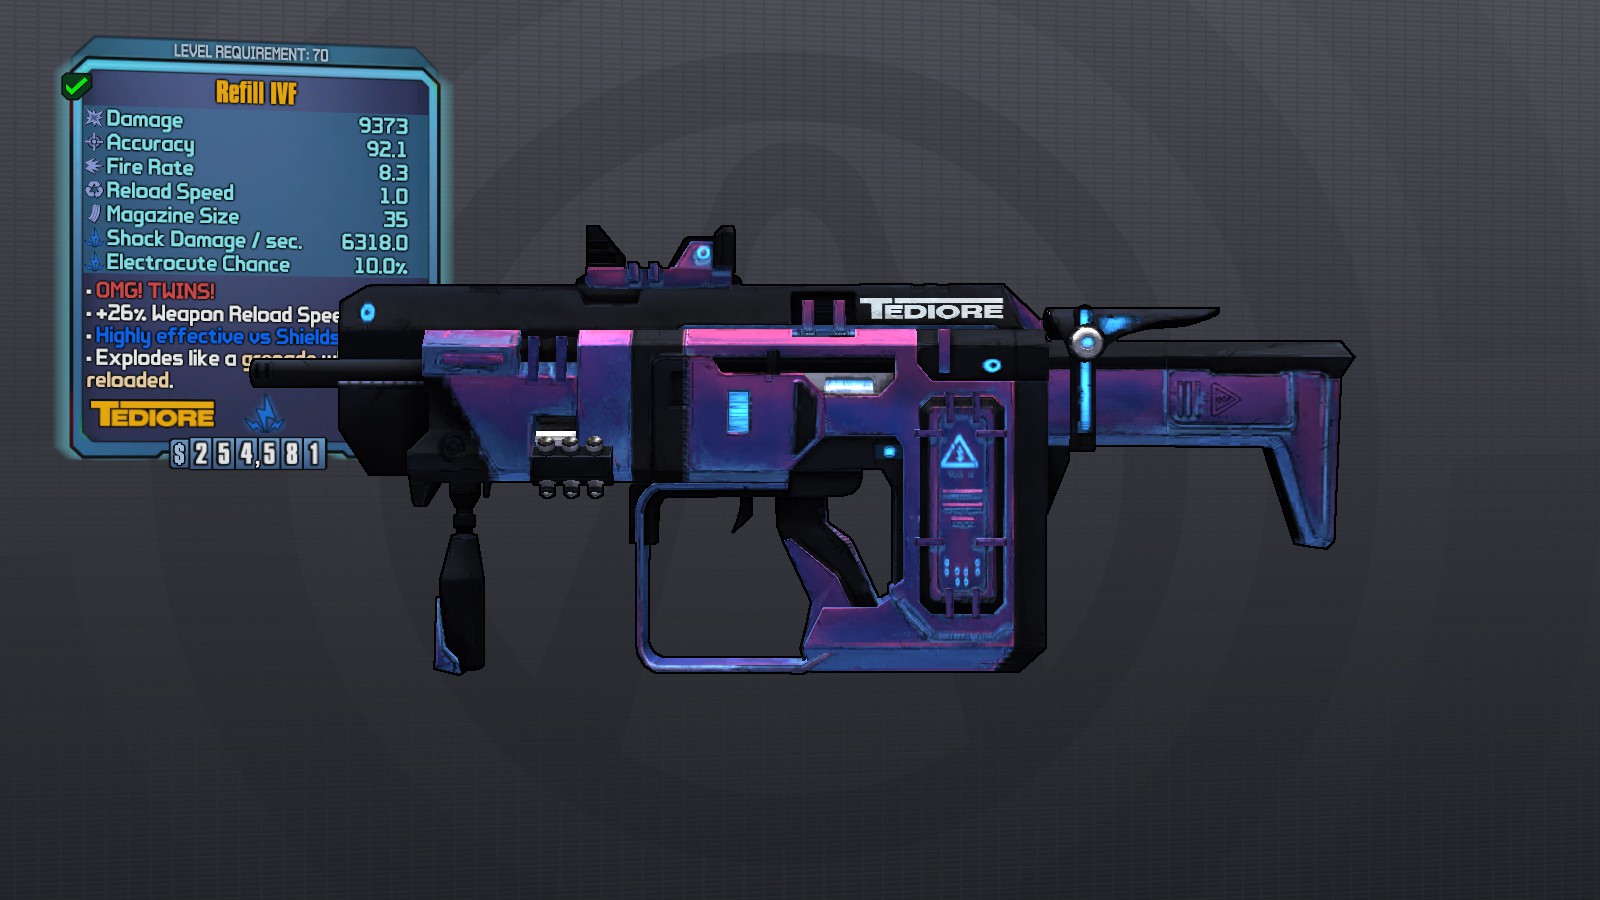
The IVF:
One of the best Tediore guns in the game, the IVF can get max stacks of Load ‘n’ Splode in just a few seconds. Every reload buff Clappie has will always be active with this less than a second reload. Also both of the two babies spawned from the chucked gun get the Grenade Vent damage bonus. Try using this thing when you have Gun Wizard active to shred someone’s shield.
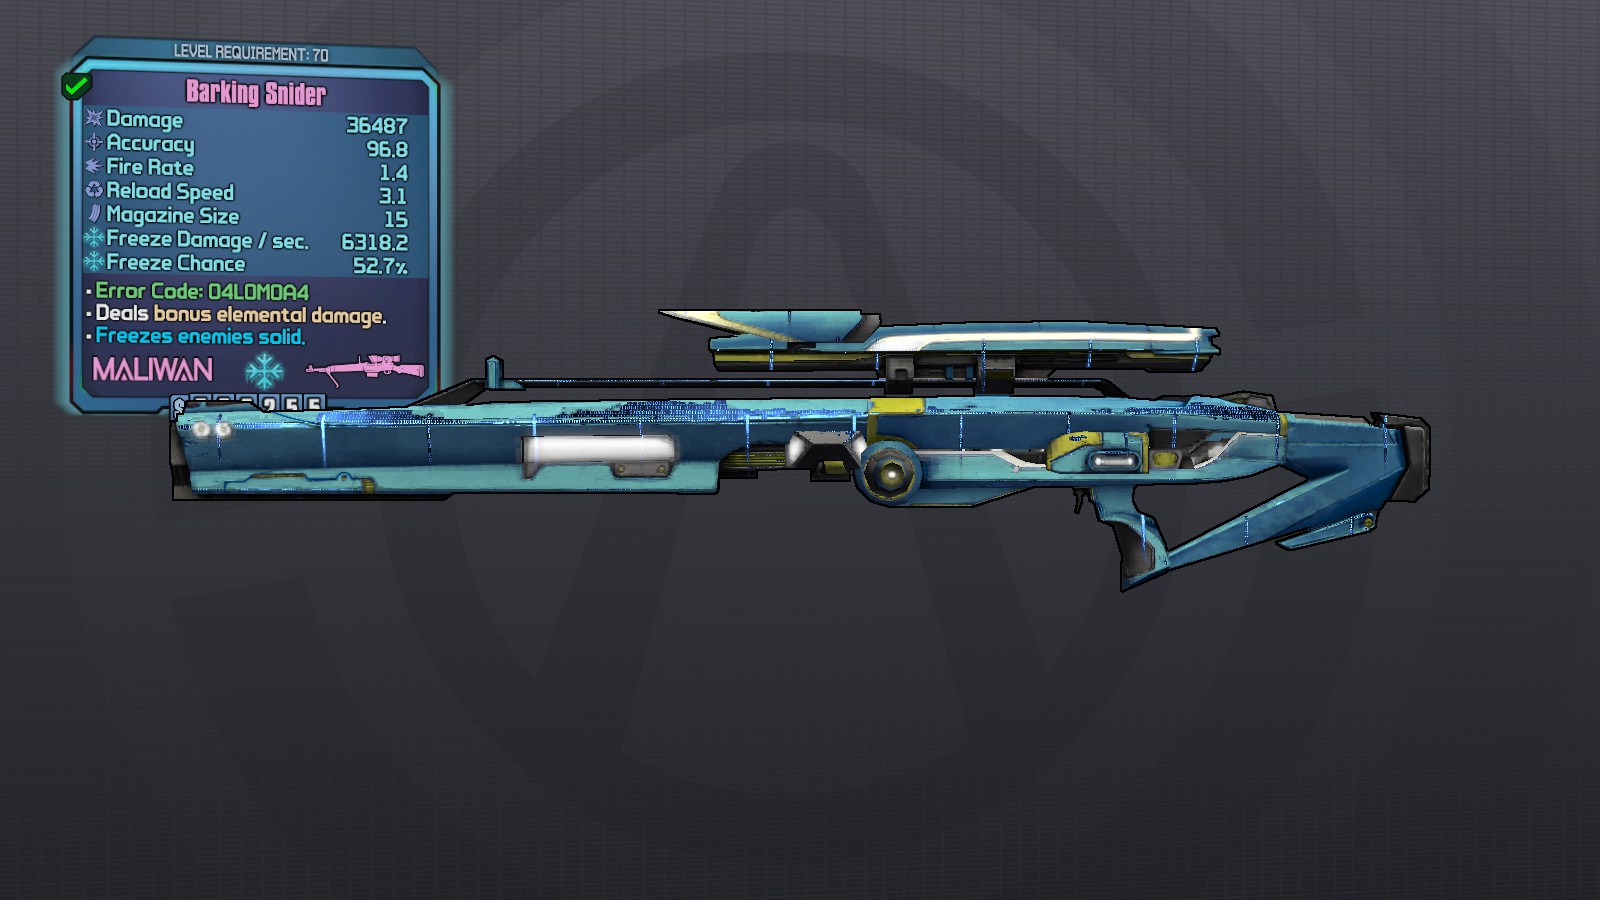
Glitch Snider:
A high elemental effect chance helps with Maniacal Laughter for general health regen and a freezing Maliwan rifle boosts your overall explosive damage with the Flakker, Luck Cannon, or Coincidental Combustion. It’s also a good sniper for keeping up Drop the Hammer, but it shines best for its ability to instantly freeze almost any badass enemy.
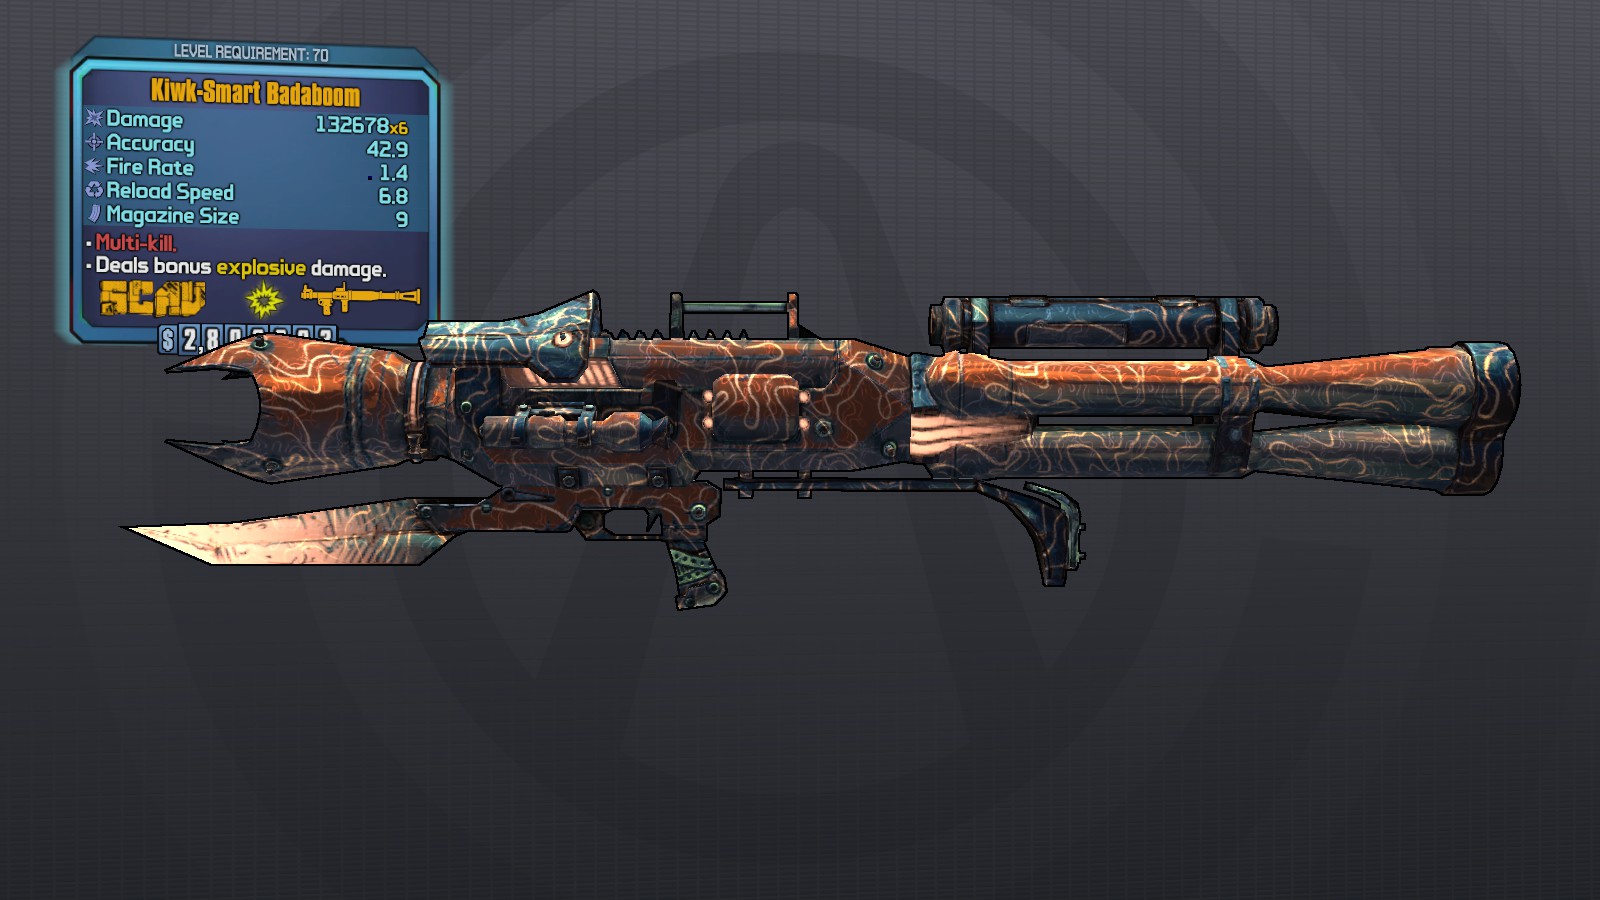
The Badaboom:
The Badaboom is one of the few launchers that is able to get the full bonus from One Last Thing, making that last able to kill any normal enemy or any frozen Badass. Get an explosive one so you get the Grenade Vent boost.


Miscellaneous Gear
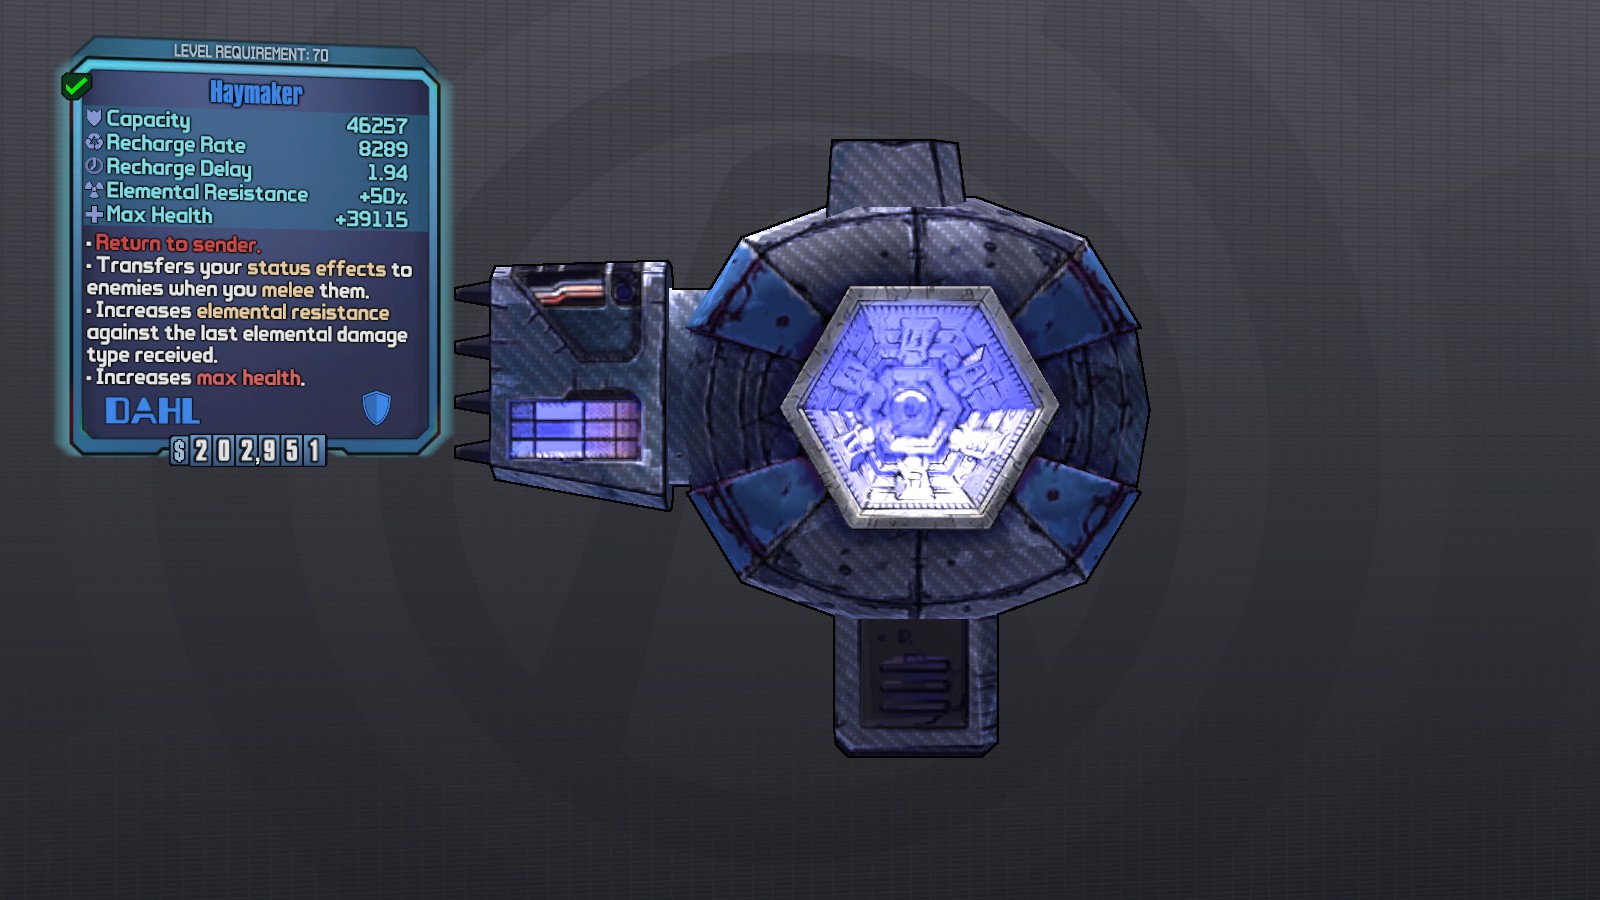
The Haymaker:
Claptrap loves Adaptive Shields due to him having countless methods of healing from applying DOTs, killing enemies, or just using his action skill. The Haymaker is amazing for Claptrap because it lets you melee away your corrosive DOTs, which can easily shred all that bulk away in a few seconds. Furthermore, the low recharge delay helps counteract Killbot’s shield drain.
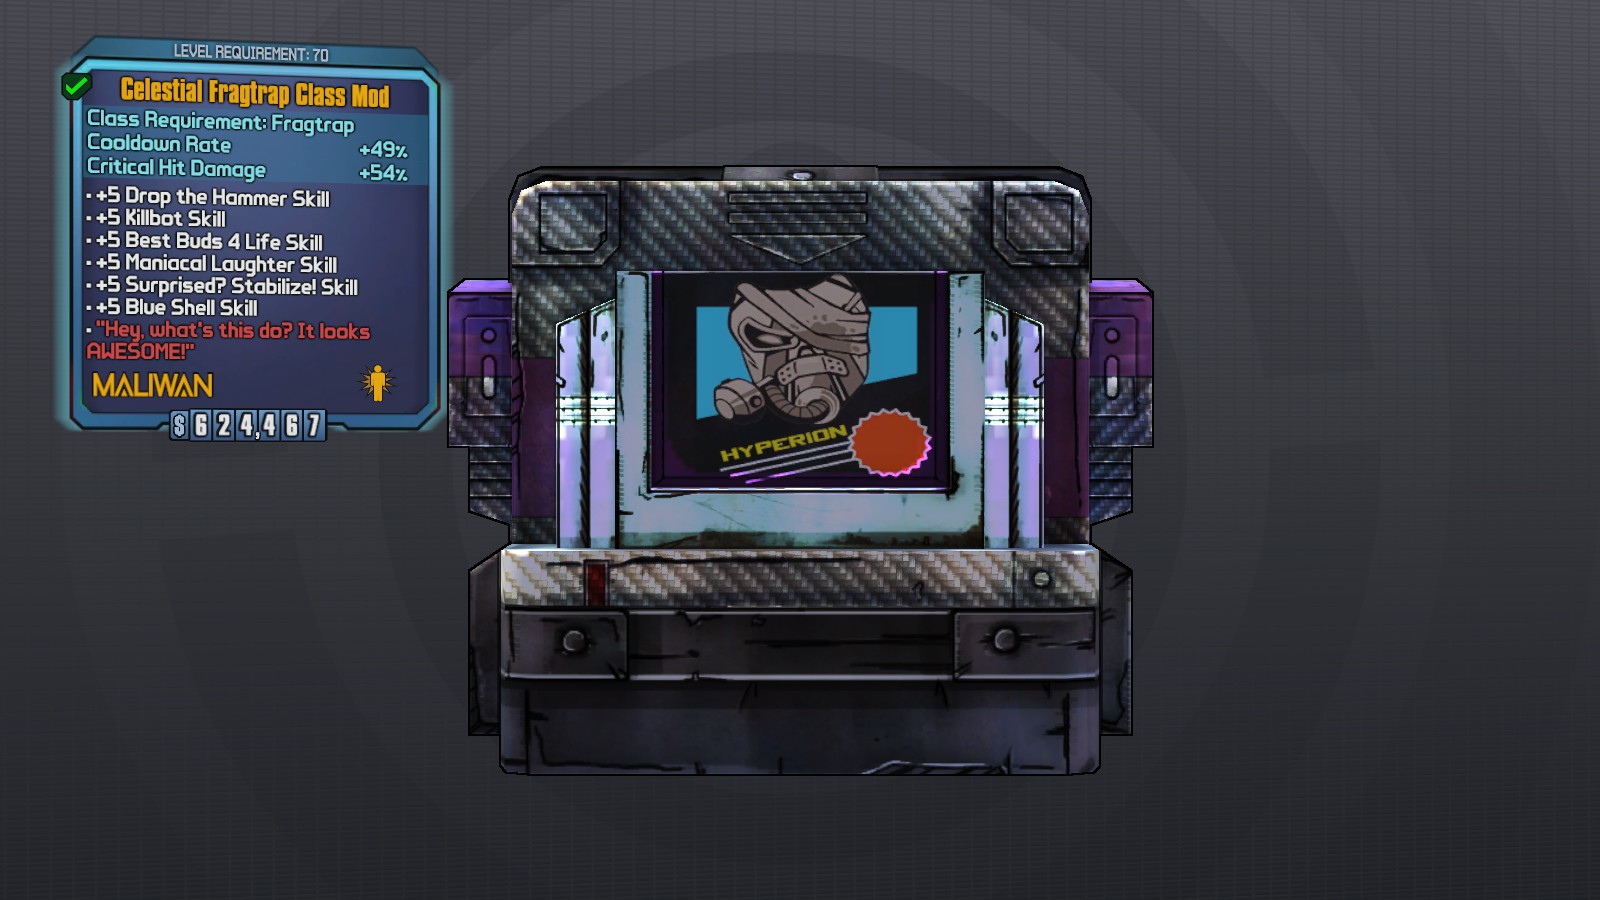
The Celestial Fragtrap:
The passive boosts from this COM offer you some cooldown rate (which is amazing since it offers more health restoration and rolls for higher damage) and an increase to your critical hit (which is alright) damage output. Boosting Blue Shell and BB4L means you can get a total 120% more Fight For Your Life time plus the additional health regen and gun damage from getting knocked down a peg. +5 to Drop the Hammer increases your fire rate and reload speed even further with an increased cost to accuracy, but that isn’t a problem when Surprised? Stabilize! is active with only 1 point investment being needed. The Killbot and Maniacal Laughter boost just gives us even more health regeneration for only 2 skill points giving you another 10 in your skill tree.
The Quasar:
A grenade that summons a surge of electricity and pulls in nearby enemies into said storm. Perfect for getting a 100 stacks of Maniacal Laughter in just a few seconds, while also providing some useful crowd control. Free health regen and a lot of damage from just wanting to keep your subroutine is very nice.
The 3DD1.E:
Everyone’s favorite Oz kit: 3DD1.E. The max shield boost helps with the Haymaker’s low capacity and makes you bulkier in general. Plus the laser damage bonus applies to both your Absolute Zero and the disco ball from Laser Inferno. 3DD1.E can also drop some care packages, they shine the most when you get your entire shield restored by hearing a simple beep.


Closing Notes
The gear previously listed is the overall best gear for almost every scenario. However, I suggest having an Audacious Sapper Class Mod to boost One Last Thing for the Invincible Sentinel and EOS, as it helps for shredding them in seconds I suggest throwing in a Clear Skies Oz Kit for helping with the latter. Here’s a simple screenshot showing what the build is capable of:
