Overview
A quick guide to getting Fable 3 to run properly on Windows 10 while setting up Online Co-Op at the same time. After checking to see if done correctly, added extra steps to increase game quality for non-potato PCs.I take zero credit for anything. Just exist and sharing information so I can have more people to play Fable 3 with.
Fable III Windows 10 & Online Co-op
You have to follow this exactly to make sure everything works as intended. Patience is in fact needed in this process since it can take a while for it to finish “working”. If you own the game and have modded it with the fake GFWL do a clean install. A clean install means making sure it’s completely gone from your system (manually deleting remnants if Steam uninstall doesn’t clear it all). When downloaded skip to Step 4.
- Purchase a Steam Key if you have not done so already. You can buy official, 100% legal, keys from here[www.amazon.com].
- Open Steam and on the bottom left hit “Add A Game” and then “Activate a product on Steam…”, redeem code, then install the game.
- Once you launch the game you will run into a never ending black screen. No idea why this happens, but this is a good time to close the game out (Alt + f4, task manager force quit, or simple close the game).
- Now, download this[community.pcgamingwiki.com] and DO NOT LAUNCH YET.
- Hit ‘Windows key + R’, type Control Panel, enter. You will have opened the control panel. Make your way into “Programs and Features” and scroll down until you reach: “Microsoft Games for Windows – LIVE Redistributable” and “Microsoft Games for Windows Marketplace”. Uninstall both.
- Now you may launch and install the brand new and shiny GFWL, from step 4, to replace the broken one you just tossed.
- Once it’s installed Open up Steam > Fable 3 > Right Click > Properties > Local Files > Browse Local Files. This will take you directly to the game files needed for the next step.
- Right click FableLauncher.exe > Properties > Compatibility > “Run this program in compatibility mode for Windows 7” & “Run this program as administrator” > Apply Changes > Ok
- Same as step 8 (the one you literally just did), but with Fable3.exe this time.
- Now just launch the game. If done correctly you will be met with a super shiny, never before seen GFWL screen. You can log in with xbox account or create a new one. Depending on if your system is potato or not it can take up to 20 or so minutes (mine took 5 but am not potato).

Once this is done you can add players in-game as you used to be able to before the servers went poof. Yay! We can trade legendaries again ~ .
Note: According to user Barkawaka, it deletes saves when signing into live. Small price to pay for being able to play online no? =)
Adding DLC (Credit: dingleson)
All credit to dingleson for finding a fix. PLEASE SUPPORT HIS GUIDE HERE. If you need help on this please ask in his guide for assistance. I did not write this up nor did I find the fix. Don’t forget to stop by and say thank you to him.
As of now, this method can only be used with Traitors Keep DLC.
The way this works is you manually download the DLC and licenses that come with it, and trick your GFWL into thinking that you have the DLC purchased with a valid license. If you are reading this guide, you are aware that GFWL doesn’t have any kind of support anymore so buying the DLC’s is impossible.
Note: I recommend installing this DLC after you have completed the main story, as its content is only accessible after you have finished the main quests. When installing this DLC, you will no longer be able to play with players that don’t have it installed, the save that you play on will not able to connect to players on vanilla. So I recommend making a backup of your save first just in case.
You can find your save folder in this path: (C:UsersSaved GamesLionhead Studios), just make a copy of the Fable 3 folder and extract it elsewhere.
For this to work, you need to download both the DLC and the licenses that activate the DLC on your GFWL account. You need to download and extract both these files into the same location:
Traitors Keep DLC
Traitor’s Keep[download.xbox.com]
Traitors Keep Licenses
[link]
Understone DLC
Understone[download.xbox.com]
Understone Licenses
–
Once you have both files downloaded, and have extracted them into the same folder (Make sure both .lic files are alongside “content.xbx”), you will need to rename the “0009xxx.lic” file with your own Xbox profile’s XUID.
Your XUID can be found here[cxkes.me]
Just type in your gamertag and hit resolve, then copy the XUID and rename it with the “0009xxx.lic” file, and make sure you keep the .lic extension.
Now you will want to move all those files into the following directory :
If any of the folders inside the DLC folder are not there, just manually create them identical to the path above, you can just copy the folder names and create them. The following files will need to be in the folder: “content.cat”, “content.xbox”, “X_IMAGEID_GAME.png”, “0009xxxlic” (Renamed with your XUID) and the “FFFxxx.lic.
One all the files are in the correct location, just open up the file dlc2paid.bnk.dat with your Notepad, and change the value of <premiumContentMask> from 1 to 0 and save it. After this step, you can now launch your Fable 3 game and will be able to access the DLC with its achievements and online support. Enjoy!
64-bit & 4GB+ RAM (REQUIRED) – Graphic Enhancement
Let’s just start off with saying that this game loads in real time. It creates unnecessary lag and renders objects slowly. So, this little enhancement basically increases the amount of RAM that the game is allowed to use. The only negative aspect of this is a longer initial load time.
Don’t worry, the initial doesn’t mean every single map, it means on game startup. It will take about 5 – 10 minutes on game start up for the game to fully load every single texture and model before hand to drastically decrease the lag and rendering time.
- First download Notepad ++[notepad-plus-plus.org], if you have never downloaded it, it’s basically a million times better than your basic txt editor that comes with windows. Use this instead from now on.
- You will need to patch Fable3.exe and it’s simpler than it sounds! Download Large Address Aware[www.techpowerup.com] (scroll down and specifically download “laa_2_0_4.zip”).
- Open an executable to modify (click on the “…” button to browse).
- Check the box specifying you want to make it large address aware.
- Click on save to commit the changes.
- Now, navigate to Fable 3 > Data > Right Click “startup.vfsconfig” and “edit with notepad ++”
- Once it’s opened in Notepad ++, scroll down until you see this line of code:
<Composite> <Required><Ref ID=”globals_model_headers” Mode=”memory”/></Required> <Required><Bank Path=”globals/globals_models.bnk”/></Required> </Composite> <Composite> <Required><Bank Path=”globals/globals_texture_headers.bnk” Mode=”memory”/></Required> <Required><Bank Path=”globals/globals_textures.bnk”/></Required> </Composite>
- You will be adding Mode=”memory” to 2 lines like so (underlined changed locations):
<Composite> <Required><Ref ID=”globals_model_headers” Mode=”memory”/></Required> <Required><Bank Path=”globals/globals_models.bnk” Mode=”memory”/></Required> </Composite> <Composite> <Required><Bank Path=”globals/globals_texture_headers.bnk” Mode=”memory”/></Required> <Required><Bank Path=”globals/globals_textures.bnk” Mode=”memory”/></Required> </Composite>
- Now make sure to save (for new Notepad ++ users the normal save option doesn’t work, it’s a lie and will never be fixed). Simply hit the tiny red x on the tab you have open and it will give you an option to save.
- Launch the game and remember: it will load slowly at first easily 5 – 10 minutes so BE PATIENT.
Enjoy sped up game play and no more lag / slow rendering ~
—– Bonus Below —–
.
Skip Intro Videos Patcher (Credit: XJDHDR & TheGeniusSavant)
Just want to state I do not use this since I personally don’t mind the intro videos, but some people hate them. So I have not personally downloaded this myself. I 100% cannot provide tips if you install it wrong. Also pretty sure the guy won’t check Nexus anymore if you have issues as well so you’re on your own.
Pick One of the Following:
Skip Intro Mod 1[www.nexusmods.com]
Skip Intro Mod 2[fable3mod.com]
Skip Intro Mod 1 Possible Reqs.:
– Fable3Mod Account[fable3mod.com]
– BlackDemon’s BNK Utilities[fable3mod.com]
– Notepad ++[notepad-plus-plus.org]
– nointro.patch[www.nexusmods.com]
Mod 1 Guide
Originally posted by XJDHDR:Requirements:
This was designed for the English version of Fable 3 distributed through Steam. I don’t know whether this file will work with other languages or distributions. While I would greatly appreciate it if anyone reports success in these scenarios, I can’t guarantee that you won’t have problems and especially recommend making backups before attempting. While I have provided instructions below for patching the game yourself without downloading this file, you may find this download useful if you would rather take the safe route.
Manual application:
The contents of this download can be manually applied to your game without downloading this file by following this procedure:
- Make a backup of <location where Fable 3 is installed>datalevels.bnk and <location where Fable 3 is installed>datalevels.bnk.dat in case something goes wrong.
- Download the Fable 3 BNK Browser from this site: BlackDemon’s BNK Utilities[fable3mod.com]
- Download the blank BINK file from here: [link]
- Create a temporary working folder on a storage device with at least 4GB of free space.
- Extract the contents of the two archives you downloaded earlier into your working folder.
- Create two copies of the blank BINK file and rename them to lionhead_logo.bik and microsoft_logo.bik.
- Create an empty folder in your working folder to hold the contents of one of the game’s resource packs.
- Open BnkBrowser.exe then click on Open. Navigate to <location where Fable 3 is installed>data and open Levels.bnk.
- Click on Extract All then select the folder you created in Step 7. Exit BnkBrowser when the extraction is finished.
- Open the folder you created in Step 7 then navigate to artvideos. Move the two blank BINK files created in Step 6 into this folder and overwrite the originals.
- Open BnkCreator.exe then click on Add folder(s). Select the folder you created in Step 7.
- Click on Create then navigate to <path-to-game>data. Select levels.bnk then click on Save.
- Run the game to test that it starts without issue. After that, you may delete the temporary working folder.
Skip Intro Mod 2 Reqs.:
– Fable3Mod Account[fable3mod.com]
– Notepad ++[notepad-plus-plus.org]
– notintro[fable3mod.com]Mod 2 Guide:
Originally posted by TheGeniusSavant:I had to move ALL the files into the game’s data directory (for my machine it is C:Program Files (x86)Microsoft GamesFable IIIdata Wink and edit the nointro.bat to read as follows:
_____________________________________
@echo Furby’s Fable3 No-Intro Fix
@echo ————————–
@echo injecting microsoft_logo.bik
bnktool -i levels.bnk artvideosmicrosoft_logo.bik microsoft_logo.bik
@echo done..
@echo injecting lionhead_logo.bik
bnktool -i levels.bnk artvideoslionhead_logo.bik lionhead_logo.bik
@echo done..
@echo …
@echo You’re now intro free
pause
__________________________________________Then open an ADMIN command prompt, navigate to the game’s data directory, and type ‘nointro’ (without the quotation marks, of course).
This worked on Windows 10.
Thanks again for posting!
Note: For some odd reason the quoting seems to be quoting the entire section if I try to quote the walk through on the first mod, but XJDHDR wrote it all.
Nude Mod (18+ Warning = Credit: Ryuseiken)
I also don’t use this since I have zero need for a nude mod. Also looking at the files, I don’t know if this will break anything or not so please be careful when downloading.
NudeMod[www.nexusmods.com]
Walkthrough:
Originally posted by Ryuseiken:Attention, please make a backup of the next file in case of problems:
“morphs_textures.bnk.dat” in the “…artcharactersherosmorphs” folder
“globals_textures.bnk.dat” in the “Globals” folder
“levels.bnk.dat” in the “Data” folderEverything is ok? so here we go:
1 – Extract the files in the 7z archive in the “Data” folder of the game.
2 – Go to the folder “…artcharactersherosmorphs” and apply the patch (double click on “Patch_morphs_textures.bat”).
– Once finished, rename the file “morphs_textures.bnk” to “art_characters_heros_morphs_morphs_textures.bnk” and copy in the “data” folder.3 – 3 – Go in the “globals” folder and apply the patch (double click on “Patch Globals_Textures.bat”)
– Once finished, rename the file “globals_textures.bnk” to “globals_globals_textures.bnk” and copy in the “data” folder.4 – In the “Data” folder, apply the patch “patch_levels.bat”
Normally if everything went well, the file .tex and rename the ones you are gone. The patch has been applied normally.
5 – Run the game and enjoy it :p
Sorry for my bad English. I hope you will come to understand me.
NOTE: Just like the last mod there’s a possibility of needing to edit the .bat to properly find the location of your files. And once again, have not actually installed this so can’t give proper walk through myself.
All Items Unlocker (Credit: ???)
I won’t use this myself since I have a habit of 100% games on my own. If you’re lazy and just want everything right off the bat, then use this.
Originally posted by CatchLightning:There is a read me inside please read it. I have no idea if their instructions are absolutely necessary but I understand why they suggest them even if it will mean you have to fight the first boss without them. PS don’t buy any gauntlets on the road to rule if you don’t want un removable duplicates (at least not easily removable). Weapon dupes should be sell able at pawn shops.
Download: [link]
Instructions.txt
This is the unlocker you put in the Traitors_KeepContent folder and save your game.
Then replace back the original ones.
I suggest you playing till after mercenaries level when you talk to 2 guys in pub before loading game with unlocker.
This unlocker will unlock all weaponsgunsoufitsDLC..
(Some broken text so can’t translate)
– ム・・鶯・鴉・韈 ・・・Traitors_KeepContent ・”DLCtraitors_keepContent”
– ムⅶ湜 鞳 ・糺鱠頸・
– ム・・鶯・鴉・韈 “Original (Use After Unlocking And Saving)” 萵 趺
ミ裲黑褊蔘褪・ 褄瑣・ 淲 犱 魵・ ・浯褌湜・・, ・・鈬魵ⅱ・・葢 籵・・ ・・砒
Walking Mod (Credit: Artofeel)
Wanted to state before hand that I do not use this mod, so use at your own risk.
Originally posted by Artofeel:Since developers did not bother to add a “walk mode”, we can do it for them.
Navigate to
Example:
and open Controls.xml.
Then navigate to the 8588 line and see the following:
This is the “Forward” button, default “W”.
To modify speed (Y type), for example reduced it by half:
It’s important to change Hex64 value (3F800000), float itself will change after game loading, but you can own.
Then navigate to line 8660:
This is “Backward”, default “S”
So reduce the speed by half:
Then navigate to line 8732:
This is “Left” command, default “A”.
Reduce the speed (X type) by half:
Then navigate to line 8804:
This is “Right” command, default “D”.
Now reduce the speed by half:
Then navigate to line 8318:
This is the “RUN” command, default “Shift”.
Change it (KeyboardKey type) to the Caps-Lock, for example:
Again, navigate to line 8588 and copy-paste this after “Forward” button:
There will be a new button “Shift” for additional forward speed.
Of course you may not reduce speeds: backleftright.
In addition, the modified Controls.xml:
Mod download: [link]
—- Final Input Below —-
.
Troubleshooting
Game broken or doesn’t want to work?
Well if you follow the steps exactly it works 100% of the time. I know because I did all the steps in every category (Online, DLC & Graphic Enhancement) 3 times in a row including clean installs.
If something broke then do a clean install and try again.
If you’re using any other section that I clearly stated that I did not do it or it could possibly break your game then please don’t ask me for assistance since I gave fair warning on both that I did not use this and it could break your game.
That’s the best advice I can possibly give you on troubleshooting.
Can’t connect to server or server/connection interruption possible fix
Originally posted by funizreaper:hey if anyone has issue: can connect to server or server/connection interruption during download, you need to manually open where that folder is and install both programs which are the two broken versions you needed to uninstalled from following this guide. You need to install them both while in that error screen, thats when you will see both programs show up in said folder.
Possible Black Screen Fix
Originally posted by K2-XT:If you’ve followed all my steps and still getting a black screen as soon as you press enter or start on the main title screen, try signing out of GFWLive, deleting your account, then signing in again.
Possible Black Screen Fix 2
Originally posted by CountViper:Here’s the tip for everyone else:
Before installing the new Live service i also set it to “compability mode Windows 7” and “run as admin” (same as the steps 8. and 9.) and after installing it was installed i restarted my computer.Then i proceded with whole process and everything ran as normal 🙂
Possible Fix
Originally posted by *Thump*:Update to last comment: I figured out the issue, so what I’m about to say, might help if others find this problem.
So basically after doing the setup as described in the first paragraph, when attempting to launch the game, the game wouldn’t even start-up. Steam would just struggle for a moment, say I’m in game and then after a few sec it would say I’m no longer playing any game.
The solution to this issue is as follows: run Games for Windows Marketplace app and log in using your registered Microsoft account. While the app is still in use simply launch Fable 3 from Steam (with admin permission and in compatibility mode (I personally used Windows Vista c. mode). It should load in as OP described above, with a black screen and a Games for Windows Live overlay popping up. After that simply follow step 10 of the guide. Hope this helps!
Note From Me
If this guide helped you please hit a thumbs up and favorite.
If you want to play with me or just want some more friendos then feel free to add me.
If the guide didn’t help ask for help before slamming a thumbs down on me. D;
—- Ignore Below Here —-
.
Adding DLC (Outdated / Works – Keeping)
Okay. After talking to management at Xbox we have a slight problem for PC. At the moment we can either have DLC but no online, or have online but no DLC. Both options are bad, but I will reach out to the modding community and ask if they can find a way to make the DLC work. It most likely won’t be legal, but it beats having only having 1 or the other.
Before people REEE about legal and pirate bad, these DLC’s are posted for free by Microsoft itself.
- Download the following 3 DLC:
Understone[download.xbox.com]
Traitor’s Keep[download.xbox.com]
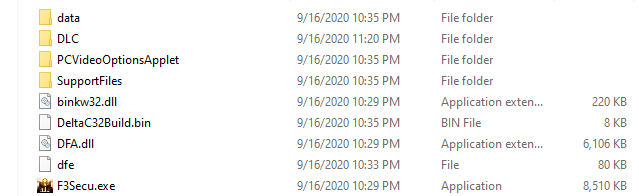
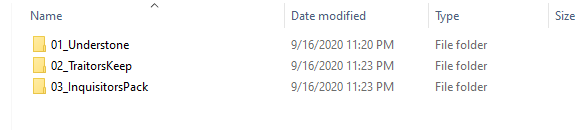
Inquisitor Pack[download.xbox.com] - Navigate to the Fable 3 install directory and manually create a folder named “DLC”. Open the folder and create 3 more folders named: “01_Understone”, “02_TraitorsKeep” and “03_InquisitorsPack”.
Install Directory
Inside DLC Folder
- Place each respective DLC in its designated folder.
Pretty simple, unlike the other guides you are keeping GFWL how it is. You want DLC and Online mode right?