Overview
This guide covers just about everything to do with smelting in the Factorio. Designs, Ratios, Furnace Setups, Tips/Tricks and more. Covering both belted designs and robot-based setups.
Introduction
Hey there, and welcome to my first Steam Guide! Some of you may know me from my http://www.youtube.com/Xterminator.
I figured it was time to put together some guides here on Steam that have more of a focus on a specific subject. So, to start it off we have smelting!
Smelting and setting up furnace layouts is one of my favorite parts of Factorio, arguably one of the most important because without a sufficient smeltery the rest of your factory will suffer.
So, let’s get started! The following section will cover ratios, which are an important starting point to create an efficient and powerful smeltery.
Ratios
Ratios are used throughout the whole game and are the key to optimizing your factory to the max. However, in this guide, we will only be focusing on smelting ratios, or more specifically, furnace to belt ratios. “What does this mean?” You might be asking.
To put it simply, there is a very specific number of each type of furnace required to completely fill each level of belt. The specific number depends on the belt speed/throughput and the smelting speed of the furnace and the item being smelted. Before we continue, if you prefer to see a live demonstration of these ratios, you can check out my Smelting Ratios Video.
We’ll start with Stone Furnaces since those are what you will be starting with and have for a good while. Stone Furnaces have a crafting/smelting speed of 1, which is essentially base rate – meaning there will be no modifier on the craft time of items because you would just multiply it by 1.
Using Stone Furnaces, and for smelting Copper, Iron, and Stone you need 48 (24 per side) to completely saturate a Yellow Belt, 96 (48 per side) for a Red Belt, and 140 (70 per side) for a Blue Belt:
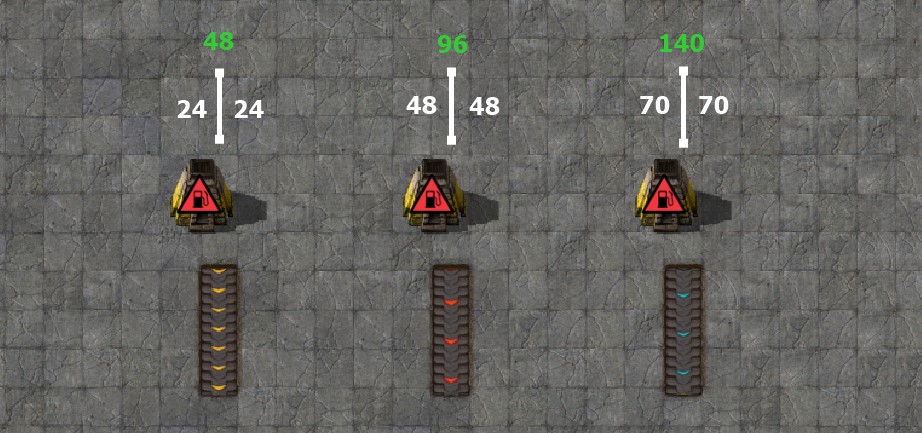
Pretty simple right? Once you know and memorize these ratios it will help immensely with building some great furnace setups! On to Steel and Electric Furnace ratios…
Luckily, Steel and Electric Furnaces both have the same smelting speed so the ratios will be the same for both, and on top of that, their speed is exactly double that of a Stone Furnace (so 2) so we can just half all the above numbers.
Meaning you need 24 (12 per side) for full saturation of Yellow Belt, 48 (24 per side) for Red Belt, and 70 (35 per side) for Blue Belt:
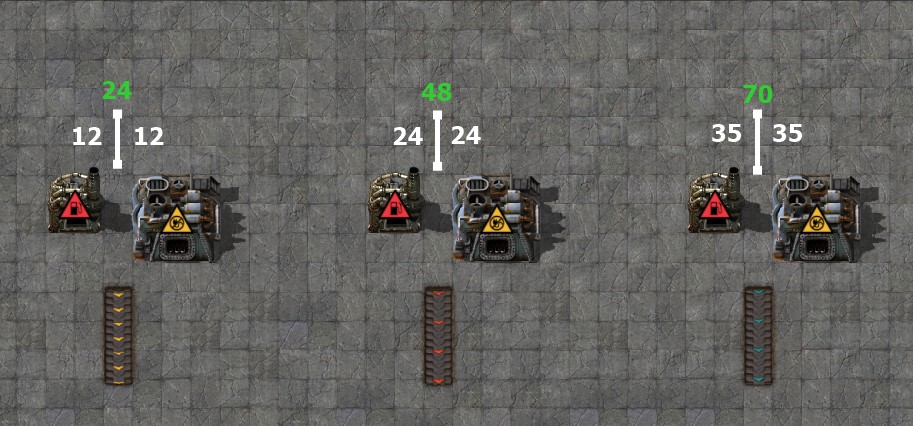
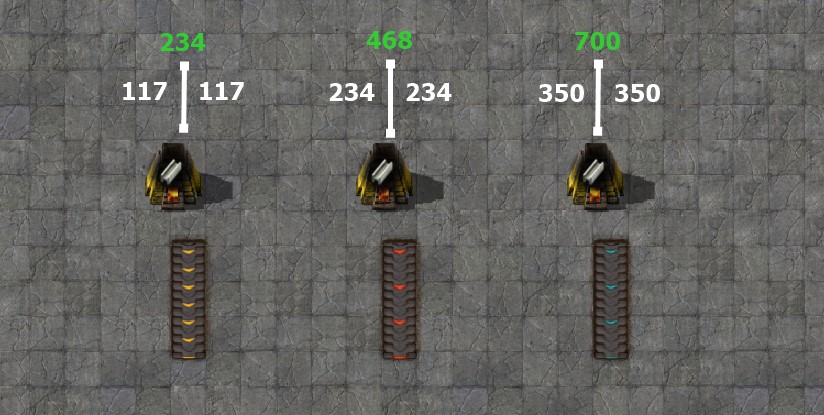
That covers everything except for smelting Steel. This is where things get a bit crazy. Steel has a craft time of 17.5 seconds, compared to the 3.5 of the other three resources, so 5x as long. This means that it increases all the above ratios by 5x. This is why even getting a full Yellow Belt of Steel is quite a difficult task.
For Stone Furnaces you need 234 (117 per side) to fill a Yellow Belt with Steel, 468 (234 per side) for a Red Belt, and 700 (350 per side) for Blue Belt, and yes I did say 700…
And lastly, using Steel and Electric Furnaces, we need half the amount (remember they smelt 2x as fast as Stone Furnaces). Some numbers rounded up to make it easy. So 118 (59 per side) to saturate Yellow Belt with Steel, 236 (118 per side) for Red Belt, and 350 (175 per side) for Blue Belt:
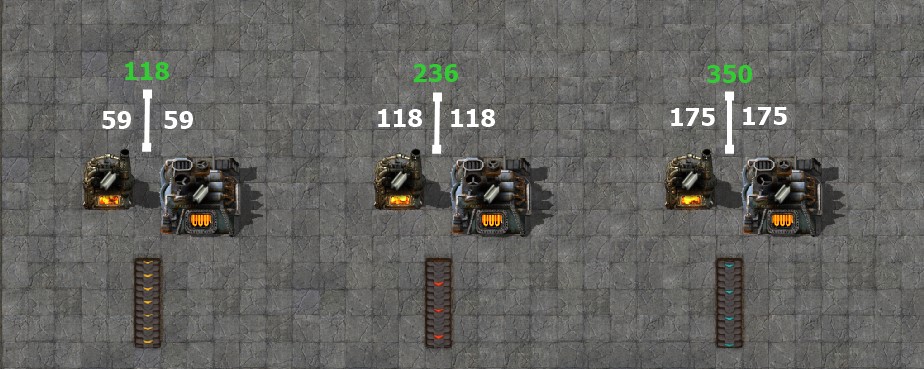
For basic smelting (without modules or beacons), these are the important ratios to keep in mind and will be the building block for the setups shown in the rest of the guide. Moving on to the next section!
Balance & Symmetry
Inherent balance (and symmetry) is key in making, and keeping your smelters and resource lines running without having to use too many weird balancers or other unnecessary tricks.
It’s actually a pretty simple concept but may not be something you initially think about when you start the game (I know I didn’t) because you just want resources and may not care how you get them. You can achieve Inherent Balance by simply building and feeding things evenly. It’s that simple! Smelters are a great way to demonstrate this, but these principles can be applied throughout an entire factory.
To expand upon things further, if you build something that is evenly balanced side to side or top to bottom and also feed resources as equally as possible then you will inherently have a balanced output without having to use any lane balancers or other tricks.
Here is an example of a balanced setup:
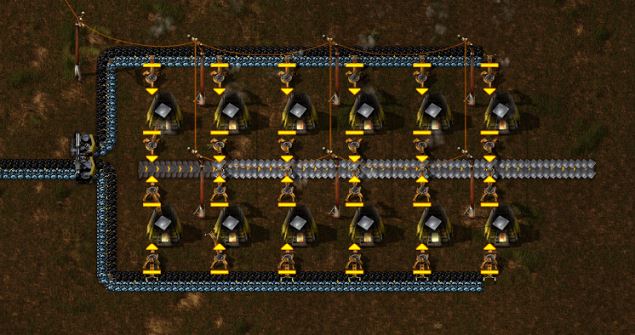
The main thing to notice is that the design is symmetrical by having an equal amount of smelters on both sides, uses the same speed of belt throughout the build and is fed it’s resources equally by using one Splitter to even split an input line 50/50 to both the top and bottom.
Here is a simple example of a smelter that is not inherently balanced or symmetrical and will cause problems later down the line unless you use some balancing trick:
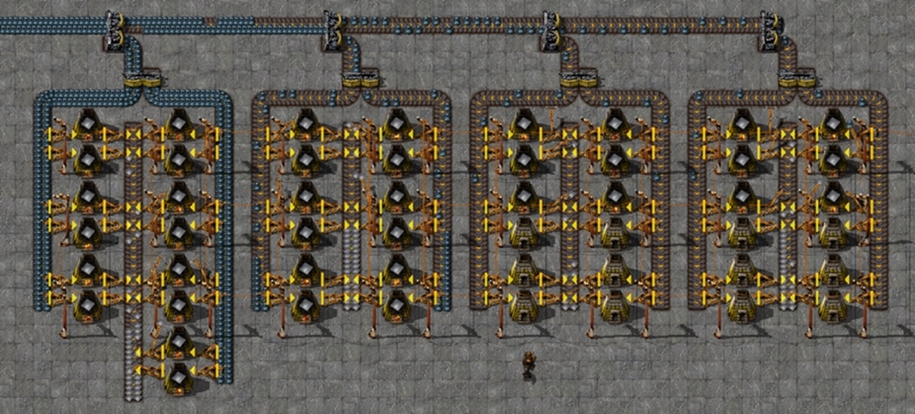
So, there are a few issues with this right? The first and most noticeable is the fact the first smelter has 2 extra furnaces on one side. That alone will throw things off a little, so again, try to build things symmetrically if at all possible. However, the real problem here is the input line. Notice how each smelter progressively gets less and less ore even though the main input line is a full belt of ore? This is because of the way it’s being split off. By just putting a Splitter on the main feed line each time, it is giving a huge priority to the first smelter with less and less priority to each proceeding one.
The reason for this is actually pretty straightforward. The first Splitter is sending 50% of the main ore line to Smelter 1, and 50% continues down the main line. The second Splitter is doing the same thing but is only getting 50% of the initial ore to begin with (remember the 1st Splitter already sent half to Smelter 1), so in reality Smelter 2 is only getting 25% of the total ore that went on to the main feed line. It continues on down using that principle so that the very last smelter is only getting 12.5% of the overall ore compared to the 50% the first one got.
There are a few easy ways to avoid this and ensure that your feed lines are balanced and evenly sent to the smelters. One of the easiest ways is to have dedicated feed lines for each set of smelters rather than splitting off multiple times. Another solution would be to use a balancer to make sure they are all fed equally. There are many different options for balancers out there, but the Wiki has a page full of them which can be found here[wiki.factorio.com].
In the next section, there will be some examples of different belt-based furnace setups and I’ll cover the pros/cons of each
Belted Designs & Layouts (And Pros/Cons For Each)
Most conventional belted smelter designs are pretty similar in their most basic form. The main differences you will notice is how or where the belts are routed, the furnace arrangement, and where it inputs and outputs materials. The next 3 designs shown below are all pretty similar in general but have small differences that mostly come down to personal preference and the situation.
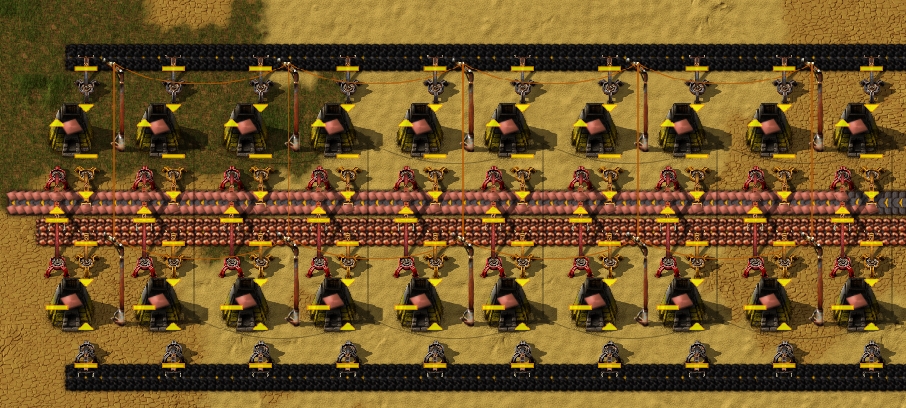
This particular design utilizes dedicated lines for input and output. You’ll notice that it has a full belt (both lanes) for the ore, then the same for coal, and lastly the same thing for the plate that it outputs. So, what are the Pros/Cons of this type of design?
Pros:
– Having the dedicated means you are less likely to have input flow problems because each material gets its own full line rather than half of line like many of these other designs.
– There is more room for error with the balancing since it has a full line to work with, so if one lane of the belt isn’t quite balanced, it still has the whole other lane to pull from.
Cons:
– It’s slightly larger than other designs that combine resources on one belt.
– It uses quite a few more Inserters than other designs because it needs the Long Handed Inserters to export.
– It is still limited by the throughput of the output belt (the one for the plate) so having the dedicated lines for the ore and coal is probably overkill and not actually needed.
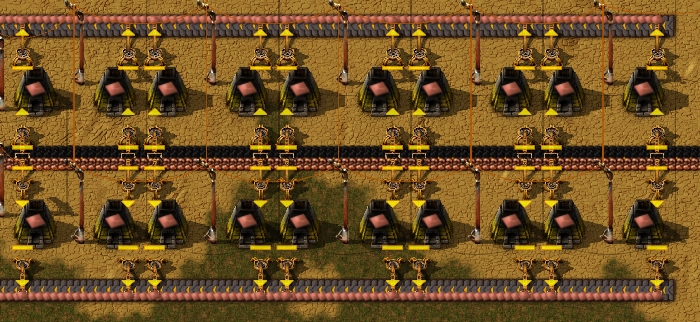
I actually used to use this design almost exclusively a long time ago but started noticing some of the issues with it the more I played. This is not to say that it’s bad by any means though. The main difference here is that the plate is put on the outside belts and the ore/coal is fed from the interior line.
Pros:
– More compact than the above type of design.
– Don’t have to worry about splitting the input lines down both sides since it is in the middle.
– Possibility to send each side of plate to a different location if desired.
Cons:
– Have to combine the two exterior plate lines down into one if you want a full line at the end. This can sometimes be tricky or have issues.
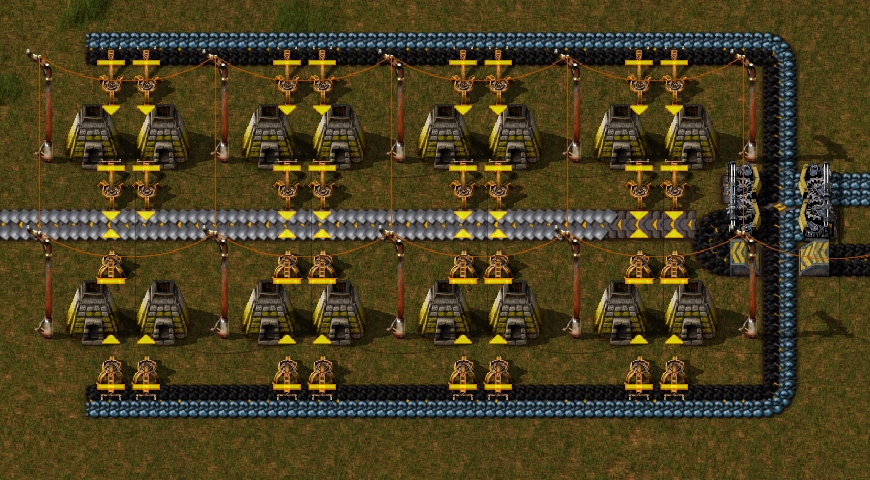
I would consider this the “standard design”. It is the type of setup I started using after I stopped using the one above, and haven’t changed yet. Pretty much identical to the one above, but instead it outputs the plate to the middle and has the ore/coal on the outside. Do take note of the device on the far right that is distributing the ore and coal to both lanes. It makes a little more complicated, but easy to do once you get the hang of it, and ensures balance as well!
Pros:
– Truly inherently balanced because of the way the ore/coal is distributed with the Splitters on the right, and will automatically balance the plate belt if you build the same amount of furnaces on each side like the picture.
– No need to recombine two plate lines into one.
– Fewer Inserters than the very first design and more compact.
Cons:
– A bit more complicated due to the distributor at the front.
– Would require splitting the plate line if you want to send it to two different places from one smelter.
There are obviously many more different designs you can make. I have seen some extremely clever and unique designs but they are usually for specific cases/situations. I tried to demonstrate some designs that are more “general” and can be used in almost any situation.
Now to move on to Robot Based designs!
Robot Based Designs & Layouts (And Pros/Cons To Each)
Robot Based smelting designs can come in all shapes and sizes, have many different levels of optimizations and levels of production. I can’t show every possible design because they can be almost endless. There will be a couple showed below that have some distinct differences from one another.
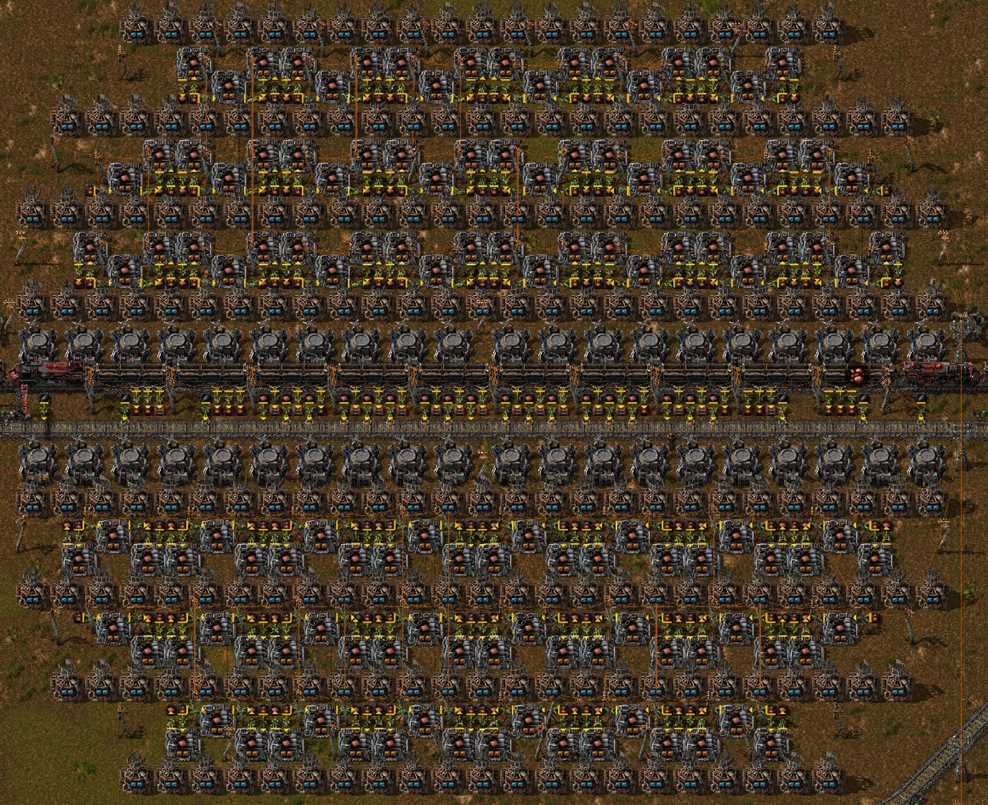
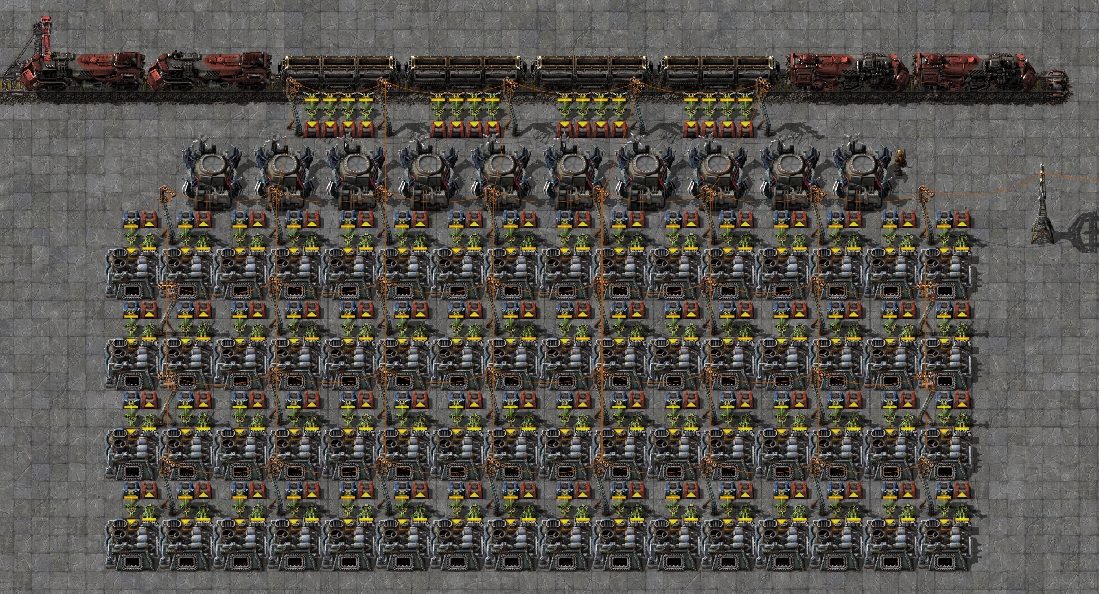
Now I know it is a bit hard to see, but the sheer size of some of these designs makes it difficult to get a good screenshot that still shows the whole thing. This design is probably one of the most highly optimized and game performance efficient setups out there. I use it in one of my YouTube series and so far it hasn’t failed me. I suppose I should define what I mean by “optimized”. In this case, optimized designs are built to try and be the most game performance efficient as possible, so taking the least amount of processing possible in-game and therefore allowing you to build even bigger.
There are many different tricks utilized here to make this so well optimized.
– The whole design is tapered, with each row being shorter. This greatly helps reduce bot travel.
– The train unload/load chests are interwoven together to save space and therefore bot travel.
– Only the minimum amount of Inserters are used on the trains to reduce Inserter counts.
– The higher throughput Logistic Chests in the smelters are towards the center of the train area so minimize bot ravel.
I know that was probably a lot to take in. This build is really only something you would use in a megabase where the game performance has a big impact on your play. One of these designs will produce roughly 24.7k plates per minute. This particular version if the build is setup to support 3-10-3 ore train and 3-6-3 plate trains, it could be reduced to support smaller trains though.
There actually isn’t much to list for Pros/Cons of this one… The “Pros” are essentially mentioned in the above bullet points, and so far I haven’t encountered any issues or “Cons” with it. I suppose the only main issue is that it’s insanely expensive to build in the first place. 😉
If you want a blueprint of this exact design you can find it, as well as many others, check out the Other Resources section at the end.
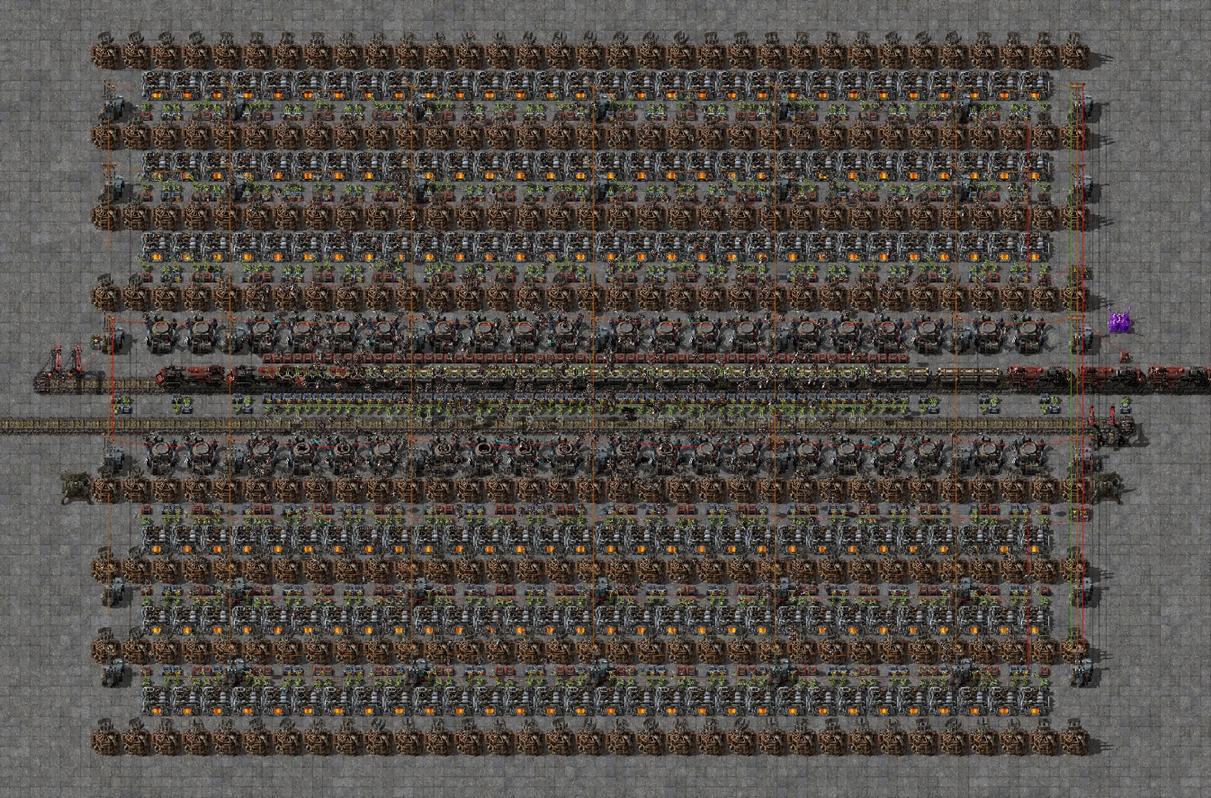
At first glance, this smelter looks pretty much the same as the one above, but actually, has a much larger impact on game performance. It is quite a bit simpler to build though. The first thing to notice is that this design is not tapered and uses a lot more Inserters on the train loading/unloading. Also, it does not share chests at the smelters.
This may sound bad, but honestly, if you aren’t going super, mega, or giga-scale, this type of design will work great for you! You won’t notice any game performance impact unless you plan to build many of these.
This particular design does about 30k plate a minute, but the concept is what’s important. You could use this concept to make a bigger or smaller smelter to fit your needs.
It is completely viable to use robot based smelting before you get beacons or modules, and there are many different ways you could do it. The above picture is just one example. It uses the same general techniques to be a bit more optimized, like having all the chests be on the side of the smelters that’s closest to the train station. There are also only 4 unload Inserters on the train because 6 or more would just be complete overkill.
Now, of course, your bots are going to hate you while trying to operate in a design like this, but for earlier in the game, before you get beacons/modules, a few designs similar to this would work totally fine. Depending on the size of your base, these would even work late game. Definitely sufficient to make the materials needed to make a rocket or two. 🙂
As an ending statement, I’d like to reinforce the idea of creating your own designs if you’re up for it. These builds are just examples to show you different concepts, and you are welcome to copy them, but these are certainly not the only way to build a smelter, so give it a shot with creating your own! If you have issues, I’m happy to answer any questions on my Discord[discord.gg] or in the comments here or on my videos. 🙂 The https://www.reddit.com/r/factorio/ and Forums[forums.factorio.com] are great places to ask for help too.
Ending Tips/Advice
Creating any build in Factorio takes some thought and can be a challenge, but don’t ever make it a chore. Have fun with it! There are nearly endless ways to build any type of design, and being creative is having fun with it is very important in my opinion. However, if I were to give some general tips to keep in mind, here they are:
– Figure out what you need first, then fulfill that need. This applies to almost anything in the game, not just smelting. Early game this isn’t always viable, but later on if you have a set amount of something you want to build (circuits, science packs, or even rockets for example) then working backwards from there to figure out how much of each product you’ll need can make things a lot easier down the road.
– Finding Bottlenecks. This can be both the most fun and most frustrating part of the game. If you have a bottleneck somewhere (Red Science for example), I find the easiest way to identify that is to walk through the process from end to start rather than just assuming it’s a smelting problem or gear production problem. If you do find it’s a smelting problem, that’s usually pretty easy to expand, just keep the belt capacities and throughput in mind though.
– Leave plenty of space! In version 0.15, Smelting almost always takes the most room compared to any other part of your base, and you will definitely need to continue to expand it as you progress through the game. Having a lot of extra space around the smelting area will save you a lot of time and headache later because you hopefully won’t have to move everything each time you want to expand.
– Upgrading to Steel Smelters from Stone Smelters as soon as you can. Steel Smelters consume fuel at the same rate as Stone Smelters but smelt the ore 2x as fast, which means they are a lot more fuel efficient. On small scales, this may not mean much, but if you have quite a bit of early game smelting you will go through fuel pretty fast.
Other Resources
There are so many different places to find information on the game, I can’t list all of them. Here are a few though.
The Official Wiki[wiki.factorio.com]. Fill with tons of information about pretty much everything in the game.
Cheat Sheet by DDDGamer[dddgamer.github.io]. Very well done cheat sheet that gives information on many aspects of the game. Including belt speeds, productivity module payoff rates, Mining speeds, Nuclear Ratios and much more!
My YouTube. I have many tutorials and guides on my YouTube Channel. Including my V0.15 Tutorials, Tutorial Playlist (before 0.15, but many still viable), Build Workshop with MadZuri, and many more playthroughs and , etc.
My Website: [link] – Includes most the blueprints I use, as well as other useful blueprints. My mod lists for series and more!

