
Overview
Hallo,viele werden sich wundern wiso Fallout3 auf ihren modernen Win7 Rechnern nicht so richtig laufen will.Bedenken sie bitte Win7 64 bit gab es noch nicht als das Spiel programmiert wurde.Ich hab einige Maßnahmen teffen müssen damit es wieder läuft.I7 CPUs sind Mehrkernprozessoren sag dem Spiel das davon 2 CPU Kerne benutzt werden können.Das sollte helfen einige Abstürze zu verhindern !!Öffne die fallout.ini in: My DocumentsMy GamesFallout3 Finde the Zeile: bUseThreadedAI=0 Ändere diese zu: bUseThreadedAI=1 Danach füge eine zusätzliche Zeile ein: iNumHWThreads=2———-Andere Methode Prozessorkerne verringernGeht auch im Windoof per MSconfig, Registerkarte “Start” auf die Schaltfläche “Erweiterte Optionen Anschließend können Sie dort die Zahl der Prozessorkerne (bei Mehrkern-Prozessoren) bzw. die Zahl der Prozessoren insgesamt (bei Mehr-Prozessor-Systemen) festlegen. Nach Anpassung der Einstellungen neu booten.———————————————————————————–Mir fiele dann noch der WIN XP Kompatibilitätsmodus ein, Klicken Sie mit der rechten Maustaste auf die Fallout 3.exe und wählen Sie den Punkt “Eigenschaften” aus. In den Eigenschaften von Fallout 3 wählen Sie als Nächstes den Reiter “Kompatibilität” aus. Aktivieren Sie den Kompatibilitätsmodus, sodass Fallout 3 unter Windows XP SP3 ausgeführt wird.——————————————–Unofficial Fallout 3 PatchThe Unofficial Fallout 3 Patch is an extensive mod fixing various bugs throughout the Fallout 3 world and in the official DLC’s!How do I report a bug?All bugs should be reported on the Unofficial Fallout 3 Patch bug tracker here. Registration isn’t required and highly recommended you use it to report bugs as it will help me greatly in keeping track of everything but of course if you’d prefer you can still post/email me any bug reports. When reporting object placement bugs or pretty much anything simply open your console, click the object with the problem or one near it and write down the formID, only report it if the first 2 numbers are 00 (Fallout.esm) or 01 (Anchorage.esm) otherwise it means a mod added that object and it isn’t something I can fix.Important Notes-The Unofficial Fallout 3 Patch has been created for Fallout 3 v1.1 (english) or higher and should not be used with any other Fallout 3 versionslanguages.-The Unofficial DLC Patches will ONLY work if the DLC’s are in your Fallout 3Data folder otherwise using them will crash your game. If you want to move the DLC’s out of G4WL then simply do a file seach in your “C:Documents and Settings” for *.esm” (make sure the option “Search hidden files and folders” is checked) once found simply cut and paste them into your Fallout 3Data folder and enable them like any other plugin.-ArchiveInvalidation Invalidated! activated upon installing UF3P, it will not be deactivatedremoved upon uninstalling.-If you have already been afflicted with the Charon and Ahzrukhal “stuck” bug then it will be reset so you can talk to Charon and initial the event again.-The Mouse Menu Acceleration Fix will not be removed upon uninstalling the Unofficial Fallout 3 Patch, if you want it gone then use the shortcut created in your start menu to remove it before uninstalling.-The G.E.C.K SArchiveList Fix will not be removed upon uninstalling the Unofficial Fallout 3 Patch.-If you are already afflicted the bug that causes DogmeatSergeant RL-3Fawkes to having massive amounts of HP it cannot be undone, UF3P’s fix simply stops it from happening.http://www.nexusmods.com/fallout3/mods/3808………………………………………………..Nächste Hürde Grafikkarte :Jojo wir haben 2014 und moderne GrafikKarten werden nicht aufgeführt.Hier eine auflistung der damals empohlenden Hardware: Intel Core 2 Duo Prozessor 2 GB Arbeitsspeicher Direct X 9.0c kompatible Grafikkarte mit 512MB RAM (NVIDIA 8800, ATI 3800) Offiziell unterstützte Grafikkarten: NVIDIA GeForce 200 series NVIDIA Geforce 9800 series NVIDIA Geforce 9600 series NVIDIA Geforce 8800 series NVIDIA Geforce 8600 series NVIDIA Geforce 8500 series NVIDIA Geforce 8400 series NVIDIA Geforce 7900 series NVIDIA Geforce 7800 series NVIDIA Geforce 7600 series NVIDIA Geforce 7300 series NVIDIA GeForce 6800 series ATI HD 4800 series ATI HD 4600 series ATI HD 3800 series ATI HD 3600 series ATI HD 3400 series ATI HD 2900 series ATI HD 2600 series ATI HD 2400 series ATI X1900 series ATI X1800 series ATI X1600 series ATI X1300 series ENB ist eine Grafikbibliothek, die die von Skyrim genutzte Creation-Engine, eine Weiterentwicklung der Gamebryo-Technik, die etwa auch in Oblivion oder Fallout 3 zum Einsatz kam, mit modernen Effekten wie Ambient Occlusion, hochwertiger Beleuchtung oder einem Depth-of-Field aufwertet. Das Ganze wurde von dem Russen Boris Vorontsov programmiert und wird mit einer modifizierten D3D9.dll in das Spiel integriert.—>Dort gibts es das als MOD ^^ http://www.nexusmods.com/fallout3/mods/18107/?————————Wenn du ein Dualmonitor System hast deaktivier mal den zweiten Monitor Hab gehört Fallout3 mag sowas nicht.————————-Abhilfe 1. FSR – FalloutStutter Remover – http://www.fallout3nexus.com/downloads/file.php?id=88862. Den Texturenspeicher öfters leeren – http://www.fallout3nexus.com/downloads/file.php?id=78173. in der Fallout.ini den Wert “iPreloadSizeLimit” erhöhen – einfach ne 0 dranhängen………………………………Benutzte Modshttp://www.nexusmods.com/fallout3/mods/1789Color Hi-Detailed map and icons (Pipe Boy Worldmap)Hm wenn mir noch was einfällt werd ich es erweitern 🙂
extended Tuning for FalloutPrefs.ini
Die ini-Datei (FalloutPrefs.ini) befindet sich unter Eigene
Dateien -> My Games -> Fallout 3.
Macht am besten vor dem Ändern der Werte eine Sicherung der
FalloutPrefs.ini, indem ihr eine Kopie der originalen Datei in einem
anderen Verzeichnis erstellt.
Die ini-Datei am besten mit dem Editor öffnen. Unter
Bearbeiten befindet sich eine Suche womit man Befehle schnell
findet.
Bitte beachten das hier evtl. nicht alle hier gelisteten Einträge findet, aber die meisten Einträge sind identisch und haben denselben Effekt
[General]
uGridDistantTreeRange=15
uGridDistantCount=25
uGridsToLoad=5 / Erhöhe diesen Wert um mehr
Detail-Außenzellen zu laden. Bei einen Wert von „5“ werden 25
Zellen geladen und bei einem Wert von „7“ 49 Zellen.
Bei einen Wert größer als „9“ treten Wasserdarstellungsfehler
auf, diese kann man mit dem Befehl „uNumDepthGrids=3“
beseitigen in dem man „3“ mit „1“ ersetzt.
Ich würde den Wert nicht höher als 8 setzen.
Achtung: Es kann zu Bugs kommen wenn man diesen Wert
verändert, mann kann durch Objekte fallen oder in ein Gebiet
kommen wo man die ganze Zeit springt und nur sehr langsam
vorwärts kommt.
Bei Erhöhung wird stark die Performance verschlechtert und die
Ladezeiten werden länger.
fGlobalTimeMultiplier=1.0000 / Dieser Wert gibt an wie
schnell sich die Zeit in Oblivion dreht. Bei Erhöhung des Wertes
kann man sich Sonnenaufgang und untergang schön
anschauen
Die zwei folgenden Werte geben an wie viele Zellen in den RAM
geladen werden. (für Interior und Exterior Gebiete) Diese
Werte sind natürlich abhängig von eurem RAM. Ich würde bei
1Gb die Werte verdoppeln (6/72).
Achtung: Wenn man den Wert bei „uGridsToLoad=“ erhöht wird
auch automatisch der Wert bei „uExterior Cell Buffer=“ erhöht.
Wenn man diese Wert erhöht sollte man auch den Wert bei
„iPreloadSizeLimit=“ erhöhen.
Dies könnte einen Performanceschub geben.
uInterior Cell Buffer=3
uExterior Cell Buffer=36
uGridDistantTreeRangeCity=4
uGridDistantCountCity=4
bPreemptivelyUnloadCells=0 / Dieser Wert muß auf “0“ sein
wenn man „iPreloadSizeLimit=“, „uInterior Cell Buffer=“ und
„uExterior Cell Buffer=” erhöht hat.
Ansonsten arbeitet dieser Wert gegen die anderen.
Ich glaube wenn dieser Wert auf „1“ gesetzt wird dann werden
die Zellen nicht mehr in den RAM geladen.
iPreloadSizeLimit=26214400 / Dieser Wert gibt an wie viel
bytes in den RAM geladen werden. Sollte man diesen Wert
erhöhen muß man von seinem kompletten RAM immer
min.125MB abziehen damit Windows auch noch was hat.
Erhöhung könnte einen Performanceschub bringen.
bUseHardDriveCache=0 / Dieser Wert könnte auf “1” Ruckler
reduzieren.
[Display]
fDecalLifetime=10.0000 / Diese Einstellung gibt an wie lange
das Blut sichtbar ist (in sec),
bAllowScreenShot=0 / Diesen Wert sollte man auf “1” setzen
damit man mit der Drucken-Taste Screenshots machen kann.
Diese befinden sich dann im Fallout 3-Ordner.
bDoCanopyShadowPass=1 / Wenn man den Wert auf “0”
setzt werden die Baumschatten entfernt. Kann man auch unter
Optionen einstellen.
Bringt einen Performanceschub.
bFull Screen=1 / Ja, das is klar.
Die zwei nachfolgenden Werte geben die Auflösung an.
iSize W=1280
iSize H=1024
fDefaultFOV=75.0000
Die 4 folgenden Werte geben die Anzahl der Schatten an. In
den Optionen kann man max. „10“ einstellen. Wer mehr haben
will kann den Wert hier erhöhen (Achtung: gibt dann
Performanceverluste, bei erhöhung)
iActorShadowIntMax=10 / Hier kann man die Anzahl der
Schatten in Interiors erhöhen.
iActorShadowIntMin=0
iActorShadowExtMax=10 / Hier kann man die Schatten der
Exteriors erhöhen.
fShadowFadeTime=1.0000 / Gibt an wie lange es benötigt
bis Schatten Ein- und Ausgeblendet werden.
iShadowFilter=2 / Erhöhen des Wertes lässt die Schatten
glatter werden.
iShadowMapResolution=1024 / Hier kann man die
Auflösung der Schatten einstellen. „128“, „256“, „512“ für eine
etwas bessere Performance und „2048“ für eine bessere
Auflösung.
bShadowsOnGrass=0 / Gibt an ob Schatten auf den Graß
dargestellt werden.
Achtung: Kann zu Performanceverlust führen.
bActorSelfShadowing=1 / ist das gleiche wie
Körperschatten, kann man auch in den Optionen einschalten
bAllow30Shaders=0 / Dieser Befehl müsste eigentlich
angeben ob SM 3.0 an oder aus ist. Manch meinen das mit
aktiviertem HDR die Performance besser wir aber ich konnte
keinen Unterschied feststellen.
[Water]
Die 5 nachfolgenden Werte geben an was alles auf dem Wasser
reflektiert wird. Hat bei mir keinen unterschied in der
FPS-Anzahl gemacht.
bUseWaterReflectionsMisc=1
bUseWaterReflectionsStatics=1
bUseWaterReflectionsTrees=1
bUseWaterReflectionsActors=1
bUseWaterReflections=1
uDepthRange=125
bUseWaterDepth=1
bUseWaterLOD=1
fSurfaceTileSize=2048.0000
uNumDepthGrids=3 / Sollte bei einem höheren Wert als “9”
von „uGridsToLoad=“ auf „1“ gesetzt werden um
Wasserdarstellungsfehler zu vermeiden.
[SpeedTree]
iTreeClonesAllowed=1 / Wenn man diesen Wert auf “1” setzt
dann ist jeder Baum einzigartig. Naja, bringt nicht wirklich was.
fCanopyShadowGrassMult=1.0000
iCanopyShadowScale=512 / Gibt die Auflösung der
Baumschatten an. Kann bei einem Wert von „128“ zu
Performancesteigerung führen.
bEnableTrees=1 / Wenn man diesen Wert auf “0” setzt
werden keine Bäume mehr dargestellt. Naja, würde ich nicht
machen.
Bring aber einen großen Performanceschub.
bForceFullLOD=0 / Wenn man diesen Wert auf “1” setzt dann
ist das Detail (LOD) der Bäume besser und diese erscheinen
besser. Kostet nur wenig FPS.
[BackgroundLoad]
Die folgenden 5 Werte geben an was alles im Hintergrund
geladen wird.
Das kann eine weichern Spielfluss erzeugen und die Ladezeiten
verringern.
Ich würde die 5 Werte auf „1“ setzen.
bBackgroundLoadLipFiles=0
bLoadBackgroundFaceGen=0
bUseMultiThreadedFaceGen=1
bBackgroundCellLoads=1
bLoadHelmetsInBackground=1
bUseBackgroundFileLoader=0 / Dieser Wert auf “1” kann
das Rukeln auf manchen PCs verhindern.
Aber es kann auch zu Abstürzen und langen Ladezeiten führen.
[Weather]
bPrecipitation=1 / Entfernt bei einem Wert von “0”
Regeneffekte und schneien. Kann helfen wenn bei diesen
Effekten die Performance sinkt.
Grass]
iMinGrassSize=80 / Bei Erhöhung des Wertes kann man die
Dichte vom Graß verringern.
Ich finde einen Wert von 170 ganz gut. Bringt sehr viel
Performance und ist eine bessere Alternative als die
Darstellungsweite von Graß zu verringern.
fGrassEndDistance=8000.0000 / Hier kann man die
Darstellungsweite vom Graß erhöhen.
fGrassStartFadeDistance=7000.0000 / Hier kann man
Angeben ab wann das Graß eingeblendet wird. Sollte immer
kleiner als „fGrassEndDistance=“ sein weil ansonsten das Graß
in die Landschaft popt.
bGrassPointLighting=0
bDrawShaderGrass=1 / Wenn man diesen Wert auf “0” setzt
dann sieht das Graß nicht mehr so gut aus. Aber es gibt einen
kleinen Performanceschub.
iGrassDensityEvalSize=2
iMaxGrassTypesPerTexure=2
fGrassWindMagnitudeMax=125.0000
fGrassWindMagnitudeMin=5.0000
[Landscape]
fLandTextureTilingMult=2.0000 / Wenn man diesen Wert
verringert dann sind die Texturen in der Ferne nicht mehr so
gekachelt. Aber dass führt dazu das die Texturen in der Nähe
schlecht aussehen. Also ich würde diesen Wert so lassen.
[BlurShader]
fSkyBrightness=0.5000 / Gibt die Helligkeit des Himmels an.
fSunBrightness=0.0000 / Gibt die Helligkeit der Sonne an.
Die zwei folgenden Befehle kontrollieren die Kraft des
Bloomeffekts in den Außen- und Innengebieten der
entstehenden Pixel.
fAlphaAddExterior=0.2000 / Dieser Wert erhöht die
Helligkeit der umgebenden Pixel.
fAlphaAddInterior=0.5000 / Dieser Wert erhöht die
Helligkeit, ich sag mal, der inneren Pixel.
Achtung: Wenn man diesen Wert zu weit erhöht wird der
Himmel zu Hell und man sieht die Wolken und Sonne nur noch
schlecht. Dies kann mit einem kleineren Wert bei
„fSkyBrightness“ verhindern
iBlurTexSize=256
fBlurRadius=0.0300 / Wenn man diesen Wert erhöht wird das
Licht mehr in andere Pixel übergehen.
Kontrolle sind die DLCs aktiv STEAM FIX
Bei der Goty müssen wenn alle DLCs richtig aktiviert beim verlassen von Vault 101 wurden folgende Meldungen erscheinen:
Das man ein seltsames bedrohlich wirkendes Funksignal empfängt (Mothership Zeta).
Eine Notiz von Fährmann Tobar wurde hinzugefügt (Point Lookout)
Ein Notruf der nur für bestimmte Ohren gedacht ist wird empfangen (Operation Anchorage)
Ein Notruf von Wernher (The Pitt)
Und dann noch “Broken Steel wurde aktiviert, die maximale Levelgrenze auf 30 angehoben.
wenn du z.b. einen Mod benutzt der aus den DLCs die Texture-Models nimmt und du stattdessen unsichtbare Raider hast tja dann hast du gerade den Fehler gefunden 🙂
Ist mir so passiert hatte aus “the Pit” Raider Rüstungsmodels es ist echt fies unsichtbare Raider zu erlegen.
Du musst die Fallout3.exe,Fallout3.cfg und die Fallout3.dat aus dem Spiele Ordner nehmen
Kopier sie einfach in einen Extra Ordner (dann ist nix gelöscht und alles noch ok )
Umbenennen der vorhandenen Patch Dateien der Version 1.7
(hatte das noch dunkel von meiner letzten Gamming Session im Kopf )
Fallout3ng.exe –> Fallout3.exe
Fallout3ng.cfg –> Fallout3.cfg
Fallout3ng.dat –> Fallout3.dat.
Denn sollte der Launcher auch als GOTY Version starten mit allen Add-ons.
———————–
I7 CPU FIX
I7 CPUs sind Mehrkernprozessoren sag dem Spiel das davon 2 CPU Kerne benutzt werden können.
Das sollte helfen einige Abstürze zu verhindern !!
Öffne die fallout.ini in: My DocumentsMy GamesFallout3
Finde the Zeile: bUseThreadedAI=0
Ändere diese zu: bUseThreadedAI=1
Danach füge eine zusätzliche Zeile ein: iNumHWThreads=2
———-
Andere Methode Prozessorkerne verringern
Geht auch im Windoof per MSconfig,
Registerkarte “Start” auf die Schaltfläche “Erweiterte Optionen
Anschließend können Sie dort die Zahl der Prozessorkerne (bei Mehrkern-Prozessoren) bzw. die Zahl der Prozessoren insgesamt
(bei Mehr-Prozessor-Systemen) festlegen.
Nach Anpassung der Einstellungen neu booten.
PC Keyboard Map by DMichaels
This is a printable PDF – U.S. Letter size.
[link]


MOD Fallout 3 Re-Animated by Alendor
V.22 Updates
———————————————————–
:35 animations added (mostly for rifles)
:Added support for all common rifle based weapons, including; Hunting rifle, Laster Rifle, Lever Rifles, Shotguns.
:sneaking version for rifles added (auto rifles still don’t have sneaking).
:Animation count has now reached roughly 80 animations.
:should minimize shoulder issues with power armor till I get around to animating them
:Known issues are some clipping with hand placement, and fingers not animated during reload.
V.13 Updates
———————————————————–
:Fixes various small issues. PA clipping severely reduce on weapon idle. Pistol sneak animations added to pack.
:animation count with rifle pack is now roughly 60
Lever Rifle Pack Beta
———————————————————–
Lever Rifle pack, lemme know what you guys think. I suggest using this only if you use lever rifles mostly, as it will mess up other rifle based weapons. Being shotguns, laser rifles, hunting rifle.
Install is the same as the main pack.
—————————————————————————————————————————————————————————————————————————————————-

V.09c Updates
———————————————————–
:fixed hopefully all neck issues
:tweaked standing idle to not be off balance
V.09b Updates
———————————————————–
:Fixed crooked neck while aiming. Due to work issues I won’t be updating for possibly up to a week, so i wanted to get this out to people. Normally I won’t do such small updates.
V.09 Updates
———————————————————–
:Fixes firing issues with rifles.
:Tweaked animations to rifles, and idles.
:Added pistol hip firing for all pistols minus 1 (which i think is mesmatron).
:Animation count is now at 30.
V.02 Updates
———————————————————–
:Fixed the finger placement for rifles.
:Fixed hopefully all the aiming issues.
:Sniper rifle fires where you aim.
:PA weapon idle modified to match more with the non weapon idle.
:Lowered rifle position, fixes some head clipping with power armor, and has a better position based on the characters eye.

MOD NMC’s Texture Pack for Fallout 3
[link]…
NMC’s Texture Pack For Fallout 3.
Texture Pack by NeilMc_NMC for Fallout 3. A year in the making, this mod attempts to make Fallout 3 a photorealistic experience and replaces the default graphics with thousands of photorealistic textures.
Hoch aufloesende Texturen, die das Spiel schoener machen.
MOD Fallout 3 Realistic Wasteland Lighting by Sal203

FO3 Realistic Wasteland Lighting & Weather is non-ENB overhaul that changes the appearance of Fallout 3’s exterior lighting conditions. It’s the same Fallout people have come to love, but enhanced with weather and lighting designed to mimic those of real life, instead of the surface of Venus as the original game seemed to. Weather types have also been changed to no longer be “location specific” as they were in the vanilla game. There’s just as much chance of a bright sunny day in DC as everywhere else, for example, and now you don’t have to be in the mountains for it to be overcast.
FO3 RWL comes in two exciting flavours, FO3 Only and the GOTY edition, all in one archive. The GOTY edition brings more true to life weather conditions to the DLCs as well as the main game world. The Pitt has an appearance similar to a bad smog day in Beijing, Point Lookout keeps its foggy aesthetic while still moving towards realism based lighting conditions.
Installation
============
I do not know if NMM will cause problems with this mod as it does with FNV RWL; I recommend manual installation. The file includes two .esps, “FO3 Realistic Wasteland Lighting” and “FO3 RWL GOTY.” You’ll only need one of them.
1. Download the file
2. Drag contents into your Fallout 3 install directory
2. Launch FalloutLauncher.exe or your mod manager
3. Tick the boxes of the .esp files from the mod that you want to use
To uninstall, delete the esp files, and delete the Fallout 3/Data/Textures/fo3rwl folder. When updating, please follow the uninstall instructions before installing the new version.
Requirements
=============
The FO3 Only version requires FO3 Only. The GOTY edition requires the DLCs The Pitt, Point Lookout, and Broken Steel. This mod was made with FO3 version 1.7.03, the last update released for the PC version of the game.

MOD Color Hi-Detailed map and icons by MAXHARDMAN
[link]On map you may see every small house, every road and all other thing .
Used materials from:
ORWIC by worm82075
Custom Vector Maps v3 by Xiphos
Color differentiations of icons:
Red – potentially danger places
Blue – metro stations
Yellow – populated places
White – Pre-war structures
Green – sewer and land places
Gray – undiscovered places
Better use with white color of PIP-BOY.
Installation:
1. Extract files , place folder Textures to Fallout 3/Data directory .
2. Check bInvalidateOlderFiles=1 in FALLOUT.INI at Fallout 3 folder in MY Documents/my games
3. Check if Archiveinvalidation.txt is already in Fallout3 folder, if found edit and add lines:
textures/interface/worldmap/wasteland_1024_no_map.dds
textures/interface/icons/world map/icon_map_cave.dds
textures/interface/icons/world map/icon_map_city.dds
textures/interface/icons/world map/icon_map_encampment.dds
textures/interface/icons/world map/icon_map_factory.dds
textures/interface/icons/world map/icon_map_metro.dds
textures/interface/icons/world map/icon_map_military.dds
textures/interface/icons/world map/icon_map_monument.dds
textures/interface/icons/world map/icon_map_natural_landmark.dds
textures/interface/icons/world map/icon_map_office.dds
textures/interface/icons/world map/icon_map_ruins_sewer.dds
textures/interface/icons/world map/icon_map_ruins_town.dds
textures/interface/icons/world map/icon_map_ruins_urban.dds
textures/interface/icons/world map/icon_map_settlement.dds
textures/interface/icons/world map/icon_map_undiscovered.dds
textures/interface/icons/world map/icon_map_vault.dds
Uninstall icons:
-delete folder *”Fallout 3″datatexturesinterfaceiconsworld map
-delete lines from Archiveinvalidation.txt
Uninstall map:
-delete file *”Fallout 3″datatexturesinterfaceworldmapwasteland_1024_no_map.dds
-delete lines from Archiveinvalidation.txt
The Fallout Overhaul Kit 2

Name: FOOK2 – FallOut Overhaul Kit
Version: 1.2 Open Beta
[link]
The Fallout Overhaul Kit (♥♥♥♥), is a customized compilation of user modifications, gameplay balancing changes, and original content designed for the PC game Fallout 3 by Bethesda Game Studios. The second installment of ♥♥♥♥. This edition is designed to go beyond what ♥♥♥♥ had started. Including better weapons, armor, items, and an overall rework of the system from the ground up. FOOK2 and ♥♥♥♥ are different in that FOOK2 is a revamp and reproduction of everything that wasn’t fixed in the original ♥♥♥♥. The newer development was designed around better ergonomics between mods and compatibility to reduce bugs and overall conflict among some of the most popular pieces of work to date. What started off as nothing more than a compilation of previous mods and material turned into a completely new development. FOOK2 redesigns the wasteland in better flow with the fallout universe and tries to fill in the gaps that Bethesda left behind.

MOD DCInteriors Project by chuckSteel
[link]The D.C. Interiors Project
12/05/12
Have you ever thought about scabbing the DC wastes, even though, the super mutants may horrifically and violently rip your heart out? Have you said to yourself “D*** the torpedoes, I am going Downtown anyway”, only to find once you arrive that 99% of the shops and houses are all boarded up? Have you ever seen a building on the horizon, thinking you’ll head there, just to find nothing of interest, nothing worth investigating? If so, this mod is for you!
Just opened in the beautiful Downtown D.C. Waste, Georgetown District.
A Cuppa Joe,
Floyd’s Barbershop,
Robinson’s Robots,
Mama Dolce’s Outlet Store,
The US Army recruitment Center,
the Nuka Cola Soda Shop,
and two abandoned townhomes.
Just opened in the lovely Downtown D.C. Waste, Mason District.
D.C.P.D. 15th Precinct,
Drunkin Donuts
Lincoln Savings,
Majority Whip’s Ice Cream,
No Exit,
Tinker’s Toys,
Tanto’s Indians,
US Post office,
Just opened in the wonderful Downtown D.C. Waste, Seward Sq.
5th St Automat,
4077 Pharmacy,
Alice’s Diner,
Capital City Savings and Loan,
Dr. Smith’s office,
Family Classics Video,
the Gothem Bus Co,.
Munster’s meats,
Nortons Plumbing,
Otis’s Fine Liquors,
Penny’s Adult Books,
The Radiation King Superstore,
the Red Racer Shop,
Robco Terminal Sales and Service,
Rutter’s Newborn Store,
Queen Victoria’s Little Secret,
Family Classics Video,
and 21 Townhouse and Apartment Buildings.
Just Opened in the spectacular L’Enfant Plaza.
A Cuppa Joe,
Apocalypse Cow, Brewery and Pub,
Besnik’s Barbershop,
Cosmos Comics,
Suds ‘Z Bubbles, Laundromat,
Majority Whips,
Mighty Mouse, Exterminators,
Polly’s Pure Breads, Bakery,
Underdog’s Redhots,
Unstable Toad Genetics,
14 Townhome and, Apt. Buildings.
Just opened in the Glorious Downtown D.C. Waste, Takoma Park,
A Cuppa Joe,
Chairman Moa’s Chop Suey,
Civil Defense Office,
Cornucopia Fresh Groceries,
Corvega Dealership,
Dine and Dash Restaurant,
The First Edition,
Lady Frumperton’s Fashions
the last Gasp Funeral home,
Majority Whip’s Ice Cream,
Radiation King Store,
Shelter nightclub,
Sonic Boom Music,
Super Sport Custom Motors,
USO Club
Western Union,
Just opened in the expansive D.C. Wasteland,
Jury Street station,
Two Abandoned Houses,
North West Senica,
A Cuppa Joe,
The Dog House, Hotel,
Liberty Pawn,
The Shepherds Hand, clinic,
Minefield,
Arkansas’s, safe-house,
Sprigvale,
one small ranch home,
Warrington Station,
Classic auto,
Two, Abandoned Houses,

MOD GNR Enhanced by Raptre

Adds 100 great theme fitting songs from “More Where That Came From” by OldManMose76 to Galaxy News Radio while retaining the original 20 songs.
Many Radio enhancements and fixes including:
– Allows Three Dog to speak of you after level 20.
– Stops news stories of quests after they are finished (Oasis, Grayditch, Canterbury Commons, Tenpenny Tower).
– Adds a story about the Outcasts fighting the Brotherhood.
– Increases the chance of playing player-specific news.
– Fixes problem with NewsLink play mode.
– Places safeguards to play songs and specific news stories when introduced.
– Adds missing player gender checks for some stories (Head of State, Trouble on the Homefront, Paradigm of Humanity intro).
– Expands Nuka-Cola challenge news story from 1 line of dialogue to 4 lines.
– Adds extros to 12 original songs if played last.
– Adds intros to 12 original songs if played first.
– Increases song memory list.
– All audio files have had their volumes normalized.
– Stereo mp3 audio files have an ID tag with the correct song information.
MOD Talking User Interface by Diegog5
[link]This mod adds a talking user interface to the game, kind of like Kortana? in the Halo series. Compatible with almost every single mod in nexus.Watch the video to see how it works.
Installation:
=============
If you are updating install the mod again and also choose optional files again, even if you have chose them before.
Warnin!!! If you plan on installing the optional file called “Thread Detection” Backup the following folder just in case you want to uninstall it. C:…Fallout 3DataMusicBattle
1: Extract the Data folder to your Fallout 3 main folder.
2: Install the optional files, read the “Optional Files Instructions.txt”. When installing the optional files it will ask you to replace some files, say yes.
If you haven’t done so:
Make sure that bInvalidateOlderFiles is set to 1 in Fallout.ini.
Get ArchiveInvalidation Invalidated here:
[link]
MOD CONELRAD 640-1240 – Civil Defense Radio by Macabre Productions
George McKelvey – My Radiation Baby [1964]
[link]Track List
==========
“Uranium Fever” Elton Britt
“Old Man Atom” Sam Hinton
“Advice to Joe” Roy Acuff
“Atomic Energy” Sir Lancelot
“Bert the Turtle (Duck & Cover Song)” Two-Ton Baker
“Bikini” Dexter Gordon
“Crawl Out Through the Fallout” Sheldon Allman
“Fallout Shelter” Dore Alpert
“Atomic Cocktail” Slim Quartette
“Great Atomic Power” Louvin Brothers
“Hydrogen Bomb” Al Rex
“Jesus Hits Like an Atom Bomb” Valley Trio
“Atom Bomb” Glenn Barber
“A Bomb Bop” Mike Fernandez
“Krushchev and The Devil” Jay Chevalier
“Mr Stalin” Smith, Arthur
“My Radiation Baby (My Teenage Fallout Queen)” George McKelvey
“Old Man Atom” Sons of The Pioneers
“Atom Bomb Baby” Five Stars
“Radioactive Mama” Sheldon Allman
“Aint I Right” Marty Robbins
“Satellite” Teresa Brewer
“Sputniks and Mutniks” Ray Anderson
“Stalin Kicked the Bucket” Ray Anderson
“The Hydrogen Bomb” Rogers, Al
“Atomic Sermon” Billy Hughes
“Trial of Francis Powers” Red River Dave
“Uranium” Commodores
“Russia Russia (Lay That Missile Down)” Prescott Reed
“Atomic Bomb Blues” Homer Harris, Muddy Waters
“Uranium Fever” Rudy Gaddis
“Watch World War 3 (On Pay TV)” Crown City Four
“Atomic Baby” Amos Milburn
“West of the Wall” Fisher, Miss Toni, Shanklin
“The Bear Flew Over the Ocean” Jimmie Driftwood
“When That Hell Bomb Falls” Fred Kirby
“H Bomb” V.A.
“When They Found the Atomic power” Hawkshaw Hawkins
“You Hit Me Like an Atomic Bomb” Fay Simmons
“Tic Tic Tic” Doris Day
“No No Joe” Hank Williams
“When They Drop the Atomic Bomb” Doll, Jackie & His Pickled Peppers
“Thirteen Women” Haley, Bill & Comets
“Fujiyama Mama” Wanda Jackson
“Get That Communist Joe” Kavaliers
“Satellite Baby” Skip Stanley
“Theres a Power Greater Than Atomic” Buchanan Brothers
“Sputnik Satellite Girl” Four Ekkos
“Atom Bomb Baby” Five Stars
“I’m Gonna Dig Myself a Hole” Arthur Crudup
“I’m No Communist” Carson Robison
“Atomic Nightmare” Talbot Bros of Bermuda
“Uranium Rock” Warren Smith
“Atomic Power” Buchanan Brothers
This mod adds a new radio station to your Pip-Boy 3000.
The station plays 55 music tracks from the era of the Atomic
Threat, including 29 authentic public service announcements from
Civil Defense Washington.
CONELRAD (Control of Electromagnetic [or Electronic] Radiation) was a method
of emergency broadcasting to the public of the United States in the event of
enemy attack. It was intended to serve two purposes; to prevent Soviet
bombers from homing in on American cities by using radio or TV stations as
beacons, and to provide essential civil defense information on 640-1240.
2 hours, 20 minutes of Music across 55 tracks
22 minutes of PSAs & Civil Defense
The station is fully scripted as per official stations.

MOD Portable Tunable Radios by Razorwire

Description:
The latest in my series of small Portable Mods, this was a request actually, which i thought may be quite useful.
A portable radio that “CAN” pick up all ingame stations of the wastes, GNR, Enclave, Agatha. Depending on what stage you are at in the game. If the station cant broadcast it wont, simple as that. My mod doesn’t change that.
Sold by Moira, Seagrave, and Wolfgang.
Trying a new persistent sale script this time.
How to Use:
This uses an updated version of my placement scripts used in my other mods.
But if your unfamiliar, heres the gist of it.
1. Purchase
2. Drop it from the Misc Item Menu of your PipBoy
3. Drag it around with your Grab key and place it
4. Activate to finalise the placement
5. Once placed Use activate to turn on or off.
6. Use Grab + Activate to put it back in your inventory.
Requirements:
FOSE
Conflicts:
None, uses only modified ingame meshes.
Bugs:
Unless anyone finds any this mod is final. It has been cleaned.
Fixes:
1.2 – System rewrite, misc tweaks.
MOD Television Comes To Fallout V2 by RazorWire
[link]An interactive animated Television which has the ability to emulate video playback with synced audio.
The TV itself is portable and can be purchased, along with Gear and Videos, from:
Moira, Seagrave, Tulip, Wolfgang, Lydia.
How It Works:
-After a few seconds of processing all items should be available for purchase.
-Upon purchasing a TV and your choice of Gear & Videos drop the TV from your inventory
-Press Activate on the TV (regardless of it saying “TAKE Television”). A New TV is spawned you can interact with.
-Use the menu to set it up the way you want it, or turn it on/off, don’t forget to load some videos in the player.
-Press GRAB (Z) + Activate at any time in this process to add the TV/GEAR/VIDEOS back into your inventory.
Current Video Count:
-31 Videos Split into 6 Download Packs and Categorized In-Game with the following Prefixes:
-Briefing:
-BoS:
-Commercial:
-History:
-Vault-Tec Presents:
-Trailer:
Video Specifics:
-0 to 5 minutes of video playback using 4k image sizes, cycling through 6440 UV keyframes.
-8k is possible for 2x Res but adds 4x the Filesize. 8k is NOT viable for longer play time as it adds 4x the Sub-Pixel Stutter.
-Completely Modular, supports user made add-ons.

MOD Animated Slot Machine at Moriartys by Razorwire
Adds a fully animated slot machine to one of the walls of Moriarty’s saloon. It functions pretty much like a regular
slot machine in a casino, it allows for multiple caps to be inserted to up the cap multiplier on wins. There’s a small
homage to the original Space Quest added for good measure.
I had to disable one of the unnecessary chairs to make room
for it, but i think you’ll find its well worth it.
How It Works:
-Go to Moriarty’s
-Insert desired caps
-Pull arm
-Win or loose
-Version 1.22 – small bug fix to the freezing up problem ive been sitting on for a while. Only the 50% ver this time, sorry.

MOD Portable Bear Traps V2 by Razorwire

Description:
Version 2 of the old Portable Bear Traps mod. You can now pickup any bear trap you find
in game, sell it or use it. No “original” references are removed by this mod only disabled, so
theres no need to worry about that. Ive also removed the “gib” function since it seems
it would cause actors to fall through the floor. A new havok object has been made to
prevent the bear trap from sometimes doing that once dropped.
How to Use:
This uses an updated version of my placement scripts used in my other mods.
But if your unfamiliar, heres the gist of it.
1. Purchase
2. Drop it from the Misc Item Menu of your PipBoy
3. Drag it around with your Grab key and place it
4. Activate to finalise the placement
5. Once placed Use activate to turn on or off.
6. Use Grab + Activate to put it back in your inventory.
Requirements:
FOSE
Conflicts:
None, uses only modified ingame meshes. I load it before both FWE & MMM without worry.
Fixes:
V2.2 Reset the beartrap script to near original state, since it seems i broke the ability to disarm traps.

MOD Whats Your Brand – cigarette texture megapack by CptJoker
1950s Commercials for Lucky Strike cigarette
[link]This mod is a high-resolution retexture of the cigarette pack and cartons, and features a choice between seven meticulously-researched cigarette brands to enhance your gaming pleasure. Five period-correct brands (Old Gold, Camel, and two colors of Lucky Strike) and two alternative brands for those wanting something a little different (Player’s Navy Cut and Black Death.)
Also included is an optional white-filter cigarette retexture, for the ultimate in smoking refinement. 🙂
UPDATE: By popular demand I have added Marlboro as an option, and also revamped the textures. Now they look twice as dirty as before!
== INSTALLATION ==
1. Select your choice of brand from the available folders. Unzip the “textures” folder into Fallout 3Data.
Optional: Move the “textures” folder from the “(Optional) White Cigarette” folder into Fallout 3Data (if you want white-filter cigs.)
2. Edit your ArchiveInvalidation.txt (or create one in Fallout 3Data) with these additional lines:
textures/clutter/junk/cigarettecarton.dds
textures/clutter/junk/cigarettecarton_n.dds
textures/clutter/junk/cigarettepack.dds
textures/clutter/junk/cigarettepack_n.dds
textures/clutter/junk/cigarette.dds
3. If you have not yet done so, you must also edit the line in fallout.ini (found in My DocumentsMy GamesFallout3) to this:
bInvalidateOlderFiles=1
== UNINSTALLATION ==

Remove the files from the textures/clutter/junk folder:
cigarettecarton.dds
cigarettecarton_n.dds
cigarettepack.dds
cigarettepack_n.dds
cigarette.dds
(Also remove any entries you added to ArchiveInvalidation.txt)
MOD Better Booze by CptJoker and odin_ml
American Propaganda Films 1949
[link]This mod replaces the default booze bottles with classy real-world replicas, carefully selected to be timeline-correct. The mod is divided into 3 preset packs for easy installation, plus a FULL BAR pack for custom mixes. (Though one should obviously never mix alcohols in real life!)
The CLASSIC PACK contains old-school Fallout designs reimagined from those tiny images we all know and love: Gamma Gulp, Roentgen Rum, Rotgut, and Booze.
The MAINSTREAM PACK is made of what I consider the more popular choices: Budweiser, Jack Daniels, Jim Beam, and Smirnoff.
The ALTERNATIVE PACK is for those who want slightly less-obvious brands in their game, namely: Blatz, Crown Royal, Black Velvet, and Prestige.
The FULL BAR set contains all the above plus two additonal whiskey options (Jack Daniels and Black Velvet swapped items) all divided by item type, for the ultimate in booze customisation!
Finally, use the WINE ADDON pack to add replacement textures for the wine bottle, a choice between house white or red (green bottle or burgundy.)
NEW in VERSION 0.2b!
Through the kind contribution of odin_ml, the Better Booze mod now comes with an optional bottle mesh addon that makes all the bottles much rounder. No more hexagonal bottles!
Enjoy!
== INSTALLATION ==
1. Select the pack you wish to install. Unzip the “textures” folder from the archive into Fallout 3Data. Overwrite any files and folders (only booze-related textures will be affected.)
If you wish to customise textures using the FULL BAR pack, select the type of booze you wish to replace and copy the appopriate “textures” folder into Fallout 3Data. Overwrite any files and folders.
2. Edit your ArchiveInvalidation.txt (or create one in Fallout 3Data) with these additional lines:
textures/clutter/food/beerbottle.dds
textures/clutter/food/beerbottle_n.dds
textures/clutter/food/vodka.dds
textures/clutter/food/vodka_n.dds
textures/clutter/food/vodka_em.dds
textures/clutter/liquorbottles/whiskeybottle01.dds
textures/clutter/liquorbottles/whiskeybottle01_n.dds
textures/clutter/liquorbottles/whiskeybottle02.dds
3. If you have not yet done so, you must also edit the line in fallout.ini (found in My DocumentsMy GamesFallout3) to this:
bInvalidateOlderFiles=1

Remove the following files from the textures/clutter/liquorbottles and textures/clutter/food folders:
beerbottle.dds
beerbottle_n.dds
vodka.dds
vodka_n.dds
vodka_em.dds
whiskeybottle01.dds
whiskeybottle01_n.dds
whiskeybottle02.dds
(Also remove any entries you added to ArchiveInvalidation.txt)
MOD Hi-Res Lunchbox Retexture by Dazington

INSTALLATION:
………………………………………………………………………….
1. Extract the textures folder into the “Fallout 3/Data” folder
Example of what it should look like,
“C:program filesbethesdafallout 3Data”
may be different depending where you installed it.
2. I recommend using ArchiveInvalidation Invalidated so search for it at Fallout3Nexus
3. SKIP THIS STEP IF USING ArchiveInvalidation Invalidated
Find the fallout.ini in “my documentsmy gamesfallout 3”
Open it and look for this line:
“bInvalidateOlderFiles=0”
Change it to:
“bInvalidateOlderFiles=1”
If you have an “ArchiveInvalidation.txt” in your “Fallout 3” game folder
add this line:
“textures/clutter/junk/lunchbox.dds”
Otherwise take the one in this archive.

MOD Sunglasses Collection by farbentier
[link]This mod adds several new sunglasses to the game, most of them in different colors. A merchant named Dana Sawyer in Rivet City sells them. She has a stall at the Rivet City Market.
VERSION 1.6
– What’s new? New sunglasses model “Wanderer”. They are “Black Rim Glasses” which are actually already in game, but modified to look more like “Wayfarer” glasses. Available in different colors.
– Now with BSA-file. Makes the installation and uninstallation much easier. To those of you having older versions: if you use the new one, you may delete these two folders from the old version: FO3/data/textures/sunglassescollection and FO3/data/meshes/sunglassescollection.
– Installation:

1. Download and unpack the file
2. You should get a folder, within this folder there are two files (sunglassescollection.esp and sunglassescollection.bsa)
3. Copy these two files to your FO3/Data folder
4. If you don’t have it already, download ArchiveInvalidation Invalidated (prevents possible troubles with meshes and textures)
5. Check the sunglassescollection.esp with FOMM or the FalloutLauncher and play the game
– Uninstallation:
Delete sunglassescollection.esp and sunglassescollection.bsa from your FO3/Data folder.

MOD Wearable Backpack – Modder Resource by HarbingerSP001 – balian – bunsaki

Wearable Backpack – BlackWolf Backpack 1.0a
——————————————-
– This is unofficial optimisation/enhancement mod based on: “Wearable Backpack” Mod by balian
This mod now work separately and can work along side.
If you wish the backpack to behave as portable container esp is now included. Add-on mod is original create by “TGBlank”.
Blanks Container Backpack – An Addon for BlackWolf Backpack (Crouch will pickup backpack, Stand will activate container.
Details
——-
This mod adds a backpack with new model that you can wear. It increases your carry weight to 15/25/35/45/50/70.
The item can be purchased at:
– Moira`s Crater Side Supply in Megaton
– Chief Gustov in Tenpenny Tower
– Potomac Attire in Rivet City Market Place
+ Vendor Caps Will Be Increase by 500 (Once Only)
On first start you will receive a message indicating the backpack has been added to these vendors.

BlackWolf Backpack 15WG (Bum Pack, No Backpack Straps Used, Skinned Item, No Container Support)
=================================================
-> Smaller Size Backpack with Black/Digital/JSDF/Snow/ACUPAT Retexture.
-> Cost 150 Caps
-> Add 15WG Carry Capcactiy
-> Add 2 AR
-> Item 75 CND
BlackWolf Backpack 25WG (No Backpack Straps Used)
=================================================
-> Smaller Size Backpack with Black/Digital/JSDF/Snow Retexture.
-> Cost 200 Caps
-> Add 25WG Carry Capacity
-> Add 3 AR
-> Item 100 CND
BlackWolf Backpack 35WG
=======================
-> Standard Size Backpack with Black/Digital/JSDF/Snow Retexture.
-> Cost 250 Caps
-> Add 35WG Carry Capacity
-> Add 3.5 AR
-> Item 100 CND
BlackWolf Backpack 45WG
=======================
-> Middle Size Backpack with Black/Digital/JSDF/Snow Retexture.
-> Cost 300 Caps
-> Add 45WG Carry Capacity
-> Add 4 AR
-> Item 125 CND
BlackWolf Backpack 50WG
=======================
-> Large Size Backpack with Black/Digital/JSDF/Snow Retexture.
-> Cost 350 Caps
-> Add 50WG Carry Capacity
-> Add 5.0 AR
-> Item 150 CND
BlackWolf Backpack 70WG
=======================
-> Larger Size Backpack with Black/Digital/JSDF/Snow Retexture.
-> Cost 400 Caps
-> Add 65WG Carry Capacity
-> Add 5.5 AR
-> Item 200 CND
Slot Usage Notes
—————–
-> Backpack use “Backpack” Biped Object slot
-> Backpack Straps use “BodyAddOn1” Biped Object slot
-> Backpack straps have low priority (Armor Addon). Other wearable items using “BodyAddon1” will take precedence.
Pre-Installation
——————————————————-
Find and change line “bInvalidateOlderFiles=0” to “bInvalidateOlderFiles=1” in files “Fallout.ini” & “FalloutPref.ini”.
Useful Mod(s) To Improve Mod Installation/Compatibility/Texture Problems:
ArchiveInvalidation Invalidated
Fallout Mod Manager (FOMM)
Installation
————
Extract files from BlackWolf Backpack into your “Fallout 3Data” Folder
File structure should look like:
Fallout 3DataBlackWolf Backpack.esp
Fallout 3DataBlackWolf Backpack – Vendor Script Replenish.esp (Optional)
Fallout 3DataBlackWolf Backpack.bsa
Enable “BlackWolf Backpack.esp” in Fallout 3 Launcher or FOMM.
Un-installation
————–
Delete files in “Fallout 3Data” Folder with naming “Blackwolf Backpack”.
* Optional Installation * (Compatability, leave disabled unless needed)
———————————————————————–
Enable “BlackWolf Backpack – Vendor Script Replenish.esp” in Fallout 3 Launcher or FOMM.
This is if you wish to have the vendors restock the item everyday.
The script check runs once every 10 min of gameplay via quest. A dialogue box will appear to notify restock.
It is only required to run this file if you find vendor no longer has backpack anymore or upgrading from old file.
Optional Files – Esp
——————–
[OptionalESP]BlackWolf Backpack – Blank’s Container Patch – Patch for mod that turns backpack into portable container
[OptionalESP]BlackWolf Backpack – Anchorage Gauss Rifle Fix – Fix Gauss Rifle hiding backpack (Require Operation Anchorage)
[OptionalESP]BlackWolf Backpack – Zeta Drone Cannon Fix – Fix Drone Cannon hiding backpack (Require Mothership Zeta)
Replacement Files – Esp
——————–
[ReplacementESP]AlternativeBackpackStraps – Alternative Bigger/Thicker Straps (May have clipping bugs)
[ReplacementESP]DisableBackpackStraps – Disables use of backpack straps.

MOD Broken Steel German Fix by SEKoner
[link]Im DLC Broken Steel Deutsch wurden 2 Texte in Englisch belassen, die im Original FO3 bereits übersetzt waren. Die hier hochgeladenen Dateien von BS, bringen die Sätze wieder ins Deutsch zurück.
Es wird nur eine der beiden Varianten bnötigt. Die ESM Datei ist ein Ersatz für die Orginaldatei von Broken Steel. Die ESP ist ein Fix im Plugin Format.
MOD Autans Extra Posters as Stand Alone Mod Resource by Autan and Warll
[link]This file contains the extra posters(“Civil Defense” and “Posters2”) by Autan in a stand alone esp that will not over write vanilla fallout 3’s posters.
To use this with your mod you should use FO3EDIT to merge both your mod’s and this esp. The textures and NIFs must be kept in the same directory hierarchy. Instructions to merge using FO#edit:
“Load both mods with FO3Edit. Once everything is done loading expand “Extrapostersbyautan.exp” and expand the “staic” header. Then select all the files and press your mouse’s right side. Select form the list “Copy as new ecord into…”. A new window will pop up, wait the timeout period of three seconds and press “Yes, I’m absolutly sure”. Press “ok”, then press “ok” then press “ok”, then press “yes”. Select the mod you want to merge it with and press “ok”. Then close FO3Edit and allow it to save.”
The posters use the naming convention of “PosterAutan(name)(versionnumber)” I suggest you simply search “all” for “poster”, doing this will also bring up the vanilla posters. If you only want to search for these new posters you can by searching “all” for “PosterAutan”

MOD Ultimate Perk Pack by TheFakeEmpire
Deutsche Version

orginal
[link]ANOTHER ANOTHER UPDATE:
I’m back. Just bought GOTY edition, so I’m becoming accustomed with the new DLC and the game itself (and trying to deal with computer issues). I am going away for a week over New Year’s but after that will start modding again and updating this. Thanks to anyone who still cares 🙂
UPDATE:
Hi everyone, I know it’s been a long time coming, but here’s an update of where I stand with this mod.
I’ve been very busy lately, and simply haven’t had enough time for playing Fallout, let alone modding it. But now I’m much freer and am starting to work on this again, as well as a few new mods. I’d like to quickly thank you for your continuing support of this mod.
I am planning on updating Pack 1 with new icons, expanding Quest and Experience Perks, and starting a new Pack. I also recently purchased Operation: Anchorage and The Pitt, and am planning on individual mod packs for each of these DLC, I see a lot of potential for some cool stuff.
I buy DLC only on disk, so don’t expect Broken Steel stuff until it is released on disk. However once I get it, it will be my highest priority to make versions of components adjusted for a Level 30 cap, as well as to make a Broken Steel component in it’s own right.
I’m also looking into creating FOSE versions of some of these perks, in particular the ones dealing with scoped weapons so as to accommodate mods such as WMK and ♥♥♥♥.
So that’s where everything stands, stay tuned and thanks for the support. Check out my (relatively) recent interview over at Planet Fallout for some more info. This mod will remain the premier perk mod, I promise.
File Of The Month February ’09
A big thank-you to everyone who voted
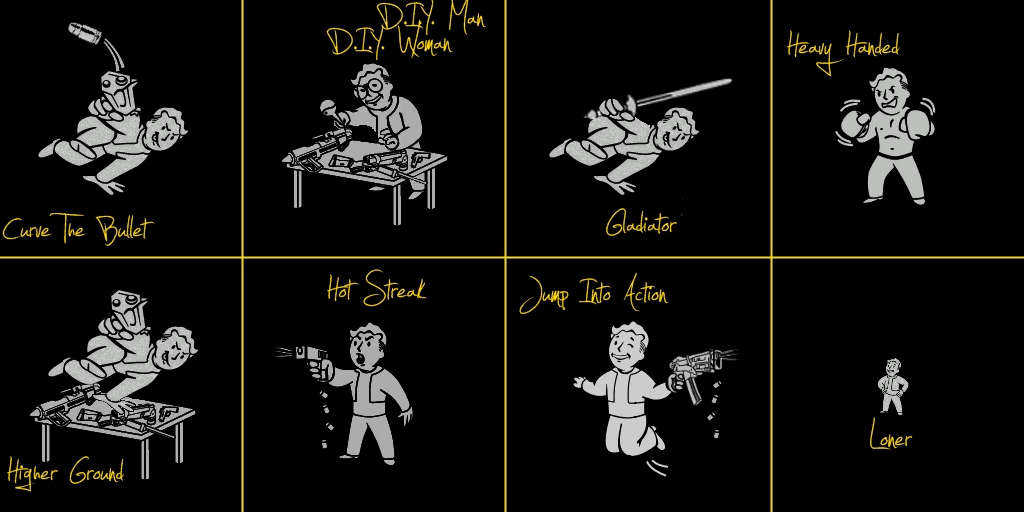
The UPP:
This page is now the center for downloading all components of the UPP, which is now modular. All files here will work perfectly by themselves, however for the full experience, all UPP mods should be used. Combined, they add over 70 high quality perks to the world of Fallout 3, along with new unique icons for some of these new perks (only Pack 2 currently).
The Files:
UPP – Original Perks: Makes alterations to the original perks of Fallout 3.
Current Version- 2.0
UPP – Experience Perks: Adds the ability to earn some original perks via your miscellaneous repeated actions.
Current Version- 1.0
UPP – Pack 1: Adds nearly 40 balanced, innovative, funny, and fun, perks to the game.
Current Version- FINAL
UPP – Pack 2: Adds 27 new perks to compliment and expand Pack 1, most of them with new icons.
UPDATED: Current Version- FINAL
UPP – Quest Perks: Adds perks to the game that are obtained through completing quests.
Current Version- 1.5
UPP – Beverage Perks: Adds perks to the game relating to the consumption of beverages (eg. Alcoholic).
Current Version- 1.5

MOD 2Perks Per Level by Xodarap777

ALL CREDiTS GO TO Xodarap777
Original Mod Here
[link]
Desription:
This Mod Allows you to Pick 2 Perks Every Level.
this really isn’t a “Cheat” or “God” Mod.
Once you really think about it, it Only makes since.
With all the Perk Addon’s & Perk Packs out there
i found it irritating, Only Able to Choose one perk, and having to level up
again to get a perk i also liked Previously, this mod Fixes that.
iNSTALLATiON: Simple.
Fallout3 Data Location
WindowsXP) C:\Program Files\Bethesda Softworks\Fallout 3\Data
Windows7) C:\Program Files (x86)\Bethesda Softworks\Fallout 3\Data
1.) Simply Drop the 2Perks Per Level.esp in your Fallout 3 Data folder
2.)Open FOMM Or Whatever Mod Manager you use, Activate 2Perks Per Level.esp
3.)Enjoy 🙂
After you Select & Choose your first perk and continue,
it will take Exactly 6. Seconds for the Menu to pop again. then Press Continue through the Skill part,
bringing you to the perk Menu
LoadOrder: Anywhere you think is best, Probably with your other Skill Mods.
Recommended:
PerkPacks Which you see in ScreenShot
Ultimate Perk Pack
[link]
vorgemerkt MOD Asharas Hair Conversions by SydneyB

Mod ist vorgemerkt da Geck bei mir gerade nicht funktioniert
muss ich das mal spaeter testen.
hab aber mal abgespeichert bevor ich es vergesse
Required tools
==============
* GECK: [link].
Recommended mods
================
* Quarn’s ArchiveInvalidation Invalidated: [link]
If you have any problem with textures not loading correctly, use this utility from Quarn and everything will work fine.
Install
=======
1. Extract the files of this mod to a temporary location (you can use 7zip: [link], to unzip them) and chek the folder structure.
2. Copy to (install folder)Fallout 3Data:
.- the meshes folder
.- the textures folder
If asked if you want to overwrite existing files say “Yes to all”.
3. Open the GECK (you can download it from here: [link].
4. Select File -> Data from the top menu, and check Fallout3.esm and your current cosmetic mod (or only select Fallout3.esm if you are not using any cosmetic mod). Select your current cosmetic mod and press the button “Set as Active File”. Then press the OK button and wait for the GECK to stop loading.
5. Add a new hair:
* Select Character -> Hair from the top menu: a window will pop up with all the available hairs.
* Right click on the list of hairs and select “New” from the pop up menu. Enter a unic name for your hair (for example, FallenHair1) and press OK.
* On the right section of the window, enter a name for your hair (this will be the name displayed in the character facegen screens in game). Check the Flag “Playable”. Check the flag “Can be female” or “Can be male” depending on if the hair is for female or male characters. Make sure the flag “Fixed color” is deselected.
* Click on the Edit button of the Art file section and select the hair mesh file (for example DataMeshesCharactersHairFallenHair1.nif)
* Click on the Edit button of the Texture file section and select the tecture file (for example DataTexturesCharactersHairFallenHair1.dds)
* Click OK
6. Assign the new hair to your race:
* With the hairs window opened, select Character -> Race from the top menu. Another window will pop up showing all available races (move the window as needed if it covers the hairs window)
* Select the race you want to modify (for example Caucasian) on the list.
* Select the Face Data tab on the right. You’ll see a list of Hair Styles available for the selected race.
* Left click on the new hair you’ve just added in the hairs window and with the left mouse button pressed, drag it to the Hair Styles window of your race and then drop the hair there (stop pressing the mouse left button). The new hair has just been added to the list of available hairs for your race.
* Click OK on the races window.
* Click OK on the hais window.
7. Save your changes to the active .esp file.
8. Start Fallout 3 Launcher, click ‘Data Files’ and place a checkmark beside the .esp file.
MOD Hair Pack by Yoshikina

Hair Pack v 2.2
—> Sorry, I don’t speak english. This is machine translation.
HairPack adds 24 new female, and 14 male hair style, imported of plugins for “Oblivion”.
WARNING!
I don’t answer on frequently recurring issues what arising by wrong installation, or conflicts. Please read the forum and readme.
———————————————
UPDATE: v 2.2 – Fixed a bug with Nova. This Version don’t contains new models of hair! If you have already downloaded version 2.1, just download the patch for Nova, you don’t need download full version 2.2!
In version 2.1 added 5 new styles for real men 😉
Also added new hairstyle for some male NPC, citizens, raiders, etc. (optional).
-> Description <-
———————
This addon adds 24 new female, and 14 male hair style, imported of plugins for “Oblivion.”
Folders “Eng” and “Rus” contains english and russian master file, and plugin file, who added haircuts for some NPC’s (like “SPARTAN VIs Pretty Girls”), raiders, and some other NPC.
Don’t use hair_add_npc.esp without Hairpack.esm, this will not work.
–>> WARNING! This addon not compatible with any other plugins, who change records RACE and EYES !!!
-> Install <-
———————
Unzip folders “textures” and “meshes” to a your Data folder.
Unpack HairPack.esm and hair_add_npc.esp(optional) to your Data folder (for russian version use files from RUS folder).
If you want new hairstyle for some NPC, use the plugin “hair_add_npc.esp”. This file must be used only with HairPack.esm!!!
Folder HairPackCompSaramHM contains master file and plugin file, who compatible with “Saram Hair Mod”. You need download the full version of “Saram Hair Mod” therehttp://www.fallout3nexus.com/downloads/file.php?id=5462 and unpack “textures” and “meshes” folders, into yuor “Data” folder.
Load order:
Fallout3.esm
HairPack.esm
russian.esp (for russian or other version. If you use this esp, then necessarily to use hair_add_npc.esp)
…..
hair_add_npc.esp (optional. BUT required for work with Russian version)
* If you use russian.esp, or other plugin with translation, remember – plugins for localisation overwrite field RACE, EYES and NPC_.
Use ArchiveInvalidation Invalidated [link]
I retained compatibility with “Josef Grey’s’ Kozaburo ‘Hair Style for Fallout 3” (http://www.fallout3nexus.com/downloads/file.php?id=749). Uncheck “Josef Greys Kozaburo Hair Style for Fallout 3.esp” in your FalloutLauncher, but do not remove the Kozaburo textures and hair mesh.
This archive has no containt models and textures to Kozaburo hairstyle!
—— ESM file. —————
The master file contains records HAIR, EYES, and RACE. All races (Ghoul, Child, Old, Raiders) added links to hair and eyes from my addon.
The plugin file (hair_add_npc.esp) contains changes for NPC.
In the Russian version hair_add_npc also includes a field RACE, so-as “russian.esp” rewrite RACE record of master file.
Example to use HairPack.esm with your addon:
Open in GECK fallout3.esm + HairPack.esm + your addon, and change hairstyle for NPC.
Save your plugin.
Set load order:
fallout3.esm
hairpack.esm
…..
hair_add_npc.esp (if need)
your_addon.esp
–> Uninstall
——————
Remove folder “eyes” in Datatexturescharacters.
Remove HairPack.esm, hair_add_npc.esp, eye_hairpack_en(ru).esp.
