
Overview
This guide will show you Step-By-Step how to make a mod in Blender (Free 3D modelling software) and show you how to edit textures, materials, get your Weapon, Costume or replacement in FFXV. It is aimed at people who have dabbled at some creative design or have used creative software in the past. A background on how games or 3D models work is helpful (if you know what a Polygon and vertex is you should be ok). I will be updating this guide more if people like it/find it helpful. ^_^If this guide is helpful to you and helped you make a mod, please do share it with me! I’d love to check out the mods you make if this helped you in any way! <3-Ky-
Introduction
Ideally this guide is for people who have some minor (or beginner) experience with using 3D programs and are unsure how to go about making a custom item (or people returning from a very long break from modelling and may need a small refresher) who would like to learn how to make their own designs real within Final Fantasy XV.
In this guide will try to explain everything in-detail you need to make a simple mod from scratch, Start to Finish. It will cover design basics and mood boards, basic levels of Poly Editing in Blender and touch upon texturing, materials and how to Rig basic items. This guide will show you howto turn your basic design into something you can get working in game on your VERY OWN!
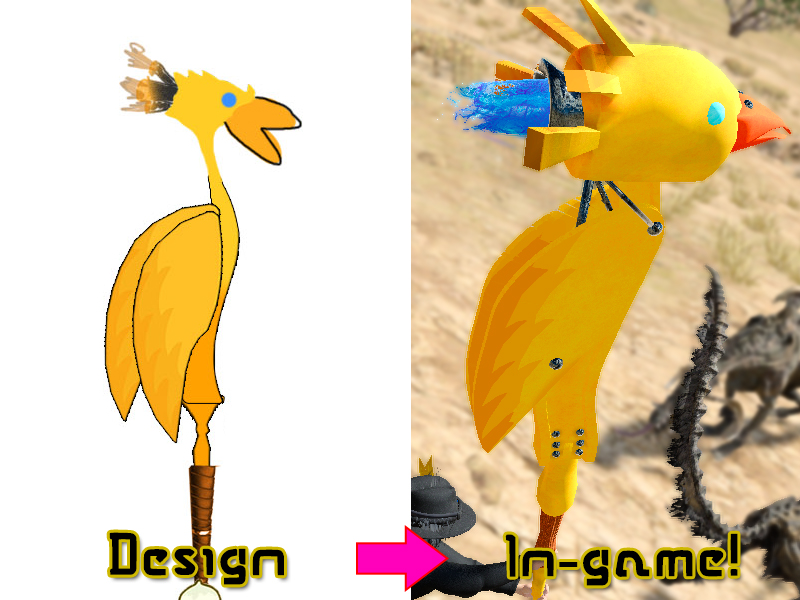
The Initial Design vs the fully made model!
This guide will expand based on what YOU NEED, so comment if you would like to know something extra about modding for FFXV and I’ll make a chapter about it!
This guide also assumes you have minor artistic/creative talent and a moderate understanding of computers. If you need anything explained in more detail, do not hesitate to comment!
-Kyriya ❤
I will be using an Add-on called Bmax(the tutorial doesn’t need this but it may be of help to you), this gives me a Windows-like set up. I found it great as the standard Blender set up was a little strange for me to learn initially.
It’s optional if you wish to use this, but in my opinion it was considerably more familiar for me and a fair bit more intuitive.
[link]
To install this add-on (if you are new to Blender or come from 3Ds Max like me) go to:
File->User Preferences->Add-ons->”Install Add-on from File”
Then select the Bmax/Add-on ZIP File. Ensure it’s ticked/enabled next to the name once installed and click “Save User Settings”
Additionally if coming from 3Ds max you can enable 3Ds max-like inputs via “Input” in user preferences.
Quick useful guide to the Blender UI. Fast Read, or if you like a YouTube video that’s super helpful! Refer back to this if you need help navigating Blender:
1. Drafting your Design (Drawing/Photoshop/Paint etc)
It’s always important to have a sketch/rough design made; it doesn’t need to look professional at all. It’s just going to be something to help you make it in 3D! This is for you and no one else so be creative!
It’s up to you how you do this, here are some of the ways I’ve done designs:
By hand – Simple Pen and Paper, just doodle what you want to make. It doesn’t have to be complicated!
2D drawing/Image Editing program – This is my personal preferred method and the one I’ll be using for this tutorial. You can use something like GIMP, PaintShop, Photoshop or even if you want… Paint on normal Windows! These programs are relatively similar in how they work. Remember this design is to help YOU. It doesn’t have to look good as long as it helps you!
Are you stuck? Don’t be put off! Look around you for ideas, look on your desk? What do you see, could something be adapted as a weapon or costume? Are you inspired by anything in particular? What about that CD next to you? Maybe you could make it into a weapon to use in FFXV! How would you use it as a weapon? A Disc Launcher? A thrown weapon? What about objects outside? Maybe your inspired by an event, like Halloween or New Years, maybe Summer or Winter? Go around, get ideas, don’t worry if you have to stop for this bit of the guide and just get some inspiration on what to make!
For my inspiration for the weapon I’m making in this tutorial I’ll be using the theme of Chocobos and Hammers! This will be the weapon for my “Chocobo Ranger Noctis” as part of my “Custom Chocobros set” (Which includes: Chef Ignis, Lifeguard Gladio, Photographer Prompto and their associated weapons)
For my designs I usually use a combination of drawing and combining images that inspire me with informative text, in design this is usually called a “Mood Board”. Here is mine for the Chocobo Hammer:

Below is the secondary design taking input from my first design and changing it to be better than the first (it still doesn’t look great but remember, your design is only a reference for yourself, I’m putting it here to give you all an idea on how to start your own design).
Once your happy with your drafts and mood board/s, feel free to open blender and we’ll get started!

2a. Quick Mod Organizer Setup
We need to quickly set up “Final Fantasy Windows Edition Mod Organizer”. If you haven’t got that yet, look on the steam store and download it. It’s free!
Store Page for FFXV Mod Organizer
[link]
Once inside you’ll need to setup a space where you can make your mod.
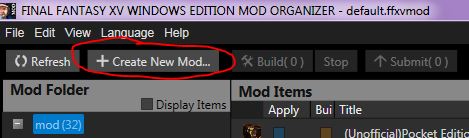
1. Click “+ Create New Mod“
2. Label your mod and select which category it is. In my case I am making a weapon, so I will select “Weapon [Solo Play]“. The DLC comrades is Multi-Play and will appear in Comrades once you select this option instead. Based on what you select here will determine what Sample Model you’ll need to import into Blender later (covered later in tutorial).
3. Finally Right click your newly created mod entry and select “Open Assets Folder“.
This folder will be where you place all your textures and Blender Files.
2b. Starting your design in Blender (3D)
So we have our drawn/photo drafts. We’ll want to start making the 3D meshes in Blender. This section will cover basic poly modelling and a step by step on how you can modify meshes to your designs. This may be slightly harder for some who are unfamiliar with 3D, however I will try my best to cover what’s needed.
First we’ll need to import a Sample into Blender of whatever we’re making. To do this go into:
File->Import->FBX
Navigate to your Mod Organizer install location:
…steamappscommonFFXVModOrganizersample
Here is a quick reference on what files are what:
nh00_020 – Noctis Costume Model
nh01_020 – Gladio Costume Model
nh02_020 – Prompto Costume Model
nh03_020 – Ignis Costume Model
we_02_100 – Weapon Sample (We’re using this one for the tutorial)
Click the weapon and import it. Click off into the viewport to De-select it so you can start to add meshes. If you add a mesh with an object selected it will combine, so be careful if you don’t want to do this!
Break down your design into basic shapes. As you can see from the second design I made we can split the model into several parts:
2* Wings = 2 Cylinder
Body = 1 Cube
Lower Body = 1 Cylinder
Handle = 1 Cylinder
Greens = 1 UV sphere + 3*Planes for leafs
Head(little more complex):
Main Head = 1 Cube (if using “Extrude” on it for the head feathers)
Beak = 1 Cone, split into two objects OR 2* 1/2 cone.
Eye = 2* UV spheres, halved.
We can now see from breaking down our model into basic shapes that closest resemble them, we have somewhere to start and for anyone who hasn’t made a complex model before this may be helpful to do. Again this is only how I do it, for some more professional 3D users I’m sure you have many different (and better) ways of doing it.
Create the new meshes for your model based on the closest shapes. I’ll now create it and show you the basic layout.

Note: While placing each new mesh, change them in 3D space with the Move, Rotate and Scale (at the bottom of Blenders Window) to lay them closest to how your design was made. Also use the “Snap” tool to snap an object 5 degrees at a time (useful for rotating 90 Degrees), ensure you disable it when its not needed! Click off the mesh before making a new one else they will join together as one object! The sample weapon you’ve imported should help act as a guide for the scale of your weapon (this is also true of outfits).
“Proportional Editing” is similar to 3Ds Max’s “Soft Selection” (More on that later).
3. Poly Modelling from the Basic Shapes
Now we have all our basic shapes in place, we’ll begin to edit them. This section will be very picture heavy as it will go over step by step how to replicate the shapes I’m using with simple tools.
TIP: Remember to save often and keep backups/versions from this point on!
Click on the Images in this guide to Maximize them!
1 – Using our Scale tool we scale up the body. The object look we want is that of a building girder. We’re going to make this design look as if it was designed from someone who was out in the wilds.

2 – When we are happy with our results and position/shape of the object move onto #3.
3 – Add in some extra Edges, be sure to be in Edit Mode, Edit Edges. Do this by using the “Slice” option in Bmax. Alternately it’s called “Loop Cut and Slide” in the normal Blender “Mesh Tools” Panel on the left hand side. Use your scroll wheel to increase the number of segments.
TIP: If the panel isn’t visible hit SPACE BAR and/or look for a small + icon, this will maximize any hidden menus.
4 – “Loop Cut and Slide (Basic Blender)” / “Slice-> Slice Plane(Bmax)” again this time making two(2) more loops going along the Z axis.

5 – Using the Scale Tool drag them apart until your happy with how they look.
TIP: The scale tool is very useful when poly modelling as you can move individual Vertex/Edges/Polygons away or closer to each other. We’ll use this technique again later! It’s very versatile!
6 – Make a second set of two loops around the box and with both new loops selected* move them as close as you can to the other Edges you made previously.
* If for whatever reason you de-selected the Edges you just made, you can re-select them using “Loop” while in Edit Mode. for a handy tutorial on what Edge Loops are and how to easily select stuff while Poly Modelling.
7 – Using our trusty Scale Tool we’ll move the loop closer to itself on the other side. This should now form the building girder-like object in the screenshot.

8 – For the next bit we’ll be using an excellent tool called Proportional Editing this is an AMAZING tool and will make working with Poly Modelling vastly easier! To see the Proportional Editing button, refer back to the earlier screenshot displaying Tools, Snap and Proportional Editing! Next go “View(In the bottom left)” and change views until you can see your object side on from an orthographic view.
9 – With Proportional Editing ON and being in Edit Mode with Edit Vertices, click and drag to select Vertex. While holding down your mouse click, use the Scroll on the mouse to change the area of influence of the Proportional Editing, too big and the entire object will move, too small and nothing will happen. As you scroll you’ll see a number in the bottom left change, this is the radius of influence.
10 – With a suitable level of Proportional Editing enabled move it so you get a steady curve in your Poly Model.
11 – Switch to the Scale Tool with Proportional Editing still on and scale the tip. As you can see now, Proportional Editing is a really neat tool for modelling as it has so many applications! Remember to enable it or disable it based on what you require!
12 – Its looking ok. We can add some details later in texturing as well as a few metal rivets in the final design to make it look better. But this is an acceptable shape!

13-15 – Start modelling the wing. We can make a fairly nice wing according to the design I made, just using this and the Move Tool while in Edit Mode -> Edit Poly.

16 – Select the head/cube mesh we made. For this one we’ll be using the Sub-Divide tool another useful option for Poly Modelling high-detailed objects. This adds more Polygons, Edges and Vertex. Do not use this excessively as too many Polygons can lead to crashes or exceptionally high load times!
Go to Tools on the top left, scroll down to Mesh Tools and click “Sub-Divide”.
On the Bottom Left of Blender you’ll see a window like the one in the screenshot. Change:
Number of Cuts: 5
Smoothness: 0.2
Tip: You can experiment with these options as nearly each Tool or function has these options in the bottom left! Try them out and see what works best for your model.

17 – Next we’ll use a combination of the Scale (You can just use the Scale tool if you like, but I find the scale option a bit better as it scales everything at once, not just one side) in the Tools Menu (Top left Blender Window). Click this and move your mouse to adjust the Polygons shown in the screenshot, get them close to the Edges and use your move tool to move the Polygons back into the head. This is where I’ll place the Rockets shown in my design, because who doesn’t love Rockets on Hammers!?
18 – The final result should somewhat look like a square crater.
19 – Next use Proportional Editing to shape the head into a more Chocobo-like shape. As this is a fairly quick tutorial I won’t worry too much about accuracy or style and make it somewhat resemble a Chocobo head.
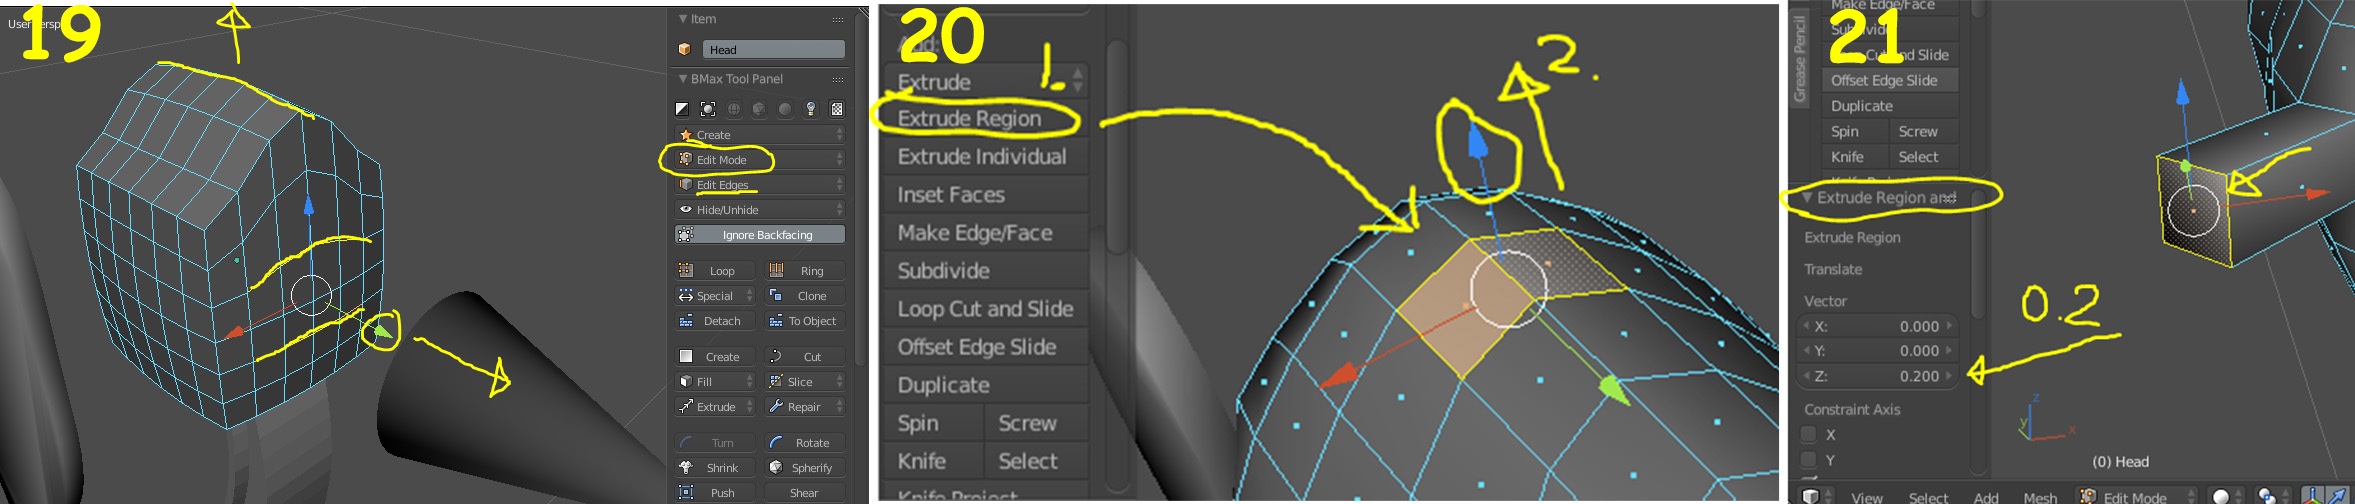
20 – Turn OFF Proportional Editing for the next bit as we do not want to influence Polygons for this next bit. Let’s go into Edit Mode and Edit Poly. Lets select some Polygons on the head and Extrude Region we can move our mouse and place it anywhere we like.
21 – Remember how I said all tools have a option panel in the bottom left? Well even after you’ve moved it with your mouse you can fine-tune everything mathematically if you choose to!
For this example I’ve chosen to have a value of 0.2 for my Extrude Region.
Tip: Extrude Region is a great Poly Modelling tool! Just like Proportional Editing and tactile use of the Move, Rotate, Scale and Snap Tools, you will be using this a fair bit for most of your custom models! Extrude Region was heavily used in my Blade of the Hexatheon (FFXV Mod) for the Dragon Wings!
22 – Next let’s start working on the Beak. I rotated a cone using the “Snap Tool” by 90 degrees. Went into Edit Mode and deleted half the shape by setting my camera to the Right Orthographic View
Tip: Changing the camera to Right/Left, Front/Back is handy while poly modelling as it allows greater accuracy than your normal 3D perspective for these kind of operations.
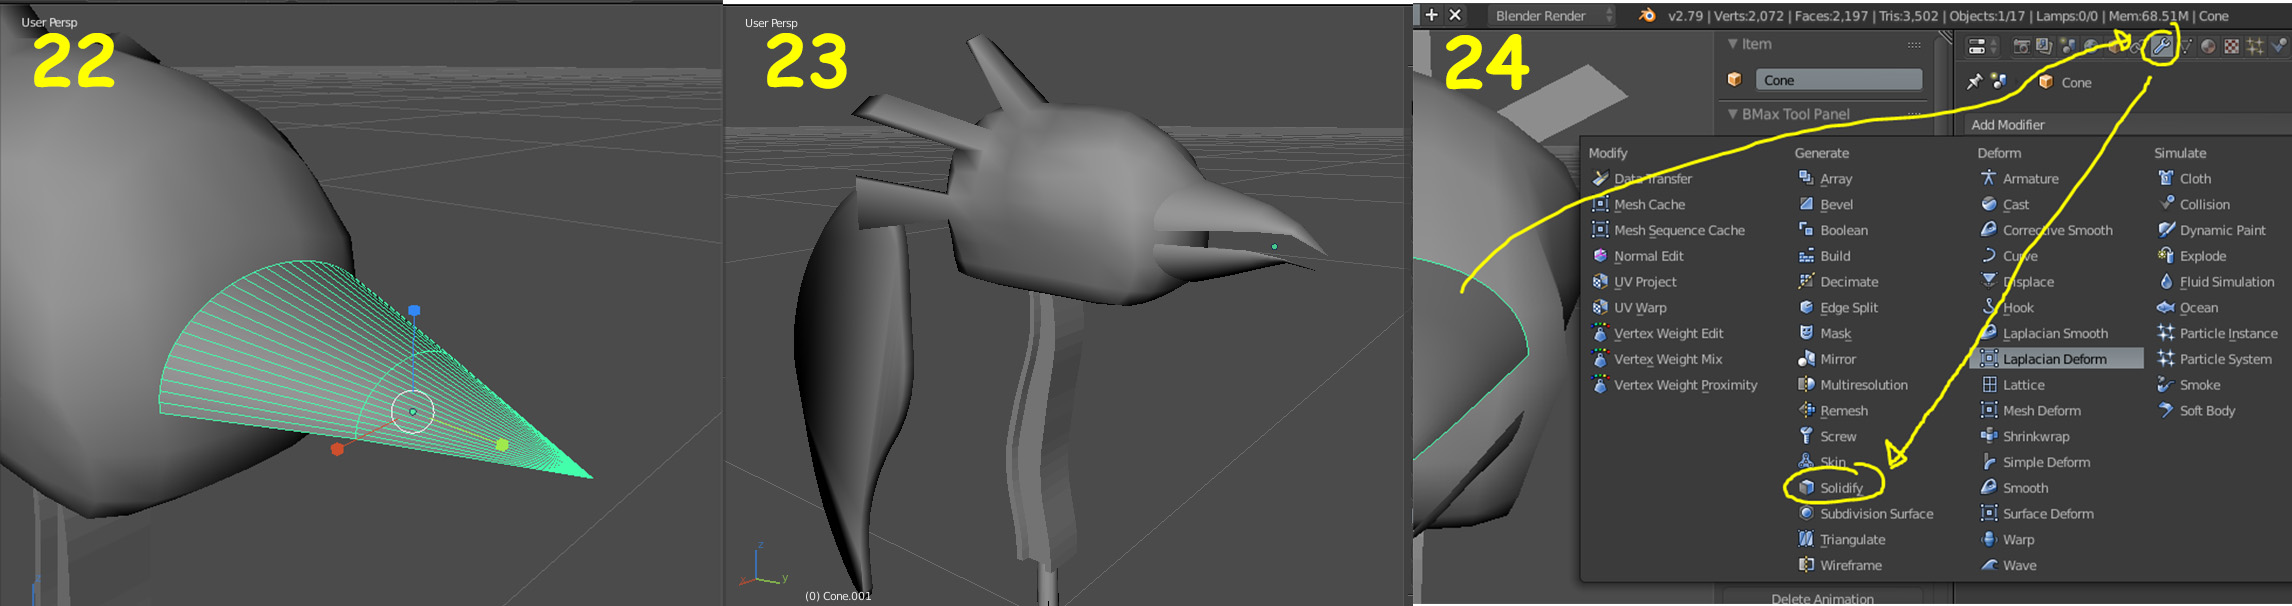
23 – Next I simply added 1 level of Subdivide, Turned on proportional editing and bent the beak a little to resemble a Chocobo. I then applied a “Mirror” (Tool bar in top left of Blender -> Transform -> Mirror) with a “Copy” to get the bottom part of the beak. I edited the bottom part to be in-line with the top Chocobo beak.
IMPORTANT FFXV NOTE: When using MIRROR to Mirror an object, it is vital you go into Object Mode, bottom left “Object > Apply > Rotation and Scale!”
You will then have to select all Polygons, Shading/UVs > Normals>Flip Direction to fix it in game!
3a. Poly Modelling continued
24 – next we need to apply a Solidify Modifier via the Modifiers panel (

Note:(Solidify) This is useful only when you have a model that you can see through one-side in game with. Remember this increases the polygon count and you will also need to click “Apply” in the modifier panel for it to register in-game. Make a backup or another save of your file before doing this, in case you need to come back to it!
We’re nearly done on modelling!
25 – Next let’s move onto the handle. Using all we’ve learnt so far, turn on Proportional editing again. Go into a side View, Drag and select some Polygons and use the Scale(Transform) in the top left to change the look of the handle, giving it a more interesting look.

26 – There we have our final handle, notice how I took some minor inspiration from Mace of the Fierce as per my mood board in my initial design. Remember you don’t have to stick to your design entirely, feel free to improvise and go over your model now before moving onto the next section.
Next is UV unwrapping.
4. Introduction: UV Mapping
Don’t fret this part may look hard, but once you get down to it you’ll find it fairly easy.
You can also follow this part of the tutorial using any costume or weapon, the same theory applies to most!
If you like I’d suggest watching this AWESOME video by BlenderGuru on UV unwrapping. Its very informative! My guide will cover a bit of this as there would be way too many steps to write down to explain it all.
I strongly suggest getting the add-on “UV Squares” as its rather helpful!
Download it here:UV Squares Blender Add-on[github.com]
Click the green button “Clone or Download” -> “Download as ZIP“
Install it Via: File -> User Preferences -> Add-Ons -> Install Add-on from File and select the ZIP.
First things first, you’ll need to prepare the UV/Image Editor. As we’re not using animations we can replace the Timeline editor.
Click the button down here and select “UV/Image Editor”. I’ll note down the various functions of the window next as I found this incredibly hard when first starting, you can make this window bigger by clicking and dragging the top border up. Next to the name saying “Render Result” at the bottom, hit the [X] to close it, you normally won’t be needing this for FFXV, you can also navigate back to this “Render Result” if you wanted to from the dropdown to the left of “+ New” I’ll try to include as much information I wish I had known when I started.


These are your standard tools for manipulating UV maps. You can select Vertex/Edges/Faces/Islands and manipulate them by using these.
UV Unwrap:
Consisting of the major tools for this tutorial Mark Seam, Clear Seam and UV Unwrap. A Marked Seam (also covered in the video tutorial above) is an Edge that is selected in Edit Mode and has this applied, the Edge turns green this allows you to break up 1 mesh easier.
Tip(Seams): Think of it like a scissor cut along a drawn edge, if you were cutting out a cube from paper.
Just as you can Mark a Seam, you can also Clear Seam. Do this if the seam you’ve made doesn’t look great. Simply select the entire object in Edit Mode in the 3D window above the UV/Image Editor and hit “Clear Seam“.
The Four “Selections”:
Vertex/Edge/Face Selection simply allows you to manipulate the Vertices of your UV-Map. Each Vertex, Edge and Polygon(aka Face) corresponds to a co-ordinate in the UV map. You can see what corresponds to what via “Selection Synch” (Full name: Keep UV and Edit Mode Mesh in Synch). This will make whatever you select in the 3D view be the only visible Vertex/Edge/Poly within the UV Map, great for seeing how stuff lines up!. Select your entire mesh and press “Selection Synch” again to return to the previous mode.
Finally we have Island Selection Mode. You may be wondering what Islands are in UV mapping? Well when a seam (aka the virtual scissors of UV mapping) would cause a cut across your single mesh and turn your one mesh into two individual texture areas, we call these Islands. Islands exist on one singular 3D mesh and splitting up or cutting open your mesh to map out using seams and islands is a more efficient way to do UV mapping.
It can take a little while to get use to, but once you do its simple! This is by far the trickiest part of 3D modelling in my opinion, but gets easier once you start doing it.
With this primer in mind. We’re ready to get onto UV Unwrapping for real!
5. UV Unwrapping/Mapping
Again if you have yet to get the UV Squares add-on. Check the section above as we will be using it!
I’m going to start un-wrapping the body/building girder for the Chocobo Weapon.
Note: Before unwrapping ANYTHING. In Object Mode click “Object -> Apply -> Rotation and Scale” on the object before unwrapping. The reason we do this is to apply any poly Modelling changes we’ve made to the shape as the UV map still thinks it’s a cube!
Expand the 3D view again as we’ll be using that for just this step and go into Edit Mode -> Edit Edge.
Select the Edges you want to cut along for your UV map. I’m choosing something that vaguely looks like a cube.
TIP(Seams): Remember you don’t have to select everything at once, you can add to or clear seams 1 by one if you like. Nothing you do is final here.
TIP(Loops): Remember you can do a selection loop (as I mentioned earlier). To select Edges easier and more efficiently than just one-by-one.

Once your seams are marked your ready to attempt a UV unwrap. Remember this isn’t final and can be re-done as many times as needed!
Select all the Edges with Ctrl+A (Bmax) or A(Default Blender) and click “Unwrap” -> Unwrap, the UV/Image Editor should now show some kind of Islands.
TIP(UV-Unwrap):There are different options here, you can try different types of Unwrap. Some may yield better results than others, Smart UV Project can sometimes eradicate the need for Mark Seams. Try and see what works best for your model!

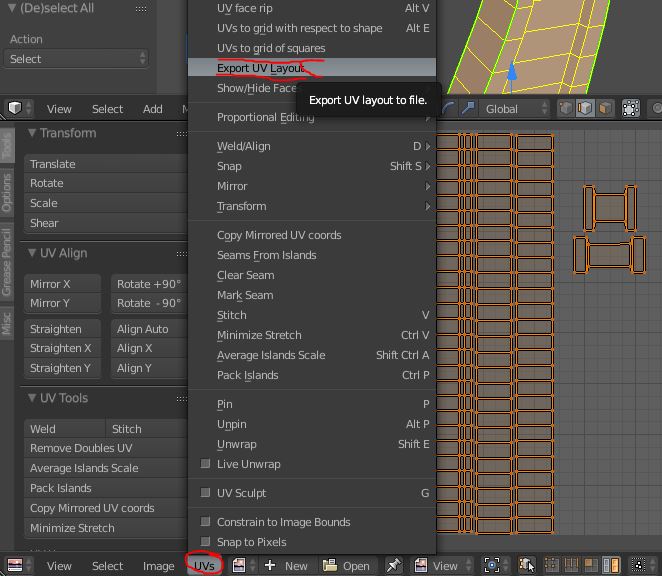
With one of the islands selected I’m going to hit “Snap to Axis (X or Y)”. This seems to have worked very nicely! (If this doesn’t work for you, try “To Grid By Shape” or “To Square Grid”, the aim is to get a fairly simple shape you can paint a texture on.
With that I’m going to just apply another Snap to Axis (X or Y) to the other curved shape, use the Transform Tools in the Tool section of the UV Editor to Scale and Translate the UV Islands so they are roughly the same size, then I’ll export it ready for an image editor!
Go to UVs -> Export UV Layout. Remember your Assets Folder you made with Final Fantasy XV Windows Edition Mod Organizer*? It is suggested you save your Output File here. You can also change the desired dimensions of your UV map here. It won’t make a difference if you decide to make the texture smaller or bigger later. UV maps are percentage based and will scale up and down with ease!
*If you have yet to set up the Mod Organizer, see Quick Mod Organizer setup.

6. Texturing your UVs
This section covers Texturing and then applying that Texture to a Material in Blender.
This part ideally needs you to have some knowledge of ANY graphics editing program. It doesn’t matter which one as long as you feel comfy using it!
I’m using Photoshop CS6 but you can use a free one such as PaintNet(Image Editor)[www.getpaint.net] this is very similar to Adobe Photoshop and free!
If your thinking about giving up, don’t! I know the prospect of having to texture seems hard, but just takes things at your own pace, don’t worry if your textures could look bad. You got this!
-Bit of Encouragement! ❤
Your probably wondering how you’d even get started, well I’d suggest a Google search for a texture site or using this one Texture Website[www.textures.com] my old college professor (thanks Paul!) suggested it to me and it’s not too bad, and its free for 15 textures a day, which is fine as we’re not going to need more than that for this weapon!
TIP(Textures): As you design more things or work with textures more, it’s a good idea to make a folder on your PC dedicated to different textures. I have a folder called “Texture Library” and have placed Folders inside that describing different material types. Placing those material types within their appropriate folders you can build a library. Using this it’s easier to reference a texture you have and make quick use of it!
Next just download a texture that you think could work for your object (or create one from scratch if you have a camera/confidence in graphics design!). I’m going with a rusty metal look for my Chocobo Hammer (Note: I changed this later but kept a subtle rusty look by setting it as an Overlay in my graphics program). I’ll use my graphics program to change the Hue and Saturation to a Chocobo-Yellow.
First I’ll need to load my UV map into my image editor.
Now I’ll just quickly make this texture, feel free to play around with your texture. I made mine by doing the following:
Combine a Rust texture with a flaky paint texture, used a mask (or you can use the eraser if you like to reveal the next layer down), added some decals that have rust and damage. Changed it to be more yellow.
In order to get this to work in FFXV we need to save it as a .PNG file. Save it in your Assets Folder you made with Mod Organizer. Now back to Blender to quickly see how it looks.

In Blender select your object again, you can expand the 3D view again as the UV map for this object should be done. Go back into Object Mode.
On the right hand side hit “Materials” 

That’s because we need to enable Materials in the viewport so we can see!

We forgot one last thing. We need to add lighting into the scene. Go to World(
With this changed we can finally see our texture! Tweak it in the graphics program if you need to and update it with the Refresh icon to the right of the texture path. Once you like it or think its passable, try texturing your other items! You’ll get faster and more efficient as you do! I’ll come back when mine is done and continue writing from there!
7. Rigging the Weapon with an Armature
You should now have tinkered enough and got your model in a state where you at least ready to test it, or you feel it is complete.
Useful information for this chapter is from the Official Modding Tools Guide (which covers some basics). It covers bone names which may be handy!
[link]
Most samples have skeletons/rigs that you can use so depending on the complexity of your model, very little work should need doing. As there are two types of FFXV rigs within the samples that I know of I’ll explain them both.
Rigging is binding vertex so they respond to a bone Structure / Rig / Skeleton in game. For example “Weight Painting” some sunglasses to the C_Head bone will make them move with your FFXV characters head. I know this sounds incredibly confusing and it does take a while to learn the more in-depth details, but don’t worry this guide will cover the absolute basics in rigging for FFXV to get you going!
Luckily for weapons you only need to concern yourself with 1 bone. Meaning all Objects Vertices need to be weight painted to that 1 bone. The sample model titled “We02_100_mod” has an example of the Armature needed. You can just re-use this by deleting all existing models that are linked to it.
So if you’ve been following this guide let’s get to it! This is the last step needed before we put it in the mod organizer! Yay!
You’ll need to select your meshes first and the Armature second by selecting multiple items.

When you have made your selection (selecting the Armature/Bones as the last object). On the left hand side panel where you had your Tools look for the tab that says Relations, under that you should see an option saying Parent: Set and Clear. We’ll want to click “Set”, this will bring up a menu and you’ll have multiple options.

Armature Deform – Binds it to the Armature/Rig and KEEPS weight painting. Useful if
your copying an item from rigs that share bone names (i.e. Noctis’s boots from one of his
costumes onto another). Doing this would retain all Weights.
With Empty Groups – Gives the mesh vertex groups of the Armature with no weight information in any groups. Think of this like an empty cup that needs filling in order to allow movement. This option will require you to do additional work as there will be no weight info!
*You would normally use this option for CHARACTER RIGGING then “Weight Transfer”(Under Weight Paint mode, by selecting two meshes) the weights from a sample character over to your design!
With Envelope Weights – A kind of automatic weight solution. Tries to guess what bone is connected to where. On more complex rigs this can cause some strange deformations, movement kind of looks very “folded-paper-like” from experiments using this.
With Automatic Weights – Automatic. Tries to guess what is connected to where, can cause bad deformations on complex rigs in FFXV. Suitable for weapon rigs! May need some additional manual tweaks later on complex weapons.
So let’s select Automatic Weights for this weapon! Don’t worry we’ll check out the “Weights” to be sure, then we’ll get to exporting it for FFXV!
Ok so let’s select any one of our meshes and check quickly. Select “Weight Painting” it’s in the drop down with Edit Mode and Object Mode.
Now I’ll tell you how I look at weight paints, this is only my way there could be a better way or a more efficient way. Select Object Data(
Red= Highest level of influence. 100% of this will move with the bone its painted to.
Dark Blue= 0% influence, not influenced by any bones, this part of the mesh will not move.
We need to ensure all are painted to respond to “C_Body” for our Weapon. So lets go around the various meshes by switching back to Object Mode, changing object and then back into Weight Painting again. Is everything Red when “C_Body” is selected in Vertex Groups?
If so great! If not don’t worry, we can just select C_body in vertex groups and use our tool shelf in the top left to specify the brush (how we paint on Weights).

As we can see, this mesh isn’t weight painted fully. In order to fix this, select the brush type on the left hand side by hovering over the brush icon, select “Add” as the brush type, ensure you have C_Body still selected in vertex groups so you can add weights top that bone onto that part of the mesh! Paint over using your cursor until its red and we’re good to go and export!
Manual weights can be a pretty complex thing to learn but you will get better with practise!
New Chapter/s about outfits on Request!
8. Mod Organizer – Getting it in game
The next steps should take a matter of minutes. However I’d suggest getting one add-on made by our lovely coders over on the Final Fantasy XV Modding Discord[discord.gg] (Leonblade and Wim).
You can download the package here which will fix issues at night due to an error in the FBX and FFXV in Blender. Unzip the main file first and read the instructions!
Add-on Download: Final Fantasy XV – Blender FBX Exporter (Glow Fix)[cdn.discordapp.com]
Note: This still gives you the original exporter with an option for FFXV in the dropdown. read the install instructions included in the file! While this isn’t needed to get your model in game, the models will glow white at night and in dark areas due to how glow in managed in the exporter in Blender if you choose not to use this!
Ok last checks!
-Are all your images .PNG format?
-Is everything connected to your armature and weight painted?
-is everything textured? If you’re missing a texture you’ll get an error! Everything has to have a material and texture!
-Are all your images, Active Blender Files and assets inside the assets folder you made in the Mod Organizer step from early on?
-Happy with your model. You did well to come this far and also thanks for reading the guide! <3
Right then! Let’s get to it!
Select File -> Export -> FBX(.fbx)
You’ll be presented with a window that looks something like this.

Click the dropdown and select the “FFXV FBX” filetype. This will only be available if you installed the add-on. If not you can use FBX 7.4 Binary however you will get the glowing bug.
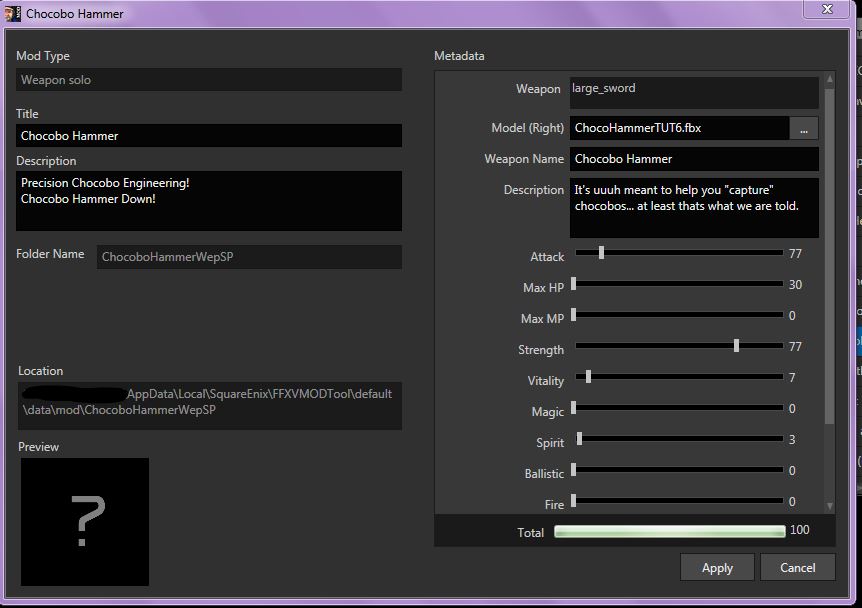
Locate your project and “Right Click” > “Properties”. This is where we will specify the FBX file to use!
Click the “…” to choose a FBX file to use, set its stats and give it a description and name for the Workshop(left) and a description and name for in game (right).
We’re good to “Apply” and right click “Build”. This can take a few minutes so just be patient, go get a drink, watch some Youtube it’s up to you. If all has gone well you should see:
Status(OK)
Remote Build (OK)
If you do not see this and instead get an error, please check the next chapter for solutions, bug fixing and issues. Save your blender file and export again, R-click, build and see if this solves your issues!
Tip:(Preview Image) There is a file in your assets folder called “$preview.PNG” changing this in an image editor with a picture of your mod makes it pretty for your steam workshop page and gives a preview in game!
Ok this stage is quick. Go to Mods on the Main Menu, enable your mod it should be there. Load your save and test it! If you get a crash see for solutions below in the next chapter! Usually they are really easy to fix and its just a case of going back into Blender to resolve a few names!
Well the hammer is made and here we are!

Chocobo Hammer – (Greatsword) (FFXV Custom Modding Weapon!)
❤-Ky-❤
FAQ: Help I got an error/It crashed my game!
(Directly Taken From: [link]
Error reports contributed by the FFXV Modding Discord[discord.gg]
1.”data://”
Cause – Happens when your .fbx has spaces in it. (example: bla bla.fbx)
Solution – Re-build your .fbx without any spaces. (example: bla_bla.fbx or blabla.fbx)
2.”-o output error:” (Credit @HeartlessSeph)
Cause – Happens when your Windows user name has spaces in it.
Solution – Swap profiles/change your Windows username so it doesn’t have spaces.
3.”FileNotFound on data://”
Cause – Spaces in one of your texture files or textures are not there
Solution – Rename your texture file without any spaces and re-apply it to your model/make sure your textures are within your mods asset directory.
4.”[FbxConverter] convert error -1:c:\”
Cause – Having no material applied to the mesh at all.
Solution – Apply a material to the mesh even if you’re testing it without textures.
5.”SubmitItemUpdateResult=k_EResultLimitExceeded”
Cause – Your preview image is too large.
Solution – Delete the preview image from your asset folder or make a new one. (no larger than 600×600 .png)
6.”[GraphicsDataBuilder] build error -1073741819:Error_Unknown”
Cause – Mesh is not UV unwrapped.
Solution – UV unwrap your mesh.
7.”An error occurred while sending the request. at System.Runtime.ExceptionServices.ExceptionDispatchInfo.Throw()”
Cause – Internet connection error.
Solution – Check your internet connection and make sure you’re connected to the internet.
8.”Error: The size of the file exceeds 100MB”
Cause – Your .fbx file is greater than the limit. (100MB)
Solution – Lower the size of your .fbx file. (Having an active SS modifier adds to the load and if it’s applied on export then this can drastically boost your file size.)
1. Game Crashes when attempting to use mod/loading game (Credit: @Jazneo)
Cause – Material or Texture names have a Period (.) or special characters (– , . ( ) = +) in them.
Solution – Remove the peroid off the Texture and Material Example “Green.png” Has to be “Green”
Tip: You can use Blender’s “Outliner” and select “Blender File” once in the Outliner from the dropdown, to see the contence of your Blender file and eliminate any special characters in textures, materials and meshes.
2. I can’t see my model in game or its invisible
Cause – You may have enabled multiple “Influences” for a texture in Blender. i.e. The main Diffuse texture is set to provide “color”, “Intensity” and multiple others.
Solution – For Final Fantasy XV only have 1 influence per texture.
3. My model appears tiny or has distorted animation.
Cause – Weight painting OR character is not in A-Pose (and is instead in T-Pose)
Solution – Ensure all Meshes being used are weight painted correctly and characters are lined up as close to the sample meshes as possible!
Useful FFXV Modding Resources
If you like modding feel free to join the FFXV Modding Discord[discord.gg]. Also feel free to ask us for help if you have modding issues!
If your a fan of FFXV has handy resources on modding and general console/pc FFXV stuff. Ask in the “mod-help-n-discussion” channel for help.
[link]
MicroKnightmare’s Mega Guide <LINK>
Useful information by MicroKnightmare and friends.
Regarding all aspects of FFXV modding, from getting Alpha Channels to work in game to better ways to import things, better rigging and how to get specific glow effects for your models!
Ultimate Texture And Material Guide<LINK> (Fixed link as it was broken, sorry!)
Also if you would like a better in-depth guide to what materials are what in Final Fantasy XV then the amazing user EratoTiaTuatha has you covered