
Overview
I Give 2 distribution Options for G.F. on Characters:PART 1:Character 1: Quezacotle,Brothers,Cerberus,Tombery,BahamutCharacter 2: Shiva,Sieren,Diabolos,Pandemona,DoomTrain,KaktorCharacter 3: Ifrit,Carbuncle,Leviathan,Alexander,EdenPART 2:Character 1: Quezacotle,Brothers,Diabolos,Tombery,Bahamut,EdenCharacter 2: Shiva,Leviathan,Sieren,Pandemona,AlexanderCharacter 3: Ifrit,Carbuncle,Kaktor,Cerberus,DoomTrainP.S.I Hope This is OK is my First Guide
SEED TEST & RANK
Test Level Answers
LV 1: Y N Y Y Y N N Y N N
LV 2: Y N Y Y Y N Y Y N N
LV 3: N N Y N Y Y Y N Y N
LV 4: N Y Y Y N N Y Y N N
LV 5: N N N Y Y N N Y Y Y
LV 6: Y N Y Y N N Y Y N Y
LV 7: Y Y Y Y Y Y N Y Y N
LV 8: N Y N N Y Y N N Y N
LV 9: N Y N N N N N N Y Y
LV 10: Y N N N N N N N Y N
LV 11: Y Y N Y Y N Y N N Y
LV 12: N Y N N Y N Y N Y N
LV 13: Y N N N Y N N N N N
LV 14: Y Y Y Y N Y Y N Y N
LV 15: Y Y N N N N N Y N Y
LV 16: Y N N Y N Y N N Y N
LV 17: Y N N N Y N N Y N N
LV 18: Y N N N Y N N N N N
LV 19: Y N N Y N N N N N Y
LV 20: Y Y N Y N Y Y Y N N
LV 21: Y Y Y Y N N Y Y Y N
LV 22: N N N Y N N N Y Y N
LV 23: Y N N N N Y Y Y Y Y
LV 24: Y Y N N Y Y N N N Y
LV 25: Y N Y Y Y N N Y N N
LV 26: Y Y N Y N Y N Y N N
LV 27: N Y N N N N Y N Y N
LV 28: Y N N Y Y Y N Y N N
LV 29: N N N Y Y N N N Y N
LV 30: N Y N N N N Y N N N
SEED RANK & PAY
LV 1: 500
LV 2: 1000
LV 3: 1500
LV 4: 2000
LV 5: 3000
LV 6: 4000
LV 7: 5000
LV 8: 6000
LV 9: 7000
LV 10: 8000
LV 11: 9000
LV 12: 10000
LV 13: 11000
LV 14: 12000
LV 15: 12500
LV 16: 13000
LV 17: 13500
LV 18: 14000
LV 19: 14500
LV 20: 15000
LV 21: 15500
LV 22: 16000
LV 23: 16500
LV 24: 17000
LV 25: 17500
LV 26: 18000
LV 27: 18500
LV 28: 19000
LV 29: 19500
LV 30: 20000
LV A : 30000
Card Club – Members and Membership
1) Jack:
Jack is the first to mention the CC Group to Squall. He is also the first member to challenge Squall once he has considerable skill in Triple Triad. He is found in the Balamb Garden main lobby.
2) Knight Club:
A SeeD only interested in playing Triple Triad who says nothing except “Draw…” to challenge the player. He is randomly found outside of the dormitories along the circular walkway.
3) Princess Diamond:
A pair of female students found with Jack in the main lobby, walking up to and standing in front of the directory.
4) Prince Spade:
This is the guy who gave Squall his first deck of Triple Triad cards. He is found on the second floor in the hall leading to the elevator. He possesses several high level cards.
5) Queen Heart:
This member is Xu. She holds many high level cards, which includes the Carbuncle card. She can be challenged on the bridge.
6) Master King:
Revealed to be Quistis. She holds many high level cards, including the Gilgamesh card. She only challenges Squall randomly in his dorm room when he rests after he defeats Queen Heart. Once Squall wins the game Quistis can be challenged on the bridge.
7) Magician Joker:
Holds the Leviathan card. He updates the battle meter and acts as a shopkeeper in Balamb Garden’s training center and the Ragnarok spaceship. He appears randomly on a platform overlooking the water in the training center.
And last but not least:
Dr. Kadowaki also mentions she once served as Master King, but was defeated by an unspecified student (presumably Quistis) four years prior. She does not hold any rare cards.
P.S.
After you have won in Balamb Garden 15-20 rounds Triple Triad,
is a seed on the ground floor in front of the signpost and walk off.
All Magazines
The Weapons Monthly Magazines:
1) Weapons Monthly, March:
Found at the top of Dollet communications tower after defeating Elvoret. The Elvoret drops the magazine upon defeat.
2) Weapons Monthly, May:
Found in the Deling City Sewers. This sewer is actually located behind the Presidential Residence and can be accessed by either Rinoa or Squall during their respective trips into the residence.
3) Weapons Monthly, June:
Found after defeating the BGH251F2 at the Missile Base. The machine drops the magazine upon defeat.
4) Weapons Monthly, July:
Found at the Training Center in Balamb Garden in Disc 3.
5) Weapons Monthly, August:
The “treasure” of Trabia Garden can be found five steps south of the Gargoyle fountain, barely seen.
6) Weapons Monthly, 1st
Can be found in the Lunatic Pandora lab during the last Laguna dream sequence.
Combat King Magazines:


1) Combat King 001 – Dolphin Blow:
The bottom floor of the D-District Prison; must be acquired before rescuing Squall from the Interrogation Room.
2) Combat King 002 – Meteor Strike:
Battle against Fujin and Raijin at Balamb Hotel in Disc 2
3) Combat King 003 – Meteor Barret – Combat King 003 Sidequest:
The player can witness numerous optional scenes between Zell and the Pigtail Girl, who works in the Library Committee in Balamb Garden. None of the scenes are required in order to get the magazine, but the more scenes the player witnesses, the more complete the dialogue will be at the end.
1. After hearing the briefing for the Timber mission, the party can return to Balamb Garden and enter the library, where Zell will ask the Pigtail Girl about a book he is looking for.
2. if the player takes Zell back to Garden to warn Headmaster Cid of the missiles, and visits the library, the Pigtail Girl will give Zell a Mega Phoenix. If Zell’s not in the party, she gives a Remedy.
3. When Irvine has to choose instruments for the characters to play during the concert, he can leave the scene and visit the library, where the Pigtail Girl asks questions about Zell.
4. After liberating Balamb from Galbadia, the player can enter the library with Zell in the party and the Pigtail Girl’s friends hold a questionnaire for him.
5. After visiting Trabia Garden the player can take Zell to the library to the screen with the Esuna draw point and overhear the girls talking about Zell.
6. On Disc 3 the girls on the Library Committee will tell Zell the Pigtail Girl is looking for him.
The magazine can be obtained at any time after having liberated Balamb from Galbadian soldiers. After talking to one of the girls of the Library Committee, the player can head to Balamb and a girl in a red skirt will tell Zell that a girl with a pig-tail stopped by his house.
At Zell’s house he will ask about the girl. The player must have Zell in the party and sleep in the Balamb Hotel. Upon waking the party notices Zell is gone, and find him downstairs where he’s having a conversation with the Pigtail Girl, who hands over the Combat King 003.
4) Combat King 004 – Different Beat:
The player must speak to a lone Esthar soldier on a bridge near the Airstation during Lunatic Pandora’s attack on Esthar City, while controlling Zell.

5) Combat King 005 – Final Heaven:
Inside Lunatic Pandora, on the path leading left from Elevator 03’s basement. Can only be found if the player chose to trigger the red detonator during Laguna’s second dream sequence.
Pet Pals Magazines:
1) Pet Pals Vol. 1:
Obtained from Zell on the train to Timber. Also sold in Esthar Book Store. Walk for approximately 800 steps to learn Angelo Strike.
2) Pet Pals Vol. 2:
Found on Rinoa’s bed on the Forest Owls train. Also sold in Esthar Book Store. Walk for approximately 200 steps to learn Angelo Recover.
3) Pet Pals Vol. 3:
Can be bought in Timber’s Pet Shop. Walk for approximately 900 steps to learn Invincible Moon.
4) Pet Pals Vol. 4:
Can be bought in Timber’s Pet Shop. Walk for approximately 250 steps to learn Angelo Reverse.
5) Pet Pals Vol. 5:
Can be bought in Esthar’s Pet Shop. Walk for approximately 400 steps to learn Angelo Search.
6) Pet Pals Vol. 6:
Can be bought in Esthar’s Pet Shop. Walk for approximately 1010 steps to learn Wishing Star.
Occult Fan Magazines:
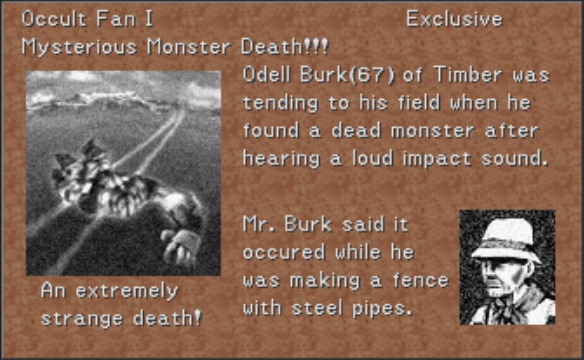
1) Occult Fan I:
The magazine is found on a bookshelf in the library in Balamb Garden. It features a story about Odell Burke, who heard a loud noise while making a fence out of steel pipes, only to discover a dead monster as if it was hit by a runaway train. This magazine gives clues for the player on one of three items needed to obtain Doomtrain – the Steel Pipe. The dead monster appears to be a Wendigo, one of the two enemies where Steel Pipes can
2) Occult Fan II:
After winning a game of Triple Triad against the pub owner in Dollet, the magazine is found by repeatedly examining the magazine stacks on the floor in his ‘private room’. It features the sighting of a UFO, said to happen during a major Malboro outbreak. It points out where to find the UFO after four encounters with it – the Grandidi Forest near Esthar, where Malboros are found. It points out one of the three items needed to obtain Doomtrain – the Malboro Tentacle.
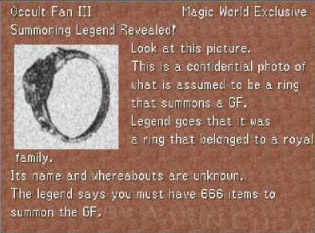
3) Occult Fan III:
The magazine is obtained from the Master Fisherman as soon as the party reaches Fishermans Horizon (down the ladder on the third screen). It features the item used to summon Doomtrain – the Solomon’s Ring and describes the quantity of additional items needed to be used with the Solomon’s Ring.

4) Occult Fan IV:
The magazine is obtained from the Presidential Aide in the Presidential Palace in Esthar. The player must leave the Palace, talk to another aide at the Esthar Airstation and come back to find it. Can only be obtained before Lunar Cry. The magazine features two unidentified beings, but also hints on the third item needed to obtain Doomtrain – a Remedy+.
Timber Maniacs Magazine:

1) Timber Maniacs 1:
Balamb, Train Station or 2nd floor of the Inn.
2) Timber Maniacs 2:
Timber, Timber Maniacs Office Building.
3) Timber Maniacs 3:
Timber, Hotel Guest Room.
4) Timber Maniacs 4:
Fishermans Horizon, Grease Monkey’s House.
5) Timber Maniacs 5:
Fishermans Horizon, Hotel Guest Room.
6) Timber Maniacs 6:
Trabia Garden, Graveyard.
7) Timber Maniacs 7:
Dollet, Hotel Guest Room.
8) Timber Maniacs 8:
Dollet, Pub.
9) Timber Maniacs 9:
Shumi Village, Artisan’s House.
10) Timber Maniacs 10:
White SeeD Ship, Bridge.
11) Timber Maniacs 11:
Edea’s Orphanage, Inside the house.
12) Timber Maniacs 12:
Deling City, Under the bed in the hotel room.
Refining Items
1) Ammo-RF for Irvine’s Limit Break, Shot:
Bomb Fragment: 1 = 20 Fire Ammo
Cactus Thorn: 1 = 40 Demolition Ammo
Chef’s Knife: 1 = 20 AP Ammo
Energy Crystal: 1 = 10 Pulse Ammo
Fuel: 1 = 10 Fire Ammo
Laser Cannon: 1 = 5 Pulse Ammo
Missile: 1 = 20 Demolition Ammo
Normal Ammo: 1 = 1 Fast Ammo
Poison Powder: 1 = 10 Dark Ammo
Power Generator: 1 = 20 Pulse Ammo
Red Fang: 1 = 40 Fire Ammo
Running Fire: 1 = 40 Demolition Ammo
Screw: 1 = 8 Normal Ammo
Sharp Spike: 1 = 10 AP Ammo
Shotgun Ammo: 1 = 2 Fast Ammo
Venom Fang: 1 = 20 Dark Ammo
2) F Mag-RF:
Bomb Fragment: 1 = 20 Fira
Bomb Spirit: 1 = 100 Firaga
Flare Stone: 1 = 1 Flare
Inferno Fang: 1 = 20 Flare
Magic Stone: 1 = 5 Fira
M-Stone Piece: 1 = 5 Fire
Phoenix Spirit: 1 = 100 Firaga
Red Fang: 1 = 20 Firaga
Wizard Stone: 1 = 5 Firaga
3) Forbid Mag-RF:
Dark Matter: 1 = 100 Ultima
Energy Crystal: 1 = 3 Ultima
Meteor Stone: 1 = 1 Meteor
Pulse Ammo: 5 = 1 Ultima
Star Fragment: 1 = 5 Meteor
Ultima Stone: 1 = 1 Ultima
4) Forbid Med-RF:
Adamantine: 5 = 1 Vit Up
Aegis Amulet: 2 = 1 Spd Up
Doc’s Code: 1 = 1 Megalixir
Elem Atk: 1 = 4 Elixir
Elem Guard: 1 = 4 Elixir
Gaea’s Ring: 1 = 1 HP Up
Hundred Needles: 1 = 1 Spd Up
Hyper Wrist: 10 = 1 Str Up
Jet Engine: 50 = 1 Spd Up
Knight’s Code: 1 = 1 Vit Up
Luck-J Scroll: 1 = 1 Luck Up
Magic Armlet: 10 = 1 Spr Up
Med Kit: 1 = 1 Megalixir
Mega-Potion: 20 = 1 Elixir
Monk’s Code: 1 = 1 Str Up
Rocket Engine: 5 = 1 Spd Up
Royal Crown: 10 = 1 Mag Up
Shaman Stone: 10 = 1 Hero-trial *NOTE: Doomtrain must be Level 100*
Status Atk: 1 = 4 Elixir
Status Guard: 1 = 4 Elixir
5) GFAbl Med-RF:
Adamantine: 20 = 1 Steel Curtain
Aegis Amulet: 10 = 1 Giant’s Ring
Barrier: 50 = 1 Aegis Amulet
Bomb Fragment: 100 = 1 Bomb Spirit
Cactus Thorn: 100 = 1 Hundred Needles
Dark Matter: 1 = 1 Luck-J Scroll
Diamond Armor: 5 = 1 Elem Guard
Dragon Fang: 100 = 1 Med Kit
Dragon Skin: 100 = 1 Glow Curtain
Elixir: 10 = 1 Doc’s Code
Energy Crystal: 50 = 1 Samantha Soul
Force Armlet: 10 = 1 Magic Armlet
Giant’s Ring: 10 = 1 Gaea’s Ring
Glow Curtain: 2 = 1 Monk’s Code
Gold Armor: 5 = 1 Diamond Armor
Holy War: 5 = 1 Knight’s Code
HP-J Scroll: 10 = 1 Giant’s Ring
HP Up: 2 = 1 HP-J Scroll
Hypno Crown: 10 = 1 Royal Crown
Jet Engine: 10 = 1 Rocket Engine
Lightweight: 100 = 1 Accelerator
Luck-J Scroll: 1 = 1 Luck Up
Luck Up: 2 = 1 Luck-J Scroll
Mag-J Scroll: 10 = 1 Force Armlet
Mag Up: 2 = 1 Mag-J Scroll
Magic Armlet: 20 = 1 Moon Curtain
Malboro Tentacle: 100 = 1 Moon Curtain
Orihalcon: 10 = 1 Adamantine
Phoenix Pinion: 20 = 1 Phoenix Spirit
Power Wrist: 10 = 1 Hyper Wrist
Ribbon: 1 = 1 Status Guard
Rosetta Stone: 1 = 1 Shaman Stone
Royal Crown: 20 = 1 Status Atk
Samantha Soul: 20 = 1 Elem Atk
Shaman Stone: 1 = 1 Rosetta Stone
Silver Mail: 10 = 1 Gold Armor
Spd-J Scroll: 10 = 1 Jet Engine
Spd Up: 2 = 1 Spd-J Scroll
Spr-J Scroll: 10 = 1 Hypno Crown
Spr Up: 2 = 1 Spr-J Scroll
Str-J Scroll: 10 = 1 Power Wrist
Str Up: 2 = 1 Str-J Scroll
Vit-J Scroll: 10 = 1 Orihalcon
Vit Up: 2 = 1 Vit-J Scroll
Whisper: 100 = 1 Healing Ring
6) GFRecov Med-RF:
Diamond Armor: 1 = 16 Pet House
Gold Armor: 1 = 4 Pet House
Healing Mail: 1 = 1 Pet House
Healing Ring: 1 = 20 G-Mega-Potion
Healing Water: 1 = 2 G-Hi-Potion
Life Ring: 1 = 2 G-Returner
Mesmerize Blade: 1 = 1 G-Hi-Potion
Pet House: 1 = 2 G-Returner
Phoenix Spirit: 1 = 40 G-Returner
Regen Ring: 1 = 6 G-Returner
Silver Mail: 1 = 2 Pet House
Whisper: 1 = 4 G-Hi-Potion
7) High Mag-RF:
Fira: Firaga (5-1)
Blizzara: Blizzaga (5-1)
Thundara: Thundaga (5-1)
Aero: Tornado (10-1)
Cura: Curaga (5-1)
Double: Triple (10-1)
8) I Mag-RF:
Arctic Wind: 1 = 20 Blizzara
Fish Fin: 1 = 20 Water
Magic Stone: 1 = 5 Blizzara
M-Stone Piece: 1 = 5 Blizzard
North Wind: 1 = 20 Blizzaga
Water Crystal: 1 = 50 Water
Wizard Stone: 1 = 5 Blizzaga
9) L Mag-RF:
Chef’s Knife: 1 = 30 Death
Cottage: 1 = 20 Curaga
Dead Spirit: 1 = 20 Death
Death Stone: 1 = 1 Death
Healing Ring: 1 = 100 Curaga
Healing Water: 1 = 20 Cura
Holy Stone: 1 = 1 Holy
Life Ring: 1 = 20 Life
Magic Stone: 1 = 5 Cura
M-Stone Piece: 1 = 5 Cure
Mesmerize Blade: 1 = 20 Regen
Moon Stone: 1 = 20 Holy
Phoenix Spirit: 1 = 100 Full-Life
Regen Ring: 1 = 20 Full-Life
Saw Blade: 1 = 10 Death
Tent: 1 = 10 Curaga
Whisper: 1 = 50 Curaga
Wizard Stone: 1 = 5 Curaga
Holy Water: 1 = 2 Zombie
Zombie Powder: 1 = 20 Zombie
10) Med LV Up:
Elixir: 10 = 1 Megalixir
Hero: 10 = 1 Holy War-trial
Hero-trial: 10 = 1 Hero
Hi-Potion: 3 = 1 Hi-Potion+
Hi-Potion+: 3 = 1 X-Potion
Holy War-trial: 10 = 1 Holy War
Phoenix Down: 50 = 1 Mega Phoenix
Potion: 3 = 1 Potion+
Potion+: 3 = 1 Hi-Potion
Remedy: 10 = 1 Remedy+
Remedy+: 10 = 1 Elixir
X-Potion: 3 = 1 Mega-Potion
11) Mid Mag-RF:
Fire: Fira (5-1)
Blizzard: Blizzara (5-1)
Thunder: Thundara (5-1)
Cure: Cura (5-1)
12) Recov Med-RF:
Cottage: 2 = 1 Mega-Potion
Healing Mail: 1 = 6 Hi-Potion
Healing Ring: 1 = 20 Mega-Potion
Healing Water: 1 = 2 Hi-Potion
Life Ring: 1 = 2 Phoenix Down
Mesmerize Blade: 1 = 2 Mega-Potion
Phoenix Spirit: 1 = 100 Phoenix Down
Regen Ring: 1 = 8 Phoenix Down
Tent: 4 = 1 Mega-Potion
13) ST Mag-RF:
Antidote: 1 = 1 Bio
Betrayal Sword: 1 = 20 Confuse
Cockatrice Pinion: 1 = 20 Break
Curse Spike: 1 = 10 Pain
Echo Screen: 1 = 2 Silence
Eye Drops: 1 = 1 Blind
Soft: 1 = 3 Break
Magic Stone: 1 = 5 Berserk
Malboro Tentacle: 1 = 40 Bio
M-Stone Piece: 1 = 5 Silence
Mystery Fluid: 1 = 10 Meltdown
Ochu Tentacle: 1 = 20 Blind
Silence Powder: 1 = 20 Silence
Sleep Powder: 1 = 20 Sleep
Steel Pipe: 1 = 20 Berserk
Wizard Stone: 1 = 5 Bio
14) ST Med-RF:
Betrayal Sword: 1 = 1 Remedy
Cockatrice Pinion: 1 = 3 Soft
Curse Spike: 1 = 1 Remedy
Dragon Fang: 1 = 1 Remedy
Malboro Tentacle: 1 = 2 Remedy
Med Kit: 1 = 20 Remedy
Ochu Tentacle: 1 = 3 Eye Drops
Poison Powder: 1 = 3 Antidote
Silence Powder: 1 = 3 Echo Screen
Sleep Powder: 5 = 1 Remedy
Venom Fang: 1 = 10 Antidote
Zombie Powder: 1 = 3 Holy Water
15) Supt Mag-RF:
Aura Stone: 1 = 1 Aura
Barrier: 1 = 40 Shell
Dragon Fang: 1 = 20 Esuna
Dragon Skin: 1 = 20 Reflect
Fury Fragment: 1 = 5 Aura
Giant’s Ring: 1 = 60 Protect
Glow Curtain: 1 = 100 Reflect
Magic Stone: 1 = 5 Dispel
Med Kit: 1 = 100 Esuna
Moon Curtain: 1 = 100 Shell
M-Stone Piece: 1 = 5 Esuna
Protect Stone: 1 = 1 Protect
Rune Armlet: 1 = 40 Shell
Saw Blade: 1 = 20 Dispel
Shell Stone: 1 = 1 Shell
Steel Curtain. 1 = 100 Protect
Turtle Shell: 1 = 30 Protect
Vampire Fang: 1 = 20 Drain
Wizard Stone: 1 = 20 Dispel
16) T Mag-RF:
Coral Fragment: 1 = 20 Thundara
Dynamo Stone. 1 = 20 Thundaga
Magic Stone: 1 = 5 Thundara
M-Stone Piece: 1 = 5 Thunder
Shear Feather: 1 = 20 Aero
Windmill: 1 = 20 Tornado
Wizard Stone: 1 = 5 Thundaga
17) Time Mag-RF:
Accelerator: 1 = 100 Haste
Black Hole: 1 = 30 Demi
Dino Bone: 1 = 20 Quake
Dragon Fin: 1 = 20 Double
Lightweight: 1 = 20 Haste
Magic Stone: 1 = 5 Haste
M-Stone Piece: 1 = 5 Slow
Rocket Engine: 1 = 50 Triple
Samantha Soul: 1 = 60 Triple
Spider Web: 1 = 20 Slow
Steel Orb: 1 = 15 Demi
Three Stars: 1 = 100 Triple
Wizard Stone: 1 = 5 Stop
Card’s Convert for Items
Level 1 – Monster Card
Geezard: 1 = 5 Screw
Funguar: 1 = 1 M-Stone Piece
Bite Bug: 1 = 1 M-Stone Piece
Red Bat: 1 = 1 Vampire Fang
Blobra: 5 = 1 Rune Armlet
Gayla: 1 = 1 Mystery Fluid
Gesper: 1 = 1 Black Hole
Fastitocalon-F: 5 = 1 Water Crystal
Blood Soul: 1 = 1 Zombie Powder
Caterchipillar: 1 = 1 Spider Web
Cockatrice: 1 = 1 Cockatrice Pinion
Level 2 – Monster Card
Grat: 1 = 1 Magic Stone
Buel: 1 = 1 Magic Stone
Mesmerize: 1 = 1 Mesmerize Blade
Glacial Eye: 1 = 1 Arctic Wind
Belhelmel: 1 = 1 Saw Blade
Thrustaevis: 1 = 1 Shear Feather
Anacondaur: 1 = 1 Venom Fang
Creeps: 1 = 1 Coral Fragment
Grendel: 1 = 1 Dragon Fin
Jelleye: 1 = 1 Magic Stone
Grand Mantis: 1 = 1 Sharp Spike
Level 3 – Monster Card
Forbidden: 1 = 1 Betrayal Sword
Armadodo: 1 = 1 Dino Bone
Tri-Face: 1 = 1 Curse Spike
Fastitocalon: 1 = 1 Water Crystal
Snow Lion: 1 = 1 North Wind
Ochu: 1 = 1 Ochu Tentacle
SAM08G: 1 = 1 Running Fire
Death Claw: 1 = 1 Sharp Spike
Cactuar: 1 = 1 Cactus Thorn
Tonberry: 1 = 1 Chef’s Knife
Abyss Worm: 1 = 1 Windmill
Level 4 – Monster Card
Turtapod: 5 = 1 Healing Mail
Vysage: 1 = 1 Wizard Stone
T-Rexaur: 2 = 1 Dino Bone
Bomb: 1 = 1 Bomb Fragment
Blitz: 1 = 1 Dynamo Stone
Wendigo: 1 = 1 Steel Orb
Torama: 5 = 1 Life Ring
Imp: 1 = 1 Wizard Stone
Blue Dragon: 4 = 1 Fury Fragment
Adamantoise: 3 = 1 Turtle Shell
Hexadragon: 3 = 1 Red Fang
Level 5 – Monster Card
Iron Giant: 3 = 1 Star Fragment
Behemoth: 10 = 1 Barrier
Chimera: 10 = 1 Regen Ring
PuPu: 1 = 1 Hungry Cookpot
Elastoid: 1 = 1 Steel Pipe
GIM47N: 1 = 1 Fast Ammo
Malboro: 4 = 1 Malboro Tentacle
Ruby Dragon: 10 = 1 Inferno Fang
Elnoyle: 10 = 1 Energy Crystal
Tonberry King: 1 = 1 Chef’s Knife
Wedge, Biggs: 1 = 1 X-Potion
Level 6 – Boss Card
Fujin, Raijin: 1 = 1 X-Potion
Elvoret: 1 = 10 Death Stone
X-ATM092: 2 = 1 Turtle Shell
Granaldo: 1 = 1 G-Returner
Gerogero: 10 = 1 Circlet
Iguion: 1 = 1 Cockatrice Pinion
Abadon: 1 = 30 Dark Ammo
Trauma: 1 = 30 Demolition Ammo
Oilboyle: 1 = 30 Fire Ammo
Shumi Tribe: 5 = 1 Gambler Spirit
Krysta: 1 = 10 Holy Stone
Level 7 – Boss Card
Propagator: 1 = 1 G-Mega-Potion
Jumbo Cactuar: 1 = 1 Cactus Thorn
Tri-Point: 40 = 1 Jet Engine
Gargantua: 10 = 1 Strength Love
Mobile Type 8: 1 = 10 Shell Stone
Sphinxara: 1 = 1 G-Mega-Potion
Tiamat: 1 = 10 Flare Stone
BGH251F2: 1 = 10 Protect Stone
Red Giant: 1 = 5 Meteor Stone
Catoblepas: 1 = 1 Rename Card
Ultima Weapon: 1 = 1 Ultima Stone
Level 8 – GF Card
Chubby Chocobo: 1 = 100 LuvLuvG
Angelo: 1 = 100 Elixir
Gilgamesh: 1 = 10 Holy War
MiniMog: 1 = 100 Pet House
Chicobo: 1 = 100 Gysahl Greens
Quezacotl: 1 = 100 Dynamo Stone
Shiva: 1 = 100 North Wind
Ifrit: 1 = 3 Elem Atk
Siren: 1 = 3 Status Atk
Sacred: 1 = 100 Dino Bone
Minotaur: 1 = 10 Adamantine
Level 9 – GF Card
Carbuncle: 1 = 3 Glow Curtain
Diablos: 1 = 100 Black Hole
Leviathan: 1 = 3 Doc’s Code
Odin: 1 = 100 Dead Spirit
Pandemona: 1 = 100 Windmill
Cerberus: 1 = 100 Lightweight
Alexander: 1 = 3 Moon Curtain
Phoenix: 1 = 3 Phoenix Spirit
Bahamut: 1 = 100 Megalixir
Doomtrain: 1 = 3 Status Guard
Eden: 1 = 3 Monk’s Code
Level 10 – Player Card
Ward: 1 = 3 Gaea’s Ring
Kiros: 1 = 3 Accelerator
Laguna: 1 = 100 Hero
Selphie: 1 = 3 Elem Guard
Quistis: 1 = 3 Samantha Soul
Irvine: 1 = 3 Rocket Engine
Zell: 1 = 3 Hyper Wrist
Rinoa: 1 = 3 Magic Armlet
Edea: 1 = 3 Royal Crown
Seifer: 1 = 3 Diamond Armor
Squall: 1 = 3 Three Stars
Chocobo Forest – Side Quests Part 1
Make your way towards Shumi Village if you are not close to it already. Just behind Shumi Village you will notice a small, round forest which is the “Chocobo Forest: Beginner” for the start of the Chocobo Forest side quest.
Once inside the forest you will meet up with Chocoboy. Tell him that you want to catch a Chocobo. Chocoboy will offer you a whistle for catching Chocobos called a [ChocoWhis]. I will give you an explanation on how to complete the quests within this guide, but for 1,000 Gil it really cannot hurt to listen to Chocoboy’s explanation as well.
You will have access to two different whistles:

[ChocoSonar] is used to determine the Chicobo’s locations
[ChocoZiner] is used to draw out the Chicobos
Press Square to switch between the ChocoSonar to locate, the ChocoZiner to catch. Start by selecting the ChocoSonar and press Triangle until the bar rises and the sound effect changes and then switch to the ChocoZiner to call down the Chicobos. Once you are able to get just one Chicobo to drop talk to it to call over the mother Chocobo. Once you have found called down the mother Chocobo you can have her assist you with finding items by continuing to press Triangle. If you drop more than just the one Chicobo you can leave the forest to restart.
The screenshots below will assist you with locating both the single Chicobo and the treasures within each forest. Stand exactly where Squall is shown in each of the screenshots to drop the Chicobos and to receive the item.
Chocobo Forest: The Beginner’s Forest
(located near Shumi Village on Winter Island)
Use the ChocoZiner at the back left area of the screen to call down the single Chicobo and talk to it to make the mother Chocobo appear. Dig for items at the back right area of the screen and you will find an [Aura Stone].
Chocobo Forest: The Roaming Forest
(located north of Trabia Garden in a place called the Bika Snowfield)


Start by sounding the ChocoZiner right near where Chocoboy is standing to drop two Chicobos. Then stand between both Chicobos and blow the whistle to see a third drop and for all three to disappear. Walk towards the entrance and stand in front of the fallen log – call down another Chicobo. Talk to that Chicobo and mommy will arrive. To find the item you will need to stand at the far back of the screen behind where the mother Chocobo is standing to find a [Shell Stone] and a [Holy Stone].
Chocobo Forest: The Forest of Solitude
(located on the continent of Centra which is on the lower third of the map – but on the northern most point of the continent)


Finding the lone Chicobo can be pretty painful on this map. Be sure to stand exactly where Squall is shown in the screenshot to the right. It may take a few tries. After you call over the mother Chocobo you will need to challenge Chocoboy to a game of cards to get him to move, though you don’t actually have to play. He is standing on the spot where you need to dig to find a [Protect Stone], a [Meteor Stone] and five [Gysahl Greens].


Chocobo Forest – Side Quests Part 2
Chocobo Forest: The Forest of Fun
(located on the south-western portion of Centra, the southernmost grouping of continents – you can ride a Chocobo there from the Forest of Solitude)
Use the ChocoZiner in each of the spots shown in the screenshots below (twice in the last spot). Dig in the last spot to receive a [Meteor Stone], a [Flare Stone] and an [Ultima Stone]. Hop on the Chocobo to make it to the next spot.
Chocobo Forest: The Enclosed Forest
(located on the south-eastern most portion of Centra)


Use the ChocoZiner in each of the spots where Squall is shown standing in the screenshots. Dig in the last spot to receive a [Meteor Stone], [Holy Stone] and an [Ultima Stone].
Chocobo Forest: The Enclosed Forest
(located on the northern tip of Centra in a place called the Grandidi Forest, which is the large continent on the east side of the map. It is impossible to take Balamb Garden over to this continent because there is nowhere to land. The only way to get to The Forest of Solitude is by riding a Chocobo over to Centra. Start off in the Roaming Forest and hop on a Chocobo and ride it over to the next forest.)


Walk into the middle of the forest to complete the quest by watching the Chocobo dance. Talk to the leftover Chicobo to receive the Chicobo Card (though the game incorrectly calls it the Chocobo Card).
You can now use the Chicobo Card to complete the next part of the Queen of Cards side quest to win the Chubby Chocobo Card. Go back into the Chocobo Sanctuary to grab a Chocobo to get off this part of the continent.

UFOs & PuPu Card – Side Quest
Did you happen to notice that, despite all of your card playing, there is a blank spot on page 5 for a missing Level 5 Monster Card? The card you are missing is the PuPu Card that is obtained through the UFO side quest.
Be sure that you have at least 5 [Elixir]s in your inventory before you begin the quest. You can buy Elixirs from the shop in Esthar (called “Esthar Shop!!!”). If you have Tonberry’s “Call Shop” ability you can pull up “Esthar Shop!!!” from anywhere. If not, you will have to travel to Esthar to make the purchase.


In order to make the process much smoother and easier you should junction Diablos’ “Enc-None” ability so that you are not forced into any battles against regular monsters. You will still be able to find and locate the UFO with this ability enabled.
You now have to locate a UFO in 4 specific locations noted below:
– Winhill Bluffs: The area surrounding the town of Winhill
– Mandy Beach: Northeast of Timber
– Heath Peninsula: Small island east of Trabia Garden
– Kashkabald Desert: Just east of Cactuar Island
Once you have seen the UFO in each of these locations you can continue with the rest of the quest. Head over to the Grandidi Forest, which is the forest surrounding The Chocobo Sanctuary.


Land Ragnarok at the top of the canyon (there are very few non-forested areas to land) and wander around until you encounter the UFO. Similar to the last encounters, you can leave “Enc-None” on until you find the UFO. Destroy it once you finally do encounter it in order to continue the quest.
Final reminder: Make sure you have 5 [Elixir]s in your inventory and make sure that at least one of your characters has the Item command enabled.

Fly over to the crater where Balamb Garden used to be. Wander around the crater area until you find PuPu and again, you can leave the “Enc-None” ability enabled. Feed PuPu 5 [Elixir]s once you find him.
At the conclusion of the battle you will receive the PuPu Card.


Obel Lake Side Quest – Part 1
The rewards for completing this side quest include a [Three Stars] and a [Luck-J Scroll], which are really nothing special, so its at this point that you have to decide whether you really want to complete this lengthy side quest for such a lackluster reward. The choice is yours.
Note: Junction Diablos’ “Enc-None” ability to make sure that you do not wind up in a bunch of random monster encounters during this quest. Having “Enc-None” junctioned will not interfere with the quest in any way.
Make your way over to the town of Timber. To north of Timber is a Obel Lake and there is a peninsula jutting out across it. Walk out on to the peninsula and press X until a window pops up that says:
This must be Obel Lake:
– Throw a rock
– Try humming
Choose the “try humming” option and continue to choose that option until a shadow approaches and speaks to you. Keep speaking to it until it tells you about his friend (“It’s my friend, Mr. Monkey… Can you find him for me?”). If you continue to talk to the shadow it will offer more hints as to where you can find Mr. Monkey.


Before you leave, press X while on the peninsula and this time choose to throw a rock. Keep throwing rocks until you receive the message “The rock skipped many many times.” Once you receive this message you can head over to find Mr. Monkey.
Mr. Monkey can be found in the forest west of Dollet. When you find the Monkey you will be given two options; you can either throw a rock at the monkey or sing to it. Choose to throw a rock. It may take a try or two, but if the last rock you threw at Obel Lake “skipped many many times” the monkey should eventually throw a rock back at you with a bunch of letters on it (U R H A E O).


Head back to Obel Lake and speak with the black shadow to start receiving clues as to where the other rocks are located. In each of the areas mentioned below just keep pressing X until you find the rock. Each time you find the rock make your way back to the black shadow at Obel Lake to receive your next clue.
Here are some of the clues you will receive:
Obel Lake Side Quest – Part 2
“You’ll find something on an island east of Timber, too.”
The island you are looking for is located east of Timber (obviously). There are two islands in that area; a larger island with a beach to the south and a smaller island with no beaches to the north. The rock is found on the small island to the north. (R E A I D R)

“There’s also something on top of a mountain with a lake and a cavern.”
Hop into the Ragnarok and fly over timber. Trace the train tracks heading west out the city along until they cross a river that leads to a waterfall to the north coming out of the mountain. Land on this mountain and wander around this mountain pressing X until you see the message “A bird is warming an egg.” Choose to “Check it out” and you will be thrown into battle against two Thrustaevis’. After the battle you will receive one of the rocks. (E A S N P D)

“At the beach in Balamb, something special washes ashore at times.”
Fly over to Balamb and wander around the only beach that the tiny island has. You may find plenty of fake rocks during this portion of the search, but just keep looking. (S T S L R M)

Note: If you see any other clues you should ignore them and speak to the shadow again. The other clues lead to (useless) draw points for magic.
Go back to Obel Lake once you have all four rocks. The game does not give much away in terms of clues for solving this puzzle, but essentially you can read it from the top right letter first, and going down it reads “MORDRED PLAINS HAS TREASURE”.

Fly over to Mordred Plains which is an area located to the north of Esthar city. It is enclosed by a mountain range to the north and to the south, so it is only accessible by flying in.
As you wander through this area you will find all kinds of rocks. Ignore all of the rocks except for the “red-faced” rocks that will tell you the exact opposite direction that you should go. So, for example, if you an encounter a “red-faced” rock that says:
“The red-faced rock tells you angrily “The treasure’s to the north!”
Then you should head south! You can also keep talking to the red rocks as they may be able to tell you two directions that you should head at once.
Keep wandering around until you encounter a “red-faced” rock that says “The treasure’s not here!” and you are done. Once you have obtained the [Three Stars] the quest is completed.

Conversion Levels of Squall’s Gun Blade
1): Revolver
6 Spell Splitter, 2 Screws = 100 Gil
2): Kiastraight
1 Iron Pipe, 4 Screws = 200 Gil
3): Edge trigger
1 Mesmerize Blade, 8 Screws = 400 Gil
4): Flame-Tan
1 Betrays explanation rings, 1 Toad Tank, 4 Screws = 600 Gil
5): Gap Lance
1 Dino Bone, 2 Red Tusks, 12 Screws = 800 Gil
6): Offense & Punishment
1 kitchen knife, 2 Star Splitter, 1 Toad Tanks, 8 Screws = 1,000 Gil
7): Lionheart
Adamantine, 4 Dragon Teeth, 12 Pulsar Ammo = 2,000 Gil
Conversion Levels of Rinoa’s Blaster Edges
1): Pinwheel
3x [M-Stone Piece] = 100 Gil
2): Valkyrie
1x [Shear Feather] + 1x [Magic Stone] = 200 Gil
3): Rising Sun
1x [Saw Blade] + 8x [Screw] = 400 Gil
4): Cardinal
1x [Cockatrice Pinion] + 1x [Mesmerize Blade] + 1x [Sharp Spike] = 800 Gil
5): Shooting Star
2x [Windmill] + 1x [Regen-Ring] + 1x [Force Armlet + 2x [Energy Crystal] = 1000 Gil
Conversion Levels of Quistis Whips
1): Chain Whip
2x [M-Stone Piece] + 1x [Spider Web] = 100 Gil
2): Slaying Tail
2x [Magic Stone] + 1x [Sharp Spike] = 200 Gil
3): Red Scorpion
2x [Ochu Tentacle] + 2x [Dragon Skin] = 400 Gil
4): Save the Queen
2x [Cockatrice Pinion] + 4x [Sharp Spike] + 4x [Energy Crystal] = 800 Gil
Conversion Levels of Xells Gloves
1):Metal Ankle
1 Fish Fin, 4 Magic Splitter = 100 Gil
2):Maverick
1 Dragon Scale, 1 Cobweb = 200 Gil
3):Gauntlet
1 Snakeskin, 1 Battle Chunks = 400 Gil
4):Ambition
1 Adamantine, 4 Snake Skins, 1 Battle Chunks = 800 Gil
Conversion Levels of Selphie’s Nunchaku
1): Flail
2x [M-Stone Piece] + 1x [Bomb Fragment] = 100 Gil
2): Morning Star
2x [Steel Orb] + 2x [Sharp Spike] = 200 Gil
3): Crescent Wish
1x [Inferno Fang] + 1x [Life Ring] + 4x [Sharp Spike] = 400 Gil
4): Strange Vision
1x [Adamantine] + 3x [Star Fragment] + 2x [Curse Spike] = 800 Gil
Conversion Levels of Irvine’s Shotgun
1): Valiant
1x [Steel Pipe] + 4x [Screw] = 100 Gil
2): Ulysses
1x [Steel Pipe] + 1x [Bomb Fragment] + 2x [Screw] = 200 Gil
3): Bismarck
2x [Steel Pipe] + 4x [Dynamo Stone] + 8x [Screw] = 400 Gil
4): Exeter
2x [Dino Bone] + 1x [Moon Stone] + 2x [Star Fragment] + 18x [Screw] = 800 Gil