Overview
This is a guide to explain how the AI percentage system works and how to organize movesets for your edits. This will mostly be based on my experience with the earlier Fire Pro Games – Fire Pro D and Fire Pro X Special until I have a full examination of the game systems.
Introduction
Since this game is merely days old, most of the information in this guide will be based on previous experience with Fire Pro games. I started with the SNES Fire Pro X Special and graduated to Fire Pro D years later.
About the Author: Long time shoot-style fan, Volk Han worshiper and grappler of over 20 years now. Hard-core gamer and game modder.
Overview & General Terms
In the AI system, almost all AI choices are based on what condition your opponent is in. This is for almost 90% of the menu choices. For those that are based on other conditions (such as what condition your wrestler is in) I will note them with emphasis.
Logic Example
PLEASE NOTE: THIS IS A COMPOSITE IMAGE THAT DOES NOT APPEAR IN THE GAME. IT WAS CONSTRUCTED TO SHOW ALL OPTIONS IN ONE IMAGE.
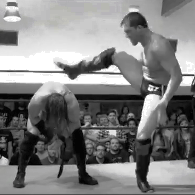
Column Descriptions
Controls: This will either detail the controls to execute the moveset (technique/move) or the situation in which it is relevant (At Legs).
Sml Dmg: Small Damage – This is the initial state of the wrestler up to light damage.
Med Dmg: Medium Damage – Your wrestler can start going for bigger techniques now like suplexes. This option isn’t always relevant. Also, please note, this portion of a match is much shorter than you think.
Lrg Dmg: Large Damage – This is when the opponent is spent. Finishes and signature techniques should be used now.
Opp. Condition Critical: The opponent either has either took a critical that somehow didn’t finish them, or they’ve taken horrific damage from beating far past the point where they could be finished. THIS OPTION IS RARELY THERE.
Match Psychology / Pacing
Much of this game is built around the psychology of an All Japan match than any other resu league: Small moves build up to bigger moves which lead to a finish sequence. If you attack with larger moves earlier in a match, expect to be countered constantly. Going for Undertaker’s or Kota Ibushi’s Last Ride in the first 30 seconds of a match will get you countered.
Now, with certain special skills, this psychology can be changed to make the wrestlers more like US wrestling leagues, or quick finish artists (like Goldberg) or even shootfighters / MMA fighters with quick kill KO or submission skills, but by default with evenly matched wrestlers it’s an AJPW 10+ minute match.
Please note that this psychology and pacing does change somewhat depending on the wrestling style chosen.
Technique Damage
- ‘Small’ Button – Opponent recovers quickly after grappling technique, opponent not knocked down from a strike.
- ‘Medium’ button – Opponent recovers slowly after grappling technique, opponent not knocked down from a strike.
- ‘Large’ button – Opponent recovers quickly but is dazed after grappling technique, opponent most likely knocked down from a strike.
- ‘Small’ + ‘Medium’ button – Opponent recovers slowly after grappling technique, opponent almost always knocked down from a strike.
How determine Opponent Damage
How the wrestler stands after a knockdown or grappling technique provides a visual cue of what condition the opponent is in. The breathing and stance is as follows:
(more later)
Wrestler Style & Match Logic
Much of this is based around LordMo’s work at
I am just going to cover this briefly, since most of it is being covered in Dank K’s Wrestler Styles guide.
Link to Stat Sheet: [link]
Orthodox: Traditional Japanese style babyface wrestler. This is generally not the style of American wrestlers. Good all around except with rough housing. They are even surprisingly good at MMA. Good examples of this are Okada and Hiroshi Tanahashi.
Technician: A technique wrestler who is slick with roll ups and pins. Examples: Dean Malenko, Harley Race, [Redacted Murderer-Wrestler].
Wrestling: Amateur wrestling suplex masters. Pretty good at pro-wrestling but can also work well in shoot fights and MMA matches. Prime Examples: Jeff Cobb, Gary Albright, Dan Severn (in UWFi).
Ground: Ground based submission pro-wrestlers. They only look to get you to the mat and make you suffer. These are few and far between, but Zack Sabre Jr and old man Fujiwara are the main examples.
Power: Brutes with massive arm power and great roughhousing skills. Almost all baby face American wrestlers fall under this style. Examples are Hull Kogan, Vader and Ultimate Warrior
American: While at first blush, this would seemingly apply to all American wrestlers, but it more references the old school NWA wrestlers. Also, Garbage/Hardcore wrestlers are generally ‘American’ style. Dusty Rhodes and Terry ‘WTF’ Funk are the best examples.
Junior: A smaller wrestler with a good mix of flying, submission, striking and technical skills. The stats here can look rather unbalanced, but generally juniors and are built with smaller point totals than heavyweights. Kushida and Brian Kendrick are prime examples.
Luchador: The definition of high flyers. Not as well balanced as Juniors, but stronger in technical criticals and stretch submissions (weirdly enough). Pentagon Jr, Will Osprey and Ricochet are prime examples, but also Neville and even TJP.
Heel: Want straight up bull$#!+ in your matches? Here ya go! Fork people in the head, hit them with weapons, bite their faces! This is what they are built for. What they aren’t built for is for actually wrestling, or any sort of long match. Abdullah the Butcher and Tiger Jeet Singh are prime examples. (non-athletic wrestlers, when they get old, go here to die)
Mysterious: Weird wrestler. Agile and full of heel tactics. This pretty much is The Great Muta and that’s it.
Shooter: A Hybrid wrestler 75% MMA and 25% puroresu style, but the striking critical emphasis references striking-heavy shooters and MMA fighters like Bas Rutten, Nobuhiko Takada, Bitsadze Tariel and Conor McGregor. Without striking critical, it works for Tamura, Masa Funaki and even Kazushi Sakuraba. With the right abilities, the more well-rounded MMA fighters will be considered shooters.
Fighter: This is a straight up striking ‘wrestler’ within the context of a MMA/non-worked Shootfight. They are garbage at everything except hitting you and are even average in MMA positions. Much more effective with striking critical and can be somewhat useless without. Examples: Buakaw, Maurice Smith (pre-UFC) and other K1 Fighters.
Grappler: Most MMA fighters are Grappler types, especially grapplers like BJJ and Sambo masters. A+ at MMA positions and techniques, stretching and choking the hell out of their opponents, and curiously: punching. Taking the punching into account, prime example is Vitor Belfort. Without much punching: Any of the Gracies and Volk Han.
Panther: An overpowered mix of high flying, kicks, technical ability and submission. They’re even decent at MMA. Also produce amazing comebacks. This is Tiger Mask, especially Sayama Tiger mask, but also including Kota Ibushi (Tiger Mask W).
Giant: Big lumbering monsters. Good at rough housing, power moves and not much else. They cannot go long matches, but can consistently & inherently no-sell a variety of moves (Kane Loaf). Andre The Giant is the main example.
Vicious: This is true Inoki strong style. Good at kicks, joint locks, amazing at chokes, good at rough-house techniques and technical wrestling. They’re even good at MMA because Inoki has an uncontrollable ego. Good examples are Inoki, Minoru Suzuki (post Pancrase) and Katsuyori Shibata (get well soon!).
For the most part, barring stat oddities, critical settings or certain abilities, matches will follow a longer AJPW style match flow, rather than the sprint matches you see in WWE.
However, this pacing is slightly different for certain styles.
Wrestling & Power: For max efficiency, these two styles are better suited for shorter matches. Their efficency in the matches tends to wane and they do not get a huge comeback boost at ‘near death’ like most other styles. However, they do not have the complete drop-off of efficiency late in a match like the shooter/MMA styles.
Heel: Tend to work like the classical wrestling style, but don’t get a near death comeback boost. Put your opponent away with your hijinks wrestling while you can!
Fighter: They are good early in a match, but fall apart at heavy damage and near death. Without abilities added in, the chance of a Fighter turning around a match late is almost zero.
Grappler: While they don’t bottom out as hard as the fighter builds, once they are near death, the chances of hanging in there for a miracle win are slim.
Giant: At the start of the match they are already sucking wind like a other wrestlers do at medium damage. Better hope that the promoter brought a golf cart to bus you from the entrance to the ring, because you might run out of gas before you finish your entrance. Good luck!
Juniors, Panthers and Viscious: all are comeback masters, all finding a second wind right as you are putting them down for nearfalls.
Moveset Organization & Choice
Unwritten rules of Fire Pro Movesets and Logic.
Keep in mind the wrestler you are creating within the context of which they wrestled, along with the context of which they are competing.
Wrestlers in US organizations will generally have smaller movesets as compared to Strong Style or new-school British Wrestlers.
MMA fighters will have smaller movesets as compared to worked shoot wrestlers such as in UWF(i) and RINGS.
Understanding Context
A good example of context is a wrestler like Minoru Suzuki. If you’re working on a version of Suzuki during his Pancrase days, you would not have him using any of the techniques he used after he left Pancrase for Pro Wrestling such as the Gotch Piledriver, chest chops, any pins or a drop kick. This version of Suzuki wouldn’t be working those techniques and instead would enter guard, ‘mount’ (front headlock position), back mount. He’s be working leg ‘tackles’, trips, kicks, grapple knees and slap blitzes.
While you can’t always set a move set to ‘Do Not Use’, you can set duplicate moves throughout the slots if necessary. Don’t set unique moves (non-duplicates) to slots that aren’t going to be used by the AI, because not only the AI is going to be using this edit, but players may be using them. If you want to have players snapping their controllers, set Hull Kogan to use a standing shooting star press somewhere in the slots for the edit. Sure the AI might have that slot at 0% in all cases, but players using the wrestler will find it. While this is funny, best not to do it.
Additionally, there are certain moveset conventions that follow from previous games with the wrestlers who are/were included. This made using different wrestlers in the game easier since there was a certain organization of techniques that overlapped between 99% of all wrestlers in the game.
Understanding Affinity
Depending on the style chosen for the wrestler, all wrestling moves will have a ranking of A-E shown during move selection. This is the Affinity of move, which is how much stamina it will cost to use it. This not the likelihood of the wrestler using the move successfully, or the damage the move inflicts.
Briefly: If you have too many moves for your wrestler at C D and E, they will gas out quicker than those with A or B moves. However, having a few signature moves or finisher with a low Affinity doesn’t matter.
Standing/Striking
Small: generally a lead hand jab, a weak punch, a quick shop or slap or a low kick. Quick resolving techniques. Almost never knocks down a fresh wrestler.
Medium: half the time this is a body attack, like a kick or sometimes a rear hand punch or a forearm/elbow shot. Sometimes knocks down.
Big: an attack that is generally expected to knock down or stun. A technique that has longer animation, start up or recovery. This also may be a command grab to a pin or a submission as well.
Small + Medium: an overwhelming attack, one expected to always knockdown or inflicts devastating damage. For shooters/mma fighters who aren’t known for their KO power, but generally do succeed in their takedowns, it will be a leg tackle (double leg).
In Grappling
Small + Up: always a bodyslam or a lift of some sort.
Small + Down: always a trip or leg takedown
Medium + Up: always a suplex or take-over
Grounded
Shooters / MMA fighters: Unless the edit is a superlative submission artist who is known for getting finishes instantly on standing or downed fighters (See Rumina Sato, Joe Lauzon or Kazushi Sakuraba), most will move to one of the three MMA positions (guard, ‘mount’ or back mount) before attacking with a submission.
Also, understand that the moves that use the MMA positions are all focused on attacking with and defending with the MMA attribute, which is very low for most wrestlers. This means the average wrestler takes more damage from attacks and exhaust themselves just from being in those positions.
Earlier shooters (pre UFC / pre UWFi) are the few exceptions to this rule. Post 2010 (or so) shooters/MMA-to-Wrestling edits who work in conventional wrestling organizations will use a mix of attacks from the MMA positions and submissions directly from downed positions.
Finishers
Be mindful, again, of the context of the edit. Many MMA and shootfighters won’t have a singular finisher, but instead have an array of finishing techniques.
Also, for 90s AJPW wrestlers, there is a gradiation of finishers, with the most powerful only used in the most dire of matches. While it might be amusing to have your edits bust out the Burning Hammer and Tiger Driver every match, try to make the logic match the conceit of the era and organization, especially for organizations for which the way a match plays out is an integral part of what makes the organization special. This means for AJPW, their super finishers will only be used as ‘near death’ or large damage and at a 1-2% chance.
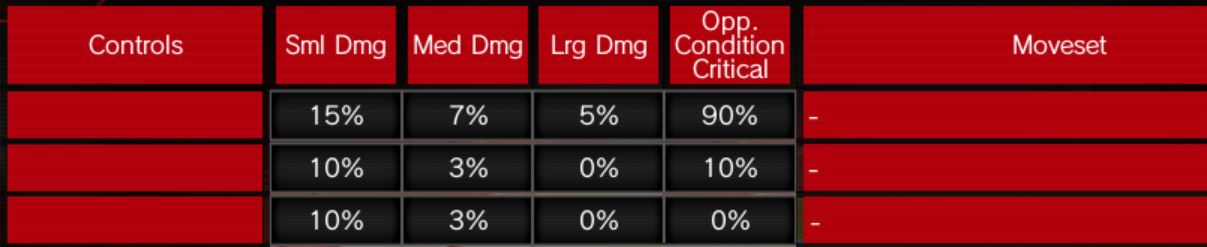
Initiate Grapple (Standing Attack)
Quite simply this should be called ‘Standing Attack’ but translation be translation.
This is the actions your wrestler will take when facing their opponent, and neither are stunned. This is the standard position your wrestler will be in.
See Overview Section for explanations of the columns ‘Sml Dmg’ and ‘Lrg Dmg’.
Initiate Grapple: The wrestler will close the distance and tie up with their opponent for a standard grapple.
Stand Back (Stall): The wrestler will try to keep their distance from their opponent, avoiding strikes or grapple attempts.
Circle Opponent: The wrestler will try to circle and maneuver to initiate a back grapple with their opponent.
Stand (SML): The wrestler will try to attack with a light (small) striking technique.
Stand (MED): The wrestler will try to attack with a medium striking technique.
Stand (BIG ↔️↕️): The wrestler will try to attack with a strong (big) striking technique.
Stand (BIG): The wrestler will try to attack with a strong (big) striking technique.
Stand (SML)+(MED): The wrestler will attack with an overwhelming strike. This is generally the most powerful strike.
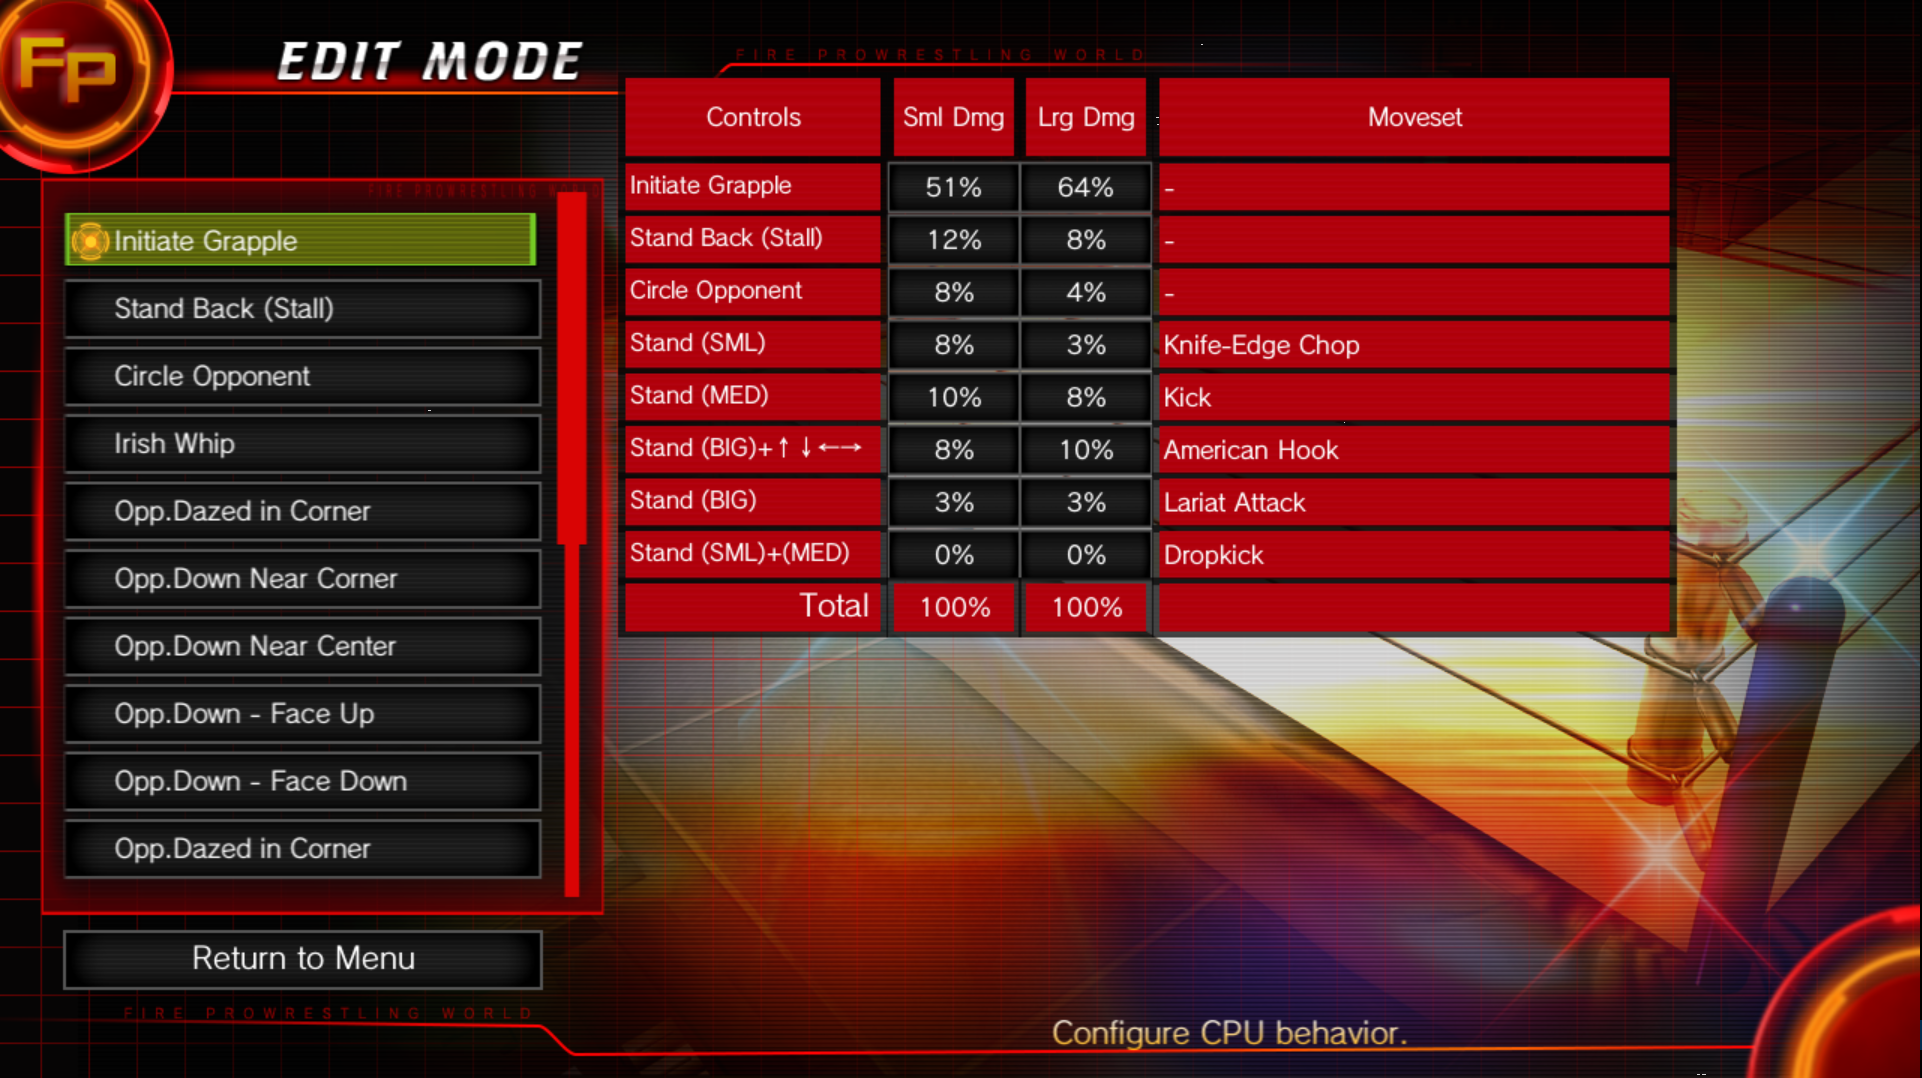
Stand Back (Stall) – Grappling Techniques
This may be the worst named heading in the game. It should be called ‘Wrestling Techniques’ or something. It has nothing to do with the stalling mechanic.
These are the techniques that your wrestler will use if they win a grapple / tie-up.
Grapple (SML): The wrestler executes a light (small) technique after the grapple.
Grapple (SML)+↑: The wrestler executes a light (small) technique after the grapple.
Grapple (SML)+↔️: The wrestler executes a light (small) technique after the grapple.
Grapple (SML)+↓: The wrestler executes a light (small) technique after the grapple.
Grapple (MED): The wrestler executes a medium technique after the grapple.
Grapple (MED)+↑: The wrestler executes a medium technique after the grapple.
Grapple (MED)+↔️: The wrestler executes a medium technique after the grapple.
Grapple (MED+↓): The wrestler executes a medium technique after the grapple.
Grapple (BIG): The wrestler executes a strong (big) technique after the grapple.
Grapple (BIG)+↑: The wrestler executes a strong (big) technique after the grapple.
Grapple (BIG)+↔️: The wrestler executes a strong (big) technique after the grapple.
Grapple (BIG+↓): The wrestler executes a strong (big) technique after the grapple.
Grapple (SML)+(MED): The wrestler executes an overwhelming technique after the grapple.
Grapple (RUN): The wrestler executes an Irish Whip, throwing the opponent towards the ropes or corner.
Grapple (3D): The wrestler locks on a standing front headlock, in order to drag the opponent in a direction.
Overall concepts: With my created wrestlers (which are generally full shooters or MMA fighters) I try to set throws and suplexes to the up (↑) direction, strikes to the neutral & left/right direction ↔️ and grounding techniques to the down (↓) direction.
Now, this isn’t a suggestion that works for all created wrestlers, but organizing the techniques a sense of logic behind them makes your created wrestler so much easier to use.
Circle Opponent (Back Grapple)
[h1Circle Opponent (Rear Waistlock)[/h1]
Another poorly named heading. These are the attacks that are used when the wrestler initiates a grapple from behind. As bad as the name is, at least it’s partially related to the ‘Circle Opponent’ option from the ‘Initiate Grapple (Standing)’ Section.
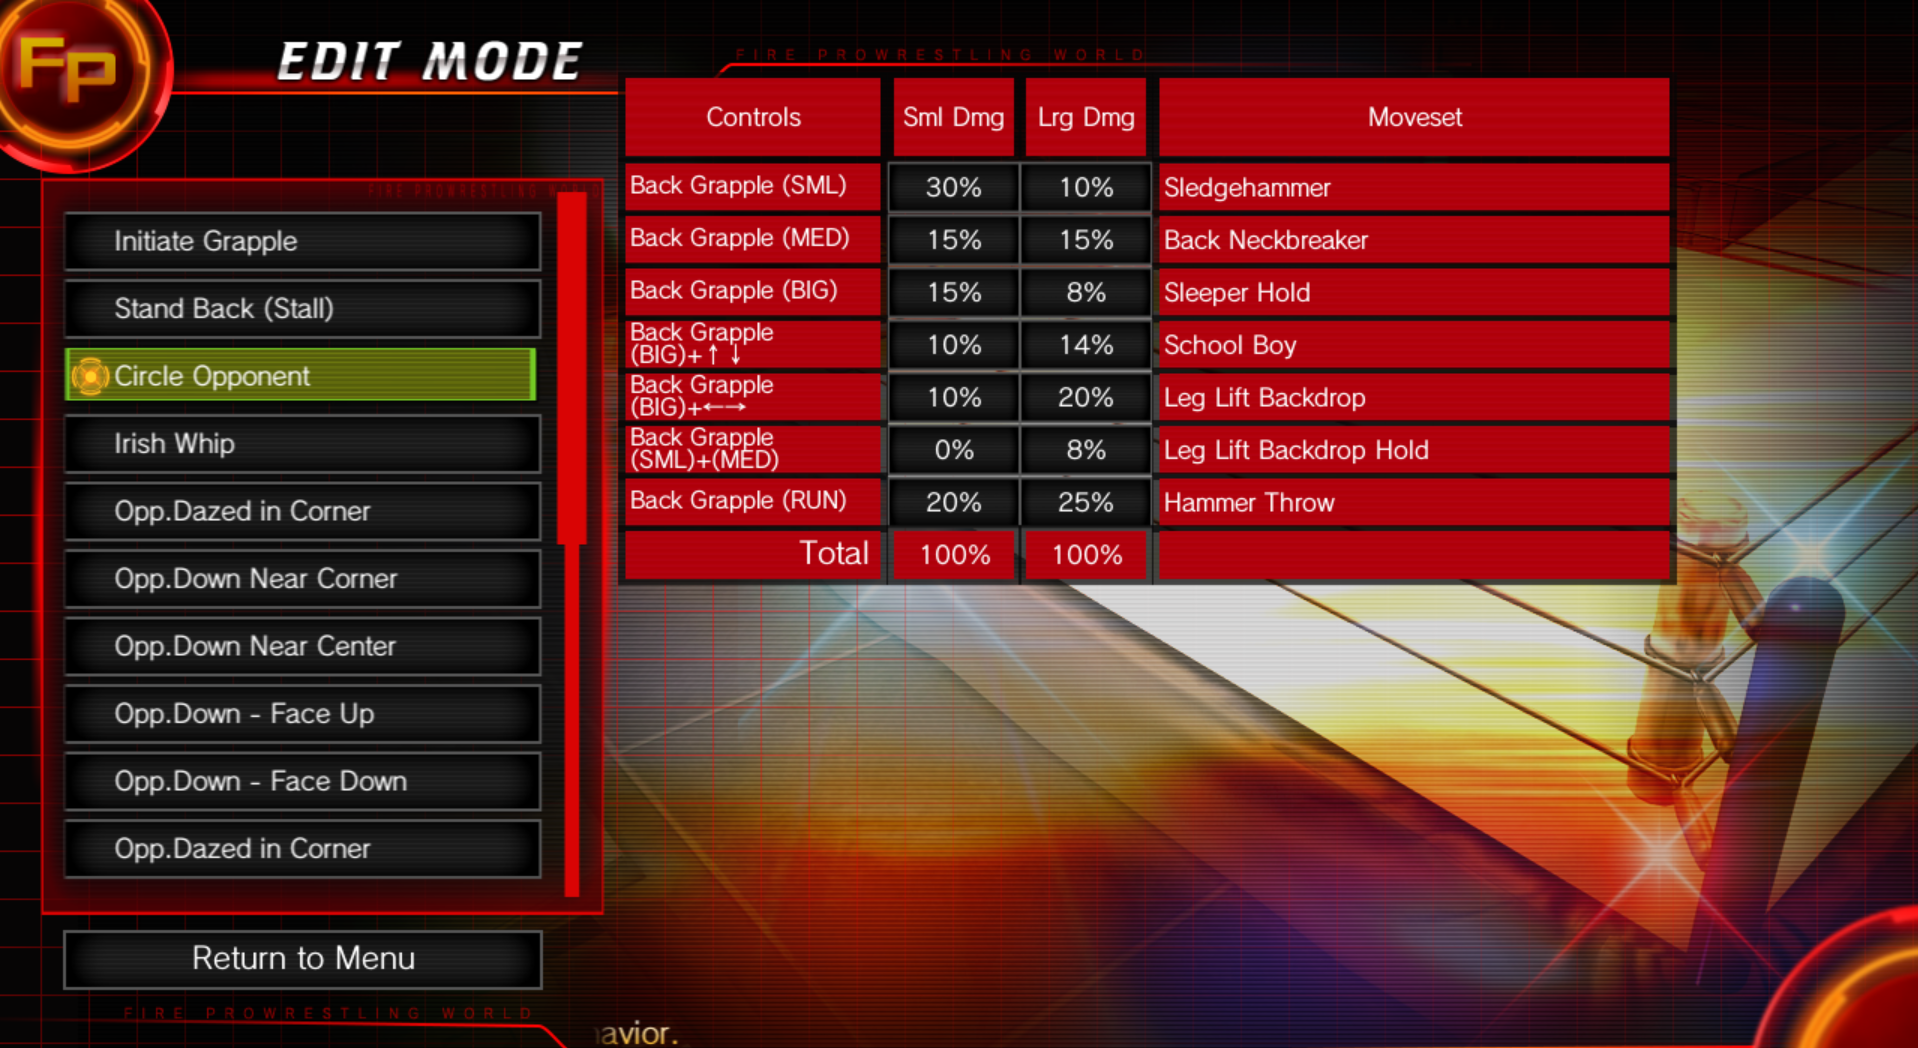
These are the techniques that your wrestler will use if they win a grapple / tie-up.
Back Grapple (SML): The wrestler executes a light (small) technique after the grapple.
Back Grapple (MED): The wrestler executes a medium technique after the grapple.
Back Grapple (BIG): The wrestler executes a heavy (big) technique after the grapple.
Back Grapple (BIG)+↕️: The wrestler executes a heavy (big) technique after the grapple.
Back Grapple (BIG)+↔️: The wrestler executes a heavy (big) technique after the grapple.
Back Grapple (SML)+(MED): The wrestler executes an overwhelming technique after the grapple. This is the most powerful back attack.
Back Grapple (RUN): The wrestler executes ??? (Needs investigation).
Irish Whip
(NEEDS INVESTIGATION)
These are the attacks that follow after an Irish Whip (throw towards ropes). For shooters and fighters, most likely these attacks won’t be used at all. It also covers techniques used after running (????).
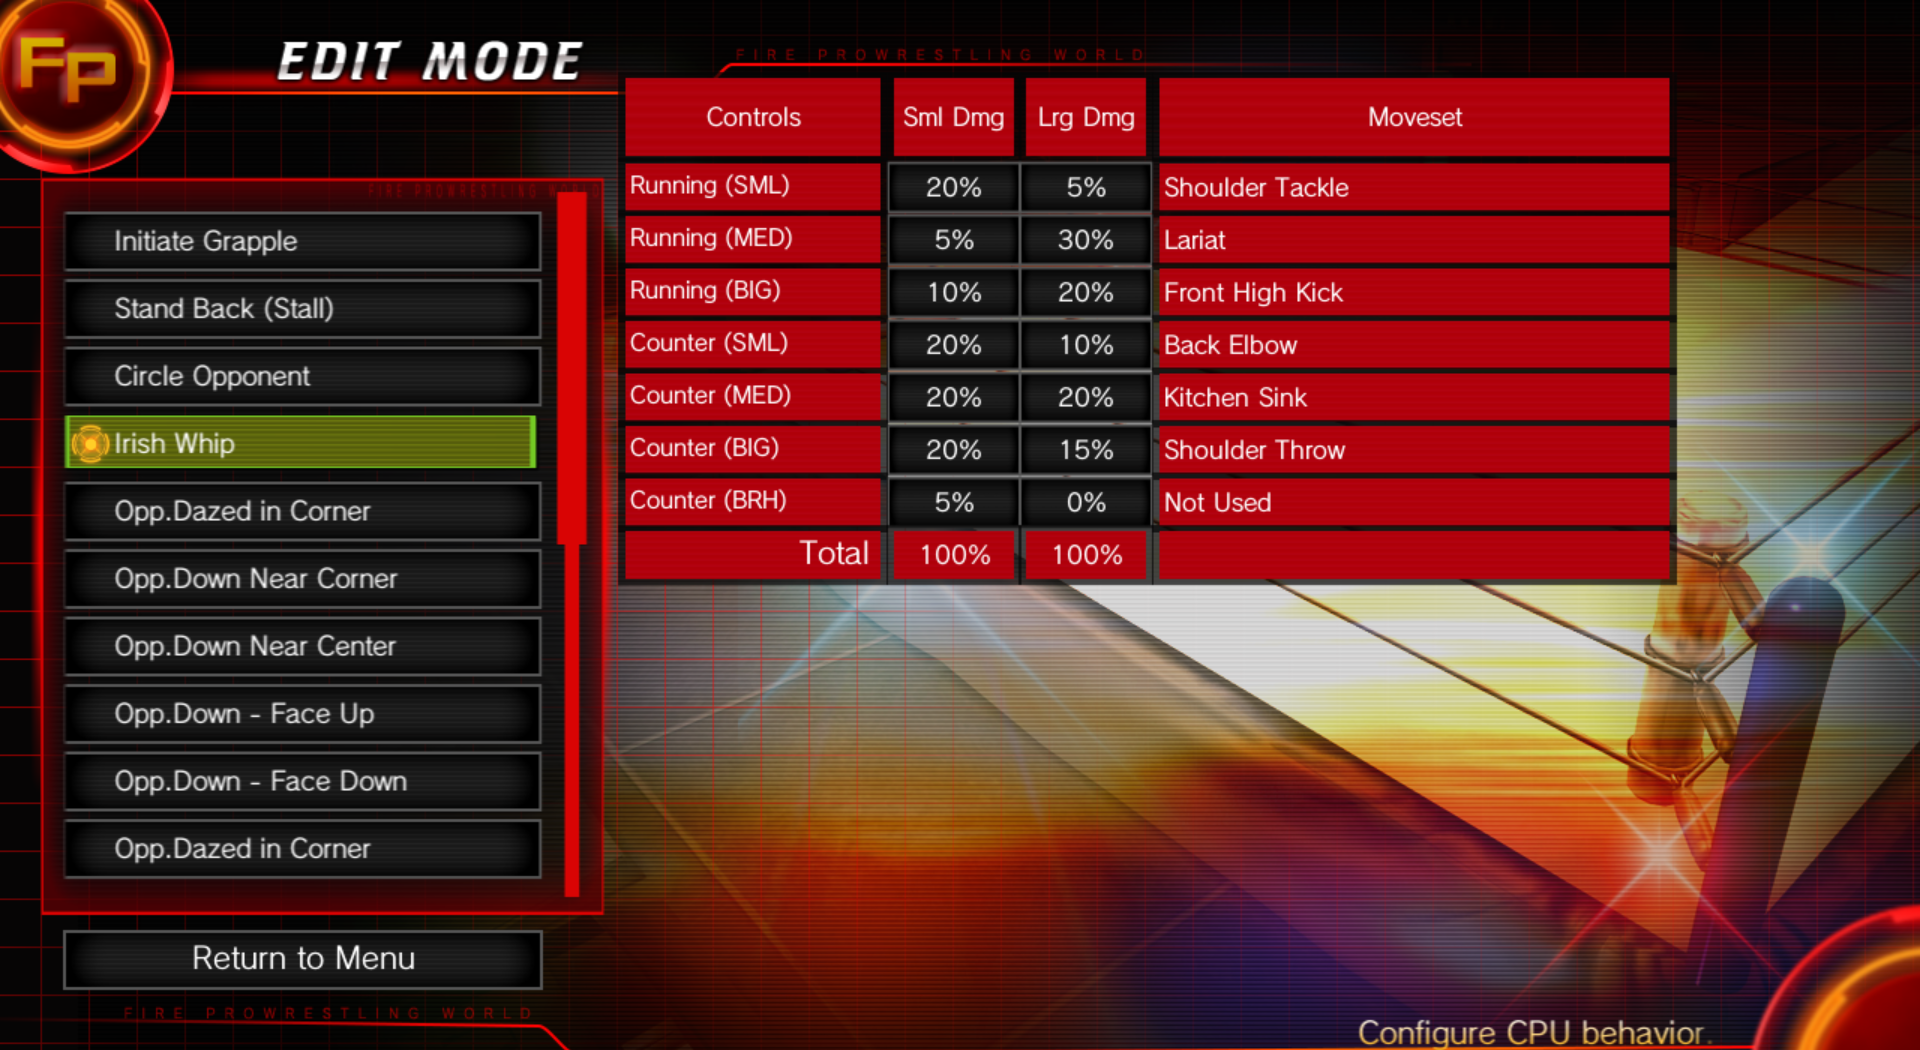
These are the techniques that your wrestler will use during a run, either from the run button or an irish whip.
Running (SML): The wrestler executes a light (small) technique on the opponent after a rebound or a run.
Running (MED): The wrestler executes a medium technique on the opponent after a rebound or a run.
Running (BIG): The wrestler executes a heavy (big) technique on the opponent after a rebound or a run..
Counter (SML): The wrestler executes a light (small) technique on the opponent when they are run at or after a rebound from an irish whip.
Counter (MED): The wrestler executes a medium technique on the opponent when they are run at or after a rebound from an irish whip.
Counter (BIG): The wrestler executes a heavy (big) technique on the opponent when they are run at or after a rebound from an irish whip..
Counter (BRH): (Has to do with breathing. Not sure how)
Opp. Dazed in Corner
Holy hell, this is a poorly described position. Note, this exact position name will come up again.
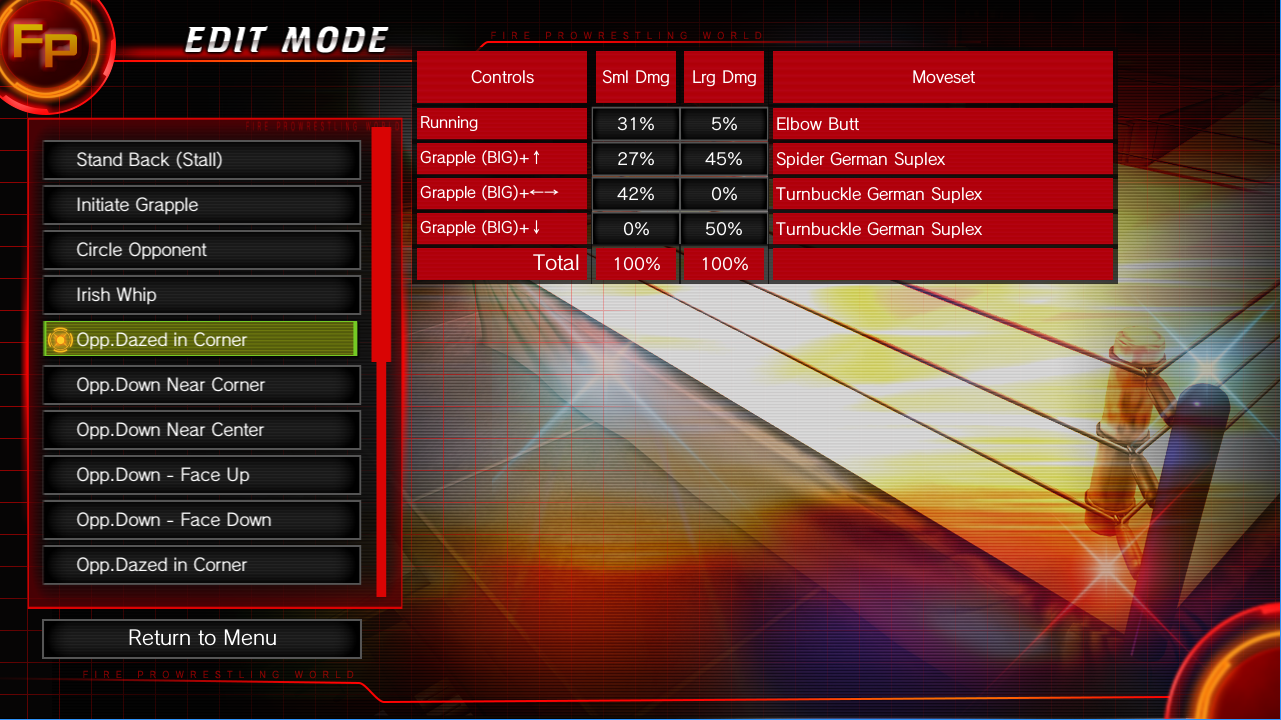
These are the techniques that your wrestler uses when the opponent is dazed, lying against the corner turnbuckles, but is still standing. See Below:
Running: While running to a dazed opponent in the corner, the wrestler uses this technique.
Post (BIG):The wrestler locks up with their stunned opponent and executes a heavy (Big) technique.
Back Grapple (BIG)+↑:]The wrestler locks up with their stunned opponent and executes a heavy (Big) technique.
Back Grapple (BIG)+↔️: ]]The wrestler locks up with their stunned opponent and executes a heavy (Big) technique.
Back Grapple (BIG)+↓: ]The wrestler locks up with their stunned opponent and executes a heavy (Big) technique.
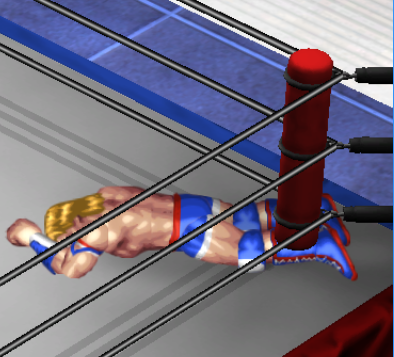
Opp. Down Near Corner
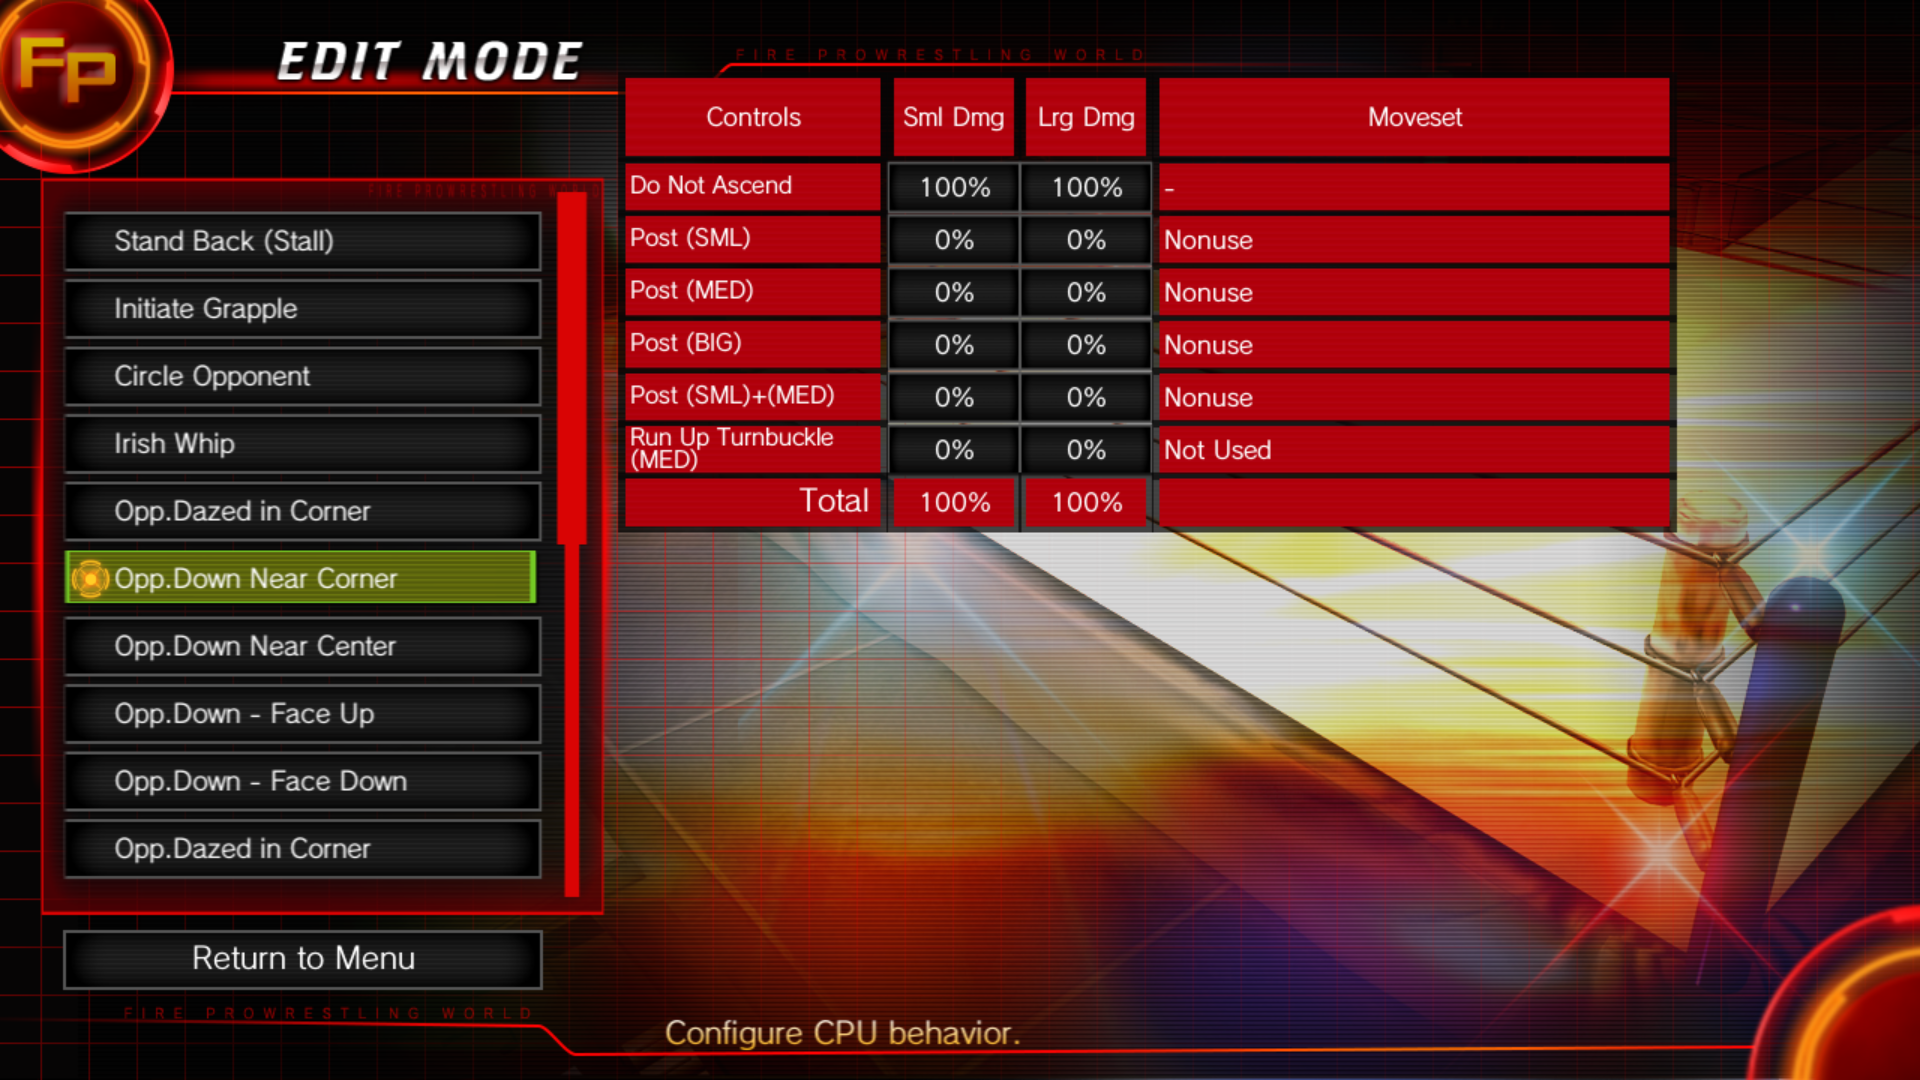
Do Not Ascend: The wrestler does not climb or work a technique involving the post.
Post (SML): The wrestler executes a light (Small) technique using the post.
Post (MED): The wrestler executes a medium technique using the post.
Post (BIG):The wrestler executes a heavy (Big) technique using the post.
Post (SML)+(MED):The wrestler executes a overwhelming technique using the post.
Run Up Turnbuckle (MED):The wrestler runs up the turn buckle and excutes a technique
Opp. Down Near Center

Don’t Run: The wrestler does nohing unsual while the opponent is down in the center of the ring.
Running at Downed Opponent: The wrestler executes a technique on the downed opponent.
Corner-to-Center Attack: The wrestler uses a special corner to center attack. (Bombaye Knee is the best example)
Opp. Down – Face Up
This is where the opponent is down with their back on the mat and chest up and the wrestler is interacting with them directly.
Pick Opponent Up: Using the small button at the opponent’s head, the wrestler will pick up their opponent.
Roll Opp.Face Up: Using the small button at the opponent’s feet, the wrestler will roll the opponent face down using their hips.
Head (MED): Attack with a medium technique while at the opponent’s head.
Legs (MED): Attack with a medium technique while at the opponent’s legs.
Head (BIG): Attack with a big (heavy) technique while at the opponent’s head.
Legs (BIG): Attack with a big (heavy) technique while at the opponent’s legs.
Head (PIN): Utilize a pin while at the opponent’s head.
Legs (PIN): Utilize a pin while at the opponent’s legs.
Opp. Down – Face Down
This is where the opponent is down with their chest on the mat and back up and the wrestler is interacting with them directly.
Pick Opponent Up: Using the small button at the opponent’s feet, the wrestler will pick up their opponent by their trunks.
Roll Opp.Face Up: Using the small button at the opponent’s head, the wrestler will roll the opponent face down using their shoulders.
Head (MED): Attack with a medium technique while at the opponent’s head.
Legs (MED): Attack with a medium technique while at the opponent’s legs.
Head (BIG): Attack with a big (heavy) technique while at the opponent’s head.
Legs (BIG): Attack with a big (heavy) technique while at the opponent’s legs.
Head (PIN): Utilize a pin while at the opponent’s head.
Legs (PIN): Utilize a pin while at the opponent’s legs.
Opp. Dazed Near Corner
This is when the opponent is standing, dazed NEAR the corner.
Do Not Ascend: The wrestler does not climb or work a technique involving the post or ropes.
Post (SML): The wrestler executes a light (Small) technique using the post.
Post (MED): The wrestler executes a medium technique using the post.
Post (BIG):The wrestler executes a heavy (Big) technique using the post.
Post (SML)+(MED):The wrestler executes a overwhelming technique using the post.
Run Up Turnbuckle (MED):The wrestler runs up the turn buckle and executes a technique.
Rope Slingshot from Apron to Inside of Ring: The wrestler attacks from over the ropes to inside the ropes using a leaping attack.
Opp. Dazed Near Center
Opp. Dazed
Guard Position
The first of the MMA positions. The wrestler steps into the guard (legs around) of their downed opponent to attempt a move.
Much like the back grapple, this position gives advantage to the wrestler initiating the position.
Mount Position
The second of the MMA positions, this is another misnamed position. This should be called ‘Sprawl Position’ or ‘Front Headlock Position’. This position generally happens after an unsuccessful leg takedown or a snap-down technique.
While this position gives an advantage to the wrestler on top, the wrestler trapped in the sprawl will have a number of specific techniques they can use from this position.
Back Mount Position
The last of the MMA positions. The wrestler takes the back position on a face down, downed opponent to attempt a technique. Again, like the other MMA positions, it provides and advantage in execution to the wrestler initiating the position.
Ukemi
‘Receiving body’. For those who do judo, don’t let this confuse you with ‘breakfalling’. More think about how ‘being a good uke’ when allowing someone to demonstrate throws or moves is important.
This is essentially ‘selling’, logic’s way of making the wrestlers behave how they would in the match and how often they will allow their opponent execute a move without resisting it. Since pro wrestling is inherently worked, there is a flow to the match that is based around allowing your opponent to execute their moves.
Also within the game is a mechanic that as the wrestler sells, they will start receiving hidden bonuses to their attributes from selling for later in the match.
The default settings are 20/25/15, which is good for an average wrestler in most organizations.
The settings vary greatly throughout the organizations and the type of fighters. The defaults work well for most wrestlers. The exceptions are wrestlers who generally do squash matches, comeback monsters like Randy Macho Man savage and MMA fighters.
Squash Match Wrestlers:
If the wrestler just goes out and no one gets any extended offense going on them go with
5/5/15. Good examples of this sort of wrestler is Goldberg.
Comeback Wrestlers:
If the wrestler always ends up losing the early parts of the match, only to come back at the end, scores of 40+/20/0 may be appropriate. Macho Man I’d set to 50/30/0, he had the worst/best comeback matches.
For most MMA fighters, boxers or fighters in general 5/5/0 is appropriate. For shooters, the default is 20/20/20, but I think that’s more appropriate for worked-shoot wrestlers, or fighters who are known for fighting for the split-decision.
However, if they are known as slow starters and generally spend early in the fights ‘feeling out their opponents’, go with a 20+/5/0 spread. The Diaz brothers are known for this.
For those who always seem to fade late in matches go with 0/5/35-60. This combined with low recovery will match this behavior well, for the most part. Jose Aldo (despite being an incredible early fight finisher) is a great example. Just beware of this late ukemi fade will lead to weird behavior when near death.
Fighters who always seem to lose once they lose a round or the fight starts going against them, but somehow always get to a decision, 0/40+/30+ may be appropriate. BJ Penn and Vitor Belfort are perfect examples.
Fighters who finish quickly, are incredibly strong in the early rounds, it may be appropriate to set them to 0/5/15, like wrestler who primarily does squash matches.
Fighters who seem to always lose the early rounds but always win later, setting them like a comeback wrestler may be appropriate, with 40+/20+/0. Great examples of this is Eddie Alvarez, Frankie Edgar and late-career Robbie Lawlor. If they get you to later rounds, you’re generally screwed.
Opp.At Back
This is when the opponent initiates a grapple from the back and the wrestler’s response/counter to that grapple.
Opp.Outside Ring
This both controls the tendancy to leave the ring to brawl when the opponent is outside the ring and also flying attacks from inside the ring to outside the ring, using the posts or the ropes.
Performance
This is just the tendancy to use taunts and signature actions in different situations.
Priority Attack
This section controls stringing together of techniques. If the wrestler is to use their finisher and then always pin, this is where it is set.
The first move (Priority Attack) can be almost any move from a variety of positions. The second (Follow-Up Attack) must be chosen from any move that attacks a downed opponent, such as a pin, pickup, stomp submission or taking an MMA position.
Showmanship – Second Interference
Showmanship
Discretion
Flexibility
Cooperation
Outside Return Count
Touchwork
Weapons
Second Interference