Overview
Similar to my XIII guide, this guide’s purpose is to make sure players have the best experience of this game without facing much technical issues and enhance the game to look at its best graphically.This guide’s main purpose is to make sure players have the best experience of this game without facing issues like lower frame rates, crashes, that can ruin the game for a lot of people. The guide also covers some additional content restoration mods, and visual enhancements that can be applied to the game by tweaking some of the graphic settings from the graphic driver side and with mods.
Prerequisites
Before proceeding with this guide, make sure that you are running the latest version of Windows 10 operating system with up to date drivers so that the solutions written in this guide works better.
Also make sure you have not installed the game in your C drive or the drive where you have your operating system installed. Steam by default will set up an directory in the C drive when you begin installing the game and you will have to change that directory in the installer window to another drive on your PC.
The Launcher
Similar to the first game, this is the launcher you are greeted with when you launch the game for the first time. You can use this to customize the visuals, and the audio language.
If you want the game to run in fullscreen or windowed mode, then there are options for that in the Screen settings. this setting has to be set to Fullscreen Display Mode as the windowed mode option limits you from customising the resolution.

There is the Resolution settings tab which allows you customize the game resolution.
If you want to play with English or Japanese audio, the option to do so is in the Sound settings tab. This option is not available if you got the ASIA region version of the game.
Here are some really crucial settings that could help in getting the game look good as well run better if you have a low end hardware.
Anti aliasing
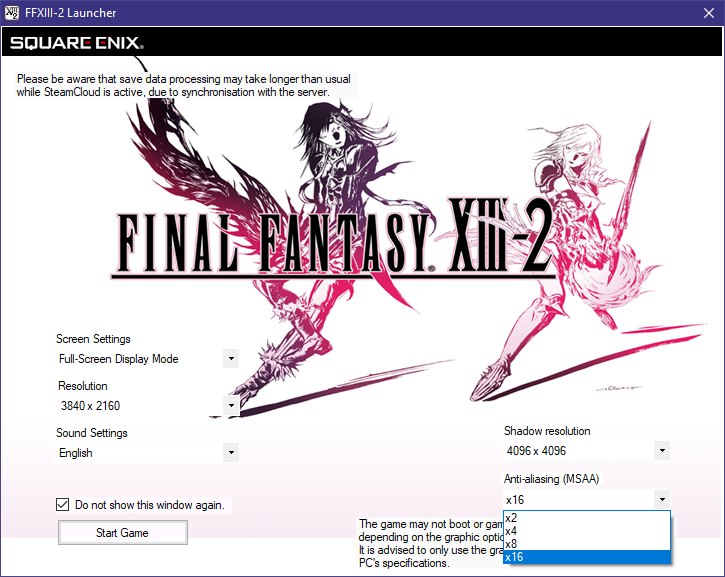
Note if you follow the DSR method in the guide, then set this to 2x as you will end up hurting performance, if set to x16.
Shadow resolution
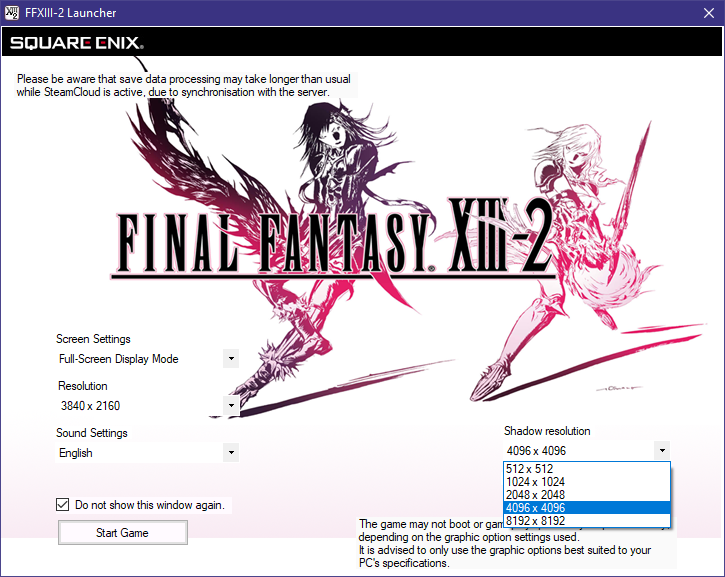
Also do not set it to 8192 x 8192 resolution. At this higher setting, the shadows will look quite blocky and will reduce ur framerate a lot even if u have a high end gaming PC as well. 4096 x 4096 is the max shadow resolution option you should play the game with.
The Problems
A lot that can be annoying for new and returning console players alike.
– Inconsistent 60fps which generally makes it not smooth to play at that framerate
– Lacks Vibration support that is present in the console versions, but disabled in the PC version
– Stutters, if you are playing without a controller
– Slower loading in some menus in game
– Constant crashes due to the game assuming its running in a 2GB RAM system
– Surround sound is broken
– Missing DLC’s from the Console versions,
– Broken rain translucency, which makes the rain in the game look bad
– No English audio option for Asia/Japan version of the game.
Solutions
Four of the above issues can be solved with the same FF13 fix made by rebtd7. thank you once again for the fix if you are reading this guide.
Download the latest version of the fix from their github releases page
[link]
If you are using an Nvdia or non RDNA AMD GPU, you can proceed to the Steps for installing the FF13Fix section of the guide.
Important preliminary step only for AMD RDNA cards:
The latest version of the FF13Fix can mitigate the performance issues that’s happening on AMD RDNA RX 5000 and 6000 series GPU’s to an extent, thanks to the creator of the fix adding an support for the fix to function properly along with DXVK.
Download the latest version of DXVK from this below link:
[link]
You have to download the tar.gz file from the above link.
After the download you have to extract the file and you will get a .tar file. Extract this file once again and you will get a folder dxvk and inside that there will be two folders x32 and x64.
Inside both the folders there will be dll files and you need to copy the dll files inside the x32 folder. So copy these dll files present inside this x32 folder to the following location:
“FINAL FANTASY XIII white_data prog win bin”
Once you have copied the dll file’s into the bin folder, rename the d3d9.dll file to dxvk.dll.
Continue to the next step here.
Steps for the installing the FF13Fix:
After downloading the FF13Fix, extract the fix to the following location.
“FINAL FANTASY XIII-2 alba_data prog win bin”
To get to this location, select this game title on your Steam library, Right click and select Properties.
then in the new window go to Local Files and then select Browse Local Files. that should open the location.
Now follow the screenshots on where exactly you have to paste the files.
“Select alba_data folder”
“Select prog folder”
“Select win folder”
“Select bin folder”
“copy the fix here. I already copied it and it should look like this”
Do note that the dinput8.dll file is now changed in the 1.6.0 version of the fix to d3d9.dll. The rest of the files remain unchanged.


That’s it. If you want to turn off vibration, you can do so by editing the values in the FF13Fix.ini file. there’s information provided in the ini file itself on what to edit and what to change.
If you are using an AMD RDNA GPU, you can set this option present in the FF13Fix.ini file which is DiscardUIVertexBuffer. You can set it from false to true and see if it improves the performance. Be warned that this particular option is experimental and if its causing any graphical issues, then set it back to false.
Now there are two fixes available on steam and I have used the large address aware one here in this guide as that’s what fixed the crash for me.
The game goes on a crashing spree due to it assuming there’s just 2gb of ram in the PC and if the game exceeds that usage, it crashes. Factors like ingame Nvidia overlay, Steam overlay and Steam cloud,..etc running in the background along with the game causes the RAM usage to spike up and crash the game at any point.
An initial fix was to disable the nvidia overlay, steam cloud and run the game.
At long last there’s a fix available that completely solves the crashes, but you still need to disable Steam cloud as that may end up corrupting your save files and crash the game sometimes.
Disabling it is quite easy too. Right click the game title in your steam library, and select Properties.
Go to the Updates tab and below there, Uncheck, the box Enable Steam cloud synchronisation for Final Fantasy XIII-2.
After doing it, Click on Close. This should disable Steam cloud.
Now onto the major fix.
This fix allows the game to use 4gb of RAM as this game is a 32bit application and thats the max RAM it can use which itself is more than enough.
I am posting the link to the forum where the fix is posted initially and you can download it from that page. Also thanks to the creator of this tool FordGT90Concept.
[link]
Extract the file, laa_2_0_4_NetFramework_4_5.zip anywhere you want. You will get an exe file named Large Address Aware. Run that exe file.
You will be greeted with this window on running the tool.

Select the game executable by selecting the box with this … symbol. the exe is in the same folder where you put the FF13 fix files. select the ffxiii2img.exe file in this location.
” FINAL FANTASY XIII-2 alba_data prog win bin “

Now Check the second box to enable the application to use more than 2GiB of memory and then click the Save button.

This should fix the crashes, making the game quite playable.
The Second fix
Do not follow this, if you followed the above method and patched the exe
If you found the above Large address aware patch harder to use, then there is another fix that I mentioned in the start of the guide. Steam cloud should be disabled for this method as well.
Download the 4gb patch from the below site. (relax, its size is not 4gb.)
[link]
Extract the zip file to anywhere you want, and open the 4gb patch.exe file. an small window will open.
Browse the game executable, which is in the same folder where you put the FF13 fix files. select the ffxiii2img.exe file in this location.
” FINAL FANTASY XIII-2 alba_data prog win bin “
Select the exe file, and click on open. After doing so another small window will appear. saying Executable is successfully patched. Hit ok to close the patch.
This should fix the crashes, through this method.


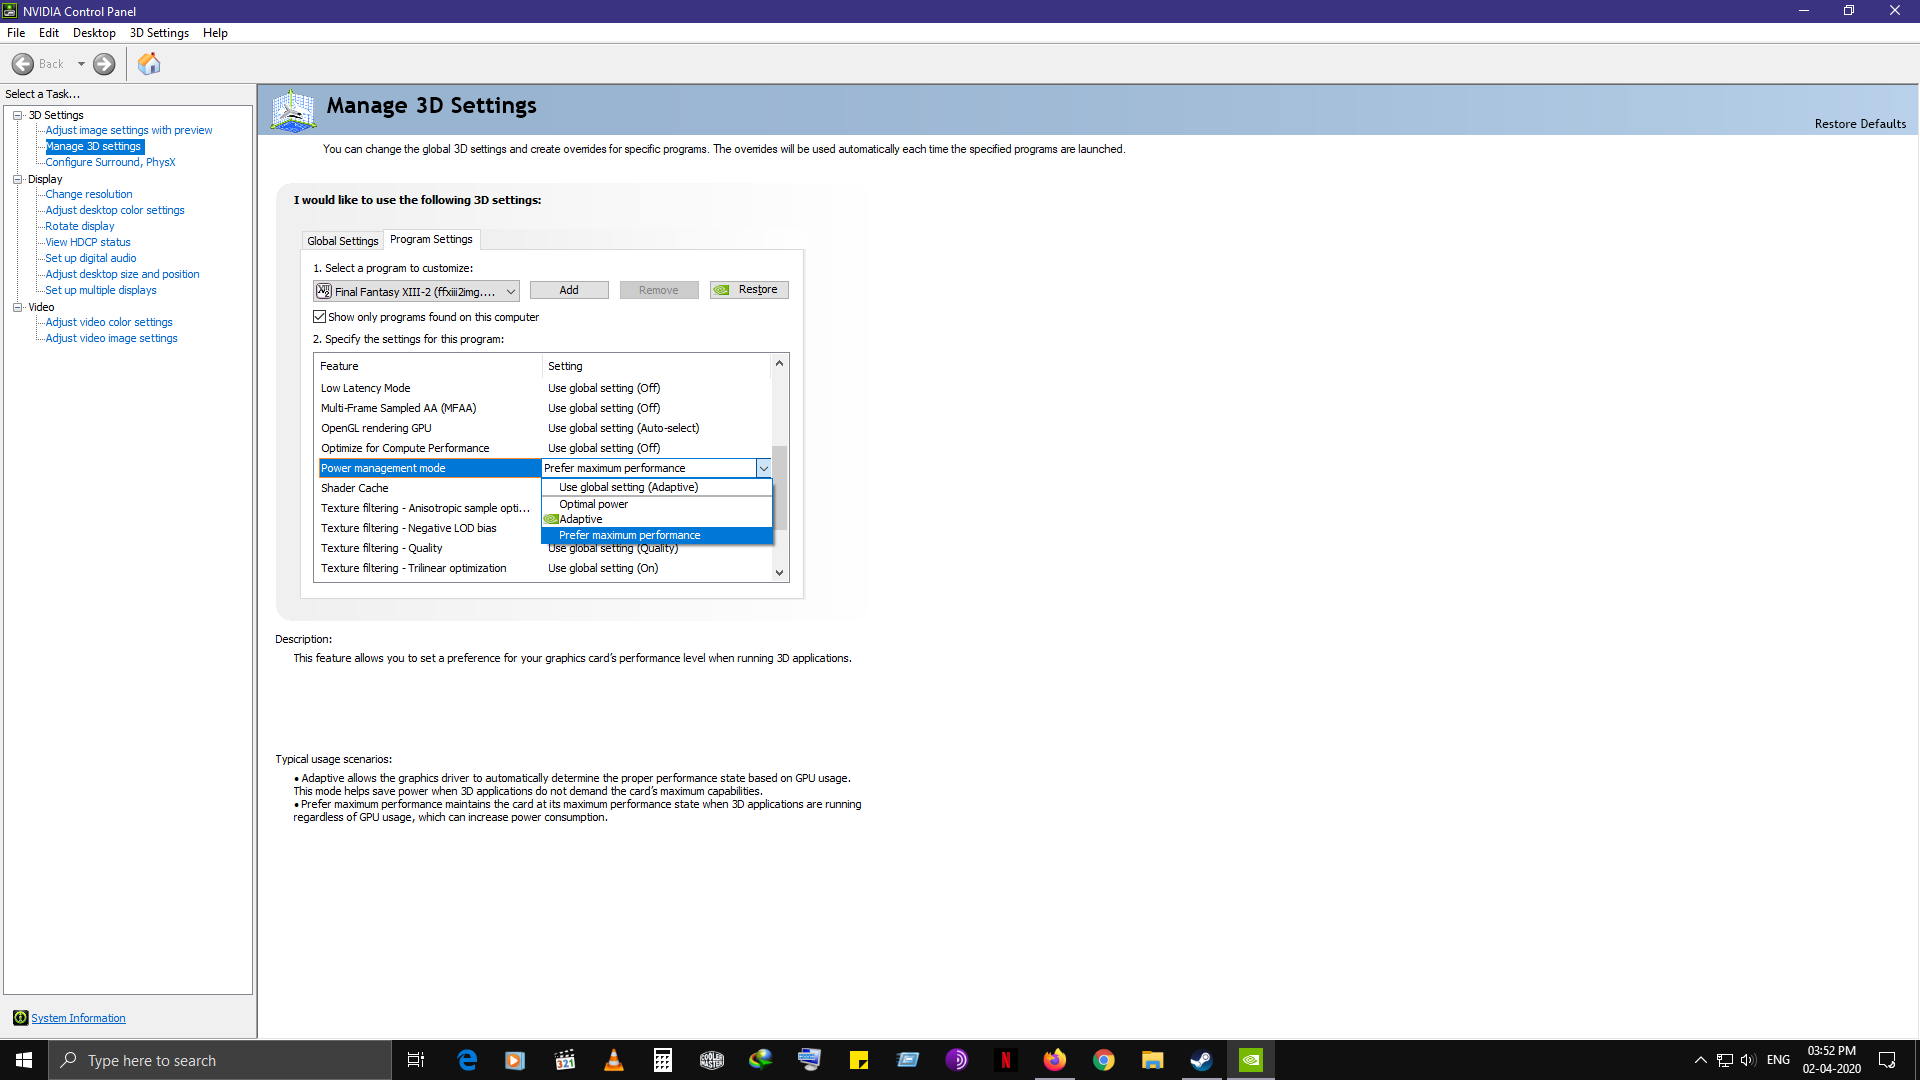
This is an additional step only for Nvdia Card users which makes sure the game’s performance at 60fps is a bit more stable and consistent.
Right click and open the Nvidia Control panel.
Select Manage 3D settings and go to the Program settings tab in the menu. click on the drop down list at the center and select Final Fantasy XIII-2(ffxiii2img.exe).

This option will open the Add window where you have to add the game executable which is the ffxiii2img.exe file, by using the Browse option and then navigate to the location of the ffxiii2img.exe file.
this file is in the same location, where you copied the FF13Fix files which is:
“steamapps commonFINAL FANTASY XIII-2 alba_data prog win bin”

Scroll down through the set of options in the list and set the Power management mode option, to Prefer Maximum performance.
Hit apply at the bottom, wait for the screen to flicker and after the apply and close dialog box disappears, close the Nvidia control panel. This should give you an even better performance.
Solutions (Continued)
Only if you are running a surround sound system, you will face this issue. Follow the fix steps given here to solve the issue.
A buzzing noise is heard along with the other sounds in the game.
Initially this bug was easily fixable by setting the compatibility setting of the launcher file to windows 8. But the newer version of the FF13Fix made the game unable to run if that compatibility setting is used. Another issue was the games positioning of the sound for 4 channel based sound setups and for some 5.1 and 7.1 sound setups.
This bug can be resolved by switching the whole sound setup to stereo and here’s how you do it.
Right click on the sound icon and select Open volume mixer
Select System Sounds


Select Playback tab and select the speaker your device is using. if you have a lot of audio ports, then you could play a sound file and see where the green bars are moving. this way you can identify which is your default audio device.

Once u identified your sound device, close the audio file, select your device in the Playback menu and click on configure.

Another menu will appear. here you will have to select which audio channel you want. select Stereo and after selecting it, click next and next once more, then finish. Click Ok on the Playback menu as well, to close it.
This should solve the buzzing noise issue on your surround sound systems.
Some of the DLC’s are not accessible in the PC port and there’s an fan made patch available to unlock them.
The console content patch by Krisan Thyme person makes the DLC’s accessible to everyone and its quite easy and simple to install. thank you for the patch if you are reading this guide Krisan.
Download the file “FFXIII-2 – Console Content Patch (v2.3).zip” from this webpage
[link]
“Extract the zip file and after doing so, you will get two files and a folder called mod.”
“Now copy these files to FINAL FANTASY XIII-2 alba_data directory.”
“After copying, open the Install Console Content patch file. You will be presented with this window
Just press the number 1 button on your keyboard and then press enter. an patching process should start to revert the game to version 1.0 and once its done, an prompt to press any button will appear in the black window.


Press enter on the keyboard and the window will change back to how it looked when you opened the file the first time.
Now press the number 2 button on your keyboard and then press enter. an patching process should start and once finished it should say in the black window finished. close the window now and thats it. you have console content patch installed into your game. you can access the outfits and the weapons in the game menu.
After all of this is done, delete the mod folder, the Install Console Content patch file, and the readme files from the location.
The PC port’s rain is not transparent like in the console versions and is just too white, making the rain look like plain white lines raining down.
Leviathan’s Tears mod once again by Krisan Thyme person fixes this issue.
This mod requires you to install the Missing DLC’s for which the installation steps are given here in this guide after the crash fixes. Follow the steps and install the Missing DLC’s, before proceeding to use this mod.
Now this mod, offered in Krisan’s page doesn’t seem to work due to it having an tiny error in the batch file which causes the patch to mess up. I have already notified Krisan about it and I hope they will update it soon with the error in the lines fixed.
I corrected that small line and zipped it, and so you can use my fixed version.
[link]“Download the zip file and extract it. you will get two files and a folder”
“Now copy these files to FINAL FANTASY XIII-2 alba_data directory.”
“After copying, open the Install Leviathan’s Tears file. You will be presented with this window”


Just press the number 1 button on your keyboard and then press enter. an patching process should start and once finished it should say in the black window finished. close the window now and thats it.
After all of this is done, delete the mod folder, the Install Leviathan’s Tears file, and the readme files from the location.
There are three versions of the game that is being sold on Steam depending on which region you purchased the game from. these are the three versions that are available for purchase on steam directly. I am basing this with the help of Steam DB site:
FINAL FANTASY XIII-2 – this is the NA version
FINAL FANTASY XIII-2 (RU/IN/CIS) – this is the EU version and the one I have.
FINAL FANTASY XIII-2 (JAPAN/ASIA) this is the Asian and Japan region version which does not come with the english audio.
You can get the EU or NA version steam key, if you purchased it from the Square Enix store or other online sellers.
If you want the english audio, then refund your copy of the game if you can on steam and get the version sold on Square Enix’s online store. This version on the Square Enix store will give you an Steam CD key for the EU or NA version of the game. this is an legal method that I can recommend for those who bought the game, is in refund period and with a card or payment method that allows refund transfers to your card directly.
If you are stuck without the ability to refund then buy the game again on the Square Enix store.
If you don’t wanna buy the game again then you have to get the game files from a safe pirate website. This is illegal and I cannot link any such site here as it goes against steam’s TOS and guidelines.
Enhancements
This section of the guide covers the Enhancements that can be applied to the game to make it look better with the help of the graphic settings available from your graphic driver.
For Nvidia Card users
Right click and open the Nvidia Control panel.
Select Manage 3D settings and go to the Program settings tab in the menu. click on the drop down list at the center and select Final Fantasy XIII-2(ffxiii2img.exe).
Then In the below submenu, select Anisotropic filtering, and set the value to whatever you prefer. (x8 or x16 is better)
Hit apply at the bottom. wait for the screen to flicker and after the apply and close dialog box disappears, close the Nvidia control panel.
–
–
–
–
–
For AMD card users
I don’t own an AMD card and can only point you to this page on how to get Anisotropic filtering working on your GPU. Follow the Anisotropic filtering section.
[link]

This should give you sharp and good looking textures for this game.
Warning: GeDoSato is not supported with the FF13 fix and so I am not recommending to use it for this game in this guide.
Nvidia DSR and AMD VSR does just what GeDoSato does. Unfortunately not all cards support this feature, which is why many still use GeDoSato for older games and for this one as well. I will assume that those playing this game has a modern GPU capable of doing this and won’t recommend GeDoSato over the FF13 fix if your card doesn’t support DSR or VSR respectively. just play the game with higher AF x16 at your native resolution.
For Nvidia Card users
First check if you card supports DSR in this webpage.
[link]
Laptop Dedicated GPUs with Optimus technology do not support DSR and the webpage below does not list this crucial piece of information while listing the cards. One thing you can do to find out if your laptop supports DSR is to right click, open your Nvidia control panel and then see on the left side of the panel, to check if you have Options that are Display, and Video apart from 3D settings in the top.
If your card supports DSR then follow these steps.
Right click and open the Nvidia Control panel.
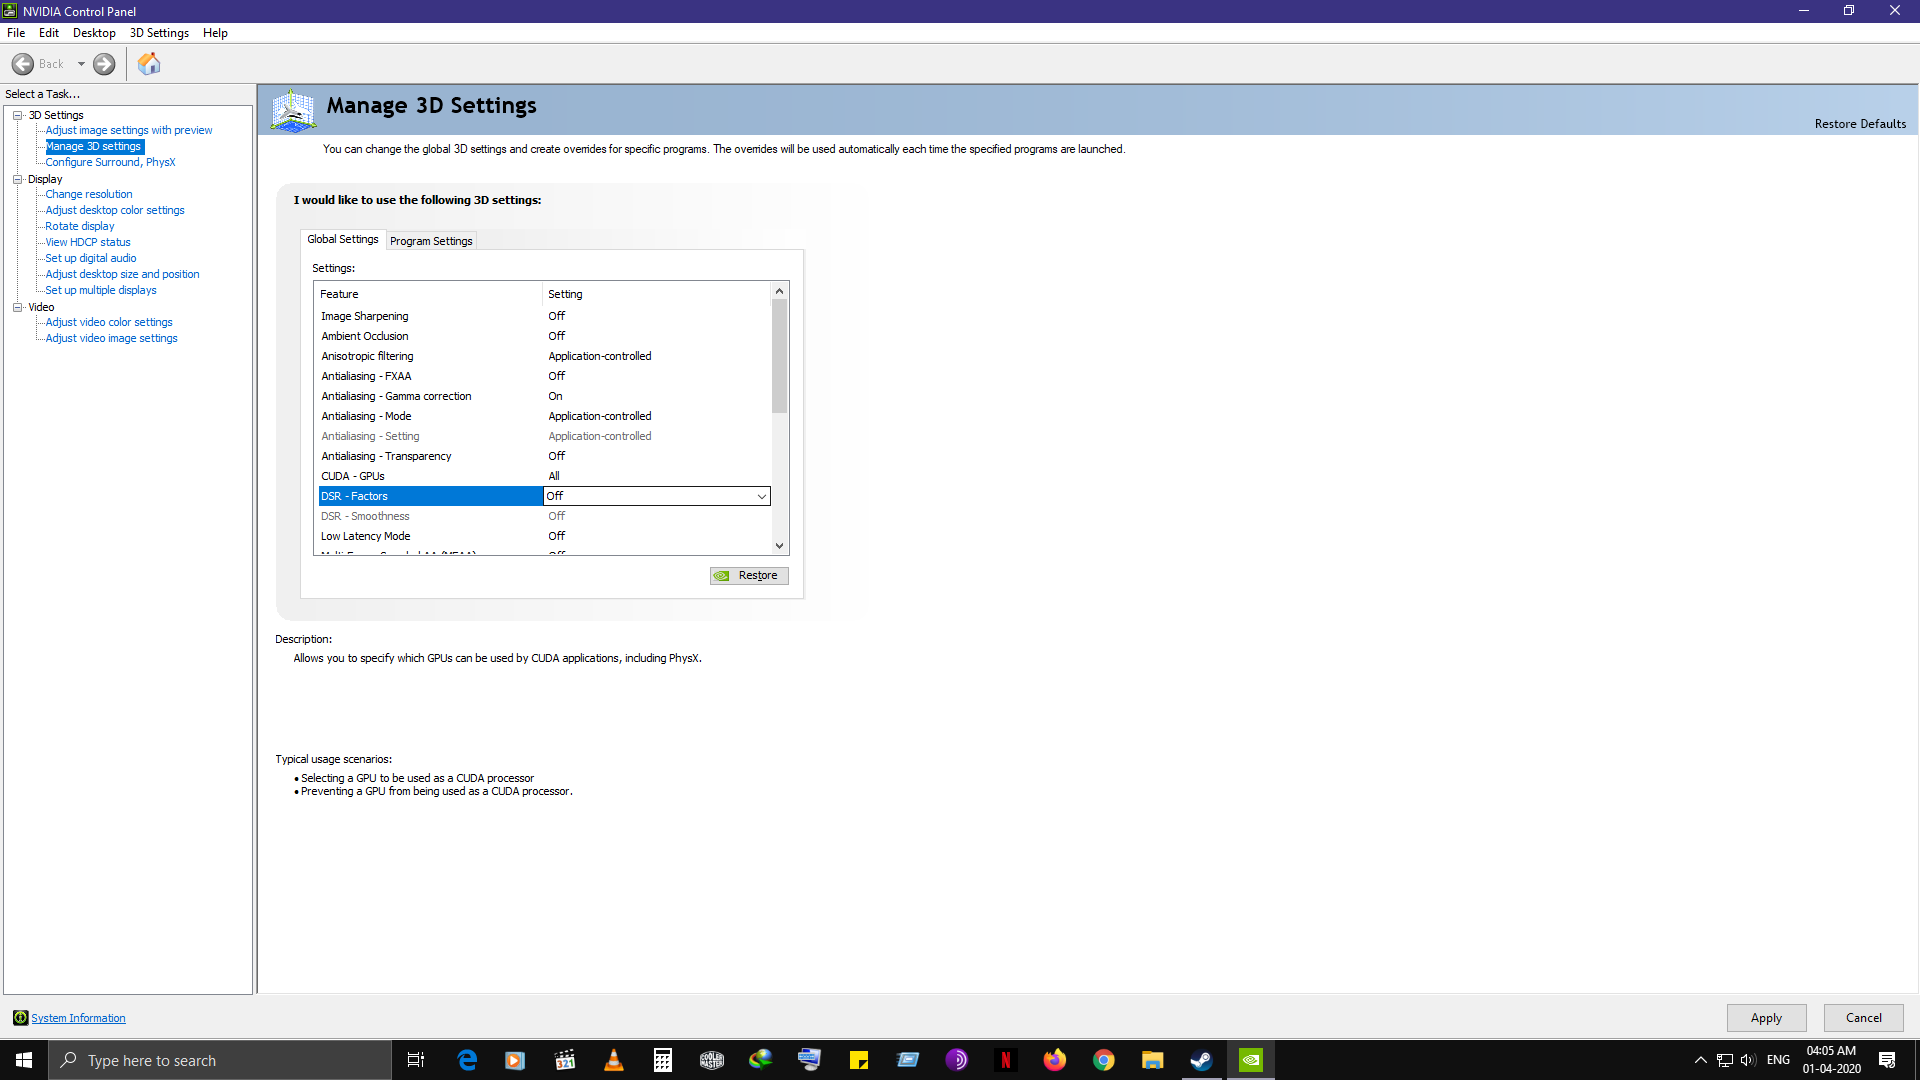
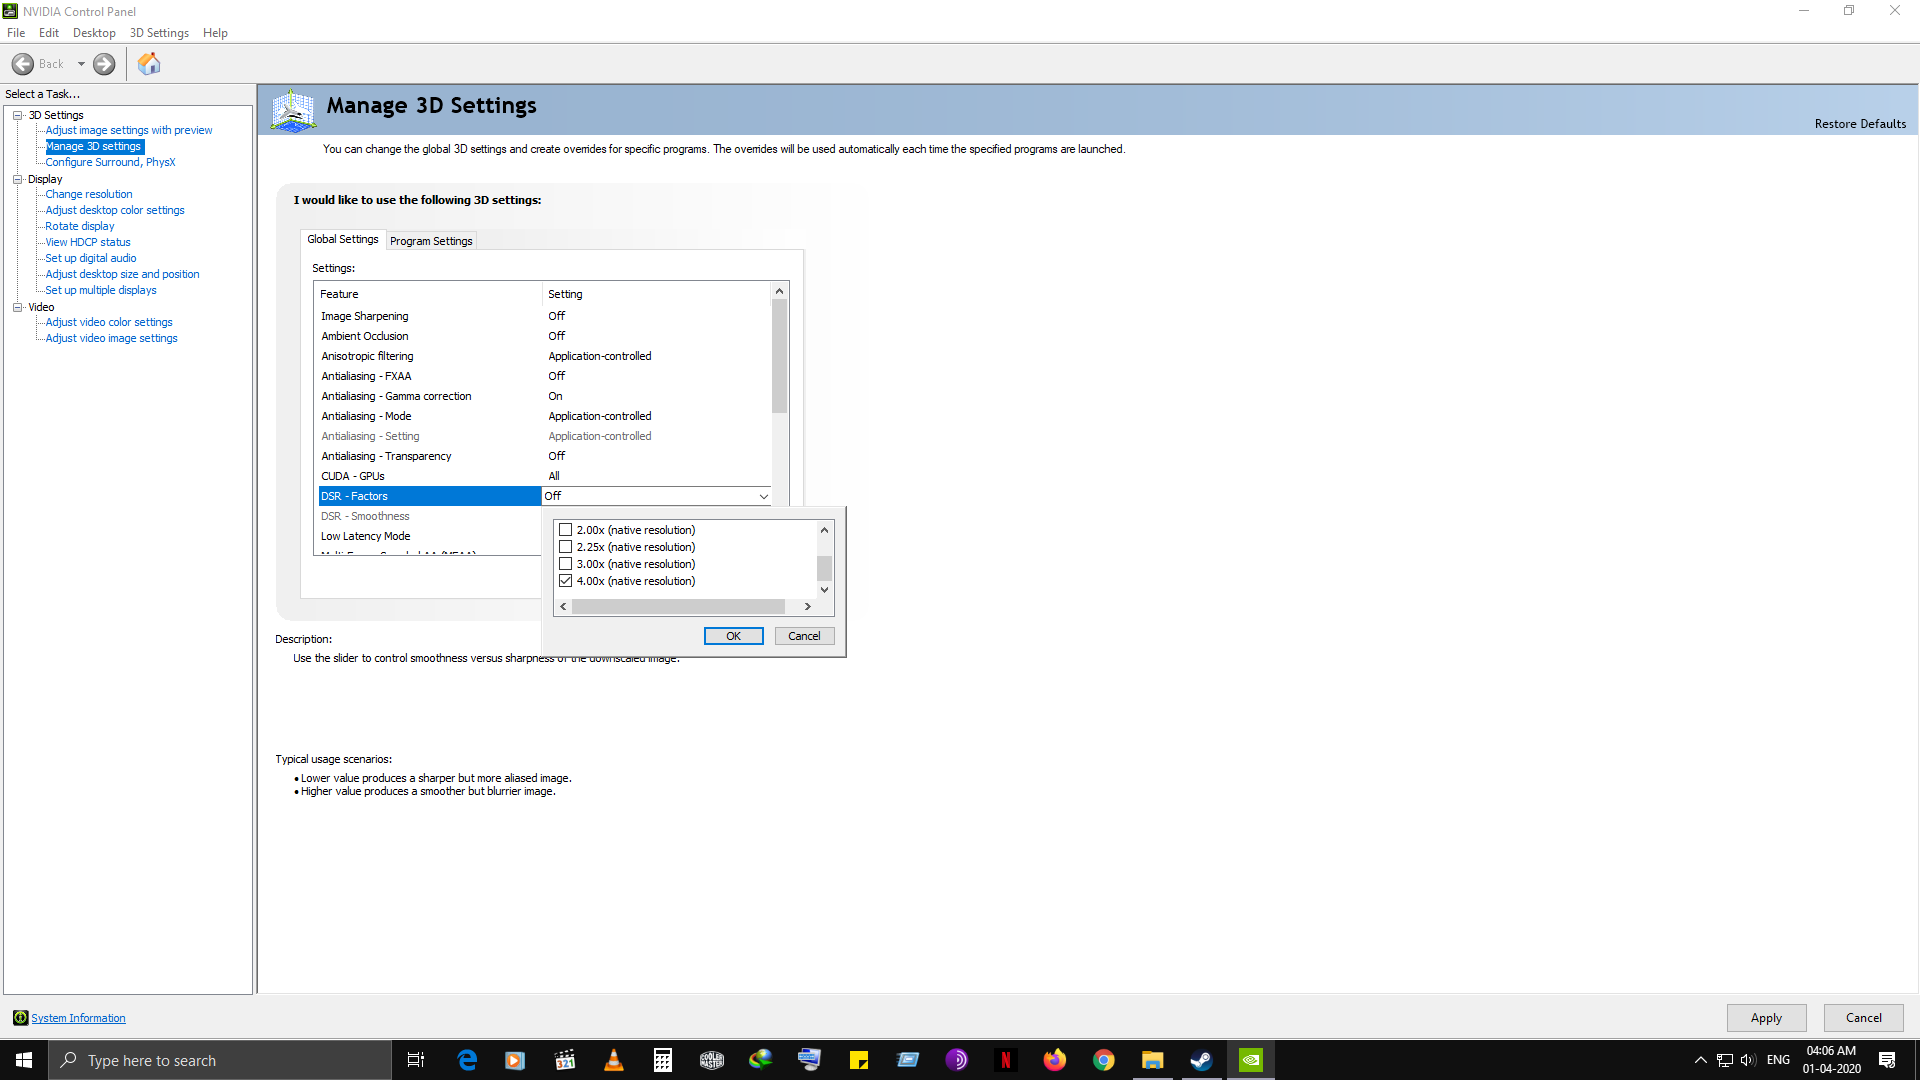
Select Manage 3D settings and go to the Global settings tab in the menu. Here, scroll down and select DSR Factors.
On selecting it, click on the Off button which will bring a small drop down list of resolutions to scale the game upto.
I will recommend the 4x one if you are having a 1080p screen. Your choice if you want a lower resolution. After checking it, the DSR Smoothness option should be clickable.

Set the DSR smoothness to 0%
Hit apply at the bottom, wait for the screen to flicker and after the apply and close dialog box disappears, close the Nvidia control panel.
Now open the FFXiii2Launcher.exe file located in the FINAL FANTASY XIII-2 folder. and select the new resolution listed in the screen settings option. For me it is 3840 x 2160 (4k).
Set Anti aliasing to x2, as it can cause frame dips due to it being at x16 for our DSR resolution.
After setting it up, hit on Start game and you will get a small box telling you how to alter settings again. Hit ok again and the game will launch.

For AMD card users
I don’t own a AMD card, and can only point you to the related page on how to do it. follow the Virtual Super Resolution section and the game exe is the ffxiii2img.exe located in the
” FINAL FANTASY XIII-2 alba_data prog win bin “
[link]
After following the guide from AMD’s page, open the FFXiii2Launcher.exe file located in the FINAL FANTASY XIII-2 folder. and select the new resolution listed in the screen settings option.
I had setup 4x more the resolution than my native 1080p resolution to upscale, which is 3840 x 2160 (4k) listed here in the launcher.
Set Anti aliasing to x2, as it can cause frame dips due to it being at x16 for our DSR resolution.
After setting it up, hit on Start game and you will get a small box telling you how to alter settings again. Hit ok again and the game will launch.
The game will now look great on your screen.
Steam Cloud alternative
Steam cloud is an automated cloud based save upload system used by games on Steam. it backs up your save files automatically online and you can download and use the save files on a different PC or the same PC.
But it doesn’t work smoothly for some games and this game especially has some issues with it.
Which is why you had to disable steam cloud for resolving the crashes, and some of you may be wondering now how do I back up my save files, if I want to play the game in future on a different PC or if you formatted your PC and reinstalled Windows?
If you had started playing the game following my guide by disabling steam cloud, then the save files would have been stored in the following location in your C: Drive or the drive where you have windows installed:
“C:Users%username%AppDataLocalSquareEnixFinalFantasyXIII-2save”
Here in the folder save, the save files will be stored and you need to back up the SquareEnix folder itself by copying it in a pen drive, or any USB device, or just wherever you want.
When you want to use the save files on a different PC, you have to copy the save files from the device or location you copied, to the following location in the new PC:
“C:Users%username%AppDataLocal”
If you had reset or reinstalled your windows, then you need to copy to the same location as above.
If you started playing the game with steam cloud, then disabled it after following my guide, then the save files before you disabled steam cloud is stored in the following location:
“C:Program Files (x86)Steamuserdata<Your user id>292140remote”
Here the save files will be stored here You have to copy it to a new location, where you have to make new folders in the following location:
“C:Users%username%AppDataLocal”
In the local folder, create a folder called SquareEnix, then a new folder inside that folder called FinalFantasyXIII-2 and inside that a folder called save.
Copy the save files which you copied in the remote folder into this save folder.
That’s it. the game should load up these save files and work fine. You have to manually back up the save files here in this method as well.
Mods and more enhancements
There are some really cool mods available for this game and in this section, I will be listing those mods with a brief write up on what it does to the game, and with a link to the page from where you can get it.
Remember that if you want to uninstall any of the mods mentioned in this section of the guide, you have to use the Verify integrity of games files option which will then re download the original unmodified files of the game.
This will remove the 4gb crash patch that you have applied on the ffxiii2img.exe file as well as remove the Console content and leviathan’s tears mods installation from your game files, thereby requiring you to re install all of them once again. So be careful with what all mods you want to install on your game.
Its advisable to install the mods in the same order that its written here. Also the FF XIII-2 HD mod has to be installed last after most of these mods are installed.
The PC version comes with Xbox based button prompts and although the prompts are correct, the icons lack the correct button colours which the 360 version of this game has.
The game also does not come with the Playstation controller icons, which can make it somewhat difficult to play this game if you are playing with a Dualshock controller.
This mod once again by Krisan Thyme person comes with the options to install either the proper 360 controller icons or the Playstation 3 icons.
Download the file “FFXIII-2 – Console Button Prompts (v2.1).zip” from this webpage
[link]
“Extract the zip file and after doing so, you will get three files and a folder called mod.”
“Now copy these files to FINAL FANTASY XIII-2 alba_data directory.”
“After copying, open the Install Console Button Prompts file. You will be presented with this window”
Press the number 1 button on your keyboard if you want the game to display Playstation Button prompts or press the number 2 button on your keyboard if you want the game to display the colored Xbox Button Prompts.
After pressing either 1 or 2 number keys, press enter and an patching process should start. once finished it should say in the black window finished. close the window now and thats it.


Delete the mod folder, the Install Console Button Prompts bat file, the image file and the readme file from this folder.
This mod once again by Krisan Thyme person is an optional mod that changes the Summoner outfit’s default colour scheme to be a bit similar to that of Rydia or Yuna. It also changes the colour scheme of the white mage outfit to brown and white.
Currently this mod is incompatible with the FF XIII-2 HD mod, so its advised not to install this mod if you are gonna be using that mod.
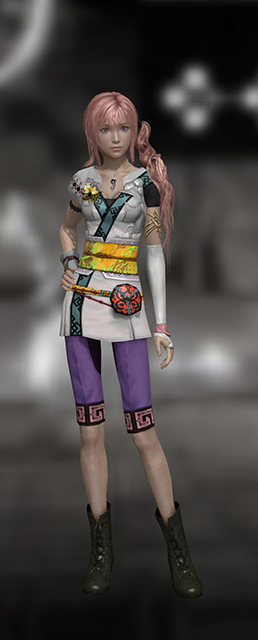
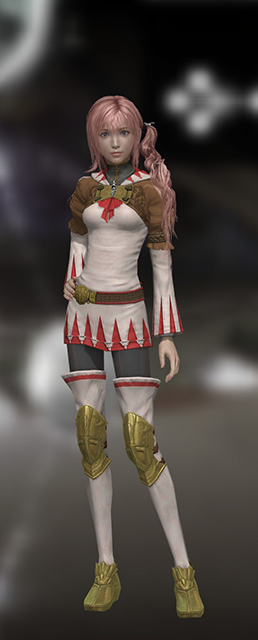
I have included images of how the summoner outfit looks in different colours, so looking at the images you can decide which colour costume you want to install with this mod. You can also check the default Summoner’s garb outfit and the default White mage outfit as well and see if you prefer those outfits instead of the ones added by this mod.
Summoner and White mage Outfit (default, not added by this mod)


Summoner and White mage Outfits (can be added by this mod)

If you are fine with the default outfits itself, then you can skip and proceed to the next mod, if not then proceed through the following steps.
Download the file “FFXIII-2 – Apotamkin’s Closet (v1.1).zip” from this webpage
[link]
“Extract the zip file and after doing so, you will get two files and a folder called mod.”
“Now copy these files to FINAL FANTASY XIII-2 alba_data directory.”
“After copying, open the Install Apotamkin’s Closet file. You will be presented with this window”
Make your selection by pressing the appropriate number button for the outfit you need and then press enter. This will start the mod installation process and you have to wait for the mod to finish installing. once its done, press the enter key to close the window.
Remember you can only use one of the options each time you open the installer and have only one of the summoner garbs from this mod installed in your game files.


For example you can install the Summoner outfit of your choice first and then open the Install Apotamkin’s Closet file again to install the White mage classic outfit. You can do the reverse as well and install the White mage classic outfit first and then any of the Summoner garbs.
Once you are done installing, delete the mod folder, the Install Apotamkin’s Closet bat file, and the readme file from this folder.
Another optional mod by Krisan Thyme, that removes the glow effect which makes the monsters in your paradigm pack glow.
Check the image of with and without the glow effect below to understand better.
If you are ok with the glow effects, then you can skip this mod and proceed to the next mod. if not then proceed through the following steps.
Download the file “FFXIII-2 – Monster Glow Begone Patch (v1.3).zip” from this webpage
[link]
“Extract the zip file and after doing so, you will get two files and a folder called mod.”
“Now copy these files to FINAL FANTASY XIII-2 alba_data directory.”
“After copying, open the Install Monster Glow Begone file. You will be presented with this window”
Press the number 1 button and press the enter key, which will start the installation process. an administrator access prompt will appear and you have to click Yes on that prompt. after this, the installation process will complete successfully.


Once you are done with this installation, delete the mod folder, the Install Monster Glow Begone bat file, and the readme file from this folder
Mods and more enhancements (continued)
This mod by MJB, enhances the quality of the textures and the character models used in the game, making it look sightly better than the base game. Thank you MJB if you are reading this guide for this mod.
More than the textures, there is an significant increase in quality of the character models and they should look good with this mod installed.
Before installing this mod, make sure that the game is able to run with the above mods installed. If the game is running fine with them, then you can proceed in installing this mod as well.
Download the mod from this page below.
[link]
Manual download the file, and make sure that the place where you will extract the zip file has atleast 20gb of space.
On extracting the zip file, you will get the following files.
Open the FFXIII-2 HD file, the one highlighted in the image above and it should open a new window.
Follow the instructions that will appear in this window and the mod will be installed successfully.

Credits
Thanks to
rebtd7 person for the FF13 Fix.
Krisan Thyme person for the majority of the mods.
MJB person for their texture and model enhancement mod.
FordGT90Concept for creating the Large address aware tool to fix the crashes
Daniel Pistelli for creating the 4gb Patch tool