
Overview
This is my first time writing a guide and it can be a bit amateurish. so bear with me if it sounds rude or well if it comes out bad. This guide’s main purpose is to make sure players have the best experience of this game without facing issues like lower frame rates, crashes, and other odd visual bugs that can ruin the game for a lot of people. The guide also covers some visual enhancements that can be applied to the game by tweaking some graphic driver settings from the graphic driver and with mods.
Prerequisites
Before proceeding with this guide, make sure that you are running the latest version of Windows 10 operating system with up to date drivers so that the solutions written in this guide works better.
Also make sure you have not installed the game in your C drive or the drive where you have your operating system installed. Steam by default will set up an directory in the C drive when you begin installing the game and you will have to change that directory in the installer window to another drive on your PC.
The Launcher
When you launch the game for the first time, there will be a launcher that you can use to customize the visuals, and the audio language.
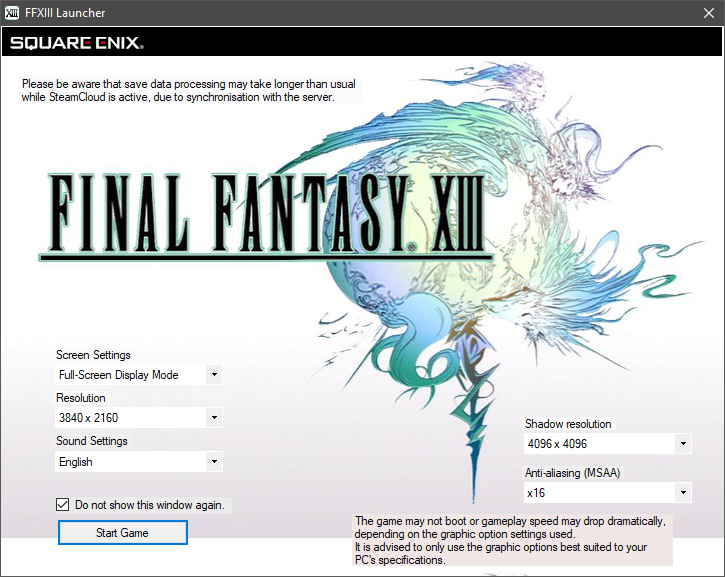
If you want the game to run in fullscreen or windowed mode, then there are options for that in the Screen settings. this setting has to be set to Fullscreen Display Mode as the windowed mode option limits you from customising the resolution.
There is the Resolution settings tab which allows you customise the game resolution.
If you want to play with English or Japanese audio, the option to do so is in the Sound settings tab. This option is not available if you got the ASIA region version of the game.
Here there are some really crucial settings that could help in getting the game look good as well run better if you have a low end hardware.
Anti aliasing

Note: if you follow the DSR method in Dave’s guide, then set this to 2x as you will end up hurting performance, if set to x16.
Shadow resolution
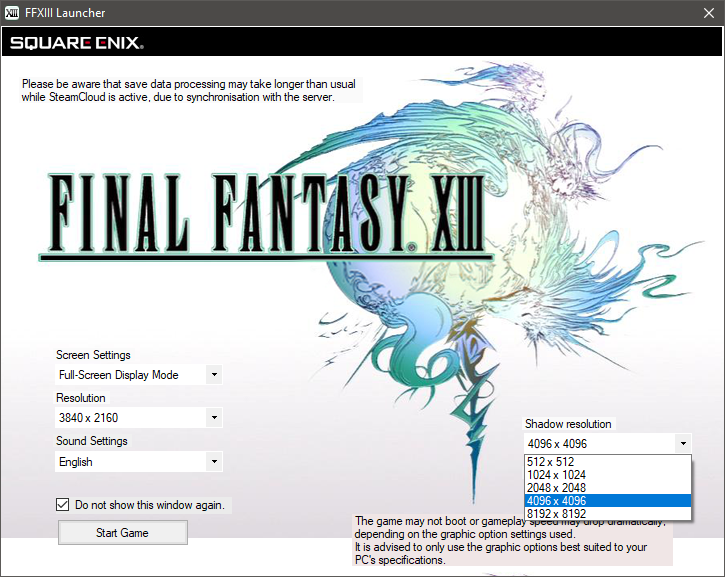
Shadow resolution is the most demanding setting and can affect the framerate a lot. Lower the values if you are not getting a better performance.
Also do not set it to 8192 x 8192 resolution. At this higher setting, the shadows will look quite blocky and will reduce ur framerate a lot even if u have a high end gaming PC as well. 4096 x 4096 is the max shadow resolution option u should play the game with.
The Problems
A few which can be annoying for new players and disappointing for returning players from the console version.
Common issues
– Inconsistent 60fps which generally makes it not smooth
– Lacks Vibration support that is present in the console versions, but disabled in the PC version
– Playing at a resolution which is higher than 720p based resolutions, can cause a few issues with scaling of some graphical elements in the game.
* Portion of the intel of enemies scanned will be missing,
* The glowing effect inside the stars when you get five stars in a battle, will be missing, &
* Animation effects inside all text boxes will be missing as well
– Stutters, if you are playing without a controller
– Macro-blocking like artifacts on character hair
– FMV cutscenes are poorly encoded for the PC version which looks slightly different from the PS3 version
– Crash before playing the first cutscene in Nautilus
– No English audio option for Asia/Japan version of the game.
can happen, but not for everyone.
– Abnormal Eyelashes and character hair
Solutions
Four of the above issues can be solved with a fix made by this amazing person rebtd7. thank you for the fix if you are reading this guide.
Download the latest version of the fix from their github releases page:
[link]
If you are using an Nvdia or non RDNA AMD GPU, you can proceed to the Steps for installing the FF13Fix section of the guide.
Important preliminary step only for AMD RDNA cards:
The latest version of the FF13Fix can mitigate the performance issues that’s happening on AMD RDNA RX 5000 and 6000 series GPU’s to an extent, thanks to the creator of the fix adding an support for the fix to function properly along with DXVK.
Download the latest version of DXVK from this below link:
[link]
You have to download the tar.gz file from the above link.
Extract the .tar file with WinRar or 7zip software and you will get a folder called dxvk. inside that there will be two more sub folders x32 and x64.
Inside both the folders there will be dll files and you need to copy the dll files inside the x32 folder. So copy these dll files present inside this x32 folder to the following location:
“FINAL FANTASY XIII white_data prog win bin”
Once you have copied the dll file’s into the bin folder, rename the d3d9.dll file to dxvk.dll.
Continue to the next step here.
Steps for the installing the FF13Fix:
After downloading the FF13Fix, extract the fix to the following location.
“FINAL FANTASY XIII white_data prog win bin”
To get to this location, select this game title on your Steam library, Right click and select Properties.
then in the new window go to Local Files and then select Browse Local Files. that should open the location.
Now follow the screenshots on where exactly you have to paste the files.
“Select white_data folder”
“Select prog folder”
“Select win folder”
“Select bin folder”
“copy the fix here. I already copied it and it should look like this”


You have to copy the fix here inside the bin folder where ffxiii.img.exe file is present.
That’s it. If you want to turn off vibration or cap your frame limit to 30 or 60, you can do so by editing the values in the FF13Fix.ini file. there’s information provided in the ini file itself on what to edit and what to change.
If you are using an AMD RDNA GPU, you can set this option present in the FF13Fix.ini file which is DiscardUIVertexBuffer. You can set it from false to true and see if it improves the performance. Be warned that this particular option is experimental and if its causing any graphical issues, then set it back to false.
This is required for those using DXVK for RDNA GPU’s and recommended if you are using The FFXIII HD Project mod and the HD Models Plus mod.
The game will crash if its memory usage exceeds more than 2GB. Using DXVK or the high res texture and model mods, can increase the game’s memory usage and cause it to crash.
With the help of the FF13Fix, an 4gb memory patch can be used to increase the game’s memory usage to be more than 2gb.
Make sure that you have installed the FF13Fix as it is required by this 4gb patch.
Make an copy of the ffxiiiimg.exe file in the folder:
FINAL FANTASY XIIIwhite_dataprogwinbin.

To make a copy of the exe, you have to first select the ffxiiiimg.exe file and right click on Copy option. then right click once again in an empty area in the folder and click the paste option. this will create an copy of the exe file.

Make sure that the File name extensions check box located on the View Tab is unchecked.

Rename this exe copy as untouched. (it must be renamed untouched for the 4gb patch to work. if you rename it something else, then you will get an code 51 error on launching the game.)

–
-Download the 4gb patch from the below link. (relax, its size isn’t 4gb.)
[link]
Extract the 4gb_patch.zip file to anywhere you want, and open the 4gb patch.exe file. an small window will open.

In this small window, navigate to the game executable file location which is in the same folder where you put the FF13Fix files.
” FINAL FANTASY XIII white_data prog win bin “
Select the ffxiiiimg.exe file and click on open.

After doing so another small window will appear saying Executable is successfully patched. You just have to click on ok to close this patch window.
This should fix the crashes.

Solutions (Continued)
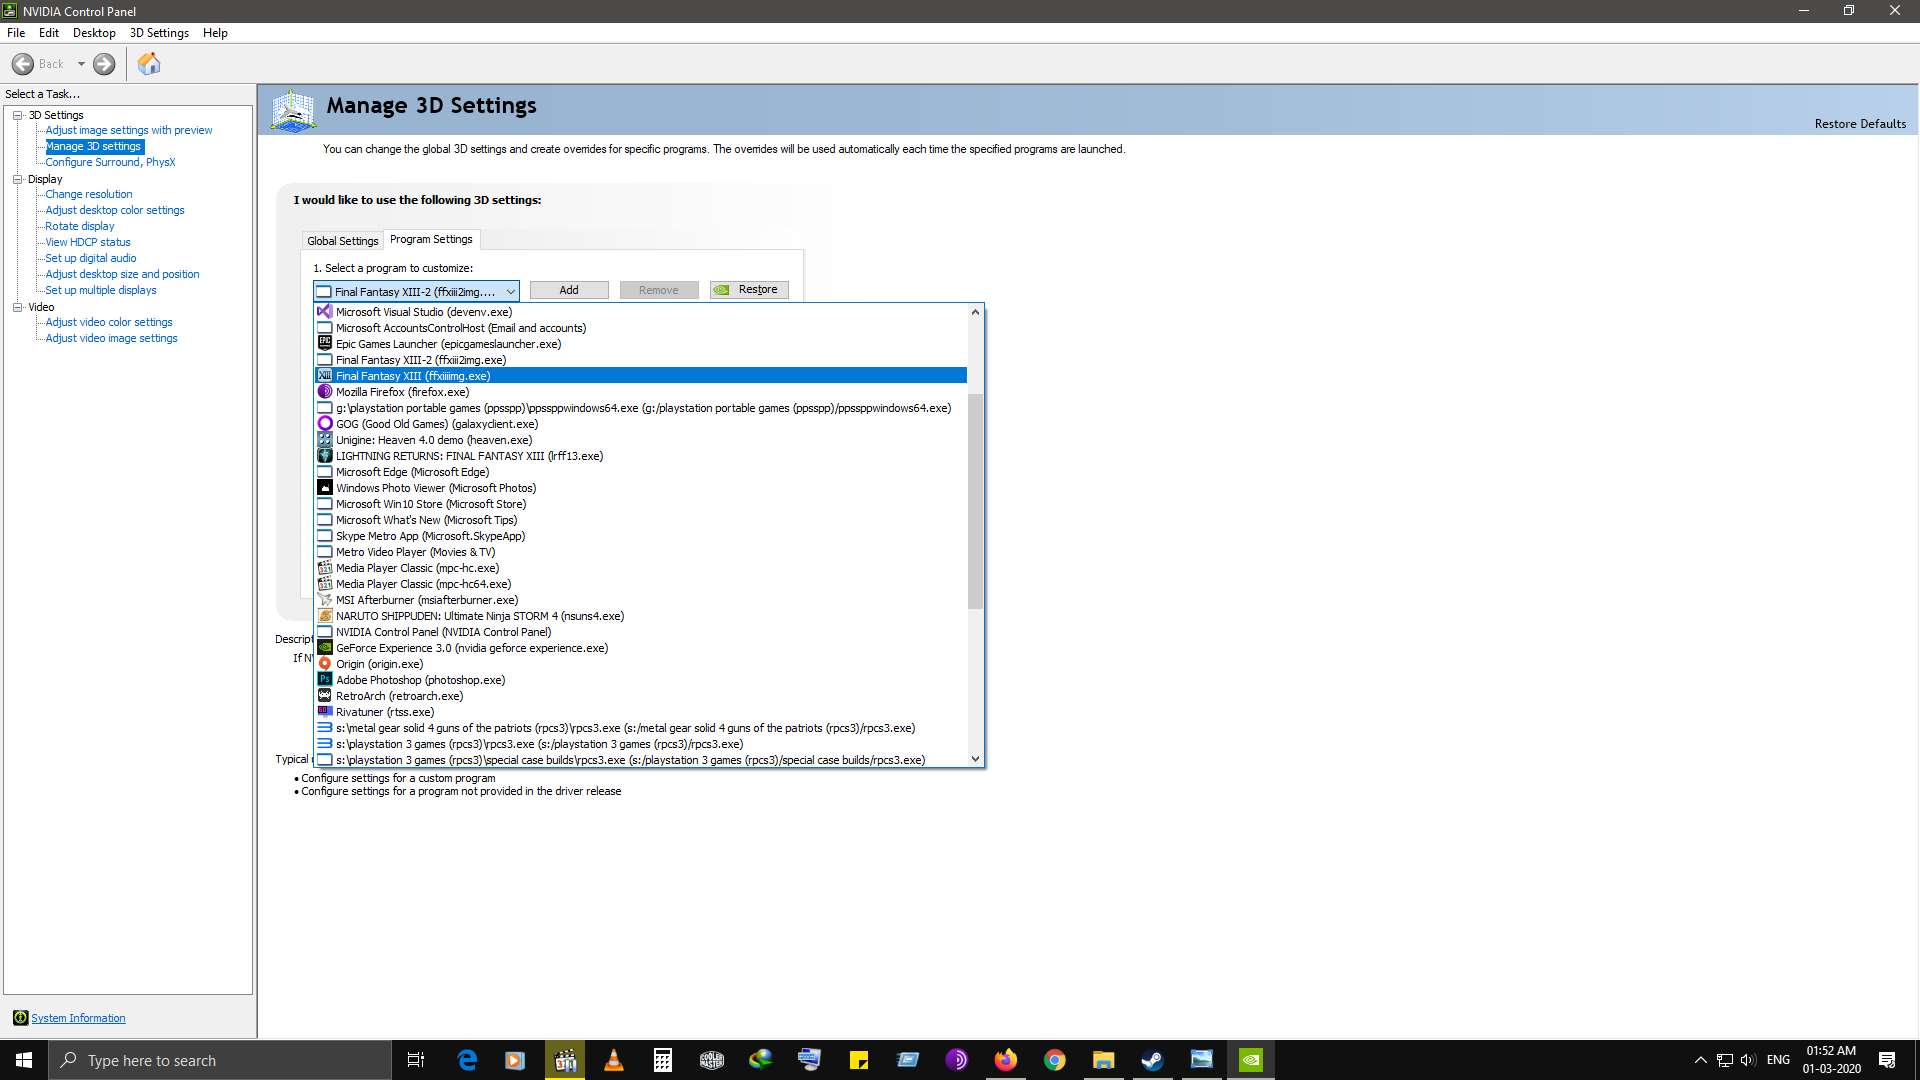
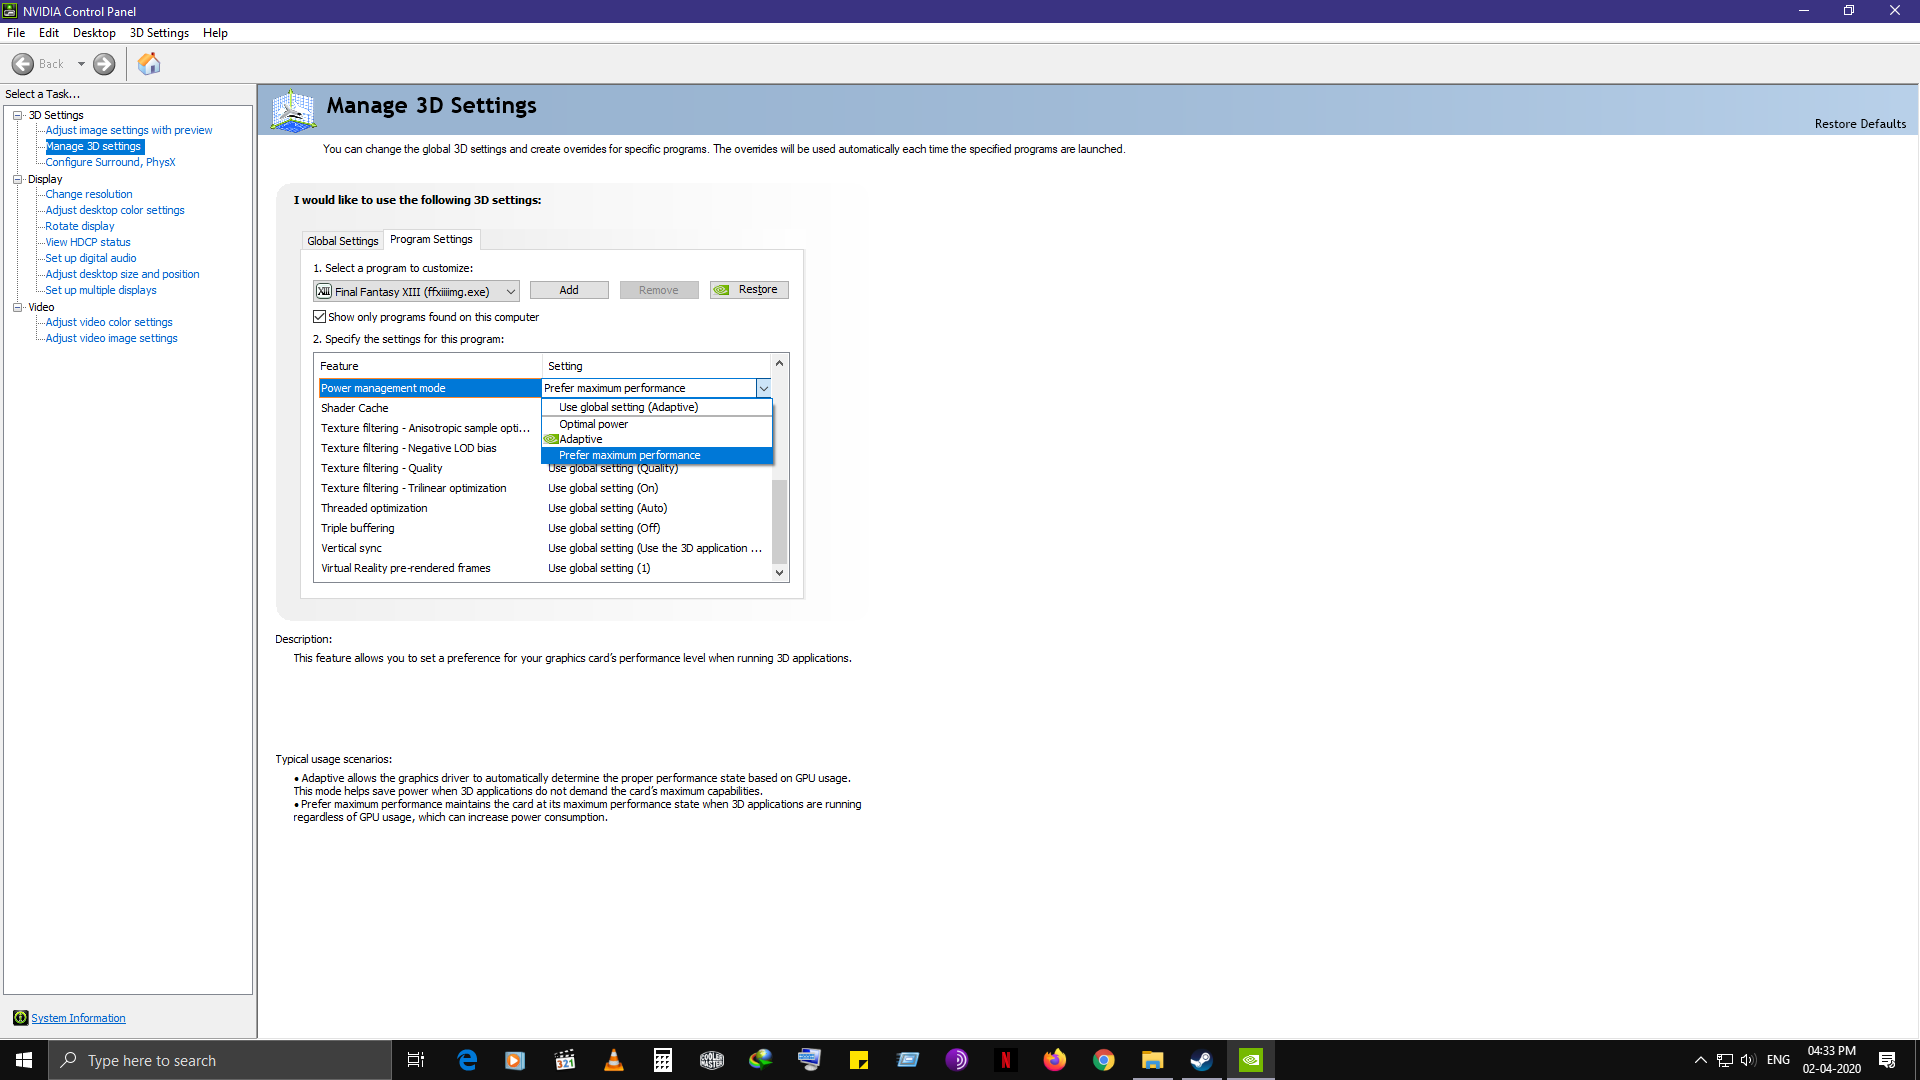
This is an additional step only for Nvdia Card users which makes sure the game’s performance at 60fps is a bit more stable and consistent.
Right click and Open the Nvidia Control panel.
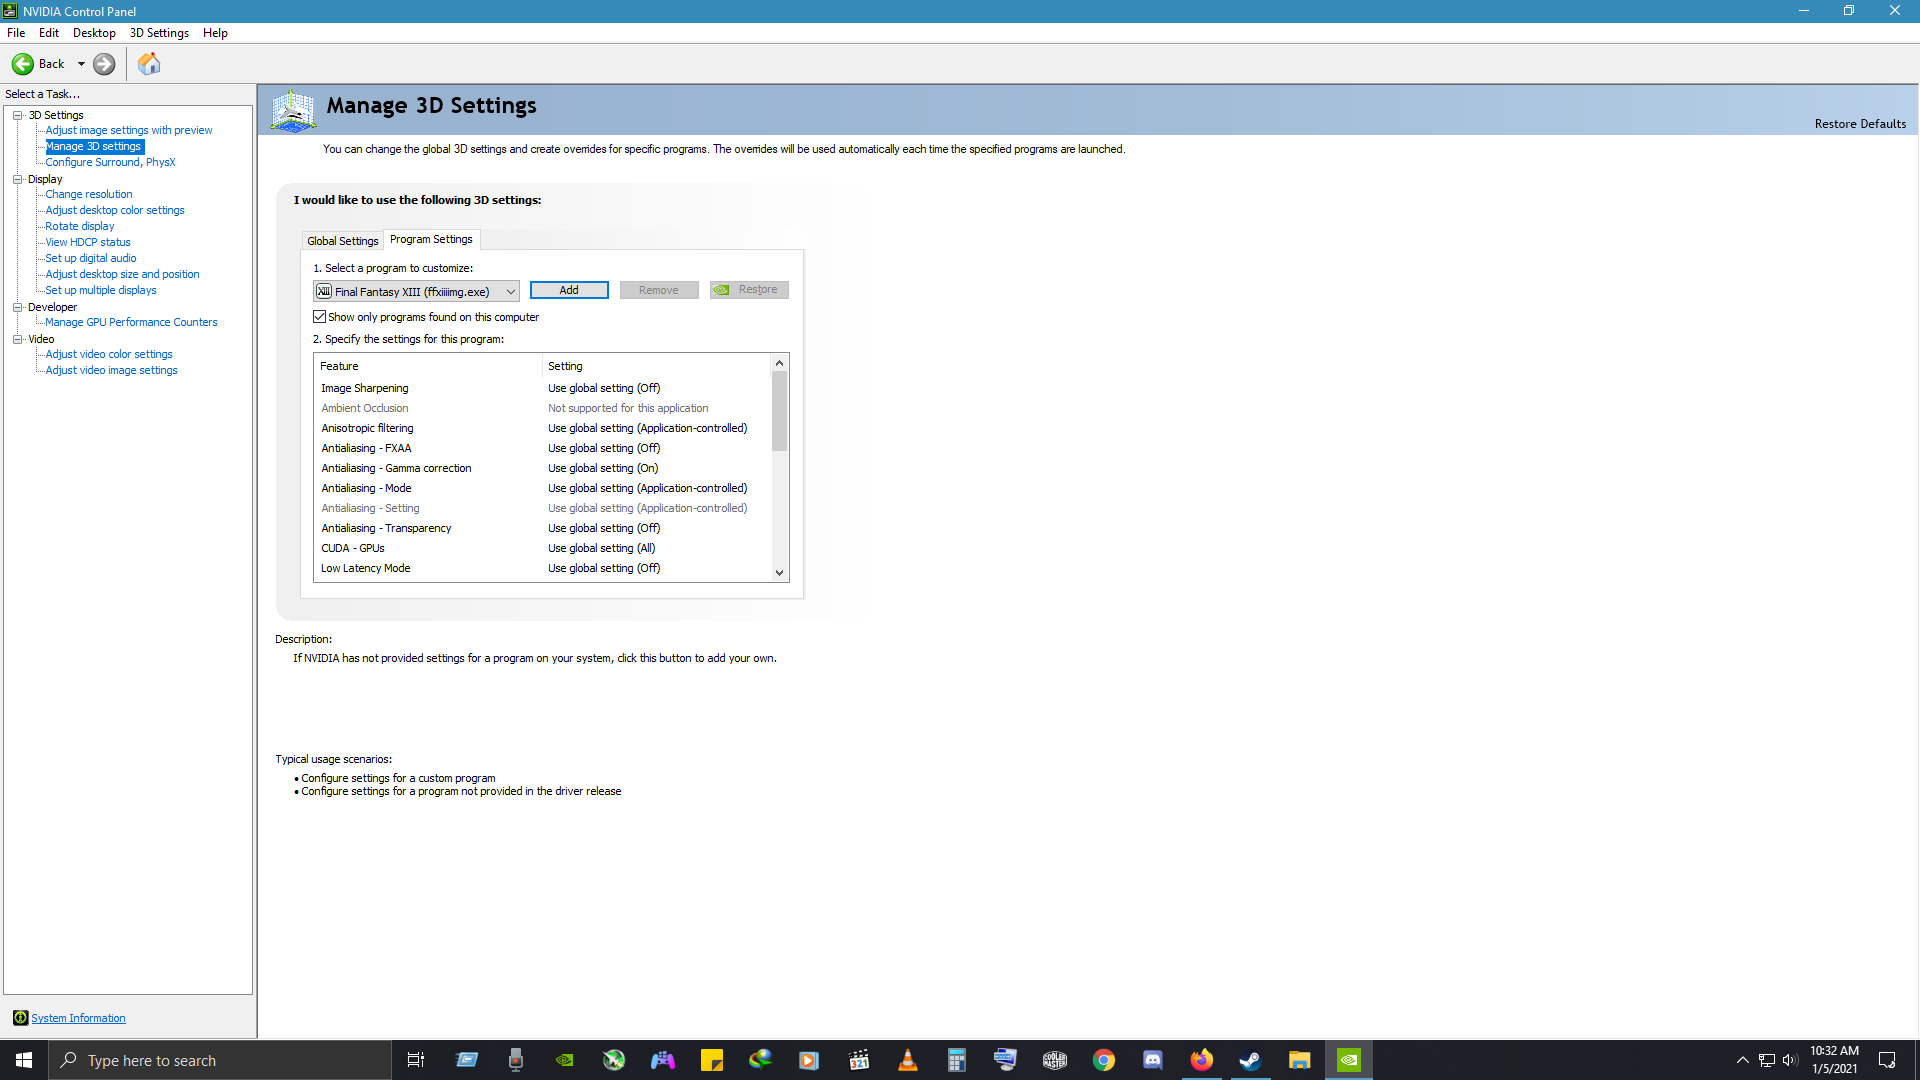
Select Manage 3D settings and go to the Program settings tab in the menu. click on the drop down list at the center and selectFinal Fantasy XIII(ffxiiiimg.exe).
This option will open the Add window where you have to add the game executable which is the ffxiiiimg.exe file, by using the Browse option and then navigate to the location of the ffxiiiimg.exe file.
this file is in the same location, where you copied the FF13Fix files which is:
” steamapps common FINAL FANTASY XIII white_data prog win bin”
Scroll down through the set of options in the list and set the Power management mode option, to Prefer Maximum performance.
Hit apply at the bottom, wait for the screen to flicker and after the apply and close dialog box disappears, close the Nvidia control panel. This should give you an even better performance.
Only if you face this issue, do the following fix steps
Due to MSAA completely disabled, some of the stuff like eyelashes and hair render very weirdly and it just looks bad. This can happen:
If the Anti aliasing is set to off in your Graphic card settings.
the exe file which is ffxiii.img.exe file is found in:
” steamapps common FINAL FANTASY XIII white_data prog win bin”
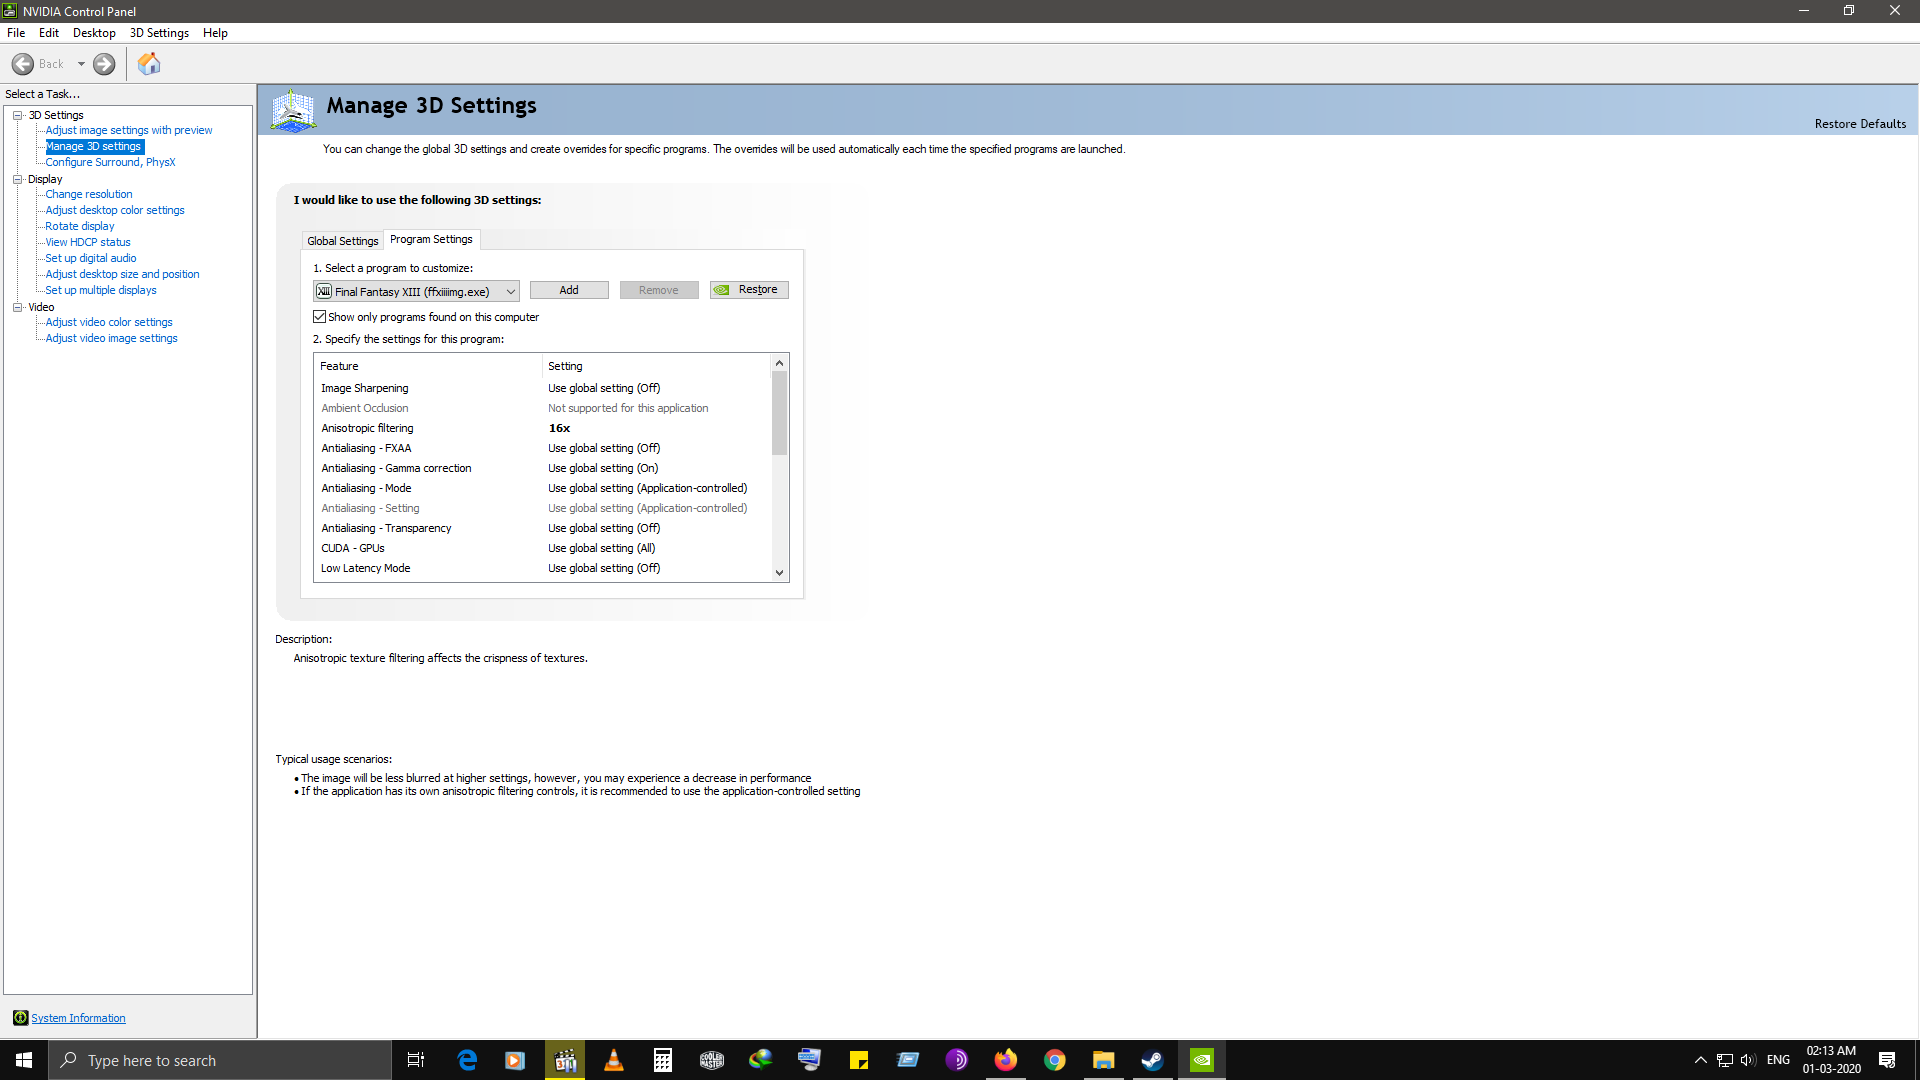
For Nvidia users
-Right click and Open the Nvidia Control panel.
-Select Manage 3d settings and go to the Program settings Tab.
-In the Program Settings tab, click on the drop down list at the center and select Final Fantasy XIII(ffxiiiimg.exe).
This option will open the Add window where you have to add the game executable which is the ffxiiiimg.exe file, by using the Browse option and then navigate to the location of the ffxiiiimg.exe file.
this file is in the same location, where you copied the FF13Fix files which is:
” steamapps common FINAL FANTASY XIII white_data prog win bin”
-Set the Anti-aliasing Mode option to Application Controlled from the set of options in the small drop down list.
-Hit apply, and close the panel.

For AMD users,
Refer this guide and the anti aliasing section.
[link]
Create a custom application profile for this game by adding the game’s exe file from from the top right option in the panel.
Set Anti aliasing mode to Use application settings if it is set to any other option.
Apply the settings, and close the panel.
This should fix the issue.
Solutions (Continued)
The FMV cutscenes (that makes this game a bit huge for its time on PC) are encoded with a slightly lower bitrate compared to the PS3 version. its not an issue for new players, but it can be one for returning players from the PS3 version.
Please check the FFXIII HD Full Motion Video mod mentioned in the Mods and more enhancements section in this guide to solve this issue.
This applies only for Nvidia card users specifically for those who are using an 900 series GPU
Its confused with the broken transparency issue that causes glitched out eyelashes and character hair.
This one is very small to notice, but quite distracting when you do see it.
When you move the character or the camera around them, you would notice small squares appear and disappear on the hair. This looks like compression artifacts that happens on low resolution videos.
What’s causing the issue here ?
It seems to be some of this games visual elements are being stored in a format that is not behaving properly when the GPU driver is trying to smooth them out with the AA, which the game is instructing to do with MSAA anti aliasing. disabling MSAA breaks transparency based alpha to coverage technique used on model’s, thereby glitching the hair and making it even worse
Here’s a solution for that.
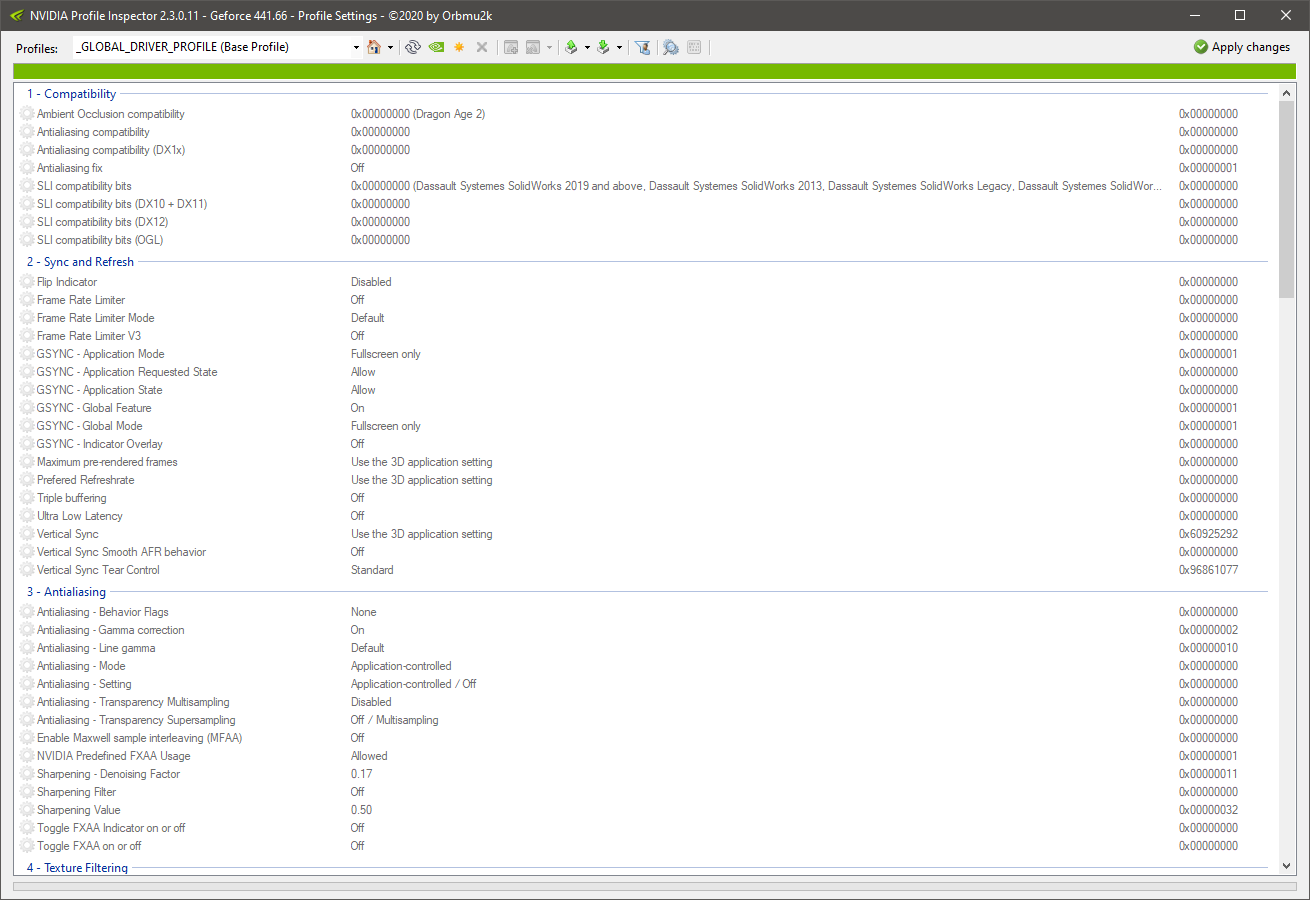
Download the latest version of Nvidia Profile inspector from the releases page . thanks to Orbmu2k for this amazing tool.
[link]
Now extract it anywhere u want. I would prefer documents. launch the profile inspector and wait for it to quickly load some stuff.
-This will be the starting window
-Now select Final Fantasy XIII from the drop down list
-In the Anti aliasing fix option, set it to on from off
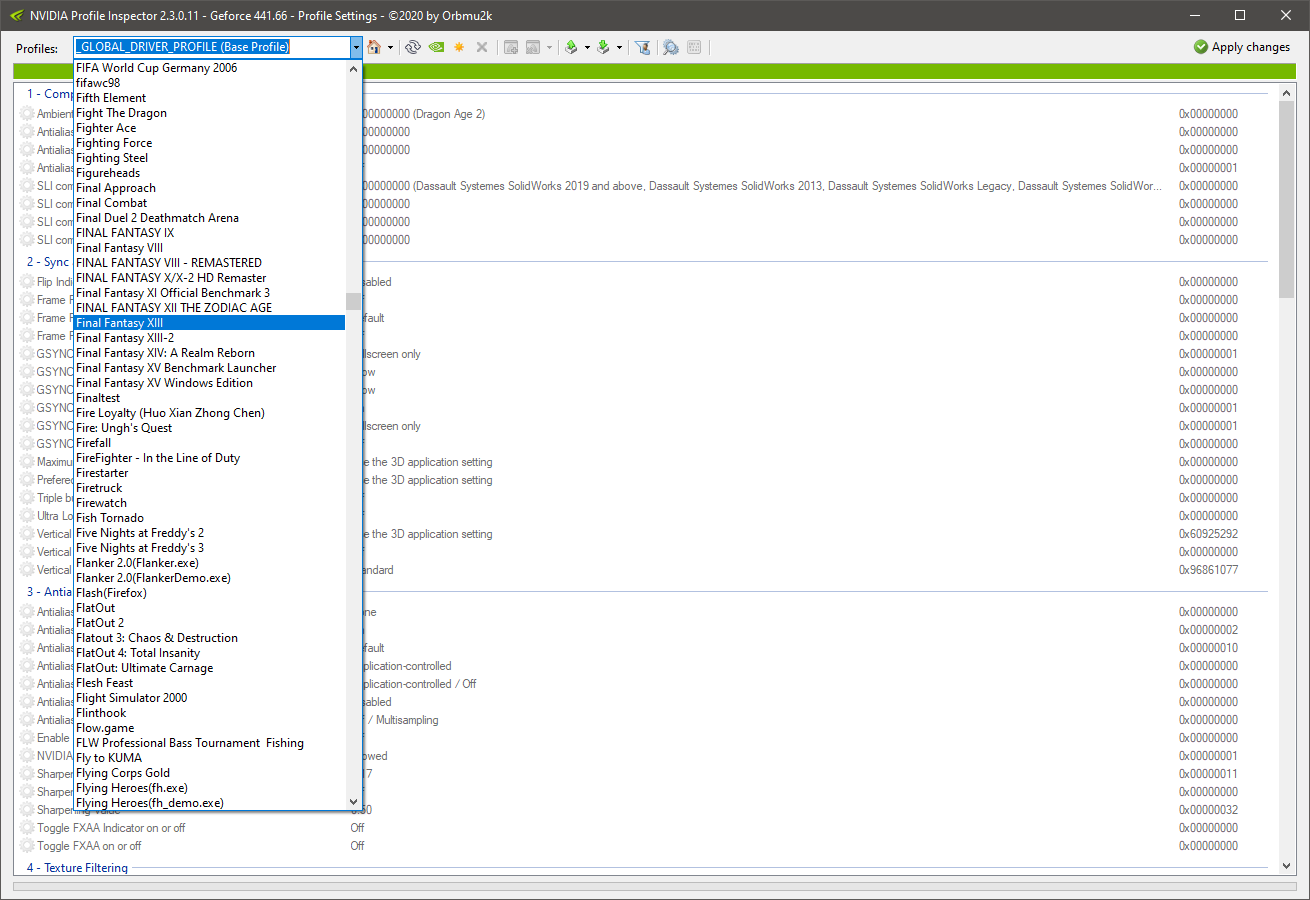
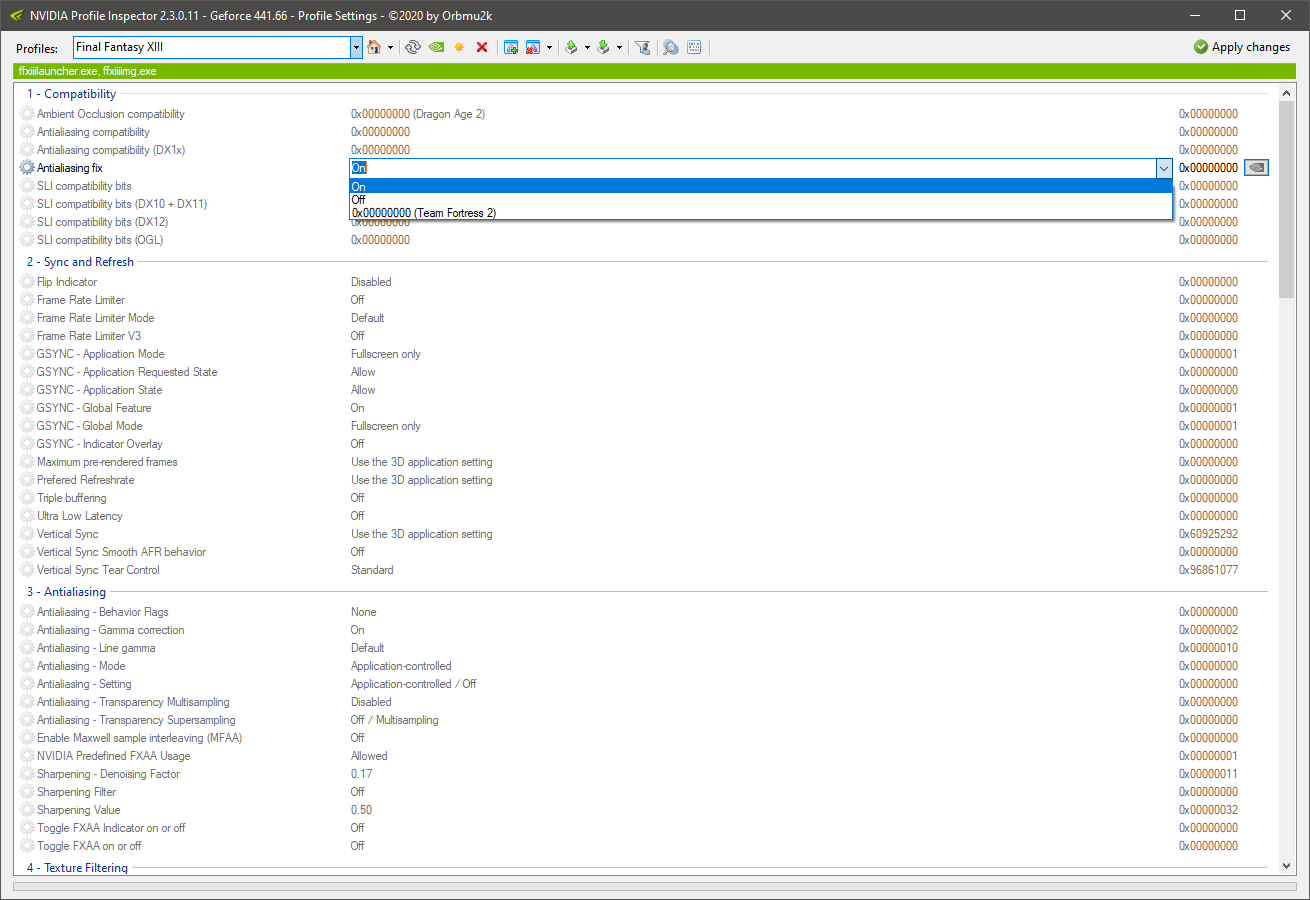
-Now click apply changes on the top right corner and close the tool.
This should fix the macro blocking issue on the hair.
The game crashes before the first cutscene in Nautilus when playing in certain resolutions.
Here are the resolutions on which the game crashes:
1366×768, 1600×1050, 2103×1183, 2351×1323, 2715×1527, and 3325×1871
Before proceeding further to trigger the cutscene, save the game and then set the resolution from the game launcher to a resolution that is not mentioned above.
Launch the game after setting an resolution that is not mentioned above in the list, and play through the cutscene. Once the cutscene has finished playing save the game and close it. Now set the resolution to whatever it was set before the cutscene and continue playing the game.
There are three versions of the game that is being sold on Steam depending on which region you purchased the game from. these are the three versions that are available for purchase on steam directly. I am basing this with the help of Steam DB site:
FINAL FANTASY XIII – this is the NA version
FINAL FANTASY XIII (RU/IN/CIS) – this is the EU version and the one I have.
FINAL FANTASY XIII (JAPAN/ASIA) this is the Asian and Japan region version which does not come with the english audio.
You can get the EU or NA version steam key, if you purchased it from the Square Enix store or other online sellers.
If you want the english audio, then refund the copy of the game if you can on steam and get the version sold on Square Enix’s online store. This version on the Square Enix store will give you an Steam CD key for the EU or NA version of the game. this is an legal method that I can recommend for those who bought the game, is in refund period and with a card or payment method that allows refund transfers to your card directly.
If you are stuck without the ability to refund then buy the game again on the Square Enix store.
If you don’t wanna buy the game again then you have to get the game files from a safe pirate website. This is illegal and I cannot link any such site here as it goes against steam’s TOS and guidelines.
Enhancements
This section of the guide covers the Enhancements that can be applied to the game to make it look better.
For Nvidia Card users
Right click and Open the Nvidia Control panel.
Select Manage 3D settings and go to the Program settings tab in the menu. click on the drop down list at the center and selectFinal Fantasy XIII(ffxiiiimg.exe).
In the below submenu, select Anisotropic filtering, and set the value to whatever you prefer. (x8 or x16 is better) hit apply on the bottom right corner of the control panel.
–
–
–
–
For AMD card users
I don’t own an AMD card and can only point you to this page on how to get Anisotropic filtering working on your GPU. Follow the Anisotropic filtering section.
[link]
This should give you sharp and good looking textures for this game.
Warning: GeDoSato is not supported with the FF13 fix and so I am not recommending to use it for this game in this guide.
Nvidia DSR and AMD VSR does just what GeDoSato does. Unfortunately not all cards support this feature, which is why many still use GeDoSato for older games and for this one as well. I will assume that those playing this game has a modern GPU capable of doing this and won’t recommend GeDoSato over the FF13 fix if your card doesn’t support DSR or VSR respectively. just play the game with higher AF x16 at your native resolution.
Since I don’t own a AMD card, I can once again only point you to the related page on how to do it. follow the Virtual Super Resolution section.
For AMD card users
[link]
For Nvidia Card users
Check if you card supports DSR. Laptop Dedicated GPUs with Optimus technoloy doesn’t support DSR.
[link]
Follow this guide by Dave person, on how to get DSR for this game. its much detailed and I followed it for my setup as well. thanks Dave for your guide.
[link]
Set the Anti aliasing to 2x as you will end up hurting performance, if set to x16. Look in the launcher pic on Dave’s guide.
Mods and more enhancements
There are some really cool mods available for this game and in this section, I will only be listing the required mods with a brief write up on what it does to the game, and with a link to the page from where you can get it.
Reason why I did not include the installation steps for some of the mods is because these steps can vary depending on the changing nature of the mod installation with updates and changes made to it.
The PC version comes with Xbox based button prompts and although the prompts are correct, the icons lack the correct button colors which the 360 version of this game has.
The game also does not come with the Playstation controller icons, which can make it somewhat difficult to play this game if you are playing with a Dualshock controller.
This mod by Krisan Thyme person comes with the options to install either the proper 360 controller icons or the Playstation 3 icons. thank you Krisan if you are reading this guide.
Download the file “FFXIII – Console Button Prompts (v2.0).rar” from this webpage
[link]
Extract the rar file and after doing so, you will get two files and a folder called mod.
Now copy these files to FINAL FANTASY XIII white_data directory.
After copying, open the Install Console Button Prompts patch file. You will be presented with this window
Press the number 1 button on your keyboard if you want the game to display Playstation Button prompts or press the number 2 button on your keyboard if you want the game to display the colored Xbox Button Prompts.
After pressing your desired selection, press enter and an patching process should start. once finished it should say in the black window finished. close the window now and thats it.


Delete the mod folder, the Install Console Button Prompts bat file, and the readme file from here.
This mod by Team NGS and MJB replaces the lower resolution FMV’s or the pre rendered cutscenes that the PC version of this game comes by default with much higher quality cutscenes that are re encoded frame by frame with modern upscaling software’s.
You can download the mod from the respective page below and in the Files section and also read more about the mods in their respective description pages.
This is for the English audio version
[link]
This is for the Japanese audio version
[link]
These newly re encoded FMV’s are much better than the original PS3 version and the new Xbox one enhanced version’s FMV’s. So it’s a must have mod for this game on PC.
The mod is quite huge and after installing it, the game size will go up from 60gb to 150gb. This is only If you install one of the versions.
if you install both of the languages, then the size will go up to 240gb which is a lot. So to save space, decide which audio language you want to play the game with and then download your needed version accordingly.
If you have the ASIA/JAPAN version of the game and are okay with the Japanese language only restriction, then make sure you only download the Japanese audio version from here.
The instructions for this mod are provided in the respective mod pages I linked by the mod authors and do note that the mod is huge and is still being slightly updated. The author will provide the correct steps to update the mods to the latest version if you have downloaded an older version. Please install the mod after you are sure the game runs properly with just the FF13fix.
This mod once again by Team NGS, enhances the textures used in the game and makes it look even better than what the base game provides.
You can download the mod from this page below and in the Files section and also read more about the mod in the description page.
[link]
The instructions for this mod are provided in the mod page I linked by the mod author and do note that the mod is a bit huge and is still being updated. Please install the mod after you are sure the game runs properly with just the FF13fix. Also make sure that you have applied the 4gb memory fix to ensure the game does not crash due to high memory usage.
This mod by MJB, replaces the default low poly 3D character models used in the game with higher poly models.
You can download the mod from this page below and in the Files section and also read more about the mod in the description page.
[link]
The instructions for this mod are provided in the mod page I linked by the mod author and do note that the mod is still being updated. If you are installing this mod along with the HD Project mod then do not merge the mod files together as this wont install this mod properly. so install this mod separately after installing the HD Project mod. One again make sure that you have applied the 4gb memory fix to ensure the game does not crash due to high memory usage.
Huge thank you to both Team NGS and MJB, if you are reading this guide for these incredible mods.
This mod by N12734, increases the audio quality of the FMV’s by replacing the lower bit rate audio files that the PC version’s FMVs come by default with higher bitrate audio files from the PS3 version. thank you N12734 for this mod, if you are reading this guide.
You can download the mod from this page below and in the Files section and also read more about the mod in the description page.
[link]
The instructions for this mod are provided in the mod’s description page by the mod author. the instructions for installing this mod begin from the Prerequisites text on wards.
This mod by No_One✔, adds in 4k resolution FMVs along with the audio files provided by the Higher quality cutscene audio mod. thank you No_One✔, if you are reading this guide.
Similar to the FFXIII HD Full Motion Video mod which adds in 1080p AI upscaled cutscenes, this mod adds in 4k AI upscaled cutscenes to the game. the only difference between this mod and the other one is the increased resolution as well as the inclusion of higher quality audio in this mod.
The mod is currently in development and is not completed yet. you can check out the linked guide written here by the mod author to learn more about the mod as well the installation steps for installing the completed portions of the mod to your game.
[link]
The mod is also larger in size than the FFXIII HD Full Motion Video mod due to the increase in resolution of the enhanced FMVs. If you are already using the Full Motion video mod but still not satisfied with the quality of the FMVs of that mod, then you can try this mod out.
Make sure that you have enough space in your hard drive where you have installed the game before installing this mod.
Credits
Thanks to
rebtd7 person for the fix
Dave person for the DSR guide.
Nvidia Profile inspector tool creator Orbmu2k person
PCgaming wiki site for provding solutions to the Macro-blocking and other issues
Krisan Thyme person for the Console button Prompts mod
Team NGS and MJB for their really cool mods
N12734 for the Higher quality cutscene audio mod and
No_One✔ for their 4k Upscaled FMV mod