![From the Depths Complete-ish Guide [APRIL 2021] for From The Depths](https://steamsolo.com/wp-content/uploads/2021/07/from-the-depths-complete-ish-guide-april-2021-from-the-depths.jpg)
Overview
All the info you need to understand the game, make informed decisions in your builds, along with examples and pictures and, eventually, videos.
Introduction
tl;dr
This guide will have a lot of tl;dr’s because the game is so deep. It will also have cringy puns because a man’s gotta have fun. Also, you won’t auto-magically become awesome at the game, but hopefully it will help you along the learning curve.
Long version
There is probably something to be learned in here for most people. The goal of this guide is to help you make informed decisions when building your vehicles. The long versions will usually contain more detailed information like maths, practical implications of the game’s mechanics and such.
Table of Contents
Due to the sheer amount of information, on top of Steam’s content formatting, I have added tags to specific sections which you may search for them.
Use control + F and copy/paste the contents in brackets to jump to a particular section.
- Introduction [INTR]
- Common Abbreviations [ABBR]
- Relevant Physics made Simple [PHYS] Partial
- Drag and speed [DRAG]
- Surface area vs space [VOLU]
- Center of mass [FULC]
- Center of mass [BUOY]
- Block Stats [BLOS]
- Block Functions [BLOF]
- Propulsion Editor (Q menu) [PROP]
- Automated Control Blocks [ACBS]
- PID (General Purpose) [GPID]
- How to tune PIDs [TPID]
- Breadboard [BRED]
- Replacing PIDs [BPID]
- Game Mechanics: Damage [GAME] Partial
- Kinetic damage [KIND]
- Thump/Impact damage [THIM]
- Explosive Damage [EXPD]
- EMP Damage [EMPD]
- Laser damage [LAZD]
- HEAT [HEAT]
- HESH [HESH]
- Game Mechanics: Defense
- ERA Armour [ERAA]
- Spall liners [SPAL]
- Armour stacking [ARMS]
- Smoke [SMOK]
- Game Mechanics: Other
- Ammo [AMMO]
- Detection [DTEC]
- Tweaking detection systems [DTC2]
- Propulsion [PROP]
- Golden Rules of Vehicle Design [GRVD]
- Engine Breakdown [PBRD]
- Weapons Breakdown [WBRD]
- Propulsion Breakdown [MBRD]
- Up to date video tutorials [VIDT]
- Useful blueprints [UBPS]
Common Abbreviations [ABBR]
Conveniently organised in alphabetical order for your wordy needs. If you can’t find it in here, there’s a good chance you can find it on the urban dictionary. If not, comment below so I can add it.
0q, 1q, 2q, 3q 4q = Number of Q-Switches on a laser coupler
AC = Armour Class, aka Armour value on block, often including stacking bonus
ACB = Automated Control Block
AOTE or AotE = Ashes of the Empire, a different campaign in the game
AP = Amour Piercing, aka value on shells, lasers, missiles, etc.
APN = Augmented Proportional Navigation, a missile component that helps guidance
APS = Advanced Projectile System, aka Advanced Cannons
BB = Sometimes used to refer to battleships, refers to Base Bleeders when discussing shells
CC = Usually refers to custom campaigns
CIWS = Close In Weapons System, usually refers to guns that target missiles using anti-missile cannon controllers
CoB = Center of Buoyancy
CoL = Center of Lift
CoM = Center of Mass
CoT = Center of Thrust
DC = Not the comics, refers to shells using Disruptor Conduits
DIF or DF = Direct (Input) Feed, refers to APS which get their ammo loaded through input feeders on the firing piece
DWG = Deep Water Guard faction, sometimes their AotE counterpart, the Dust Wing ♥♥♥♥♥♥♥
FTD or FtD = From the Depths
GPPID = General Purpose PID
GP = Gun Powder, usually when discussing APS shells
GT = Gray Talons, an ingame faction
HE = High Explosive, a type of damage
HEAT = refers to shells using shaped charges
HESH = refers to shells using squash heads
HP = Hollow Point, a shell cap for APS :^)
LAMS = Laser Munition Defence systems, aka defensive lasers
LH = Lightning Hoods, an ingame faction
LWC = Local Weapon Controller, a block generally required to make weapons work
m/s = meters per second, a measurement of speed
OW = Onyx Watch, an ingame faction
PAC = Particle Accelerator Cannon
PPM= Power per material for engines
PPV= Power per volume for engines
RTG = Radioisotope Thermoelectric Generator, a kind of nuclear power (real)
SD = Scarlet Dawn, an ingame faction
SS = Steel Striders, an ingame faction
TG = Twin Guard, an ingame faction
tl;dr = Too Long; Didn’t Read
TPG = Target Prediction Guidance, a missile component that helps guidance
WF = White Flayers, an ingame faction
WIP = Work In Progress
Relevant Physics made Simple [PHYS]
Drag and speed [DRAG]
tl;dr
Pointy things go vroom in the direction they point. Pointy is good, but smaller is even better. Lighter vehicles do not go vroom more than heavier ones in FtD. The game only takes mass into account to calculate how buoyant you are, how much force gravity applies, and how fast you can accelerate to your maximum speed. It just takes less time for lighter vehicles to get to speed and they drift a bit less.
Long version
Drag is essentially pushing back against the front of your vehicle and whatever else is in the flow of air or water. The faster you go, the more drag you experience.
I’m not an expert and you do not need to be an expert to make good vehicles. Do note that asymmetrical drag can cause your vehicle to turn or pitch constantly. The faster your vehicle is, the worse the effect. This is especially noticeable in planes.
Surface area vs volume [VOLU]
tl;dr
The more like a cube or sphere your vehicle is, the more space inside you will have. The bigger you make it, the more space you have inside to play with. Sounds like “duh?” Well, this means for the exact same shape, but twice the size, you actually get four times the room internally. So bigger actually means shields and armour actually protect more blocks, proportionally.
Also, building thin or “gluing” weird shapes together tends to increase surface area, which can be useful or detrimental depending on your goal for your vehicle. For instance, if you want a lot of small turrets, you will probably need a lot of surface areas whereas a few big and powerful weapons will likely require a lot of squishy internals to protect.
Long version
Why, you masochist?! There really isn’t all that much more to explain. This all has to do with surface being m^2 and volume being m^3. Just Google that stuff if you must.
Center of mass [FULC]
tl;dr
Vehicles turn around their center of mass. The further away from the center of mass you place your thrust, the more of an effect it has on turning though drag will apply on the relevant axis. This is why your vehicles can spin out of control sometimes when damaged/built wrong. Finally, center of mass below the center of buoyancy or lift helps stability, the opposite makes your vehicle want to flip.
Long version
This could easily devolve into way more information than needed. It’s the concept of lever and fulcrum, where the center of mass of your vehicle (which is identified visibly as such, though it may be obscured by blocks) functions as a fulcrum, the distance from center of mass at which you place propulsion components functions as a lever, and the components themselves apply the force.
If the average of the force applied over an axis is offset from the center of mass, some of the force is turned into torque. In other words, unbalanced thrust will cause pitching, yawing, or rolling, depending on which direction the thrust is applied from. If you goal is to do just that, then great. If your goal is to strafe, hover, or accelerate forwards or backwards, then torque is essentially wasted thrust.
Granted, you don’t *need* to have perfectly balanced propulsion for your vehicle to function. You can compensate in different ways, but you should be mindful about how unbalanced the thrust is because it does lead to loss of efficiency.
As far as wanting the center of mass to be below the center of buoyancy or lift, the idea is that lift and buoyancy are really just different ways to apply force or thrust on your vehicle. Lift and buoyancy pull up on their respective centers (also visually shown in game when applicable) while center of mass is where gravity pulls down on your vehicle.
So, here’s a concrete example to make this much easier to understand: if you attach a piece of string to an object and lift it using the string, the heavier part ends up at the bottom (depending on how you attach it, I know, don’t be like that), right? It’s the same for your vehicles, the center of lift or buoyancy is a string attached to your vehicle and if the heavy part (center of mass) is above it, it will want to flip if given the chance. If you do the opposite, it will self-stabilize in its upright position.
Buoyancy [BUOY]
tl;dr
Air or helium pumps in enclosed spaces help with buoyancy. Holes in those compartments will make you lose buoyancy more or less quickly. Blocks also have a buoyancy rating based on real physics. If they touch the water, those blocks will provide positive or negative buoyancy based on their weight.
Long version
There isn’t really much more to say that is practical for the game. Basically, buoyancy depends on how much water you displace. If the weight of the displaced water is greater than the weight of the object, then that object will float. That is how real world ships can be built of metal that would normally sink. Because those ships are not solid bricks of metal, there comes a point where the shape of the boat combined with a more or less empty hull moves more water in terms of weight than the weight of the ship itself.
Block Stats [BLOS]
HP: If it takes that much damage or more, it gets darker and falls off the vehicle.
Armour: Acts as a damage multiplier for most damage types. Higher values are better. Important exception is EMP.
Weight: How fat it is. This aspect is important for physics.
Material cost: Fairly obvious.
EMP susceptibility: If an EMP discharge travels across this block, it will drain up to that percentage of the discharge and take damage. It stops draining if the damage exceeds the block’s HP. If this stat is zero or missing, you can safely assume that EMP can travel through this block but will deal no damage.
Protective drainage: Similar to armour, but works only against EMP. Whether or not this block takes damage from EMP, a discharge going through a block with protective drainage will lose that much damage.
Damage reduction: Only available on surge protectors. This works like protective drainage, but it is a percentage instead of a flat number.
Buoyancy: Positive numbers make things float, negative numbers make things sink.
Drag factor: Certain blocks have less drag due to their shape. This aspect is important for physics, especially for vehicle speed.
Repair cost: Certain blocks such as ERA armour do not cost the full material cost to repair. This only applies if the block is destroyed in combat.
Block Functions [BLOF]
Here, I will list blocks per categories from the build menu:
Blocks
They mostly exist to connect things together and absorb damage. A few blocks like ERA armour have specific uses which are addressed in the relevant mechanics’ section.
Water, Air, Land
These sections contain all kinds of propulsion components and are sorted based on the environment they work in.
Control
Very diverse section, although you will realistically only use a couple of blocks from this tab.
Vehicle controller blocks let you manually control your vehicles and fire control computers let you manually fire your vehicles’ weapons.
Chairs allow you to anchor yourself on a vehicle and serve as a spawn point if you choose to spawn in vehicle chair or warp to a vehicle from the map.
Automated Control Blocks
…have their own section.
LUA Box
A box where you can either type text for people to read or use to program complex behaviour.
Bread Board
…have their own section too.
Resources
Contains most blocks that store things needed for other blocks, including:
– Material gatherers to grab precious shinies from resource zones
– Material storage for building more vehicles, repairs, fuelling steam engines
– Refineries convert materials into commodoties
– Fuel storage for running fuel engines and custom jet engines
– Ammunition storage for your dakka needs
– RTGs to generate electricity for free for a very high upfront cost and large space requirement
– Batteries to power electric engines OR some of your pew pew’s (PACs and Railguns)
– Electric engines to convert electric power into engine power; note that the maximum amount of power an electric engine can produce depends on the size of the battery they are connected to.
AI
This means Artificial Intelligence, but none of those blocks are actually smart enough to do anything on their own.
Contains sensors and blocks that control vehicles and other blocks. Most of those deserve their own section.
Fuel Engines
Parts needed to build some of the most versatile engines in the game. It’s usually a choice of between a large, efficient, and lower power engine; or a small, inefficient, and high power engine. You can, of course, scale as much as you want. Building those from scratch can be quite the science if you want the most bang for your buck. Consider checking out the useful blueprint section for a link to some very good prefabs.
Every fuel engine needs a fuel engine generator. It possible to attach cylinders directly to the generator, but they are generally attached to a crank shaft connected to the fuel generator.
Then, it’s usually a choice between low-efficiency but high power injectors OR higher-efficiency but lower power carburettor and turbochargers.
Exhaust should be routed to eventually exit the vehicle for cooling, otherwise your engine may overheat and stop working for a while. Radiators are quite good, but are also quite heavy.
Superchargers are generally ignored, since they help at low RPMs. In other words, they only help when not using the majority of your engine’s power. Generally-speaking, it’s better to use a smaller engine if you don’t need the power anyway hence why superchargers are rarely ever used.
Note that fuel engines can be used to generate electricity, which can be automated and modified using ACBs.
This section may eventually be expanded with more information. Look in the video tutorials and blueprint section for good examples of well-built fuel engines.
Steam engines
Parts needed to construct the fairly high power engines that consume more or less resources depending on the setup. Steam engines are very powerful, but do not adapt well to changes in demand. This means that a steam engine will waste materials if not turned off when it is not needed or if your power needs vary a lot.
Note that they can also be used to run custom boat propellers to achieve greater speeds with fewer propellers at the cost of having to physically connect the crankshaft to your propellers using shafts and such.
Building them requires you to build chains of boilers. Each boiler chain needs a steam control attached to it in order to function. You must then pipe the steam into pistons or turbines.
Pistons assemblies must be connected to cranks. The cranks can then be connected to a gearbox to generate engine power or power propellers. They can also be connected to a wheel to run a generate and create electricity. You can also route the exhaust of pistons (top pipe connection) to more pistons to increase the material efficiency of the engine at the cost of power density.
Turbines produce electricity which must be stored in batteries to do anything, but they do not slow down under load.
The ingame tutorial provides basic information on how to assemble them. This section may be updated with a more in-depth tutorial.
Spinblocks and turrets
Contains turrets, spinblocks, and pistons. Those are considered subobjects and can be saved as subassemblies using the Subobjects mode.
Simple weapons
Contains all the weapons that do not need to be assembled to function, and very forgettable drills.
Place those down, make sure there is an LWC controlling it that is also connected to the AI, and it should all work.
Some of the more recent simple weapons use advanced cannon shells to fire. Input the gauge listed in the menu for the simple weapon into the customiser and do not exceed the listed length and your weapon will work with your custom shell.
Missiles, CRAM Cannons, Advanced Cannons, Lasers, and Particle Cannons
These sections contain all the parts needed to assemble multi-block weapons. These deserve their own section.
Defenses
Contains almost everything that is used for defense that isn’t armour.
Decorations
Blocks used to make your vehicles feel pretty.
Misc
Contains a variety of blocks which do not fit under other categories. Namely, you will find blocks to repair your vehicles, docking stations (tractor beams to hold other vehicles you own in place), vehicle spawners, and heart stone modules (mostly used in adventure mode).
Prefab/Subobject Mode
Allows you to copy and save blocks, including their settings. You can them place the exact same arrangement on the same or other vehicles without having to do anything else.
Propulsion Editor (Q menu) [PROP]
With the 2.4 update came a new interface for propulsion components and although the same could be said out of most ingame menus, it can be a little hard to figure out.
tl;dr here is a screenshot with a basic explanation of what each button does:
(1) is the the tab for complex controller options. This feature still works, but it has been explored and explained quite well before. I may come back to this later for the sake of completion, but in terms of functionality this feature is now entirely redundant and more limited than the alternatives.
(2) reports the current usage of the propulsion block. You can also set a resting drive using this slider, in other words, you can make this block thrust permanently to varying degrees.
Very important note 1: similar to many other UIs in the game, the game represents a fraction or a percentage using numbers between 0 and 1. 0 is, unsurprisingly, no thrust. 1 is maximum thrust.
Very important note 2: negative numbers do not mean negative thrust, really (except for water propellers). It’s a way to track the same axis, but in opposite directions. For example, -0.25 on the yaw for that picture would mean that the jet would fire up to 25% of its maximum thrust when directed to turn left instead of during a right turn.
(3) fairly self explanatory. If you deselect this option, this block will show nothing even if it’s firing at maximum thrust.
(4) are the preset buttons. This may seem obvious, but there is more to these buttons than it seems. While forward thrusters do not allow the “turner” preset, every other thruster will only show presets for directions they can affect. Hitting the preset key also resets any tweaks you may have done, but it will automatically figure out whether you need a positive or negative value on your thruster for normal function. This is extremely handy if you’re not sure.
(5) the actual sliders for each axis. Note that you can type more precise values in the square on the right.
(6) activates the checkboxes for (7) and (8). The other buttons in this row mostly add sliders for more customisation, but they are often not needed for most functions unless you’re getting creative. The exception would be “show strafe and hover,” for rather obvious reasons.
(7) switches this axis to an instant response instead of increasing or decreasing thrust over time. I can’t see many practical applications to making propulsion not instant, especially since AIs and PIDs can somewhat throttle your thrust as part of their basic function. Leave alone unless you know what you’re doing.
(8) is probably the most confusing part of the UI, but also a fairly important one. This setting does apply to every form of thrust, even if you cannot actually fire it in reverse. The way this works is that the game tracks every command (forward, yaw, pitch, roll, etc.) for every component. While a demand above 100% or below 0 will not result in the thruster being magically more powerful or able to reverse, the game will still do math as to how much thrust should be produced.
If you take the example above in consideration, this means that the thruster will only fire at 75% maximum if the only thing the vehicle is trying to do is go forward. It will fire at 100% if trying to go right and forward. It will fire at 75% if trying to go left. If nonreversable was unchecked it would fire at 50% when trying to go forward and left. If trying to go forward and pitch down, it will fire at 65% as per the picture. Hopefully this makes sense. See the long version below for more information on why this may be important for your vehicle.
(9) is a global multiplier. It means this thruster will never fire at more than 90% of its maximum thrust ever, and every slider is multiplied by that much. This value can be modified using ACBs and it is a prime way to modify everything on your vehicle without having to tweak individual settings which makes it a great way to make testing propulsion much, much less aggravating.
Automated Control Blocks [ACBS]
These deserve their own section. They allow complex controls over vehicles using a relatively simple IF, THEN logic. Basically, when you press Q you will first be presented with the conditions’ tab. If the parameters of the condition you set are true, then the selected action will be undertaken automatically.
Common uses include:
- IF enemy range (whatever), Shield projectors set type (reflect) along with another one to turn shields to type (none) when there are no enemies to save fuel. You can use the same condition with steam boilers set burn rate (higher or lower) to save resources outside of combat.
- IF enemy range (whatever) or target enemy bearing (whatever), Complex controls activate (something) in conjunction with propulsion or other control blocks set to respond to complex controls. This is often used to stabilise a vehicle or override the AI’s movement for specific behaviour such as maintaining range and so on.
- The possibilities are huge and mostly limited by your creativity and how much space you need for the actual control blocks.
Note that if you have one block directly next to another and one of those blocks only has a condition, then it requires the condition for both blocks to be true to activate whatever action. The same is true with blocks with only an action and no condition can let you have two actions for multiple conditions though this is rarer and can be achieved more easily using other options.
Another important feature on the target and actions’ tab is at the bottom: filter affected components and search patterns. Search patterns allows you to modify other control blocks if you have named them by entering either their full name or part of it in that field. You can also use this feature with any other blocks if you use the block naming function (shift+n). This allows you, for example, to rename your flares and fire them from an ACB anywhere on your vehicle without firing other weapons.
The affect range is based on distance of the control block and whatever it is affecting and this is how you can control, for example, the firing of missile countermeasures without firing every weapon on board. This means that placement of automated control blocks matters sometimes.
General Purpose PIDs [GPID]
A block that tends to scare people or automagically do things. General purpose PIDs are independent from the AI and work even if the AI is turned off. Also, because their variables are not controlled by the AI, they allow for complex behaviour, especially when used in conjunction with automated control blocks.
On their own, they are usually most useful to control altitude and the stability of a vehicle. Note that they are not magic and rely on propulsion components to do anything, meaning they can only do so much if your propulsion is not setup properly, damaged, or insufficient.
Here is how to set them up:
First off, input(1) is the variable your PID will monitor. PIDs will only watch one at a time so you will need multiple PIDs to control multiple aspects of a vehicle.
Next is the ouput(2). Unless you’re getting very creative, you will usually want a PID with an input set to roll to output to propulsion roll. It’s typically quite obvious which goes with which. Altitude goes with propulsion vertical, pitch with pitch, etc.
Type(3) should typically be set to PID. Note that setting the AI PIDs to none means the AI will completely forfeit control over that axis which can be useful if you want to control it externally, like with a general purpose PID. Default tries to autocompute the variables using voodoo.
Enable fake set point(4) allows you to set non-zero target values. This is especially useful for altitude.
Set point change(5) is a number that will get added or subtracted from the fake set point, allowing for constant adjustments even if the fake set point changes. I can’t see many practical applications, but it’s an option.
Set point multiplier is the same as above(6), except it’s a multiplier instead of a flat value.
Gain(7) is how much of the thrust available to it a PID will use. If you set Integral to max (ignore), this is as much thrust as it will ever use. If you do use integral, gain is like the basic unit which will be multiplied over time by integral. In other words, a high gain loses fine control, but may be required if the available thrust is low.
Integral(8) acts as a multiplier for gain, unless you set it to max which essentially ignores integral entirely. Basically, depending on how long your vehicle has been off the fake set point, integral will multiply the gain slower or faster. Lower values mean faster increase of the gain, meaning your PID will respond faster and with increasing strength if the vehicle is off.
Derivative(9) allows your PID to “predict” instability based on recent data. A higher number means it will attempt to balance based on a longer “history” which can be useful to compensate for recoil of slow firing guns. Though, typically, higher values tend to be undesirable and can result in more instability. A value of zero means it has zero ability to predict, which will usually result in your PID overcorrecting. Good values are usually between 0 and 1 second.
[TPID]
The easy (Sith) way:
– Set Integral to 250
– Set Derivative to 0.5
– Set Gain to 0 and increase it until your vehicle is able to maintain the
desired altitude, roll, or pitch.
The proper (Jedi) way:
– Set everything to 0
– Increase Gain until the blue lines start going up and down above and below
the target (green and red lines, they should overlap or be very close)
– Set the Gain to about half of the previous value
– Start increasing Integral slowly until the vehicle is almost perfectly
stable
– Add a little Derivative to smooth things out
Tuning PIDs can seem daunting, but here’s a few tricks which are in order of how you’d typically want to go to set up a PID:
– Just set the derivative between 0.5 and 1 second and leave it
– The more unstable or the more “dangerous” it is for your vehicle to be unstable, the lower the integral should be set. 1 second is usually extremely responsive, 3 seconds is a good average and results in smoother controls.
– Finally, let the craft go and look at the graph(10). If the dark blue line is going crazy, lower the gain slowly until it smooths. If the blue line is either at the top or bottom, you probably need to add thrusters.
Troubleshooting:
– Output Saturated:
You likely do not have enough thrust and/or it is wildly unbalanced across the center of mass.
– The vehicle is wobbling really fast:
Your Gain is likely too high.
– My vehicle does not react fast enough to losing control:
Start by increasing Gain and rebalance the Integral with the new Gain settings. Alternatively, set Integral to 250 and rebalance Gain.
– My vehicle falls apart the moment it takes damage:
This can be a consequence of using an Integral of 250 since there will be no incremental change over time. Try using a higher Gain and balancing Integral again. IMPORTANT: Balancing for damage may require that you live with some wobble when at full health due to shifts in
maximum thrust available.
Possible fix for OCD people: Use two PIDs. Use ACBs with affect range to set
PID TYPE to NONE on the stronger Gain PID based on VEHICLE HEALTH. Use more ACBs
to deactivate the weaker Gain PID when the vehicle is at lower health and activate
the stronger Gain PID. Voilà! Your PIDs now adapt to damage. Consider having more
thrusters or protecting them more for maximum stability in your vehicles. Do keep
in mind that there’s a limit to how much damage you can sustain and remain stable.
Breadboard [BRED]
Note: I now have video tutorials explaining the basics and giving examples of uses of breadboards. You may find them in the useful video section.
Contrary to popular belief, this block contains no carbs. Do note that this is a work in progress block in terms of game development.
What the breadboard excels at is compact solutions to things that normally require several blocks. Mostly, in their current iteration, they can replace physical PIDs, some ACBs, and, as outlined above, switch AI stuff within a singular mainframe.
They are also useful to do things similar to what an ACB would, but with numbers that are constantly recalculated rather than predetermined.
Very important note 1: There is almost no reason to use the regular breadboard over the AI breadboard as those have more options and can do everything the other version can do with the only requirement being a connection to the right AI mainframe.
Very important note 2: Most of the breadboard stuff has tooltips. Mouse over stuff, sometimes they even describe the logic of the components with the actual numbers you put in. Perhaps the most important information is what each “connector” prong thing does; they’re small but hovering over them with your mouse will give you more information.
Due to how obscure they are to use, here are some actual examples of how to set breadboards up.
[BPID]
In this picture, the top circle (1) contains your sources of information about your vehicle or your target which can then be used with the bottom components (2) to affect PIDs, drives, propulsion, or select behaviours and manoeuvres.

You will need the following components to make a PID:
(1) is an orientation input component from the top input category in the menu. Note the (6) dropdown menu to choose the specific input you need. Other breadboard components have dropdown menus.
(2) is a PID component. Note that you still have to tweak gain, integral, and derivative and that some other PID options are missing. Do look at the PID subsection for more information on tweaking these settings.
(3) is a simple multiply component. I will explain why you need one of those just a little further.
(4) is the component inventory propulsion in the lower part of the UI.
(5) is a constant.
Here is what it should look like when done to replace a simple PID:
From left to right, you need to connect theorientation input to the top left connector the PID component. This is how the PID gets its information about the vehicle. Make sure you select pitch, roll, and such on the input to choose which axis to control.

The number component under the propulsion thing is a constant and must be connected to the bottom left of the PID in order to establish the set point for the PID. This is the value the PID tries to match. There are fancy ways to make this dynamic which will probably part of a video I will make.
Next is the PID component whose top right connector (the ouput) needs to be connected into the the top left connector of the multiply component. The multiply component itself needs to be set to -1 to invert everything coming out of the PID. This step may become unnecessary as I’ve suggested on the From the Depths tracker that this should be done automatically by the PID component, but for now it just needs to be done for pretty much every PID.
Note: altitude PIDs do not need to be inverted via this step.
Finally, you need to grab the top right connector from the multiply component and connect it to the top left connector of the component inventory propulsion thing. Don’t forget to set this last component to be same axis as your PID is monitoring (pitch, roll, etc.). In my example, I left it as “up” instead of “roll” like the input. I’m dumb. Don’t be like me.
There you go! You can now replace most PIDs with this and save both space and resources. Some creative setups may not be currently possible on breadboards simply due to the variables that are available to work with as of June 2019.
Here are some more examples. This picture has example A and B, which both control altitude. Example B makes the vehicle go up and down every 5 seconds to make it more difficult to hit. More information below the picture.
(1) are both altitude input components.
(2) are constants and define the target altitude for example A and one of the two target altitudes in example B.
(3) is a switch component with a threshold set to 5 and its open value set to 50. The threshold is what makes it go up for 5 seconds and down for 5 seconds. The open value is the second possible target altitude for the PID component.
(4) is an input timer component set to 10 seconds.
Can you figure it out?
Here is another example, thanks to Blarint from BorderWise’s community for thinking and sharing this one. This makes your vehicle point directly at its target. (1) is a primary target info component using the bottom right connector which refers to target bearing.

Game Mechanics: Damage [GAME]
Kinetic damage [KIND]
This section applies to all APS shells without a hollow point head or non-kinetic warheads (such as HE; EXCEPTION: Pendepth fuse), CRAM shells with non-kinetic filler unless they have a pendepth fuse, piercing particle accelerator cannons, simple weapons other than lasers. Fragments, regardless of the source, also behave like kinetic projectiles.
tl;dr
You need as much Armour Piercing (AP) as armour (AC) to deal full damage to a block. Having more AP than the AC does nothing to increase kinetic damage. AP vs Armour scales linearly, i.e. if it has half the AP as AC then it deals a half the damage, etc. Each block destroyed takes kinetic damage away from the projectile. The projectile keeps going until it runs out of kinetic damage or sails through.
Long version
How kinetic damage is applied is as follows, upon impact with a block the armour is calculated for any applicable stacking bonus (look at the section on armour for more info). Kinetic damage is multiplied linearly according to the following formula: kinetic * AP (Armour Piercing) / (Armour) = effective kinetic damage. If the resulting kinetic damage is greater than the HP of the block being hit, then the block is destroyed, the projectile weakens by that much and damage keeps being rolled for subsequent blocks until there is either no more kinetic damage or the projectile goes all the way through.
Note that angle of impact matters because it increases the effective distance a shell has to travel through a block. This results in a multiplier for armour for most hull blocks. The multiplier is COS(ANGLE).
On top of that, having more AP vs a block’s armour does not help damage. This may not matter when hitting heavily armoured targets, but can mean that a high AP shell may be weaker against a lightly armoured target compared to a shell with more raw kinetic damage.
IMPORTANT NOTE: Shells with a mix of kinetic and other damage types that lack a pendepth fuse may overpenetrate a target. Also, if the kinetic damage and AP are too low, there is a risk of ricochets without the payload detonating. You may use an inertial fuse to trigger the payload even if the shell bounces on the armour.
Thump/Impact damage [THIM]
This section applies to impact particle accelerator cannons, missile impact damage, HESH thump component, and hollow point shells.
tl;dr
Thump damage ignores armour stacking bonuses, angle of impact, and spreads laterally akin to an explosion instead of penetrating targets.
Long version
Thump damage still has an armour piercing value like regular kinetic damage, but it does not take armour stacking into account which makes it consistent in terms of damage no matter how thick a target is. The formula for damage is otherwise the same as kinetic.
The other difference is that instead of allowing the projectile to sail through, it detonates and any kinetic damage remaining after destroying the first block (if it did destroy the block) is transferred to the blocks on the sides of the point of impact instead of those behind. This means that thump damage can create large holes but cannot truly penetrate a target.
Explosive Damage [EXPD]
This section applies to flak, HE, and particle accelerator cannon explosive damage.
tl;dr
Explosive damage hits everything in its range for the displayed damage, with an exponential decrease the further away from the center of the explosion a block is. Armour decreases damage exponentially as well, meaning that at the same range, a block with 10 armour will take more than twice the amount of damage that a block with 20 armour would.
Long version
The way explosions deal with corners and holes has changed a few times over the years. Currently, little to no damage will be applied if the explosion has to wrap around a corner or dig into a hole in the hull depending on where the explosion was set off.
EMP Damage [EMPD]
This section applies to… EMP.
tl;dr
EMP can be weird. Typically it travels through low resistance blocks towards the nearest susceptible block. In some cases it can dissipate without really being drained. Surge protectors have additional priority when it comes to EMP, which will draw EMP to them first though it can break other susceptible blocks on the way there so be mindful. EMP will travel through stone, wood, and other similar blocks if it has no other path to a susceptible block.
Long version
EMP will travel along metal and alloy blocks generally speaking. The rest applies as above. Disruptors were reworked and now apply a debuff to any shields they go through. If a disruptor hits or goes through a shield, it will lower that shield’s chance to reflect projectiles for a certain amount. The debuff fades off gradually over time.
Laser damage [LAZD]
On the surface, lasers operate similar to kinetic damage in terms of how damage is calculated. Basically, if you have the same armour piercing value as the armour of the block being hit, you will deal full damage. This applies to defensive lasers as well, though projectiles typically have 20 armour, so you will usually do full damage as long as there is no smoke or water in the way.
Lasers also ignore armour stacking so armour piercing values above 60 are useless in theory since the highest armour value in the game for a single block is 60 for heavy armour. Do keep in mind that, as of the update of July 26th, laser shields and smoke reduces AP on lasers which means that higher values can serve a purpose in getting around laser defenses.
Damage Cont’d
HEAT [HEAT]
There are three options to use HEAT. You can either use a shaped charge head or a shaped charge secondary both of which only exist for use with APS. The third option is the shaped charge missile component which can only be put in the front.
A secondary shaped charge will only achieve 80% of the effects for the same amount of HE compared to a a shaped charge head. HE warheads placed behind a shaped charge will empower the HEAT effect. This can be increased or decreased by manipulating the “special factor” slider on the HE modules. 1 means 100% of the HE will go into the shaped charge and 0 means none of the warhead will go towards HEAT. Placing a module a different module between the shaped charge and HE will break the chain and any HE modules placed past that point will behave like regular HE.
HEAT, when triggered (triggered automatically by impact or fuses) will pass through armour in a straight line while dealing minimal damage to the blocks it passes through. Whether or not the heat jet projectile passes through depends entirely on the penetration metric shown on the shell (square root of the armour it has to go through). HEAT does not care about armour stacking, but will transform into fragments if it hits an air gap after entering an armour block. It will also transform into fragments if it hits a block not labelled as structural (e.g., applique) and functional blocks such as an AI component, engine component, etc.
HEAT fragments behave like kinetic projectiles, the number and damage of each depends on the shell or missile and have 4 AP. They spread from the airgap or structural block in a rather tight 20 degree cone.
The penetration metric works in a simple way. If there is enough penetration metric, the projectile keeps going. If not, the projectile is destroyed and no other effect takes place. To know if the projectile can penetrate you simply subtract the square root of the armour of the block it is travelling through for every meter of material it is going through. For instance, a single meter of metal has an AC of 40, the square root of which is 6.3. Therefore, a 32 penetration HEAT shell will pass through approximately 5 meters of metal.
HESH [HESH]
The only way to use HESH is with an APS shell using a squash head module.
HESH is similar to HEAT in that it creates fragments behind the armour that it hits based on its spalling metric. However, HESH also deal a small amount of thump damage and the damage of the fragments it creates depends on how much and what kind of armour was hit whereas HEAT deals a set amount of damage if it has sufficient penetration.
The fragments created by HESH also behave like standard kinetic projectiles and their damage and number depends on the HESH’s spalling metric. The damage shown in the customiser is divided by the square root of the armour it has to penetrate and then spread across a certain number of fragments. The AP of the fragments is the average of all the materials it had to penetrate and the last material counts for 3 times as much. For example, 3m metal and 1m wood would be (3*40 + 3*8) /6 = 24. This generally means that HESH fragments are more effective against heavily armoured targets.
Game Mechanics: Defense
ERA Armour [ERAA]
The ingame description for this block is quite good. If a hesh shell, heat shell or jet hits a block of ERA, then both the block and the damage/shell are simply deleted, regardless of how much damage if could have done otherwise. This also applies to fragments.
Kinetic and HE projectiles are a bit different. Instead of just negating the damage, it reduces it by a significant fraction and the block is also destroyed.
The block is single use and is vulnerable to splash damage triggering/destroying more than one block but its ability to reduce/negate damage is quite unique and useful against slow-firing, high-damage shells.
Spall liners [SPAL]
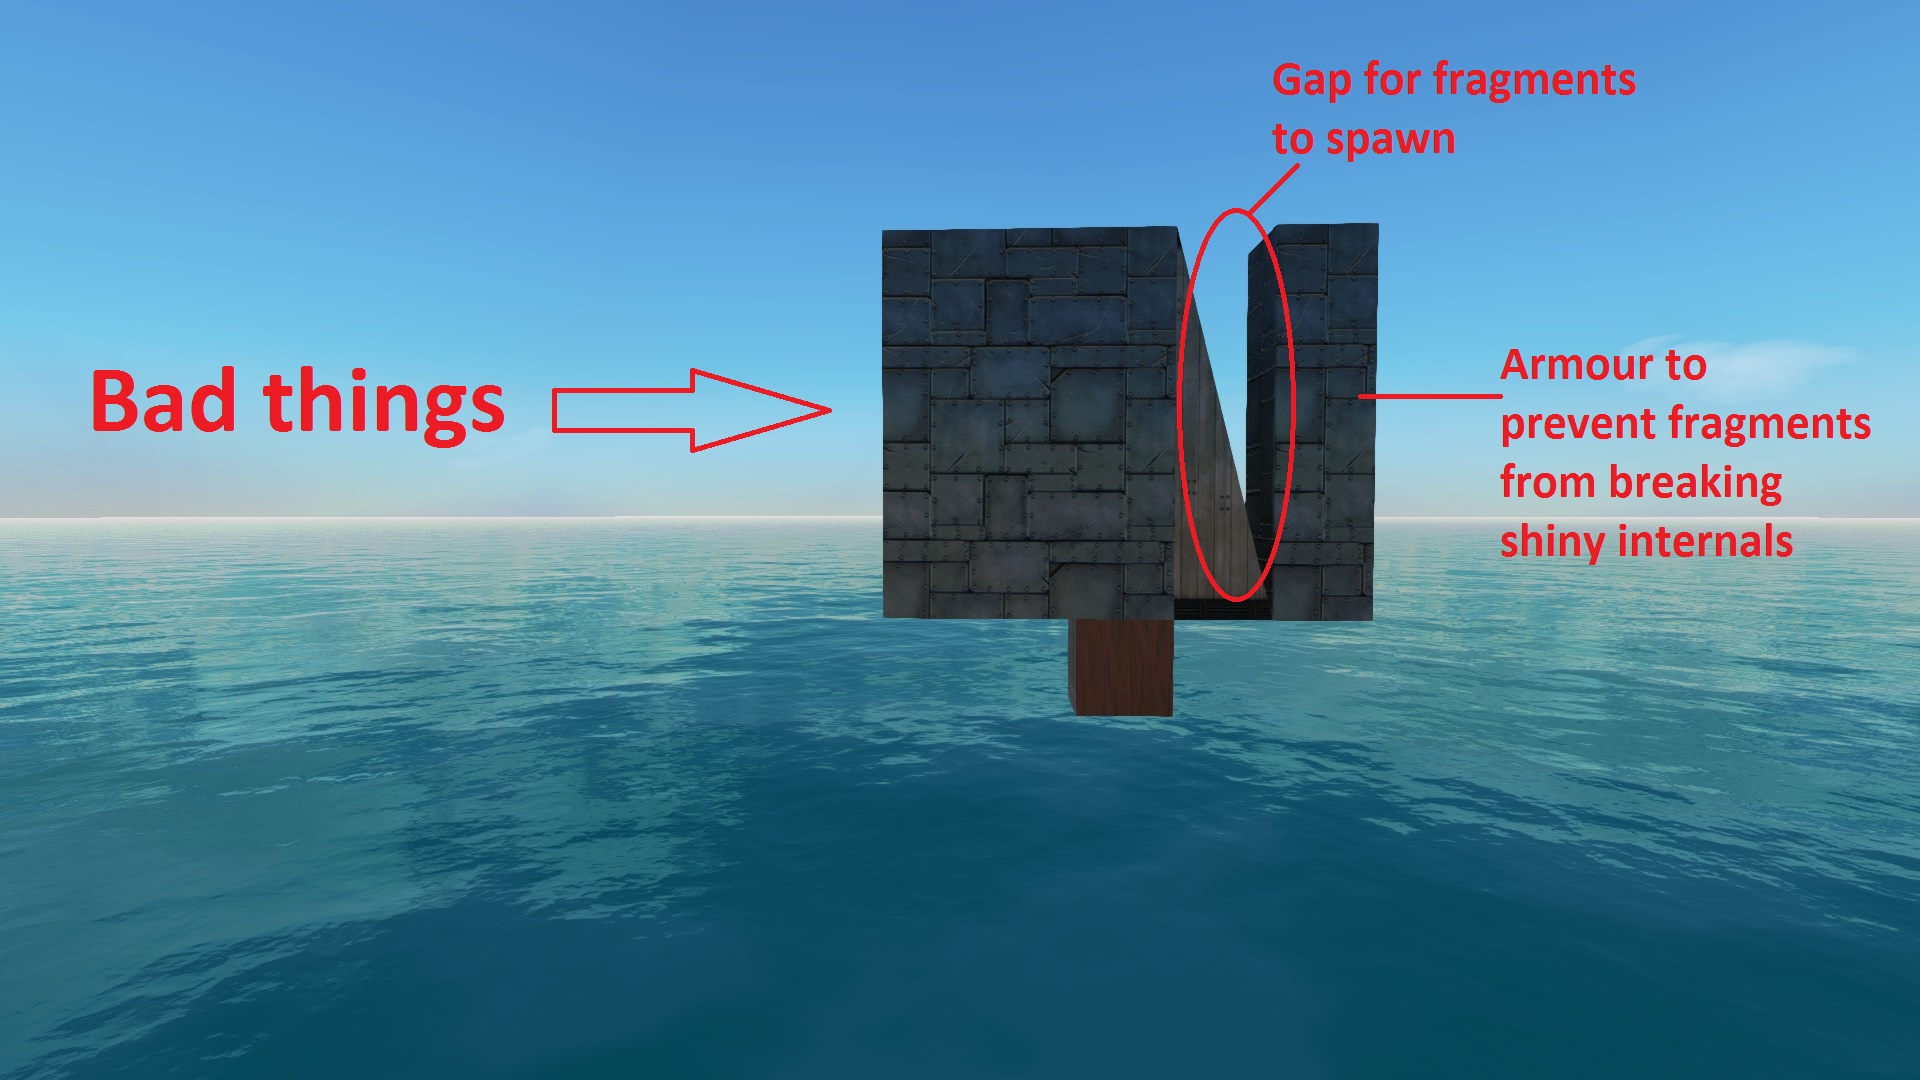
Due to the mechanics involved in HEAT and HESH shells, spall liners are a valid form of defense in FtD. There are two ways to create a spall liner:
– Leave a 1-meter gap in your armour and place some armour behind it. This causes both HESH and HEAT fragments to spawn and hit the next blocks of armour. Ideally, the last layer of armour from the outside should be wood (i.e. the last “inside” layer), since it is the lowest AC material and also the cheapest material that will stack with other materials. This will cause HESH fragments to have a much lower AP (check the section on HESH) which will significantly reduce the damage of the fragments if your next layer of armour is made of a better material than wood.
– Use slopes to create an air gap in your armour stack. This mostly works as above for the rest. Do note that using wooden slopes will work against HESH, though slopes have reduced HP, which means they may break and suddenly you have metal fragments with an AP of 40 bouncing around, doing significantly more damage. Note that poles placed parallel to your inner wall will also work and have a lot more HP.
Armour Stacking [ARMS]
When most damage effects (refer to the appropriate section on damage to make sure it applies) hit stacked armour blocks, a fraction of the armour of the material behind is added to the armour of the first block. Note that hitting a block along their lengths, such as hitting the base of a 4 meter beam, also gives those blocks their own armour stacking bonus.
The bonus is 20% of the armour of the backing material, assuming there is a full meter of material. If you use slopes as a backing material and there isn’t a full meter of material based on the angle of impact, then you only get a fraction of the bonus. For instance, if there is only half a meter of armour, you would only get half of the 20%.
This bonus applies based on the material directly behind each block being hit. So, if you have 3 meters of metal with no gaps for example, the first layer would have 40 + 20% armour (48), the second layer would also have 48, and the final layer would have 40.
You can check if your armour is stacked properly and how much AC it gets in the vehicle designer by equipping and selecting the Health/AC tool and looking at blocks from the direction where damage would come from.
Smoke [SMOK]
Not all of the smoke effects in this game affect physics. The only sources of smoke that are useful are from advanced cannon shells (200mm minimum gauge) and smoke dispensers.
Smoke affects visual and laser detection components. It will make the laser ranger finder, cameras, and coincidence rangefinders less accurate if they are covered in smoke themselves or if the target is. Missiles using laser guidance also become less accurate depending on the amount of smoke (though beam riders are unaffected) and any lasers are significantly weakened if the beam goes through smoke (reduced AP). More smoke weakens it further. The counter to this is to use more frequency doublers than needed.
Note that although PAC’s are considered energy weapons, they do not care about smoke at all.
Smoke serves no other purpose.
The formula for smoke’s AP reduction for lasers is as follows:
3 / (STRENGTH ^ 0.333)
Strength is the sum of all smoke effects covering the blocks or projectiles being hit by lasers. Laser shields are treated simple as additional smoke strength. This formula is applied only once, meaning that different sources of smoke strength do not stack multiplicatively (1000 + 1000 + 1000 does not reduce AP to 2.7%, but only to 20%).
Note that speed reduces the effectiveness of smoke. You can mouse over dispensers while moving to see the effect.
Shields [SHIL]
Ring shields increase the armour of the outermost layer of blocks on your vehicle. They only affect one axis based on the shield’s placement. This means you need at least 3 ring shields to affect every surface of your vehicle. The amount of armour provided depends on the surface area of the axis being buffed compared to the size of the ring shield.
If the ring takes damage, it will behave like a broken PAC tube when firing and break blocks in a straight line out of the tube.
Regular shields, also sometimes called planar shields or shield projectors, cannot function at the same time as a ring shield on the same vehicle. If you want to use both, you will need to switch one type of shield off before using the other.
Planar shields will reduce the AP of any lasers firing through them and also reflect shells (APS and CRAM). The chance to reflect shells depends on the angle at which the projectile hits the shield. A shell coming in perfectly perpendicular to the shield will have the best chance to pass through whereas the closer you get to a parallel flight path, the more likely it will be that the shell will bounce. The other factor for reflection is simply the strength of the shield.
Note that shells now roll for reflection only once and only the strongest shield is taken into account for laser defense, meaning multiple planar shields set to reflect will not increase your chance of reflection unless the angle of impact is more favourable to reflection. Stacking planar shields effectively is therefore extremely difficult and of questionable value.
Game Mechanics: Other
Ammo [AMMO]
Ammo boxes hold materials like other storage boxes, but weapons that require ammunition can only use materials stored in ammo boxes. Ammo boxes refill at a given rate (V menu shows the number based on your number of boxes) which will effectively choke your weapons’ output if you do not have enough.
Detection [DTEC]
tl;dr
Sorry, no such thing here. Here’s a few golden rules for your trouble:
– 360 radars actually provide decent range readings on their own against everything but submarines and smaller vehicles with extremely low radar signature.
– 360 cameras will usually serve the same purpose except they are extremely inaccurate on all accounts, though stealth is unlikely to be an issue with those. Submarines are still ignored.
– If smoke is involved, laser range finder trackers, camera gimbal trackers and telescope gimbal trackers become quite inaccurate, making 360 and 90 degree components your best bet.
– Against slower enemies, the bigger coincidence rangefinders are extremely versatile. They do suffer a bit in terms of range measurements, but they are the most accurate visual detection for range, bar the retroreflection sensor (which requires your target to have cameras pointed at you).
– Non-IR gimbal cameras will do most of the work for bearing. Camera 90 is acceptable but subpar.
– Note that vehicles close to the surface have a reduced radar signature.
Long version
In order to shoot other vehicles, you will more often than not need detection systems. Do note that most campaigns have a small amount of default detection which means that nothing can really be completely invisible nor blinded, just extremely inaccurate.
Note that all the components labelled as trackers are unable to detect enemy vehicles on their own and need other components to provide a first detection before they can function. They are, however, the most accurate detection systems.
Passive radar as well as retroreflection sensors need the target vehicle to have either radar, or visual detection components pointed at you to work. They usually suck, except the retroreflection sensor which has good range accuracy.
Passive sonar detects either other sonars or active propellers under water. This allows them to detect any kind of torpedo or submarine if they are moving.
Speaking of accuracy, all detection components have three important stats for accuracy: bearing, range, and detections per second. Bearing is the direction the target is relative to your own position. Bearing is by far the most important aspect of detection when it comes to fast projectiles (such as advanced cannon kinetic rounds, railguns, lasers and particle accelerators) because a flat trajectory will impact a target quite reliably no matter how innacurate your range detection is. Range detection becomes increasingly more important the slower your projectiles are. Finally, detections per second is the number of readings your components get. This is useful because more readings provide more data to average from, which leads to more accurate detections overall. This is not incredibly important when firing at slower vehicles though, but can make or break accuracy against fast and unpredictable targets.
Detection works on different spectrums:
– Visual: usually extremely reliable, even against smaller vehicles, though it is blocked by water, making submarines invisible to visual detection components. Great for bearing accuracy, but poor for range. Note: is affected by time of day, being less efficient at night. It’s also less efficient in stormy weathers.
Includes: all the non-IR cameras, telescope gimbal trackers, coincidence rangefinders, and retroreflection sensors.
– IR: similar to visual, but relies on the heat signature of the target or how hot it is. Fuel engines, jet thrusters, RTGs, and shields are the main sources of heat. This tends to be quite hit or miss, as heat is averaged over the size of the vehicle for each axis. Thus, the heat signature can be quite low even if there are hot parts on a vehicle if the vehicle is big enough. Does not work underwater. Good for bearing, bad for range, typically inferior in accuracy to the regular camera counterparts but makes up for it in number of detections per second and processing cost.
Includes: all the IR cameras.
– Radar: relies on radar signature, which is lowered by certain materials on the outside of a target vehicle (mainly alloy and rubber) and slopes. A flat surface has a higher radar signature than a sloped one. Does not work underwater. Provides accurate range measurements but is bad for bearing. Radar signature is also decreased for being close to the surface.
Includes: all the components with the word radar in it.
-Sonar: radar, but underwater for most part. Does not work out of water. Sonar is average at both bearing accuracy and range and has low detections per second, making it overall bad but practically the only way to detect submarines.
Includes: all the components with the word sonar in it.
– Laser rangefinder: very good at finding range, surprisingly. It struggles with smoke just like any other laser and has poor bearing accuracy.
– Wireless snooper: provides extremely inaccurate detections based on the number and of transmitters and receivers on a target vehicle as well as the distance between them. Quite reliable to provide a first detection and point trackers at larger vehicles, but otherwise too inaccurate to be of much use on its own.
Tweaking detection systems [DTC2]
If some of your detection components are made less accurate because of smoke and other effects, the game will automatically adjust the weight of each reading accordingly on the fly, so more detection is always going to be more accurate than less detection.
Golden Rules of Vehicle Design [GRVD]
– Building better in general: have a plan, consider how much engine power you’ll need, how much ammo, what weapons you want on board and as many details as you can before building the actual vehicle. Build some of the subsystems first and pre-fab them to have an idea of what size the vehicle will be and how you can arrange the internals.
– Powering vehicles: [PBRD]
RTGs are very inefficient, but can be the ideal choice for a small vehicle that does not need much power. It will wink at you and make sexy poses by providing free power. It’s a trap, more often than not.
Electric engines are required with steam turbines and RTG to convert the power into actual engine power. Do note that they become more efficient when their maximum load is restricted. This means that if you can afford the space for more batteries, you can improve the efficiency of your steam turbines and RTGs. This last part was removed in a recent update, this may or may not be permanent.
Fuel engines are typically the most cost-efficient engines for non-injector setups. They are extremely versatile with tweakable battery charge settings or straight up engine power. You can trade space-efficiency for cost-efficiency quite handily with turbocharger engines.
Steam is very powerful, but does not like fluctuations in demand.
– Ammunition management: you don’t always need to have perfect sustainability for your ammo. For larger vehicles, you can even disconnect some weapons using ACBs to turn off wireless receivers on your local weapon controllers if ammo gets low.
– Increasing vehicle survivability: repair bots are not meant to be a form of defense and will, by far, cost you more resources to keep a vehicle alive than real defenses. Armour has come a long way since older updates and offers significant protection. Do keep in mind that extra armour can slow your vehicle through added drag, makes you a slightly bigger target, and can make it more difficult to float or fly. Smoke, missile interceptors, CIWS, LAMS systems, shields and even speed and unpredictable movements should be considered first. Do ask yourself if you’re going to use certain vehicles at greater ranges and with larger friendly vehicles that may draw fire away from squishy targets.
– Weapon breakdown: [WBRD]
Missiles are nice and compact, but are one of the most easily countered weapon type. Spamming missiles can overwhelm defenses, but it is expensive. They are best on smaller vehicles or as a supplement on vehicles with other forms of offense.
Cram cannons are quite powerful, but struggle against faster vehicles. They can also be countered by LAMS. They are, however, one of the more cost-effective options to fight large ships.
Advanced cannons are quite versatile in theory, but these weapons should be designed with a specific purpose in mind to be truly effective. Different shell types have different requirements, strengths and weaknesses which will require different characteristics for the firing piece.
Lasers are possibly the strongest weapon in the game, though they have rather effective counters unless you go into astronomical running costs and use an over-the-top amount of doublers.
Particle accelerator cannons are actually often overestimated because they cannot really be defended against in a meaningful way. Armour is the only form of defense here for this weapon besides range, but it is not particularly cost-efficient for the damage it deals.
– Propulsion breakdown: [MBRD]
Custom jets are one of the most space-efficient block in terms of sheer power and require no engine power to run. However, they drink fuel and do not work in space or water.
Dedicated heliblade spinners are practically equivalent to custom jets, but they are far more versatile in the sense that they can work in 2 directions instead of only one. They can also be used without engine power if motor drive is set to zero, though this is far less space-efficient. The main drawback is that they require a lot of small delicate parts which are easily destroyed if exposed to damage. They work in water but not in space.
Jet engines are similar to custom jets, but require engine power instead of running off fuel directly. They are quite space-efficient but do not work in space or water.
Ion engines are worse than regular jet engines in both cost-efficiency and space-efficiency, but they work in water and, more importantly perhaps, in space as well.
Water propellers are extremely efficient, but work only in water.
Steam propellers are decent in terms of space efficiency and allow greater speeds in water with fewer propellers, but are more complicated to set up and create more potential points of failure since they will stop working if disconnected from their engine or if their engine is damaged..
Up to date video tutorials [VIDT]
Unfortunately, there are very few videos I can recommend at this time since a lot was made obsolete during the game’s development.
I have a growing collection of up-to-date tutorials.
https://www.youtube.com/channel/UCXjzJXurqJJWQB9fNll2W_w
Useful blueprints [UBPS]
Prefab parts of or complete engines for use in your vehicles because who has time to design good engines these days??
PARTIALLY OUTDATED BUT STILL USEFUL KINDA SORTA
[link]
Up-to-date engine platform with some good turbo designs among other things.
[link]
Up-to-date engine platform with a variety of compact designs.
[link]
One of my own creations to provide concrete examples of stuff you can do with ACBs and AI mainframes. Needs to be updated with breadboard stuff.
[link]
Special Thanks
– Awellner, for being generally knowledgeable, helpful, and providing detailed information on armour and APS shells.
– BorderWise and his community, for being helpful, making tutorials, and more.
– Blarint from BorderWise’s community for providing examples and information for the breadboard section.
Version History
No longer planning major updates.
– April 11: Tweaked some numbers; remove the campaign section
– November 5th: revised most of the guide for release; deleted outdated sections
– March 25th: revised most of the guide for the new devtest; made corrections to the HE section, added my videos about breadboards, and corrected several typos
– January 7th: revised most of the guide for changes to the game since July up to the current devtest
– July 26th: quick update to sections mentioning lasers in light of new information and laser update
– June 27th: tiny update to the campaign section to account for the new main menu
– June 26th: added section about the propulsion editor and a few screenshots, corrected information regarding the interaction between smoke and detection
– June 20th: major update to the breadboard section and the PID section, & more
– June 8th: formatting, HEAT and HESH subsections, screenshots, campaign, breadboard stuff
– April 24th: first draft