Overview
There is already a corresponding thread, but there are some mistakes there, so I decided to make this guide just to provide you the full info on the subject. Here follow the world map, the cue list and the locations screenshots with short comments. Also, the section on secret locations and an endless money trick are added.
The World Map
The Cue List
Cue
Location
Spell
Character
————————————
Southern Riverlands
——————–
————–
Angry Cook
Meldor Village –> Meldor Inn –> Basement
Multi Shot X
Garic
Crodin, the God of Water
Water Labyrinth
Wave
Arres
Living Water
Water Labyrinth
Water
Arres
Mage’s Monument
Jenise
Will Strike
Arres
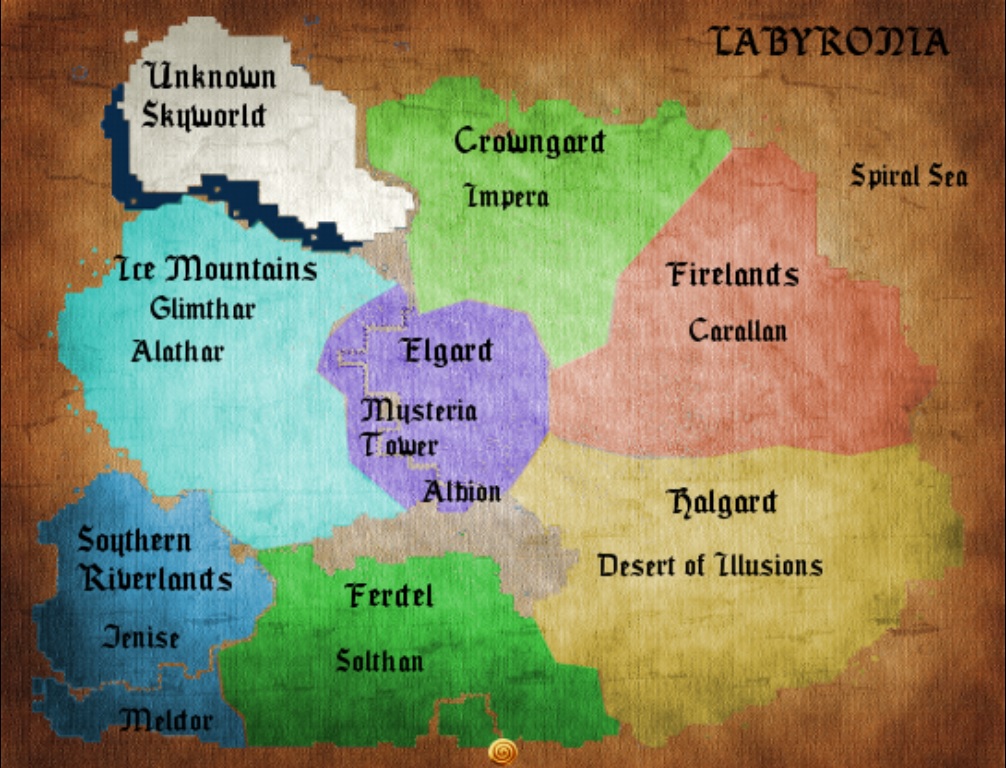
Eye Plant
Jenise Cave
Light Combo
Ann
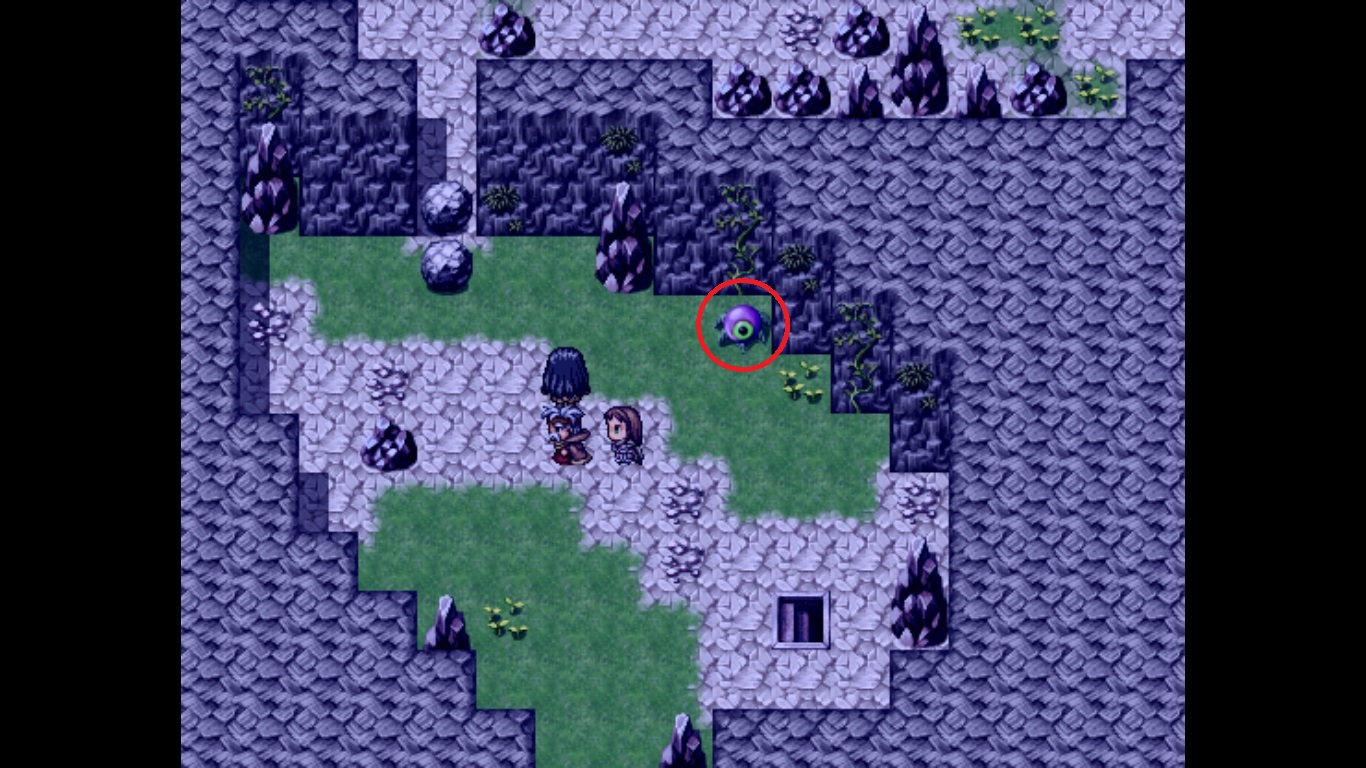
Turquoise Green Tree
Southern Tent
Wind
Arres
————————————
Ferdel Forest
——————–
————–
Bonfire
Ferdel Forest
Fire
Arres
Crimson Wolf
Deep Grotto
Cripple +
Garic
Forest Gravestone
Deep Grotto
Stone
Arres
Golden Cross
Ferdel Mountains –> Sorrow Ledge
Heal X
Ann
Break Dance
Abandoned Mine
Break +
Garic
Sun Symbol
Renegade Lair
Light
Ann
Pure Water
Renegade Lair
Cure X
Ann
————————————
Halgard
——————–
————–
State Change
Earth Labyrinth
Dispel
Arres
Zemocon, the God of Earth
Earth Labyrinth
Quake
Arres
Hollow Hill
Desert Entrance
Blind Shot
Garic
Maiden of Ely
Desert of Illusions
Recovery X
Ann
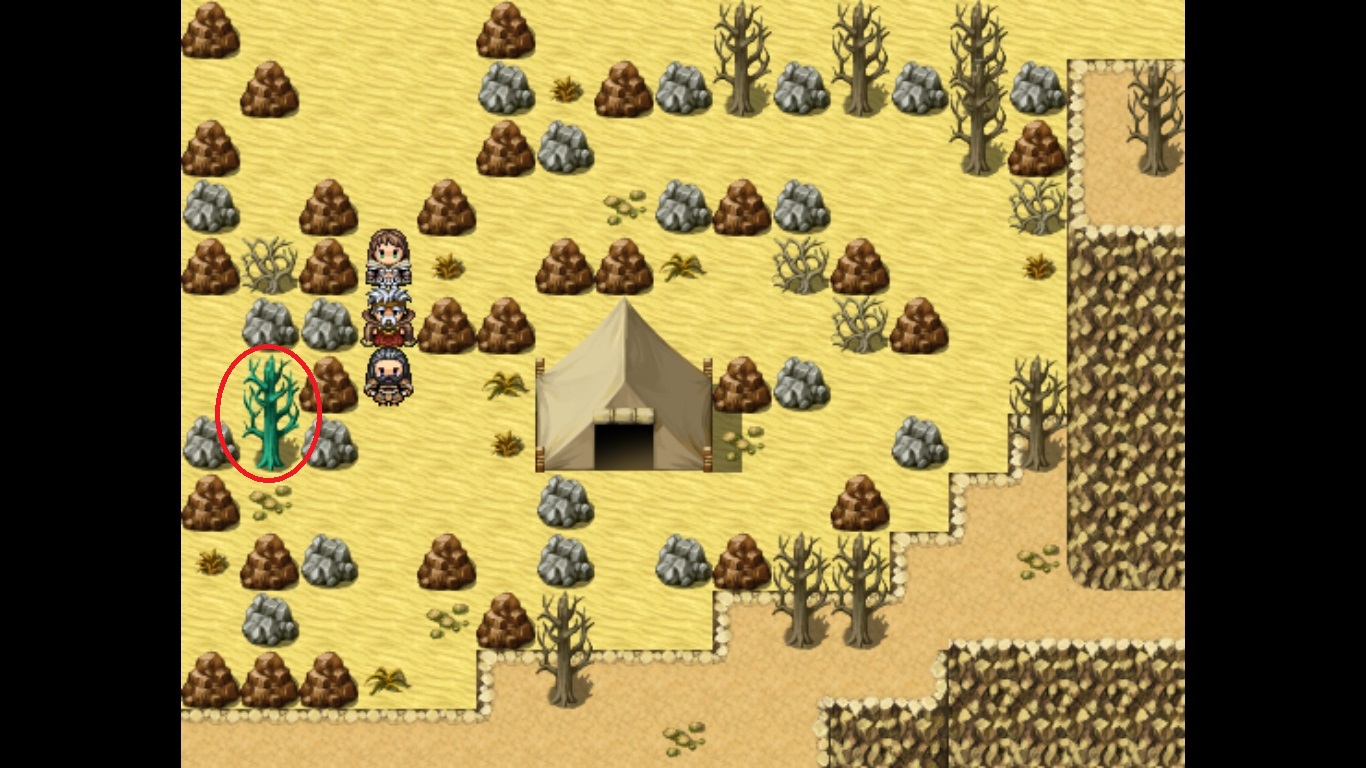
Mirage Snowman
Desert of Illusions
Magic Evade
Ann
Sky Pillar
Desert of Illusions
Enchant Blade
Arres
————————————
Firelands
——————–
————–
Bad Art
Firmagis Mountains
Intensify
Garic
Red Firmagis Branch
Firmagis Mountains
Fire Shield
Arres
Golden Shield
Carallan –> The Bruise Pub
Counter
Arres
Dinyon, the God of Fire
Carallan –> School of Fighters
Flame
Arres
Fiery Blob
Fire Labyrinth
Warm Touch
Ann
————————————
Ice Mountains
——————–
————–
Golden Beer
The Cold Shoulder
Drain Aura
Arres
Brr
Alathar
Frost Shot
Garic
The Greatest Wish
Alathar
Raise
Ann
Repair
Alathar
Raise X
Ann
Monster Supper
Windir’s Castle –> Castle 2nd F.
Steal Life
Ann
Machinery
Glimthar Village –> Garic’s Workshop
Shock Shot
Garic
Steam Rolling
Glimthar Village –> Water Heating
Ice Shield
Arres
Red Flame
Glimthar Village –> Metal Processing
Fire Shot
Garic
Abandoned Transmitter
Airship Cave
Magic Reflect
Ann
Eyes All Over
Airship Cave
Trio Shot
Garic
————————————
Unknown Skyworld
——————–
————–
Super Detective
Sciethar University
Clarity
Arres
Windir, the God of Air
Shrine Entrance
Tornado
Arres
Mind Sphere
Air Labyrinth
Temple Shot
Garic
Light Mind
Air Labyrinth
Focus
Garic
————————————
Crowngard
——————–
————–
The Old Capital
Impera Gates
Release IV
Arres
————————————
Elgard
——————–
————–
Crystal Ball
Mage’s Q. North
Spread Shot
Garic
Orange Crystal Ball
Mage’s Q. North
Spiral Slash
Arres
Images, Please
 Angry Cook
 Crodin, the God of Water: Follow the stone-paved path, and you’ll get there. Also, you have to defeat the boss to gain access to the cue.


 Living Water: The same as with the previous cue, but turn left near the end and follow directions.
 Mage’s Monument
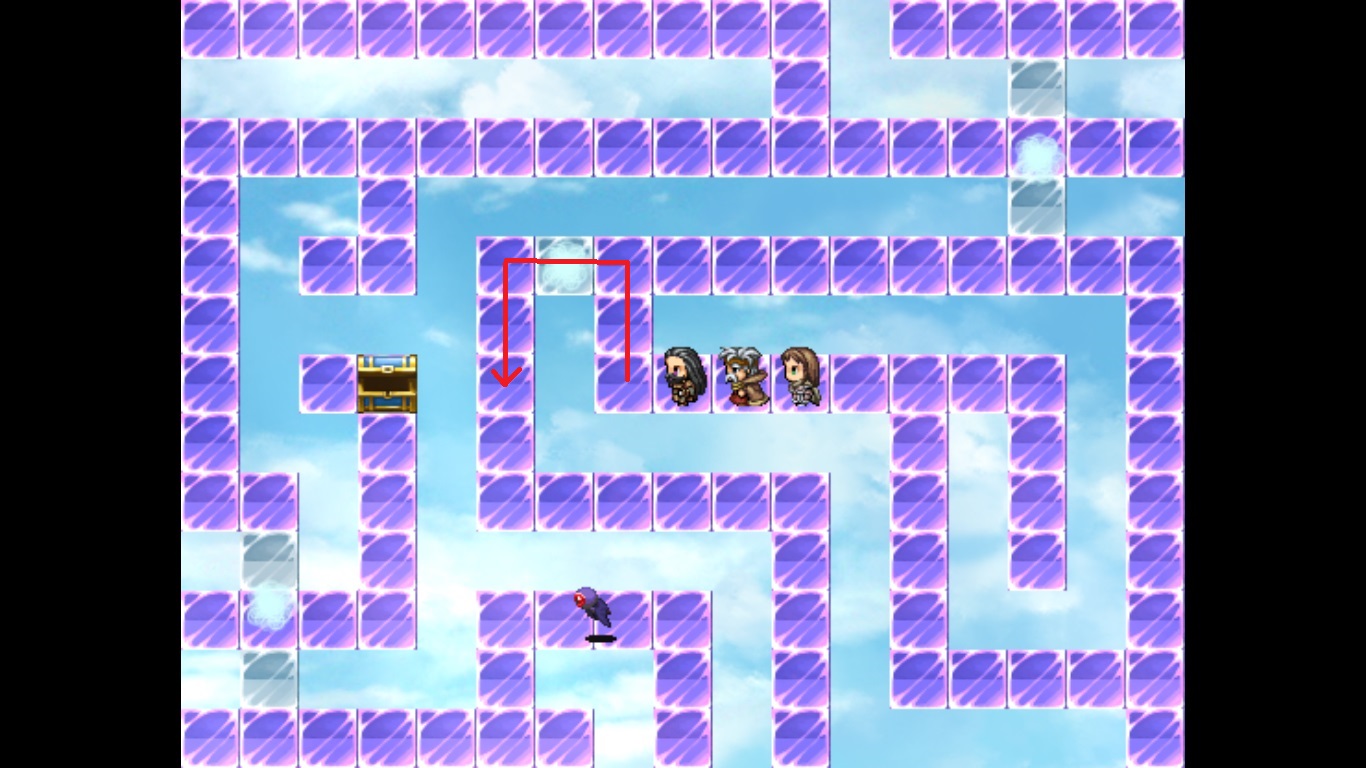
 Eye Plant: You get here after you have fallen to the Water Labyrinth from Jenise through the broken tile near the previous cue (see the screenshot).
 Turquoise Green Tree
 Bonfire: Note the hidden path you have to walk through to get there.
 Crimson Wolf: That’s not an ordinary werewolf, and he behaves quietly.

 Forest Gravestone: That’s the same place where you get the brown mushroom in the sunlit part of the forest.
 Golden Cross
 Break Dance
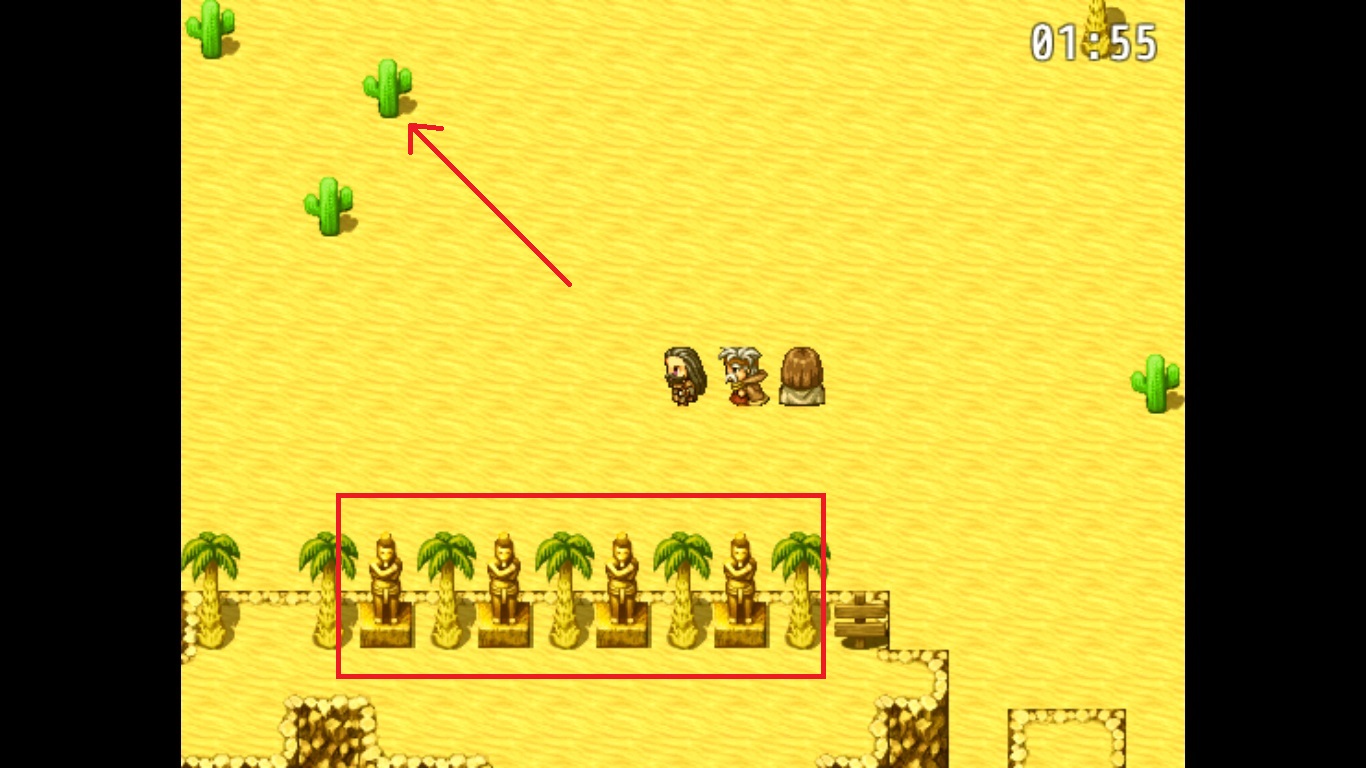
 Sun Symbol
 Pure Water

 State Change: Follow the grassy trail, but keep going forward in the indicated spot.


 Zemocon, the God of Earth: Follow the grassy trail until it’s over, then turn left and go north instead of south when the trail reappears.

 Hollow Hill: Destroy the indicated rock, then follow the opened way and climb the ladder.
 Maiden of Ely: It’s north-west from the entrance (you have to walk around the hill to find stairs up).
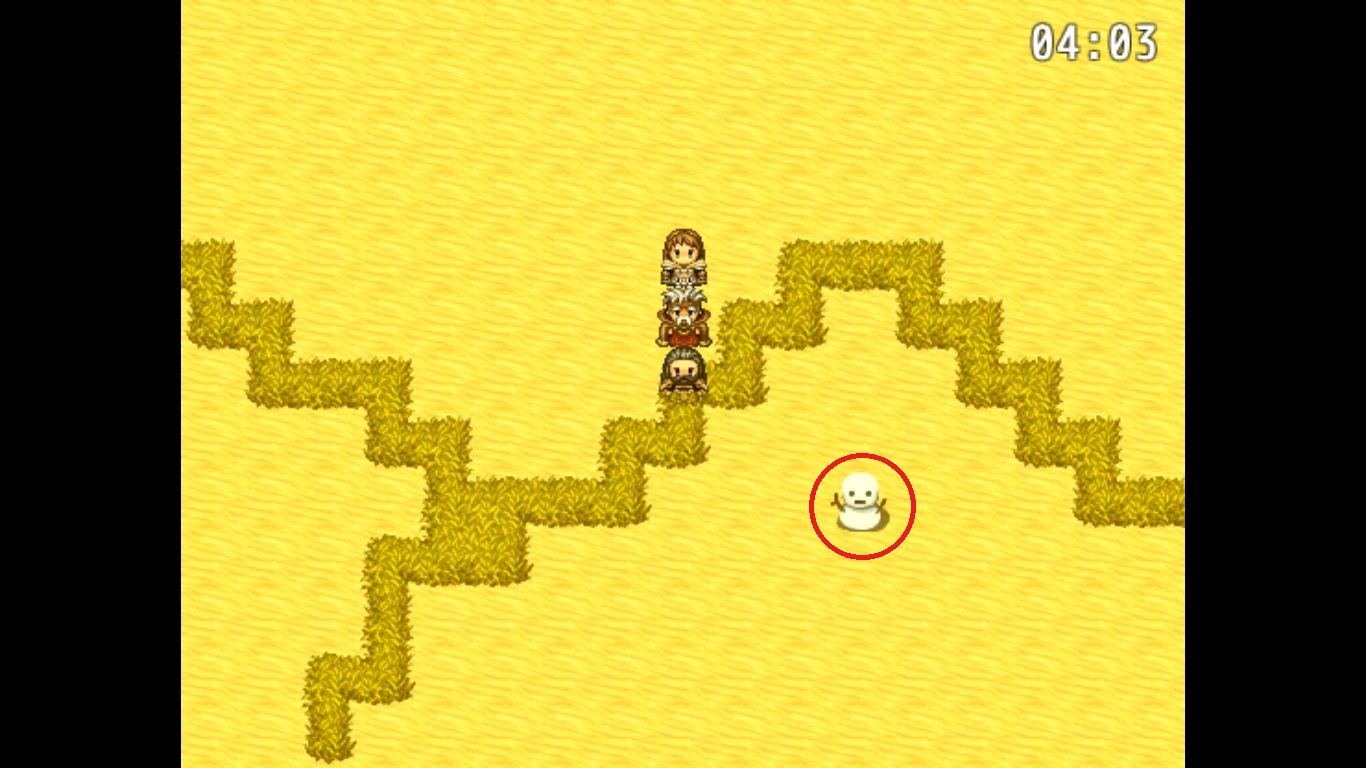 Mirage Snowman: Go east from the entrance until the sign “Boat ahead” appears, then turn north and go on until you come across the bandit camp. The cue is north-west from this place.
 Sky Pillar: It’s north-west from the previous cue.


 Bad Art: Follow directions.


 Red Firmagis Branch: Climb up from the platform of the previous cue, then follow directions. You have to destroy a rock by pushing the boulder from the platform above if you haven’t done this before.
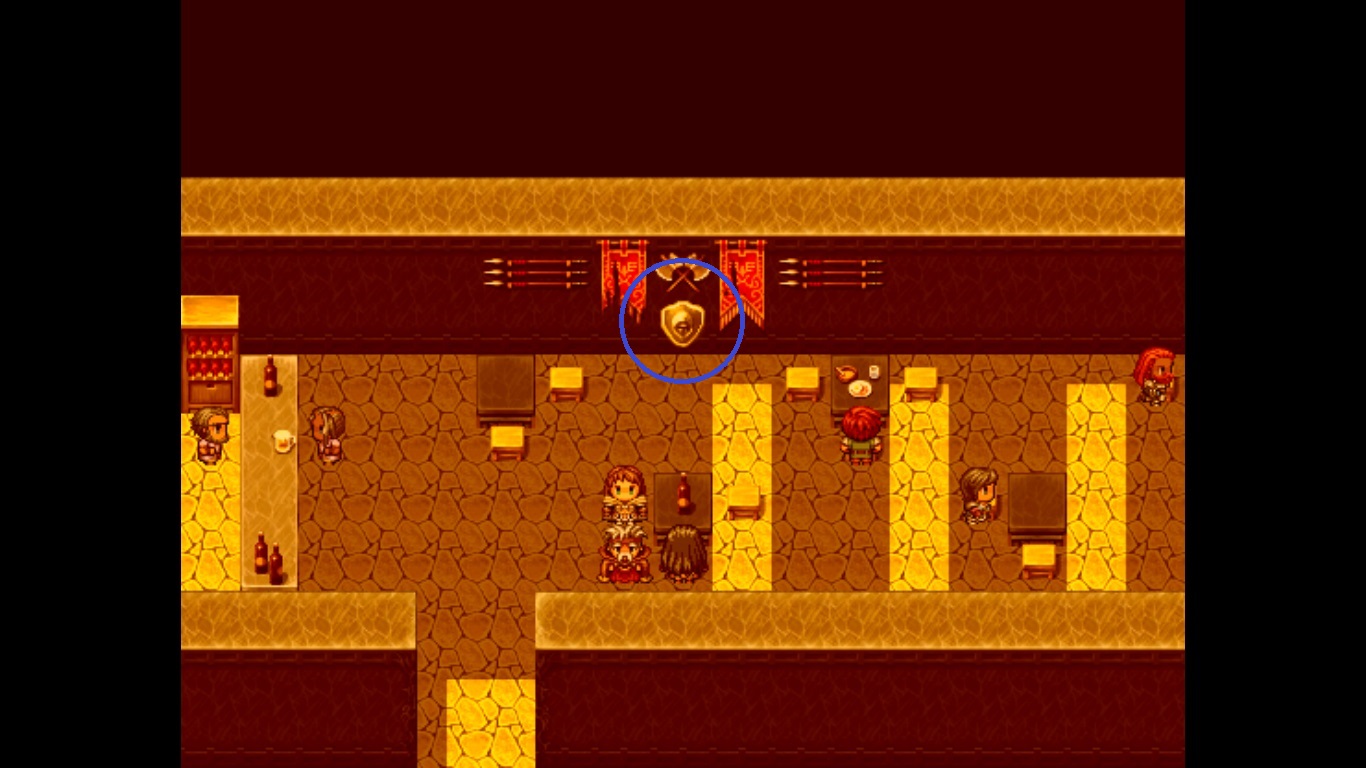 Golden Shield
 Dinyon, the God of Fire


 Fiery Blob: Follow directions. Try to escape will-o’-the-wisps, otherwise you’ll have to start all over again.
 Golden Beer: That’s the pub at the entrance to the Ice Mountains, near the bridge.
 Brr: Go north-east from the entrance, then follow the path marked with footprints and pegs.
 The Greatest Wish: It’s straight north from the previous cue.
 Repair: Go north-west from the entrance until you come across the fir-tree wall, then go north and up the ladder.
 Monster Supper: You have to kill the Deadly Dragon to gain access to the cue.
 Machinery: Note the switch you have to use to make this cue open.
 Steam Rolling: Note the switch you have to use repeatedly to make the cue open.
 Red Flame

 Abandoned Transmitter: You have to walk through a hidden arch in the wall down there, near the corner.

 Eyes All Over: The same as with the previous cue, but the hidden arch is different.
 Super Detective: You get this cue as a reward from the investigator after you have correctly identified the culprits, Lily & Berline.
 Windir, the God of Air
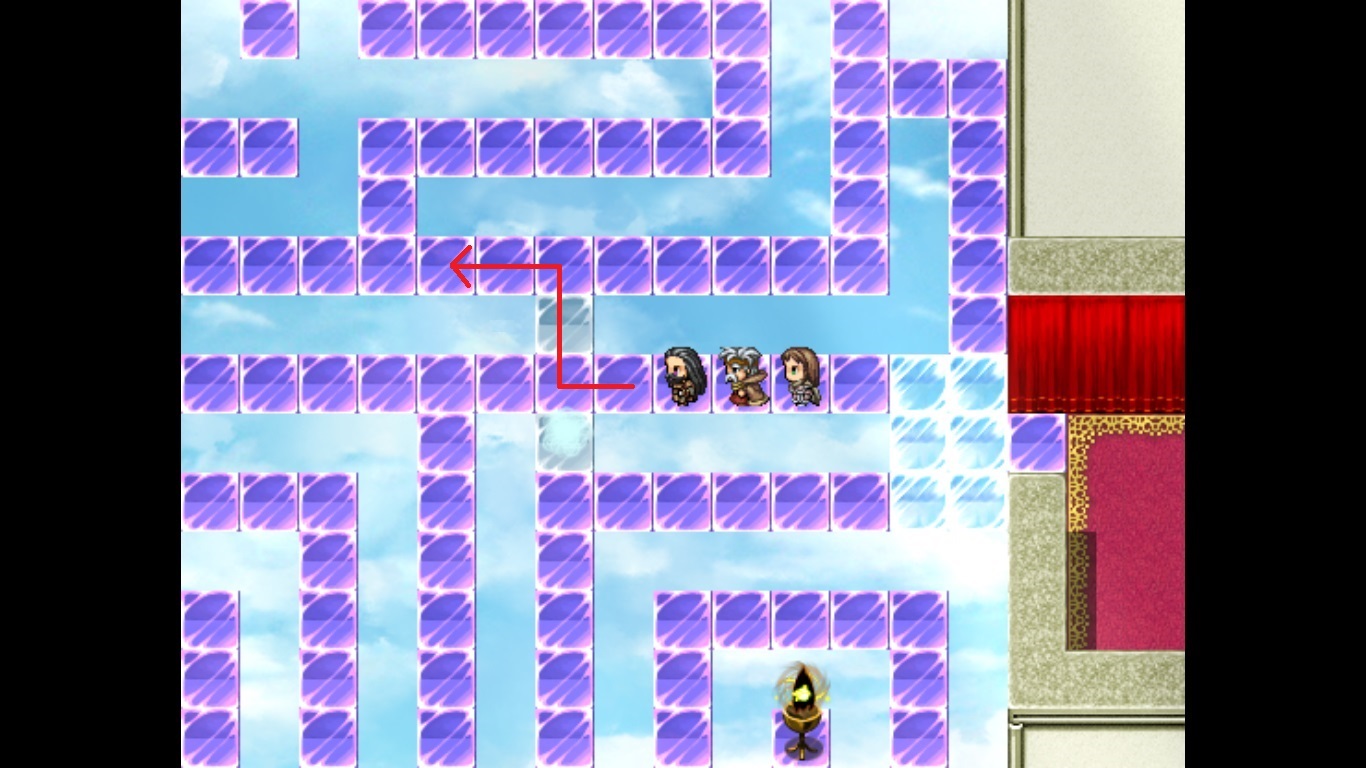
 Mind Sphere: Follow directions. The windflaw you can’t escape should carry you to the opposite side.

 Light Mind: It seems like these windflaws work randomly, so you just have to try until one of them carry you to the leftmost part of the maze, because you can’t get there any other way.
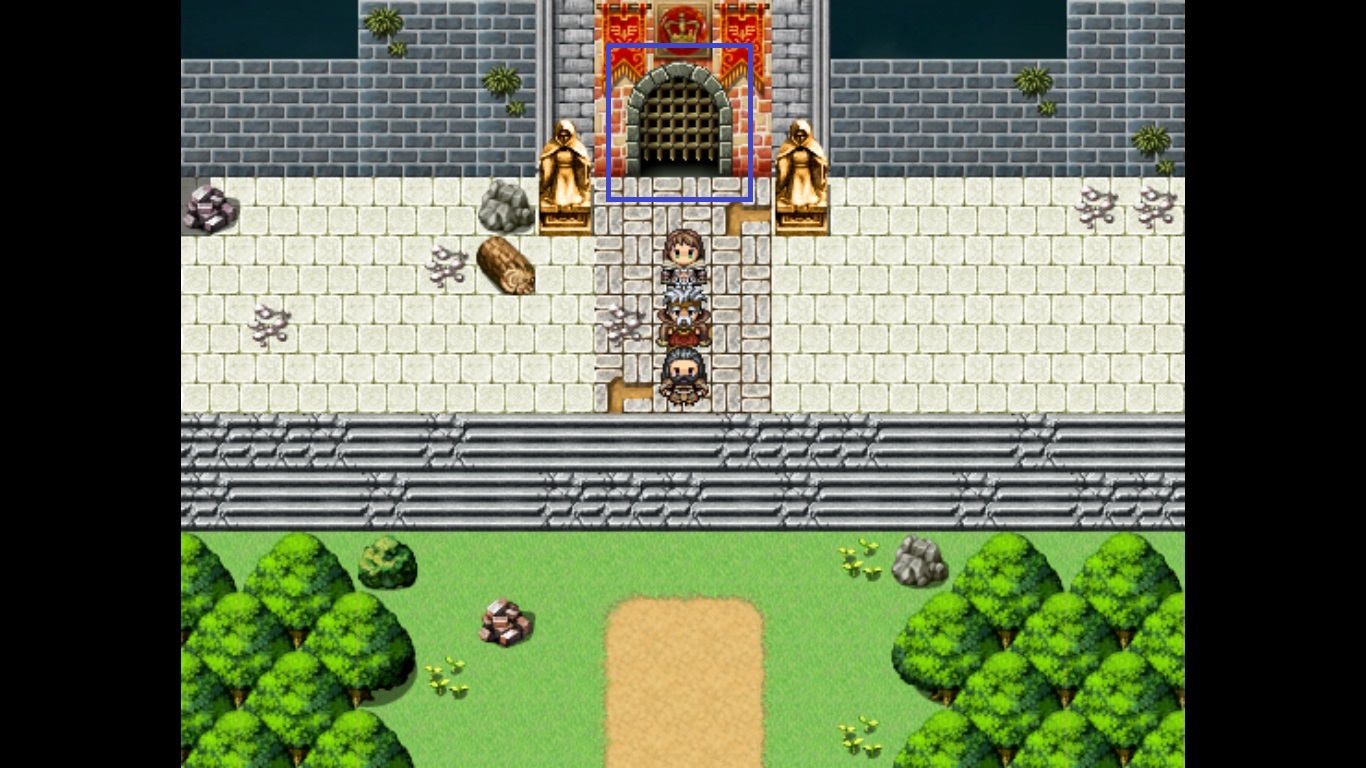 The Old Capital: You have to defeat the Monster Leader to gain access to the cue.
 Crystal Ball: Mysteria Tower –> The Four Gates –> Mysteria Lobby –> Storage Rooms –> Greenhouse –> Mage’s Q. South –> Mage’s Q. North. You have to use the Staff of Feras, which you can find in the Mysteria Lobby, to reveal an invisible doorway to the Storage Rooms.
 Orange Crystal Ball: The same path as to the previous cue, just the different room.
Secret Locations
There are four secret locations in the game, which you can’t get access to by the ordinary course of playthrough. You have to use a ship / an airship to get there.
 Renegade Lair (an island south from Ferdel Mountains): Here you can get two cues, Sun Symbol and Pure Water, and a valuable item, Berithe’s Weight Gaining Boots.
 Carnivorous Island (south from the reef near the Halgard coast or north-east from the Traveler’s Haven, where you get the ship): That’s the place where you can level up quite fast and easy.
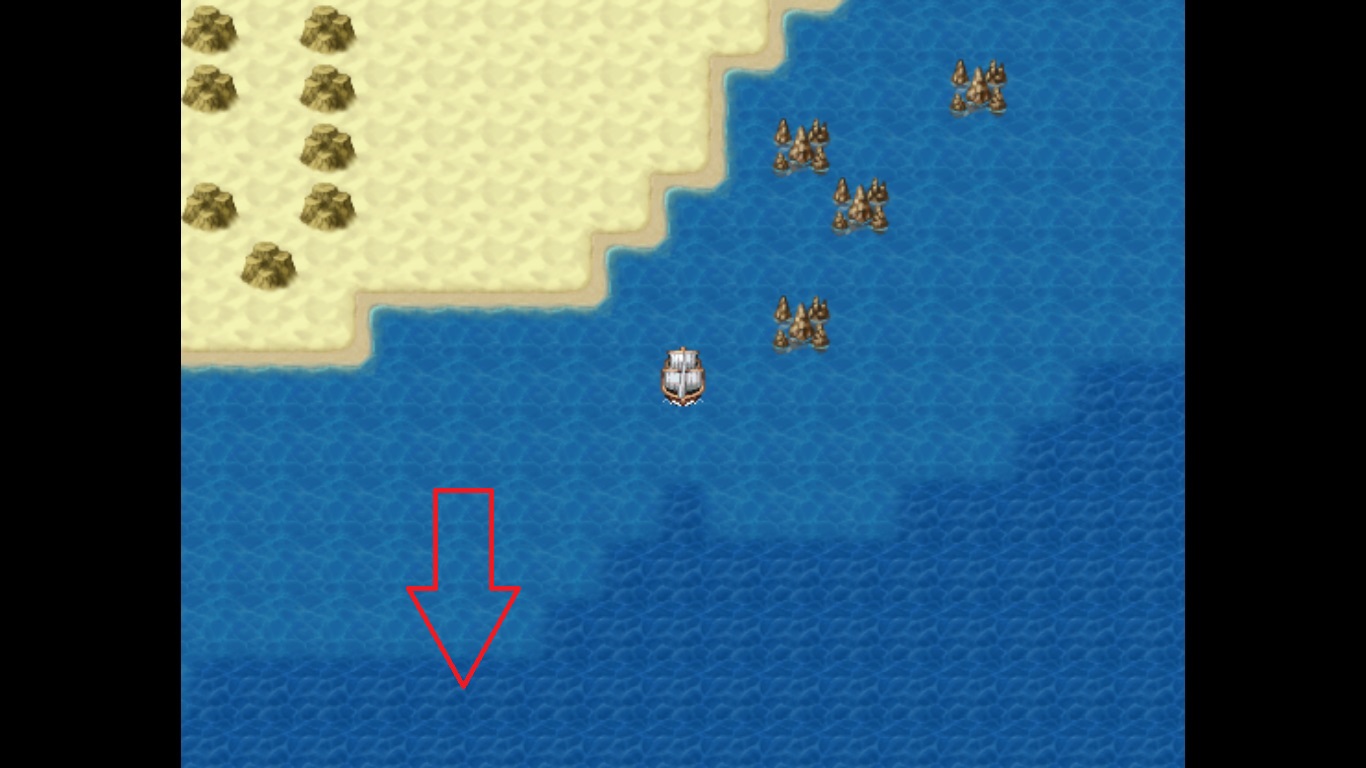
Four whirlpools of the Spiral Sea: You can get some precious loot here.
 a) The first one is west from the Carnivorous Island;

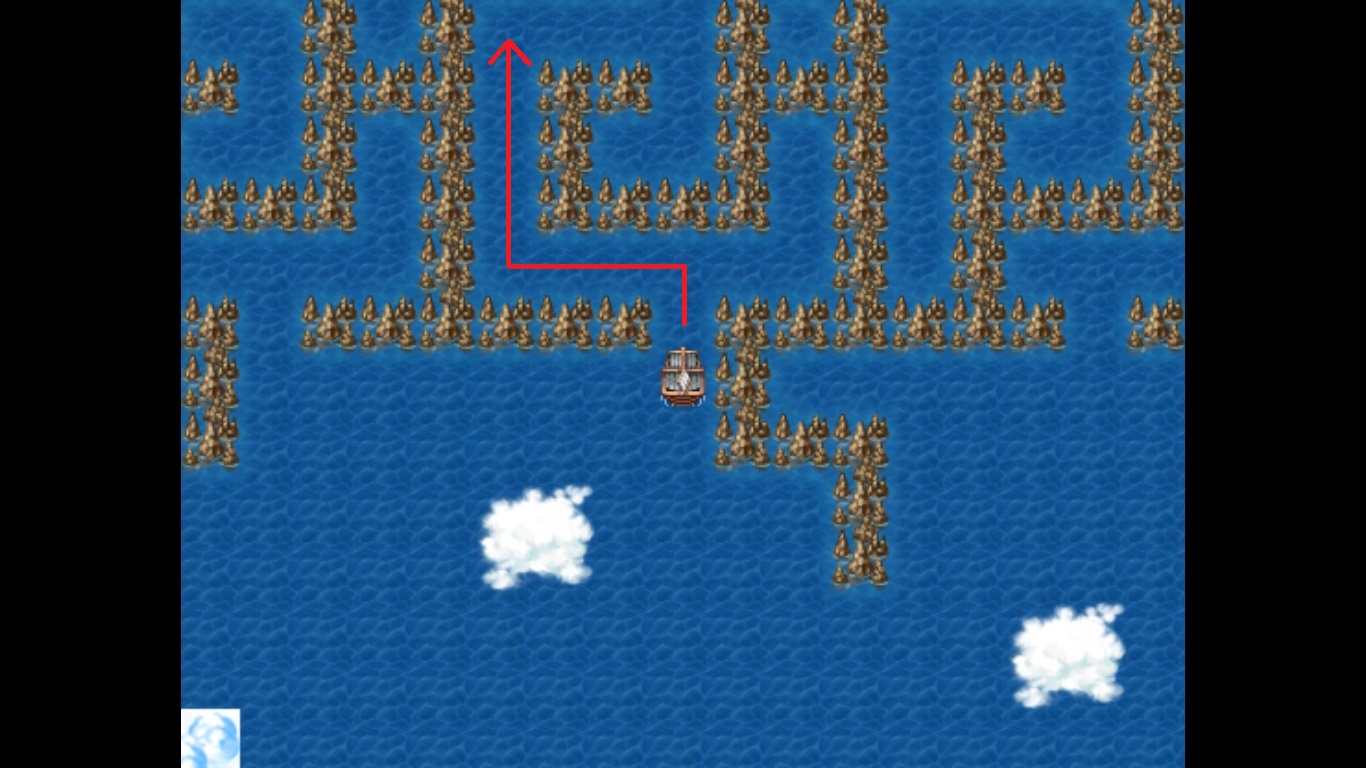 b) To the west from the previous whirlpool there’s a reef labyrinth. The entrance is on the south side of the maze. Come here and see;

 c) The third whirlpool is in the lake south from the ruined city of Albion and west from the Boat Rental (in Halgard). You can get there from the river mouth near the Unknown Skyworld.
 d) The last one is a bit west from the place where you fight Octos.
 Fire Labyrinth, or the “Pit of Pyros” (east from Carallan): Get a cue here and a lot of valuable items from the dwarven treasury.
An Endless Money Trick

At the very beginning of the game, in Meldor, you can do a trick, by means of which you will never have any trouble with money in the future (no actual cheating here!). Just buy at the Ron’s Weapons a Long Sword for 200 coins and then sell it to Ron himself for… 250 coins! By doing this constantly and en masse you will provide yourself with a seemingly endless amount of money.
The End