
Overview
This is a general guide about the ins and outs of RFMP. If you have any questions or any topics you would like to add, please let me know in the comments.
Joining Your First Game
In order to play Ravenfield Multiplayer, first ensure that you have bought regular Ravenfield on Steam. If you have not, then you will not be able to play RFMP.
Then, go to [link]
Click the green “install game” button. Once it has downloaded, go to your steam library and click play.
Once in-game, press the multiplayer button on the bottom left. From there, you will see a list of servers to join. To connect, simply double click the name of the server you want to join and once it’s done connecting, choose your team.
Server selection menu

Team selection menu

NOTE: if you are unable to join a server for whatever reason, check if the host has port forwarded or if you have been banned from the server.
Navigating the Loadout Menu
The loadout menu (which can be activated by pressing L) is a crucial part of the RFMP experience. It provides access to changing your primary, secondary, and tertiary weapons, as well as a minimap, a team switcher, a spawn point selector, and a disconnect button.
Loadout Menu
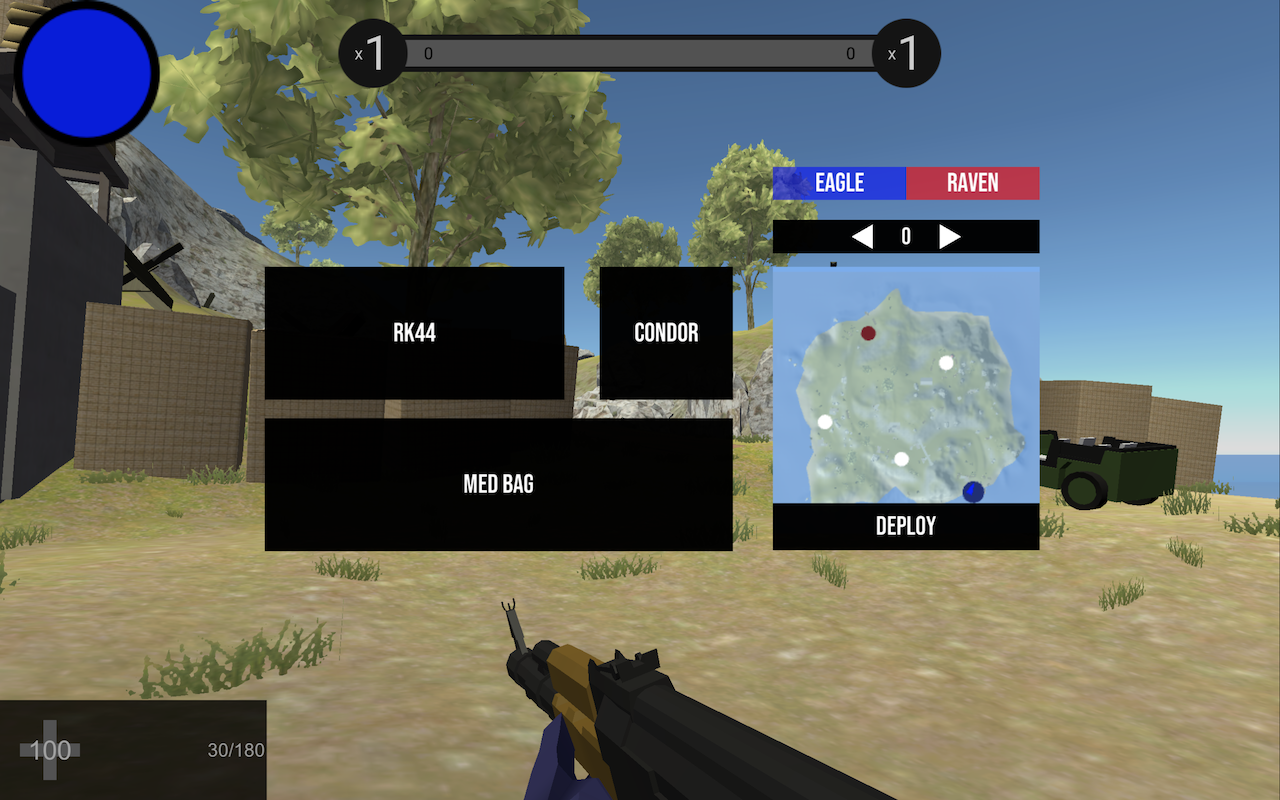
Weapon Selection
Somewhat similar to Ravenfield, your weapon loadout consists of a primary gun (anything from full autos to snipers), a pistol, and a third option of your choice (anything from med bags to rockets). To change weapons, simply click on the black box that contains a weapon name and pick a new one of your choosing. Unlike Ravenfield, you can change weapons when you are at a friendly spawn. You do not have to respawn to change weapons.
Team Switcher, Spawn Point Selector, and Minimap
The team switcher should be used sparingly, but if you truly do want to switch teams, just click your desired team once. This will kill you and respawn you at a friendly spawn.
The spawn point selector works differently from Ravenfield. Instead of clicking spawns, you toggle through them with the arrows on top of the minimap. The spawn you select will appear bigger than the rest.
NOTE 1: Some maps are broken and will not show you which spawn you have picked (e.g. Metropolis)
NOTE 2: The minimap can also be shown by holding m.
Navigating the Scoreboard
The scoreboard contains lots of info about everyone who is currently playing. To access more info, simply click their name. This is important as you are able to grab someone’s Steam ID in case he/she is hacking or being overly toxic
Scoreboard

For each player, a kill count, death count, and score count is given. The score for each player starts at 0 and every time they get a kill, the number of flags the player’s team has gets added. Essentially, it’s kills x #flags/team, except #flags/team changes throughout the game.
The scoreboard also contains the server name in the bottom left and your ping in the bottom middle. When you first join a server, wait a few minutes for your ping to settle down so it can give you an accurate reading.
Navigating the Options Menu
The options menu can be reached either by pressing the tab in the main menu or clicking escape while in a match. From there, keybinds, graphics, and other miscellaneous settings can be changed.
Options menu in the main menu

In game menu – options is second from the top

Recommendations for Various Settings
Helicopter Keybinds: The default keybinds in RFMP are the same ones as the default ones in Ravenfield. It is recommended to swap yaw and roll controls to make flying easier.
Good heli controls

Graphics Settings: Especially with a potato computer, the default graphics settings might cause you to run into some problems. I recommend setting the quality level to “FAST” and also turning off “Blooooooooooooom”. You can mess around with these toggles to find your best fit.
My recommended graphics settings

Miscellaneous Settings: These settings can also help with your graphics (target frames and max decal) as well as provide you more info in-game (hit markers, kill indicators, damage). Toggle aim and toggle crouch are purely up to you, but if you choose to use auto-reload, you will be singled out as a noob.
My recommended miscellaneous settings

Using Chat and Chat Commands
Using the text chat can be fun if used correctly. To chat, simply press y. These messages will reach everyone, regardless of team. To use team chat, press u. These messages will only reach your team. For these messages, there will be a [TEAM] label next to them.
Example of epic strats

Rules when using chat
1. Please do not spam (i.e. one message with lots of characters or multiple messages sent in succession)
2. Friendly banter is fine, but please refrain from being overly toxic (i.e. using racial slurs or other hurtful insults)
Chat Commands
!votekick [STEAM NAME]: Use this when someone is being toxic. This will remove them from the server, but only temporarily.
!voteban [STEAM NAME]: Use this when someone has already been kicked but has come back to be toxic again. This will make sure they can never come back.
NOTE 1: Teamkilling will usually result in an autokick, so you don’t have to worry about that.
NOTE 2: All helpers are able to kick/ban users without a vote. If you are having problems with someone, please ping one of us on discord with the server name, the name of the offender, and the offender’s steam id (hold tab and left-click the name).
!skip: Use this when the current map is boring or Stakeout Night and you would like to move on. When enough people vote, a map selection menu will pop up. To exit out of this menu, press the white x in the top right corner.
NOTE 3: The skip menu is organized in such a way that by default, people will click Stakeout Night (since it’s in the center of the screen). No one likes to play this map and the flags in it are buggy. However, if you do end up skipping to this map, press n to activate night vision.
Map selection menu

Server Hosting
The first step to host a server is to forward port 7777 (unless you want to play over LAN, in which case ignore this paragraph). To do so, check the various links and posts in #faq on the RFMP discord server: [link].
If you are on Windows and would like to host a dedicated server (one which you yourself cannot join), first find RFMP in your Steam library and click play. Now, instead of choosing to play the game, choose to launch the dedicated server hoster. Follow the instructions on there and your server will be up for everyone to join.
If you are not on Windows or you would like to join your own server, start the game as normal. From there, hold down the multiplayer button. You will see a gray progress bar appear. When it reaches the end, the in-game server hosting menu will pop up. Enter the needed information and click “Create” to open up your server.
NOTE: The in-game server has a few limitations: no special characters in the name or password, the name must be more than three letters, and no spaces are allowed.
In-game server hosting menu
