Overview
Guide for the Basics, Getting a Party started and Surviving and Walkthrough for Act 1 of the game
Basic Tips
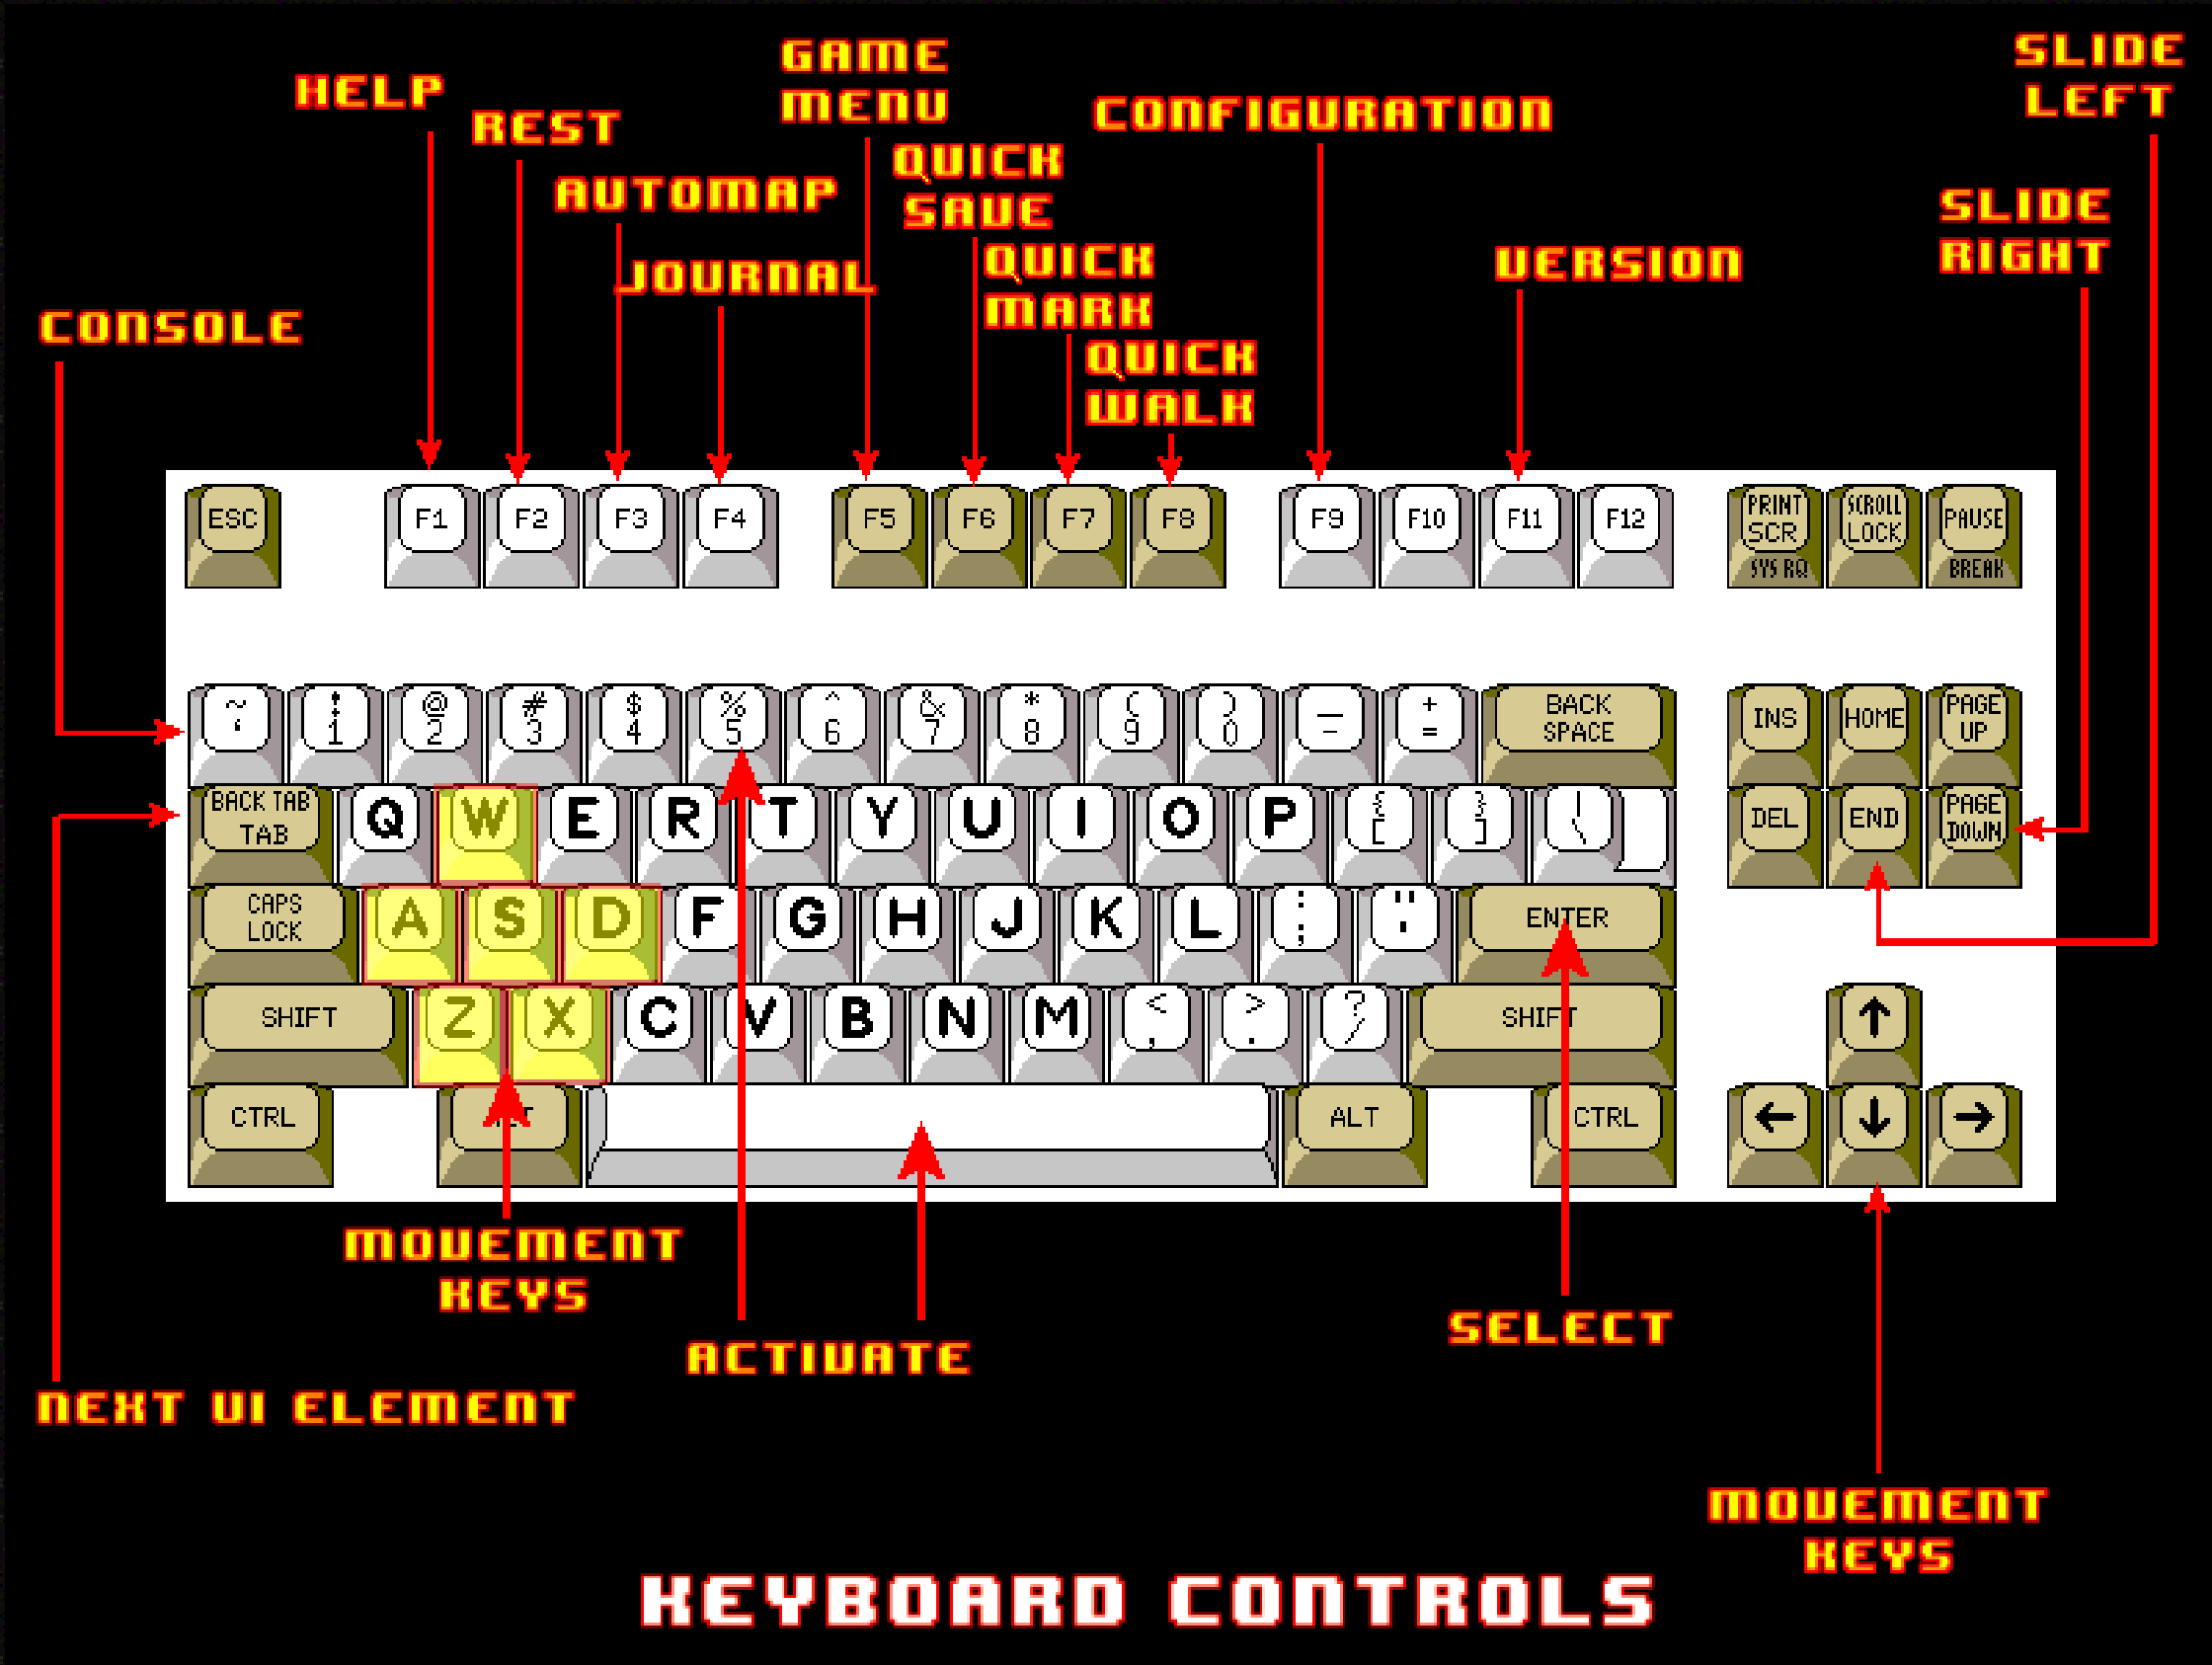
- F1 key shows hotkeys
- Enter key to skip through combat
- Percentage after a Successful Hit indicates Remaining Enemy HP
- To Recruit NPC: While talking to them, Right-Click Context Menu from Talk to Recruit (Handshake icon)
- Pick Apples from Bushes, Leeches from Ponds Outside to cure Diseases and Poisons (By using Inspect/Eye symbol while close)
- Always have Detect Secret on Indoors (especially dungeons)
- Use “Set Path”, “Pathfinder” and “Exit & Walk” on the Map to Quicktravel
- Higher Vitality helps with Penetration – so make sure to rest and have that up before tough fights, Higher STR/AGI increases Chance of Penetration
- After assaying an item, drag it on Assay button for Stats
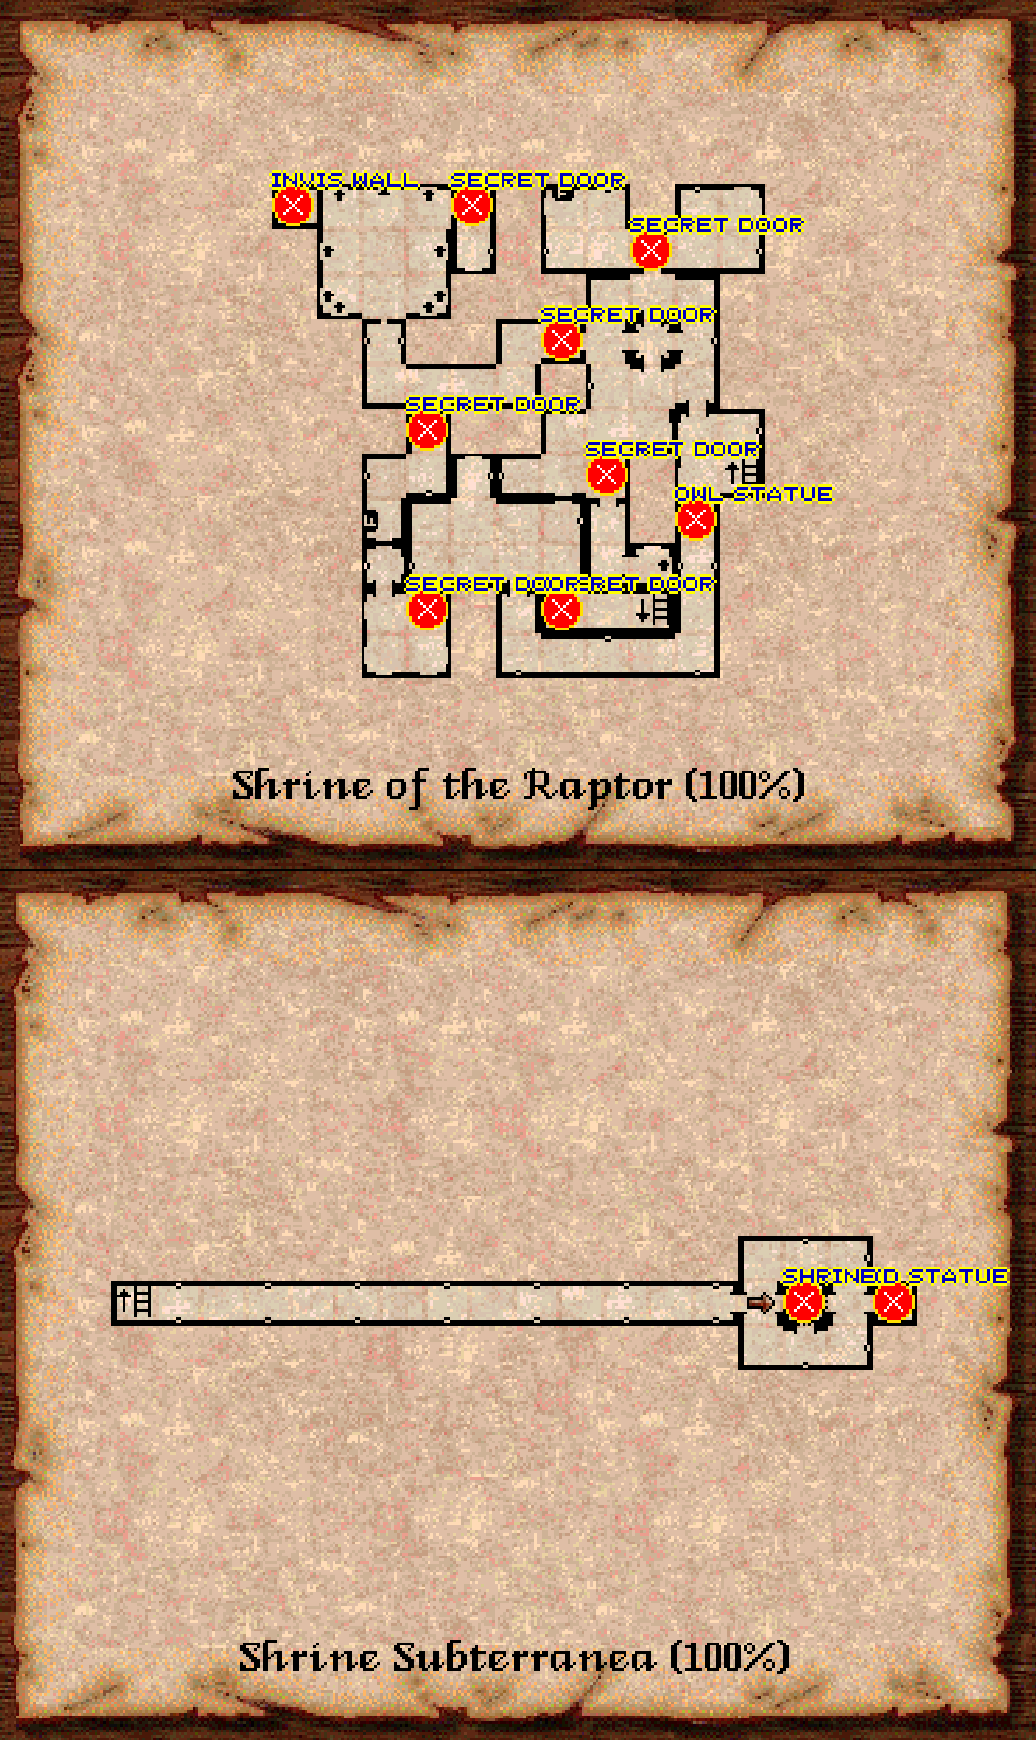
- You can heal Diseased characters in the Shrine of the Raptor if you pick “The Shrine” as a Starting point and you get the Owl Statue (Bottom floor with the Sparkles)
- You can Save & Load before Looting Chests for Random Loot
- Switch character formation by clicking their names
- Social Spells: Mind Read on NPCs (Shows what words they react to); Charm (Opens up more Options and makes them much more Cooperative)
- Some NPCs like Smithers can help you SuperID items early on updating your Journal (just hand them items when they appear), Critical Mission Items leave behind Info on what to do with them in their Journal entry
- There is a difference between Slashing/Thrusting/Swinging/Smashing on Different Enemies
- Later in the game cast Improved Identify before opening Chests if you want them to be SuperID’d and have Journal Entries
- If you have issues with High resolution displays on Windows not displaying the entire Screen, go into your local Grimoire folder –> Right Click “Grimoire.exe” –> “Compatibility” –> Tick Checkmark on “Disable display scaling on high DPI settings”. Then Stretch to Full Screen in the game settings and everything should be fine.
Creating a Party, Picking Starting Spot
You don’t want to start a game using “Quick Start!” with the Premade party, since there are some real losers in there that might lead to a quick demise. The two tanks don’t really have sufficient HP to properly tank, the Bard and the Sage have 4 and 2HP each leading to a simple cough in their direction making them fall over, the Cleric and Bard only have 6 Magic being able to cast only a spell or two before having to rest etc.
You want to create your own party, you’ll need two tanks in the Front Row that will take most of the punishment early on, you can mostly follow the games recommendation for this, Saurian/Drake/Naga seem like good choices for Warrior/Berserker characters, and you’ll want them to be Male since they get Bonus Strength.
You will also want some support characters like a Ranger, Thief or Bard, possibly a Cleric and a Aeorb Sage and maybe a Thaumaturge or Wizard as a Glass Cannon.
Max. Roll for Bonus Points is 32 with the 4D8 Method, to be able to unlock some classes you will need a high value here (for instance choosing Durendil you will need to roll a 30 or higher to unlock the Templar class), but also generally you’ll want to roll a high Value here. Stick Bonus points into HP for the tanks, and primarily in Skills or Attributes for the others, although having some HP at the beginning generally doesn’t hurt. Even after a successful roll, the amount of Hitpoints, Magic and Vitality generated for specific characters is random, so if you get a Mage with 2HP and below 10 Magic, you’ll want to retry for something better.
- Some Early Spells You Want: Detect Secret (Indispensable), Identify (Helpful), Charm, Some Attack spells like Poison or Chilling Touch and generally Pick Cure Light Wounds, Cure Disease etc. Spells as early as possible with Cleric, since you might need them badly
- Skills to Pick aside from Class Specific: Scouting (Ranger, Thief – Indispensable for finding Secrets), Lethal Blow (Probably one of the Most Important Late game Offensive Skills), Assaying (For Identifying Items), Lockpicking/Inspection/Robbery (For Opening Locked Doors/Chests and Thieving), Diplomacy (For Successful Conversations Checks)
- A lot of Use-Skills like Stealth, Robbery, Swimming, Climbing might require a few points to get going but are easily raised through Use later (and you will need to use Swimming/Climbing to progress in the game later, so put a few points into them on all characters at your convenience since that will allow you to survive the first plunge and raising them by using them)
- Special Racial Attacks – Drake: Breathe Fire, Saurian: Stinking Bile, Leonar: Battle Roar, Vamphyr: Charm, Aeorb: Mindflay
- Saurians and Drakes deal 3D4 Damage with their Claw/Tail/Bite Attacks, while Starting Weapons only deal 1D4 Damage, Naga does 2D6 and inflicts Poison
- Mana regeneration seems to depend on race with Feyfolk and Aerobs having an advantage before Drow or Human
- Lockpicking: On Chests Inspection and Lockpicking determines whether you will set off a Trap or not and how likely it is to go off. On Doors Inspection determines how many Letters you see and Lockpicking determines how many chances you have. Each Column corresponds a letter for the Puzzle.
- HP, Magic, Attributes, Bonus on Level Up are Random Rolls
Here’s a handy Spreadsheet Guide for the Stats of all Race/Class combinations: [link]

Best Combinations for Race and Class so far giving the most Bonus Points at the Start and the most Skillpoints on Level Up seem to be:
Aeorb Sage 2.0x
Durendil Templar 2.0x
Wolfin Ranger 1.6x
Feyfolk Necromancer 1.6x
Drake Metalsmith 1.5x
Giant Warrior 1.5x
Saurian Berserker 1.3x
Barrower Thaumaturge 1.3x
Wolfin Cleric 1.2x
Rhattu Thief 1.1x –> Rhattu Assassin 1.8x
You can Start the game in different areas (Configuration –> Game Start) and there are different Starting Boni for said areas. While “The Shrine” is the Standard starting spot for beginners with the easiest fights, “Sanctuary” seems to be the best Early game Option given the rewards.
“The Shrine” / Briarpatch Woods
- Owl Figurine –> Leading to Secret Area in Shrine of the Raptor
- 9 Lore Entries (Thanatos, Gorgon, Scylla, Aurora, Arachne, Atropos, Megaera, Nemesis, Lachesis)
- ID Owl Statue
- Shrine that heals Disease and other negative Status Effects
“Sanctuary”:
- Xenomorph Keycard for Endgame weapon
- 1000 Free XP (Bringing some characters to Lvl2)
- Terminal that lets you train Skills “Iron Fist”, “Accuracy”, “Firearms” on all characters to +12
- Terminal that reveals the maps for Village of Crowl, Briarwood Forest, Gardens of Midknight
- Statue to Identify items (Super IDs up to 10 items)
- Ranged Star Gauntlet Weapon with 99 Charges that is helpful in early tough fights
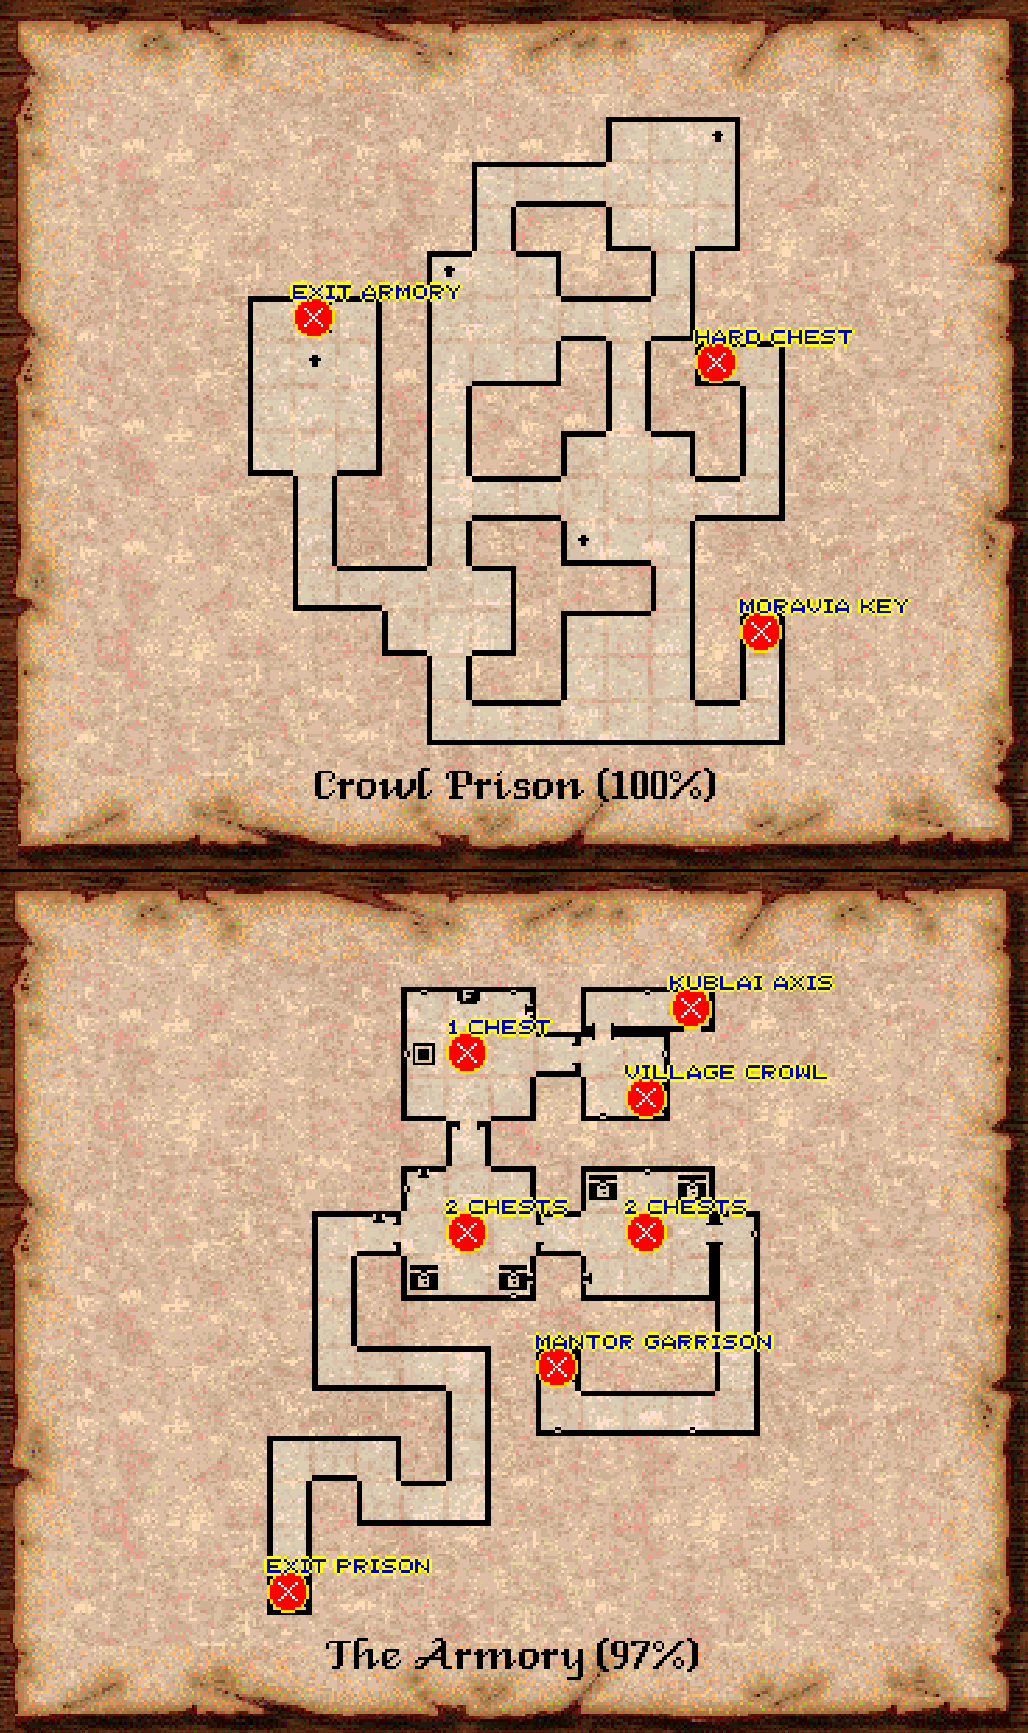
“Imprisoned” / Crowl Prison:
- Moravia Key
- 1 Hard Chest with 12 Items (Armor, Helmet, Random Weapons, Bow, Arrows)
- 5 Early Easy Chests with 7 Items in the Crowl Armory (Arrows, Scrolls, Sword, Axe, Maces, War Axe, Lance…)
“Wilderness” / Gardens of Midknight:
- Key of the Ancients
“Eerie Wastes”:
- Skull of Hathor Sogg
Talking to NPCs
Talking to the various NPCs in Grimoire is important for progressing in the world and collecting hints for what you have to do. There are some Spells that are helpful for finding out what you can talk to specific NPCs about, “Mind Read” will display important Keywords they will answer to (but be careful, because some NPCs won’t like you trying to probe around in their minds). The higher the “Diplomacy” skill is on the character talking to NPCs, the more susceptible they are to your inquiries, and you can use “Charm” to make them even more amenable.
There are two kinds of Keywords in Grimoire, General Lexical Talking Points that will prompt the same answers from every NPC you ask and are rather unimportant outside of adding to the Lore:
General: News, Prophecy, Winged Exemplar/White Owl, Holy Road, Clock of Fate, Golden Baby, Vanguard Marines, Pirates, Duroch Mal, Gold, Chasm, Golden Hand, Quest, Magic, Map, Potion, Wand
Places: Hyperborea, Village of Crowl (Bronze Cauldron, Crusader Temple, Museum of Magic, Catacombs), Aquavia, Kublai Axis, City of Waterport, Gideon, Samhain
Races: Human, Drow, Barrower, Wolfin, Feyfolk, Saurian, Naga, Drake, Rhattu, Leonar, Aeorb, Durendil, Vamphyr, Giant
Skills: Swimming, Climbing…
People: Mordecai, Captain Krone, Trimestes, Smithers, Rosy, Lord Ahriman, Raghilda, Khan Raji, Argosyre, Gorlo, Junga Din, Mistral, Black Pierre
Historical People: Saint George, Kroondergraff, Bishop, Esoph, Black Lich
And there are Talking Points that specific NPCs will react to uniquely and will often Update your Journal, indicated with a “(J)”:
Little Rosy: Rosy, Trimestes, Bronze Cauldron, Saint George, Holy Road, Museum of Magic, Crusader Temple, Wand, Little Daisy (J), Black Pierre, Snark Mistress, Black Lich
Raghilda: Sister/Clara (J), Ruby Broach, Samhain Horror, Potion, Depetrify (J)
Smithers: Father (J), Ukluk, Loogmar, Marque, Chasm, Great Bridge, Blacksmith, Forge, Museum of Magic
Gorlo: Book, Crusader Temple (Key if High Diplomacy/Charm), Scandal, Bishop, Esoph (J), Argosyre (J), Catacombs (J), Tome of the Spider, Key, Saint George, Mistral (J), Hobknob, Goblet
Trimestes: Museum of Magic (J), Cenotaph (J), Magic, Rosy, Eldritch (Spellbook Upgrade), Refund
Junga Din: Junga Din, Spiders, Chasm, Bridge, Black Lich, Where Lich, Hobknob, Apprentice, Dartagnan, Samhain, Goblet (Will need it to progress)
Mistral: Mistral, Esoph, Key, Black Lich, Eldritch (Spellbook Upgrade)
Captain Krone: Krone, Vanguard, Expedition, Black Lich, Signet, Chasm (J), Commendation (J)
Sir Coffergus: You, Eyrie, Quest, Catechism (J)
Recruitable NPCs: Little Rosy (Feyfolk Thaumaturge), Raghilda (Human Cleric), Junga Din (Human Thief), Gorlo (Human Cleric, after handing him the Tome of the Spider), Mistral (Human Cleric, if revived), Sir Coffergus (Human Templar, after completing his Quest)
Lockpicking Minigame
There are two types of Lockpicking Minigames in Grimoire, one needed to Open Chests where you have to find out which wire on the left belongs to which wire on the right and one to Open Doors, which will require you to match a word Hangman style.
Opening Chests: On Chests Inspection helps by making it possible to click on the outer rim and reveal numbers of which wire on the left belongs to which on the right. Lockpicking determines whether you will set off a Trap and how likely it is to go off while matching the wires. If your Inspection is low but Lockpicking high, a better strategy would be to connect the wires directly since the Trap is less likely to go off. If your Inspection is high but Lockpicking low, reveal the numbers first and connect the wires after.
Click on the outer boxes with a high Inspection skill to find out the combinations, click on the inner red Rhombus (one left, one right) with a high Lockpicking skill to try and cut a wire.
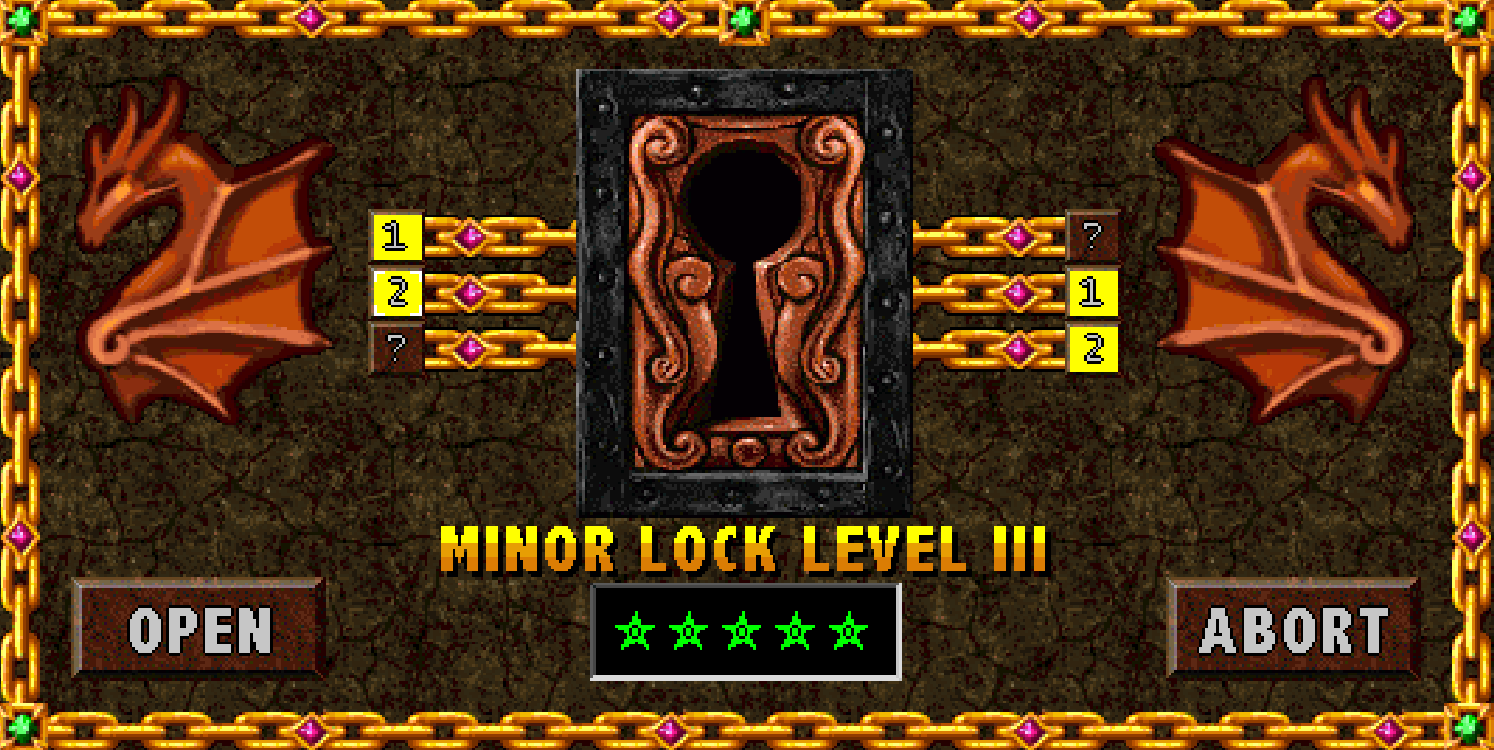
Opening Doors: You have to pick a letter from each column displayed forming a word as a solution for a puzzle. Your Inspection skill is responsible for the amount of uncovered letters displayed and your Lockpicking skill is responsible for the amount of attempts you have to find the solution before the trap goes off.
Each letter of the word corresponds to a Column in the Minigame, below you can see how often you can fail before the trap goes off indicated by stars.

MINOR LOCK LEVEL I
A SHINING ALABASTER VAULT AM I THAT HOLDS WITHIN A GOLDEN HEART –> EGG
BORN INTO MISERY BUT STRONG IN PRIME AND SHORT OF BREATH I LAY DOWN TO SLEEP –> MAN
CHESTER AND HAZEL ARE MY RELATIONS BUT NO KIN TO ME –> NUT
IT RETURNS TO DRINK THE BLOOD OF THE YOUNG WHEN IT GROWS HUNGRY –> WAR
I SPIN UPON MY OWN SELF IN DANCE THAT ENDLESSLY REVOLVES AROUND MY START –> TOP
MUDDY MUCK AND MIRE MOST MISCHIEVOUS –> BOG
MULTIPLY ME AGAINST MY OWN AND I REMAIN SOLITARY AS MYSELF –> ONE
YOU GASP IN MY ABSENCE AND BLUSH IN MY PRESENCE –> AIR
MINOR LOCK LEVEL IV
A MIGHTY EMPEROR AM I WITH TIME AS HIS HANDMAIDEN AND SILENCE HIS COUNSEL –> DEATH
A READY GENERAL WHO DRIVES HIS ENEMIES ACROSS THE THRESHOLD IN PALL OF DUST –> BROOM
HE WHO EMBRACES ME IS SOON CORRUPTED BY MY EMBRACE IN TURN –> POWER
NO MAN MAY WEAR THIS CLOAK BUT IT CONCEALS THEIR MISDEEDS –> NIGHT
ONE WHO FEELS THIS IS PROOFED AGAINST HIS FOE AND FLIGHT –> BRAVE
PRECIOUS IN FALLING WE CANNOT BE COLLECTED OR SAVED –> TEARS
MINOR LOCK LEVEL V
A FIRE IN THE BELLY THAT VOMITS FORTH STEEL –> FORGE
A WHITE JACKET AND A PINK HAT TO DINE IN THE LARDER –> MOUSE
ONE TWO THREE BUY MUCH INDEED WITH MANY OF ME –> COINS
THESE RINGS BIND WITHOUT A BETROTHAL –> CHAIN
THIS ROYAL BATTLE IS ALWAYS THIRTY-TWO AND THIRTY-TWO –> CHESS
TINSEL AND PAPER WE ARE GARBED TO SIT BEFORE THE PINE –> GIFTS
MAJOR LOCK LEVEL VII
IVORY LADIES ON A FIELD OF GREEN THEIR SUITOR ALL IN BLACK –> TENPINS
A WAX VAULT OF GOLDEN TREASURE AND A THOUSAND DAGGERS TO GUARD IT –> BEEHIVE
NONE BEND THIS BOW BUT FIVE ARE BENT BY IT –> RAINBOW
Sanctuary, Village of Crowl
If you start the game with the “Sanctuary” Option, you’ll wake up in the Sanctuary, before you is a chest with the Xenomorph Keycard and a powerful Ranged Early game weapon, the Star Gauntlet, there’s a terminal with some Lore information nearby (The password for it is “ABEND” found on a corpse nearby), further away is a Statue that can Identify the Star Gauntlet, a Training Terminal that can Teach your characters the Skills “Iron Hands”, “Firearms” and “Accuracy” up to 12 and a wheel that you can turn to gain 1000XP and Level up some of your characters (You might want to hold off on this if you want to recruit NPCs first). After that and a good rest you should hopefully be ready for outside.

You won’t want to run into many tough encounters early on and will improve the chances of that not happening by setting “Wandering Monsters” to “Never” in the Configuration until you get your bearings. The goal for now is to go North and then West, there will likely be 3 Random encounters on the way that might be easier or harder depending, your “Star Gauntlet” should be of help. After you’ve reached the big town plaza you should be relatively safe, you can recruit your first helpful NPC companion “Raghilda” (Human Cleric) by heading South to the “Wayfarer Inn”, talking to her first and then choosing Recruit from the round Context menu. After that head North to the Briarpatch Woods.

If you start here, you have to get out while making sure that your party doesn’t die from Disease, you’ll find the Moravia Key on a skeleton on your way out, as well as a really tough to crack chest and various chests in The Armory on your way out full of weapons of various kinds:
Briarpatch Woods, Aquavia
After stepping out into the road, you should meet “Little Rosy” (Feyfolk Thaumaturge) for the first time, have a conversation with her and then you can recruit her to your party as a second NPC party member. The Encounters here shouldn’t be much of a problem after that, go right ahead and dispatch “The Green Hand Gang”, which would have been an issue for a Lvl1 party starting off in “The Shrine” area. You can also find a few hidden goodies like the remains of a Party of Adventurers and several charges of Pointy Stick by exploring the corners of the map and Sleeping in certain spots:

has a lot of Secret Doors and an Invisible Wall granting 1D6 Devotion to a single character, so make sure to have “Detect Secret” on at any time, for parties that started off in “The Shrine” area, they can use the Owl Figurine by putting it in an alcove near the Entrance, opening up the lower part of the dungeon, with additional Lore added to the Journal and a Subterranean Level with a Statue able to Identify items and a Shrine that is able to remove Bad Status effects from characters like Disease:
is the first larger Dungeon you will encounter in the game. After entering the large room filled with water you need to find the Secret Wall Button at the back left, which lowers a Drawbridge for a chest containing the Key for the locked skull gate. Explore beyond, beat the Snake Miniboss in the North, Loot everything and solve the Puzzle (Sun, Moon, Star – The answer is hidden in an Inscription on the Level below)
After descending to the second Level, Aquavia Causeway look around, embark on the boat and fight your way through schools of hungry Piranhas until you reach the Invisible Wall at the other end of the hall, then find the Secret wall to the right, use the Lever to open the door to the boss. If you solved the puzzle on the Level above you can also use the Secret Lever for an item to make the fight ahead easier. After defeating Shiva Han you can look around and loot the rest, through the Teleporter to the right you will find the King’s Crest in a Chest.

Village of Crowl, Catacombs
With a somewhat stronger party that has hopefully Leveled up a few times, it is time to head back to Crowl, Sell all the unneeded items for some inventory space, pick the city clean as far as possible and take care of the ?UGLY DOG?, talk to the NPCs there extensively about their concerns and push the story forward. Smithers can be quizzed by asking “Can We Help You” or talking about his “Father” or “King Loogmar”, you can also show him King Loogmar’s Crest and he will have something to say about it. Gorlo will give a lot of hints by himself regarding the “Book”, “Scandal” and “Crusader Temple“. Just follow the conversation and with the right incentives he even hands over the key to the Catacombs. Trimestes is also an important person in town, for Details see the Section below about Talking to NPCs.
The Catacombs can be reached through the Crusader Temple. The solution for the Apparitions puzzle is “Grief” and can be found on an Inscription in a pool of water. You get the Key of Mystery from behind the door and can open a Locked Door nearby with it to detect two Inscriptions (On the wall and by using “Look”). Major enemies on this Level are “The Ungrateful Dead” and a “Crypt Cleaner”. Before heading down don’t forget to pick up the Dead Rat from an urn.
There is a Golden Hand with various charges to loot here you will need to enter the Cenotaph, as well as some Hints on Several Inscriptions on the walls, and you can find the Crypt of Mistral behind a Secret Wall in the back.
The third area accessible from the Crusader Temple, you can find a few hints of what might have happened to Raghilda’s sister throughout, but the path is closed off for now.

Gardens of MidKnight, Cenotaph of the Black Lich, Spirit Caves
Gardens of MidKnight is a rather straightforward area with a bunch of Entrances leading to other more important areas
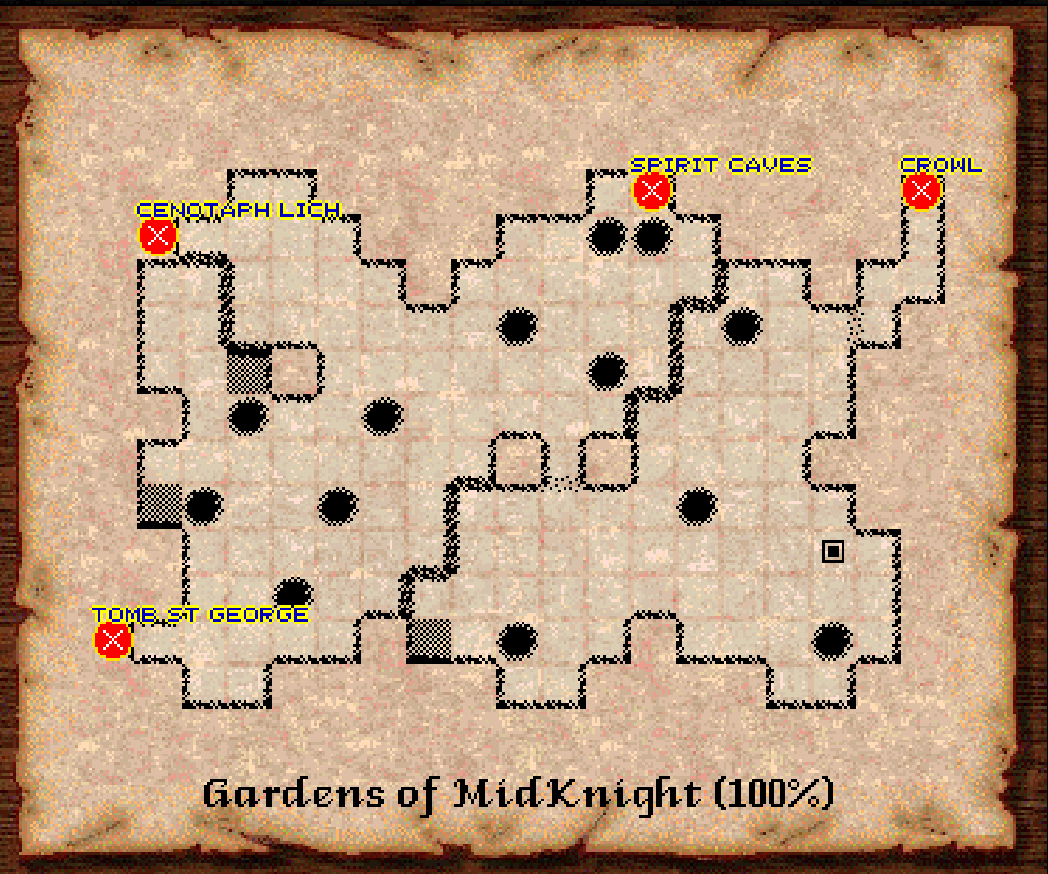
Explore the cave, behind a hidden wall to the North-East you will find a Scroll Container you can put up to 16 Scrolls into by picking them up and Right-clicking it. Further inwards you will find a Ghost guarding a chest that is immune to physical weapons and an even tougher battle with a Banshee.

The Entrance door is closed and trying to open it provides you with 3 Journal Updates. Use the Golden Hand/Hand of Glory from the Crypt of Monks in the Catacombs to open it. Explore this Level, don’t forget the Tome of the Spider in the library and head on to the Cenotaph Vault.
To the right you find a well, which after interacting with it will produce an Ankh, straight ahead is a speaking Stone Face on the wall asking for a name. The solution to the Puzzle is Esoph.
Through the first door you find a cocoon on the wall with Junga Din (Human Thief) inside, with the right approach you can make him give you a Goblet, see below in the “Talking to NPCs” section for what he wants to talk about, he is also the third recruitable NPC in the game.
On the other end of the room is an Altar, to get to Hobknob’s Lair you have to place the Dead Rat you found in the Catacombs on it and use the Ankh/Bane of Hobknob you found earlier on it afterwards. Prepare for a tough boss fight before doing so.
Hobknob is a tough boss enemy that will damage your party a lot and use that damage to heal himself. Control Spells like Sleep and Paralysis seemed to work best while hitting him with all that you have. Once he’s done you can explore the rest of this Level, there are a few things to discover, don’t forget to pick up the Seahorse Signet ring in the Southwest. After that head back up and continue on your way.
Explore the rest of this Level and open it up with the two Levers until you get to a second Stone Face. Use the Goblet/Spirit Goblet from Junga Din on it to open up the next door.
It’s time to face the ruler of this domain, the Black Lich, be sure to get his treasure too, especially his Necrostaff and don’t forget the hidden Switch with Mistral’s Letter and Monk’s Bones to the right of the chest in the back.

Samhain Gorge, Ukluk Mining Company, Deepsink Project
Backtrack through the Pit of Hobknob and an Invisible wall to Samhain Gorge, there is a Puzzle near the Entrance for an Orb that reveals the whole map with the right Setting Moon. There’s not much to do here just yet but explore, head to the Ukluk Mining Company Entrance in the North after you’re done.
Explore the Level. Westwards you can find the room of the Quartermaster in the North with a Harness you will need and right next to it is a Hidden Switch in a Wall for a part you will also need to repair it. Southwest is the Entrance to the Deepsink Project.
Eastwards there is a room with three Levers that will send you on a little Drain Adventure to Cistern Zero with nothing plot-critical in the South and to the North you can find a locked door with King Loogmar’s symbol on it. To open the door use the King’s Crest you’ve picked up from Aquavia on it. You will need to have the repaired Outrigger Harness with the Linchpin to proceed here and don’t forget the Letter of Marque after the Loredump. Also North you’ll find Engineering with the Amulet “Pride of the Mines” and the Chance to drop a Ringmail.
At the entrance of the Pitch black area the game refers to “Infravision”, I’m not sure what exactly is meant by that, it’s possible this is something Vamphyrs have, without it you’ll have to wing it using the Minimap since the Light spell doesn’t work. Have Detect Secret on and try turning around in the black seeking around till your cursor turns into a hand when there’s a Secret nearby. Move along the corridors while bewaring of Poison Gas as it might kill your party, you need to switch a Lever in the North to open a locked door Southwest, then Input the combination from the Inscription in the Secret area to open another door Bolt, Bolt, Bolt, then get a piece of Ore from a passageway Northeast and get it to the Kroondergraf’s Geodetic Crusher to crush it and get the Stepping Stones. Using the Quickpath Feature may also be helpful on this Level.
After you’re done with that Ordeal you can head out and back to Samhain Gorge to the very edge of the Chasm. DRAG the Stepping Stones from your inventory on the USE button of one of your characters (the symbol is of an arm holding a hammer).

Crowl, The Eyrie, Raptor Grotto
Since there is only a locked door waiting ahead, find your way back to Crowl (Quickpath Feature may be of help once more) and give Smithers the Letter of Marque upon which he will hand you a Seal you can combine with the King’s Crest to receive Royal Seal of Loogmar.
While here, do a quick trip to the Crusader Temple to hand Gorlo the Tome of the Spider for 1000XP and the Crypt of Monks below it through the Catacombs to lay Mistrals bones to rest, or just revive him by using the “Raise Dead” spell on his bones, upon which you can talk to and recruit him (Human Cleric). Either way you get the Key of Saints.
You can meet Captain Krone in the Mantor Garrison, look at the poster in front of the Entrance for a hint, then turn around, click on the window and when asked about your business, say “Expedition” to be let in. Visit Captain Krone right ahead and give him the Seahorse Signet ring for 500Gold and 250XP. Also show him the Necrostaff taken from the Lich for improved reputation, Armory Key and a Letter of Commendation. You can now get into The Armory part of Crowl mentioned at the Beginning of this Guide and clear it of loot.
It’s also time to visit the Museum of Magic under the Bronze Cauldron by buying a Ticket, use the Chronoworks of Kroondergraf down there and solve the Puzzle Spin Wheel, Blow Trumpet, Twist Crank, Turn Key, Pull Lever, Wind Coil with the help of the Inscription from the Catacombs to get a Jeweled Egg.
It is time to head to the Tomb of Saint George, Open or Lockpick the first door, see all the mosaics inside, then open the door at the end with the Key of Saints. Look at the rest of the mosaics and then head up to The Eyrie.

Talk to Sir Coffergus and then explore the outside area. In the North there is a Avian Helm behind a Secret Wall you will have to open. Make sure to be ready before proceeding. To get to a Secret area in the game which gives you 1000XP just for showing up Put on the Avian Helm and Sleep on the circle to the NorthEast of the map. East you will find the item that Sir Coffergus has been seeking for, the Amulet of Astrixus. If you give it to him, you can hire him to your party. Clean out the Raptor Grotto at the end.
You wake up in the sky and 1000XP richer, there are two bosses to beat here, the Displacer and the Wizard of Worrfair. Make sure to look out the windows for some Lore. At the end of this short Adventure you will have a Magic Sack (with 16 Slots for Spellbooks/Wands/Potions) to put items into, Spellbooks for “Firestorm” and “Magic Missile” and an Entire High-AC Blood Robe attire for one of your mages.
Explore the Dungeon as you go along. Don’t drink the water. Make sure to get the Cosmic Egg from the Northwest of the Dungeon and the Ring of Swordsmen (+12 Swordsmanship/Agility) from the Southwest.

Samhain (Great Hall, Mausoleum, Underworld)
With both the Cosmic Egg and Jeweled Egg in your possession head back down towards Samhain Gorge and the Deepsink Project. Use the Cosmic Egg on the Kroondergraf Geodetic Crusher to get Cosmic Egg Yolk. Pour it into the Jeweled Egg to get a Mechano Egg.
Open the door with the Royal Seal of Loogmar, put together by combining the King’s Crest and Royal Seal. Explore the adjacent rooms, in the Northeast you will find a Glass Vial you will need to fill at the Black Cauldron North to get a Rotgut Tincture. Southeast is an Oracle that can SuperID items for you. Southwest is the Entrance to the Samhein Mausoleum and further SouthEast you can continue on after splashing the Rotgut Tincture on the Rusted Chain.
At the Beginning of the Level is a Lever puzzle where all Levers need to show up to open a door with an ?Old Book?/Encoded Catechism inside. Proceed along the Alcoves searching for Secrets and you can find two Hard Chests to open with possible loot like Heraldic Shield, Greaves, Amulet of Might, Ring of Protection, Horn of Winter etc. In the Southeast is a hall with a talking Stone Face in the middle asking you about the Catechism/Seven Virtues of a Knight. Further ahead there’s a hidden Chest behind a Secret Wall with the Mausoleum Key in it that will open the locked door in the Northeast to the Sacred Pool you will need to enter the Caliburnus area after reciting the correct Catechism. If you have any Perk Keys with you, you will be able to use them on the 8 chests in the South of the map (one chest is empty). Loot Clockwise from Top Left: Farulosonoth’s Staff (TOHIT 20 VS INFERNAL), Lute of Nirvana (Healing Cloud), Moon Singer Polearm (Spear&Lance 6D8 TOHIT 10 HIT 40 VS ASIAN), Gnorff’s Cloak (AC 20 +16 Stealth), Empty, Ring of Joy (MEN 20), Glorious Orb of Codexia (9 Charges Wizard’s Eye), Wulven Dash Boots (AC10)
The main attraction on this Level is “The Dirge” who you will find in the middle of the Level and whose Quest you will need to complete to be able to move on. Through an Invisible Wall right and heading all North you will find a Wizard Bag with 16 Slots for Spellbooks, Wands, Potions etc. West is a Giant Snake which is one of the bosses on this Level, the other is ”The Legion”. Another curiosity is the Phoenix Cage with a Puzzle you have to solve. Both can be reached through a Secret Wall and by walking through an Invisible Wall in the South. The solution for the Phoenix Cage Puzzle can be found on an Inscription on a wall to the Southeast. You will have to use the Secret switch to the right of it for a grate to appear over the pit and you’ll need “Ancient History” to read it, the combination it reveals is: Moon, Moon, Fire, Fish, Fire, Fish, Man, which you’ll need to use on the Phoenix Cage to be able to Look and find a Phoenix Feather with dozens of charges of “Raise Dead”. And once again, Don’t Drink the Water!
The items for The Dirge puzzle are scattered throughout this entire map and getting them is its only purpose. You will need to find the Secret Walls around the Level and have someone with high Lockpicking or a magic user with Knock Knock open the chests behind them.
To complete The Dirge ritual hang the Wreath on the wall left of the talking Stone Face where the dial showing SUN can be seen, place the Burial Mask and Walking Cane on Alonzo’s bones, give the Eulogy book to the Stone Face, equip the Prayer Shawl on one of your party members and put the Pyre Starter on the Bull Statue in the middle. Take Alonzo’s Remains from the wall and get the Chamber of the Waters Key from the Stone Face.

You need to be able to swim to proceed here, at least 3 squares otherwise you’re out of luck. You can train your characters to swim by stepping into the water and out again, then sleep till at least a bit of their Vitality returns and do it again (as long as they have some Vitality left they won’t sink so spells like Refresh or rations will also help), but they need at least 1 Skillpoint in the Skill previously or they’ll die instantly. The same situation appears later in the game regarding Climbing. Anyway, from the edge of the water, swim 2 squares to the right and one back, then detect the Secret Wall, immediately head in and head for the Turtle, open the Secret Wall ahead too and explore.
Alonzo’s bones cannot be Raised from the Dead as far as I can tell, so do what the Stone Face told you, combine Charon’s Toll with Alonzo’s Remains. Then use Alonzo Sargozo with the Funeral Pyre in the middle of the lake. Take Alonzo’s Ashes back to The Dirge for 2000XP.
Afterwards head Southwest on your Turtle-boat till you find a Teleporter, on your first Hop you can find a hidden chest behind the wall, on your second Hop there is a Fountain near the wall that is connected to a Puzzle. On your third Hop there is a Black Cauldron with Silverfish in it, on your Fourth Hop there is a talking Stone Face that wants to eat Quicksilver. The solution to the puzzle is taking your fastest character (SPD = Speed, Haste also helps), Polymorphing it into a frog and try as long as you need to catch the Silverfish, then give it to the Stone Face. While in animal form you can also reach an ACME vending machine through a window on an island South from the starting point.

Back in Crowl at the Museum of Magic put the Mechano Egg into the Chronoworks of Kroondergraf to get a Mechano Owl.
Give Sir Coffergus the Amulet Astrixus for 300XP, Hand him the Encoded Catechism to get the Knightly Catechism. Then head for the Bird Nest in the North of the map and set the Mechano Owl into it. Sleep. It’ll drop the Key of the Exemplar in your lap. L-A-C-H-E-S-I-S.
With the Knightly Catechism you can now solve the Puzzle here, simply read the book for the Solution Courage, Humility, Devotion, Sobriety, Honesty, Loyalty, Duty. After that use the Mausoleum Key to open the Sacred Pool in the Northeast, and you are let into the area with Caliburnus (6D8 Sword).