
Overview
M1A2 Abrams, T-72B3, T-62, Challenger 2 and Leopard 2, here’s the long guide!(Disclaimer : Tank mechanics are still being worked on by OWI, will keep it updated soon as possible.)
!!!Warning!!!
- Sometimes main gun will NOT reload after playing reloading sound, this is particularly annoying and frustrating. Switching to HE then back to AP can fix this, keep spamming R may also help.
Your Mission
Unlike APC or IFV, you’re not responsible for transporting infantry. Your targets are enemy tank, IFV, APC, truck and foot mobiles. Yes, your task is simple: Clearing all the obstacles in your team’s way. In the following chapters, we’ll go through skills for you to kill and push, and avoid being killed.
Remember : Your HEAVY ARMOR and HEAVY FIREPOWER are the greatest asset for your team. You either stand on the first defense line or be the center of attacking force. Don’t play tanks like a sneaky sniper, your role isn’t that sh*tty.
Know Your Tank
M1A2 Abrams is the main battle tank used by US Army, British Army got the Challenger 2, Canadian Forces have Leopard 2, while the Russian Ground Forces use the upgraded T-72B3. And T-62 for Militia Gopniks
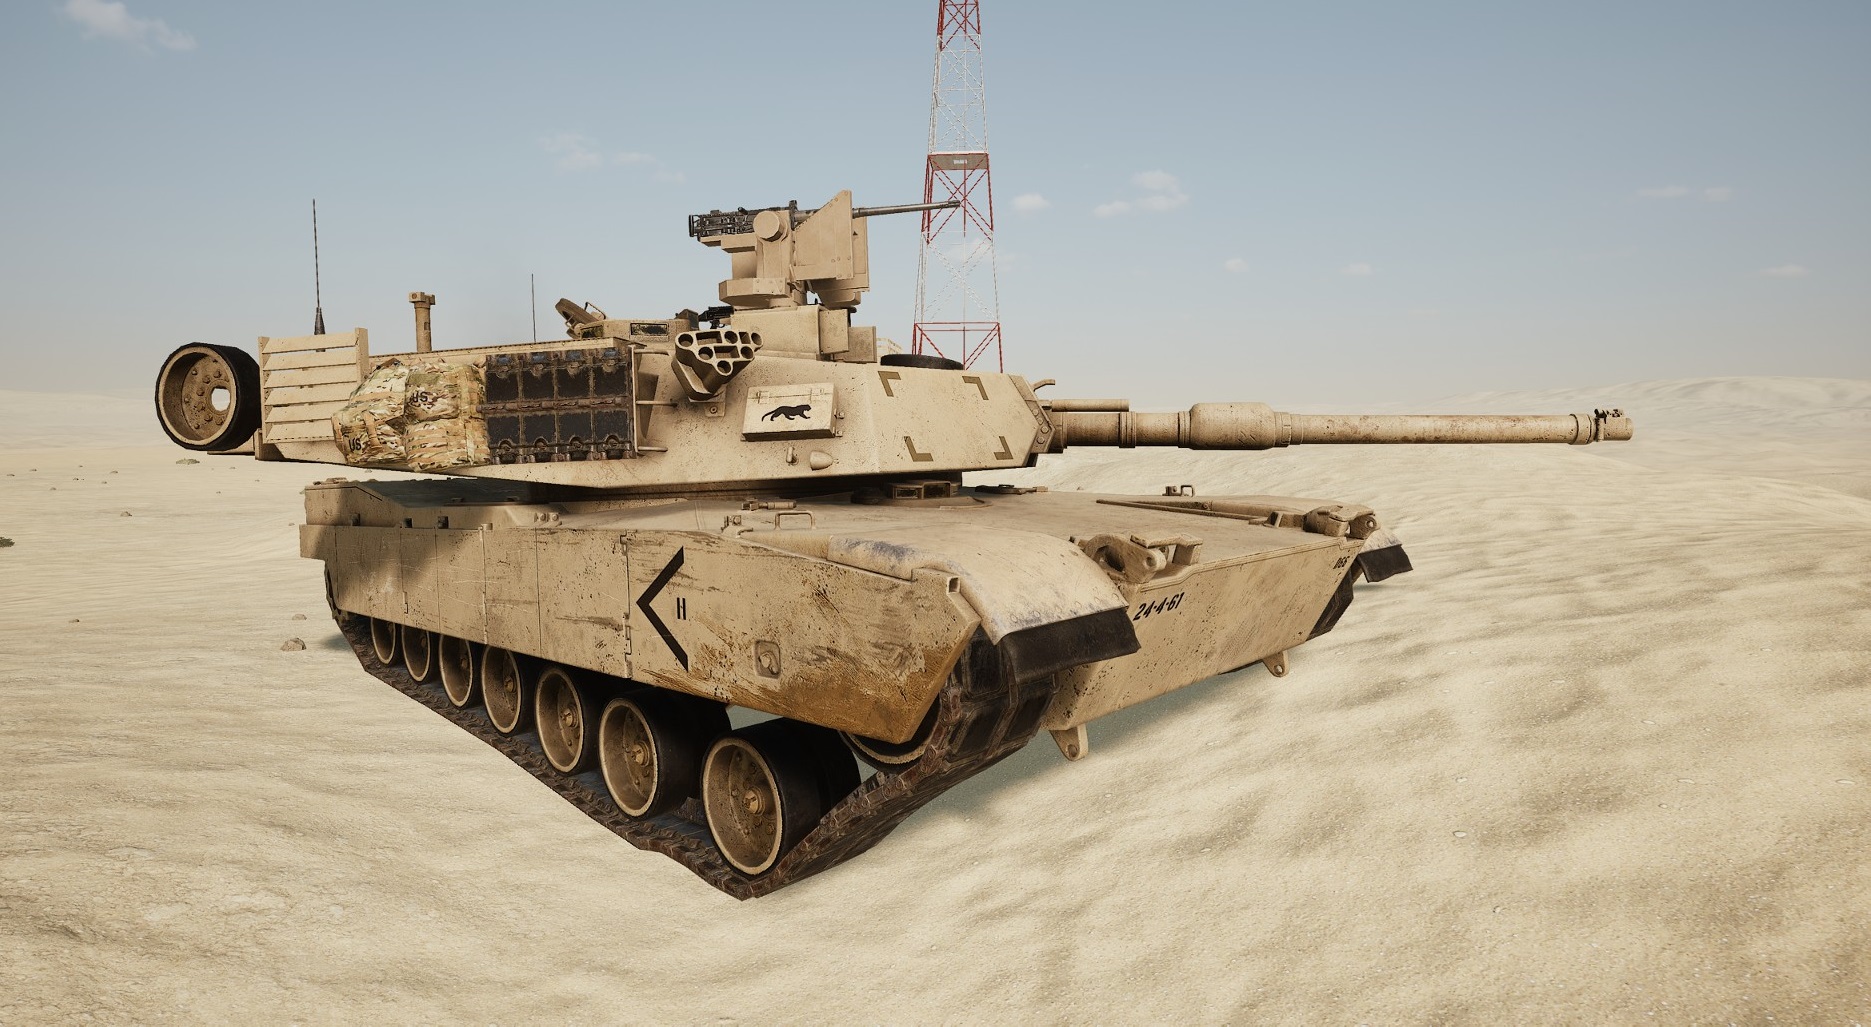
M1A2 Abrams
The main advantages of M1 are highly magnified gun optics, fast reload speed, and the loader’s extra machine gun turret. Your gun has good elevation, but it also comes with tall and big frontal area.
Pros
- Good gunner/commander optics for long range battle
- 21 APFSDS with lots of HEAT-MP shells available (21 shots)
- Good overall armor protection
- Human loader is fast, and he never feels tired
- Fast reverse speed and good acceleration (Thank you gas turbine)
Cons
- Too big, also too tall. Can be spotted easily far away
- Frontal weak spot is easily reachable by trained gunner
- Big turret makes it easier for opponents to disable it.
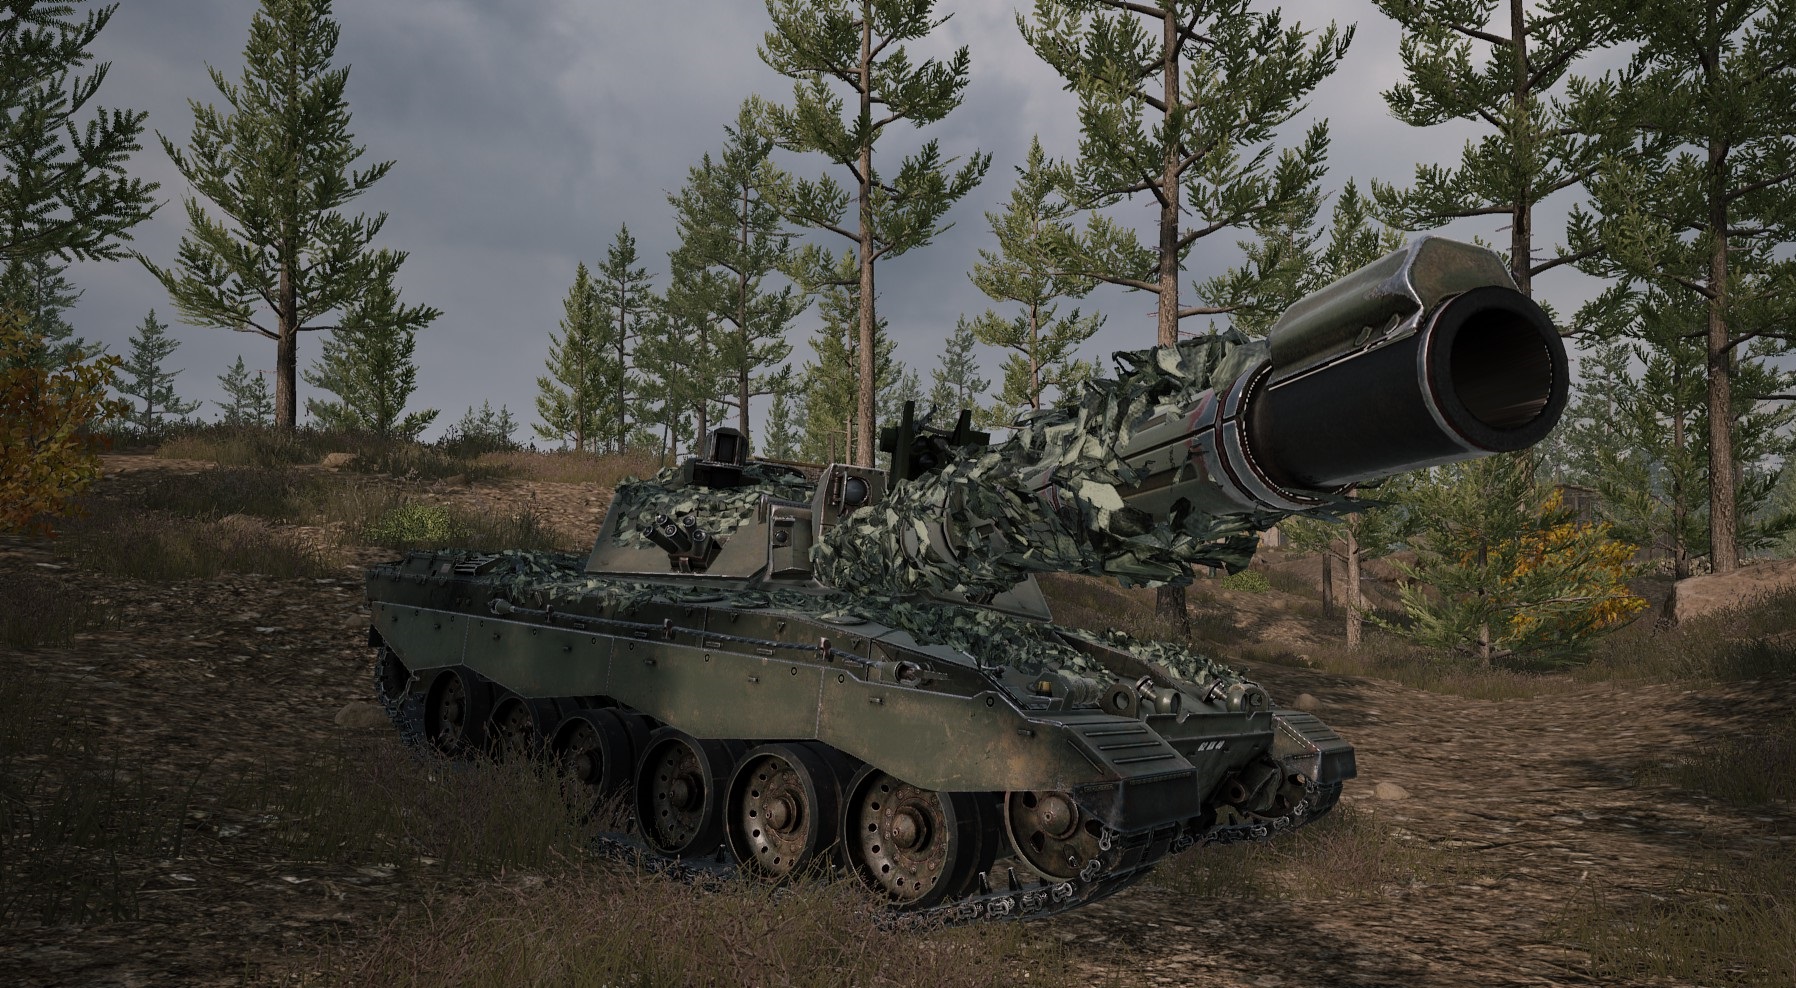
FV4034 Challenger 2
Challenger 2 tank has awesome optics and firepower, the CROWS turret with GPMG made it easy for the Chally 2 to support infantries. It also comes with additional smoke shells. However, the one applied by OWI is not the up-armored version, which means the lower glacis isn’t well protected. It will be an easy job to fight against old T-62, but be careful when facing upgraded T-72s…
Pros
- Overall great optics
- Excellent APFSDS ballistics at range
- All 4 crewmember are protected inside hull
- Can use smoke shell to distract enemy tank or cover friendlies
- Quieter than Warrior
Cons
- Slower reload speed
- Slow speed, you cannot outrun a T-72
- Frontal weak spots are easily reachable
- Limited ammunition (14 AP, 9 HESH, 3 WP), remote turret isn’t a HMG

Leopard 2 A6/A6M
Leopard 2 is German made main battle tank for Canadian Armed Forces. Equipped with long barrel 120/L55 main gun, it’s a scary opponent on the battlefield. It’s highly maneuverable, equipped with epic long barrel main gun, it’s firepower against armored vehicles is impeccable. However, it does not have a remote controlled machine gun turret, loader’s LMG is an open top. It’s strongly advised to avoid being swarmed by infantry.
Pros
- Great optics and awesome long range firepower
- Good maneuverability, drives faster than Chally
- Fast human loader
- Good ammo capacity
- Completely invincible once tracked when first came out
Cons
- Need manual adjustment on reticle
- A big turret make it easy to be disabled
- Does not come with commander’s heavy machine gun
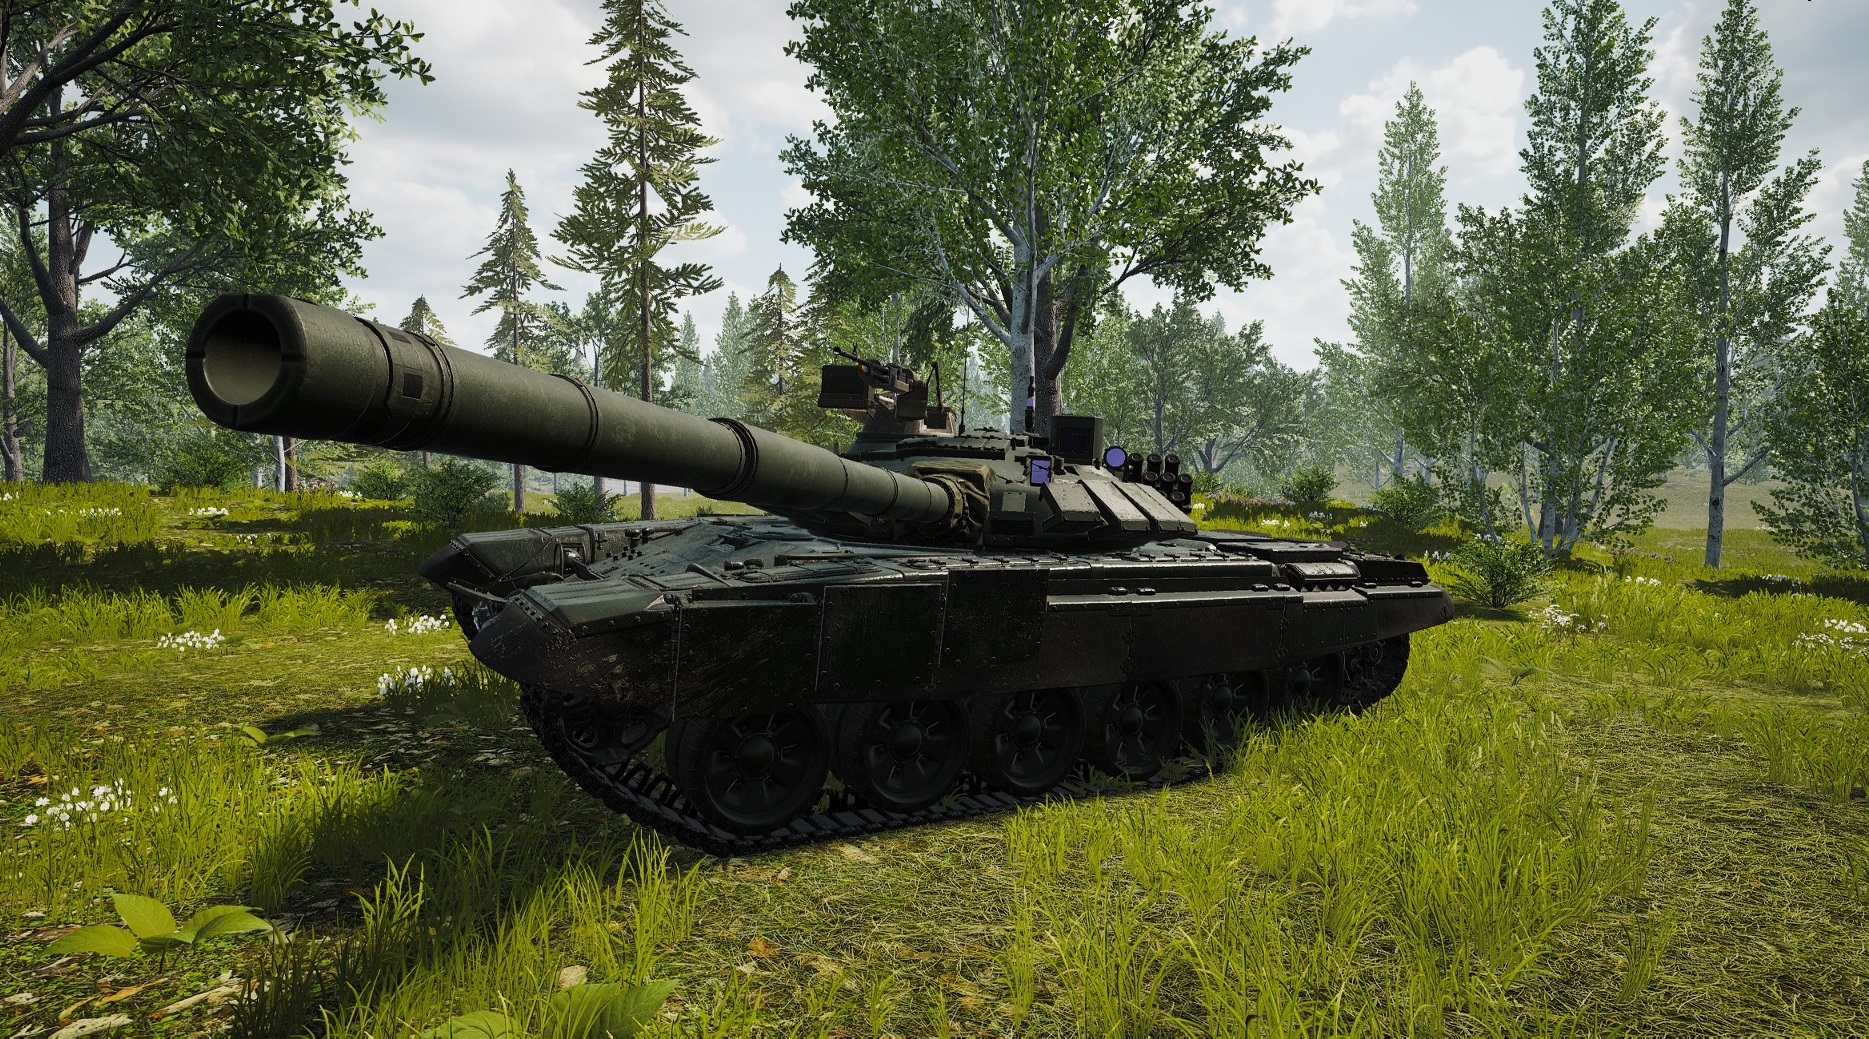
T-72B3
When compared with its opponents, T-72B3 has lower profile but poor gun elevation. However, it has decent firepower which comes with different types of ammunition. Auto loader performs a bit slower than human loader, which also comes with potential weak points of ammo storage inside hull.
Pros
- Small frontal area and short height made it easy to hide the T-72
- Great variety of ammunition (APFSDS/HEAT/HE-Frag/Guided Missile)
- Armor on turret area is impeccable
- Commander’s NSVT turret shoots extremely fast
- Perfect top speed
Cons
- Side hull armor is thin, which increases the chance of getting ammoracked
- Main gun fires slower than Abrams (Autoloader is 2 secs slower)
- Extremely low reverse speed at 10km/h

T-72S
T-72S is the export version applied by Middle East Alliance, it shares more less identical features of Russian one. But without guided missile, also comes with less AP sabots but much more HE-Frags.
Pros
- Small frontal area and short height made it easy to hide the T-72
- Great variety of ammunition (APFSDS/HEAT/LOTS OF HE-Frag)
- Armor on turret area is impeccable
- Commander’s NSVT turret shoots extremely fast
- Perfect top speed
Cons
- Side hull armor is thin, which increases the chance of getting ammoracked
- Main gun fires slower than Abrams (Autoloader is 2 secs slower)
- Extremely low reverse speed at 10km/h
- Reduced APFSDS shell storage and without guided missile

T-62
T-62 is an early Russian tank for Gopniks Militia, Insurgents and Middle East Alliance. It has an 115mm smooth bore canon with coax machine gun. But it’s armor is too old to withstand any modern anti-armor ammunition. You will have to keep a long-long distance from your enemy and always pair up with friendly armor units, or you will be doomed by not only APC/IFVs but LAT/HATs.
Pros
- The only tank for non-conventional forces
- Tons of HE-Frag ammunition
- Can carry infantries outside the tank
- Can carry extra ammunition
- Equipped with DshK HMG on fourth seat / MEA’s T-62 has remote controlled NSVT HMG
Cons
- Less armor protection, even a 30mm can do damage
- No laser range finder for gunner
- Reload time is 9~10 seconds long
- No hunter-killer
Vehicle Component Damage System
In Alpha V12, OWI introduced component damage into gameplay. There are three new hit boxes : engine, ammunition storage and turret. To be simple, those are just more equipment health values derived from vehicle health.
And here are the consequences if you took too much damage.
- Vehicle (Hull): You will be on fire then soon blow up when it reaches zero.
- Engine: Degraded driving performance, immobilized if it reaches zero.
- Tracks: Instant immobilization, you can only turn slowly with one track.
- Turret: Cracked sight, unable to move the turret.
- Ammunition Storage: Instant death from ammo cook-off.
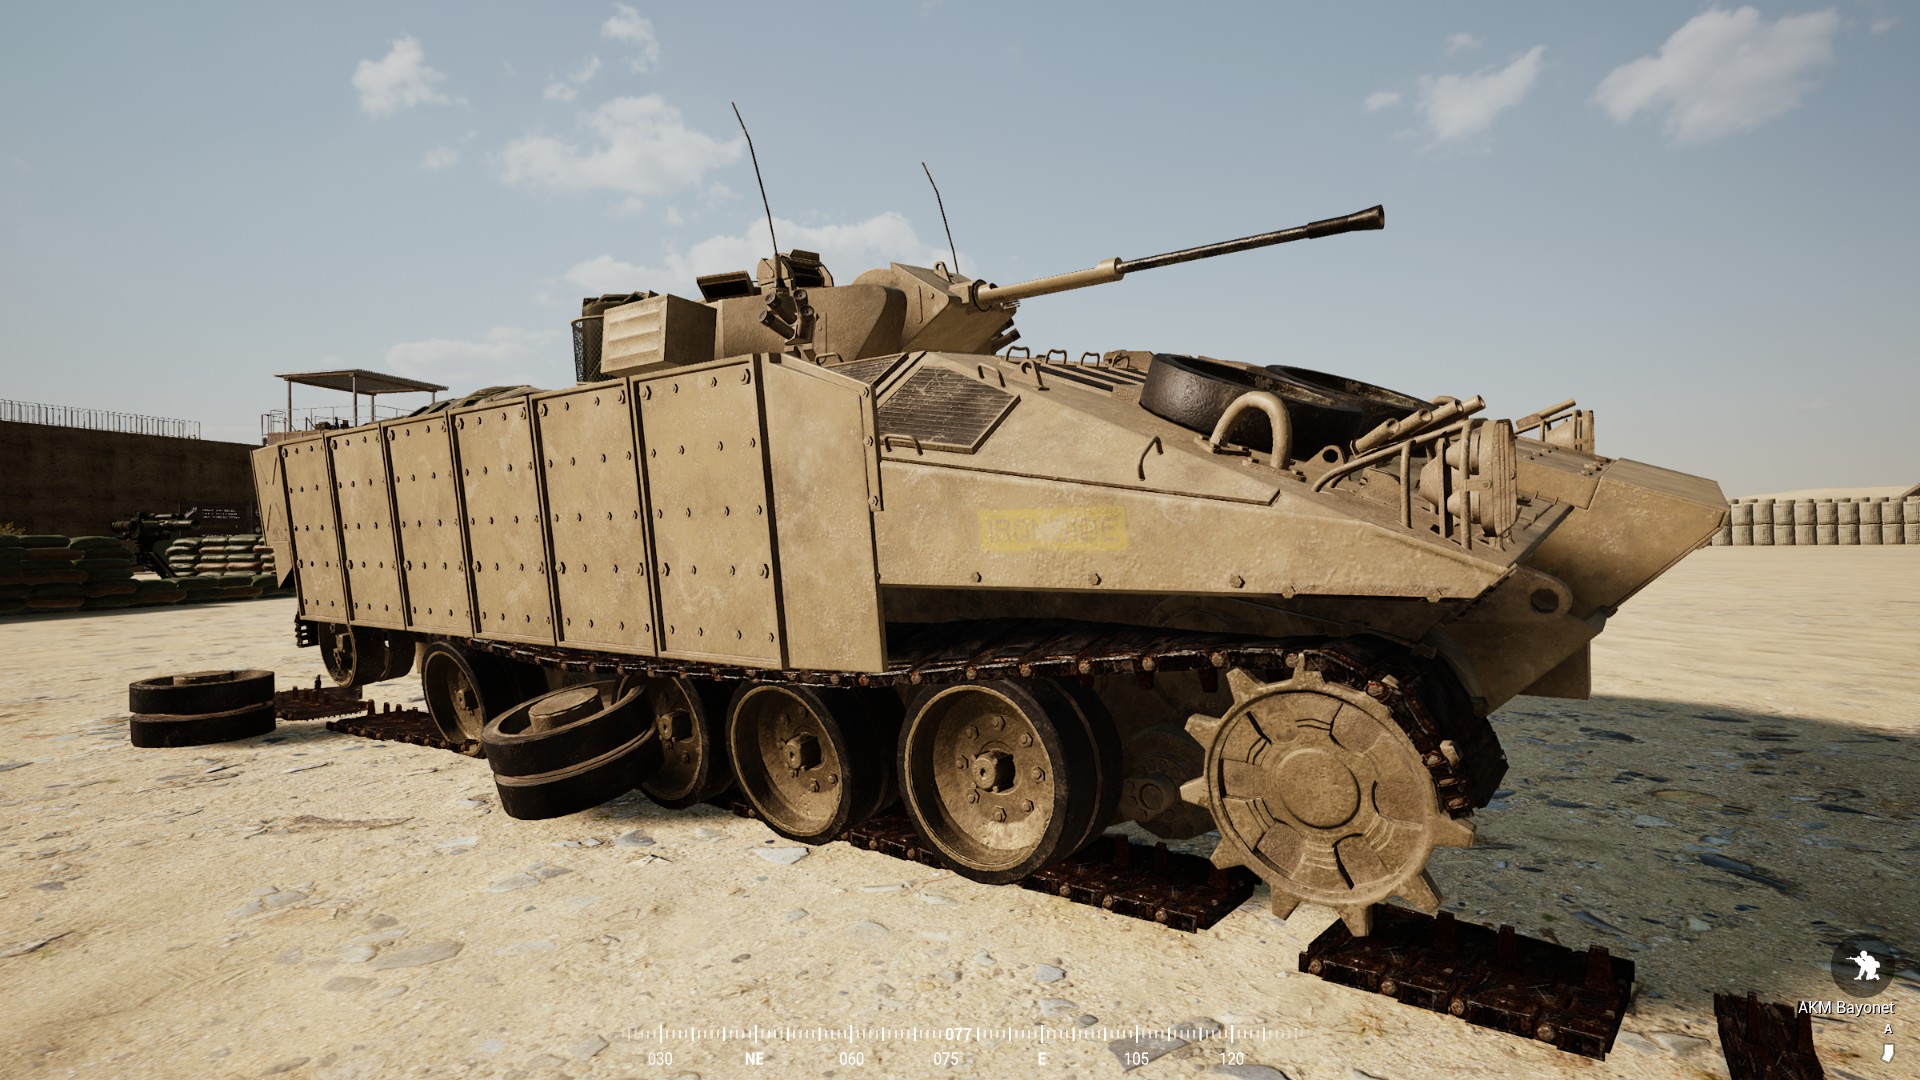
This picture above shows a de-tracked Warrior, it’s know as mobility-kill. Now you can not only aim for the engine but for tracks. Tanks are nerfed a lot in V13, even a LAT and destroy your track, and you’re doomed.
In Jensen’s Range, armor thickness, engine and ammunition compartment are depicted with transparent models. General speaking, forward hull and turret have the thickest armor. While side, rear and top armor are thinner. Ammunition compartment are usually located deep inside hull, so it’s not easy to trigger ammo cook off effect with low penetration capability weapons. For engines, some vehicles have them on the front side(ex:M2 Bradley), some hide them in rear side of the hull(ex:T-72).
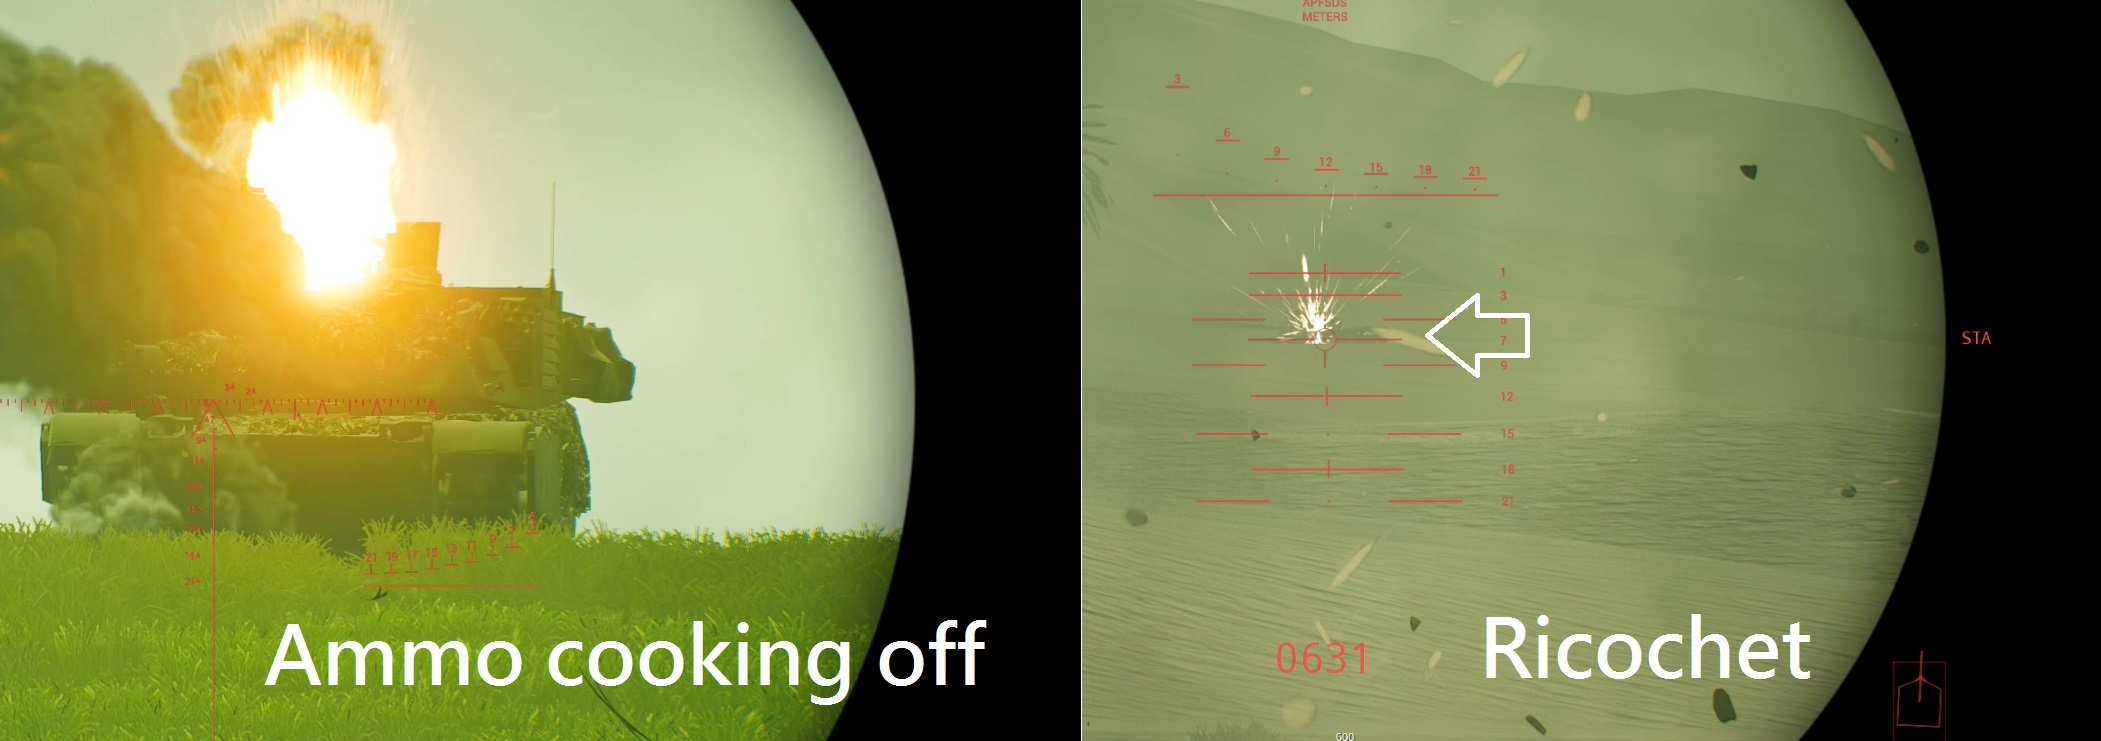
Let’s talk about the “penetration and damage” mechanism. According to the developers on Reddit, this is the current version of damage calculation: Each shot has its own penetration capability based on ammunition type, range, impact angle and armor thickness of the impact point. Incoming round will do full damage to respective component if it penetrates armor, or it will not do any damage. It’s all or nothing, based on the result of penetration calculation formula.

- If penetrated, there will be black smoke at where you hit.
- If bounced(ricochet), there will only show some sparks.
Now you learned the way to deal with incoming fire in the tank. First of all, it’s always good to face your enemy with the thickest armor. And it’s also good to keep a distance from enemy tank, since APFSDS use kinetic energy to penetrate armor, the further away you stay from enemy tank, the lower speed and penetration capability for enemy armor piercing rounds. What’s more, if you force your enemy to shoot you at steep angle, like placing enemy tank at your 2 or 10o clock, incoming rounds may bounce off and do no damage.(Ricochet effect).
Driver’s View
Driver has limited field of view, since the player can only look front with only 1(T-72/T-62) or 3(M1) periscopes. On the lower corner, we have some new stuff.

Vehicle Smoke
It’s a powerful tool to cover advancing friendlies, or when falling back. When deployed with LMB, it could set up a thick smoke wall between you and your opponents. Pop up-Take a shot-Deploy smoke and fall back is a common tactic during modern panzer battle.
Engine Health Indicator
The double ring indicates engine on/off and engine health. When being damaged by incoming fire, engine health will go down, which causes vehicle performance downgrade. It can be partially repaired with crewman’s repair kit, but unable to restore full health. (The vehicle will still be moveable but at lower speed, go seek for repair station to fully recover it.)
Track Health Indicator
A de-tracked tank is a sitting duck, it indicates if your track is damaged by incoming fire. In V13, explosives like HEAT Rocket/Mine/Satchel Charge/30mm Autocannon/Tank shell will F-up your track easily. You can still turn with a single track, but unable to move. If both of your tracks are down, you better pray.
Turret Health Indicator
The lower it is, the slower the turret turns. The gunner won’t be able to turn the turret if it reaches zero, which turns your tank into a WWII StuG.
Ammo Storage Health Indicator
When it reaches zero, the tank will be on fire and blow up very soon.
Gear Selection
Holding “Shift” no longer activates the vic-boost. Instead, it just locks your gear. So selecting lower gear by releasing throttle, and holding “Shift” at the first gear to get maximum torque when climbing slopes is what drivers need to know. Further more, if the tank couldn’t climb up a hill, reverse gear may make it.
Attitude Indicator
The attitude of tank is also important and worth a glance. Our tanks have limited sh*tty main gun elevation, if the driver stop the tank at a nose-up attitude, not only he exposes vulnerable chassis to incoming fire but also made gunner unable to aim down. Keep an eye on it when fighting in complex terrain conditions.
Ammo counter(Not shown when ammo is full)
This displays how many ammo points are required to fully rearm your tank, check this before heading for a front line repair station.
Gunner’s Sight
Currently in V12, there isn’t fancy modern FCS on tanks, so there’s no automatic firing solution or lead calculation. Both tanks use their auxiliary sight, which is basically “range and fire”. However, we still have laser ranging, so your task is to lase target with rangefinder, and aim with range ticks on your reticle. The reticle changes with ammo types, cause different rounds have different flying trajectory.

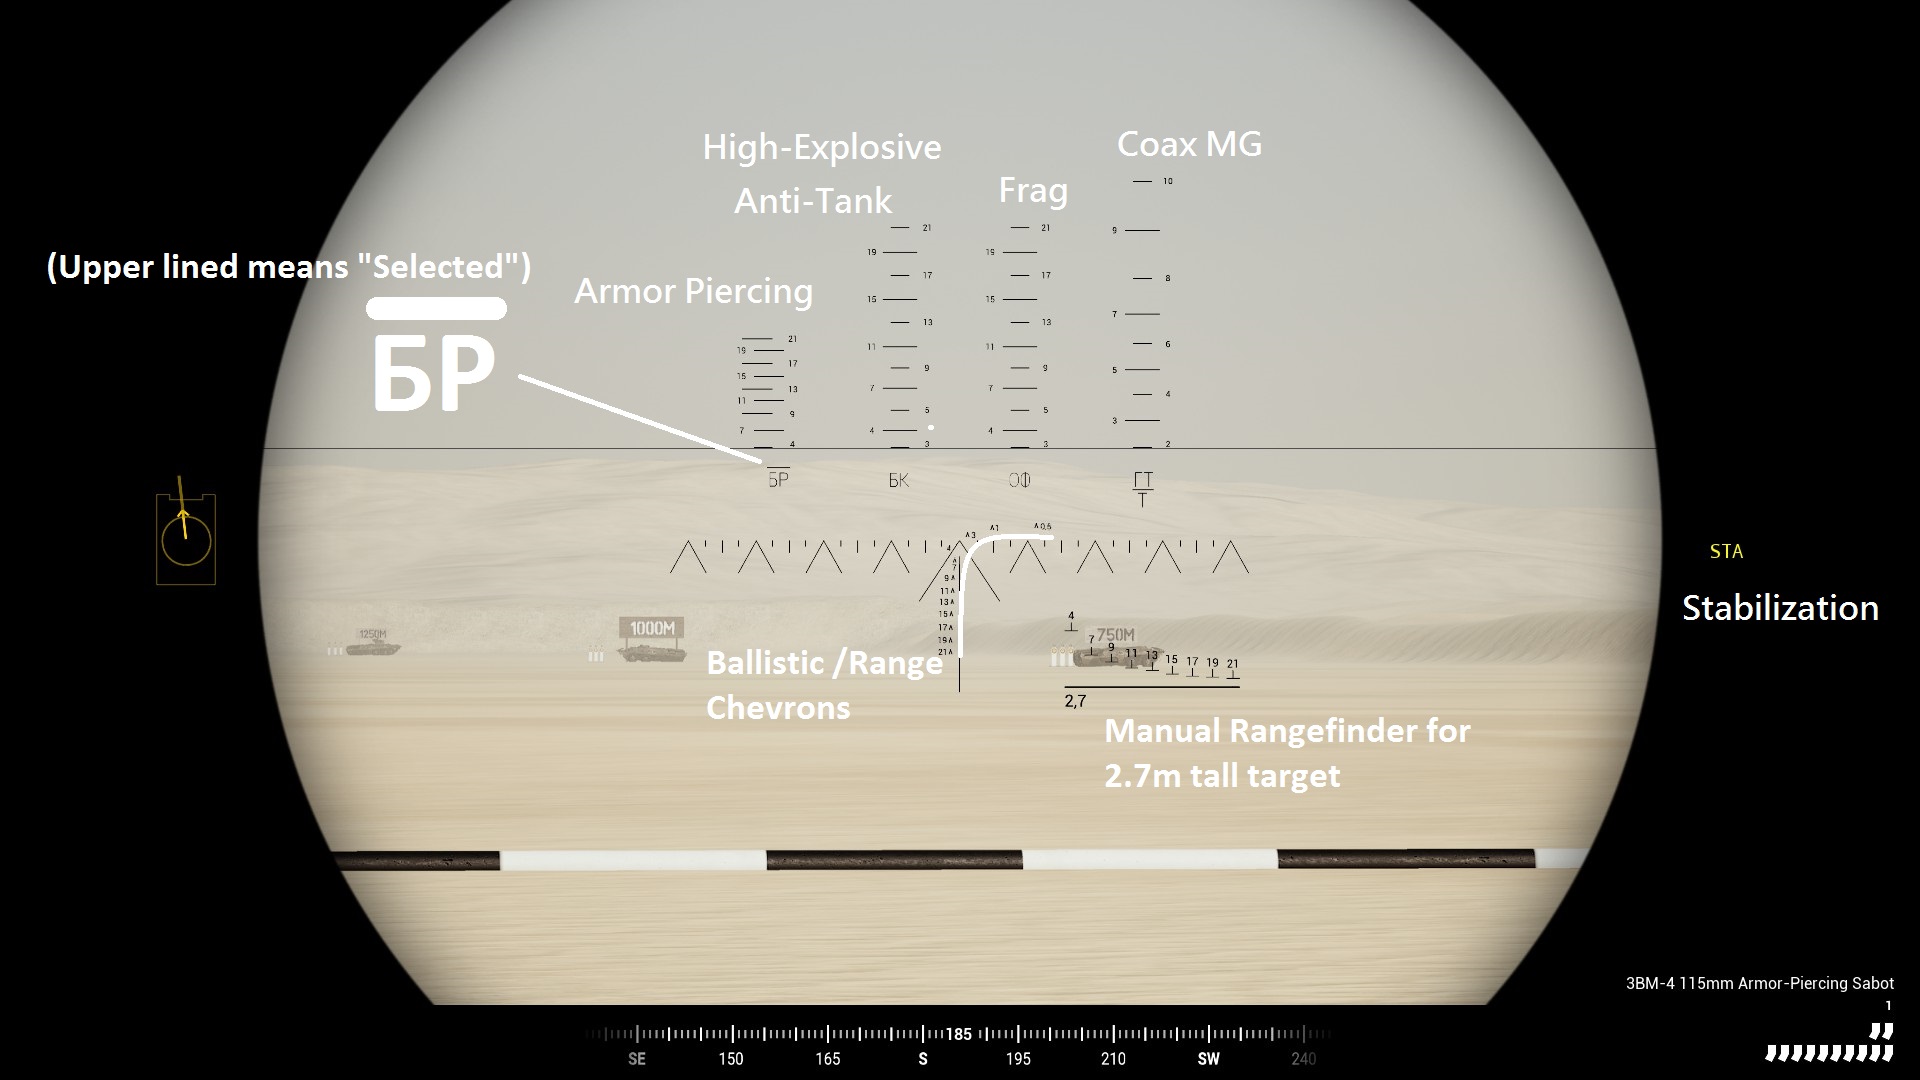
T72
Let’s take T72B3 as example. First of all, point at your target with the biggest chevron on the center to get range reading. Laser range finder will display measured range on the bottom of the sight picture. For example, it’s around 900m.


(This is far different from real Russian tank optics, it’s also not how real SOSNA-U looks like, if you’re ArmA or Steel Beasts veteran, don’t be mislead by it. Also, according to field test on Jensen’s Range, those chevrons are the most accurate with in 1000m range. Its error increases accordingly when engagement range excees 1000m.)
M1 Abrams
For Abrams, it’s a bit simpler, same way, get range reading first and aim accordingly. Note that you need to select maximum zoom for trajectory calculation.
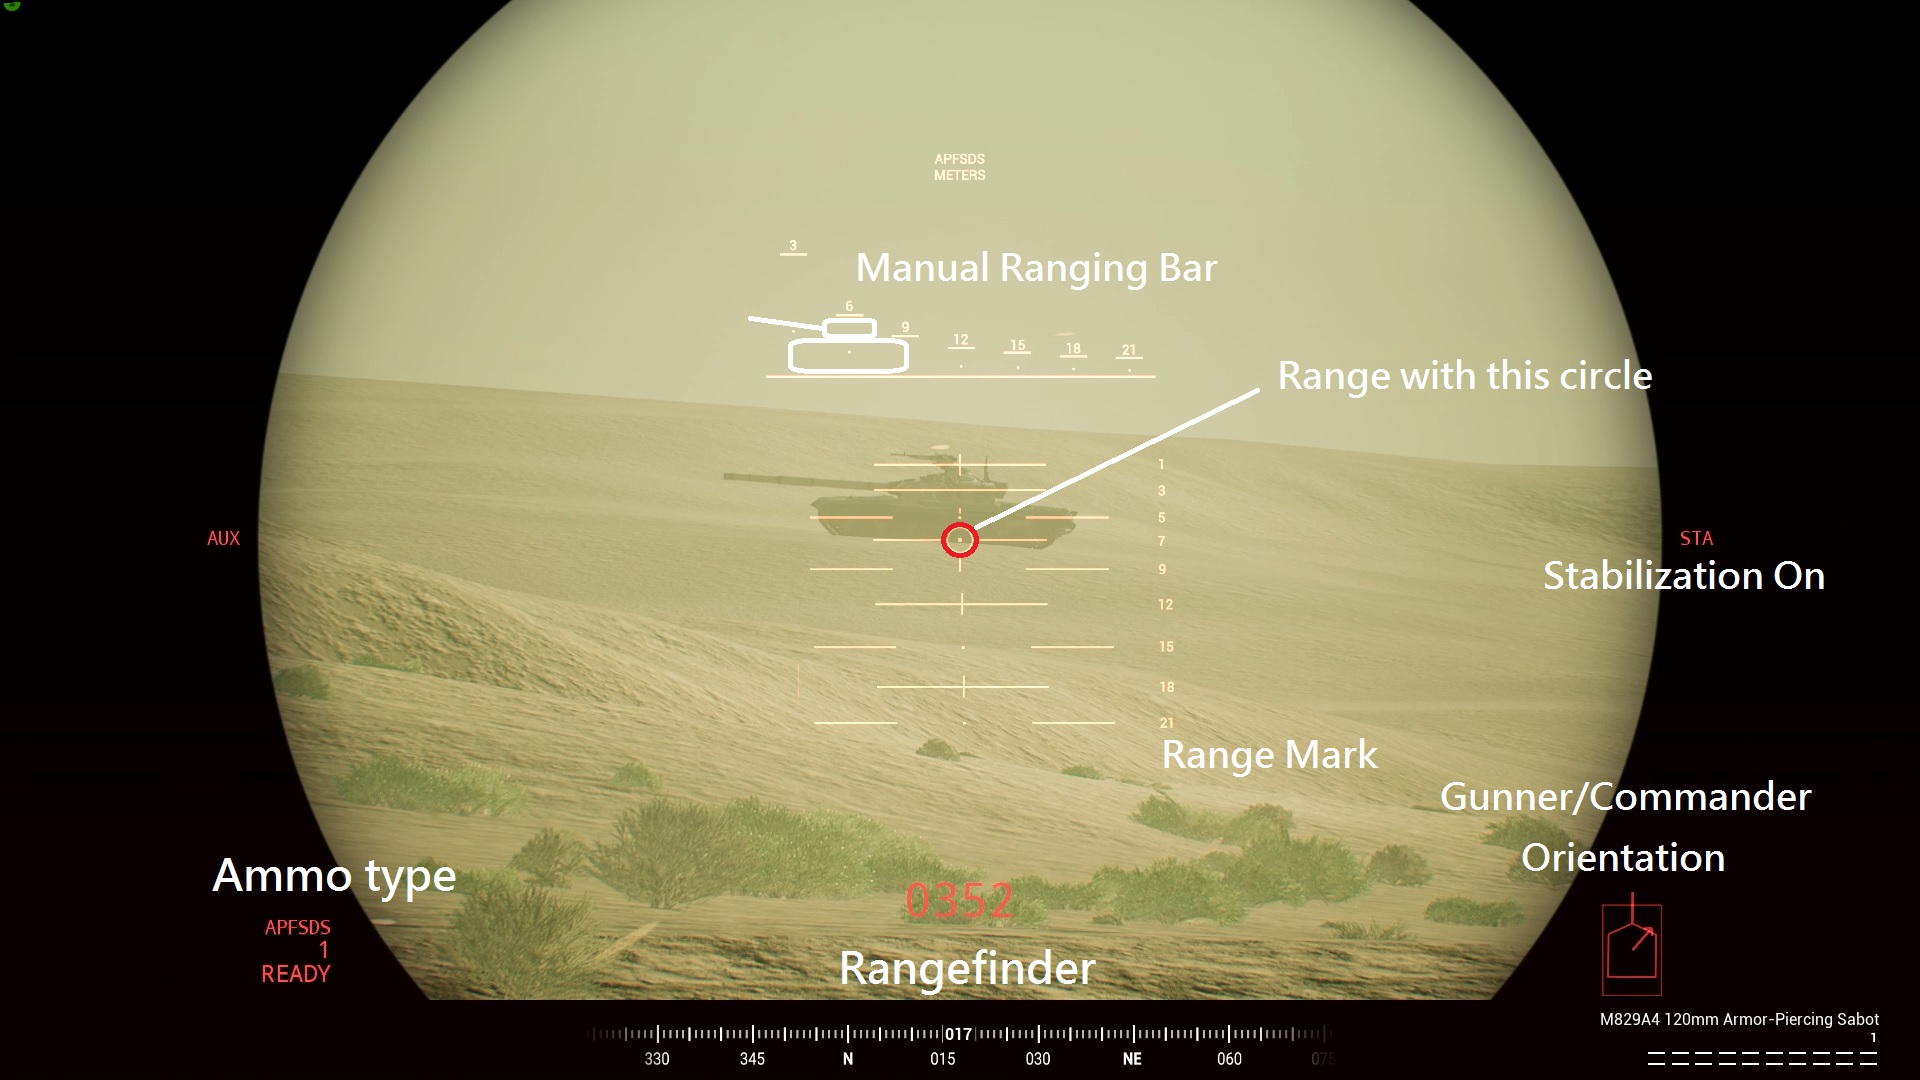
Challenger 2
The reticle on Challenger 2 is a bit different from M1 Abrams, you have to use the small red circle to get range reading. Its ballistics trajectory is also different, aiming objects closer than 100m should be performed carefully.

Leopard 2
On Leopard 2, you have to manually adjust reticle with rangefinder reading. Leopard’s rangefinder only give you 3 digit code, it has to be multiplied by 10 to get actual range. (ex: 070=700m) It takes longer time to aim and fire, but remember that Leopard has an OP long barrel and German AP sabot.

T-62
The gun sight on T-62 is simple, you need to range manually because there isn’t laser range finder. Asking your squad leader to range it or use coax MG to get a rough reading.
After V12.1 update, TURRET DAMAGE comes into play. If turret health drops below 50%, your sight will show fractured. And the consequences are :
- No or downgraded stabilization
- Slow turning or stuck turret

Precision Gunnery
Your aiming point is not where the barrel points!!!
This is particularly important in closer range, do calculate the error of sight mount and adjust accordingly, or you can’t hit weak spots accurately.
- T72/T-62: Sight located on the upper-left side from gun barrel
- M1 Abrams: Sight located on the lower-right side from gun barrel
- Challenger 2/Leopard 2: Sight located on the upper-right side from gun barrel

Applying lead manually
Leading your target is also essential, when you see a moving target at distance, remember that APFSDS flies at approximately 1500 m/s as initial muzzle velocity, and the average fighting distance for tanks in Squad is usually below 1000m. Flight time will be really short, so applying lead is possible without fire control computer. Here’s my personal steps to lead a target.
- Put your crosshair on target to get distance D.
- Calculate flight time (1000m = 1km = 1 sec as rule of thumb)
- Align target with reticle, measure how many ticks target travels during flight time.
(Like count “one-sec” in your mind as timing reference) - Apply lead and take the shot

Which component shall I shoot?
- If you see a target in the middle of open ground at long range, go for his tracks, he’s not going anywhere without tracks. A broken track is immediate mobile kill, unlike a damaged engine.
- When chasing a damaged target, takeout his engine or tracks.
- When fighting 1 on 1 at close range, aim for frontal weak spot (turret ring, driver hatch…) because there’s no time to waste on non-critical parts like tracks.
Armor Weak Spots (Updated after V15)
There is no official data for each ammunition damage on each component, so I cannot say “It needs X rounds of AP or HEAT on somewhere to kill a certain type of tank”.
M1A2 Abrams
Abrams has excellent protection on its frontal hemisphere, especially the turret. But there’s a small but reachable weak spot : Turret Ring. According to the damage model in Jensen’s Range, there’s a red ring below the turret, that’s Abrams’ achilles heel. It will always cause critical damage, like ammo cook-off, if the turret ring got hit by AP round or Guided Missile.

When the tank is about to cross a ridge, its nose-up attitude may expose another weak spot : Chassis. A well placed armor piercing round may go through chassis and disable engine.

Although its turret has great protection on the front, it’s rear hemisphere isn’t that well protected.

Challenger 2
The chobham armor is real, its turret has great armor protection on front side. However, as you can see from this graph below, other components are poorly armored, especially lower glacis. So there is a critical factor using the Chally 2 : Hull Down, you have to utilize perfect gun elevation to avoid exposing hull to your enemy.

The Challenger 2 needs the same playstyle like T-72, you never expose your side armor or you are done. Chally 2 has a extremely big engine bay, its side armor is even worse. It’s easy to get mobility killed. However, the ammo rack is located deep inside hull, which lowered the possibility to get ammoracked.

Leopard 2
According to official model, it’s the same as Challenger: Gun Mantle. Aim here if you want to score the kill fast. Leopard 2 also has a very big engine bay, so aim here for mobility kills. However, its ammunition is stored at front, covered by thick hull frontal armor, it may be a bit easier to go for side shots to reach its ammo rack. (Note: OWI just decided to buff ammorack health for Leopard, so it’s no longer a fast kill strategy. )

T-72B3 and T-72S
This Russian steel beast has perfect protection on its frontal area. And its shape make ricocheting easily. That’s why people usually feel difficult to kill a T-72 face on. However, its Chassis could still be reached if got caught crossing ridge. After V12.1 update, T-72 seems to have the same frontal weak spot: MANTLET. It’s located right below the main gun, but it’s a bit more difficult to hit.

T-72’s side and rear are not as well protected as Abrams. Here’s the key to killing T-72: Ammo Storage. Since Russian tanks use auto-loader, there’s a round shaped ammo pool right beneath the turret. It’s reachable with accurately placed side shots. The result is usually total destruction followed by ammo cook-off. Additionally, engine bay is another good choice, your target will become a sitting duck with dead engine.

T-62
T-62 is decades older than Abrams or T-72B3, so it’s armor is really weak, you can easily tear it apart with 30mm/LAT/HAT in closer distance. When engaging the T-62, hitting anywhere but side of turret should work pretty good.

M2 Bradley
Bradley has decent firepower, but its armor isn’t that thick. Here’s where you can shoot : Front for its engine, middle for ammo storage. It’s usually one or two shots kill. (THREE SHOTS IF YOU DIDN”T AMMORACK IT)
BMP-1

BMP-2
WIP
Turret Stabilization
Most turrets have dual axis stabilization in V12, its purpose is maintaining a stable firing platform on a moving vehicle. By pressing “Z” in the gunner or commander seat, turret stabilization function could be enabled. And it’s indicated by “STA” or “STABILIZED” label in the scope picture.

Ammunition Types
- AP/Missile for TANK/IFV/APC
- HEAT/HESH for IFV/APC/INFANTRY
- Frag for soft targets/room or bunker clearing
- Smoke for covering infantry or disrupting hostile vehicle and stationary weapon
APFSDS
Armor-Piercing Fin-Stabilized Discarding-Sabot, it’s your primary choice against heavily armored vehicles. Made with depleted uranium or tungsten alloy, it uses pure kinetic energy to penetrate through heavy armor. The effect of APFSDS is strongly affected by range, impact angle and armor thickness on impact point. The closer you are, the more powerful it is. And it’s most likely to penetrate armor at 0 degree incidence angle. Last but not least, always pick the weakest spot to shoot! M1 uses M829A4, and 3BM60 “Svinets-2” for T-72 as APFSDS.

HEAT/HESH
High-Explosive Anti-Tank, it’s used to destroy lightly armored vehicles like BTR or Stryker. Working in the same way as anti-tank rocket, it uses chemical energy to drill through armor plate. Since it doesn’t count on kinetic power, its performance will not drop at greater distances. M1 uses M830A1, and 3BK29M for T-72 as HEAT. Note that M830A1 is categorized as HEAT-MP(Multi-Purpose), which means it can also be used on soft targets.

HESH, High Explosive Squash Head. This type of ammunition is widely used by British tanks. The way it works is to “stick and paste” a great deal of explosives on armor, then detonates itself to create fragmentation inside the hull. It is particularly effective on soft targets, lightly armored vehicles and stationary strong holds.

- Although it says “Anti-Tank”, I prefer using HEAT on buildings and strongholds, it’s a perfect weapon to destroy FOBs. One shot the radio, two shots bunker, 4~5 shots to bring the HAB down.
- The debate over “When to use HEAT instead of APFSDS “ has been there for a while, there should be a range at which the penetration capability of APFSDS drops below HEAT’s. This value is yet to be tested on live server.
- Yes you can use HEAT on tanks, but you still need to know where to shoot, it won’t do damage if it can’t penetrate armor. Modern composite armor are well known to be HEAT resistant, so that’s really not a good idea to attack the front armor with HEAT……but you can try this when ambushing people from behind, yeah, it depends.
Fragmentation
Russian High-Explosive-Frag, it’s like a freaking big hand grenade. It’s used to deal damage to soft targets, like room cleaning or destroying infantries.

Guided Missile
Only Russian tanks have it, it turns your tank into a mobile missile launcher. The one used by T-72 is 9M119M Refleks laser guided anti-tank missile system. Just like using TOW or Kornet, keep the crosshair centered on target until impact. Guided shells are the most effective on moving targets at long range. What’s more, since it uses shaped charge warhead like HEAT, its armor penetration performance remains constant at different ranges.

However, there’s another thing to mention, because it uses HEAT warhead, it’s penetration capability may not be enough against frontal armor. What’s more, it flies a bit slower than sabot shells, so it’s ill advised to use it for head-on tank battle.
Perfect weapon to take out TOW launchers from far far away.
Your missile flies even faster than TOW.
Caution : It has MIMINUM ARMING DISTANCE
Smoke/WP
This is only seen on British Challenger 2 tank, this can be used to place accurate mark on targets at long range. It is also quite possible to disrupt enemy stationary weapon like missile launcher with smoke shells.

Commander’s Station
Commander’s seat has the best view on the tank, he can spot targets easily with magnified scope. As the commander yourself, you need to keep the situation around your tank in control, check the map, direct driver to make his job easier, and call out target for gunner.
- As the commander, you have to keep your situational awareness at a good level by referring to map and radio frequently. And it’s also your mission to keep your driver and gunner’s situational awareness.
You also have a remote controlled HMG turret, use it to clear threats around your tank, especially anti-tank infantry and missile launcher operators. (Remember, you’ll need to manually reload commander’s gun on T-72)


Hunter-Killer Capability
On modern tanks, commander and gunner use different observation devices, like the CITV (Commander’s Independent Thermal Viewer). Tank commander can assign a new target for gunner, even he’s already engaging a threat. The result is reduction in time searching for new targets. Since the commander can look for targer B when target A is being engaged by gunner. He can direct gunner to target B anytime he wants. This is called “Hunter-Killer” capability, and in Squad V12, developers introduced such function into vehicle play.
(Caution : Hunter-Killer could only be used when stabilization is on)
While in Gunner’s seat, by pressing “E”, you can synchronize your view with commander, vice versa.
So it will work like this:
>Commander: Tank! Two o’ clock!
(Gunner Presses “E”)
(Main gun automatically turns to where the commander looks)
>Gunner: Target acquired!
>Commander: Fire!
>Gunner: What’s that s*it behind a wall at bearing 280?
(Commander Presses “E”)
(Commander’s turret automatically turns to where the gunner looks)
>Commander: That’s a Stryker! Fire!
>Gunner: On the way!
And there’s also an override function, which forces the turret to face where the commander looks. Turret override function could be activated by pressing “Space Bar” by commander.
It will be like this:
>Commander: Tank! Tank! Tank!
(Commander Presses “Space Bar”)
(Main gun automatically turns to where the commander looks)
>Gunner: Target acquired!
>Commander: Fire!
Caution: This will force the turret to turn, and it can possible disrupt the gunner, you better don’t press “Space Bar” for a truck if the gunner is engaging a tank!

Threat Categorization and Management
This is not only for commander, but all crewmembers. (Yes, all tanks should be fully crewed.) Intel of incoming threats can either be obtained visually or vocally. And threats at different hazard level should be dealed with in different ways. In this chapter, threats are listed from the highest (Require immediate reaction) to the lowest.

Whoever saw it MUST report in voice channel
Tanks are the highest level of threat, you both have strong enough armaments to punch through each other’s armor. Once the existence of hostile tank be confirmed around you, all unnecessary engaments shall be avoided to keep crewmembers concentrated. Remember, if it’s not you ambushing enemy tank or you getting ambushed, the chance of killing each other for both side is almost the same.
IFVs, especially missile equipped ones are somewhat(?) more dangerous than tanks. A single TOW can eat up 60~70% of your health (in V12), two shots and you’re dead. It only takes your opponent few seconds to go for the second shot, the time allowed to react is short as hell. If you successfully dodged the second shot, you still need to RTB at 30~40% health, which means that another IFV, tank and TOW emplacements going after you has a great chance…
When confirmed hostile tank/IFV beyond visual range…
- Commander: Keep marks updated, plan interception path and scan the area.
- Driver: Drive according to commander or gunner, check map constantly.
- Gunner: Scan the battlefield by reffering to the bearing to enemy tank.
When spotted hostile tank/IFV within visual range…
- Commander: Direct gunner and scan for additional threats(another tank? IFV?)
- Driver: Slow down for better target aquisition, be ready to stop when asked.
- Gunner: Scan, identify target and open fire.
If a missile equipped IFV (ex:Bradley) is near you, charge at him.
TOW missile has 50m arming range, it can’t do anything to your tank within it.
When retreating from these threats…
- Commander: Ask for help,check map for repair station/fire support .
- Driver: Follow low ground to nearest safe zone, use smoke when necessary.
- Gunner: Deploy smoke when required, return fire.
Using smoke can both be good or bad, if your enemy already lost visual contact with you, keep that smoke generator on may help him to F you up…
Safe Zone: A place where you won’t be exposed to direct enemy fire. Or the area covered by friendly Tanks/IFV/Emplaced ATGM.

Whoever saw it MUST report in voice channel
Guided anti-tank missile is the ultimate weapon used by infantry to stop your tank. TOW, Kornet, Russian TOW, whatever you like to name it, they are difficult to spot but extremely powerful, 2 or 3 shots and you’re gone. If you’re on attacking side, always be prepared to see them around defensive FOBs.
However, since ATGM is a line-of-sight weapon, most of them will be placed on top of something tall. (roof, hangar, tower, hill…..) So it can be spotted from far away, your gunner may have the chance to take them out beyond 1.5km, the effective range of guided missile.Always assume that a missile launcher is watching you from enemy cap, the tank commander shall plan the safer route approaching game objective, ask friendly units about the direction it’s looking and avoid it’s line of sight.
Once you saw it, it’s highly possible that he already saw you and ready to fire. Your advantage is that you got commander’s remote contolled HMG and gunner’s HEAT/Frag shells. Open fire together, use your heaviest firepower to disrupt, suppress and take out the missile operator. (You still need infantry to help you to take out that FOB, that’s why you should never attack alone)
When the missile operator is down, there are two options:
- Only break down launcher to 1/3 state(Tripod only), remember its location. So enemies trying to re-build it can be taken out easily, the whole launcher is INOP when you’re around.
- Destroy the whole launcher, this costs your opponent another 600 build points and 500 ammo to place down a new one, but you need to find it out again.

Whoever saw it MUST report in voice channel
HAT and LAT, those man carried launchers are annoying. After the introduction of track damage, it will become a very serious problem. If you’re along nearby enemy FOB, and your track got destroyed by infantry, you became a stationary turret. And got F-ed by tons of infantry. So, NEVER GO ON OFFENSE ALONE! (Yes I’m yelling =D)
Use the advantage of your tank, keep a good, long distance to engage enemy strong holds. Kill LAT and HATs outside the range of their rocket launcher. You have good scope, great fire power and armor protection, they don’t.
So, commander should use his remote controlled HMG primarily on AT infantry. It’s too slow for the gunner to turn the turret around, and he should be focusing on other threats. For driver, avoid driving straight into enemy HAB, and stay away from congested area. That’s the real world problem for tank crew: upban area, compound or thick forest.
You should never end up like this: Your engine’s dead, your tank got stuck right next to enemy FOB, you cannot jump out to repair cause there’re bunch of them waiting for you. You stayed inside, can’t do anything because the turret got jammed after the HAT impact, you heard a non-friendly tracked vehicle coming, you spent the last seconds to figure out how to explain to your teammates, and……BOOOOM.

Whoever saw it should report in voice channel
Yes they are easy targets, if you’re already in battle, taking them out is okay. But don’t waste too much ammo if your primary task is taking down enemy tanks. Remember, you need 2~10 AP shells to kill a single tank. (Based on gunner’s skill)
Also, firing your main gun tells everyone: “There’s a big-a*s-fu*king TANK here!”
Situational Awareness (SA)
- Where is my tank?
- Where are friendly armor and anti-armor units?
- Where are enemy armor and anti-armor units?
- Did I pass sufficient intelligence to my crew?
By combining all external intelligence together, one can draw a virtual picture of the battlefield in their mind. Not only the tank commander but all crew members know “WHAT’S GOING ON”. This is essential to modern combat, one has to maintain a good quality flow of intelligence among his team, remember, intel advantage plays a great rule.
What can we use to maintain good SA?
- Go with fully crewed tank.
- Scan surroundings continuously.
↓↓↓↓↓↓↓↓↓↓↓↓↓↓↓↓↓↓↓↓↓↓↓↓↓↓↓↓↓↓↓↓↓↓↓↓↓↓↓↓↓↓↓↓↓↓ - Receive external intelligence from friendly units
↑↑↑↑↑↑↑↑↑↑↑↑↑↑↑↑↑↑↑↑↑↑↑↑↑↑↑↑↑↑↑↑↑↑↑↑↑↑↑↑↑↑↑↑↑↑
Yes, dear infantry units, mark them on the map or tell us via team chat

Ro’s Step-by-Step Guide for Running Tank Squad
1. Manage your crew
Choose who you are going to assign on which position inside the tank. It’s preferable to have people you know in your crew so that you know what they are capable of. Most crucial is the Driver for he is the one who will get you in and out of places especially when you are severely damaged. Second most crucial is the Gunner, the gunner must have good eyes and ears. The second someone yells target position, he must know immediately where to snap his turret to. Commander need to be both good at spotting and relaying intel to Driver and Gunner, also coordinating between tanks and other friendly units. Fireteam is extremely useful since it relays target coordinates as fast as real word datalink.

At this stage:
- Find reliable crewmembers (Preferably server regulars)
- Assign fireteam for each car
- Set up movement plan
2. Find a stand-by location
A Stand-by location is a place in the map where you can have eyes on friendlies on the ground without the enemy spotting you easily. There you will wait for Intel from other Squads about where the enemy tanks / kornet or TOW launchers are. Killing hostile tanks is your top priority if you confirmed their existance, because your team will benefit from a 20 minutes “tank-free” period, making it easier for your team on attacking objectives. If you decide to defend the middle cap, it’s always good to operate under friendly missile launcher coverage.

At this stage:
- Access the tactical map (Did the rush squad get wiped? Any marked enemy armor?)
- Protect surrounding friendlies setting up their FOB
- Request REPAIR STATION to be set up
- Scan battlefield for any contacts
3A. Play Active, do Search and Destroy(Optional Choice)
If no other Infantry Squad or APC / IFV squad has eyes on the enemy tank for a while , you can risk prowling around the map behind enemy lines to flank and find the enemy tanks. This is a risky maneuver and takes a lot of coordination within your tank crew to work properly. Your driver is also crucial to this step.
At this stage: The side with INTEL ADVANTAGE always win the battle!
- Access the tactical map frequently (Any marked enemy armor?)
- Keep both tanks together and under each other’s covering fire
- Plan and update escape route according to situation
3B. Play Passive, wait for friendly units to report enemy tank.
If enemy positions are confirmed accurately, you can now move out and find a safe path towards the enemy. You can choose to flank them or go straight for them. Either way, you won’t have to worry about spotting them. All you need now is your crew skills.

At this stage:
- Make sure everyone knows where enemy tank is (Mark and SPEAK UP!)
- Ask friendly SLs to keep marks updated
- Be ready to react to false alarm (Is it a MTLB or freaking T-72 ?)
4. Engagement
Where to shoot and when to pull out – If you now find yourself engaged by enemy armor , your gunner and driver must now put their skills to the test. A good driver knows when to stop the vehicle and when to get out. Most of the time if a tank reaches below 75% ( Which makes them easy prey for ATGM’s ) A driver should ask whether they want to pull back or not. If the tank health is 50% and below , the driver must automatically pull out or reposition for repairs. The gunner must know how to shoot on the move or at least get some hits. A gunner must also know where to hit on an enemy tank. Most of the times it must go from top to bottom e.g. Taking out the turret ring to destabilize the gun and jam their turret then start hitting their other weakspots. Driver and Gunner must utilize their smoke canisters at the right times when falling back from an engagement.

At this stage:
- Direct each other in voice channel, plan tactics if you got time
- Request support from friendly AT unit if required
5. Assessment
If you do manage to win an engagement , it is time to assess for damages and ammo count. You must ask your driver on the status of the overall hull integrity and the engine health. Ask the gunner about the ammo count. If you are running more than one tank, make sure that the other tank assess their status as well. If the commander feels that the tank needs RnR (Repair and Rearm) then the driver must automatically move back to a nearby repair station or main.
At this stage:
- Taking timing note
- Check your combat capability (Health/Ammo)
- RTB or make diversion to support infantries
6.Shock and Awe FOB R*ping
If enemy tanks had not spawned yet ( If they already did then just repeat steps 1 – 5 ) you are cleared to wreak havoc against the enemy capzone. Tanks are the nightmare of defending team when they show up. Using tank gives attacking side an opportunity to rain heavy fire into super FOB/defense points at insane rate. Coordinate with the other Infantry Squads and ask them if there are any squads that are willing to push and break the stalemate. If so, then you can lead the charge and look for the enemy HAB and FOB to disable it with your main gun with HE / HEAT.
At this stage:

- Push in with infantries, be their shield and spear head.
- ATGM, HAB and FOB Radio are your top priority.
- (3~5 HEAT to down a HAB, 1 for FOB Radio)
Driver’s Tips
1.Always look for a good hull-down location. Taking a good cover will protect your vulnerable hull from incoming fire, remember that ammo storage and engine compartment are all below your turret?
2.Use vehicle smoke to cover friendly units during attack, or cover yourself while retreating. It covers more area and lasts longer than gunner’s smoke launcher, use it by left clicking mouse.
3.Turn your tank to face the greatest threat. In my opinion, threat categorization would be like this: Tank>ATGM=IFV>Infantry with RPG>APC. Since a tank can kill you easily with side or rear shot, you better place your thickest armor in front of those incoming armor-piercing rounds. IFVs with guided missile are also as dangerous as any stationary missile launchers, better not expose your vulnerable rear armor to them. (This is particularly for Talil Outskirts, missile launchers on top of hangers are death traps if you drove by unnoticed)
4.Stay away from urban area. If you really want to use tanks inside city, make sure that you have friendly infantry near by, or you and other crewmembers are just canned meat for enemy anti-tank trooper. Remeber: The more windows inside a town, the more dangerous it is.
5.If you need to climb a hill or drive slowly, press “Shift” to lock gear selection for maximum torque/low speed. And, to be honest, tracked vehicles in V12 couldn’t even climb a shallow slope, there must be something wrong with traction and friction settings….

Gunner’s Tips
1.Always have AP loaded. Why? Cause every time, behind every corner or ridge line, an enemy tank/IFV/APC should usually be there. In close quarter, which tank fires the first shot wins. The time wasted switching ammo type can kill you.
2.Pick the right spot to shoot, if you can score a hit on enemy tank’s engine or ammo storage, why wasting ammo on other areas? A direct hit on ammo rack usually results in ammo cook off and one-shot kill.
3.Don’t be too trigger happy with infantries. I know it’s fun to blow somebody high up in the sky, but, please refrain from engaging a single soldier with your main gun. The loud noise from your cannon is way too iconic. And everyone who heard that will send all anti-armor units to hunt you.
4.When fighting in the forest, like in Yehorivka or Belaya, look for MG tracers from enemy vehicles. They can direct your fire easily, and, vice versa, enemy tank may locate you if you fire coax too much!
5.Track your target for few seconds before opening fire, it helps you alot with moving targets.
6.Tell friendly units to keep a distance from your tank. GUN BLAST KILLS
Commander’s Tips
1.Always stay with friendly tank if your team got 2 tanks. Like in Talil Outskirts, it’s usually 2 vs 2. It’s always better to have covering fire then engaging two T-72s on your own.
2.Sometimes, it’s good to stay behind friendly units and wait until your team found out enemy tank’s location. It’s way easier to play flanking when your opponent has no idea where you’re coming from.
3.Thanks to introduction of Hunter-Killer system, you should now watch a wider area with your gunner. Don’t fall into tunnel vision, if you and your gunner are both focused on a single tank, another one may be trying to flank you from behind.
4.Take timing notes after your crew destroyed hostile vehicles, since each vic has its own respawn timer, you should be prepared when the waiting time expires.
5.Check your map frequently and ask for enemy armor’s location with your radio.

Examples of EPIC FAIL
Driver
- Driving into one of the big craters in tallil outskirts, it’s a big trap! Additonally, creeks and ditches in Yehorivka are dangerous as F, driving into them may cost you lots of effort to make your tank out.
- Making a U-turn instead of just reversing straight back when the tank got hit. It will stop gunner from providing his suppressing fire (Cause turret stabilization could be dead) and expose vulnerable side and rear armor to your enemy.
- Driving straight into enemy HAB. Well, if your engine got disabled by HAT, it’s endgame.
- Stopping the tank with nose-up attitude on the ridge line. Well, showing your chassis and make gunner impossible to aim down ? Not a good idea. Try to drive across the ridge for a bit, then your tank got decent nose-down attitude and the gunner has his/her gun depression.
- Helping flipped friendly vehicles is good, but don’t use the tank, because sometimes a tank can be flipped by a truck. And….if your team only has one tank, it’s almost game over.
- Not listening to commands, well, it’s difficult to shoot when the driver doesn’t know where to go.
Gunner
- Switching to coaxial MG for hostile personnel when being engaged by armor. Well, switching to coax WILL DISCARD the loaded round in your main gun. And it takes another 5~8 seconds to load back to the chamber, wasting just few seconds could be a great disadvantage in tank battle.
- Using wrong ammunition type. Check that you’ve AP loaded before entering battle, always hit “1” for AP after you complete shelling opponents with your HEAT/Frag. The reticle will also change accroding to ammo type, don’t embarass yourself.
- Firing guided shell (Refleks) at close range. It will not explode and the Abrams will F you up.
- Teamkilling bunch of friendlies with GUN BLAST
- Forgets to turn stabilization on, this will make it difficult for you to track a target smoothly.
Commander
- Spamming “Spacebar” to designate target when the gunner is already engaging it. It will force gun elevation set to commander’s aiming point, disrupt gunner’s aim, causing a missed shot.
- Looking at the same direction as the gunner for too long. Well, it’s always good to have commander watch flanks while the gunner stay focused on front hemisphere. Don’t fall into tunnel vision.
- Firing HMG at enemy tank, well, doing so only helps him find you faster….
- Allowing sh*t talks to develop in squad channel in combat. Voice frequency needs to be clear during combat, or it’s easy to misunderstand others.
Team
- Soloing tank. Hell no, grab a gunner and commander! Your combat efficiency will be greatly reduced, you need the third eye to function normally as a tank. Or go play Battlefield, you can solo them pretty well.
- Creating another tank squad when there’s already one. Well, transmitting critical messages between two tank squads will be a big mess. Why don’t you just join the first tank squad? Hijacking the tank from the armor squad is also considered as di*k move, and it can be bannable in some servers.
- Not alerting friendly tanks when enemy armored units showed up behind them. Well, you either scream in local com or type in team chat, play as ear and eyes for your team’s tank, don’t leave them fighting blind.
Acknowledgement & Links To Other Guides
Guide for newbies : Overcoming Squad Culture Shock
[link]
Survival Guide for Newbies : See and be Seen
[link]
Tips Making You Like a Veteran
[link]
Visual Identification Guide for Newbies
[link]
Anti-Vehicle Guide for LATs and HATs
[link]
SPG-9 Recoilless Rifle Guide
[link]
TOW Missile Guide
[link]
Combat Vehicle Guide (APC/IFV)
[link]
Preparing your first game as squad leader
[link]
Helicopter Pilot’s Operation Manual
[link]
* *
Thanks to Don177, who always babysits us as SL.
Hootkins, Flyfish, Moggle, Ro, Flippy, Potland, jfrod, yuri, Hadoc, Lox, Demon, Takumi, Racoon and Duck, Swiggity and Kildar.
[33rd]Regiment
Team Le.F
Team Snowflakes
Avalon | Los Angeles Server
Our best crew.