![Guide To Building Binary Star Systems [ver. 22.1] for Universe Sandbox](https://steamsolo.com/wp-content/uploads/2021/08/guide-to-building-binary-star-systems-ver-22-1-universe-sandbox.jpg)
Overview
Think that sunrise and sunset with a single star is a little dull, perhaps? Wishing to splash some more colours onto the sky of your planet? Look no further, for here lies a guide to teach you about all the ins and outs of binary star systems. This guide will inform you on what a binary system is, the types of binary star systems, walk through the procedure of how they may be created in Universe Sandbox ², and outline some common mistakes to avoid when designing them.
WHAT IS A BINARY STAR SYSTEM?

Keep in mind the configuration in the image is one of the several possibilities in binary systems, which will be discussed in the next section of this article.
BINARY SYSTEM CONFIGURATIONS
The way in which a planet can orbit a binary pair can be classified into two types of orbits: P-Type and S-Type. To sum it all up: distance is critical.


Now, the opposite to the P-type orbit happens. If the planet orbits its parent star too far, gravitational influences from the other star in the system may cause the planet’s orbit to become unstable, possibly causing it to be ejected or impact one of the stars and be consumed. The image to the right illustrates four planets in an S-type orbit with two stars.

It should be noted that P-type and S-type orbits really describes the orbit of the planet in relation to the stars. If a planet—or planets—isn’t there, there would be no P-type or S-type orbits. These two configurations are dependent on whether a planet exists or not. While it is true that there are alternate methods of classifying binary systems, if you intend to design a custom star system, it really wouldn’t be complete without a planet or two. Therefore, only this method of categorising the binaries, which is closely related to the way the planets are arranged about the stars, will be discussed.
BUILDING BINARY SYSTEMS, STEP-BY-STEP
This section explains and elaborates on the procedure of how to design binary star systems in Universe Sandbox ². Please read the above section “Binary System Configurations” before reading this, or you may have difficulty understanding the structure of the systems.
- Create a new simulation.
- Select the first star. I like to use “Add > Random Main Sequence Star” to select it.
- Place the first star anywhere in the simulation.
- Select a second star from the menu.
- On the tab that opens on the bottom left after the star is selected, where it reads “Still, Orbit, Binary & Launch,” select “Binary.”
- Under “Binary,” there is a button that reads “Balance Motion.” If it is in OFF position, press it and turn it to ON. This button balances the velocities the stars would have so the barycenter of the binary system does not move as the stars orbit it. Strictly speaking, this is not necessary, but it helps to make the system cleaner and improves stability. I highly recommend it.
- Place the second star at a distance of less than 6 AU from the first star. There is no official recognised limit. 6 AU is the limit I have placed. The reason for this is because, the closer together the stars are, the easier it is for a planet to maintain a stable orbit around them. If the stars are far apart, the planet(s) would have to occupy a very distant orbit around both stars to be a P-Type system and be stable. The distance of 6 AU is a rough limit. There would be P-Type binary systems where the stars are separated by a larger distance in our universe.
- Select both stars. This can be done by holding down the CTRL key and clicking both of them.
- On the right side of the screen, the stars’ properties panel will appear. Click on this.
- A tab titled “Multiple Bodies” will open. Click on “Create Barycenter.” A barycenter is a point around where both stars orbit. Being able to see the barycenter aids in the precision of placing planets in P-Type systems.
- Select a planet from the menu. I like to use “Add > Random Rocky Planet” or “Add > Random Gas Giant.”
- On the tab that opens on the bottom left after the planet is selected, where it reads “Still, Orbit, Binary & Launch,” select “Binary.” Though it is somewhat misleading, do not select “Orbit;” you must select “Binary” for the system to work.
- Turn the “Balance Motion” button under “Binary” to OFF position. The system fails and breaks down if you place the planet while this button is ON. This is because, in that scenario, the game tries to find a way to arrange the two stars and the planet into a configuration where the barycenter of the now 3-body system will not move as the bodies orbit it. We are focused on the barycenter of the two central stars. Planets must not balance their motion with this barycenter.
- After these options are selected, place the planet at a distance from the barycenter that is at least three to four times the distance between the two stars. As an example, if the two stars are separated by 1 AU, place the planet at least 3–4 AU away from the barycenter. This is to ensure the stability of the planet’s orbit.
- If you wish to place more planets, repeat steps 11–14 as required. Ensure that you do not place a planet within the forbidden zone of fewer than three times the distance between the two stars.
- Create a new simulation.
- Select the first star. I like to use “Add > Random Main Sequence Star” to select it.
- Place the first star anywhere in the simulation.
- Select a second star from the menu.
- On the tab that opens on the bottom left after the star is selected, where it reads “Still, Orbit, Binary & Launch,” select “Binary.”
- Under “Binary,” there is a button that reads “Balance Motion.” If it is in OFF position, press it and turn it to ON. This button balances the velocities the stars would have so the barycenter of the binary system does not move as the stars orbit it. Strictly speaking, this is not necessary, but it helps to make the system cleaner and improves stability. I highly recommend it.
- Place the second star at a distance of 120–1000 AU from the first star. There is no official recognised limit. 120–1000 AU is the limit I have placed. The reason for this is because, the further apart the stars are, the easier it is for a planet to maintain a stable orbit around one of the stars. If the stars are close together, the planet(s) would have to occupy a very close orbit around one of the stars to be an S-Type system and be stable. The distance of 120–1000 AU is a rough range. There would be S-Type binary systems where the stars are separated by both a smaller and larger distance in our universe.
- For an S-Type system, there is no need to create a barycenter. You could if you so wish, but it does not serve a purpose in aiding the placement of planets, unlike P-Type systems.
- Select a planet from the menu. I like to use “Add > Random Rocky Planet” or “Add > Random Gas Giant.”
- On the tab that opens on the bottom left after the planet is selected, where it reads “Still, Orbit, Binary & Launch,” select “Orbit.”
- Place the planet around one of the stars. The following formula defines the distance around a star in the S-Type system that a planet should be placed within for its orbit to be stable. It’s not perfect, but it is quite effective at providing a general estimation of where an orbit can be maintained around a star in these systems. You may refer to it to aid in the placement of the planet.
This formula is somewhat complex, and so it isn’t required that you use it. An alternate method of planet placement is to simply experiment with giving them orbits at different distances and seeing if their paths remain stable over a number of orbits.
- If you wish to place more planets, repeat steps 9–11 as required.
I recommend you test out the designs of strictly P-Type and S-Type systems before you move onto this. If you can design the former two systems easily, a hybrid really isn’t much of a problem. The basis of a hybrid system consists of two stars orbiting each other with one planet orbiting one of these stars. Then, a second planet occupies a distant orbit, circling both of these stars. That’s the minimum you will need. I don’t have a list of strict guidelines for this one because it is heavily based on experimentation and very fluid in terms of how it may look. Combine the rules of P-Type and S-Type systems and you will end up with a hybrid. Refer to the diagram of the hybrid system I have posted above and give it a try. Good luck.

COMMON MISTAKES TO AVOID
This section contains an outline of mistakes players commonly make when attempting to design binary star systems. Do your best to steer clear of these, and refer back to here if something just isn’t quite working despite your efforts.
If placing down a planet that you wish to orbit around both stars in a P-Type system result in the planet flying off or falling towards the stars, you’ve most likely encountered this mistake.
I’m not exactly sure why you have to use “Binary” and not “Orbit” when placing planets around both stars, but it simply doesn’t work when using the latter. This is the most common mistake in new players. The planet orbits the barycenter of the system. Therefore, using “Orbit” to place the planet sounds right, but doesn’t work in practice. Note that this issue only applies to P-Type systems, where the planet orbits two stars.
Fix: Select “Binary” mode and not “Orbit” mode when placing down a planet you wish to orbit around both stars in the binary system.
If placing down a planet suddenly causes the orbits of the system to break down and the stars to fly off or hit each other and produce a supernova, you’ve most likely encountered this mistake.
The system fails and breaks down if you place the planet while the “Balance Motion” button under “Binary” is ON. This is because, in that scenario, the game tries to find a way to arrange the two stars and the planet into a configuration where the barycenter of the now 3-body system will not move as the bodies orbit it. We are focused on the barycenter of the two central stars—a 2-body system. Planets must not balance their motion with this barycenter.
Fix: Switch off “Balance Motion” under “Binary” when placing planets.
If the orbit of the planet keeps fluctuating as it circles around the star(s) and its path is subject to constant change, you’ve most likely encountered this mistake.
Depending on the configuration of the system, placing a planet too close or too far from the star(s) would lead to instability developing in the planet’s orbit. For P-Type systems, avoid placing the planet too close to the stars. For S-Type systems, avoid placing the planet too far from one of the two stars. You should be wary of both of these scenarios if you wish to design a hybrid system.
Fix:
- In P-Type systems, the planet should not be placed any closer to the barycenter than 3–4 times the distance between the two stars.
- In S-Type systems, refer to the equation listed in the section “Building Binary Systems” to aid in planet placement.
EXAMPLE BINARY SYSTEMS
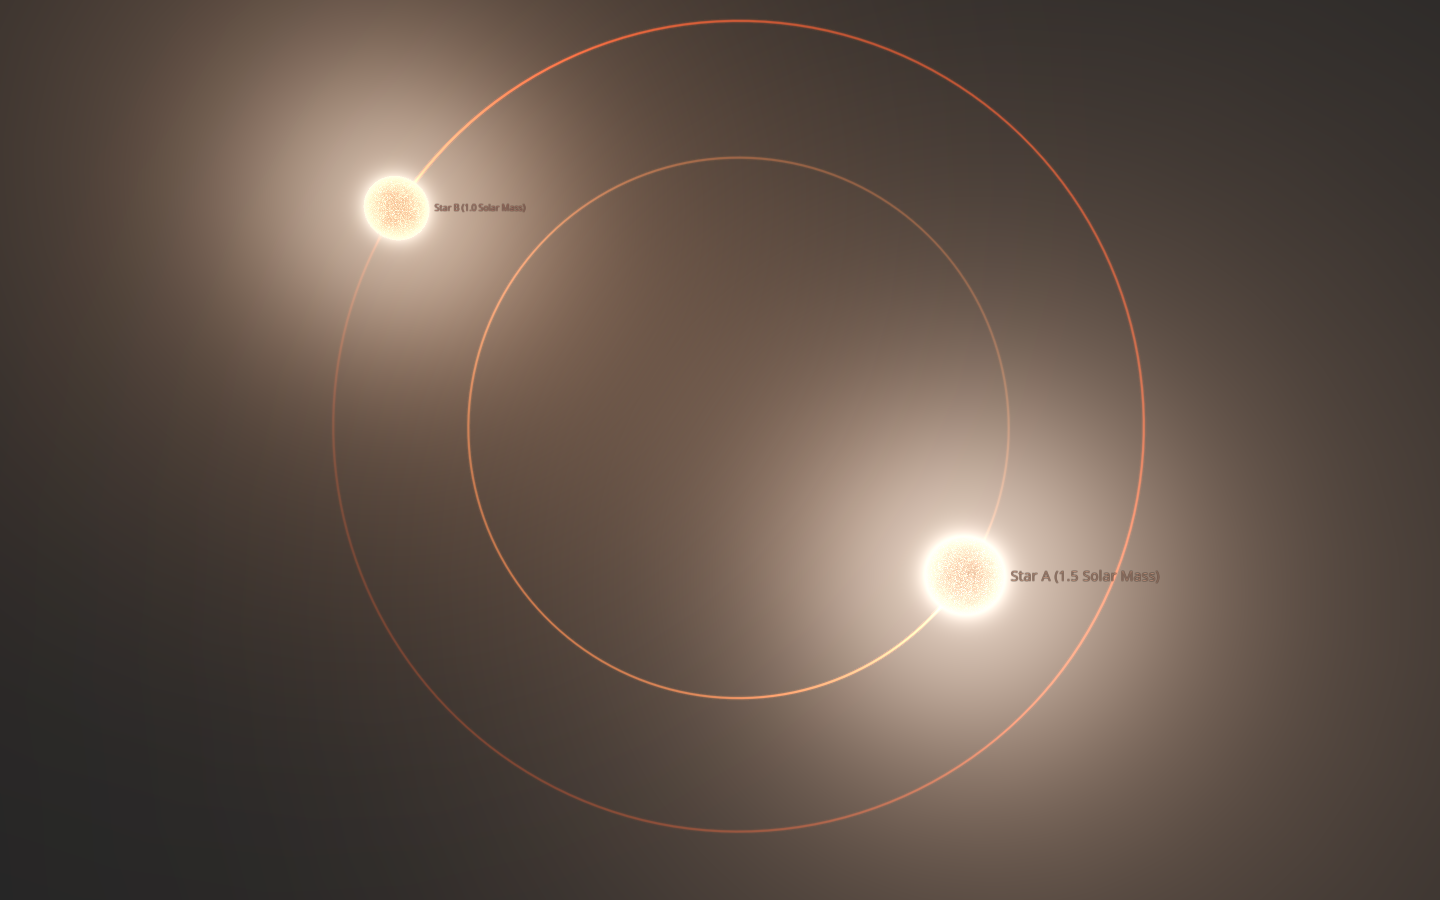
Star B: 1.0 Solar Masses

Star B: 1.0 Solar Masses
Planet A: 1.0 Earth Masses

Star B: 1.0 Solar Masses
Planet A: 1.0 Earth Masses
Planet B: 1.0 Earth Masses
Included here are two examples of using the formula to calculate the distance around a star in an S-Type system where a planet should be placed within.
Example 1
Star A is 10 solar masses and is separated from star B by 1000 AU. Star B has a mass of 2 solar masses. We want to place a planet around star A. These values can be inserted into the equation to produce the following:

Example 2
If we now want to add a second planet around star B, which has 2 solar masses, all we have to do is flip the fraction in the equation above of 10 over 2 to be 2 over 10. Recall that the numerator of the fraction is the star the planet is to be orbiting around. In this case, the star we want the planet to orbit is now star B, with 2 solar masses. Plug in the numbers once more. If performed correctly, it should equal around 58 AU. Therefore, the second planet should not be placed more than 58 AU away from star B.

SUMMARY & CONCLUSION
- Binary star systems consist of two stars orbiting a common centre of mass, also known as the barycenter.
- The way in which a planet can orbit a binary pair can be classified into two types of orbits: P-Type and S-Type.
- P-type orbits involve planets that orbit around both stars’ centre of mass in the binary system. The stars in a P-Type system are usually fairly close together.
- S-type orbits involve planets that orbit around only one star in the binary system. The stars in an S-Type system are usually far apart.
- Hybrid systems contain both P-Type and S-Type features.
- Distance between the planet to the star(s) is critical in determining whether its orbit is stable.
- In P-Type systems, the planet should not be placed any closer to the barycenter than 3–4 times the distance between the two stars.
- In S-Type systems, the planet should remain fairly close to its star to remain stable. Refer to the equation listed in the section “Building Binary Systems” to aid in planet placement.