Overview
The DA-SR 12, better known as the Stealth Type B, is a unique and challenging cruiser, trading away it’s precious Shield system for Cloaking and the most powerful beam weapon in FTL: The Glaive. This guide aims to show players of any skill level how to get this cruiser up and running.
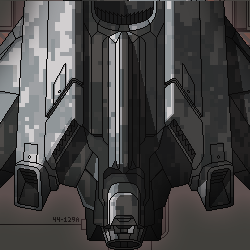
The DA-SR 12, Stealth Type-B
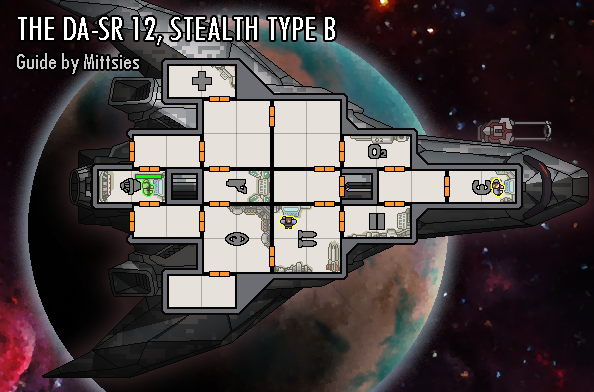
Considered by many to be among the weakest cruisers in FTL, the DA-SR 12 provides a very unique and challenging experience. Although hindered by its lack of Shield System, small 2-man Med Bay, 3 weapon slots, below average starting crew, and generally poor ship layout (only 3 ‘venting’ doors total), this Stealth cruiser begins the game with one of the most powerful weapons in the game: the Glaive Beam – capable of killing many opposing Cruisers in a single shot. This ship struggles in the early stages of the game, but due to the deterministic playstyle of Beam-type weapons (they can’t miss) it can be a very satisfying experience once it gets rolling.
This guide will be useful to both beginners of FTL who are looking to improve their runs and veterans who finally want that satisfying victory with the DA-SR 12.
Fun Facts
- Cloaking lasts 5, 10 or 15 seconds depending on the current Charge.
- When cloak ends, the system will require 20 seconds to cooldown before using it again.
- The Glaive Beam requires 25 seconds to fully charge, and fires instantly at the start point.
- The beam itself takes about 1 full second to go from it’s start to end points.
- Glaive Beam being manned by a crew-member reduces the charge time to 22.5 seconds.
- This means that if you wait about 9 seconds before using your Rank 3 Cloak, you are guaranteed to slice through the enemy ship with a manned Glaive Beam before you uncloak.
- Cloaking gives +60% Evasion and stops enemy weapons from charging further.
Early Game (Sectors 1 and 2)
Unlike most cruisers which blow through the first few sectors like nothing, the DA-SR 12 can have a lot of trouble early if you’re unlucky and get matched against enemy cruisers with drones, Zoltan shield, or laser-type weapons that cannot be ‘dodged’. Furthermore, With only 2 points into Engines your dodge chance while cloaked will only be 75%, meaning you have a 1 in 4 chance to be hit anyways. A single shot to your weapons and it’s over for you, just restart the game. Due to the randomness of enemy cruiser types, you will probably lose around 30~40% of your Hull HP before arriving at Sector 2. If you manage to get to sector 2 with an undamaged hull, then the RNG Gods were incredibly kind to you.
Avoid all Stores like the plague and do NOT repair your hull even if offered through a random event. The DA-SR 12 needs every bit of scrap it can find to cover its wide array of weaknesses. Even if you’re floating around at less than 10 Hull, it’s better to buy a system upgrade than to repair because this ship is all or nothing. Every scrap you spend is that much less you’ll have for the Shield System you so desperately need. If you find a store through a random event, you may want a 1-Power weapon, but don’t buy any augments or systems yet.

You will feel naked without this.
5 more seconds on your Cloak is essential when you have no Shield System.
Get Rank 5 Weapons (50 Scrap)
You don’t want your Glaive Beam to shut down if it gets tapped by something. Having an extra Rank into your weapons system acts like +1 Hit Points, essentially.
Get Rank 4 Engines and +2 Reactor (85 Scrap)
This will bring your Evasion while Cloaked up to 90% (25% Base + 5% Manned + 60% Cloak). Not perfect, but it will be good enough. This also allows you to run away from fights that will almost definitely cause severe hull damage (like Zoltans or ships you’re unable to instantly kill with your Glaive)
Early Game Strategy
Crew Positions

Reactor Energy Distribution
When you’re about to dodge an incoming attack, pause the game, and move a point of energy from Oxygen into Cloaking. After you’ve dodged the attacks, while cloaked, you may move a point of Engine energy over back into Oxygen. You should be constantly juggling energy during fights to be as effective as possible: and always do it while paused so you don’t make a mistake.

How to use the Glaive Beam

Using Cloak Properly
Wait before they fire their volley. As soon as ALL of their weapons have been shot, take a point out of your Oxygen and put it into Cloak, activate your Cloak to “dodge” the enemy attacks, then pray to the RNG Gods you don’t take damage. With Rank 3 Cloaking, and assuming the enemy’s weapons have slow charge times, it’s actually possible to Cloak as soon as the fight begins and unless their weapons charge in 8.5 seconds (22.5 – 15 = 7.5, +1 second for the actual laser slice to happen), you will destroy their ship before they even fire a shot. However this is generally not a risk you want to take unless you are absolutely sure their weapons cannot fire fast enough.

It’s also worth noting that you can move a crew member into the Sensors room for a moment to take a peek at the enemy’s current weapon charges. This may be important if you’re against Beam-type weapons which cannot be dodged, and need to Cloak before those weapons go off.

The Zoltan Shield has 5 HP, so rather than damage the first two rooms would normally hit, it will instead just burn the Zoltan Shield, meaning you can at most damage two of the enemy’s rooms. This means you won’t be able to kill the ship in a single slice, so your best bet is to aim the beam so that it damages the weapons room at the end of it’s slice (see image below).

Against Attack-Drones (Rank 2 Cloak)
Tricky, and usually painful, but manageable. Simply wait as long as possible before Cloaking, ideally waiting long enough to dodge the enemy cruiser’s weapon volley. If the Drone targets your Weapon or Cloak Systems, activate cloak immediately. Once your Glaive is charged, they’re dead.
Against Attack-Drones (Rank 3 Cloak)
Wait about 9 seconds then Cloak. Don’t attempt to ‘dodge’ the drone’s attack with your Cloak. If the Drone targets your Weapon or Cloak Systems, or the enemy’s weapons are fired, just activate cloak immediately. Once your Glaive is charged, they’re dead.

These drone ships can be very difficult to deal with. Not only do they have hacking which can completely wreck you if it lands on your Engines or Weapons, due to their room positioning you cannot kill them in a single slice of your Glaive beam no matter where you aim it.
Aim for their weapons room and hope for the best.
Against Boarding Drones
Do not use your Cloak to “dodge” the boarding drone. Even with the Rank 3 Cloak, your Glaive Beam won’t be charged up when the Cloak ends, and you will miss your chance to dodge the enemy’s volley. If the boarding Drone landed in Oxygen Room and you were already low on Oxygen, you may need to buy the Rank 2 Healing Bay [35 Scrap] in order to fix it. Otherwise, just play as you normally would. If the Drone landed in your Weapons Room, you may need to juggle crew-members to keep the System from being destroyed… otherwise you can probably just ignore the drone until the fight is over. Worst case scenario is an Ion Drone in your weapon or cloak rooms.
Against Boarding Crew
If they are in your Cloak Room, just ignore them as long as possible, then send in your Zoltan to deal with them before they break the system. Chances are they will teleport back to their ship, or their ship will be destroyed, before anything bad will happen. If they are in your Weapons Room, immediately send in the Zoltan to fight 2v1. If they entered a room that can be vented to cause suffocation, consider moving your human from Weapons into the Door Room to temporarily boost your door strength. This will cause them to take a little extra damage, making it easier for your crew to fend the boarder off.
If there are multiple boarders, you may consider venting the entire ship and juggling crew out of the Healing Bay. Taking a few extra points of hull damage is nothing compared to losing a crew-member.
Cloaking Hacked


Why are you here?
You have Long-Range Scanners.
Maybe you sold them. Maybe you had no choice.
Don’t change your Strategy, really. Just wait until the enemy volley is about to be fired, dodge it, and pray for the best. Cloaking during an Asteroid field increases your Evasion by 60%, but you still have a pretty reasonable chance to be hit since they are so frequent and, unlike enemy cruisers, can throw out more attacks even while you’re cloaked.
This happens
ESC -> Restart.

Mid Game (Sectors 3 and 4)
After reaching Sector 3, you’ll probably have about 50% Hull left on average. Resist the temptation to repair or buy any pointless upgrades until you have Shields or else it will only be downhill from here on. Avoid any random events that you know hold a chance of hull damage or crew-loss, as the DA-SR 12 cannot afford to lose those gambles.
#1 Priority: Save for Shield (125 Scrap)
Don’t let your scrap fall below 125 until you get a Shield System.
If you want to be a total badass, you could skip out on the shield and invest in some defense drones, or hacking, instead. However if you’re confident enough to do that, then you probably don’t even need to read this guide.
Rank 2 Door System (35 Scrap)
Seriously. Get it.

Repair your Ship (Probably around 75 Scrap)

Weapon that uses 1 Power

Hacking (80 Scrap)
Arguably the best system to obtain after Shields, Hacking can completely drop an enemy cruiser’s shields as long as they don’t have a defense drone to shoot it down. Just keep in mind that drone parts are finite, and if you rely entirely on Hacking to win battles you may run out entirely.
Second layer of Shields (100 Scrap)

Rank 2 Healing Bay (35 Scrap)
Since your healing room is only able to fit 2 Crew-members, as opposed to the usual 4, this upgrade is extremely important for handling invasions and fires.
Rank 2 Oxygen (25 Scrap)
Same price as a Reactor upgrade, and since you’ll be juggling, this is better because it gives the room +1 HP. Not a huge investment and it can really help out in those early sectors if a boarder or stray missile lands in your Oxygen room.
+2 Reactor for your Engines (50 to 60 Scrap)
After picking up your Shield, you will be a couple reactor upgrades behind. This isn’t actually super important to get immediately, but you do eventually want to get this so you can have energy in your Engines again.
Mid Game Strategy
Against a Slow Weapon and a Fast Weapon
Do not cloak to dodge the fast weapon. Just let it hit you. If you don’t wait to dodge that huge Missile or 5-Shot Laser, you’re going to regret it.
Against Double Shields with Fast-Repairs
Engies or Repair Drones can make things difficult when dealing with double-shields. Given you don’t have a second weapon yet it can take as many as 4 to 5 complete Glaive charges to kill an opponent like this. If they have weak weapons, it might be possible to fight them with well-timed cloaks and a little bit of luck Unless you think you can get past the encounter with little to no hull damage, FTL-Jump away as soon as you can.
Against Triple Shields.
Probably just FTL-Jump.
Anything else…
Just apply the same strategies you used in early game.
End Game and Preparing for the Flagship
If you’ve made it to Sector 5 and beyond, you’re probably looking at one of two scenarios. Possibility one… your ship is beaten and battered from several lost fights where you took 10 hull damage to gain a few scrap or had to jump away and obtain nothing, your ship is severely lacking upgrades and you’re probably just stalling your inevitable defeat. Possibility two… with a little bit of skill and a lot of luck, you’ve managed to have a pretty good run so far. Well hopefully that won’t change, and you’ll be able to deal with the next several sectors without dying to something.
End Game Upgrades
You will probably end up ditching the 1-Power weapon and finding something stronger and with a slower charge time like a Burst II. Quick-charging, constantly-firing weapons are generally a bad thing for you unless you find the Stealth Weapons augment. Bomb and Missile weapons are great for the Flagship, but usually not a good idea to use on prior encounters unless you’ve got at least 20+ Missiles sitting around ready for the boss.
You’ll probably want Engines and Shields to 6 Ranks each, anymore than that might mean you’ll have less Scrap (and Reactor energy) to improve other systems. Excluding Shields you have two system slots left, I recommend getting Hacking or Drones (not both) and Crew Teleporter. Mind Control, while fun, doesn’t really suit the playstyle of the DA-SR 12.
Get through 4 layers of Shield + Defense Drone
Unless you managed to obtain a Defense Scrambler augment you cannot rely entirely on Missiles and Hacking to defeat the boss, as Phase 2 includes a pesky Defense Drone which will shoot them down. A combination of Combat Drones and Laser / Ion / Flak weapons is generally a very practical way to drop the enemy’s shield. You can also use a Bomb type weapon, such as Breach Mk. II, to disable their Shields or Drone Bay so you can Hack them properly.
3 Shield Layers
3 Shield Layers + Cloak, if used properly, will almost guarantee that you will not take a single point of damage from Phase 1 of the boss. It will also be enough to deal with the Drone Swarm and Laser Barrage from the next two stages.
Boarding Crew with Teleporter
Although it’s possible to win without it, I still consider it to be essential in most situations. Being able to teleport crew directly into the boss’s vulnerable weapon rooms can make things a lot easier for you.
Defense Drones
This can shoot down Missiles and Boarding Drones from Phase 2, which is really convenient.
Hull Repair Drone
Hull Repair is generally auto-win on basically any cruiser. If I find one I often buy a Drone System from a store just to use it. It means you can fully repair your hull after each phase of the boss, or even during the boss if you don’t have another drone to use instead.
Weapon Pre-Igniter
This feels really nice to have on a weapon with a base charge time of 25 seconds.
For Phase 1, send your crew (or use a bomb/missile) to immediately take down the Flagship’s Missile Room. Then go for the Ion and Beam rooms next. The laser room can be left alone, as with 3 shields you are basically invincible to his attacks at that point.
For Phase 2 and 3, only use 1 level of Cloaking to dodge the super attacks (Drone Swarm and Laser Barrage). Cloak’s cooldown is 20 seconds and the super attacks happen about once every 25 to 30 seconds. If your Cloak was at level 3 power and lasted for 15 seconds, for instance, then you would not be able to dodge the next super attack.
On Phase 3, the Flagship will put up a super shield which is similar to that of a Zoltan Barrier which will stop you from using Crew Teleporter and Hacking. This shield has a lot of life, so don’t be afraid to use your Glaive on it.
On Phase 3, the Flagship will send over any remaining crew to attack you. If you have the means to do so, kill off all of his crew (Except 1 guy, preferably in the Laser Weapons room) to avoid this from happening. This also means you can safely teleport your crew to attack his Shield without worrying about his crew coming to stop you. If you did not eliminate his crew, be prepared for some intricate door micromanagement to keep your crew from getting swarmed and killed.
—
Good luck, have fun.