Overview
Updated for RTM so that you don’t die at the beginning and don’t run out of supplies! I’ve also compiled weapons statistics, NPC locations, skill needs and other information about the game. *I have started adding spoilers by including detailed maps of each location and markers of important items but I have not added any mission information in*. Information on LA is starting to be added but all existing content has been updated!I changed the name to better reflect the contents of the guide.
Wasteland RTM
I’ll be adding a section about the most important stats and what order you need to get them in to make the game as smooth as possible. I’ll still try to avoid any hints as much as I can. The game was a blast and I intend to play it again at a somewhat slower pace this time 🙂
All existing sections have been updated including the character creation with hints that will help you with LA and the end game. Please note that many weapons are not available until you get to Los Angeles.
At this point I’ll be adding the remaining missing maps and one new section as stated above.
I’ve finished the NPC section and believe it to be complete for all paths now. If I’m missing anyone, please send me the location, stats and situation.
Character Creation
A rambling narrative on how to think about skills
To start off with, where you put your skill points matters a lot. However, having played the game through I’m going to offer some words of caution here. Without the right skills, you will not succeed later in the game (or it will be ridiculously hard regardless of the level you play on). When picking skills, try to map out which NPC’s you want to get and what skills they have. For example, now that I’ve played through saving Highpool, I tend to always save Ag Center because of Rose. Rose has the Computer Science skill (which you will need to get to 10 if possible) so I no longer give that skill to one my core team members at all. Also, she has an intelligence of 10 which means she’ll get lots of skill points per level so it will be easy to level her up.
These are the types of considerations you have to make. And another point on this – even though I don’t have a section on character creation (there are enough of those in other guides), the two most important attributes are Coordination and Intelligence. Remember that you will have three opportunities to raise other attributes (one every 10 levels and you finish the game around 37/38 so you don’t quite get to 40 unless you really work for it). Coordination because most fighting is long range (there are close combat situations but I’ve taken the approach of not doing this) and Intelligence because you need those skill points.
Look at Scotchmo – he has a coordination of 6 but an intelligence of 3 and he’s level 14 so you can only add two attributes to him over the course of the game. Take him or not? It depends on how you want to play. And of course because of this guide you have some foreknowledge. Use it wisely!
Combat skills
First off, where you put your points in the Combat Skills section determines what weapons you start off with (and what type of ammo you need which is critical). In the beginning I wanted everyone to have an assault rifle so I gave everyone that skill. Bad idea – that means everyone needs 5.56 mm ammunition which is not only hard to come by but expensive so I kept running out of ammo. Even worse than that, when you run out of ammo enemies tend to get too close to you and they will kill you quickly.
My next approach was to give everyone a point in the blunt or bladed weapons skill. That started everyone off with a pipe or machete! Not the result I wanted because I got killed long distance almost immediately.
The solution – give everyone a different skill. This is still the best approach however ammo isn’t quite as scarce as it was in earlier iterations of the game. For the best mix I gave my characters the following:
- Assault Rifle
- Energy Weapon
- Sniper
- Submachine Gun
This results in everyone having more than enough ammunition without running out. That problem was solved and gameplay-wise I’ve had a superior experience.
One thing I will note is that there really is enough ammunition to give folks many of the same weapons. What I did to take advantage of this was to give my NPC’s the Sniper Rifle or Assault Rifle skill and left only one player each with the Submachine Gun and Energy Weapons skills.
Doing this you should take the first long barrel modification and modify the submachine gun so it has a better range otherwise that player is only good for short range fighting and while there is a lot of that, they’re out of the fight for long range gun battles and there are a lot of those.
You might ask, “why not a shotgun?” The short answer is that is that you tend to do more friendly fire damage than anything else. In addition, if you go to Ag Center you’ll pick up Rose who uses shotgun shells (although I almost immediately give her another skill like Sniper or Assault Rifle or I give her a normal handgun so she doesn’t kill my guys!).
A couple of additional notes
I am unimpressed with the performance of the high-end submachine guns – they simply don’t do enough damage for many of the fights you’ll find yourself in. I may look at the shotguns again because the high-end shotguns do a world of hurt and they have a lot of penetration.
Tech Skills
For this one, the important items are lockpicking, safecracking, alarm disarm and computer science (all four are used to open locked items and obviously to disarm alarms – and there are a lot of them depending on where you are – as well as other items for the computer science skill). Toaster repair is useful and there are many toasters to be found but it isn’t a required skill. You won’t survive without the first four skills.
The Mechanical Repair skill is only used in two areas so far and a fairly high skill level is required in the second area. Only one player needs this and you have some time to build it up.
The Perception skill combined with the demolition skill is very useful all over the place. In fact there are so many booby-traps that the perception skill is now a required skill (to detect them) and demolition (to disarm them) that you can’t survive without these skills either.
General Skills
Only one person really needs the Medic skill. This is most useful at higher levels where you don’t level as quickly (every time you level you are healed to 100%) so at lower levels this isn’t needed as much but it’s still helpful.
The surgeon skill is incredibly useful in LA. If you pick up Rose then you’ll have two players with the surgeon skill. You’ll get into a lot of battles where someone needs a surgeon either during the battle or afterwords. In addition it eases some paths through the game as you can save people who will make others see you in a favorable light.
Weaponsmithing up to a level of five is necessary to be able to apply the long barrel weapon modification. Get it. Weapon mods really do make a big difference, especially in the Jam rate and range. See the weapon modification page for more information. You don’t need this skill right at the beginning – if you pick up Angela Deth she has a weaponsmithing skill of three which will keep you going for a while. At a certain point you will lose Angela so make sure someone else eventually gets this skill. Eventually having this skill at 8 will be required but you can get a trinket that will add +2 to this skill if you don’t want to allocate the points directly.
If you are going to keep NPC’s in your party, you must have the leadership skill. The higher the skill the less likely the NPC’s will “lose control” and go off and do something stupid. Make sure one of your characters is higher in this skill. This is especially important if you have scotchmo who uses a shotgun – you will blow holes in your other characters if you can’t keep him under control.
Finally there’s the outdoorsman skill. In this incarnation it is used (as far as I can tell) only to run away from enemies as you’re travelling in the wastelands. But why run away you may ask? You want to fight every bad buy that comes along you say? Yes, that may be true for the purpose of experience but hordes of roving animals don’t drop anything useful.
The Smart A$$, Hard A$$ and Kiss A$$ skills aren’t required but they open up communication paths that are otherwise denied to you. When you get to LA having a Hard A$$ skill of 10 (or 9 + a trinket that raises it by one) will make things way, way better. Having 8 in the other two will help also. While problems can be solved in different ways, it can be more expensive. Also, in many cases, if you don’t have the skill at the right level at the beginning of a conversation, you will not be able to go back and unlock that conversation path later on.
Hopefully this small start will get people over the hump.
Non-player Characters (NPC’s)
This section of the guide is still mostly wrong. I will be updating it shortly. Sorry for the inconvenience! I’m updating it slowly and I’ll remove the header when I’m finished.
The Citadel
Name
Angela Deth
Level
14
Location
Talk with her before leaving the citadel
Attribute
Value
Skill
Value
Coordination
8
Assault Rifles
6
Strength
4
Blunt Weapons
3
Intelligence
4
Outdoorsman
2
Ag Center
You can get one NPC at Ag Center.
Location
If you save Ag Center she will ask to join your party early in the mission
Attribute
Value
Skill
Value
Luck
2
Computer Science
4
She is very effective in combat and if you are a moral player (I try to be a “good guy”) she works fine. If you like to shoot everything up, she’s probably not a good choice.
Replace her weapon with an FFS handgun (the most powerful one in the current beta) and she won’t damage your team like she does with Rose’s Thorn.
Highpool
Here you can get one NPC. Vulture’s Cry is a native american jailed in a cell being taunted by people from Highpool. To free her you can buy some coffin nail cigarettes from the vendor in the town hall, talk to the kids and give them the smokes. Then they’ll leave Vulture’s Cry alone, you can unlock the door and get her to join.
Wrecker Camp
You can get here if you rescue Highpool or if you visit Highpool after it is destroyed and talk to the one survivor you found. There’s no one here to get but vengence feels good!
Rail Nomads
At the rail nomads you can get three NPC’s.
Location
Save him from drowning and talk with his mother
Attribute
Value
Skill
Value
Coordination
3
Toaster Repair
5
Luck
5
Animal Whisperer
2
Attribute
Value
Skill
Value
Coordination
6
Shotguns
6
Awareness
1
Lockpicking
2
Location
If you negotiate a peace between the Atchinsons and Topekans Chisel will approach you as you leave the rail nomads camp
Attribute
Value
Skill
Value
Coordination
6
Hard A$$
2
Awareness
5
Blunt Weapons
2
Lil Lupe Mine
You can get one NPC in Lil Lupe Mine.
Location
After freeing the miners he is available outside the mine
Attribute
Value
Skill
Value
Coordination
5
Bladed Weapons
6
Awareness
4
Mechanical Repair
3
Damonta
You can get one NPC in Damonta and one other “NPC” although I’m not sure you would call him that. In addition to Lexcanium you can also repair the discobot Jamie (in the shop with the vendor Hopi and Magee as noted on the map for Damonta). Jamie has no stats and just follows you around but he helps in battle. He is not a member of your party – more like the guy who follows you around in the Rail Nomads camp.
Location
After defeating the Tinker he becomes available
Weapon
Lexcanium’s Bionic Arm
Attribute
Value
Skill
Value
Coordination
4
Computer Science
3
Awareness
5
Alarm Disarming
2
NPC’s (continued)
Santa Fe Springs
Name
Pistol Pete
Level
23
Location
Main gate to Santa Fe Springs
Attribute
Value
Skill
Value
Coordination
7
Handguns
8
Awareness
5
Outdoorsman
6
Name
Brother Thomas
Level
Location
Main gate to Santa Fe Springs
Attribute
Value
Skill
Value
Coordination
7
Submachine guns
9
Awareness
3
Field Medic
8
Strength
4
Blunt Weapons
6
Location
Main gate to Santa Fe Springs
Attribute
Value
Skill
Value
Coordination
7
Heavy Weapons
9
Awareness
7
Field Medic
8
Highpool
Attribute
Value
Skill
Value
Coordination
5
Animal Whisperer
4
Darwin’s Village
Location
Darwin’s Village
Attribute
Value
Skill
Value
Coordination
6
Energy Weapons
7
Temple of Titan
Only available if you send the missile to DBM and have high party charisma
Location
Temple of Titan (Missle to DBM)
Attribute
Value
Skill
Value
Coordination
7
Lockpicking
7
Luck
3
Computer Science
6
Awareness
4
Assault Rifles
5
Strength
2
Alarm Disarming
5
Temple of Titan
Only available if you send the missile to the monks
Location
Temple of Titan (Missle to Monks)
Attribute
Value
Skill
Value
Coordination
3
Kiss A$$
8
Starting Weapons
This information assumes you put one or more point in only one weapon skill. I have not tested different combinations to see which weapons you actually get. All weapons stats are also listed in their respective sections.
Skill
Weapon
Damage
Range
Capacity
Armor Penetration
AP
Ammo
Notes
Assault Rifle
M1
6-10
20m
8
2
4
5.56 mm
Energy Weapon
Phase Blaster
6-8
12m
6
3
Energy Cell
Sniper
Hunting Rifle
12-16
28m
5
3
7
.30-06
Submachine Gun
Greaser
6-9
12m
30
2
5
.38
3 shots**
Bladed
Knife
5-8
N/A
N/A
1
3
N/A
Not another one in the game
Blunt
Bar Wire Bat
8-14
N/A
N/A
3
5
N/A
Not another one in the game
Heavy
M2
3-5
22m
30
2
6
5.56 mm
8 shots**
Shotgun
Pump Shotgun
14-18
12m
7
0
5
12 ga
Brawling
Sap Gloves
2-5
N/A
N/A
0
2
N/A
Handgun
VP91Z
6-9
12m
8
1
3
.38
Not another one in the game
**Damage is damage multiplied by the number of shots which hit the target
Armor
Name
Armor
Minimum Strength
Modifiers
Combat Armor
5
4
-0.4 Combat Speed
Goat Hide Armor
3
5
-0.4 Combat Speed
Kevlar Suit
6
-0.4 Combat Speed
Mobile Infantry Armor
7
4
-0.8 Combat Speed
Power Armor
9
-1.0 Combat Speed
Pseudo-Chitin Armor
10
7
-1.4 Combat Speed
Steel Plate Armor
4
6
-0.8 Combat Speed
Locations
I’m going to try to detail as much information as possible for each location. If there are things missing please let me know.
Some locations do not have mini-maps for them (when you click “m” it shows the screen it should, but the map is black and it happens all the time on specific locations so I believe it is either by design or the maps weren’t ready). These locations are noted below (for completeness) but no map is shown for them.
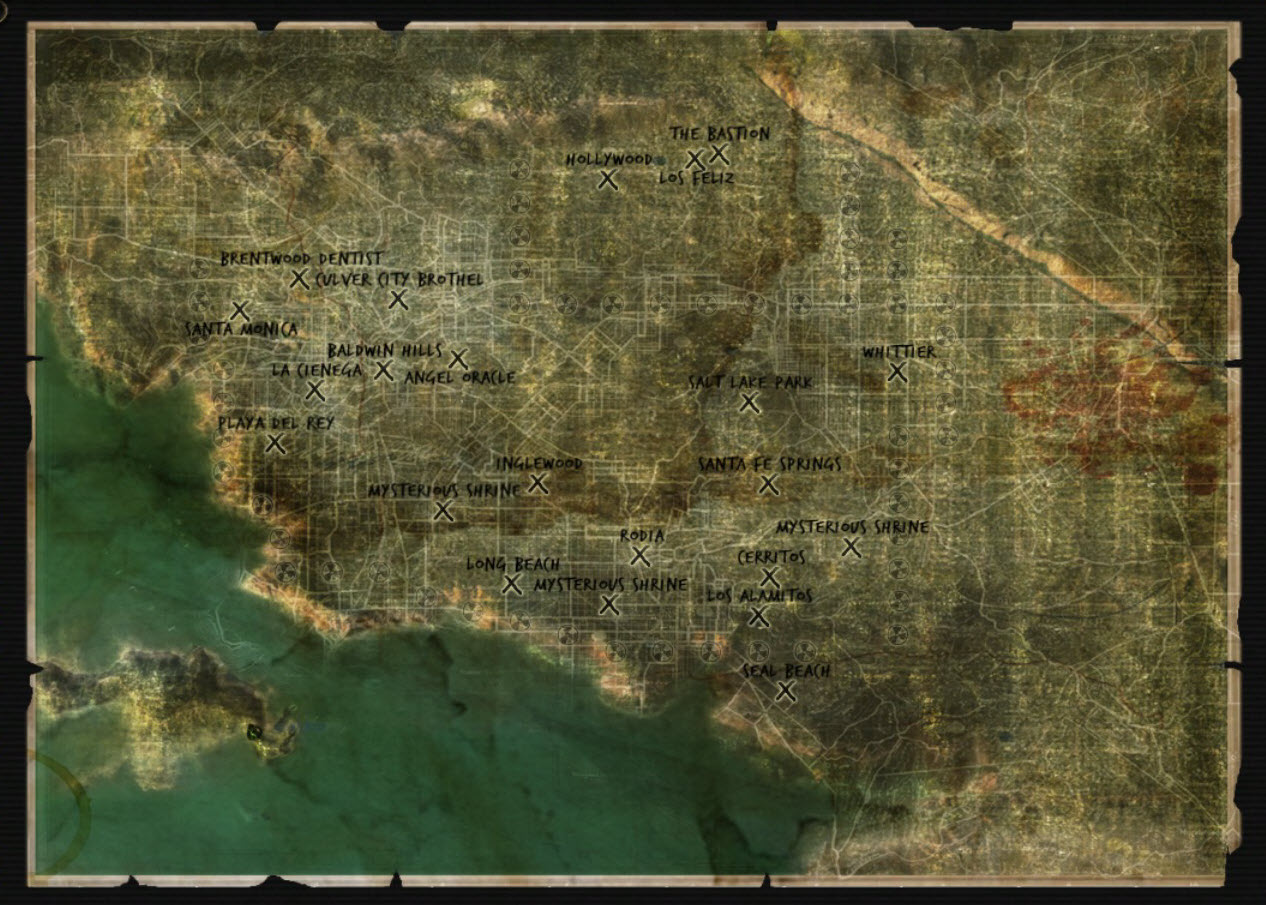
Arizona
This is an overall map of Arizona with all locations marked. Note that I have not marked the Oasis’s and the Hidden Cache’s yet (and I may not, I’m debating!).

There are four “Shrine” locations in Arizona:
- West of Leve L’upe Mine
- South of the Prison
- Southeast of Damonta
- East of the Radio Tower
These are experience shrine’s – They seem to give a random number of experience points from 115 to 240 in my experience.
Abandoned Railway
For those who played earlier beta’s this is the old “Robots!” area. It was moved and renamed but is still the same.

Ag Center
Ag Center is broken up into different areas. Each area is detailed separately.
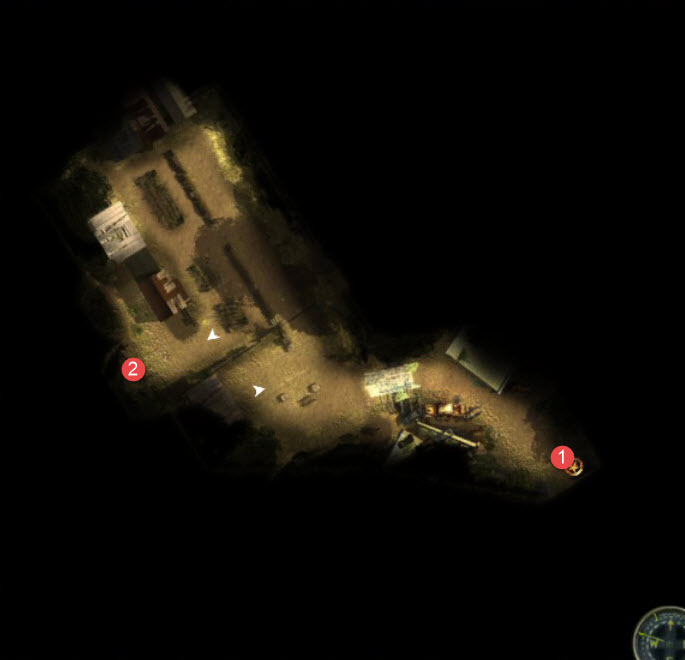
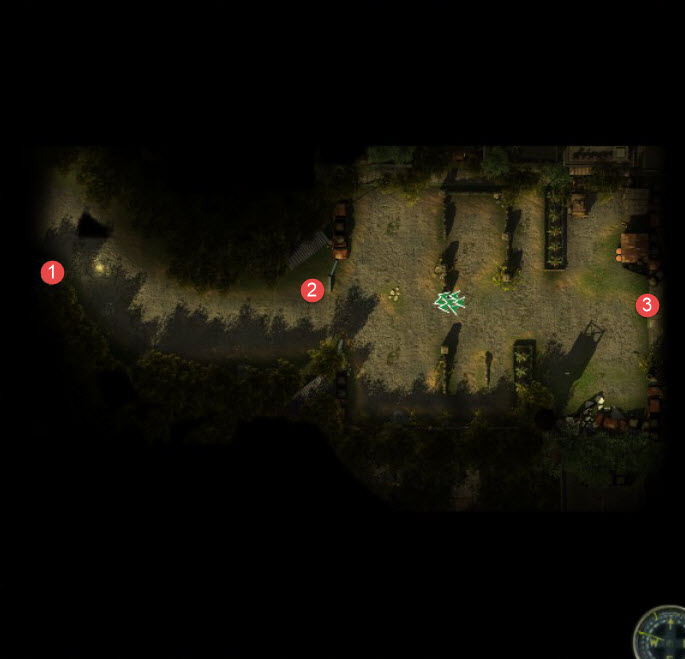
Killing Fields
The killing fields are the entrance to Ag Center. You can get here whether or not you decide to save Ag Center.

2
Entrance to Ag Center Central Complex
3
If you choose not to save Ag Center, this is the location of the serum
Central Complex
The Central Complex is where most of the story takes place and leads to all other areas of Ag Center. You can get to this location if you choose not to save Ag Center but almost all areas are cut off except the radar dish and a direct path to it.
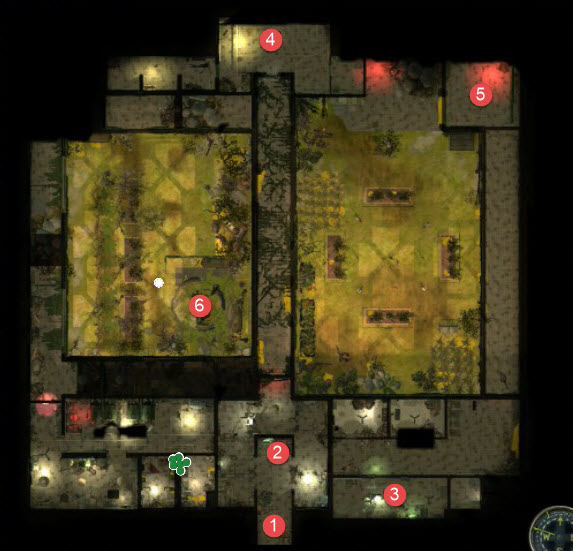
1
Exit to the kiling fields
2
Initial location of Matt Forestal and Kathy Lawson. Also the location of Dr. Larson if you choose not to save Ag Center
3
Location of Rose and where Kathy and Matt move to once the story gets going
4
Exit to the Central Basement
5
Pump system where the cure goes
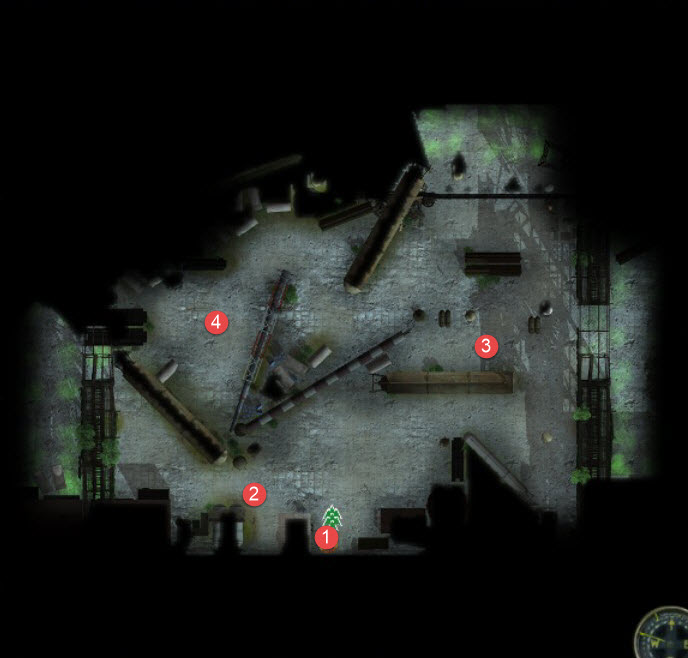
Central Basement
This location provides access to the east and west fields.
1
Exit to the Central Complex
2
Exit to the west fields
3
Exit to the east fields
West Fields
1
Exit to the Central Basement
2
Water filtration system
East Fields

1
Exit to the Central Basement
3
Water filtration system
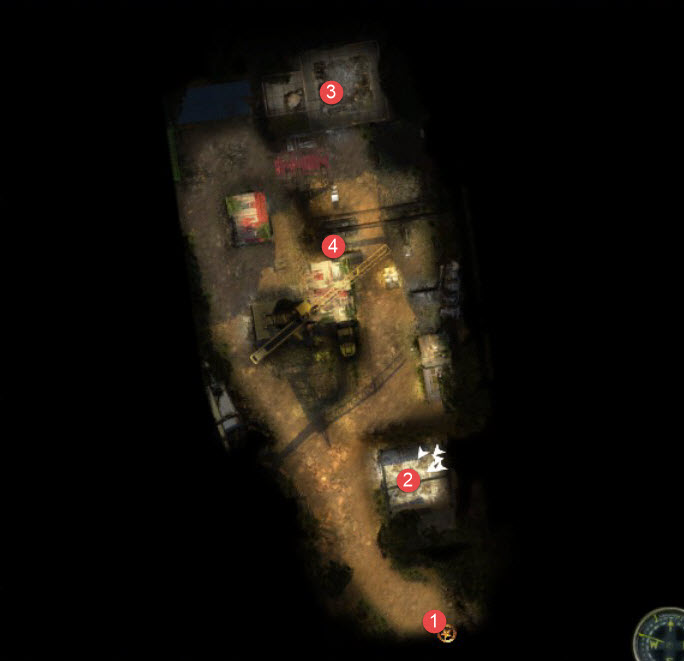
Damonta
Damonta is where you have to set up the next radio tower in order to complete the triangulation.

2
Doc and Jill and the sheep mission
9
The Tinker, Lexicanum and Binh
* A couple of quick notes here – I have not yet been able to keep Red alive long enough to find the Sierra Madre. There is also a nightclub here which I haven’t marked because I forgot to note the location. It isn’t critical.
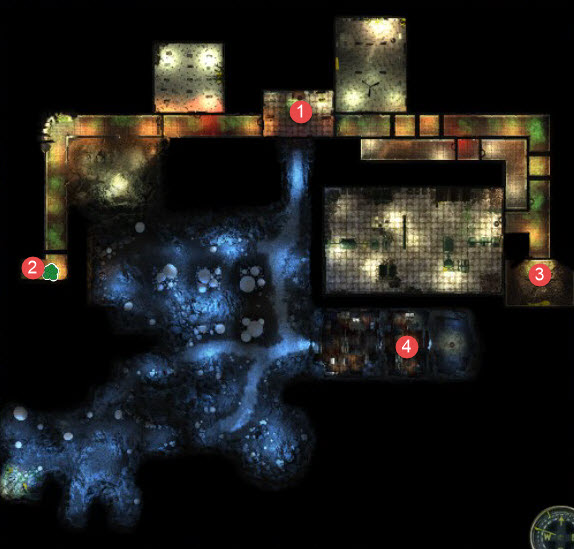
Darwin
No introduction should be necessary for those who played Wasteland 1. Darwin is now just a shell of its former self.
Village

2
Entrace to the labs. You will either need someone with a 4 or above Computer Science skill or have Rose with you to get in.
Lab – Level 1

2
Jan in the isolation room
Lab – Level 2

2
The Night Terror – no, no one’s figure out what he’s for yet…
3
Air duct passageway to #4
4
Air duct passageway to #3
5
Air purification control
Highpool
This, along with Ag Center, is a starting location in the game after the Robot Tower is complete.
Highpool

2
Shopkeeper with some weapons
3
A house you can enter. You can get to this whether you save Highpool or not.
4
If you don’t save Highpool, the destroyed Radio Dish is here and you can’t go any further. If you save Highpool, this is where you get the crane to the upper level.
5
Top of the dam. Sean Bergin is here.
6
Sewer pipe which puts you back at #1 for an easy way to get to the exit to Arizona. You can’t use this until you save all of Highpool.
7
Burning house which you can put out.
8
Entrance to Highpool underground – the cave section in the upper right of the next map.
9
Entrance to the Mayor’s office. There is a doctor here and a weapons dealer.
10
Vulture’s Cry is held in a cage here
11
Entrance to Highpool underground – the water pumping station
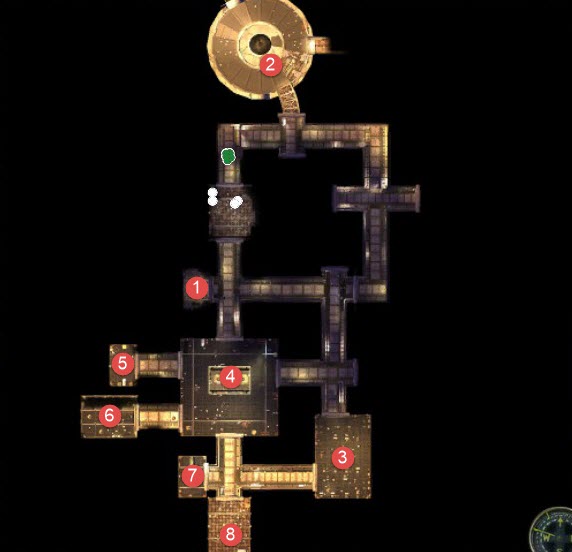
Highpool Underground
4
Spare valve for the pressure relief valve at location 10 (#8 in the annotations)
8
Pressure relief valve. This one is broken and needs the spare valve found in location 2 (#4 in the annotations)
9
Power switch for the radio mast
Infected Farm
This location is only available if you save Ag Center and get the mission from Sue.
Infected Village
This location is only available if you save Ag Center and get the mission from Sue.
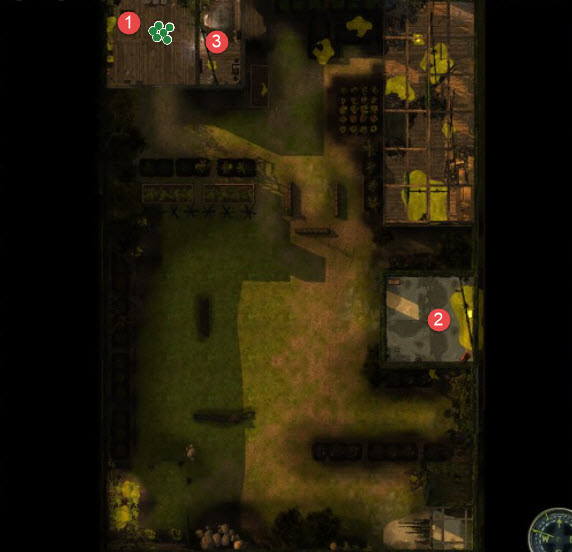
Leve L’upe Mine
This location has no real bearing on the story but is good for experience and you can pick up an NPC here.

3
Person who gives mission into the mine
Underground

3
Rockfall to be destroyed
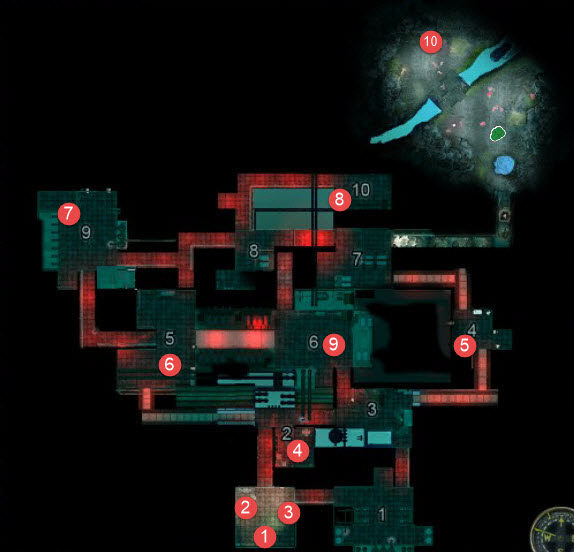
Prison
The Prison is one of the stops on your way to Damonta and it’s a required stop. You aren’t required to do anything there but it’s a lot of good experience points and a good part of the story.
Note that I’m leaving out spoilers where possible.
Prison Valley

2
Farmer who lost his pigs
3
Woman who needs help and entrance to cave that leads to #4 (this will get you past a nasty defense system
5
Seeing a man about a radiation suit
6
Encounter with a shopkeeper fleeing the area. You only get this one encounter with him so get what you need/want
7
The well with a water pump. If you can fix it you can fill your canteens up
8
RSM general store. You can’t actually purchase anything here
10
Entrance to cave (filled with bad guys) that leads to the Prison map as well. This is an alternate route
11
Entrance to the Prison map
Prison
Please note that at this time I know of no way to finish this map (the prison proper specifically) the first go around. The story works but the order of events no matter what you do is fixed and they don’t make sense in my opinion.

2
Exit to the cave that leads to Prison Valley
4
Pigs that the farmer in Prison Valley wants back. Make sure you clear the minefield before freeing them otherwise…
5
Entrance to the prison and the location you can’t get by until later
6
Dog kennels if you choose to resolve the problem this way
Pump Station
This location is only available if you save Ag Center and get the mission from Sue.

Radio Tower
This is the first location you head to in the game and you’ll end up returning here later.

5
Entrace to skill shrine cave
6
Location of part of the android that killed ace
7
Entrance to cave with the rest of the android and transmitters
Rail Nomads
This area is broken up into the Rail Nomads camp and the Atchinson’s camp. The majority of the story takes place in the Rail Nomad’s camp.

2
Ralphy is drowning here. There is also a well to top off your canteens
5
Entrace to building with the Golden Spike and Chief Kekkeban
6
Hobo camp, Scotchmo is here
7
Location of Hell Razor’s body
10
Ralphy’s mom after you save him
11
Bar with the Snake Squeezin salesman who was with Ace
12
Halliday’s weapon shop
15
Halliday’s stolen supplies
16
Exit to Atchinson’s Camp
Atchinson’s Camp

1
Exit to Rail Nomad’s camp
2
Rail Thieves (note that you have to kill them in all locations to finish this mission)
6
Antique’s dealer, sells a CD-i
Ranger Citadel
This is where you start the game and is your homebase for the first half of the game.
Please note that this is something new that I’m trying. If you like it or not, drop me a note in the comments, this is generally a lot of work.
Exterior

2
Entrance to the actual Citadel
3
Shopkeeper – Cpl. Solveig Sefors
Interior

6
Fresh water for canteens
7
Prison (Baychowski is here)
8
Tan (Explosive ordinance shop)
11
Entrace to the helipad when going to LA
Silo 7
There isn’t much here. The exterior is basically a path to the silo and the interior is just the missle bay.

2
Entrance to Silo 7 missle bay
Temple of Titan
Aboveground
Please note that after sending the missle to DBM this area changes drastically. For the end result see the section, “Titan Canyon”.

2
Secret entrance to missle silo by way of the DBM
7
Entrance to missile silo
8
Hospital and entrance to underground hospital
11
Entrance to missile silo
13
Entrance to missile silo
Missile Base
One note here, after sending the missle to the DBM this becomes inaccessible.
1
Exit to #7, Temple of Titan aboveground
2
Missile Silo Control Panel
5
Exit to #13, Temple of Titan aboveground
7
Exit to #2, Temple of Titan aboveground
8
Exit to #11, Temple of Titan aboveground
Titan Canyon

2
Meet with the DBM emissary
5
Raider needing an escort
10
Sludge Barrel and skill shrine
12
Water vendors stuck and need help
14
Exit to Temple of Titan
Canyon + Temple
After you complete Silo 7, if you send the missile to the DBM then the two locations are combined into one fairly small location as shown in this map.

Los Angeles
This is Los Angeles after Patch #1. Either I missed a bunch of stuff on my first playthrough or the map changed fairly significantly. Anyway, here it is now.
More details on the various locations coming as I have time.
Angel Oracle (New!)

4
Sandra trapped in a tree
14
Civility guards training
15
Entrance to steam tunnels
18
Press room – Mr. Manners and the radio
Angel Oracle Steam Tunnels

Cerritos (New!)

3
Woman who called for help[/td]
Hollywood (New!)

7
Sewer entrace to slaves
9
Entrance to hotel and Hollywood Sewers
10
Secret path to the Bastion
11
Rambeau’s (weapons shop)
12
Chest with Manny’s blackmail photos
13
Healing and entrance to mom and pop shop
Note that #13 is the where the currently broken mission is so you’ll have to get all three other chamber of commerce members to vote in your favor.
Sewers

Inglewood (New)
Long Beach (New)

If I remember correctly, there is a bag of kittly litter past the scorpitron.
3
Children of the Citadel
Los Alamitos (New)
There is also a bag of kitty litter here.
Rhodia (New!)

12
Dante’s place (Possum Farmer)
15
Pipe to secret entrance to bank
Santa Fe Springs (New!)

6
Gate which needs key from Woodson
8
Pistol Pete (Fred) – after your first mission
12
Initial chopper crash site
13
Lumber to repair fence with
Santa Monica
There really isn’t much here except to rescue a boy from church militants. Helpful hint – get the Lobber’s first then the Commando’s second.

The “loot” by the gas station is relayed to you by the mayor of Rodia’s cleaner (in the mayors office) if you rid the town of the punks. This is one way to discover Santa Monica – another is a simple radio call from Woodson telling you there’s been a request for help.
Trinkets
1992 M.I.T. Class Ring
+1 Kiss A$$
Air Jordans
-5% Chance to Evade; +0.5 Combat Speed
Akita Figurine
+1 Animal Whisperer
Anna’s Eagle Feather
-3% Chance to Hit; +3% Chance to Evade
Army Issue Backpack
-1.0 Combat Speed; +20 Max Water Carry; +20 lbs. Carry Weight
Aviators
-1 Awarness; +5% Chance to Hit
Borken Toy Robot
+1 Computer Science; -1 Charisma
Cat Burglar Mask
-3 Strength; +3% Chance to Evade; +2 Safecracking; +2 Lockpicking
Choice
-15% Chance to Evade; +5 Combat Initiative
Clay Wizard Figurine
-5 Armor; +2 Perception
Dowsing Rod
-2 Intelligence; -1 Speed; +3 Perception; +3 Demolition
Inverted Four-Leaf Clover
-2 Luck; +5% Chance to Evade; +5% Chance to Hit
Luchadore Belt
-2 Speed; +2 Strength
Luminox Watch
-0.5 Combat Speed; +1 Awareness
Matt Forrestal’s Ranger Star
+1 Barter
Monocle
-4 Combat Initiative; +3m. Maximum Range
MkIII Camera
+1 Smart A$$
Mutant Kangaroo Paw
-2 Animal Whisperer; +2 Outdoorsman
Pair of Engagement Rings
-1 Action Points; +3 Combat Initiative
Pooka Shell Necklace
-2% Critical Chance; +1 Charisma
Rabbit’s Foot
-2 Animal Whisperer; +1 Luck
Shaft of Prayer
-2 Coordination; +5% Chance to Hit; +3% Critical Chance
Shiny Ranger Star
+1 Hard A$$
Ship in a Bottle
+1 Mechanical Repair
Spiked Braces
+3% Chance Critical Dmg. Bonus; -5% Chance to Evade
Spiked Collar
-1 Kiss Ass; +1 Charisma
Stuffed Miniature Dog
+1 Leadership
Sunbrella
+20 Max Water Carry
Toolkit
+2 Weaponsmithing; +2 Toaster Repair; +2 Mechanical Repair
Unusual Bow
+3% Critical Chance
Wasteland Fan Club Pin
+1 Kiss A$$
Can only be obtained by giving the wasteland game disk (from Darwin’s Village) to the museum curator in the citadel
White Death
-10% Chance to Evade; +5% Ranged Hit Bonus
Weapons and Weapon Stats (Newly Updated!)
All you wanted to know about the weapons available to you.
Assault Rifles
Name
Ammo
Damage
Range (meters)
Capacity
Armor Penetration
Action Points (Single)
Damage/AP (Single)
Action Points (Burst)
Damage/AP (Burst)
Weight (lbs.)
Notes
AK-47
7.62
30-50
22
30
5
5
8
7
17.1
8
AK-97
7.62
45-66
35
30
6
5
11.1
7
23.8
9
AUG
5.56
26-32
22
30
5
4
7.3
6
14.5
9
FAMAS
5.56
14-21
24
25
3
4
4.4
5
10.5
8
FN-FAL
7.62
24-38
26
30
7
4
7.8
6
15.5
7
G3
7.62
20-34
28
30
6
4
6.8
8
10.1
9
G41
7.62
57-75
35
30
7
5
13.2
7
28.3
8
HK33
5.56
16-25
20
20
4
4
5.1
6
10.3
6
M1
5.56
6-12
20
8
2
4
2.3
6
M14
5.56
7-13
22
20
2
4
2.5
5
M16
5.56
37-48
24
30
4
5
8.5
7
18.2
7
M4 Carbine
5.56
19-27
20
30
3
5
4.6
8
8.6
8
Rust Bucket
5.56
10-14
18
20
2
5
2.4
7
Sweetness
5.56
22-24
20
30
3
5
4.6
6
11.5
8
The Lariat
12ga
1
18
1
1
6
.2
100% to apply All Tied Up
All assault rifles except for The Lariat have a 10% chance to apply Bleeding Wound
Bladed Weapons
Name
Attack Diagnonally
Damage
Armor Penetration
Action Points
Damage/AP
Notes
Combat Knife
N
10-15
4
3
4.2
Combat Machete
N
18-23
6
3
6.8
Makeshift Cleaver
Y
7-10
3
3
2.8
Makeshift Machete
Y
4-9
2
4
1.6
Makeshift Sword
Y
17-24
7
4
5.1
Pocket Knife
N
1-2
1
4
0.4
Found in a toaster in Titan Canyon
Proton Axe
N
35-52
7
6
7.3
Requires 6 stength (-40 Chance to Hit)
Shu-Model Ranger Combat Knife
N
5-8
2
3
2.2
70% to apply Opened Up
All weapons have a 10% chance to apply Bleeding Wound except for the Shu-Model Ranger Combat Knife
Blunt Weapons
Name
Attack Diagonally
Damage
Armor Penetration
Action Points
Damage/AP
Ace’s Wrench
Y
11-18
3
5
2.9
Hobo Basher
Y
5-9
3
4
1.8
Makeshift Mace
Y
42-60
9
6
8.5
Nail Board
Y
10-15
3
5
2.5
Nightstick
N
16-21
5
4
4.6
Plasma Hammer
Y
55-75
10
5
13
Rebar Staff
Y
35-48
6
5
8.3
Sledgehammer
Y
45-65
10
5
11.0
Spiked Bat
Y
18-27
9
4
5.6
Wooden Staff
Y
9-13
4
4
2.8
All weapons have a 10% chance to apply Concussion
Brawling Weapons
Name
Damage
Armor Penetration
Action Points
Damage/AP
Apply Concussion
Notes
Boom Fist
11-15
5
4
3.3
20
Brass Knuckles
6-9
1
3
2.5
20
Dragon’s Claws
15-19
7
3
5.7
20
Metal Nails
10-12
4
3
3.7
20
Rebar Knuckles
8-11
3
4
2.4
20
Sap Gloves
2-5
0
2
1.8
20
Toxx Claws
16-17
7
4
4.1
60% to apply Opened Up
Upchucker
11-15
3
5
2.6
60% to apply Vomiting
Energy Weapons
Name
Damage
Range (meters)
Capacity
Armor Threshold
Above
At
Below
Action Points (single)
Damage/AP
Action Points (Burst)
Damage/AP (Burst)
Death Ray
50-70
30
10
6
0.4
0.9
2.4
6
10
Final Assessment
11-17
10
12
3
.5
1.0
2.3
3
4.7
Herbicide
10-19
14
8
2
0.4
0.9
2.2
6
2.4
8
5.4
Ion Beamer
14-20
20
10
6
0.4
0.9
2.2
4
8.5
Ion Blaster
15-20
20
10
4
0.5
0.9
2.2
4
4.4
Laser Carbine
6-9
17
20
2
.5
.9
2.4
6
3.8
Laser Pistol
9-11
11
10
2
.4
.9
2.3
3
3.3
Meson Cannon
30-38
20
5
3
0.4
0.9
2.2
6
5.7
Neutron Projector
40-52
30
10
5
0.5
0.9
2.2
5
9.2
Phase Blaster
6-8
12
6
1
0.4
0.9
2.2
3
2.3
Photon Canon
34-42
20
10
4
0.4
0.9
2.2
6
6.3
Plasma Beamer
7-12
12
10
4
0.4
0.9
2.2
4
7.1
Pulse Rifle
13-17
12
10
3
0.4
0.9
2.2
4
3.8
6
7.5
WOPR Blaster
15-20
20
10
3
0.4
0.9
2.2
4
4.4
Explosive Weapons
Name
Damage
Range
Radius
Armor Penetration
Action Points
Damage/AP
Dirty Grenade
15-20
6
10
6
2.9
Mangler
100
25
4
5
7
14.3
Rauhman Candle
28-36
25
6
7
7
4.6
Sabot Rocket
150
25
5
7
7
21.4
Handguns
Name
Ammo
Damage
Range
Capacity
Degree Cone Angle
Armor Penetration
Single Shot AP
Damage/AP
.38 Revolver
.38 cal
17-22
10
6
3
3
3
6.5
.38 Semi-Automatic
.38 cal
7-12
13 m.
6
1
3
3.2
.45 Peace Keeper
.45 cal
34-50
12
6
4
6
7.0
.45 Widow Maker
.45 cal
22-28
12
6
5
3
8.3
Click 17
9 mm
21-26
10
12
4
4
4
5.9
Click 19
9 mm
24-38
10
15
5
4
7.8
FFS Benetto
9 mm
20-31
14
12
3
4
6.4
Gold Engraved Derringer
.38 cal
8-9
16
2
2
3
2.8
M1911
.45 cal
50-70
12
7
7
6
10
Marakov
.38 cal
9-15
10
8
2
3
4
Midnight Special
.38 cal
7-11
10
6
2
2
4.5
Rose’s Thorn
12ga
5-13
9
1
60
1
4
2.3
Wasteland Hawk
.45 cal
30-40
12
7
6
4
8.8
All weapons have a 10% chance to apply Bleeding Wound
Heavy Weapons
Name
Ammo
Damage
Range (meters)
Capacity
Armor Penetration
Action Points
Damage/AP
Weight (lbs.)
Burst Count
Notes
Bar
5.56
15-22
22
24
4
6
18.5
18
6
Big Betty
7.62
10-20
24
100
4
6
15.0
18
6
Trade Magee a gun for this
Bren
5.56
9-14
20
36
3
5
11.5
17
5
M2
5.56
4-7
22
30
2
6
7.3
16
6
M60
7.62
15-24
24
100
5
5
19.5
19
5
Minigun
7.62
22-30
24
200
7
7
29.7
30
6
SAW
7.62
17-25
24
100
6
8
15.8
22
6
The 3
7.62
9-18
18
204
6
6
20.3
36
9
All weapons have a 10% chance to apply Bleeding Wound, except “The 3” which has a 9% chance
Shotguns
Name
Damage
Range
Capacity
Degree Cone Angle
Armor Penetration
Single Shot AP
Single Shot Damage
Burst Shot Count
Burst Shot AP
Burst Shot Damage
Coach Gun
21-28
12
2
20
2
5
4.9
Hoblet’s Problem Solver
27-32
13
2
30
4
3
9.8
2
4
14.8
Jackhammer
45-60
13
10
45
6
6
26.3
Lever Action
18-34
10
5
30
2
5
5.2
M-37 Pump Action
21-28
12
6
30
3
4
6.1
Mississippi Mule
10-14
9
8
70
2
2
5
4.8/AP
Over Under
28-35
13
2
30
4
3
10.5
2
4
15.8
Pump Shotgun
14-18
12
7
30
1
5
3.2
Sawed Off Shotgun
13-16
9
2
45
1
5
2.9/AP
2
6
4.8/AP
SOSG
19-30
14
12
35
3
4
6.1
Spaz 12
55-70
13
9
30
6
5
12.5
3
8
23.4
Street Cleaner
20-37
13
20
40
4
4
7.1
Tactical Shotgun
33-48
13
7
25
5
4
10.1
The Holdup
24-35
13
5
30
5
3
9.8
The Roach
20-26
8
12
35
3
5
4.6
All weapons have a 10% chance to apply Bleeding Wound except Mississippi Mule which has a 15% chance
In addition, The Roach has a -10% Chance to Evade modifier
Sniper Rifles
Name
Ammo
Damage
Range
Capacity
Armor Penetration
Single Shot AP
Damage/AP
Weight (lbs)
.50 Anti-Material Rifle
.50
110-140
40
20
10
7
17.9
25
Arctic Sniper
7.62
50-64
36
5
9
6
9.5
11
Bullpup
.30-06
35-40
23
6
5
5
8
9
G43-W
.30-06
24-32
30
5
4
6
4.7
9
Hunting Rifle
.30-06
12-18
28
5
3
2
2.1
Karibiner
.30-06
20-30
24
10
4
5
5.0
10
M40
.30-06
17-21
32
7
3
6
3.2
8
PSG1
7.62
50-60
36
10
10
6
9.2
9
SVD
7.62
40-70
34
10
9
5
11
12
SV-V
7.62
40-56
32
10
6
6
8
10
The Dragoon
.50
140
46
1
10
8
17.5
22
All weapons have a 10% chance to apply Bleeding Wound
Submachine Guns
Name
Ammo
Damage
Range
Capacity
Armor Penetration
Burst Shot AP
Damage/AP
Burst Shot AP (x6)
Damage/AP (x6)
Notes
AR-Short .45
.45 cal
24-32
16
30
6
5
16.8
8
17.5
x3/x5
Bad Attitude
.38 cal
8-10
12
30
2
5
5.4
Burst is three shots; Modifiers: -1 Smart Ass, +1 Hard Ass, -1 Charisma
Greaser
.38 cal
8-11
12
30
2
5
5.7
Burst is three shots
Mac 17
.45 cal
12-21
15
30
3
6
13.8
Mark 27
.38 cal
5-8
14
32
2
4
4.9
Burst is three shots
Mark II Sven
.38 cal
6-7
16
32
2
4
4.9
Burst is three shots
MP5
9mm
17-31
11
30
5
5
14.4
6
20.0
Burst is three shots, extended burst is 5 shots
MP5k
9 mm
11-15
12
30
5
3
13
4
16.3
Burst is three shots, extended burst is 5 shots
PP-81
.38 cal
8-12
13
34
2
5
8.0
Burst is four shots
Psoz, Mark II
.38 cal
16-19
10
20
2
5
10.5
Burst is three shots
Skorpion
.38 cal
6-11
15
20
2
4
6.4
Burst is three shots
TMP9
9 mm
13-22
13
20
4
5
14
7
17.5
Burst is four shots, extended burst is 7 shots
Tommy Gun
.45 cal
14-19
15
50
4
5
16.5
7
18.9
Burst is x5/x8
UMP
.45 cal
13-17
13
30
6
4
11.3
6
17.5
x3/x7
Uzi
9 mm
16-23
11
30
3
5
11.7
7
16.7
3x/6x
All weapons have a 10% chance to apply Bleeding Wound
Weapon Modifications
Name
Usable On
Modifiers
Requires Weaponsmithing
Type
Flash Suppressor
Pistols, SMGs, Assault Rifles, Sniper Rifles
+12% Chance to Hit
8
Barrel
Full Choke
Shotguns
-10 Cone Angle; +4m. Maximum Range
4
Choke
Grand Slam Weight
Melee Weapons
-10% Chance to Hit; +15% Critical Chance
8
Weights
Grip Tape
Melee Weapons
-1 Attack AP
1
Grip
Heavy Weights
Melee Weapons
+8% Critical Chance
6
Weights
High Capacity Mag
Pistols, SMGs, Assault Rifles, Sniper Rifles
-2% Chance to Jam; +4 Capcity
4
Magazine
High Powered Scope
Revolvers, Assualt Rifles, Sniper Rifles, Energy Weapons
+7m. Maximum Range
5
Scope
Improved Choke
Shotguns
-5 Cone Angle; +2m. Maximum Range
6
Choke
Laser Sight
Revolvers, Pistols, SMGs, Assault Rifles, Sniper Rifles, Energy Weapons
+15% Chance to Hit
7
Under Barrel
Leather Grip
Melee Weapons
-1 Attack AP; +2% Chance to Hit
5
Grip
Light Weights
Melee Weapons
+6% Chance to Hit
4
Weights
Long Barrel
Pistols, SMGs, Assault Rifles, Sniper Rifles
+6m. Maximum Range; +5m. Optimal Range; +6% Chance to Hit
4
Barrel
Open Choke
Shotguns
+10 Cone Angle; -4m Maximum Range
1
Choke
Quick Mag
Pistols, SMGs, Assault Rifles, Sniper Rifles
-3% Chance to Jam; -1 Reload AP
7
Magazine
Short Barrel
Pistols, SMGs, Assault Rifles, Sniper Rifles
-4m. Maximum Range; -2m. Optimal Range; +4% Chance to Hit
2
Barrel
Small Scope
Revolvers, Assualt Rifles, Sniper Rifles, Energy Weapons
+3m. Maxium Range
3
Scope
Sturdy Mag
Pistols, SMGs, Assault Rifles, Sniper Rifles
-4% Chance to Jam
1
Magazine
Suppressor
Pistols, SMGs, Assault Rifles, Sniper Rifles
+5% Critical Chance; -90% Noise Radius Modifier
6
Barrel
Tactical Scope
Revolvers, Assualt Rifles, Sniper Rifles, Energy Weapons
+8m. Maximum Range, +6m. Optimal Range
7
Scope
Underbarrel Flashlight
Revolvers, Pistols, SMGs, Assault Rifles, Sniper Rifles, Energy Weapons
+4% Chance to Hit
3
Under Barrel
