Overview
A guide on how to install and start a Half-Life 2: Deathmatch Dedicated server.
Downloading SteamCMD | Скачивание SteamCMD
ENG
Server location:
The first thing you want to do is create a folder where your server will be located. I would personally do something easy like creating a folder called “hl2dmserver” on my Desktop for example.
Setting up SteamCMD:
1. Now you need to download SteamCMD from valves website, which can be found here.
2. Once downloaded make a new folder for steamcmd, and extract SteamCMD in there.
It should now look like this:

3. Now start SteamCMD and wait until it finishes updating, while it’s updating it should be creating new folders and files in the directory you created.
Once SteamCMD is done it should look like this:
RUS
Расположение сервера:
Для начала вам следует создать папку с расположением сервера. Я же создам абсолютно нейтрально-названную папку “hl2dmserver” на своём рабочем столе, для примера.
Установка SteamCMD:
1. Теперь вам нужно скачать SteamCMD с сайта Valve, найти который можно здесь .
2. Скачали? сделайте новую папку для steamcmd, и разархивируйте его в неё.
В итоге выйдет что-то подобное:
3. Запускайте SteamCMD. Он создаст нужную ему ерунду и, возможно, обновится. Просто ждите.
Когда SteamCMD закончит со своими прелюдиями это будет выглядеть так:
Downloading the server | Скачивание Сервера
ENG
Now in SteamCMD type the following commands:
login anonymous
Wait for it to login
force_install_dir (full path to where you want to install the server)
( for me that would be: force_install_dir C:UsersideboDesktophl2dmserver )
app_update 232370 validate
This will download the hl2dm server.
exit
This will close SteamCMD
Now everything is downloaded, your server folder should look like this:
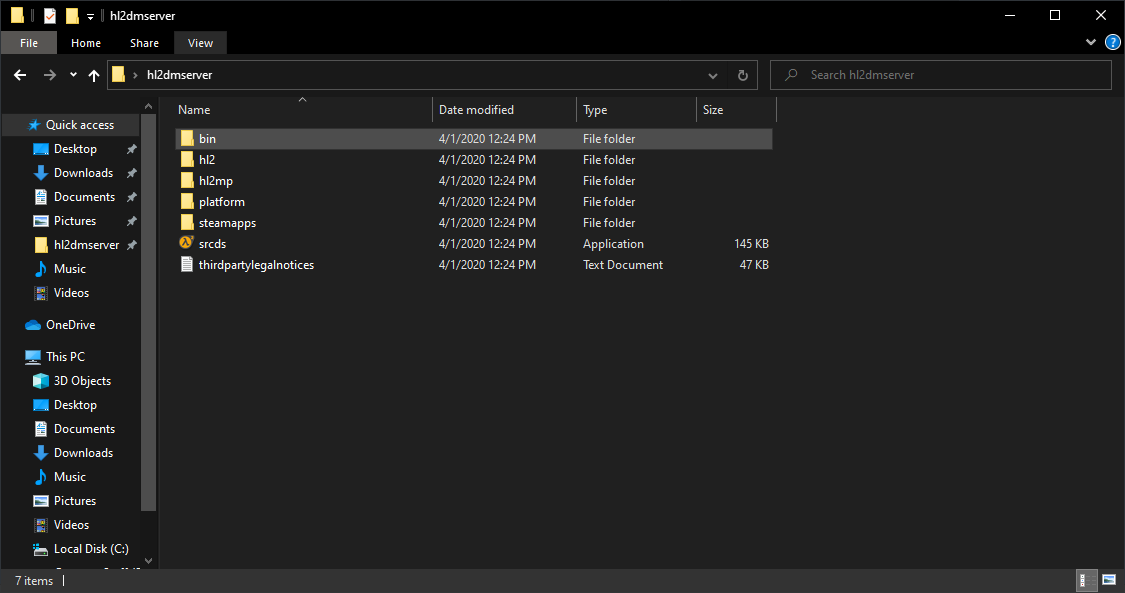
RUS
Вводим следующие команды в консольку SteamCMD:
login anonymous
Ожидай пока консоль залогинится
force_install_dir (ПОЛНЫЙ путь к месту где у тебя будет сервак)
( Для меня это как-то так: force_install_dir C:UsersideboDesktophl2dmserver )
app_update 232370 validate
Это скачает hl2dm сервер.
exit
Закрываем SteamCMD
После всех команд и скачиваний получаем вот это:
Server Config | Конфиг Сервера
ENG
The server config is not included in the download, so you’ll have to add it yourself. Go to hl2mpcfg, in here create a new file called “server” with the extension “cfg”, which will make: server.cfg.
Then copy all of this code into the file:
// HL2MP Server Config file // mostly the default settings with rate limits set to prevent massive lag // put this file (server.cfg) in the cfg folder (this file is for HL2DM SRCDS servers only) // qUiCkSiLvEr hostname “Half-Life 2 DeathMatch!” sv_hl2mp_weapon_respawn_time 20 sv_hl2mp_item_respawn_time 30 // set to 1 if this is a teamplay server mp_teamplay 1 // allow or disallow damage from teammates mp_friendlyfire 0 // how much damage is inflicted from falls, default 0 mp_falldamage 0 // set to 1 if weapons stay (immediate pickup by players without weapons) // requires that there be additional ammo (can’t pick up a weapon to get more ammo) mp_weaponstay 0 // set to force players to respawn after death mp_forcerespawn 1 // enable player footstep sounds mp_footsteps 1 // enable flashlight mp_flashlight 1 // enable autocrosshair (default is 1) mp_autocrosshair 1 // allow bots mp_allowNPCs 1 // world gravity (default 600) sv_gravity 600 // world friction (default 4) sv_friction 4 // world water friction (default 1) sv_waterfriction 1 // Minimum stopping speed when on ground sv_stopspeed 100 // spectator settings sv_noclipaccelerate 5 sv_noclipspeed 5 sv_specaccelerate 5 sv_specspeed 3 sv_specnoclip 1 // player movement acceleration rate (default 10) sv_accelerate 10 sv_airaccelerate 10 sv_wateraccelerate 10 // max player speed (default 320) sv_maxspeed 320 // misc physics settings, leave them as-is sv_rollspeed 200 sv_rollangle 0 sv_bounce 0 // player stepsize – dont mess with this (default 18) sv_stepsize 18 // misc default vehicle settings (leave these alone) //r_VehicleViewDampen 1 //r_JeepViewDampenFreq 7.0 //r_JeepViewDampenDamp 1.0 //r_JeepViewZHeight 10.0 //r_AirboatViewDampenFreq 7.0 //r_AirboatViewDampenDamp 1.0 //r_AirboatViewZHeight 0.0 // teamplay talk all (1) or team only (0) sv_alltalk 1 // enable voice on server sv_voiceenable 1 // disable pause on server (set this to 0 always) sv_pausable 0 // disable cheats (set this to 0 always) sv_cheats 0 // teamserver coop (default 0) coop 0 // deathmatch – set this to 1 deathmatch 1 // allow players to upload sprays (default 1) sv_allowupload 1 // allow sprays and map content to be downloaded (default 1) sv_allowdownload 1 // how often players can spray tags (default 20) decalfrequency 20 // fast http download url address //sv_downloadurl // Enable instanced baselines – Saves network overhead sv_instancebaselines 0 //Force server side preloading (default 0) sv_forcepreload 1 // set fraglimit before mapchange mp_fraglimit 30 // set timelimit before map change mp_timelimit 30 // Max bandwidth rate allowed on server, 0 == unlimited sv_maxrate 9999 // Min bandwidth rate allowed on server, 0 == unlimited sv_minrate 5000 // Maximum updates per second that the server will allow (default 60) sv_maxupdaterate 30 // Minimum updates per second that the server will allow (default 10) sv_minupdaterate 10 // Maximum lag compensation in seconds (default 1) sv_maxunlag 1 // explosion size (default 1) sv_robust_explosions 0 // Maximum speed any ballistically moving object is allowed to attain per axis (default 3500) sv_maxvelocity 3000 // rcon failure settings sv_rcon_banpenalty 0 sv_rcon_maxfailures 10 sv_rcon_minfailures 5 sv_rcon_minfailuretime 30 //The region of the world to report this server in (255 = world) sv_region 255 // gather server statistics sv_stats 1 //After this many seconds without a message from a client, the client is dropped (default 65) sv_timeout 65 //Enables player lag compensation sv_unlag 1 //Specifies which voice codec DLL to use in a game. Set to the name of the DLL without the extension // miles is the only voice codec available for Source games sv_voicecodec vaudio_miles //Enables HLTV on this server // do not enable HLTV for HL2DM servers right now sv_hltv 0 //toggles whether the server allows spectator mode or not mp_allowspectators 0 // If set to 1 then Server is a lan server (no heartbeat, no authentication, no non-class C addresses, 9999.0 rate, etc. ) // set to 0 for internet server sv_lan 0 // Server contact name / url / email sv_contact “” // server password for players to join (default “”) //sv_password “” // execute SteamID based ban list // this file must be located in the cfg folder exec banned_user.cfg // execute IP based ban list // this file must be located in the cfg folder exec banned_ip.cfg // Set packet filtering by IP mode (default 1) sv_filterban 1 // log all bans in logfile sv_logbans 1 // enable logging and start log file (always last thing) sv_logfile 1 log on
You can change this file to make changes to the server, for example: sv_password will set a server password and mp_teamplay 0 will turn off teamplay.
RUS
Про конфиг тоже не забываем. Нет, его у нас ещё нет. Идём в hl2mpcfg, и делаем файл “server” с расширением “cfg”, и получаем: server.cfg.
Копируем всё, что ниже и вставляем в свой кфг:
// HL2MP Сервер. Конфиг-Файл // В основном тут стандартные настройки // Засунь этот файл (server.cfg) в папку cfg (Этот файл только для HL2DM SRCDS серверов) // qUiCkSiLvEr hostname “Half-Life 2 DeathMatch !” sv_hl2mp_weapon_respawn_time 20 sv_hl2mp_item_respawn_time 30 // Тимплей сервер? Оставь 1. Нет? – 0 mp_teamplay 1 // Френдли фаер mp_friendlyfire 0 // Урон от падения mp_falldamage 0 // Бесконечное оружие // (Именно оружие, не патроны!) mp_weaponstay 0 // Убирает задержку при респауне mp_forcerespawn 1 // Звук шагов mp_footsteps 1 // Включает фонарик mp_flashlight 1 // Включает Autocrosshair mp_autocrosshair 1 // Разрешает ботов mp_allowNPCs 1 // Гравитация (дефолт – 600) sv_gravity 600 // Friction мира (default 4) sv_friction 4 // Friction воды (default 1) sv_waterfriction 1 // Скорость остановки на земле sv_stopspeed 100 // Настройки наблюдателя sv_noclipaccelerate 5 sv_noclipspeed 5 sv_specaccelerate 5 sv_specspeed 3 sv_specnoclip 1 // Ускорение игрока (дефолт – 10) sv_accelerate 10 sv_airaccelerate 10 sv_wateraccelerate 10 // Скорость игрока (дефолт – 320) sv_maxspeed 320 // Ерунда с физикой, не лезьте сюда sv_rollspeed 200 sv_rollangle 0 sv_bounce 0 // Размер шага игрока (при высоком значении игра будет считать стены на ступеньку) sv_stepsize 18 // Ерунда для машин //r_VehicleViewDampen 1 //r_JeepViewDampenFreq 7.0 //r_JeepViewDampenDamp 1.0 //r_JeepViewZHeight 10.0 //r_AirboatViewDampenFreq 7.0 //r_AirboatViewDampenDamp 1.0 //r_AirboatViewZHeight 0.0 // войсчат для всех (1) или только для команды (0) sv_alltalk 1 // Войсчат sv_voiceenable 1 // Пауза sv_pausable 0 // Читы sv_cheats 0 // Тимсервер кооп coop 0 // Режим ДМ deathmatch 1 // Кастомные спреи sv_allowupload 1 // Скачивать файлы новым игрокам? sv_allowdownload 1 // Частота рисовки спреев decalfrequency 20 // Быстрый обмен пакетами при скачивании //sv_downloadurl // Тоже что-то со скачиванием, лучше не трогать sv_instancebaselines 0 // Пред-загрузка файлов сервером sv_forcepreload 1 // Фраглимит прежде чем поменяется карта mp_fraglimit 30 // То же, но со временем mp_timelimit 30 sv_maxrate 9999 sv_minrate 5000
Installing SourceMod and MetaMod (OPTIONAL) | Установка SourceMod’а или MetaMod’a (ЕСЛИ НУЖНО)
ENG
If you want to add addons to your server or use the admin menu you’ll need to install SourceMod and MetaMod.
Installing MetaMod:
1. Download MetaMod here[www.metamodsource.net] (Download the one for windows)
2. Extract the zip file into your root folder (for me: C:UsersideboDesktophl2dmserverhl2mp)
Installing SourceMod:
1. Download SourceMod: here[www.sourcemod.net] (Again the one for windows)
2. Extract the zip file into your root folder (for me: C:UsersideboDesktophl2dmserverhl2mp)
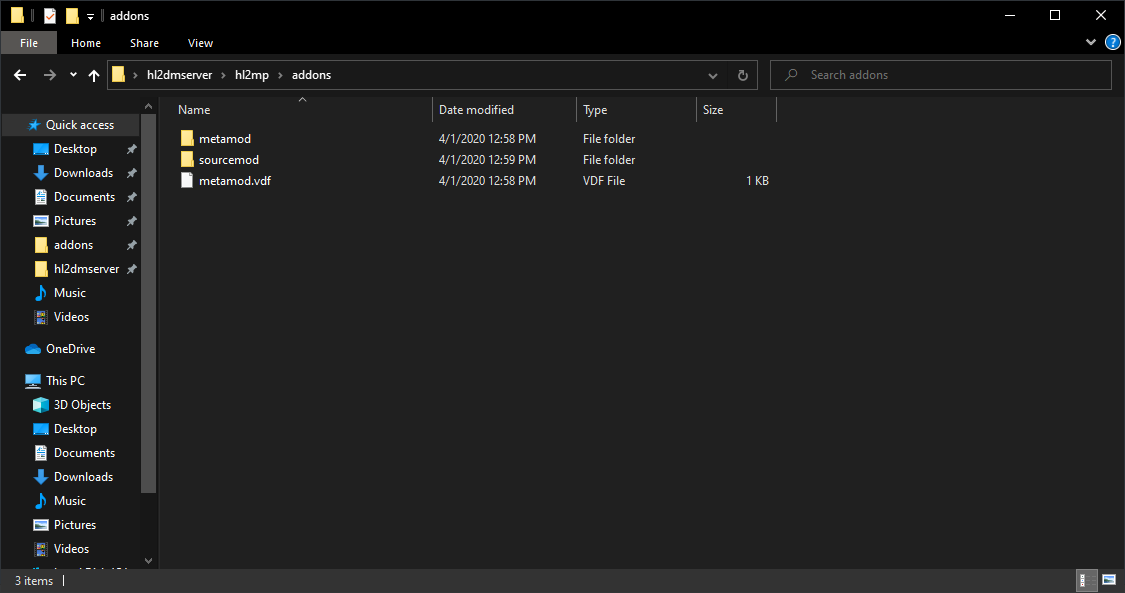
It should look something like this:
RUS
Если вам уж очень нужна админка на серверах, вам нужен СорсМод или МетаМод.
[h1Установка МетаМода:[/h1]
1. Скачайте метамод here[www.metamodsource.net] (Для Windows)
2. Распакуйте его в корень (for me: C:UsersideboDesktophl2dmserverhl2mp)
Установка сорсмода:
1. Скачайте сорсмод: here[www.sourcemod.net] (Again the one for windows)
2. Распакуйте в корень (for me: C:UsersideboDesktophl2dmserverhl2mp)
Получаем такое:
Starting your server | Запуск Сервера
ENG
To start your server you need to create a executable that starts “srcds.exe” with certain arguments.
1. Create a new file in the same folder where “srcds.exe” is called “startserver” with the extension “bat” so “startserver.bat”
2. In this file paste the following line:
start srcds.exe -console -game hl2mp -port 27015 +maxplayers 8 +exec server.cfg +map dm_overwatch exit
3. To start your server execute “startserver.bat”
RUS
Для запуска сервера создайте “srcds.exe” с такими аргументами как указано ниже.
1. Создайте новый файл в той же папке что и “srcds.exe” который назван “startserver” с расширением “bat” (“startserver.bat”)
2.В файл вставьте эту строчку:
start srcds.exe -console -game hl2mp -port 27015 +maxplayers 8 +exec server.cfg +map dm_overwatch exit
3. Запустите “startserver.bat”
Port forwarding | Открытие Портов
ENG
To allow other people join your server you have to open a port on your router to allow hl2dm internet traffic to pass trough.
This is relatively simple depending on your router.
1. Open your routers web interface in your browser
2. Search for the port forwarding page
3. Type your IPv4 address and the game port: 27015, both UDP and TCP
4. Now press enter and save the settings.
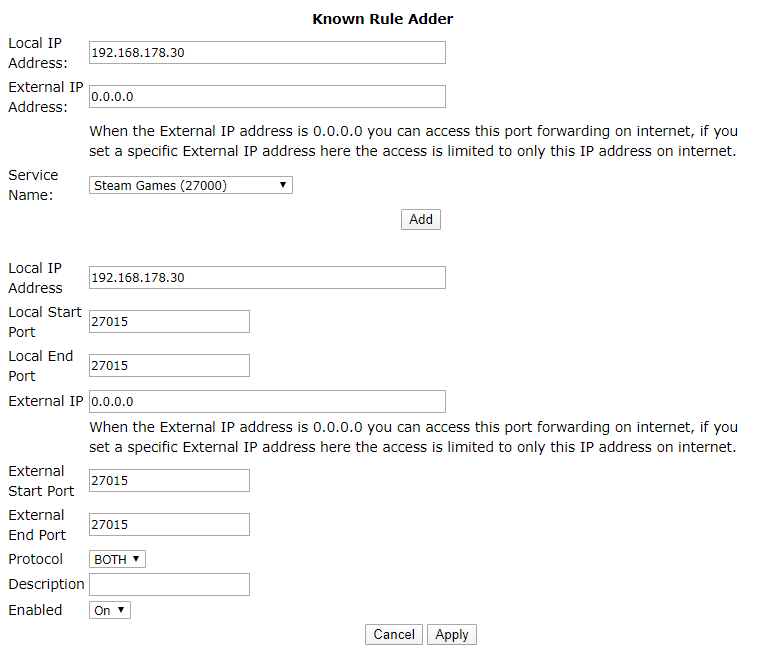
For me it looks something like this:
RUS
Чтобы позволить людям зайти на ваш сервер, вам понадобится открыть порты для трафика.
! Для каждого провайдера или роутера свой способ, нагуглите эту информацию !
В моём же случае это делается так:
1. Открываем веб-интерфейс роутера в браузере
2. Ищем вкладку с портами
3. Вводим свой IPv4 и порт 27015, обо UDP и TCP
4. Сохраняем настройки.
Получаем это:
Contributions
Thanks to Charmander for translating this guide to Russian 🙂
![Half-Life 2: Deathmatch Dedicated Server Installation Guide [ENG/RUS] for Half-Life 2: Deathmatch](https://steamsolo.com/wp-content/uploads/2021/07/half-life-2-deathmatch-dedicated-server-installation-guide-eng-rus-half-life-2-deathmatch.jpg)