
Overview
This guide will show info information on Half Life’s leaked alpha from 1997.
Downloading the CD.
To download the CD itself, click here.
Background of Valve.
OVERVIEW:
Valve was founded in 1996 by Gabe Newell and Mike Harrington who, after a combined 22 years of making the world more productive, decided to make the world more fun. In the ensuing months, Valve licensed the Quake engine from id Software, signed a publishing deal with Sierra On-Line and hired a staff of 20, all of whom have equity in the company. Members of the Valve staff come from Florida, Virginia, California, Washington, and New York, and the countries of Texas, Canada and England. They collectively define sunlight as “that which makes a computer monitor difficult to see” and free time as “when we get to play games instead of making them.” Valve is based in Kirkland, Washington.
PRODUCTS:
Valve’s debut game release, Half-Life, will be published and distributed by Sierra On-Line in November 1997. Valve has a second unannounced game in development.
ABOUT THE VALVE TEAM:
Gabe Newell
Founder/Managing Director
Gabe held a number of positions in the Systems, Applications, and Advanced Technology divisions during his 13 years at Microsoft. His responsibilities included running program management for the first two releases of Windows, starting the company’s multimedia division, and, most recently, leading the company’s efforts on the Information Highway PC. His most significant contribution to Half-Life was his statement “C’mon, people, you can’t show the player a really big bomb and not let them blow it up.”
Mike Harrington
Founder/Director of Development
Mike’s development career began at Dynamix, where he worked on a variety of sports titles for GameStar/ Activision. He spent the last nine years at Microsoft working as a developer or lead developer on OS/2, Windows NT and Microsoft Bob v1 and as a development manager on Microsoft Bob v2 and Microsoft News Viewer. Mike was pleased to learn that resistance is not, in fact, futile.
Harry E. Teasley III
Game Designer/Level Designer/Artist
Harry came to Valve from Shiny Entertainment, where he was working on the upcoming game Wild 9’s. Prior to Shiny, Harry was at Williams Entertainment where he was lead artist and designer for PlayStation Doom, and was lead designer for Doom64. Before Williams, Harry worked with Sid Meier at Microprose on Civilization as well as Pirates Gold, among other projects.
Chuck Jones
Illustrator/3D Artist
Chuck joins Valve from Apogee/3D Realms where he was an artist and animator for Duke Nukem 3D, Rise of the Triad, Shadow Warrior and, most recently, the Duke Nukem Plutonium Pack. Formerly a tattoo artist, Chuck tagged Jerry Cantrell of rock group Alice In Chains long before he created the space aliens who invaded Los Angeles.
Ted Backman
Art Director/Conceptual Artist/Illustrator/Animator
Ted has been a freelance artist and animator in the Seattle area for the last four years. Ted developed many of the more unusual monsters for Half-Life, including the Head Crab, Mr. Friendly and Big Momma. He is also a black-belt karate instructor.
Ken Birdwell
Senior Software Development Engineer
Ken has contributed to a wide range of projects in the last 15 years. These include in-circuit emulators (CodeTap), 3D surface reconstruction (Surfgen), 3D prosthetics design tools (Shapemaker), and satellite networking (Microsoft’s Broadcast PC). He also wrote one of the first graphical shells for multiplayer on-line games for Compuserve’s Sniper. Oddly enough, Ken has a BFA from the Evergreen State University, where he studied painting, photography, and animation. Ken has designed and implemented the animation system and many other engine components for Half-Life.
Ben Morris
Tools Architect
Ben is the creator of DCK (Doom Construction Kit) and WorldCraft, the definitive Doom and Quake level creation tools. He is currently developing tool-kits for our in-house designers as well as for third party use and general release.
Gregg Coomer
Game Designer/Art Director
Gregg has worked on a variety of graphic design, multimedia, and web projects for Nintendo and Microsoft. Resident art-boy, he’ll critique your shoes, interior decoration, and interface design, in that order. His secret dream is to create a game called ‘Aksidenz Grotesk’. You know, for kids.
Kelly Bailey
Senior Software Development Engineer/Musician
Kelly, formerly a product unit manager at Microsoft, has a programming background that includes consumer multimedia, database engines, and networking. He created all of the music and sound effects for Half-Life. He is also lead singer for a Seattle band, Lucy’s Fishing Trip, and, therefore, shaves less than the rest of the staff.
Dario Casali
Level Designer
Joining Valve from England, Dario is a world-famous level designer. His work includes some of the most popular deathmatch levels on the Internet, as well as Final Doom, published by id Software.
Steve Bond
Game Designer/Engineer
Having made the great trek westward from Fort Walton Beach, Florida, Steve is responsible for much of Half-Life’s sophisticated monster and entity behaviors, of which the squad-level AI is his favorite. Steve worked with John Guthrie on several projects that demonstrated the power and flexibility of the QuakeC development environment, which caught John Carmack’s attention, who in turn referred him to us. Before that, Steve worked at a local Internet service provider and delivered pizza, a fact that we rarely let him forget, even in his corporate bio.
John Guthrie
Game and Level Designer
Along with Steve Bond, John started the influential and popular Internet gaming site, Quake Command. John was also the co-creator of Quake Airplane and Quake Kart. Today, he occupies Valve’s darkest office, where he is hard at work constructing the chambers and corridors of Half-Life’s treacherous missile base and underground train system.
Karl Deckard
Game Designer/Animator
Karl comes to Valve by way of Nintendo, where he was responsible for graphic design and production on Nintendo Power Magazine and several player’s guides, including Killer Instinct, Yoshi’s Island, and Super Mario RPG. His thorough familiarity with paper-based role-playing games, wargames, and CCGs, combined with his knowledge of PC and console video games mark him as Valve’s quintessential game fanatic.
Brett Johnson
Level Designer/Composer
Brett’s craftsmanship as a musician is matched only by his ability to create traps which snare, snag and frag unwary explorers in 3D environments. Valve lured Brett mid-way through his final year at Rensselaer Polytechnic Institute and a promising career in biochemistry. A hard-assed New Yorker, Brett continues to deny Seattle’s claim to being the birthplace of espresso.
Karen Laur
Illustrator/Texture-Maker/Artist at Large
Karen has contributed to Starwave Corporation’s Castle Infinty and Eastwood, and Activision’s Zork Nemesis. She was the sole creator of Materia Prima, a texture collection published by the Valis Group, and was head designer for Maya Romanoff, a prestigious producer of hand-made wallpaper. Karen was also owner/operator of the Washington DC restaurant, Dante’s.
Randy Lundeen
Level Designer/Graphic Designer
Randy comes to Valve by way of Microsoft, where he worked as an interface designer for the Internet Gaming Zone. Randy designs some of the most unusual and original levels in the company; he also is the most likely person to be pushing the polygon and memory limits of our engine. In his distant past, he was a key staff member at a potato processing plant (his responsibilities including peeling and potato quality oversite).
Duncan
Game/Level Designer
Duncan refuses to tell us his first name. We have suggested “Monty.” Duncan is a genuine sociopath who has collected more ears in Diablo than anyone else in the company.
Dave Riller
Level Designer
Prior to joining Valve, Dave was an active developer in the on-line Quake community, and worked with id Software on the deployment of Quake World. For his day job, Dave was a program designer/analyst at MSI,
Alpha notes.
Half-Life Alpha Notes
Contents of this CD:
Drivers and Tools – a variety of drivers (latest DirectX, Righteous 3D drivers we know work, etc…). The one most likely to be of use is the Glide 2.31 runtime, which many people don’t have. Install this, and make sure glide2x.dll is in your Windows system directory. About 80% of the time if someone can’t get the GL version of Half-Life to run, this is the problem.
Half-Life – this directory contains all the files for actually running Half-Life and Worldcraft
Half-Life Links – an HTML file of the known on-line resources for Half-Life (excluding Sierra and Valve)
Materials –screenshots, white papers, the E3 movie, etc…
Walkthrough – contains a document describing how to walk through a couple of the included levels
You can run Half-Life by running the supplied batch files (Half-Life.bat and Half-Life GL.bat), which will launch you into the demonstration rooms from E3, or you can run engine.exe and enginegl.exe, which will leave you at the console. See below for some useful commands you can use from the console.
The GL version of the batch file tries to set up appropriate 3DFX variables for performance and quality before launching enginegl (if you aren’t using a 3DFX card for your OpenGL accelerator, these won’t do anything). You can have arguments to the engine (like +exec gaben.cfg or +map c1a3) that are just console comands with a “+” in front of them. For example, Half-Life GL.bat should have a line like “enginegl +map techdemo +exec gaben.cfg –width 640” in it. The –width 640 is unnecessary and just is overkill to make sure the engine runs in 640 by 480 mode.
By default, the batch files exec a file, gaben.cfg, in addition to the default, autoexec, and config.cfg files. All CFG files are text files. You can create your own configurations and run them either by replacing the line “+exec gaben.cfg” in the batch files, or by typing “exec <yourname.cfg>” at the console.
GABEN.CFG settings:
~ – brings up the console and makes it go away
escape – brings up the menu system
e – go forward
d – go backward
s – strafe left
f – strafe right
mouse movement turns you up and down and left and right
space bar – jump
control – crouch
b – use (good for opening drawers and fuse closets)
q – toggles invulnerability
r – toggles invisibility
z – make gun visible
x – make gun invisible (useful for screen shots)
n – noclip (lets you move around without touching anything)
h – makes everything really bright (called fullbright)
j – turns off fullbright
l – toggles the trace lines in the grunt room so you can see the AI
key 1 – toggles your flashlight
keys 2,4 – this followed by a click of the left mouse button is how you select weapons
keys 5-0 – make various noises so you can show off the DSP effects
backspace – stops the CD from playing
mouse button 1 – fires your weapon (or selects it if you’ve typed 2 or 4)
mouse button 2 – uses your weapons secondary attack (only on machine gun now)
mouse button 3 – spray paints the Half-Life logo on the wall
keys F1- F11 – play songs off of the CD
key F12 – takes a snapshot of the screen and saves it to your Half-Life directory
tab – slow motion
shift – normal motion
If you bring up the console by typing ~ (the console is the thing that looks like command.com), you have some other useful commands:
restart – restarts the level
maps – lists all the maps in the valvemaps directory
map techdemo – takes you to the very beginning of the E3 demonstration
map maindemo – takes you to the doors right outside the room with the seal on the floor
map silodemo – puts you in the room out in front of the green tentacle monster
map c1a3 – map with a bunch of grunts and the fan puzzle
quit – good for escaping the occasional ugly situation
bind keyname “console command” – binds the key to the console command in quotes
playdemo <demfile> – there are a number of *.dem files you can run to see recordings of game action, such as c1a1, dem1, etc…
vid_describemodes – lists all of the modes Half-Life can run on your machine
vid_mode <modenumber> – switches to that video mode
You can also change the configuration of keys by being in the game and hitting the Esc key, which brings up the user menus. One of the menus is Options, and you can look in their to change which keys do what. This behaves pretty much the same way Quake type games do, so it should be familiar.
Valve identity


Screenshots
WORLDCRAFT:
Valve used the Worldcraft sofware to design levels. They eventually tweaked it, renamed it to Valve Hammer, and released it to the public for free. The screenshots however are bitmap so I converted one of them to JPEG format.

SKELETAL SYSTEM:
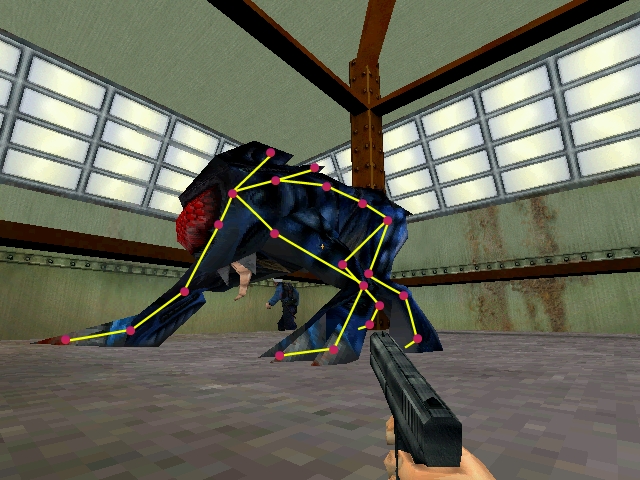
Half-Life’s Skeletal Animation System
===========================
One of the key technology advances over other action games that Half-Life possesses is its skeletal animation system. The basic characteristic of a skeletal animation system is that rather than storing a discrete set of polygonal meshes for each key frame of animation, the skeletal animation system works by moving the bones within a monster and deforming a mesh and texture map around the resulting skeleton.
There are a number of critical advantages this gives an animator in building much more interesting and complex monsters. First, all character motions and bone positions are interpolated to precisely the point in the frame that the engine is currently rendering. This results in much smoother animation than you would see in typical action games which are using a quite jerky 10 frame per second mesh playback rate regardless of how fast your PC is capable of rendering the scene. For example, Chuck was limited to a 4 frame walk in Duke Nukem, but with a reasonable PC running Half-Life, he will see as many as 80 frames in a single walk cycle.
Second, because of the algorithms used in our skeletal animation system, we can get much higher polygon counts out of our monsters. Basically the processing bottle-necks switch from being mesh based to being bone and pixel based. Specifically, the most complicated creature in Quake was about 500 polygons, while with Half-Life we already have creatures with over 6000 polygons.
Third, skeletal based animations are much more compact than animations used in other actiong games. This makes sense becaue rather than storing all of the mesh and vertex information for each key frame, you only have to store positioning information for the bones themselves. This means that you can have around 10 times as many animations and still use the same amount of memory. In terms of the game, we can now afford to have a tremendous number of animations for each monster without asking the user to put a zillion MBs of RAM into their machine – for example we have different animations for each character in the game if you shoot them from the front, from the left, from the right, and from behind.
Fourth, skeletal animation makes it possible to correctly animate characters. The faster the character runs, the faster the legs moved. Hands reaching out to ladder rungs will reach a correct distance and will also move at a correct speed as the player speed varies.
Fifth, the skeletal system allows us to have removable and switchable body parts. This allows for weapon changes, or the ability to damage monster geometry (“It’s only a flesh wound.”)
The last advantage is that by having a skeletal system, we have the ability to use compound animations. What this means is that rather than having a fixed set of animations, we can build animations
Videos
I uploaded all AVI files to YouTube however are not public.
Trailer:
Grunts demonstrations:
Other trailer:
Drivers and Tools
Here is a list of all the Drivers and Tools you can get from the CD.
The engine of Half-Life itself.
GoldSrc (also known as Goldsource) was a game engine used internally by Valve Corporation. It was a heavily modified Quake engine that debuted with the release of their science fiction first-person shooter video game Half-Life. The engine also powered future titles developed by or with oversight from Valve, including Half-Life’s expansions, Day of Defeat, and multiple titles in the Counter-Strike series.
Development:
The basis of GoldSrc is the engine used in the video game Quake, albeit with heavy modification by Valve Corporation, at the time called Valve Software. While the engine served as the basis for GoldSrc, Gabe Newell has stated that a majority of the code used in the engine was created by Valve themselves, not taken from Quake. GoldSrc’s artificial intelligence systems, for example, were essentially made from scratch.[1] The engine also reuses code from other games in the Quake series, including QuakeWorld, and Quake II, but this reuse is minimal in comparison to that of the original Quake.[2] In 1997, Valve hired Ben Morris and acquired Worldcraft, a tool for creating custom Quake maps.[3] The tool was later renamed to Valve Hammer Editor and became the official mapping tool for GoldSrc.
Prior to the creation of the Source engine, the GoldSrc engine had no real title and was simply called “The Half-Life engine”. Once Source was created, Valve forked the code from the Half-Life engine to make the Source engine. This created two main engine branches, each used for different purposes. One was titled “GoldSrc”, and the other “Src”. Internally, any games using the first variant were referred to as “Goldsource” in order to differentiate the two branches. Eventually, it became something of a moniker for the engine and was adopted as the official title externally.[4]
Valve Corporation released versions of the GoldSrc engine for OS X and Linux in 2013, eventually porting all of their first-party titles utilizing the engine to the platforms by the end of the year.[5][6]
Games using GoldSrc[:
Half-Life series:
Half-Life was the debut title of both GoldSrc and Valve Corporation. It went on to receive critical acclaim, winning over fifty PC Game of the Year awards.[7] The game was followed up with two expansions, Half-Life: Opposing Force and Half-Life: Blue Shift, both of which ran GoldSrc and were developed by Gearbox Software.[8][9] Half-Life: Decay, an expansion pack for Half-Life only released on PlayStation 2, was released in 2001 alongside Half-Life’s debut on the platform.[10] Unlike other games in the series, it never received an official version for Windows, however an unofficial version of the game was released by independent developers in 2008.[11][12][13] Half-Life: Decay was the final iteration in the Half-Life series to run on GoldSrc, with Half-Life 2 and all titles succeeding it running on the Source engine.[14]
Other Valve Corporation titles:
Valve developed a number of titles using the GoldSrc engine, many of which were based on original user-made modifications of Half-Life. Team Fortress Classic, released officially by Valve Corporation in 1999, was one of such games (based on an older Quake mod, Team Fortress). Counter-Strike, Ricochet, and Day of Defeat were also originally modifications, the rights to which were purchased by Valve.[15][16] Counter-Strike evolved into its own series with the release of Counter-Strike: Condition Zero in 2004, and while Counter-Strike: Source ran on the Source engine, further games in the series still used GoldSrc.[17] Counter-Strike Neo, Counter-Strike Online, and Counter-Strike Nexon: Zombies, released in 2005, 2008, and 2014 respectively, utilized GoldSrc as their basis, despite the development of the Source engine having been completed and the first version released.
Third-party titles and modifications:
See also: List of GoldSrc engine mods
The GoldSrc engine was also used for a variety of third-party titles and modifications not directly developed by Valve Corporation. Rewolf Software used the engine for the game Gunman Chronicles in 2000, and James Bond 007: Nightfire was developed by Gearbox Software using a modified version of GoldSrc in 2002.[18][19][20]
Unofficial, community-made modifications of GoldSrc were also produced. Notable titles include Natural Selection, Cry of Fear and Sven Co-op , with Valve’s Team Fortress Classic, Counter-Strike, and Day of Defeat all being based on GoldSrc mods of the same names. Sven Co-op is now available as a standalone game for free on Steam.
New technologies of GoldSrc.
New Technologies Behind Half-Life
The next step in the evolution of 3D first-person action games, Half-Life combines the most advanced, proprietary technology with genre-breaking gameplay elements.
Improved rendering technologies using 16-bit color
One of the most noticeable limitations of first-person shooters has been their 8 bits per pixel (bpp) color quality. The result is monotonous, unrealistic lighting and color that adds little to the gaming experience. And, even though an accelerator can improve the appearance of 8-bit games, they cannot expand an 8-bit game’s color palette beyond the original 256 colors.
Half-Life is engineered in 16-bit color, which expands the available palette to 65,535 colors. And, with support for graphics acceleration, Half-Life lets those with advanced hardware see over 16 million colors. The result is greatly enhanced realism and visual richness. Specifically, 16-bit color makes the following innovations possible:
Realistic lighting, translucency, and blurring Thanks to those 65,535 colors per image, Half-Life engineers can blend light and color in innumerable ways to get a variety of effects. Examples include smoke, metallic surfaces, translucent water and energy beams—even force fields that can fade in and out. Different colored lights from different sources will blend properly as they pool on a floor or wall. And because these features are implemented in software, they can be made an integral part of the gameplay experience, not just a visual treat for those with advanced hardware accelerators.
Dynamically changing surfaces Surfaces in Half-Life are dynamic—they can change over time or as the player interacts with them. Damp walls may grow mossy, water will ripple as the player moves through it, and hard surfaces will retain the scars of a previous firefight.
Non-organic monsters With realistic surfaces, monsters aren’t limited to being organic creatures. They can evolve into hybrids of flesh and metal, for example. The realism of the reflections can provide useful feedback to a player, too, such as whether that monster’s metal breastplate is made of penetrable aluminum or impermeable steel.
Improved technologies for monsters: skeletal animation
Hand-in-glove with a demand for realistic lighting and color effects is a desire for monsters that look and move as realistically as possible. To accomplish this goal, the engineers at Valve have created a skeletal animation system for monsters. Rather than store a discrete set of polygonal meshes for each key frame of animation, as traditional action games do, the skeletal system moves the “bones” within a monster and deforms a mesh and texture map around them.
There are a number of advantages this gives Half-Life animators as they build more compelling and complex monsters:
Smoother and richer animation Half-Life players will see much smoother animation than in typical action games. While both sprite- and mesh-based animation systems are based on a fixed keyframe animation rate, which is typically targeted at the lowest common denominator system, Half-Life’s skeletal animation system does not limit the number of frames in an animation. For instance, a typical walk cycle may have as many as 80 frames in Half-Life, as compared to only 4 in some sprite-based games.
6000+ polygon monsters With Valve’s new skeletal system, monsters can be much more complex than ever before—without affecting performance. Half-Life will have monsters of up to 6000 polygons, compared to the 500-plygon monsters in traditional mesh-based games..
Anatomically correct motion Through skeletal animation, motion can become more realistic and natural because the animation doesn’t depend on thousands of interactions of mesh vertices that are difficult to map in all permutations. The faster a character runs, for instance, the faster the legs will move.
Multiple animations, compound animations and switchable body parts Because skeletal animations are more economical, Half-Life has many different animations per creature. And, rather than have a fixed set of animations that involve a monster’s entire body, Valve can build animations of many different parts and then combine them into a whole. Monsters can turn their heads to look at the player while they are running. Troops can pull out weapons and fire while they are moving or kneeling. Compound animations also make it possible to remove or switch body parts in response to the gaming action—say, to allow for a weapons change or to show damage to a monster that’s still fighting.
Improved technologies for monsters: artificial intelligence
Valve has created a technology that imbues Half-Life monsters with tactical intelligence, multi-character cooperation, and a supreme will to live. The result is a menagerie of new creatures whose intelligence and unpredictability make them truly formidable adversaries.
Traditionally, game AI is a set of hard-coded if-then decisions for every possible situation that could confront a monster, such as, “If there is a bad guy in this room then shoot at him.” Valve took another tack, designing a module-based AI system that provides practically infinite flexibility and monster growth potential. Below are just a few of the ways that AI decision modules work together to produce unprecedented monster intelligence.
Monster behavior based on player’s actions moment by moment In Half-Life, monsters might advance only when it makes sense to. They assess how much health the player may have, where the player is heading, how many of their own kind are left in a room, and whether they have enough health themselves to fight. Such conditions and others dictate whether a monster will chase, attack, or retreat. While in other games monsters are basically suicide squads, in Half-Life monsters don’t want to die.
Squad (group) behavior Valve’s module-based AI technology also adds the new twist of squad behavior and cooperation among monsters. Adversaries can make a threat assessment, recruit others and then plan a coordinated attack against the player.
Flocking behavior Achieving realistic motion for creatures that travel in swarms, flocks, or packs is just as important as achieving it for those that move individually. To do that, Valve has crafted an innovative Flocking Behavior Model that realistically depicts the organic movement of animals such as birds and fish.
Multi-sensory monsters Half-Life monsters possess a rich and varied group of senses for detecting a player’s presence—namely, sight, hearing, and smell. For instance, some monsters can’t see at all, but locate the player by sound. Others have the ability to track the player who has moved on by using a scent trail. This forces players to rethink their tactics and weapons choices.
Improved technologies for more exciting gameplay
Valve thrusts players into a full-surround gaming environment that is its own thriving space. Half-Life has an ecology and a society. Monsters are breeding, herds are forming, and some monsters prey on others. Players are dropped into the middle of this environment and must learn from what they see. In order to survive, they must use both their weapons and their wits. Some examples of innovations that enhance the player’s gameplay experience include:
Continuous-world experience Instead of discrete levels that offer no chance of turning back, Half-Life lets players return to any space they’ve visited—though what has happened in that space in the player’s absence may be surprising
Usable vehicles and props Valve’s designers have made sure that vehicles and props aren’t merely backdrops to a story—they are tools that must be used to advance in the game. For instance, an underground train system takes players to numerous stations and allows them to backtrack. Some vehicles also contain, or can be used as, weapons to mow down monsters.
Ducking, crouching, and crawling For more realistic and varied action, Half-Life lets players duck and
Walkthrough – Part I
THE PORTAL DEVICE (C1A1):
The first map starts the player in the control room of the Portal Device. Adjacent corridors take the player through a series of laboratories and holding cells where specimens seized from the interdimensional portal have been kept for study. The player will navigate the area unarmed except for a crowbar, which he may use to pry open doors and airduct grills. Please keep in mind that this map is still in progress. Some switches have been disabled, some doors have been locked in an open position, and other temporary changes have been made to allow free exploration with a minimum of snags dead-ends. Even so, some judicious use of “noclipping” may be necessary in tight spots.
You begin in a laboratory, at the controls of an interdimensional portal. (Disaster FX still to come.) Throw the switch to get into the outer corridors. To your right is a broken airlock. You will need to duck through the broken panel and trigger the opposite door, which is also malfunctioning (a well-timed scurry is necessary to get through the far door). Beyond the broken airlock you will find a view into a room you cannot enter; it’s blocked by fallen equipment. Another door leads you down into a power room where you will find a ventilation grill on the floor (look for the violet light). Eventually these grills will be removable with a crowbar; for the moment they will slide open when you touch them. You will have to duck to enter the airduct, then toggle on your flashlight. (To bind a key for this purpose, pull down the console (~ key), and type: bind [key] “impulse 100”.) Switch the flashlight off when you are in bright areas, as it will currently slow down your framerate. Tour the ducts until you reach a dead end with a vertical shaft extending above it. At this point, if you turn to your left and jump, you will be able to scale the shaft and come out into a ceiling duct (it may be helpful to crouch as you step off the ladder. Ahead of you is another grill opening into the room with the revolving beacon. Both doors are blocked, but you can move the equipment away from one, and press on through this level. There is an airlock not far beyond, although triggering it can be tricky; you will need to activate the passcard slot, then hit the lever.
There are labs beyond this. One cannot be entered, although the door will open slightly. The other lab door opens all the way, but the floor is flooded with electrified water. Step right in and you’ll be electrocuted. You must jump from table to countertop, then switch off the lights. Now you can get through the door at the back of the lab. From here, you can circle around to the second lab and imagine the fun you’ll have with a bunsen burner and some ruptured gas tanks. For now, shooting the wall near the gas tanks will cause it to shatter. (Note that currently maps are not saved in-state; therefore, if you blast out a wall in one area and come back to it after having transitioned to another map, the wall will appear to have been restored again.)
Near a small room containing a High Voltage switch is a stairway shaft that will lead you down to a series of cages. (You can reach these cages sooner by avoiding the broken airlock outside the laboratory, and riding a large lift down to the lower level; but note that once you have stepped off the elevator and allowed the grill door to close, you will not be able to raise the grill again in this version.) Playing with the switches and levers in this area will open the cages in various combinations. You may find that if you enter certain cells, the sewer grates are movable. By jumping into the drains and ducking down, you can explore beneath the cells and reach otherwise inaccessible areas. You may have to “noclip” to get out of the drains, however. (Pull down the console by typing “~” then type “noclip”; you may also bind a key to toggle this function, following the example shown for the flashlight. Once you are in noclip mode, you can sail through walls and floors by working the mouse combined with the Alt key.)
As you explore the lower area of cells, you will discover an exit (triggered from inside the main green-lit holding room) and an emergency override switch which is accessible via one of the stairwells. Activating the emergency override will open a large door in the subbasement, and you can then proceed to the next map. (A transitional area is not currently in place; you will go directly to an elevator that opens into C1A2…)
THE OFFICE WARRENS (C1A2)
The second set of areas consists mainly of office complexes in a Cold War era style, full of shell-shocked civil servants and their scattered remains. The monsters got here ahead of you, pouring through numerous temporary dimensional rifts that gaped during the disaster. You will see offices, storage rooms, and a cafeteria with an enormous freezer. In some places it is necessary to climb onto crates and couches and then to jump; this will give access to areas above the ceiling, and permit you to get past blocked doorways.
When you begin the level, you will almost immediately encounter a locked door with a small viewing window beside it. The door is sealed, but if you shoot out the wiremesh glass, you can pass through the window. You will need to use a combined jump and crouch move to get through the window; this move will come in handy throughout the game.
Also at the start of this level you will see a locked break-room where a scientist has barricaded himself. Shoot near the fire extinguisher down the hall and you will gain access to an airvent that will take you into the break-room.
Most areas in the office complex may be explored freely, but you will encounter several serious obstacles that require dexterous maneuvering. The first is a locked door with several crates littering the hallway just in front of it. You will need to push the boxes into position beneath a ladder visible in the exposed ceiling area. After arranging the boxes, clamber from the shorter box onto the taller and jump. Now you will have access to the ceiling area. Leap up while moving forward, and you will find yourself scaling a ladder into the ceiling area. From here you can crawl above the sealed door and come down into the next room.
To gain the exit, you will have to reach the balcony that overlooks the large cafeteria room. The door to the stairwell is locked so you must travel through the freezer ventilation system to move up to the balcony. (The freezer vent is too high up to climb into without positioning a crate to climb on.) In one of the small rooms near this balcony, you will discover a grill in the floor which lets you down into the ventilation system. Eventually this leads you out into a very dark room of ductwork. You’ll need your flashlight here, and you will also need to do some very dexterous jumping to get up along the tops of the ducts and into another section of ductwork. Through some very solid bars you’ll get a glimpse of the Exit—but your crowbar won’t be sufficient to let you at it. You will find that a bit farther along you will be able to stand up and enter an area of girders and ceiling tiles. Push a grill out of your way and you can pass across the ceiling by hugging to the girders; beware of the acoustic tiles, which cannot bear your weight. By this route you can eventually drop down into the hallway near the Exit door, and from here you’ll gain access to two more elevators. One of these is out of service; the other will open but the car is far above. Make sure you have your controls set for “Run Always” and then leap across the shaft; you’ll find you can scale the opposite ladder. By cautiously edging along the interior of the shaft, you must climb each section of ladder until you reach the top of the elevator car. Pry up the access hatch and drop inside, and this will lead you to The Security Complex (C1A3).
THE SECURITY COMPLEX (C1A
Walkthorugh – Part II
C1A3)
With the office complexes behind you, you step off an elevator into a corridor strewn with crates. A door labelled “Silo Access” to your right is sealed–clearly, this will be an important destination when you’ve gained proper access. The level is populated by houndeyes and human shock troops who have made their way down from the surface (which is very close at this point). You must fight your way through the troops to an airlock, which opens into a large area rimmed with a catwalk patrolled by troops and housing an airway shunt control with three colored handles. The air system is accessible through a floor hatch in this same area; you will find it in a small room cluttered with crates. To open the hatch, stand over it and activate the “use” function (bind a key for +use e.g. bind “u” +use). This leads to a cellar where you will see various ducts and a grate allowing you access to the ductwork.
You can reach numerous otherwise inaccessible areas by following the air ducts, including the guard room visible from the airlock (this room cannot be entered via the door). In the air ducts, you will encounter the three gates that are controlled by the three switches in the large room, and which are referenced on the legend sign next to the switches. You will also see a large double fan, with other ductwork that may be interesting beyond it (but unfortunately the fan will chop you to bits should you try to proceed through it. Perhaps if you could shut off the fan….)
Another route out of the main air shunt room is down a side passage into a smaller storage area, where you will see a storage ledge covered with crates, with a ladder leading up to them. Climb the ladder up to the ledge and push the button there; this will open the door at the other end of the room, under the stairs, taking you to a larger, flooded storage area. There are crates in the flooded room, with catwalks keeping you above the creatures infesting the floor (or so you hope…). You will find that jumping comes in very handy in this room—from crate to crate, and along the catwalk.
Following the ramps will take you through a computer center, beyond which sits an immense fan housing. There is a large elevator in the room as well, and it leads to what you suspect is the catwalk from the first large room you encountered, the one patrolled by the grunts out to exterminate you. The obvious switch for the elevator doesn’t seem to work properly, though, so you need to figure out what’s wrong with the switch and see if you can fix it. Should you fix the lift, leap onto it from the catwalk as it rises past and it will carry you to the upper level of the main room. (Getting the elevator to work means using the fusebox that the switch is connected to. There is a sparking fuse in there that needs to be set before the lift switch will work.)
As you suspected, it leads to the catwalk in the first large room. You walk along the walkway only to discover a sentry cannon that spins down from the ceiling, barring any chance of getting to the elevator at the far end of the corridor. There must be another way up, because clearly you cannot make it past this cannon…
The key is the air ducts. You will have to figure out how to turn off the big double fan, in order to gain access to the vents beyond. This requires opening the correct gates within the vents, and shutting off power to the fans. If you do this successfully, you can get to the ducts that take you to the surface and the security center there. The player must set Gate B open, and leave the others closed: Gate A will send the player hurtling into a blade-like fin that will slice them in half, and Gate C will send the player into a fan that will chop them up. Gate B shoots the player into the large fan housing, where they will find two fuseboxes. Open each and shoot them, thus disabling the power to all the fans. The player can then go up the ladder, back through the vents, past the now dormant double fan, and up into other ducts. This takes the player to the surface level.
From the you can look out over the dark landing field where a battle between human and alien forces will be staged. In the finished map, the controls in this room will allow you to disable security for the sealed door you saw at the very beginning of the level, and the turret in the corridor (allowing you to take the elevator back down). The player will then return through the level, having acquired access to that door, and raise the garage door that opens into Silo 2. (Currently, triggering the control-room switch has no effect on the silo entry.)
ALIEN RESEARCH LAB (C2A3)
You enter the research complex riding an elevator up into a crate storage room, the main storage facility for the missile base. The storage room leads through a tunnel and out into a large rocky cavern, which holds the exteriors of the three labs. The labs are color-coded: LAB1 is orange, LAB2 is red, and LAB3 is blue. Another tunnel at the far end of the cavern will take you to the entrances. As you pass up this tunnel you will see a blue-bordered door at your left; this entry to LAB3 requires special access, which involves two scientists having their retinas scanned in simultaneously. The retinal scanners are in place, but not yet functional. The player will eventually have to track down two scientists in red LAB2 and lead them back to the entrance to LAB3.
Walking past the entrance to LAB3, the tunnel will take you to the surface and back into a bunker-like entrance to the other two labs. You will encounter a large door marked “RESTRICTED.” The button for this door is currently out of order, but there is a secret switch just to the right of the frame, which you must trip it by moving up against the outer right framework of the door. Beyond this point, entrance to LAB2 requires a key the player does not possess. The only lab you initially have access to is LAB1. Entering into LAB1, you must make your way to the emergency exit, then leap across the gap to red LAB2 and duck through the half-opened doorway. LAB2 is the largest lab. The two scientists are being held prisoner there. You must free both of them from their human captors and lead them back to the entrance to LAB3. In order to find both scientists, the player must negotiate his way through the maze of winding tunnels and rooms that make up LAB2. They are both held in rooms whose exit is controlled by a switch outside the room. Once freed, they can follow the player to the entrance to LAB3.
Currently, since the retinal scanner is not functional, to enter LAB3 you must summon the console and type “map c2a4c.” This will transition you into LAB3. From here you can make your way to the inner lab, which is surrounded by a deep chasm. The inner lab contains two active containment chambers, each one holding a live Alien grunt in a stasis field. Once inside, the door closes. Since this is a restricted area and the only way out is with a key, the player must make use of the “only in emergency” switch that shuts off power to the facility. When this happens, the lights go out and the power to the containment chambers is shut off. The Aliens then break out of their prisons and the door to the lab opens. The player can then escape to the surface through the emergency exit, which is now open.
COMMUNICATIONS CENTER (C3A1)
The main goal of the Communications Center is to lower the security status of the base. A lofty goal indeed, but to get from the start of the level to the command center, the player is going to have to go down for a swim in the sewers. Near the start of the level you will find an elevator shaft with a grate at the bottom. Pry the grate (with the +use function) and drop down into the water below.
Exploring the conduits, you will find a ladder leading up to the Communications Center. There is a helicopter pad waiting for its chopper (still to come). In the observation tower above the heli
Walkthrough – Part III
helicopter pad waiting for its chopper (still to come). In the observation tower above the helipad you can throw a switch to open the roof hatch. Eventually swarms of aerial creatures will swarm down from the sky, and you will have to put the chopper’s blades to work dispatching them. For now, keep going.
You will find a green-lit Communications Control Room. With the base on high security status, the room has been sealed, and the center’s head scientist is sealed inside. Farther on you will encounter a security guard at a wide console. Sighting you, the guard will activate several turrets which you will have to disable; you will also have to disable the guard and take a security card from him. You may now shoot out windows in the command center and get instructions from the scientist there about reprogramming a satellite dish elsewhere in the complex.
There is a second glass-walled communication center. Now that you have the guard’s access card, shatter the glass and enter the center. You will be able in the finished map to use one of the consoles to lower the security status, which will automatically unlock the other doors in this level. Now you can climb to the satellite and program in the necessary settings. An important message will stream into the communications center. In addition, the scientist will reward you by activating an emergency lift that lets you advance to C3A2—the first of several research labs.
REACTOR LAB (C3A2)
The Reactor Lab currently allows free non-linear exploration with plenty of combat. Doors and unfinished puzzle elements have been removed for ease of navigation. In its final form, the level will be one large puzzle, requiring the player to disable and flood a reactor core.
As you explore the map, you will find a crew’s locker room containing storage lockers where rad suits will eventually hang, and a radiation shower (useful in case you go swimming in the reactor core without your suit).
At some point you will find yourself in a glass-walled observation room with a door that refuses to open due to a reactor breach. Shoot out the glass and jump to the deck below. The cooling tanks along your way resemble lethal swimming pools, and if you jump in you will discover movable grates below. You must negotiate underwater pipes that will give you access to a sequence of pump rooms. Look for ladders leading up from the coolant into the pump areas. The player will have to disable these pumps and shut down the flow to the core itself. If you find yourself in the reactor core, remember that currently there is no way out except back through the pumping tubes. In the finished game, you will need to disable the pumps, shutting off the flow of coolant and causing the reactor to shut down. The lab will then flood the reactor with emergency coolant. Seeing this, you will switch on the pumps again, flooding the reactor to overflowing, and giving you access to the otherwise inaccessible catwalks near the upper rim. From there you can acquire a keycard allowing you to continue to the next laboratory.
Walkthrough – Sypnosis
The Portal Device is a dimension-spanning gate of unpredictable power, constructed in a decommissioned missile silo. So far no one has ventured through the Portal, but there has been a steady flow of odd creatures coming to our world. You are a weapons research scientist who has never touched a weapon—until now.
An accident in the Threshold’s power core fractures the local fabric of spacetime, and hordes of creatures begin spewing into our world through the fissures. Monsters are everywhere, and your co-workers are dropping like flies. You head for the surface but the usual routes are unpassable—damaged by the disaster and infested with monsters. The silo security guards are in a state of primal terror and looking for someone to blame. The obvious scapegoats are the scientists. Namely, you.
In your flight to the surface, you acquire a device which means the difference between victory and annihilation—but you don’t realize whose victory, until too late. As the Portal experiment’s first human subject, you are cast into the alien world to confront the ultimate horror…to cut off the invasion at its source. In Half-Life, you won’t just go head-to-head with an alien boss—you will fight it from the inside out.
Final notes from the author of this guide.
I will be making another guide on how to install Half-Life alpha. All info in this guide was obtained from the CD itself (except the engine part which was obtained from Wikipedia. [en.wikipedia.org] Thanks for reading!