Overview
Here I plan to share all possible details on the Gungeon’s many weapons, items, enemies and secrets. This will be quite the major project yet I feel its best to start now and help as many as possible.
Introduction
Welcoming to my first ever game guide. I’ll admit the Gungeon is quite a daunting first pick but I feel its best to work with since no one has worked on a broad guide just yet. I doubt I will get all the information and pictures needs to properly detail everything so if anyone who is interested feel free to share such things. I promise I will list you in contribution to whatever is related. Anyway though lets get started!
If you plan to contribute please send me a message through Steam or comment here.
Controls and Basics
Just a small section to detail the default controlsm detailing the basicsof the game and some tips starting off.
W,S,A,D: Movement directions.
Q: Uses a Blank.
E: Interact, used mainly for table flipping.
Esc: Pause screen.
I: Inventory and log screen.
Tab: Hold to show full map and passive item screen. Allows you to teleport between room pads.
Spacebar: Use active item.
Mouse: Aiming.
Left-Shift Button: Switch between active items if possible.
Left-Mouse Button: Firing weapon, hold for charged shots.
Right-Mouse Button: Dodge rolling.
- Your sidearm is your friend. While the damage for it is low you’ll never run out of ammo and it makes it useful picking off either weak or nearly dead enemies.
- Table flipping can save your life. It can stop at least full round of shots from rapid fire enemies and can even be moved about when you press up against it.
- You can reload during dodge rolls. This is important against bosses who will pretty much fill the screen with bullets and force you to dodge
The basic items that aren’t related to the guns and other items used in the game yet are very important towards your survival in the Gungeon.
Health: Your health is detailed with hearts with each half counting as a hit, totaling to 6 hits with starting health. To increase health you need to collect a Master Round from being a floor boss without being hit, collecting certain items that increase your total health or possible blessings from shrines. To regain health you have to find them in chests, random drops from finishing rooms, buying from stores, using certain items or from certain shrines.
Armor: Temporary health which you can collect and stack up on. When your hit it will also make a knock back field like a blank to push back enemies but DOESN’T clear away bullets or stop enemies from shooting. These can be found from finishing rooms, buying from stores, using certain items or from certain shrines.
Blanks: Your main defense item in the game. Blanks are used to clear the room of bullets and stop enemies from shooting for a few seconds. It also will create a shockwave to knock back close by enemies. They can even reveal secret rooms and activate certain shrines. Start off with two and will get two on every floor if you have none. You can collect more through clearing rooms, buying in stores or in chests.
Keys: To get any items without using the stores you need to open up chests. There are also certain doors that require keys to open. They can be found from finishing rooms, bought in stores or inside chests even.
Money: It makes the world go round! Needed to buy anything in the stores and also for opening the elevator levels. Comes in copper (1), silver (5) and gold (50). Dropped by slain enemies, rewards for clearing rooms, trading items to the Sell Creep or from opening chests.
Ammo Boxes: Sooner or later you’ll run out of bullets for your big guns. Ammo boxes are needed to restock weapons, so make sure your wielding the right one you wish to be fully loaded. Like the others you find from finishing rooms, trading or chests.
Hegemoney Credits: Special currancy that can only be spent on unlocking items in The Breach or unlocking elevator levels. You obtain them from defeating bosses which can drop between 1 to 3 credits.
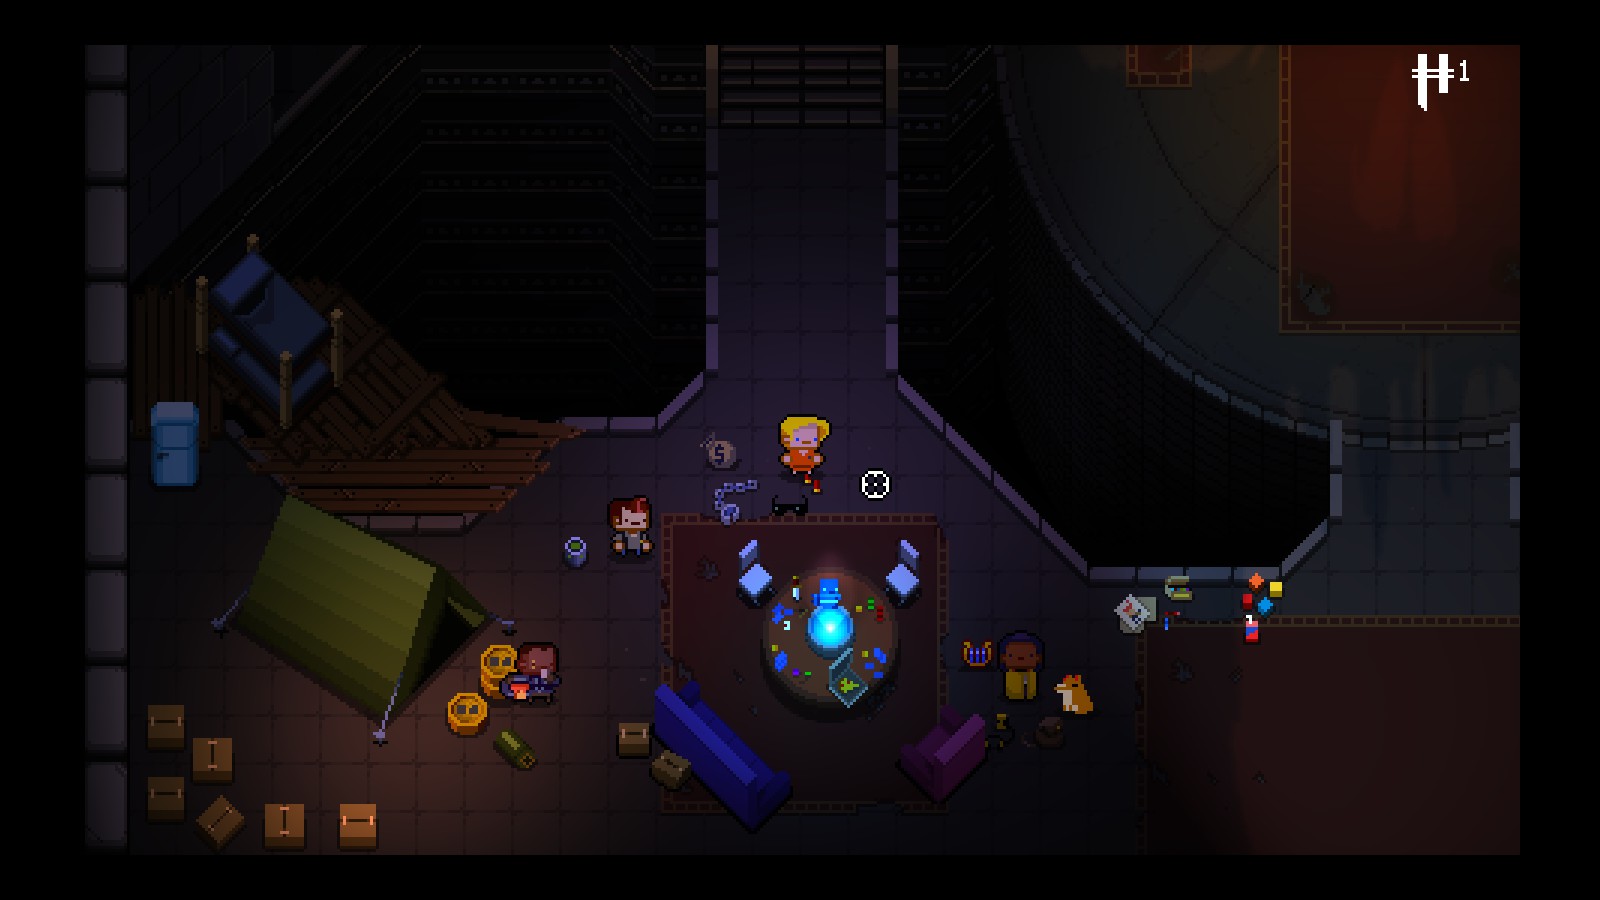
The Characters
There are currently six known playable characters which all have their own unique starting gear. They all come with one weapon that has unlimited ammo and can’t be dropped in the game. These starting weapons all vary in quality based around the other starting benifits. Weapons and item details are fully listed in their proper sections.
Starting Weapon: Marine Sidearm
Active Item: Supply Drop
Passive Item: Military Training
Other: One armor shield
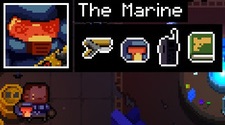
Pros: By far the toughest out of the group of Gungeoneers thanks to the free armor shield. Has the most accurate starting sidearm out of all the characters. The supply drop is great for emergenies to restock on ammo. Passive makes all guns better and stacks well with other related passives. Perfect for speed runs because of naturally fast reload and accuracy.
Cons: Supply Drop is a single use only and the sidearm has weaker damage per shot. Lack long term item utilities of other characters.
Starting Weapon: Rogue Special
Active Item: Trusty Lockpicks
Passive Items: For You? and Hidden Compartment

Pros: Has the most starting passive out of all the Gungeoneers and quite useful active item. Lockpicks are extermely useful dealing with chests and saving keys early on. Even if your locked out of a chest you can still destroy it for a possible heart piece or junk. For You? offers a handy discount which no one else can get along with increased active item use and ammo count.
Cons: Starting weapon has terrible range, damage and accuracy. Lockpick has chance of locking yourself out of chests and items.
Starting Weapons: Budget Revolver and Sawed-Off
Active Item: Molotov
Passive Item: Enraging Photo

Pros: Starts with two weapons instead of one. The revolver has good rate of fire and reload while sawed-off has strong close range damage. The molotov is a great crowd clearer thanks to covering a large area for a long time.
Cons: Revolver has a very small chip to the other starting guns. Sawed-Off relies on ammo which can run out quite quickly if over used. The molotov CAN burn you if you walk into the fire. The enraging photo relies on inflicted damage to be used and has quite short effect time.
Starting Weapons: Rusty Sidearm and Crossbow
Passive Item: Junior II

Pros: Starts with two weapons instead of one. The Rusty Sidearm is very accurate and has a good reload speed as well. Crossbow is a power long ranged weapon that can pick off tough targets across whole rooms with great accuracy. Junior can prove invaluable by digging up that much needed key, heart or ammo you just needed.
Cons: Starts with no active item. The sidearm bullets have a relitively slow travel speed compared to other stating guns. Crossbow is very slow on reload and canbe punishing if you miss. Junior’s item finds can be quite rare and doesn’t always offer what you need.
Chest Guide
Chests will be your main means of finding new guns, active items and passive. Normally they are found within treasure rooms yet can drop rarely from clearing a room, discovering secret rooms, using certain shrines or completely Winchester’s mini-game.
Any chests that are found in treasure rooms are always locked and require keys or Trusty Lockpicks to open. You can destroy the chest by shooting it which can give you health, junk, possibly explode or very rarely drop an item.
The rarity ratings of chests are by the following:
1: Brown
2: Blue
3: Green
4: Red
5: Black
6: Rainbow (Extremely rare, drops 8 items and/or guns.)
There is also the possbility of encountering a Glitched chest which seems to give nothing and instead takes you to a new room that forces you to go against the boss. You’ll face TWO Beholsters which is extremely difficult if you have no extra weapons on hand. Its unsure what happens if you win this fight. (Credit for this find goes to JerryTheSlug)
NPCs Guide
The Gungeon has a small group of other characters who offer trading services, lore or trouble for you.
The Bum
The first NPC you’ll meet in the game. Doesn’t offer any aid or advice, yet does comment on your progress throughout the game

Ser Manuel
Your tutorial teacher who shows you the basics of the game from shooting, dodging and using blanks. Also is your first boss at the end of it…if an easy one.
Starts a side quest if you discover his armor and shield in the hidden room set in the left area before his boss room. Lets you go and fight Blockner on level three in the Black Powder Mine.

The Vendor
The guy you’ll mainly go to to buy what you need. Sells three random pick ups and a mix of possibly items or guns. Stock amounts vary.
DO NOT FIRE YOUR GUN IN THE STORE!
If you do he will give you a warning at first. The second time you do he’ll double the prices. Third time he’ll start shooting at you and close the shop completely for the rest of your run.

Sell Creep
A green mutant under a grate you buys your unwanted items and guns. Has a chance appearing in stores. Just drop them on the grate and he’ll give shells in return. Currently I don’t know how the values of items or if its more randomized.

Truck
An orc trader who sells more realistic items and guns. When you find and buy an item he’ll appear in the Breach where you can unlock more items with Hegemoney.

Ox and Cadence
A clerk and golem who can be found on the Gungeon Proper (Second Floor). Their locked up in a cell which can be unlocked with the required key found on the level. Once free they move to the Breach and unlock more items for you to use with Hegomoney.
Patches and Mendy
Two ‘doctors’ who will fully heal you when you talk to them. Can only heal you once per encounter so best use their services if your low on health or leaving a floor.

The Guns – Part 1
The weapons of choice here…Its called the Gungeon for a reason. With so many choices to shoot and blow up your foes it best to know what is right for the job.
Accuracy: Rating judges how much spread the gun has from when the bullet is fired and how far it strays away off target.
Damage: How much the weapon deals.
Range: Judges how far the bullet(s) will go out before disappearing.
Rate of Fire: How fast the weapon can shoot.
Reload Speed: How quickly the weapon can reload. Detailed in seconds.
Clip/Ammo: The number of shots you have before you reload along with the number of bullets you have before needing to restock.
Special Quality: Some guns have effects on enemies such as status effects or amusing aspects.
The starting pistol weapons each Gundgeoneer has. These weapons have unlimited ammo at the cost of having very varied stats based around the build of the character except for damage which are the same. They cannot be found in any chest or bought at the store.
Marine Sidearm:
Accuracy: Great (No doubt from Military Training passive.) 
Range: Good
Rate of Fire: Good
Reload Speed: 1.5 seconds (Again counting in Military Training)
Clip Size: 10
Rogue Special: (Semiautomatic) – Underhanded and Efficient
Accuracy: Bad 
Range: Short
Rate of Fire: Moderate
Reload Speed: 2 seconds
Clip Size: 8
Budget Revolver: (Semiautomatic) – Affordable Arms
Accuracy: Moderate 
Range: Good
Rate of Fire: Great
Reload Speed: 1 second
Clip Size: 5
Rusty Sidearm:
Accuracy: Good 
Range: Good
Rate of Fire: Average
Reload Speed: 2 seconds
Clip Size: 6
These are the possible weapons you can find either in chests, shops or boss drops. The chest color determines weapon quality.
Vulcan Cannon: (Automatic) – Boundless Slaughter
Accuracy: Terrible 
Range: Far
Rate of Fire: Rapid
Reload Speed: 0.1 seconds
Clip/Ammo: 990 (Never seems to need reloading despite being able to.)
Special Quality: Weapon of choice of the Gatling Gull.
Sawed-Off: (Semiautomatic) – No Butts About It
Accuracy: Bad 
Rate of Fire:
Reload Speed: 2 seconds
Clip/Ammo: 6/150
Special Quality: None, but Convict starts with it.
Tear Jerker: (Semiautomatic) – Q_Q
Accuracy: Average 
Range: Average
Rate of Fire: Moderate
Reload Speed: 2 seconds
Clip/Ammo: 20
Special Quality: Creates water puddles when it hits.
Lower Case r: (Burst) – Alphabetical!
Accuracy: Average 
Range: Average
Rate of Fire: Slow
Reload Speed: 3.5 seconds
Clip/Ammo: 36/890
Special Effect: Spells bullets!
Winchester Rifle: (Semiautomatic) – Guns and Deviltry
Accuracy: Perfect 
Range: Very far
Rate of Fire: Slow
Reload Speed: 2 seconds
Clip/Ammo: 12/128
Special Quality: Large bullets.
Bow: (Charged) – Hold Fire to Charge
Accuracy: Perfect 
Range: Very far
Rate of Fire: Slow
Reload Speed: 1 second (automatic)
Clip/Ammo: 1/100
Special Quality: Hold for greater damage and range. Full charge pierces enemies.
Shotbow: (Semiautomatic) – A Teleporter Accident
Accuracy: Bad
Damage: Average to good based on how many bullets hits.
Range: Good
Rate of Fire: Slow
Reload Speed: 2.5 seconds
Clip/Ammo: 3/80
Special Quality: Very wide and far shotgun like spread.
Blunderbuss: (Charged) – Shoots Anything
Accuracy: Bad, wide spread makes up for it. 
Range: Average
Rate of Fire: Fast, matters on how quickly you hold and release shots.
Reload Speed: 2.5 seconds.
Clip/Ammo: 4/100
Special Quality: Fires many bullets in one shot and has strong enemy knockback. Shots bounce off walls.
Flamehand: (Semiautomatic) – 2D6 + Int Mod
Damage: Low
Range: Good
Rate of Fire: Fast
Reload Speed: None, doesn’t need to reload.
Clip/Ammo: 200/200
Special Quality: Causes burn damage and pierces through enemies.
Trashcannon: (Semiautomatic) – Take It Out!
Damage: Great
Range: Good
Rate of Fire: Average
Reload Speed: 1.5 seconds
Clip/Ammo: 1/50
Special Quality: Shots burst into puddles of posion. Puddles can affect you! Damage is improved by holding onto junk.
Hegemoney Carbine: (Automatic) – All The Same
Accuracy: Good
Range: Good
Rate of Fire: Good
Reload Speed: 2.5 seconds
Clip/Ammo: 25/600
Special Quality: None
Void Shotgun: (Semiautomatic) – CQC
Damage: Great
Range: Short
Rate of Fire: Average
Reload Speed: 2 seconds.
Clip/Ammo: 4/120
Special Quality: None
Witch Pistol: (Semiautomatic) – Spells Your Doom
Accuracy: Perfect
Damage: Average
Range: Average
Rate of Fire: Fast
Reload Speed: 2 seconds
Clip/Ammo: 6/300
Special Quality: Has chance to turn enemies into chickens. Doesn’t let get coin drops though polymorphed. Doesn’t work on bosses.
Crossbow: (Semiautomatic) – The Original
Accuracy: Perfect
Range: Far
Rate of Fire: Slow
Reload Speed: 1 second
Clip/Ammo: 1/100
Special Quality: Higher damage the closer the target is.
RUBE-ADYNE Prototype: (Semiautomatic) – It Never Quits
Accuracy: Perfect
Rate of Fire: Rapid
Reload Speed: 0.5 seconds
Clip/Ammo: 6/200
Special Quality: Shots can bounce of multiple surafaces.
Lil’ Bomber: (Charged) – ReFuse To Lose
Accuracy: Good
Range: Good
Rate of Fire: Slow
Reload Speed: 3.5 seconds
Clip/Ammo: 3/60
Special Quality: Explosive shots. Explosions cancel out enemy bullets. Shots can bounce off walls.
Shotgrub: (Semiautomatic) – No Worries!
Accuracy: Bad
Damage:
Range: Good
Rate of Fire: Slow
Reload Speed: 2 seconds
Clip/Ammo: 8/250
Special Quality: Has chance to poison and missed shots become poison puddles.
MAC10: (Burst) – $#!^@NeverEnd
Damage: Low
Range: Good
Rate of Fire: Fast
Reload Speed: 2 seconds
Clip/Ammo: 30/600
Special Quality: 4 shot burst fire.
Crestfaller: (Semiautomatic) – Cold Reality
Accuracy: Good
Range: Good
Rate of Fire: Slow
Reload Speed: 2.5 seconds
Clip/Ammo: 8/250
Special Quality: Shots will freeze enemies.
The Guns – Part 2
Molotov Launcher: (Semiautomatic) – Exactly What You Think
Accuracy: Good 
Range: Far
Rate of Fire: Slow
Reload Speed: 4 seconds
Clip/Ammo: 1/80
Special Quality: Fires molotovs like the active power item.
T-Shirt Cannon: (Semiautomatic) – Machine Gun Wash Only!
Accuracy: Great 
Range: Good
Rate of Fire: Good
Reload Speed: 1.5 seconds
Clip/Ammo: 6/250
Special Quality: Covers enemies and ground with t-shirts.
Luxin Cannon: (Automatic) – Omnichrome
Accuracy: Good
Damage: Average/Great with final shot
Range: Good
Rate of Fire: Rapid
Reload Speed: 3 seconds
Clip/Ammo: 45/600
Special Quality: Fires powerful crystal bolt on final shot for extra damage.
Markarov: (Semiautomatic) – The People’s Gun
Accuracy: Good
Damage: Low
Range: Good
Rate of Fire: Good
Reload Speed: 2 seconds
Clip/Ammo: 7/350
Special Quality: None
Pulse Cannon: (Semiautomatic) – Time Of Death…
Accuracy: Average
Damage: Average/Great, matters on how many bullets hit.
Range: Good
Rate of Fire: Average
Reload Speed: 2.5 seconds
Clip/Ammo: 8/120
Special Quality: Close 5 bullet shotgun burst shots.
VertebreaK – 47: (Automatic) – Nervous Yet?
Accuracy: Great
Damage: Average
Range: Good
Rate of Fire: Good
Reload Speed: 2 seconds
Clip/Ammo: 30/250
Special Quality: Homing bullets that move between enemies. Bullets also form a chain link between shots which hurts enemies.
Old Goldie: (Semiautomatic) – For The Discerning
Accuracy: Great
Damage: Good to great, matters on how many bullets hit.
Range: Short
Rate of Fire: Average
Reload Speed: 1.5 seconds
Clip/Ammo: 4/70
Special Quality: Shotgun burst is bunched closely together even at farther shots.
RPG: (Semiautomatic) – Leveled Up
Accuracy: Perfect
Damage: Great
Range: Great
Rate of Fire: Very Slow
Reload Speed: 4 seconds
Clip/Ammo: 1/40
Special Quality: Explosive shots. Can cancel out enemy bullets.
Sniper Rifle: (Semiautomatic) – Scope Creep
Accuracy: Good 
Range: Far
Rate of Fire: Slow
Reload Speed: 2.5 seconds
Clip/Ammo: 10/80
Special Quality: Bullets pierce through one enemy.
Blooper: (Semiautomatic) – Close Your Bloop
Accuracy: Bad 
Range: Short
Rate of Fire: Average
Reload Speed: 3 seconds
Clip/Ammo: 5/150
Special Quality: High enemy knockback.
Wind Up Gun: (Automatic) – Charge It
Accuracy: Average 
Range: Good
Rate of Fire: Good
Reload Speed: 2 seconds
Clip/Ammo: 20/600
Special Quality: First half of chip does high damage while the last half does less. Shots pierce through enemies.
Alien Sidearm: (Charged) – Shield Breaker
Accuracy: Good
Damage: Low/Good
Range: Good
Rate of Fire: Good
Reload Speed: 2 seconds
Clip/Ammo: 10/350
Special Quality: Fully charged shots increas bullet size and damage.
Regular Shotgun: (Semiautomatic) – ♥♥♥♥♥♥ and Locked
Accuracy: Bad
Damage: Good
Range: Short
Rate of Fire: Average
Reload Speed: 2.5 seconds
Clip/Ammo: 8/150
Special Quality: None
Siren: (Semiautomatic) – Mershotgun
Accuracy: Average
Damage: Good
Range: Average
Rate of Fire: Average
Reload Speed: 2 seconds
Clip/Ammo: 6/200
Special Quality: Shots leave water bullets which clear away fire and poison. Immune to fall damage when gun is being held.
Banana: (Charged) – Planpain
Accuracy: Good
Damage: Great
Range: Good
Rate of Fire: Average
Reload Speed: Instant
Clip/Ammo: 7/50
Special Quality: Exploves shots. First banana splits into three others which bounce around.
Gungeon Ant: (Semiautomatic) – What Army?
Accuracy: Average
Damage: Low to Good
Range: Good
Rate of Fire: Average
Reload Speed: 1.5 seconds
Clip/Ammo: 6/100
Special Quality: Bullets leave oil patches or shoot fire which ingites oil. Switches between reloads.
Thompson Sub-Machinegun: (Automatic) – Myeah, See!
Accuracy: Average
Damage: Average
Range: Good
Rate of Fire: Rapid
Reload Speed: 0.5 seconds
Clip/Ammo: 30/350
Special Quality: None
Barrel: (Semiautomatic) – Nothin’ Easier
Accuracy: Good
Damage: Good
Range: Good
Rate of Fire: Good
Reload Speed: 1 second
Clip/Ammo: 9/300
Special Quality: Attacks can stun enemies and create water puddles.
Shotgun Full of Love: (Semiautomatic) – Kill With Kindness
Accuracy: Good
Damage: Great
Range: Short
Rate of Fire: Average
Reload Speed: 1.5 seconds
Clip/Ammo: 8/120
Special Quality: Bullets can charm enemies.
Deck4rd: (Semiautomatic) – Unicorn Of Handguns
Accuracy: Good
Damge: Great
Range: Good
Rate of Fire: Average
Reload Speed: 1.5 seconds
Clip/Ammo: 2/60
Special Quality: Explosive shots.
Triple Crossbow: (Semiautomatic) – 3 > 1
Accuracy: Perfect
Damage: Great
Range: Good
Rate of Fire: Rapid
Reload Speed: 1 second
Clip/Ammo: 3/100
Special Quality: Reloading switches between three shot spread bolts and a single slowing bolt.
Smiley’s Revolver: (Semiautomatic) – All Smiles
Accuracy: Good
Damage: Average
Range: Good
Rate of Fire: Good
Reload Speed: 0.5 seconds
Clip/Ammo: 6/250
Special Quality: Discount in stores. Short increase in fire rate after a roll. Double ammo count if you also have Shade’s Revolver.
Proton Backpack: (Beam) – Crossing Streams
Accuracy: Perfect
Damage: Great. High against ghosts.
Range: Far
Rate of Fire: Constant
Reload Speed: None
Clip/Ammo: 500/500
Special Quality: Locks onto enemy once hit. Deals higher damage to ghost type enemies.
Eye of the Beholster: (Semiautomatic) – What A Beauty!
Accuracy: Great 
Range: Far
Rate of Fire: Good
Reload Speed: 2 seconds
Clip/Ammo: 12/250
Special Quality: Final shot summons a friendly Beadie to fight with you for a short wild. Piercing shots.
AU Gun: (Semiautomatic) – Some Assembly Required
Accuracy: Perfect
Damage: Insanely high
Range: Far
Rate of Fire: Fast
Reload Speed:
Clip/Ammo: 1/22
Special Quality: None, just extremely high damage for a single shot.
Light Gun: (Semiautomatic) – Third-Party
Accuracy: Perfect
Range: Good
Rate of Fire:Good
Reload Speed: 2 second
Clip/Ammo: 6/150
Special Quality: Final shot fires a duck that homes in on an enemy for high damage. Normal shots pierce through enemies.
Camera: (Charged) – Say Cheese
Accuracy: Perfect 
Range: Whole screen.
Rate of Fire: Very slow
Reload Speed: 3 seconds
Clip/Ammo: 4/60
Special Quality: Hits all targets in the room. Does more damage closer you are to target. Has chance to stun.
Active Items
These items are situational since you activate them yourself. Some are single use while others recharge by causing damage to enemies.
Active Item Detail Guide:
Name and Item Comment: Self explained.
Effect: Details what the item does.
Damage: List damage if possible.
Special: Unique aspects of item.
—————————————————————————————————————————–

Effect: Marks a landing zone for a crate of ammo to be dropped in.
Single Use.
Special: Marine starts with.
Trusty Lockpicks – Who Needs Keys? 
Special: Pilot starts with. Is unlocked for possible item find once the Pilot kills his past.
Molotov – Feel The Burn 
Special: Convict starts with. Can be normally obtained by chests or buying.
Orange – You’re Not Alexander
Effect: Gives a permanet heart when used.
Single use.
Shield of the Maiden – Block And Load
Effect: Hold to block attacks yet stops you from moving. When you try to shoot or let go of spacebar the shield will be no longer active.
Meatbun – On A Roll
Effect: Heals a full heart.
Single use.
Aged Bell – Lacuna
Effect: Stops time, freezing enemies and their bullets. Let’s you steal from shop.
Passive Items
Passive items are always in constant effect so long as you hold them. Certain items can be destroyed if special conditions are met.
—————————————————————————————————————————–

Ability: Increases reload speed and accuracy on all weapons.
Special Conditions: Unique to the Marine. Cannot be dropped.
Disarming Personalityp – For You?
Special Conditions: Unique to the Pilot. Cannot be droped.
Hidden Compartment 
Special Conditions: Pilot starts off with. Cannot drop.
Enraging Photo – Don’t Believe His Lies
Ability: Increase overall damage rating by one when hit. Last 5 seconds.
Special Conditions: Unique to the Convict. Cannot be dropped.
Dog – Junior II
Ability: Chance to find ammo box, keys or hearts when room is cleared. Will identify mimics by barking at chests.
Special Conditions: Unique to the Hunter. Cannot be dropped.

Ability: None, but can be solid to the green mutent that appears under a grate in stores.
Special Conditions: Can only be found by destroying chests.
Master Rounds – First/Second/Third/Fourth/Fifth Chamber
Ability: Gives an extra heart when held. Each one except the fifth must be traded to help unlock an elevator floor.
Special Conditions: Only earned for beating the floor boss without being hit.

Ability: Reveals secret room entrances with a small brick pointing towards the wall.

Ability: All your bullets have a chance to cause poison status on enemies.

Ability: Increases your movement speed and gives a piece of armor.

Ability: Prevents being moved by recoil, attacks or conveyor belts.

Ability: Increases the speed of your bullets.

Ability: Rolling through bullets reflects them.
Ring of Mimic Friendship – Unlikely Allies
Ability: Prevents mimic attacks.

Ability: Increases total ammo count by 10%.

Ability: Guns you throw and drop will explode.

Ability: Split shots but lowers damage.

Ability: Regain half a heart from destroying a chest. Doesn’t work on opened chests.

Ability: Immunity from posion damage and protective orbital.

Ability: Increases gun accuracy and shows full aim direction.

Ability: Increases all gun accuracy.
Gas Mask: – Breathe Deep
Ability: Makes you immune to poison.
Honeycomb: – Bee Prepared
Ability: Releases bees to attack enemies when hit.
Cog Of Battle: – Active Reload
Ability: Add’s an indicator on the reload bar. If clicked at the right time it will increasethe damage of the next clip. Prolongs reload if misclicked. Improves all reload times.
Old Crest: – Armor Up
Ability: Grants a armor shield which always goes first. Take it to the tomb room in the Gungeon Proper to unlock the second hidden floor and face against the secret Old King boss.
East Reload Bullets: – Rolling Reload
Ability: Rolling reloads one shot into gun if possible.