Overview
This is the manual to Hearts of Iron: The Card Game. It includes both the 2.0 rule set and the original classic conversion rule set.
Note From the Author
Just a reminder folks that the contents of Hearts of Iron the Card game, as well any assets used by Hearts of Iron the Card game is Paradox Interactive’s property and that commercial sale of this mod in any form is not allowed. Redistribution of this mod without my permission is also not allowed.
With that said, please enjoy this manual and Hearts of Iron the card game!
Addendum
This addendum is only for the steam version of this guide. This entire guide is practically a copy and pasta with formatting improvements so it doesn’t look horrid here. The sole reason of creating this guide is because steam keeps deleting my manual link in the workshop due to it being on an external site. The original guide which can be accessed in game via the rules is the preferred method of viewing the rule
Veterans Corner
For those who have played Hearts of Iron the card game, let me first say welcome back to the battlefield! This section is dedicated for a quick sweep of all the new features and changed rules so those who already know how to play can quickly get right back into the fray. If you need information on any new icons you can refer to the ‘Card Information’ section. If you are a new player please skip this section and go straight to the ‘Game Basics’ section to get started on learning!
Whats new
Combat frontage – A new concept that was introduced is now there is limited unit play space and divided into two segments, the front lines and reserve lines. Each line can support up to 8 units each and during combat you will interact with both lines. With this new frontage your ability to attack and defend is solely dependent on the front lines, your reserve line acts as a support when needed so even if your opponent has more then 8 units he cannot use all of his/her cards at the same time. The new combat frontage also makes certain doctrines stronger as they can hit only certain lines and also allows comebacks as only so many units can be fielded on the front lines to defend or attack. Some units have the unique ability to circumvent the combat frontage and attack as a front line unit from wherever.
Tech level – Since unit rarity is no longer a factor tech level is introduced to get that feeling of rarity back into the game as well as provide a new dynamic. Tech level influences the cards deployment and repair costs. If you don’t have enough tech cards, unit costs to deploy are increased by one factory (Or infra for eco cards) per level from your current tech level. Like infra, they can be deployed freely from the side if you can tank the cost. While technically able to play without any tech cards your unit deployment and repair will move at a snail pace especially on cards that require large number of factories.
Suppression- Suppression is a new basic type of attack that fills the gap between pinning and damage. Units that are suppressed are pinned but like a damaged unit, it cannot defend. Suppression can be removed by resupplying the unit like you would with a pinned one.
Armor & Piercing- All units now have armor ratings and all attacks a piercing rating. Armor represents how well armored a unit is, the higher the armor the more likely it can reduce enemy attacks just like how heavy armor did. Piercing is an attacks ability to break through the armor. When piercing is equal or higher then its targets armor, it does full damage of the token, For every amount lower then armor however it drops the tokens strength by that many steps. For example a piercing 2 kill token vs a unit with armor of 4 will drop to a pin for that unit.
Economy Simplification- Economy overall has been simplified down to 2 components, a single generic factory card for building units, a single generic supply card for unpinning units. Simple as that, no longer is there unique factory cards and confusing unit costs for not having the right factories. The unique field factories such as Sherman reliability are still in game but will require you to put them on your combat lines taking up precious unit slots. One factory still equals one supply as needed.
New HQ System- HQ’s are completely redone and now not only act as army bonus but now acts as a deck and combat modifier giving you extra options to gain the upper hand over your opponent. HQ’s can now only be played during certain phases or moments such as battle or during the draw phase and only cost supplies instead of factories. HQ’s are also now divided between the old fashion persistent HQ’s you know, and the new active HQ’s. Persistent HQ’s take up reserve line space while active HQ’s utilize the active HQ spot, however active HQ’s tend to be in play for a very short time and only one may be in play at a given time.
Reserves- Reserve units, or you may have known them as reinforcements, system has now changed. The reserve line now is the only line where you can pull your reserves from instead of your hand. This means you must pay the cost of the unit before you can use it as a reserve and can no longer pull units for free which made some doctrines such as Maskirovka extremely powerful. There is however HQ’s and cards that allow you to circumvent this and completely surprise your opponent by drawing from your hand.
Hidden Units- Hidden units now have been changed slightly but for the better. Ambushing cards have been outright removed, instead a hidden unit always is ambushing thus all of its attacks are inverse tokens as long as its hidden. Hidden units that are attacking reveal themselves. Hidden units in combat that are placed with a token are revealed as well to balance it out. Naturally if they attack they reveal themselves but not without the inverse token hit.
Card Rebalancing- There were lots of card balancing across the board. For the most part many cards are as you remember them but others have gotten buffed or debuffed as necessary. Very few cards were removed and replaced with other cards for factional consistency and balance.
Setting Up
This section will go over more information about how to start the game and detail the different type of cards and details the board itself.

- Battle Arena – When combat occurs this is where cards go to fight it out.
- Fighting Phases – As combat progresses this is used to keep track of the current combat range
- Front Line – This is where your primary attacking and defending units go. It fits up to eight unit cards.
- Reserve Line – This is where your support and rear units go. It fits up to eight unit cards
- Resource Section – Here you can manage your nations resources. Factories, Supplies, Infrastructure, and Tech.
- Active doctrine & HQ – Here you show your current active military doctrine or active HQ to your opponent.
- Doctrine pile – Any extra doctrines are put here after their costs have been paid.
- Initiative space. – This small colored space represents whose is currently acting when a player piece is upon it.
- Phase Bar – This section between the initiative space indicates what the current game phase is.
- Victory Section – This colored section represents how close you and your opponent are to V-Day.
Green cards are economy cards. Economy cards are needed to deploy all other cards as well as keep them functioning by resupplying them or just to out right use them. Used economy cards are put off to the side.
Red Cards are unit cards. Unit cards will form the back bone of your army allowing you to attack and defend.
Blue cards are military doctrine cards. You will need your doctrines in order to attack. Some doctrines provide a unique effects on breakthrough while most will just provide victory points on a breakthrough.
Gold cards are HQ cards. HQ cards provide unique bonuses to your nation through special effects that allows you to gain an edge over your opponent.
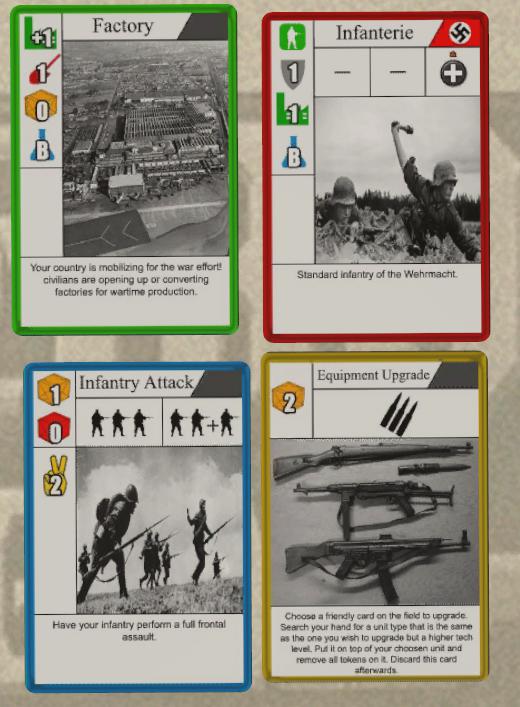
Economy Cards
1. Card name
2. Card information section, from top to bottom…

1. Factory cost
2. Infrastructure cost
3. Supply cost
4.Tech requirement
* If there is a + value then permanently add the requested type. If there is a – value then permanently remove the requested type.
3. Card trait section
Unit Cards
1. Card name
2. Cards Faction
3. Card information section, from top to bottom…

1. Unit type
2. Armor rating
3. Factory cost
4. Tech requirement
4. Card trait section
5. Combat section
Doctrine Cards
1. Card Name
2. Cards costs. From top to bottom….
1. Supply deployment cost
2. Supply use cost
3. Doctrine effects section
4. Attackers required units
5. Defenders required units

HQ Cards
1. Card name
2. Cards cost
3. Deployment phase

Types of Units
In Hearts of Iron the card game there is many different types of units. Each type is indicated by a unit icon in the top left of the unit card. Some units can have more then one type, in such a case the primary unit type is highlighted and the 2ndary type is behind it.

Starting from left to right. The first type of unit is the infantry type. Infantry make up the core of your military and are your primary defense and attack unit. Although the down side to most infantry are that they are vulnerable to most attacks and require to get close up and personal to do any damage. Most infantry can be easily stop with weapons like machine guns, tanks, and aircraft.
The next unit type is the support unit. Support units are things like mines, heavy guns, and tacticians for your forces. Support units can be brought in if there is an infantry to support it. For every one infantry you may bring in one support unit. Support units give much needed firepower for your infantry that allows them to shoot down aircraft, blow up tanks, or advance safely with artillery cover.
Tanks are mechanized units generally with high armor and good supporting fire. Tanks provide great armor for your forces to absorb weak kill shots or increase the mobility and protection of infantry such as mechanized infantry. Tanks however are highly vulnerable to anti-tank guns and bombers both which can easily destroy most tanks in a single shot.
Bombers provide great aerial strength for your forces allowing you to usually penetrate or one shot almost any unit. Bombers tend to be fairly expensive but usually worth their cost to quickly destroy enemy units. Bombers are vulnerable to anti-air fire that can prevent them from attacking and extremely vulnerable to enemy fighters.
Fighters are the final unit type. Fighters provide strong air defense against an enemy air force. Although strong against air units fighters have little power against ground units and are vulnerable to anti-air fire.
Now that the cards and board have been established the pre-game setup can be gone over.
The pre-game board consists of both players decks face down and the starting economy cards. Each player gets 5 free factory cards and 3 free infrastructure cards. The starting VP is 0 for both sides and is shown with each players piece. The starting phase is set to repair phase with a player piece.
The first thing required before a match to start is a deck. A deck consists of a minimum of 60 cards or maximum of 120 cards. In a deck you cannot have more then 5 of any one card apart from the basic 2 economy cards (Factory ; Armament Factory) The first thing you will do is overview all doctrines in your deck, then choose one to place face down on the active doctrine section of the board, return all doctrines to your deck then shuffle it.
Next, draw 10 cards from your deck. You may only start the game with 6 cards so you must return 4 of the 10 cards to the deck before the match can begin. Once again both players will shuffle their decks after returning the 4 cards. Once both players has reduced their starting hand to 6 cards and shuffled their decks, a coin will be flipped to determine who will get the initiative first. Once the initiative has been determined both players will now reveal their initial doctrine and the game begins.
Setting up Addentum
Spent Resource Section
——————————-

Game Basics Part 1
Now the game has begun its time to figure out what your out to do to gain victory. The goal of Hearts of Iron the card game is to be the first to get your player piece to V-Day or ‘Victory day’. This is achieved by using your nations military doctrines and unit cards to outplay your opponent and achieve breakthroughs. As you achieve breakthroughs you earn victory points which gets your player piece that much closer to V-Day. Your opponent however will do his best to use his unit cards to prevent a breakthrough and engage your forces in direct combat in hopes to destroy your unit cards to prevent you from further attacking.

The game is played in 4 primary phases as shown on the right side of the board. From top to bottom the phases are the following.
Repair Phase – The repair phase is the first phase of the round. The repair phase is where you restore used economy cards and may repair or resupply your units.
Draw Phase – The draw phase is where you can draw cards or discard cards from your hand.
Armament Phase – The armament phase is where you may deploy unit, economy, and doctrine cards to the field or shift your units from your front lines to the reserve and vice versa.
Battle Phase – This is the final phase of the round where both sides will clash in battle to try and achieve a breakthrough.
Repair Phase
The repair phase is the first phase of the round. Ironically the game starts in the repair phase even though there is nothing to repair thus it skips straight to the draw phase. The primary purpose of the repair phase is to freely recover all used economy cards for the new round and to pay for repairs and resupply for your unit cards.
If a unit is damaged you can repair it by paying the units cost.
If a unit is damaged but you do not have sufficient tech level for the card, pay an additional factory per tech level you do not possess for the card.
If a unit is pinned or suppressed you can unpin it by paying 1 supply for the unit. Alternatively you can convert 1 factory to 1 supply to also unpin the unit.
Thats all there is to the repair phase, its pretty straightforward. If you run out of factories or supplies then you can no longer repair or unpin units and later in the round deploy cards or use HQ’s and certain doctrines.
The draw phase is the second phase of the round. The draw phase is where you spend infrastructure cards in order to draw cards from your deck. Every time you wish to draw a card from your deck you must spend an infrastructure card. If you run out of available infrastructure cards then you can no longer draw cards. If your hand has 10 cards you cannot draw any more cards till you discard a card in your hand.
It is a simple as that. The draw phase is a relatively short phase.
Armament Phase
The armament phase is one of two core game phases. In this phase you can build additional economy cards if you have any leftover infrastructure. You may also convert your factories infrastructure cards or place tech cards from the side if you have sufficient infrastructure. You may also deploy unit cards if you have any remaining factory cards. If you have any supplies left you can also deploy doctrine or valid HQ cards. This phase you may also rearrange your forces on your combat lines.
To deploy a unit you must pay the units factory cost. The cost of the unit is shown on the left side of the card where the factory icon is. Before a unit can be deployed you must first check to see if you meet the cards tech requirements. This is done by checking how many research facilities you have on the field. If you have the required amount of tech facilities then you may deploy the unit with no penalty. If you do not have enough tech facilities then you must pay an additional factory for every tech level difference between you and the card. Tech facilities are not used up when deploying units they are simply used as a check for tech level. Tech comes in three levels; Base Tech ; Tech level one ; Tech level two. Base tech cards do not require any tech cards on the field and do not incur any tech penalties. Tech level one cards require at least one tech card on the field or pay one additional factory to deploy the card. Finally Tech level two cards require at least two tech cards on the field or pay one or two additional factories to deploy the card.
Economy cards may also be deployed during this phase. Most economy cards require infrastructure in order to be placed on the field. Economy cards provide a persistent bonus to your economy for each one placed, this is denoted by the +# on the units side bar. Some economy cards can permanently remove and discard other cards and is denoted by the -# on the units side bar. For the most part most economy cards add to your overall economy while adding additional infrastructure will force you to discard a factory. Infrastructure can be added freely by using the cards from the side and are not required in your deck as long as you pay the price of the card. Some economy cards are field factories as denoted by an trait icon (check the Trait icon section for more info). Economy cards that require tech do not increase the factory cost but instead increase the infrastructure cost per difference in tech. Tech cards can be placed freely from the side collection of tech cards as long as you have sufficient infrastructure to place it down. You do not put tech cards in your deck, they can be placed just like infrastructure and placed as long as your willing to tank the cost.
Doctrines are also deployed during this phase. Most doctrines cost supplies instead of factories and as such 1 factory can also equal 1 supply as necessary. Deployed doctrines are put in your doctrine pile and remain such until needed.
Finally some HQ’s may also be played during this phase. Most HQ cards are usually used during the armament phase although some can be used during other phases. HQ’s primarily cost supplies instead of factories and as such you may convert 1 factory into 1 supply as needed. There are two types of HQ’s, passive HQ’s and active HQ’s.

HQ cards with the shown icon above mean’s its a passive HQ thus can stay in play for the entirety of the game. HQ’s without that icon are known as active HQ’s and are placed on the active HQ box when used. There can be multiple active/passive HQ’s all used at the same time. To know if an HQ can be deployed during your current phase you check the deployment phase section of the card as they will match up with the icons on the phase bar on the right side of the board.

This icon which is not shown on the phase bar looks like the battle phase but with the added spark background it represents that the HQ can be used in an active battle only. Usually dropped during the front line or reserve line deployment for combat.
Game Basics Part 2
Manning the Lines
During this phase and up until the first battle begins for this round you can rearrange the position of your unit cards on the field. You may move them freely between the reserve and front lines. As such it is a good idea to make sure you have enough troops on the front lines to defend or attack as needed and pull back damaged units or hold back some units in the reserve to be used as needed reinforcements.
The meat and bones of the game, the combat phase. In this phase you use your deployed units to attack by using your doctrines. You must follow your doctrine in order to attack. Your opponent has the option to defend or let the attack breakthrough. If the attack breaks through then you gain the effects of the doctrine card which in most cases in victory points. Once you finish attacking your opponent will get a chance to counter attack so a defense will have to be made.
Attacking and Defending

Once the decision has been made by you, you may initiate an attack if your doctrine allows it. This is indicated by your doctrines attack section which is the left center box.
As shown in the picture to the right, in that example to attack you must use three front line infantry units. Because as described earlier that you can bring in one support unit for every one infantry it is allowed in place of a 3rd infantry unit to use a support card. You confirm your attacking force first by putting them in the battle arena.
Once you commit your forces to the battle the defender can now decide whether to defend or let the attack breakthrough. On the right side of the doctrine the attacker is using shows what the defender must bring in. Unlike the attacker there is a plus sign between the last two infantry. Units after the plus sign are additional units that may be played. Additional units may come from your reserve line or your front lines. Thus the defender may defend with only two front line units + an extra front line unit or a reserve unit or no 3rd unit at all.
If the defender wishes to bring reserves to the battle he first must first commit his front line troops, then the attacker will see if he can commit any of his own reserve troops. In the case of this doctrine the attacker can not bring in any reserve units. The defender then can bring in his own reserve units since the doctrine allows it and may place it in the battle arena. After the front line units have been committed you can no longer place any units from the front line, only units from the reserve can be placed during the reserve commitment phase of combat.
Defense Doctrines

Some doctrines cannot be used to attack but instead used to augment your defense. These are known as defense doctrines and are indicated by the shield trait icon on the side. Defense doctrines are used to counter an incoming attack by changing the possible unit choices to defend with. This can be only done if the front line unit types of the defense portion of the attackers doctrine are exactly like the defense doctrines front line unit types. It doesn’t matter how many there are as long as they are the same types. In the case of the example card on the right, the unit types are exactly the same as the infantry attack doctrines defense portion. That means this doctrine can be used for defense in place of the attackers doctrine.
All defense cards cost supplies to use for combat due to the fact you are changing what kind of units you can bring in. This is noted by the red supply box. You cannot use defense doctrines to attack as there is no attacking units on the card.
Other Unit Icons

Game Basics Part 3
The battle lines have finally been drawn, the battle will now begin. The start of all combat begins at the artillery range and progresses towards close range where afterwords the battle ends.

Combat is systematic and starts at longer artillery ranges and closes in to close ranges. This is seen both on the board via the arena and on the cards themselves. Combat begins at the artillery range and both players chose their cards to attack in the artillery range. This is done by setting the card to the empty side of the battle arena to denote it is attacking. If you have no unit that can attack the current range then you must wait for your opponent to chose his attacks. Once the units have been confirmed for the attack, all units that acted during the battle are now pinned and the attack tokens are now placed on the battlefield for both players. These tokens must be placed on your unit cards before the battle can progress to the next phase. You place tokens given to you by your opponent, not your opponent placing them for you. Units that are afflicted with a token can no longer act in combat whether it be a pin, damage, or kill token.
Token placement is done is a systematic way and you can follow this list to place all tokens by the end of that combat range. All tokens MUST be placed! The only exception to that rule is unit specific tokens. Different tokens may not be placed on the same unit in the during the same combat range unless you hit rule 5 on the below list.

2. Inverse tokens are placed only on valid targets during the current range.
3. Specific unit tokens are placed as long as there is a valid target.
4. Normal tokens are placed as long as there is a valid target.
5. If a token of higher level remains and there is no longer any valid targets, may replace a token of the lowest possible level.
The same is repeated again for the battle range, and again for the close range phase. As combat closes the intensity of the battle gets higher and higher and more tokens turn from simple pins or damage to devastating kill shots. Once combat has past the close range phase the battle ends and the cards are returned to the original position the field. If there is any killed cards they are discarded.
Combat armor and attack piercing is important for all combat as that denotes how many piercing spark icons the enemies token needs in order to damage your unit. In the case of this infanterie card it has an armor rating of 1, its only attack is a close range damage token with a piercing spark of 1. This means this infantries attack is relativity weak, it only penetrate units whose armor is at 1 or less. If the token from this infantry tries to penetrate a unit whose armor is at 2 the attack token drops one level because the enemies armor reduces the incoming attack. This will be explained more shortly.
There are three basic attack tokens in game.

Damage token : Damage tokens denote a partial destroyed unit. Damaged units can be repaired during the repair phase for the factory cost of the unit. May place up to two damage tokens on a unit however that will kill the unit and by battles end must be discarded.

Kill token : Kill tokens denote a destroyed unit. At the battles end the unit is to be discarded.

When dealing with armor and piercing each of the three basic types of attack act as an attack level. Pin is the lowest attack level. Next up is damage. Finally the kill shot is the highest level of an attack. As said before when armor reduces the level on an incoming attack it drops the attack by one level. If a piercing 1 kill shot was placed on a unit with an armor rating of 2, the attack would decrease to a damage token, thus it dropped one attack level. It is possible armor rating can be so high compared to the attack that it doesn’t even pin the unit. If the piercing of an attack is greater then the armor of the enemy unit It does not increase the level of attack! This is because if you firing a rifle bullet into an enemy, it does not magically do more damage if it can over penetrate the target. If the bullet already could already penetrate the target before at a lower piercing level why would it do more damage.
Apart from the three basic types of attacks there is five types of special attacks.

Inverse Token : An inverse token is an off colored token. It does exactly what the original token did except you get the place the token on the enemies card instead of him/her doing it. If your attacking you may place the inverse token first before normal tokens are placed. If defending you place the inverse token seconded before normal tokens are placed.

Cover : All tokens during the phase this attack is used is placed on the card that uses this token. Even if there are multiple pin, damage, or kill tokens they all stack on this unit.
Suppression : Takes a seat between a pin token and a damage token, suppressed units are pinned but cannot defend as if damaged. This token can be removed by resupplying the unit like a pinned unit. If armor reduces suppression then its reduced to nothing just like a pin. This token cannot be placed where this is a pin unless there is no where else for the token to go.
Swap : When used, can swap positions from the battlefield to another friendly units position anywhere on the field and then bring that friendly unit in place of the swapped unit in combat. In most cases it requires a legal unit that doesn’t break the doctrine or the one infantry to one support ratio that is in use for offense or defense. Cannot be used to swap with a card in your hand unless it says so on the card.

The game ends under two conditions.
One player has achieved V-Day
Both players have run out of cards to draw
If one player reaches V-Day the game is over and that player has won the game. However if both sides run out of cards to draw then the game ends in a draw. To break the draw both players may agree to a sudden death match where the game resets and whoever scores at least one victory point the game immediately ends and that player is the winner.
Game Basics Addendum
These rules are for more advanced players
– Once while in game and you run out of cards, at the start of the next round you automatically lose
-Resource Decay if you do not play a card from your hand or draw a card, at the end of the round discard one card from the top of your deck.
– Only once before the match begins you may mulligan your starting hand.
Card Information
In Hearts of Iron the card game there is three available factions each with unique cards available to them which provides different play styles and approaches to the game.
Axis

Comintern

Allies

This section will provide info for all traits in the game that appear on the left side of the card. This was done to primarily save space and simplify and express the meaning of the card more easily to newer players

Frail : Any damage token placed on this card becomes a kill token.
Anti-Air : This card may be played as a general air unit on defense.
Artillery : This card may be played from the reserve line as a front line unit. Marks this card as an artillery piece.

Rapid Reserves : This card may be played from the reserve line as a front line unit
Free Supply : This card unpins for free during the repair phase.
Obstacle : This card cannot be used on the offensive. Marks this card as an obstacle.


Unreliable : When acting in combat must flip a coin to check if attack succeeds. If heads the attack succeeds, if tails the attack fails. Either way pin this card afterwords for acting.
Victory or Valhalla : If this card is damaged, it cannot be damaged again.
Untrained : Damage this card if it acts in combat.

Hidden : This card is played face down. As long as this card is face down, during combat all tokens from this card become inverse tokens when this card acts. This card is revealed if it is used on the offensive or a token is placed on it.
Field Factory : This factory is deployed in the field factory section.
Deck Building
Building a deck in Hearts of Iron the Card Game is pretty straight forward. The following rules are to be followed to create a legal deck
– Deck must be 60 cards
– Deck must contain at least one doctrine
– Deck cannot contain more then 5 of the same type of a unit. The only exception being the Factory card and the Armament Card to which you can have as many as you like
– Deck cannot contain cards of multiple factions. If you build an Axis deck all cards must be either neutral faction or Axis cards for example
About Classic Rules
Now as most veterans will know upon playing playing HoI-TCG out of the box with this mod, that the game does not utilize the original classic rule sets but instead builds upon them. This manual is for both new and old players alike that, instead of using the newer rule set, wish to play with the games original rules. For reasons such as easier to play, feels more fluid, or just for nostalgia factor, this manual is for you.
This manual does not teach a player how to play the basics of the game, please refer to the main manual for such information. This manual will cover the rules that relate to how to play in the classic rule set. If information is not mentioned in this manual then it usually means nothing about that part of the game was changed and you should refer to the main manual for more information about that section.
Just one note is that the entirety of the game was designed and balanced around the 2.0 rules. In some if not many cases the game may feel a bit broken or unfair in classic rule sets. Then again even the original game had some of these problems so you may see the crop up.
So please, enjoy Hearts of Iron the Card Game in its original true glory with this guide!
Classic Rule Basics
When we look at the board, really not much requires your attention. The board itself was designed with the 2.0 rules themselves. So things like the front and reserve line are arbitrary for classic rules. Units can attack from any line it doesn’t matter. Technically you can have more then the 16 max cards for the combat lines but for aesthetics and space issues, its probably a good house rule to maintain the max 16 on field rule. Then again its up to the player themselves.
The tech section of the economic portion of the board can also be ignored. Tech is primarily a 2.0 rule to simulate the many different factories and the effects they cause when you don’t have all the appropriate factories. This will lead in to the tech portion on the cards themselves shortly. So cause of this you don’t need to factor in tech penalties when deploying or when repairing cards. What it says on the card is precisely what you must pay for it.
On the cards themselves, they actually follow the classic rules in almost every respect. It is just hidden by things like armor rating and piercing value.
For example, for the Panzer VI on the right, it has an armor value of 4 and a penetration value of 4. In the classic game these were called “Heavy armor” trait and “Negate heavy armor” trait. So just like I said, its disguised by numbers now but still strictly follows the original game. Like I said before when regarding tech penalty and tech for cards just ignore them. They are a 2.0 rule so whatever the cost of the card is, is the cost you pay straight up for deployment and repair.

Repair Phase
Repair phase for the most part really hasn’t changed, just me parroting the no tech rule thus no repair penalty has to be applied for being behind on tech.
Armament phase, again, hasn’t changed. Again im parroting the no tech rule so no penalty for trying to deploy a unit that is higher tech. You also no longer need to play with research facilities so there’s that too. Again doesn’t matter how you arrange your units except for some doctrinal effects against your cards although some players may want to put in house rules to remove those doctrines which only effect front line units to effect all units. Those rules were put in for 2.0 style play where most units in reserve line cannot be directly used anyways but for classic rule they can freely strike from wherever.
During combat like I said in the previous section, doesn’t matter where units attack from but as long as they match the doctrine card themselves. When pulling reserves however they are not pulled from the reserve line but instead from your hand. This causes cards like flank attack and immediate reserves to lose their purpose and again were designed with 2.0 in mind.
Not sure why this even has a section, card battle itself has not changed. Just remember from earlier about the heavy armor and negate heavy armor from the boards & cards section and that pretty much nails it. There is no armor besides heavy armor and there is no penetration so all attacks are worth the same exact weight apart from attacks with a penetration of 4 which is negate heavy armor. So thus an infantry with his puny rifle can damage a panzer IV with no problem within classic rules.
Final Notes
I like to thank you the reader for your time for reading through this manual for Hearts of Iron the card game. I hope now you have a better understanding of the game and might give it a whirl with a friend or two and enjoy it in the process. That alone is enough to have make this project worth anything! With that said I hope to see you on the battlefield soon!
I like to thank Shams for providing the original game assets.
I like to thank Bowser for helping play test and balance the cards.