Overview
This guide will allow you to create, customise and use you own cubic skybox backgrounds for your future Human: Fall Flat levels.
Installing GIMP
To create the PNG image used in your skybox, you’ll first need to install the free, open source image manipulation program GIMP.
You can find the latest version at:
[link]
Setting up the canvas
You’ll first need to open a new file. Set up the canvas to have pixel dimensions of 2048 x 1536 AND Fill with transparency.

Next, you’ll need to configure the grid. To do this, first access the view tab and tick “show grid” AND “snap to grid”.

You’ll see lots of squares appear on your canvas. The final step is to configure the grid to be 512px instead of 10px. Do this by finding the configure grid option under the image tab.

Creating the skybox image
Next comes the fun part. First, choose a background and foreground colour (BG and FG) and then use the bucket tool to fill the canvas.

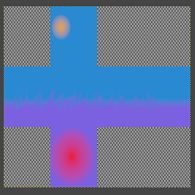
Then, select the rectangle tool and cut away the corners to form the required skybox cube map shape. The rectangle tool should snap to the grid, then hit delete to return your selected area to transparency.

From the image above, you can see which face of the cube will be mapped where. Bear this in mind as you create your skybox image; imagine the map folding up into the cube to form the skybox!
Exporting the Skybox image
Once you’ve finished creating your amazing skybox, you’ll need to export it as a .png image.

Save it somewhere where you can easily access it. Now open your Human: Fall Flat project, and drag it from the file explorer into unity so that it is saved in your project folder / file system too.

Setting up the Skybox in Unity
The final step is to apply the appropriate import settings to the PNG image so that it may be used as a Skybox. The image below shows the settings that I would recommend:

After hitting the apply button, you should see the image in the file explorer turn into a sphere. This means you are ready to apply! Simply drag the sphere into the 3D viewer to set the skybox. (Alternatively navigate to the lighting settings under the window tab.)

You should now be able to see your creation in the sky! I hope this helped you. I look forward to seeing many wacky and awesome skyboxes in the future, happy creating!


