
Overview
This guide took me a lot of time to make too. I had to browse through so many forums and sites to make this work, I think I’m going crazy. So, I present to you, the guide on how to play SMod and the glorious mod CSS Sci Fi 3: Hardwired.EDIT: Due to a few requests I got, this guide (as of September 2015) now presents how to install SMod Redux.BEFORE WE BEGIN, I would like to thank the people at the bsnooch.com forums. You guys are the best! 😀
Introduction – About SMod
In case you didn’t know, SMod is a TC (Total Conversion) mod for Half-Life 2. Basically, SMod is the vanilla HL2 campaign, but with new guns, new skins, new models and really cool new features. It’s a really fun mod!
However, a lot of SMod versions are available, and each has even more features and weapons. Some that I know are Tactical, CryLife and of course, CSS Sci Fi 3: Hardwired.

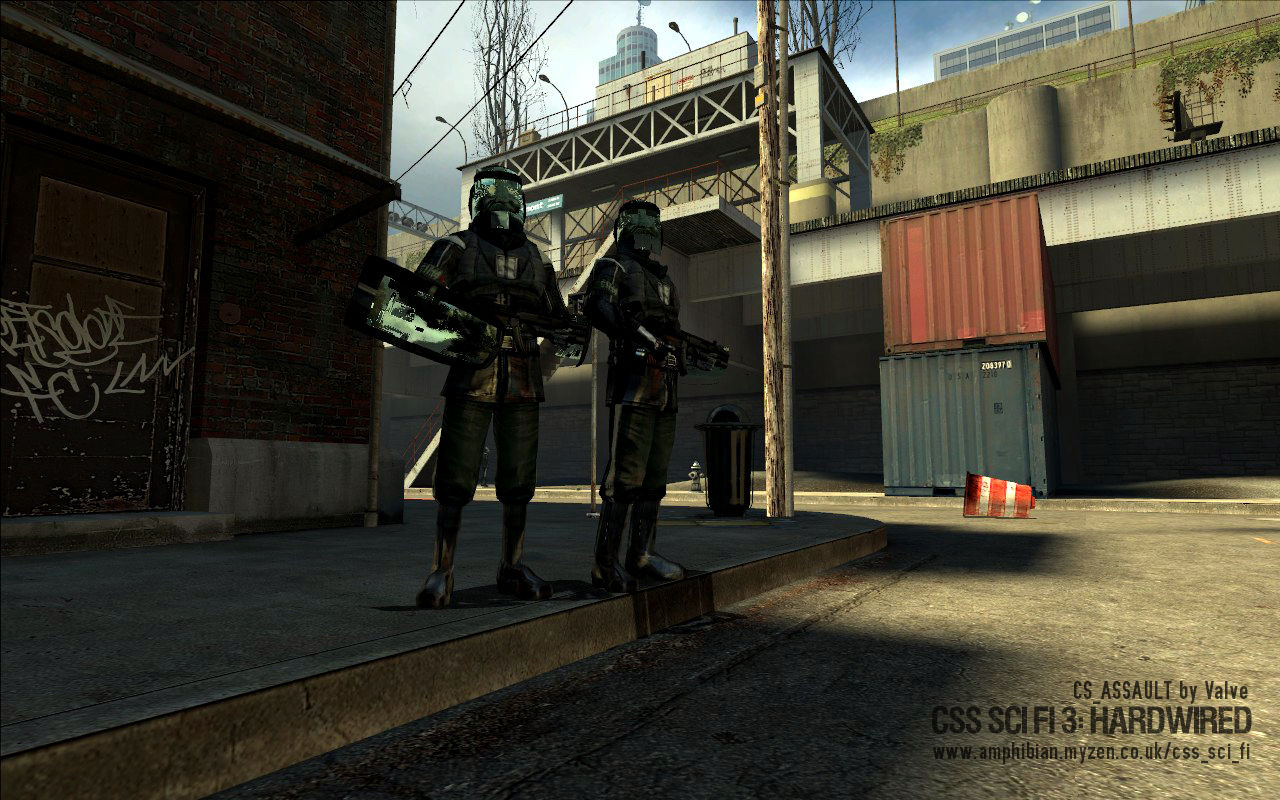
CSS Sci Fi 3: Hardwired is much more different than any other SMod version. Apart from new weapons and such, in this mod, instead of playing through the normal HL2 maps, you play through modded versions of every CSS map (when I say modded, I mean that some things were added so the maps can be played in single player). There are also some custom maps for CSS.
The reason I wanted to talk about this version specifically is because:
A) It is my favorite version of SMod and
B) This one is the hardest to install, due to the numerous updates that were released for HL2, mainly the 2010 update and Steampipe, but also because it requires CSS, which makes things even more messed up.
So, in this guide, I will show you how to install and play SMod and CSS Sci Fi 3: Hardwired.
Obviously, you will need Counter Strike: Source in order for this mod to work.
1. Installing SMOD Standalone.
As mentioned in my HL2: Ep2 guide, SMod is a different story. It is one of the most heavily modded modifications for HL2, and it won’t be that easy to install. In order to play this mod, you need SMod Standalone version 0.56:
[link]You will also need the CSS Addon version 0.35: (for CSS Sci Fi 3: Hardwired and some mods that require CSS to work)
[link]And yes, both of these files are safe!
IMPORTANT NOTE: The mod’s files and HL2’s files MUST be on the same HDD. If for example HL2 is installed in Drive C:, but the mod is installed in Drive F:, then you’ll probably encounter some errors. If you’re not sure about it then you can contact me.
The SMod Launcher isn’t running on Steam, so you won’t be able to open the overlay or do other Steam related things in-game. SMOD Standalone includes SMOD 40aq. Both of these files are installers, but BEFORE YOU BEGIN: Put both of these files on your sourcemods folder BEFORE the installation, so the sourcemods folder looks like this:

Open the file SMODStandalone_install.exe first (obviously). You will be greeted with an installer.

After you read the terms and such, you have the option of creating a desktop icon. Then click “Install”, and now wait.

After some time, a new cmd window will open to execute some commands. Just wait here too.

This cmd window will open again some times. Again, just wait. After the installation is over, you are done.

Installing the CSS Addon is basically the same. It also needs to be in the sourcemods folder BEFORE the installation. When you open the launcher, it looks like this:

In the top left corner, you will see “SMOD40aq”. This, apart from SMOD40aq, shows all versions of SMod that you downloaded. So, if you installed CryLife for example, it will show up there. If you want to install a different version, then take the directory and put it in the folder “Smod Standalone/mods” folder.

That’s all you need to do to play SMod. Though, some versions, like Redux and Tactical, require a custom gameinfo.txt. You can find those right here:
[link]
Just scroll down a bit, and you’ll find them. To install them, find the mod’s gameinfo.txt file (found in the mod directory obvs), copy the fixed gameinfo.txt found in the site, then replace it from the line “FileSystem” to the end. Again, kudos to that site and its users!
WARNING: Do NOT use Steam to open SMod Standalone, and you will not see it on your library. You have to manually go to its directory and open the .exe to play it. You may encounter some errors otherwise.
So if you don’t want to play CSS Sci Fi 3, you’re done!
2. Installing CSS Sci Fi 3: Hardwired
Now, the big one. This is not that easy to install. This mod was made in 2009, and a ton of updates have happened since then. The way the game files were managed was changed, so this mod can’t find CSS’s game files, because it believes it’s still on the CSS .gcf file, which is now a .vpk file. Thanks to the awesome modding community though, people managed to find a way to play this great mod.
Again, make sure you have the CSS Addon for SMOD Standalone before you do anything!
First of all, download the mod here:
[link]
Yet again, these files are safe. Both of these .zip files include an installer. So, after you unzip the installer, open it. When you do, you’ll see this message:

Click OK, then Next, and then you’ll be greeted with this:

This is where the installer will extract the files. While you can install the files on the sourcemods folder, I recommend extracting them in the mods folder in the SMod Standalone folder.

After you click on Install, you’ll see this message:

Click on Yes. The installation will now begin.

After that, you will be asked to find the directory of CSS.

NOTE: You must choose the Counter-Strike Source folder on Steamapps/common, NOT the cstrike folder inside it!

Click on Install, and you’ll get a message like before:

Click on Yes, then Yes again, and then wait. The installation is complete.

You can open the configuration utility if you want. There is also a desktop shortcut created, but there’s no reason to keep it. Later, install the 3.01 patch installer. It’s basically the same thing. Just choose the mods/CSS SCI FI folder when you’re asked to.
Now, go to the gameinfo.txt file of CSS SCI FI. It will probably look like this:
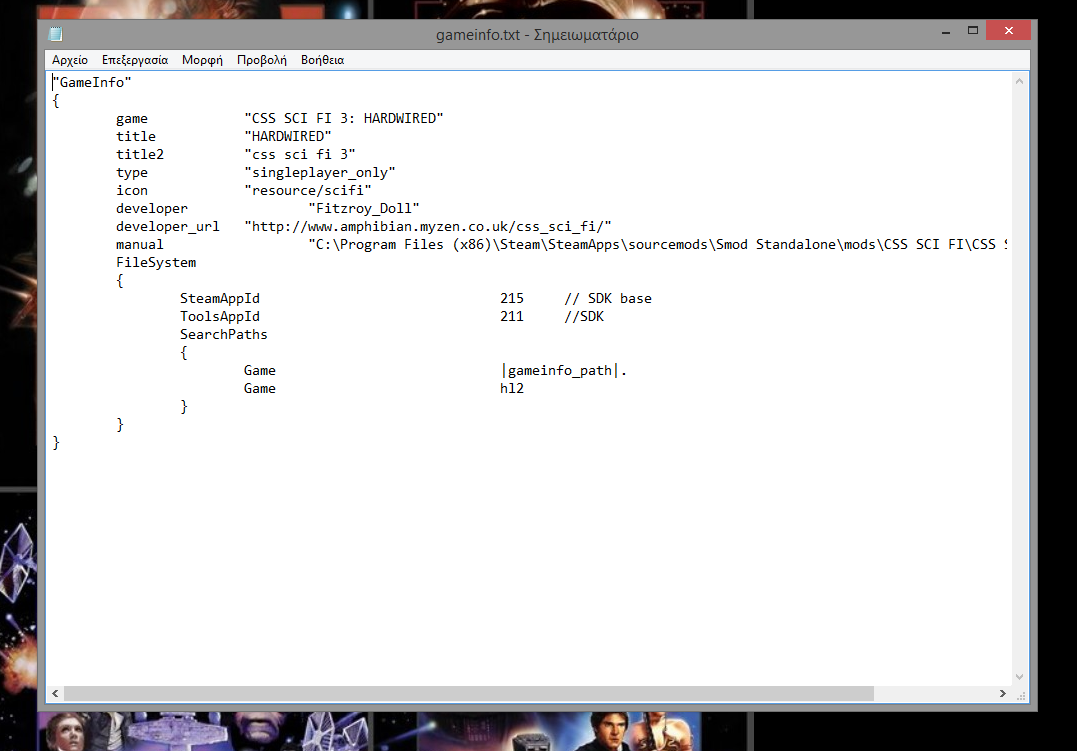
Now, you must replace the lines from “FileSystem” to the end with this:
BEFORE you try to play the game though, go to the folder CSS SCI FI/scripts. You will see this:

Open the file addcontents.txt and delete EVERYTHING. No seriously, that’s what you need to do.
After that, open SMOD Standalone. Now, you will also see the CSS SCI FI option:

After you select that option, wait for it to process some files, and you’re done!
For me everything ran fine and there were no problems with the weapons, the enemies or the new effects. However, I only got 1 corrupted texture in the cs_assault vents. I’m trying to find a way to fix it, and I am close. Also, wait past the Valve intro (which is the old one). You may think the game crashed, but it didn’t.
There are some occassions where if you enter a CSS map, the game might crash to the menu, To fix this, open the console (to enable it, go to Keyboard, then advanced, then “Enable Developer Console”. To open it, press the tilde button under the ESC key) and enter the command “ai_norebuildgraph 1”. For now,
ENJOY CSS SCI FI 3! 😀
**NEW** What to do if i still get corrupted files?
Since I published this guide, many people have been telling me that despite the fact that they followed the instructions properly, they’re still getting corrupted textures, sounds and maps upon opening CSS Sci Fi 3. This probably means that the CSS Addon didn’t work properly, which means that CSS’s game files weren’t ported correctly to the SMOD Standalone folder. Thus, the mod can’t locate the files, therefore it can’t open them. This, unfortunately, means that we have to port the game’s (Counter-Strike: Source’s) files to the SMOD directory manually.
Fortunately, there is a way to do this! However, you have to download another program called GCFScape (requires a very small amount of disk space). This is a program that allows you to open and browse the previously mentioned .VPK files, which is basically how a game’s content is stored now. What’s great, however, is that you can also extract and edit files from said games. So, this means that we can extract CSS’s game files and port them over to the SMOD directory. It’s a highly useful program and anyone interested in modding should keep this in their hard drive.
WARNING!!!!!
I HIGHLY recommend doing this after installing both the SMOD Standalone and the CSS Addon installers. If the mod works correctly after running both installers, there is no reason to follow the steps below. Ignore this part completely!!
But enough talking. Here is an archived website from which you can download GCFScape (it’s completely safe):
[link]
You will be greeted by this site:

From here, we want the 1.8.6 version. I’d recommend downloading the archived version if you just want to get this over with, but you can use the installer if you want to. If you use the archived version, you’ll encounter 2 folders in the zip file:

If you’re running on a 32-bit system, then unzip the x86 folder. If you’re using a 64-bit system, unzip the x64 file.
Now open up the program. We want to browse and find CSS’s .VPK file. To do this, go to File and click on Open.

Now you will have to browse to CSS’s game directory and find a specific file called “cstrike_pak_dir.vpk”. It’s located in this directory:
If it’s not here, then find the folder Program Files (x86) and continue on from there.
Upon opening the file, you will encounter all of the game’s data:

Don’t worry though, we don’t have to copy all of it. We only need 6 folders: “maps”, “materials”, “models”, “resource”, “scripts” and “sound”. Manually select all of them with Ctrl+Click and right-click. Then, click on Extract.

Now, we have to extract these files on the folder “CSSBase” inside the SMOD directory. It should be in this directory:
Again, if it’s not here, then check the Program Files (x86) folder. It’s gonna take some time to copy all of these files, so you’re gonna have to wait. Finally, your “CSSBase” folder should look like this:

Now, you can open up CSS Sci Fi 3 and hopefully, you will encounter no problems!!
When it comes to my personal experience, I have to admit that I retried installing this mod after nearly a year and surprisingly, the CSS Addon didn’t work correctly, and now I understand why so many people had a problem with it. I don’t know why it may not work, so I can’t really answer that. For now, enjoy your non-corrupted mod!
EXTRA SECTION: Installing SMod Redux
As I mentioned in the beginning of this guide, some people requested a way to install SMod Redux, so I decided to make another section for those people.
Remember, you need the CSS Addon ver 0.35 for this SMod version!
[link]
(I know the link is in the 1st section, but whatever.)
Here is the link for SMod Redux v8:
[link]
It’s a .zip file which contains some text files and the folder “smodredux”. Just extract this folder in Smod Standalone/mods folder.
You must also download the file SMOD Addon1, found here:
[link]

Here, just copy all the files from the .zip file to the smodredux folder. When you’re asked to overwrite some files, do it.
There’s also this patch you have to install:
[link]
You must do the exact same with this patch too.
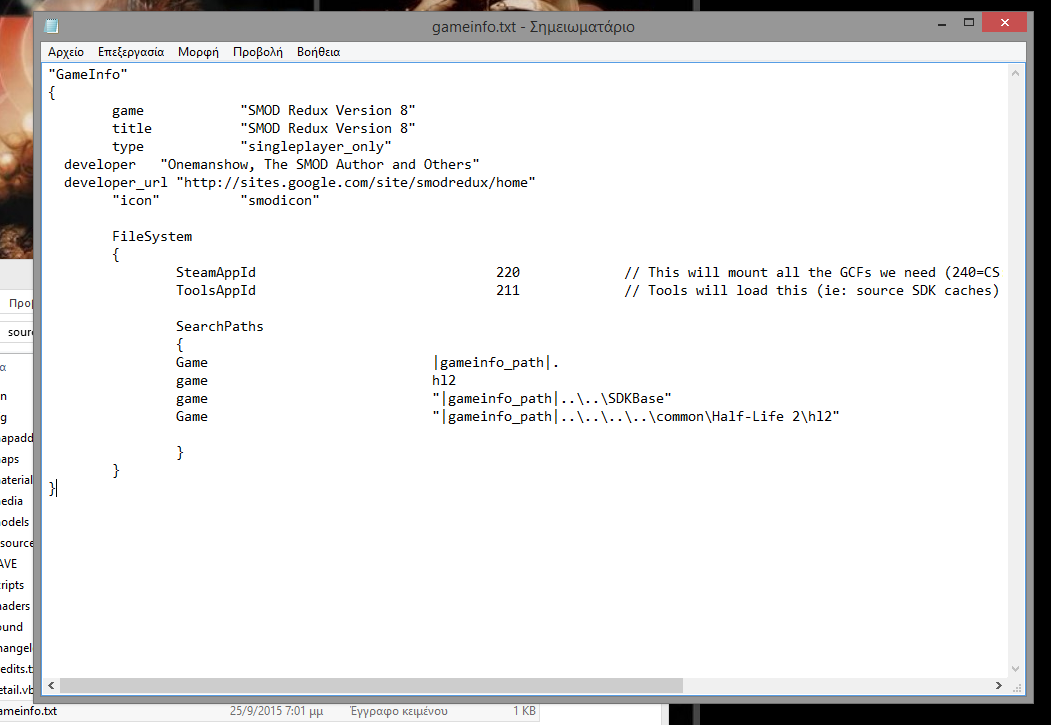
Before you try to play this mod, open the file gameinfo.txt. Replace the files from FileSystem to the end with this:
Now, your gameinfo.txt file should look like this:
Next, go to the folder scripts. You will find a file called addcontents.txt.
Open the file, and then delete everything.

Now, you’re ready to play some SMod Redux!
From what I’ve played, everything works pretty well, to the weapons, to the gore and the special effects. However, stuff like the kick and Bullet time have to be binded in the Options menu. These are the binds from CSS SCI FI 3: Hardwired:
Bullet Time: TAB
Kick: X
Iron Sight: T
Thanks!
Thank you for reading this guide! Make sure you drop a like, it really helps! 😀
I also made a guide on how to play HL2:Ep2 mods after the Steampipe update:
[link]Hλppy Gλming!