Overview
This is a guide for completing the 5 hour speedrun achievement quickly and safely without glitches. I’m fireb0rn, I’ve beaten this game hitless and have achieved the Any% No Major Glitches WR many times. I am confident I can help you do this with ease!
Introduction
Hey there, I made this guide because I noticed some of the other guides were a bit outdated, so I’ve optimized the route a bit and added key items which will make the run significantly more comfortable for beginners. The thing with this achievement is that it’s much easier if you just get overpowered and faceroll the bosses, so I have made it a focus of this guide to just get strong as quickly as possible. I think this guide will work out well for you, but if you have any questions, I’d recommend joining my discord and asking in the #hk-help channel.
If you are interested in Hollow Knight speedrunning content, check out some of my social media: https://www.youtube.com/user/fireb0rn, Tweets by fireb0rn, Twitch[www.twitch.tv], Discord[discord.gg]. If you are interested in learning an actual speedrun, join our Speedrunning Discord[www.discord.gg] and check the pinned messages in #speedrunning.
I’d recommend starting by watching this video and then using the route maps below:
Important Tips
Skip these if you’ve watched the video already.
Focus on keeping your health full at all times. Sit on the benches shown in the maps, because while you can save a bit of time by skipping benches, if you die you’re losing out on a whole lot more, as well as risking the chance of losing your geo.
Farming basic enemies is slow, so don’t waste your time on it. This route collects more geo than necessary and generally does not carry much geo in sections where you can easily die and lose your shade, so do not worry about geo too much. Just try not to die and lose any.
Shaman Stone is the best charm in the game, and Spell Twister synergizes with it extremely well. I’d recommend sticking with these charms. If you feel like you need an increase in power or movement, grab an extra mask, Nail Upgrade 2, Monarch Wings, or Shade Soul.
Spells are extremely effective for killing bosses. Descending Dark is very overpowered and has invincibility frames after casting it. These invincibility frames are canceled by casting it again, so be sure to move out of the enemy’s hitbox before trying to cast another spell.
Some of the modders in the speedrunning community checked the game’s code and have confirmed that pausing stops the in game timer from incrementing. If you need to take a break or look at the maps, then make sure to pause the game first.
Route Overview
- Defeat False Knight and get Vengeful Spirit.
- Defeat Hornet and get Mothwing Cloak.
- Get Mantis Claw.
- Get Nail Upgrade 1 and defeat Soul Master to get Desolate Dive.
- Sell all relics. Talk to Sly, buy from Salubra, and buy Lumafly Lantern.
- Get Crystal Heart, Descending Dark, and Dream Nail.
- Defeat Dung Defender and get Isma’s Tear.
- Defeat Watcher Knights and Lurien.
- Defeat Uumuu and Monomon.
- Defeat Herrah.
- Defeat The Hollow Knight.
Route Guide
Click on the images to expand if you’re having trouble reading them.
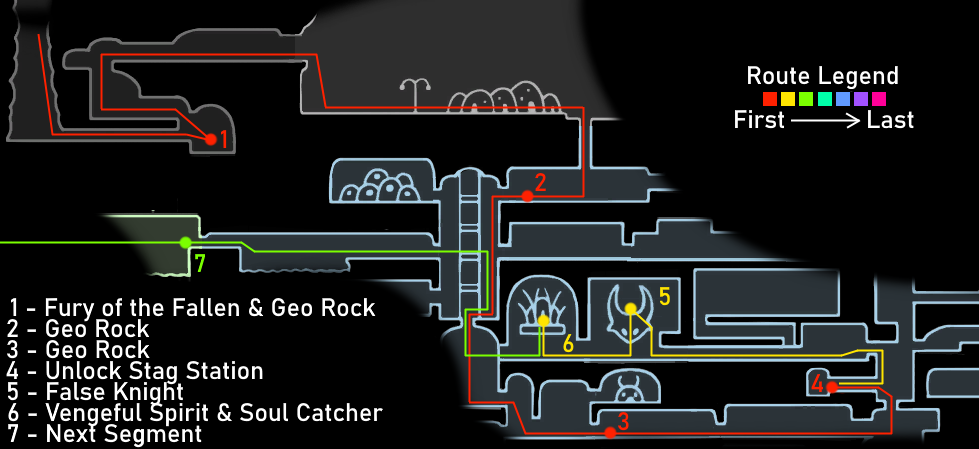
- Collect Fury of the Fallen (pogo the spikes) to unlock Salubra’s first charm notch.
- Gather 50 geo on the way to the Forgotten Crossroads Stag Station by destroying geo rocks.
- Unlock the Stag Station, bench to heal if needed.
- Defeat False Knight, collect the City Crest and his geo chest.
- Get Vengeful Spirit, pick up Soul Catcher and equip it at the bench, then head to Greenpath.
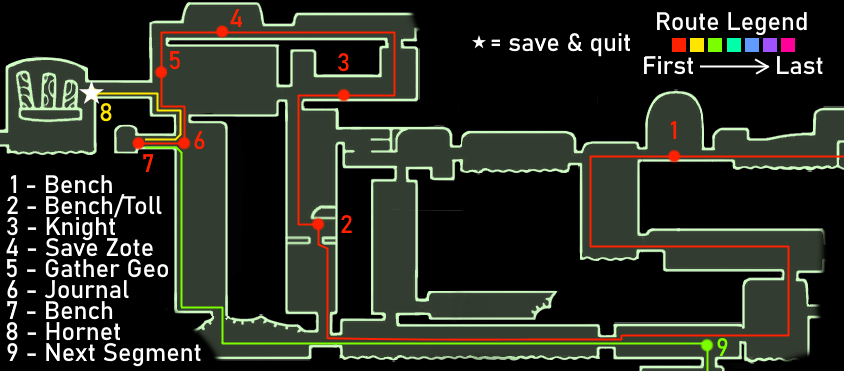
- Head to the Greenpath Stag Station, defeating the Vengefly King and the double Moss Knights for their geo on the way, as well as picking up the Wanderer’s Journal behind the breakable wall.
- Bench at the Stag Station but do not unlock the stag.
- Defeat Hornet, then save and quit immediately after picking up Mothwing Cloak.
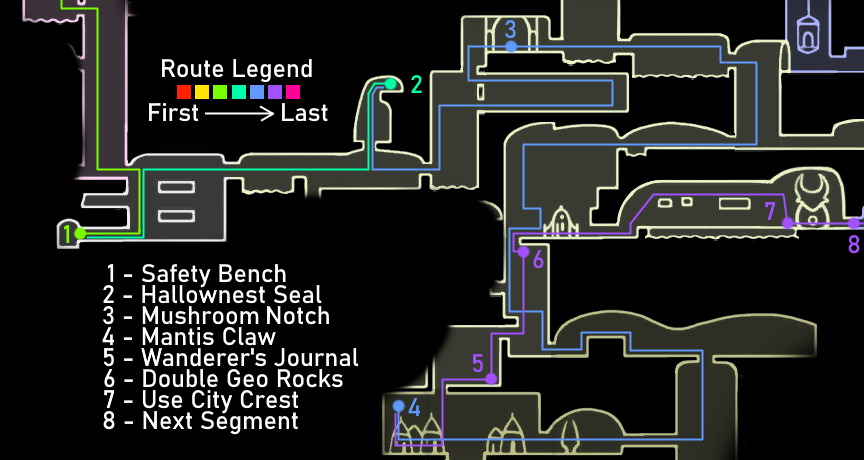
- Head to Mantis Claw, stopping for the Stag Station bench and Hallownest Seal on the way.
- Head to the City of Tears, collecting the Journal and double geo rocks on the way.
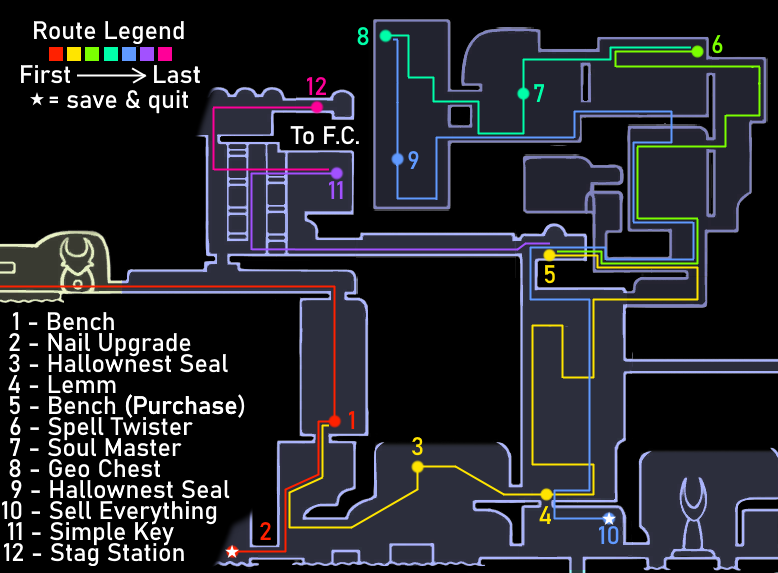
- Bench and grab the Nail Upgrade, then save and quit back to the bench.
- Head to Soul Sanctum, grabbing the Hallownest Seal on the way. If you are missing geo at any point, sell a relic to Lemm.
- Purchase and sit on the bench, then go through Soul Sanctum, grabbing Spell Twister, defeating Soul Master, grabbing the geo chest and the Hallownest Seal afterwards.
- Sit at the bench again. Equip Spell Twister. Go to Lemm and sell everything. Save and quit back to the bench. Try not to die with this geo.
- Collect the Simple Key and then stag to Forgotten Crossroads.
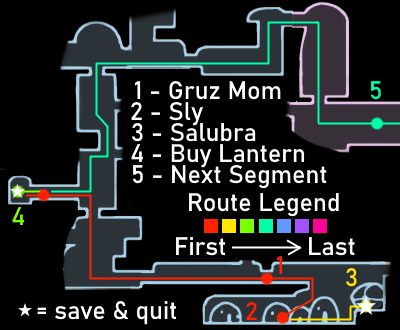
- Sit at the bench. Defeat Gruz Mother, speak to Sly, and purchase Steady Body, Shaman Stone, and one charm notch from Salubra. Save and quit back to the bench.
- Equip Spell Twister and Shaman Stone. Go to Dirtmouth and purchase the Lumafly Lantern from Sly. Save and quit back to the bench again.
- Head to Crystal Peaks.
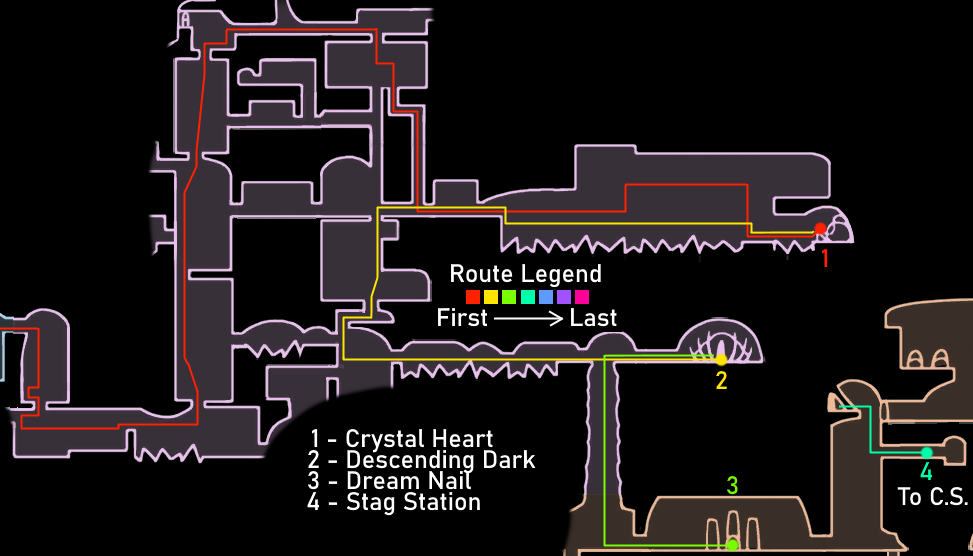
- Go straight to Crystal Heart. There is an optional safety bench which you can fork off to right before going up in Crystal Peaks, just head right instead first.
- Go straight to Descending Dark, and then continue to Dream Nail.
- After waking up in the Resting Grounds, go to the Stag Station and head back to the City Storerooms.
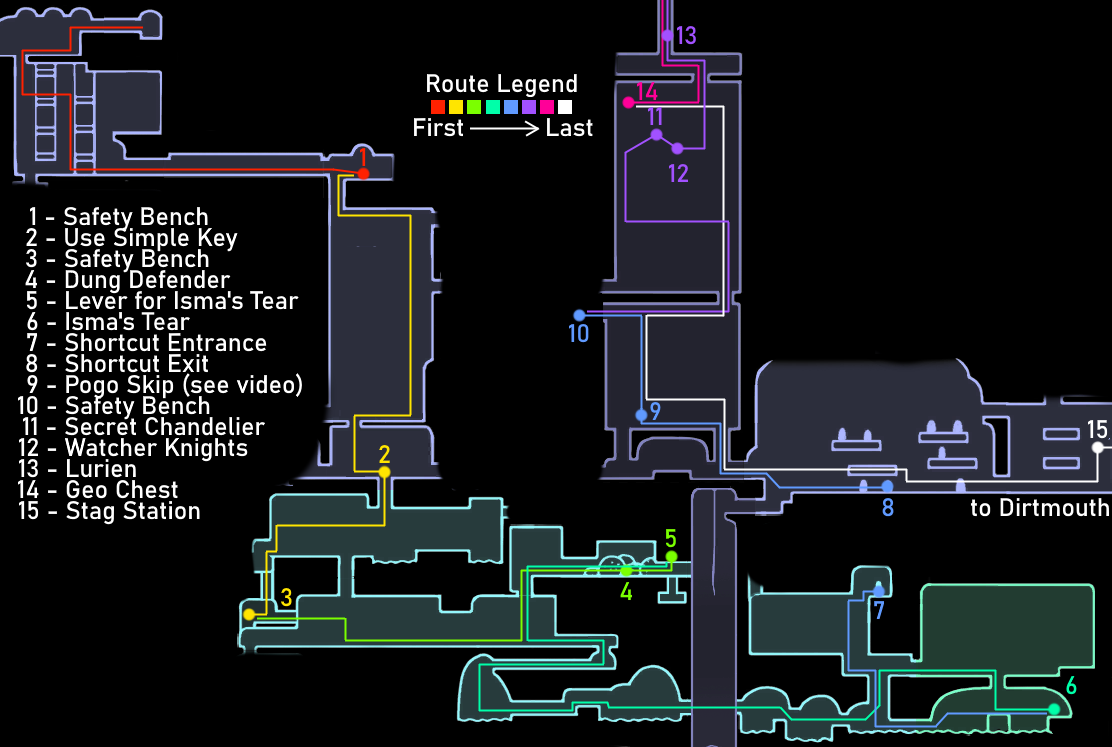
- Head towards the Royal Waterways, using the Simple Key to enter, and benching inside.
- Defeat Dung Defender, hit the lever, and grab Isma’s Tear.
- At (9), perform a background object pogo skip below the Watcher Knights to access them. Simply jump, wait until you are at the peak of your jump height, then pogo the object and walljump off of the wall. If you miss twice, then you can exit and re-enter the room from the left elevator to respawn the objects.
- NOTE: If you cannot do this skip, simply head to Broken Vessel, bench at the purchasable bench on your way there, collect Monarch Wings, and save and quit back to the bench. Continue through the route normally, but use the secret entrance to Beast’s Den to save some time later.
- Head to Watcher Knights, sitting at the Spire bench along the way. Hit down the Chandelier, accessible by breaking the ceiling to the left of the boss room before fighting them.
- Go and kill Lurien. On your way down, collect the geo chest.
- Take the Kings Station Stag to Dirtmouth.
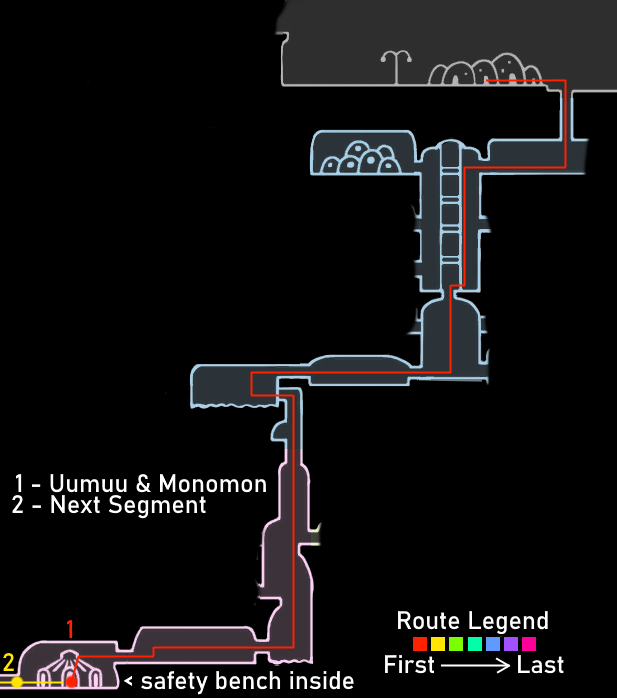
- Head to Teacher’s Archives. In the Teacher’s Archives, grab the safety bench at the top and then fight Uumuu and kill Monomon.
- Exit the Teacher’s Archives and sit on the safety bench again.
- Head left towards Queen’s Gardens.
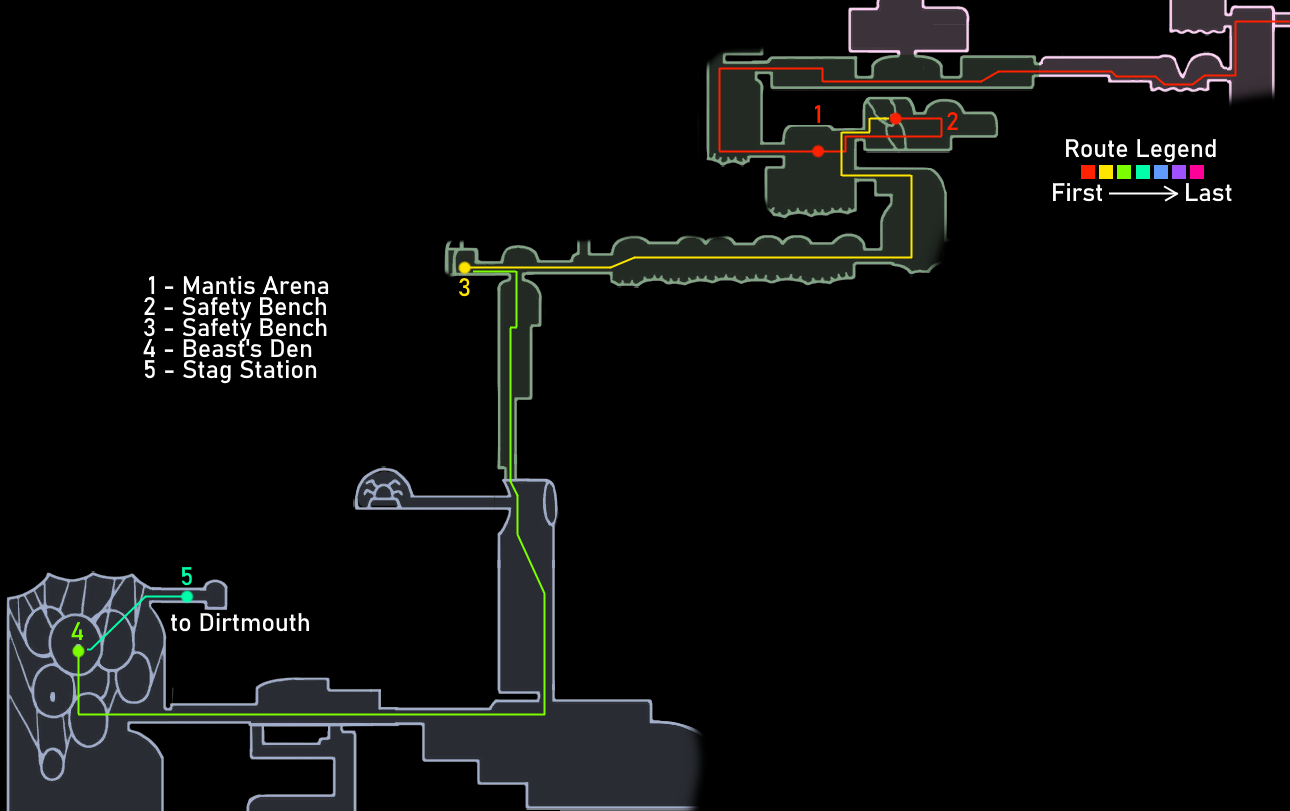
- Use the acid entrance to enter Queen’s Gardens.
- Purchase the bench before Deepnest and sit on it, then head to Beast’s Den and kill Herrah.
- Take the Distant Village Stag Station to Dirtmouth.
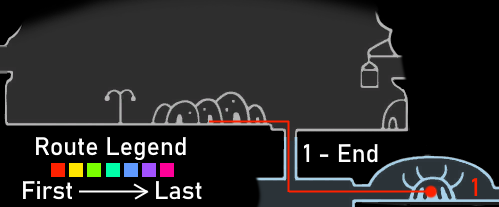
- Go to the Hollow Knight. Do not stop for the bench unless you need to heal as you will automatically spawn there after dying regardless.
Boss Tips
See the video at the beginning of the guide for commentated walkthroughs of these bosses.
This is your first “real boss fight.” Go in with full soul and health. Using Descending Dark while he is underground will stun him out of the ground and make the fight mostly trivial. Be sure to use Descending Dark as much as possible because its invincibility frames are a good defensive tool and it does ridiculous damage.
Dream Nail the Watcher Knights in the background before starting the fight for soul and healing if needed. Using pogos and diving is a good beginner strategy. After you dive, walk or jump out of their hitbox and continue the punishment, just be ready to dash away if they bounce. As they spawn, Dream Nail the beetles to gain soul, since they are invincible while spawning anyway. They will die in three Descending Dark casts each.
If you need to heal, continue hitting one of them till you’re at full soul and then try to kill one so that you have some soul leftover and can heal during the little break. Trying to heal while two knights are alive is often a futile effort, since if they aren’t in melee range, they will roll or bounce at you. Kill one of them beforehand, dodge the other, and then go for the heal.
Go in with full soul and health. Do not rush the fight but be patient and focus on luring him inside the bottom middle platform so that you can cast dive when he becomes vulnerable. To do this, lure him into one of the bottom quadrants and then stand on the opposite side of the center platform. An effective way to dodge his attacks is by moving along and sliding down the walls. If you take damage, just heal. It’s not a big deal to go slow here since he doesn’t have much health anyway.
Bench on your way in if you need health. It is expected that you will take some damage, just focus on managing your soul so that when he staggers or starts stabbing himself, you can get a heal or two off. THK does not take damage while he is stabbing himself, so use that time to heal yourself and get soul. Cast Descending Dark when you are at full soul as it is your main source of damage and will melt him, then swipe at him, pogo above him and cast it again.
Geo Backups
If you die at any point and lose your geo, you generally want to replenish your geo using relics, chests, or other spots which drop a lot of geo. I’m gonna list a lot of spots like these in case you need them.
Use this map as well: [link]
- These splits do not require much geo or have much risk of dying twice in a row. If you need some geo to progress, then just farm small enemies and geo rocks that you see.
- If you need geo for the Nail Upgrade or the bench, simply sell a relic to Lemm early.
** If you die with the geo for Lantern here are some good geo sources that you can use: **
- Hallownest Seal below Dirtmouth. Jump down the pit and walljump up to it.
- Wanderer’s Journal to the left of City Storerooms Stag Station.
- Crystal Guardian in Crystal Peaks.
- King’s Idol in Crystal Peaks, accessible by doing a background object pogo.
- Get Crystal Heart and clear the Resting Grounds Crypt of relics and geo.
- Go to Kings Station, collect the Wanderer’s Journal and Hallownest Seal.
- Gorgeous Husk to the left of Kings Station.
- If you don’t have the money for the Kings Station Stag, get geo from Gorgeous Husk.
- If you don’t have money for the Queens Station purchasable bench, skip it and play safe.
- If you don’t have money for the Distant Village Stag, farm Devouts and geo rocks in Beast’s Den.

