
Overview
This guide will show how to change the character facial expression using Cheat Engine tables.
Before anything else…
You will need the Cheat Engine Program.
Use it at your own risk. Use only in offline modes.
MAKE A BACKUP of your game save before using CE tables.
[link]
Demonstration gallery
You can view most of the facial expressions available when you are taking a picture for your CAS in Creation Mode.
The point of using CE tables is that they will allow you to change the expressions during the battle. So your screenshots can have any stage scenery, not only the default one from Creation mode.


As you can see, Bryanyora’s expressions script has some extra features (mouth/eyelids) compared to the Nepafu. However, it’s more complex to use.
My suggestion is to start with Nepafu, since you probably are already using it (Ansel unlock, camera control or joint script). But if you really want these extra features, then try the Bryanyora table.
01 – Basic: Nepafu’s CE table
1) Download the SC6 table from the Google drive link in @somberness twitter.
Tweets by somberness
2) Run Cheat Engine program AND SoulCalibur 6.
3) In CE window, click in “File” > “Open Process”. Select the SC6.exe.
4) Click in “File” > “Load”. Select the Nepafu table that you downloaded.
5) Mark the “Facial Expression” check box.
6) Start a battle.
7) Your CE window should be displaying these values:
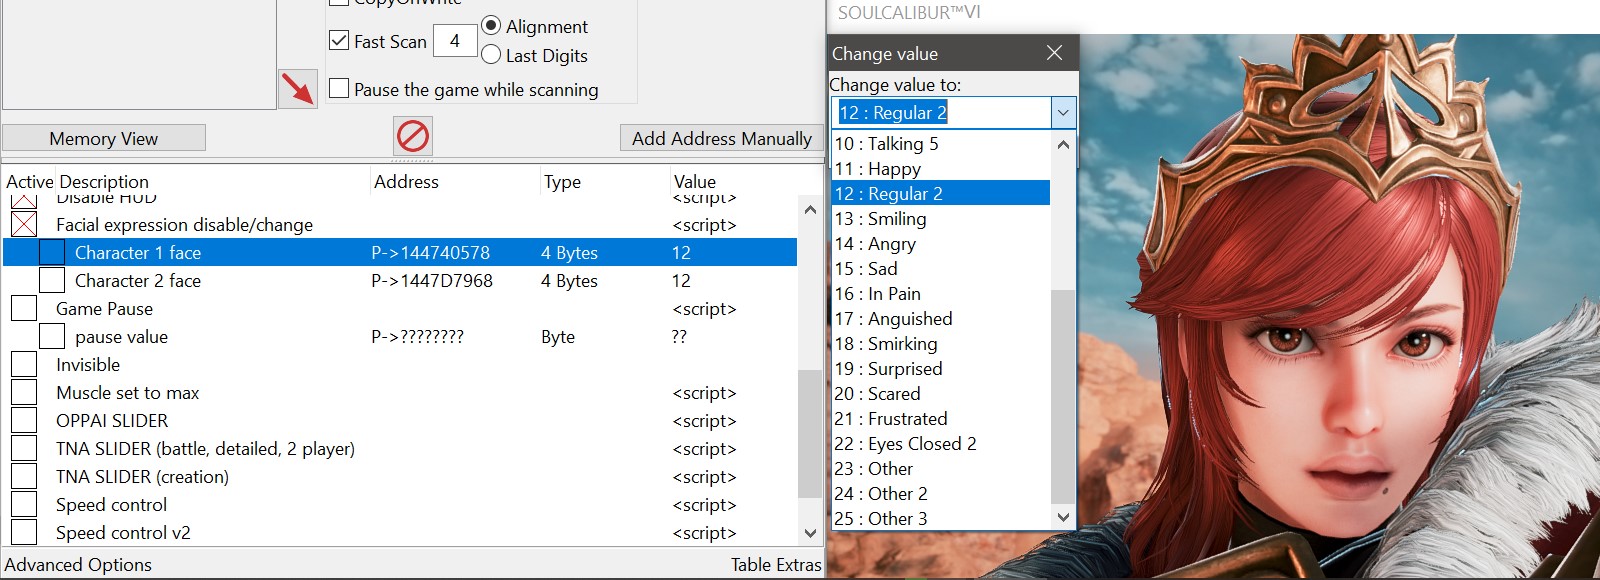
8) Select the desired expression:
Click “OK”

Note 1: It’s OK if you enable the script / mark the Checkbox after the battle have started, but the references may not be recognized at first (there are “??” instead of values).
In this case, use reset (training mode) or just hit your opponent until the script accepts values.

Note 2: the “Other” expressions (23, 24 and 25) are different depending on the character you picked. Some characters don’t have these 3 and the game will crash if you try them. In the end, my recommendation is to don’t use them.
02 a – Pre-Intermediate: Updating the Bryanyora’s CE table
Right now, (2021/06), the table available in Bryanyora’s homepage isn’t updated.
However, I just found recently that he has a Pixiv Fanbox (similar to Patreon), giving subscribers a link to updated files.
This is my point of view: if Bryanyora wanted, he could remove the link from his homepage and people would have to download only from his Pixiv Fanbox. But the link to the outdate tables is still there.
The update process of facial expressions script involves very small changes in the codes/addresses. These searches/replacements can be done with basic Cheat Engine knowledge.
Conclusion: I will show how to update Bryanyora’s expression script from the Ver 2.25.00 (table from his homepage) to Ver 2.31.00 (current SC6 version, 2021/06). If something changes in the future (the link is removed or the game receives a new patch) and the script no longer works, please consider:
1) supporting Bryanyora’s Pixiv Fanbox for updated tables OR
2) taking some extra work to find out the new addresses.
1) Download the SC6 table from the Dropbox link in Bryanyora blog.
[link]
(this site is in japanese, but the link is in english. Search the term “download”)
2) Open the table with a text editor (like Notepad).
3) Find these old lines and replace them with the updated ones:
Old:
New:
Old:
New:
Old:
New:
Old:
New:
Old (3 times):
New (3 times):
Old (2 times):
New (2 times):
4) Save the modified file, keeping the same extension (.ct). Now your Bryanyora table is updated with the correct addresses.
02 b – Intermediate: Nepafu’s CE table + UPDATED Bryanyora’s CE table
1) Run Cheat Engine program AND SoulCalibur 6.
2) In CE window, click in “File” > “Open Process”. Select the SC6.exe.
3) Click in “File” > “Load”. Select the Bryanyora table that you updated.
4) Mark the following checkboxes: “0100_Ryona Cheats” > “01A0_Facial Expression” > “01A1_Facial Expression(script)” and “01A3_Mouth(preset)“. In case you can’t mark these two last checkboxes, probably it’s because the table isn’t correctly updated:


But if you want to change the eyes expression too, you can use the Nepafu script:
7) In CE window, click in “File” > “Load”. Select the Nepafu table.
8) A message will pop-up asking if you want to merge the tables. Click in “Yes”.
9) Follow the “Basic: Nepafu’s CE table” section to enable Nepafu expressions script, so you can combine one basic face with a different mouth.
03 a – Pre-Advanced: Bryanyora Presets
In Bryanyora’s blog, he explains how to change the values (Google Translate):
This is a mouth preset.
Open the script and set the mouth.
Please keep the number of digits for each.
Mouth Open Value
Specifies the degree of eye opening. Enter in single precision floating point.
Mouth pattern
Specifies the type of mouth.
00: Disable / disable
01: A / a
02: I / i
03: U / u
04: E / e
05: Oh / o
The first mouth preset from the script:
Short story: you can change the mouth/eyelids opening values editing the presets in the table. You can make these modifications with a text editor (like you did to update the addresses) or you can right click the line in the CE interface and select “Change Script”.
This is very functional, but IMO it isn’t very practical. At least, for a casual user, since you need to save the presets with hex values (for example: 0.8 = 3F4CCCCD). So in this guide, I will explain how to use my “Support-FacialExpressions” table:

03 b – Advanced: UPDATED and EDITED Bryanyora’s CE table
1) Follow the “Intermediate” section until step 6, when you are able to change the mouth.
But instead of merging with Nepafu table, we will merge with the complementary table.
2) Download the “Support-FacialExpressions” table from here:
[link]
3) In CE window, click in “File” > “Load”. Select the support table that you downloaded.
4) A message will pop-up asking if you want to merge the tables. Click in “Yes”.
5) Press “F”+”T” (custom hotkey) to enable “Support – Facial Expressions”. The table should be like this:
Here is a practical example with values and some explanations of each line:
– [Must be “1”]: the values of these lines must equal to “1” or the support table won’t work as intended. If you enabled the script with the hotkey “F”+”T” (and not clicking the checkbox), all these lines will have the right value. If not, you can double click the value and set it manually.

– 1P Mouth type: Select one value from the dropdown list:
0 – None
1 – “a”
2 – “i”
3 – “u”
4 – “e”
5 – “o”
– 1P – Mouth Value: this is a “Float” Value. Double click to set the number or assign some hotkeys (Ctrl+H) to increase/decrease it.
The common values are between 0.0000 and 1.0000, but you can set it beyond (negative numbers too).
– 1P – Forced Expression: Select one value from the dropdown list:
0 – No edit
1 – Regular
2 – Left eyebrow raised
3 – Right eyebrow raised
4 – Eyes closed
5 – Right eye closed
6 – Left eye closed
7 – Talking 1 – “a”
8 – Talking 2 – “i”
9 – Talking 3 – “u”
10 – Talking 4 – “e”
11 – Talking 5 – “o”
12 – Happy
13 – Regular 2
14 – Smiling
15 – Angry
16 – Sad
17 – In pain
18 – Anguished
19 – Smirking
20 – Surprised
21 – Scared
22 – Frustraded
23 – Eyes closed
– 1P – Edit eyelids separately?:
0: off = will take the value from “1P – Eyelids Value – both” and apply them to both sides – right and left.
1: on = will IGNORE the “1P – Eyelids Value – both” and will take the individual values.
– 1P – Eyelids Value – both: this is a “Float” Value. Double click to set the number or assign some hotkeys (ctrl+h) to increase/decrease it.
The common values are between 0.0000 and 1.0000.
– 1P – Right/Left Upper/Lower Eyelid: this is a “Float” Value. Double click to set the number or assign some hotkeys (ctrl+h) to increase/decrease it.
The common values are between 0.0000 and 1.0000, but you can set it beyond (negative numbers too).
– 1P – MoveEyeballs (not working): this line was added because the presets have it. I couldn’t make it work, but it would be amazing!
– Player 2: the 2P lines work the same way as 1P.
04 – Final Considerations
Special thanks to:
– Nepafu – Tweets by somberness
– Bryanyora – Tweets by Bryanyora2525
Use these facial scripts together with the pose table and create some unique scenes:
[link]
Multiple expressions: