Overview
Found it on crow’s ftp the server. Hope, this guide will be very useful for those who create custom maps.
Creating building and lightmaps – Part 1
Hi all map creating fans . First of all sorry for my English its not perfect.
Ok, in this tutorial I will try to explain how to create building and how to create lightmaps.
Start :
When you start the ChromED it will ask you what type of the map you want to create. In this tutorial I will use Skirmish mode.
Steps : 1. Tic the Skirmish mode
2. Name your map( in my case spudmap )
3. Click next
4. Then click finish
The editor will load the map with some buildings and other stuff. If we want to build our own map we have to get rid of the other or better said all other objects. Pic. 01.Maybe you will need to zoom the pictures.
Steps : 1. Click on the icon.(Object selection window)
2. Click on “All” to select all objects in the scene.
3. Close the window.
4. Hit “Del” button to delete all selected objects.
#1.

It should looks like on the picture #2.Dont mind the #1 step on this picture. I will describe on the next picture.
#2.

Ok Now its time to get rid of the old lightmap.
Steps:
0.Click on the icon on pic #2 ( icon is called “select level”)
1.Click on “Warlist “Tab
2.Change the name like shown on pic. #4
3.Click apply
#3.

#4.

If you done this its time to generate new lightmaps.
Steps:
1.Click “Lighting” Tab.
2.Click “Generate now”.(This will generate new lightmap)
#5.

After generating new lightmap( it will take time according to the resolution. The resolution is now set to 1024×1024) we have to hit the “reload texture” icon.
Steps:
1. Click on “reload texture” icon. (NOT USE IT)
#6.

If nothing happens follow the next steps.
Steps:
1. Go to “File” and click on “Save”. #7. (USE THIS)
2. Then again go to “File” and click on “Reload”.#8.
#7.

#8.

Placing objects.
Ok now when we cleared the map we can start placing objects. In this tutorial I will place one House.
Ok click on objects dir. As shown on picture #9.

Then you will see the list of directories which contain objects like buildings, buildings detail, crates and all the stuff you have seen in the game.
Ok so lets go back to building the house.
Steps:
1.Click on directory “Buildings”.
Choose which one you want . I choose housea.msh.
2.Click on “Put object” icon.
3. Place object by clicking on the ground ( you should also see that your cursor changed)
#10.

Now we would like to place doors and windows. So lets do it.
Steps:
1.Click on the directory “Buildings detail”.#11
2.Find and click on “doora300j.msh.( number300 size of the door) #12
3.Click on “Put objects” button.
#11.

#12.

3. Place object to the scene by clicking on the ground.
4. Use transform gizmo( the thing with red, blue and green arrows) to place doors as shown on the picture #12.( I placed the door manually by moving object with transform gizmo.)Don’t know about other way .
As you can see the door doesn’t fit to the frame so lets make them fit . You can use this system also on other objects like windows.
Steps:
1. Click one time or double click on the object( in this case door).
2. Click on “Fields” tab.
3. Click on “…” button.
4. Choose other door from the list, but with number 360.
5. Click ok and yes and ok . You will see the door has changed to appropriate size.
#13.

The next thing I want to mention is that once we create door or even other objects we can copy and paste them to another place. Just click on the object so you can see the transform gizmo and then hold the “shift “ key and move the object using the transform gizmo ( left click and hold, after release the object is copied).
Ok now we have to put some windows. Actually we can put the windows the same way as doors.
After placing doors and windows the building should look like it shown on picture #14.
#14.

You can also adjust the size of the window manually.( you can do it also with all other objects)
Steps:
1.Select object( in this case window) or double click on the window.
2. Click on the “matrix” tab.
#15.

2, 3, and 4 represent the x, y and z coordinates or better said object will grow or shrink along the x, y and z axes, when manipulating with 2,3 or 4 buttons. You can also set, by how many steps should object change its size. Picture #16, button marked as 1.
#16

Ok building should look like this now.
#17.

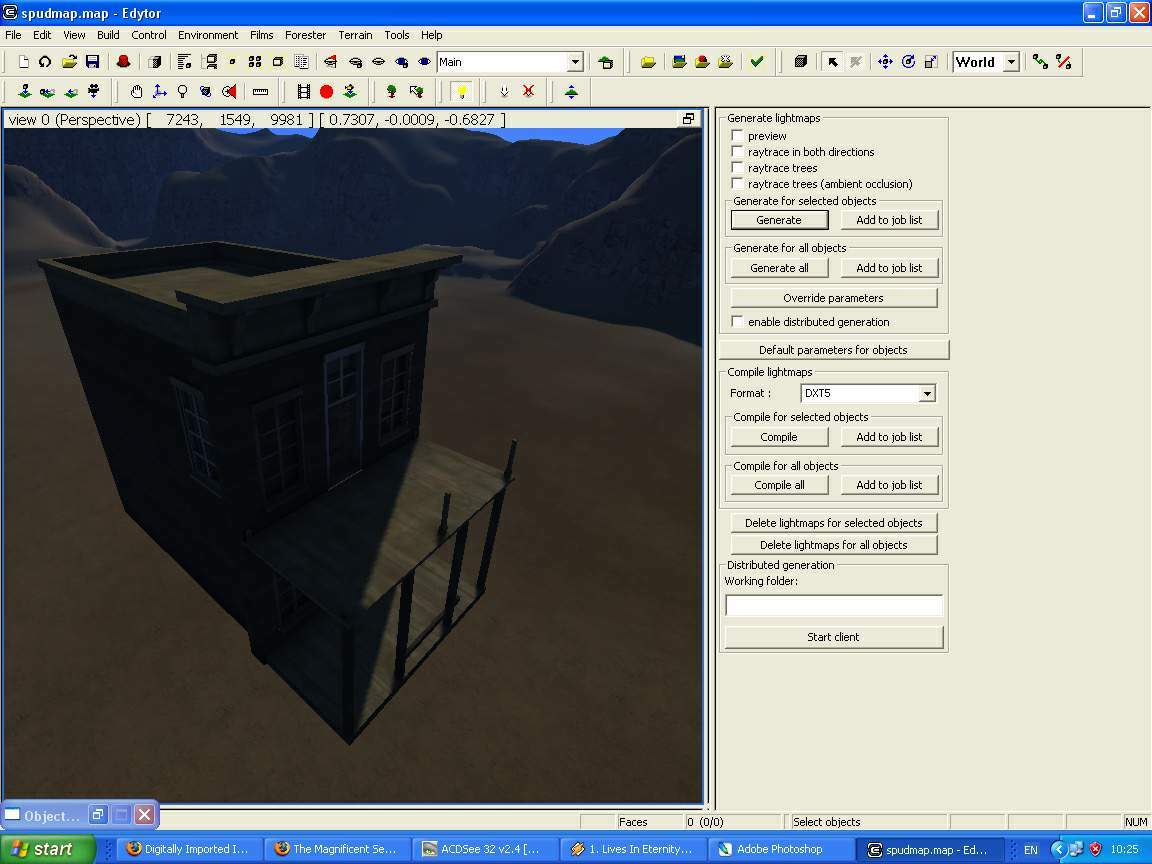
Now its time to make some object and terrain lightmap.
Steps:
1. Click on light icon.
#18.

The next thing to do is to select object you want to create the lightmap. In this case it is house and all windows and doors.
Steps:
1.Select objects.
2. Click on “Generate” button.
#19.

The process should look like on the picture #20. At the end of generation process click “ok” button.
#20.

The object should look like this now.
#21.

If the generation take a long time, than you should probably play with these settings #22( I don’t know really but it is probably best to keep settings low so you can increase the performance during the online game).
#22

Ok at the end we should create terrain lightmap. You will have to repeat the steps we did on picture #2 and #5 and than #6, #7 and #8. Than it should look like this.
#23

Ok I hope it will help you Spudgun or somebody else who will read this. I made this tutorial in a hurry so I am really sorry for mistakes. If you don’t understand feel free to ask me anytime on teamspeak or on our forums [link] .
Thanks to Cartographer, Don Arno and Kid Macoo and of course The MagnificentSeven Clan and Techland for creating this nice game.
Created by Yul.
Creating building and lightmaps – Part 2
Which files are essential, which are not? And what are they for? Here we go.
In the map folder we have:
.exp – Geometry map. When you click Build->compile, this file is generated. If it is not, you won’t be able to play the map the way it’s meant to be So make sure it is in place when distributing the map.
.inf – Lightmaps information. Lists all the information about lightmaps that were generated for the map and are locked up in the /lm folder.
.map – Map file. The essential file of the map. Holds all the essential information in itself.
.mis – Objects log file. Shows all the objects used on the map or an .eds file.
.obs – Another information file. Holds editor’s map compilation information.
.s3d – Lightmap compilation map. This file holds the information which lightmaps are belonging to which surface on the map. Also essential.
.scr – Varlist. The list of all the setup variables of the map. Deadly essential and fragile.
.trk – Game modes organising file. More information in Mapping FAQ01.
.eds – Game mode file. More information in Mapping FAQ01.
.bak, .ba1, .ba2, .ba3 – backup files. Editor saves the .map file into backup every three minutes. When you enjoy a ChromEd crash without saving, simply rename the last backup file to YourMapName.map, and your loss will be much smaller.
Basically, there are files which don’t need to be held with the map when it’s released, since many are just useless debug information, no need for distribution of these.
So, when you’re distributing your map, delete the .inf, .mis, .obs, .bak, .ba1, .ba2, .ba3 files.
The key information is: every map comes with a .trk file. In this file you can set all the things that are necessary.
Here’s an example from the classic RockExpress map.
Code:
!include(“Track.def”)
Group(“Robbery”)
{
Objects(“DATA/MapsNet/RockExpress/Robbery.eds”)
MapTitle(“&MP_MAP_RockExpress&”)
ModeName(“&MP_MODE_robbery&”)
ModeInfo(“&MP_MAP_RockExpress_robbery_info&”)
BackgroundPicture(“loading_screen_mp_r.png”)
}
Group(“goldrush”)
{
Objects(“DATA/MapsNet/RockExpress/Goldrush.eds”)
MapTitle(“&MP_MAP_RockExpress&”)
ModeName(“&MP_MODE_goldrush&”)
ModeInfo(“&MP_MAP_goldrush_info&”)
BackgroundPicture(“loading_screen_mp_gr.png”)
}
Group(“skirmish”)
{
Objects(“DATA/MapsNet/RockExpress/skirmish.eds”)
MapTitle(“&MP_MAP_RockExpress&”)
ModeName(“&MP_MODE_skirmish&”)
ModeInfo(“&MP_MAP_skirmish_info&”)
BackgroundPicture(“loading_screen_mp_s.png”)
}
Group(“deatchmatch”)
{
Objects(“DATA/MapsNet/RockExpress/DeathMatch.eds”)
MapTitle(“&MP_MAP_RockExpress&”)
ModeName(“&MP_MODE_deathmatch&”)
ModeInfo(“&MP_MAP_deathmatch_info&”)
BackgroundPicture(“loading_screen_mp_dm.png”)
}
Let’s now get through the sections of the file.
Code:
!include(“Track.def”)
This part is essential for the game engine to recognize the file.
Code:
Group(“Robbery”)
{
Objects(“DATA/MapsNet/RockExpress/Robbery.eds”)
MapTitle(“&MP_MAP_RockExpress&”)
ModeName(“&MP_MODE_robbery&”)
ModeInfo(“&MP_MAP_RockExpress_robbery_info&”)
BackgroundPicture(“loading_screen_mp_r.png”)
}
An example of a game type.
Objects parameter shows the path to objects that are added to the map when the certain game mode (given in the Group(…)) is launched. The .eds file provides: the game mode object, spawnpoints, and others – depending on the game mode (robbery adds goldsacks, locations, exit sensors, f.e.). I suggest you copy the selected .eds files from default maps and modify them to your map (make sure you rename them, and make sure all the paths are correct as well!).
As for the rest – the text strings within the ampersand signs – & – are variables which call text from lingual data buried within the file system. Replacing the text with something different – without the && – should make it all work fine
So, you have an idea, which you think would be looking good, of not even great! So, what about it now?
There are several test and phases that you can push your idea through, getting to know whether it is actually worth spending time in Eddy… or not.
Here is the first rule:
1. If you think something would look cool in real, it will most probably be a failure in the means of gameplay.
There’s a saying: a storyteller has only one thing to do – to tell a story. It’s pretty much the same with level designer. You must provide superior gameplay. Graphics, outlook design and mesh use come second.
Second rule:
2. The post popular maps are those well balanced.
I mean class usage here. I don’t think this rule needs a proof…
Basically, you need to start with a decision: do you want a map designed for certain class, or do you want it universal?
If you choose universal, you must start with creating gameplay for the most demanding classes, and that would be miner, second gunslinger, and last sniper and rifleman. Why? Because miner can fight on very close range only, gunslinger can fight close and medium. They have no chance on long distance. Having no chance causes frustration, level designer’s enemy number 1.
What does that all mean?
Simply when designing the gameplay of the map, start up with giving a safe route to gunslingers and miners at all times, a trench to jump into, a building to hide behind: simply an option at all times.
After that, you can add risky areas which can be easily covered by snipers. But beware: campers should not be 100% at no time. Every time there is a camp spot, there must be a back door. Being camped by a sniper who is unreachable and untouchable is not fun. It’s frustrating!
If you think it’s the right moment to launch up the editor, you’re gravely mistaken.
Now comes the time for sketch!
Get a pencil, a sheet of paper, and get down to sketching. Usually two-three iterations are enough:
1) make a base: draw a very simple outline of your level, main routes, main buildings/objects.
2) balance the map: find the campspots and get rid of them by making them unsecure.
3) get down to detail:
3.a) gameplay detail: cover objects, ladders, additional shortcuts
3.b) graphical detail: all things that will make the level look nice but do not affect the gameplay
Now comes the time for the final test.
Launch up your imagination… imagine you’re on the level, playing. Imagine situations which bring entertainment, imagine distances, imagine level flow.
If it seems fine – launch Eddie and get down to the final step
– – – – – – – – – – – – – – – – – – – – – – – – – – – – – – – – – – – – – – – – – – – – – – – – – – – – – – – – – – – – – – – – – – – – – – –
one needs click on reload material and shader and not on reload textures is the red button of right-hand side
– – – – – – – – – – – – – – – – – – – – – – – – – – – – – – – – – – – – – – – – – – – – – – – – – – – – – – – – – – – – – – – – – – – – – – –
Ok I figured out what I was doing wrong. I’m having to do this from memory so there may be mistakes but here’s how you do it:
Add a mesh of a person (cowboy, indian, etc.). By default their class will be meshobject. Select the object then click on the button next to the class field. You need to assign it the correct class. Navigate through the tree (start with triggerobject) until you find something like NewAIHuman (I think). Its one of the last classes in the tree under triggerobject.
Then go to the mesh browser and click on the drop down button next to the Type field. Select waypoint then click the put object button and add the waypoint somewhere. Keep adding more if you like. If you select the waypoint you can configure things that happen at those waypoints. Once I learn more and if I ever get the time I will try to do a proper tutorial. Hope this helps someone.
Creating building and lightmaps – Part 3
Now i’m going to give you some of the problems your going to encounter, at least I did, Before I tell you the answers to your questions. First, you already found out about deleting the old shadows.. Very tough, I did it once and all the shadow’s including players turned red, that was when I first started fooling around. Like your doing it’s just easier to work around em.. Second, spawn points will not be visible,, and will be deleted from the View,Objects Selection Window so you cannot find them or move them..!!!! This is important when working with terrain cause you can bury a spawn point and that means someone respawns and can’t move.., or is out of map, etc.. Now to avoid this, go to the objects selection window and delete all of the spawn points, (If they’re already deleted your screwed) and then make at least one new one. The class is spawn point and the object or mesh to use is under interface called dot.3da, when you make this spawn point and all there after you will see them…and they won’t be deleted from the objects window. Last quick one, set object or mesh first before setting class.. There’s more of course..LOL!!
Now to answer your questions, to edit terrain there is a terrain icon in the toolbar.. find it, if you don’t see it go to View, Toolbars and turn on all of em.. you will see it, green triangle with dot or small arrow on top and bottom, anyways when you find it under tools hit the icon with the arrow over green hill pointing up.. now move your mouse over the terrain you will see a shadow, this shadow is the area your dealing with, to change the area move the slider at top of window down,, or to the left, then move mouse out of terrain and back in, you will see shadow smaller..
Now click and hold your mouse button and move mouse either up or down,, then release button, you done.. the other icons in terrain editor work in the same way but are tuff to control.. that should start you off.. To get out of editor hit icon again and then hit the mesh browser icon..
Now for the invisible walls, you can use the barrier class, and the barrier.3da mesh found under interface.. now this object or mesh is pretty small so you have to scale it using the scale tool. You also have to set the Fields Tab settings, to find this put the barrier.3da mesh with barrier class somewhere in map then double click the gizmo, objects attributes window will pop up, hit the fields tab, check block all and enable on start.. you must have enable on start checked if you want to block passing through.. Hope this helps ya..!!!