Overview
This article will guide you through the process of creating a custom passive unit and how to create animations for it.
Getting started and passive unit settings
We are starting from the Custom Unit Creator with an empty unit. To switch it to a passive unit, open the settings panel and select Passive Unit as a type.

On the left side, you can see some new settings that are only available for passive units.

The Flee Distance setting can be used to adjust the distance at which said behaviour will be triggered.
Is Hostile can be used to prevent this unit from being attacked. If this option is set to No, all other units will ignore this passive unit.
Using preset animations
As you noticed, the unit is standing in a T-Pose. That’s because by default, passive units have no animation applied to them.

Now you can either choose to create a custom animation or select an animation from a list of presets.
To load a preset, click on Insert Preset and select one of the animations.

Creating custom animations
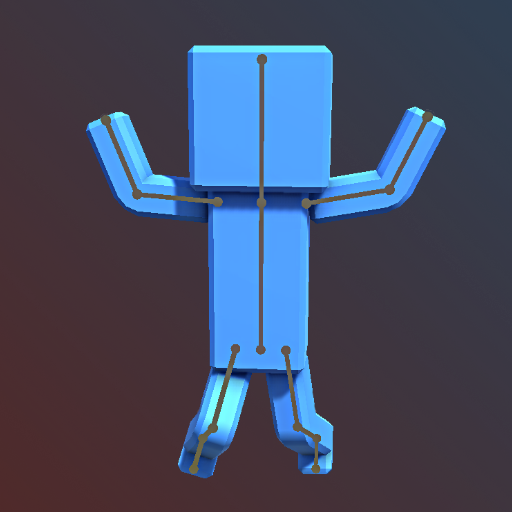
To create custom animations you first have to understand how to adjust the pose of your unit.
In the animation mode you can see the bones of the unit as lines.
Each bone controls a body part and you can adjust the rotation and position of some bones to modify the pose.


You can now click and drag on one of the colored areas of the rotation handle to rotate the selected bone and it’s body part.
To unselect the bone, you can just click somewhere else in the scene.
Now that you know how to create poses, you can use that knowledge to create animations.

The currently selected frame is marked with a blue marker in the timeline. (1)
You can click or drag on the timeline to change the currently frame. When you do that, the timeline will show the pose of your unit at that specific frame and allows you to edit it.
By default, all frames are empty. To create an animation you have to create at least two keyframes in the timeline. (If you want to create a static pose, you only create one keyframe)
A keyframe just describes a saved pose at a given frame.
All keyframes are highlighted by a yellow marker in the timeline.

Now it’s time to choose the next frame in the timeline for another keyframe.

You can just do some changes to your pose and create a new keyframe by using the yellow button again. Your first animation is now ready to be played!
You can drag in the timeline to adjust the current frame and can see a preview of your animation at any given frame.
As you can see, the game calculates different poses between your keyframes, so you dont have to create a keyframe for every frame in your animation.

That area ranges from the first to the last keyframe. When your animation is being played and reaches the last keyframe, it will be restarted from the first keyframe. That means that all frames outside of that range will be ignored, because they dont contain any keyframes.
If you want to create a seamlessly looping animation, you just have to make sure that your first and last keyframe are equal to each other.
To do that, you can just copy the pose of the first keyframe and paste it as your last frame. (Do do that, use the buttons next to the Add Keyframe button)
Dont forget to also add a keyframe, because you will only paste the copied pose!
You can always create new keyframes at any frame to adjust certain parts of the animation or overwrite existing keyframes.
The last thing I want to talk about is the time of animations. Adding more empty frames between your animations will result in a slower playback speed.
The game processes 24 frames per second. That means that if you place a keyframe every 24 frames, it will take exactly one second to move from one keyframe to the other. (Your animation will still be smooth and frame rate independent, because much more frames than 24 will be calculated internally)
To adjust the playback speed, you can always adjust the speed input in the left area above the timeline, which will work as a speed multiplier.

Please note that only creating a keyframe will save your pose. Clicking on the timeline or closing the animation mode will discard it.
That’s all you need to know about creating passive units. If you have more questions, feel free to message me on Discord or the Steam forums!