Overview
In this guide I’ll show you guys how you can create and submit your own custom texture packs for Paint the Town Red.You’ll learn how to use the required tools to extract, edit and implement your textures back into the game.
Before you start
Just a little disclaimer:
You take responsibility for anything you create.
I (as the creator of this guide) have no influence about the content you create with the techniques of this tutorial I provide for you.
With reading this guide and creating custom texture packs you agree that you won’t create any content that’s racist or offensive for people.
Thank you.
AND PLEASE NOTE THAT THIS GUIDE IS ABOUT CREATING TEXTURE REPLACER PACKS.
They replace the original textures of the game with custom ones.
There is also a way to implement custom textures as new textures via the texture creator in the game’s main menu. If you want to release your character texture pack on the Steam Workshop, then you should use this method.
Programs you’ll need
There are a few programs you’ll need to start making texture packs:
- Unity Assets Bundle Extractor[7daystodie.com] (For accessing the texture assets)
- GIMP[www.gimp.org] (For editing the textures)
OR - Photoshop[www.adobe.com] (For editing the textures while pretending you’re a professional)
Getting started
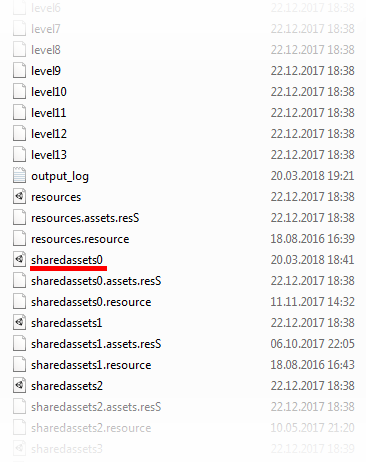
The first thing we’re gonna do is locate our sharedassets0 file in our game data folder. Thats the file where most of the games textures are stored.
You should find it under this path (Windows 7):
C:ProgramsSteamsteamappscommonPaint the Town RedPaintTheTownRed_Data
It should look like this:
If you can’t find the PaintTheTownRed_Data folder you can also access it via your Steam library.
Once you’re in your Steam library just right click on Paint the Town Red and click “properties”. Go to the tab “local files” and then click “browse local files”. Thats another way to access you game folder.
Copy your sharedassets0 file into a seperate folder. Make sure you always have a clean sharedassets0 file. Otherwise you’d have to reinstall Paint the Town Red to restore your clean sharedassets0 file.
Once that’s done you are ready to extract the texture files.
Extracting the Textures
Now we’re gonna extract the textures from the game files.
In order to do that, run Unity Assets Bundle Extractor and select File > Open.
Now select your sharedassets0 file to open it.
Sort the files by clicking on the Type tab and select all the Texture2D files by clicking on the first Texture2D file and on the last one while holding the shift key like in the gif below.
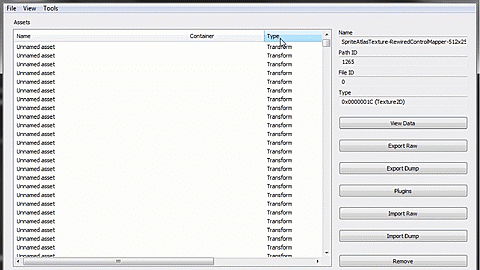
Click on the Plugins button and select Export to .png. After that select a seperate folder in which you want to save all the extracted textures.
Editing the Textures
Now that you have all the textures as .png files you can simply open them and edit them the way you wish with a program of your choice. I’m using GIMP for this step but you may use any program you like.
If you want a more detailed tutorial on how to work with GIMP for drawing textures I may expand this guide (for the case many of you need help with it).
IMPORTANT:
For editing the faces of enemies there is one important thing to mention. Every enemy has four different face textures as shown in the picture below.

- Normal: The standard face texture of the enemy. This texture is used if the enemy is in an idle (pre-combat) state.
- Wince: Once the enemy gets hit the face will change to this texture. In most cases it is very similar to the blink / dead texture.
- Angry: This texture will be applied once you entered combat and fight against the enemy.
- Blink / Dead: As the name indicates, the enemy changes to this texture in both situations: blinking and when the enemy is dead.
After you edited the textures you wanted to change you can import them back into the asset bundle.
Replacing the Textures
Now that we have changed the textures, we can replace them with the vanilla textures in the asset bundle.
Open your sharedassets0 file again with Unity Assets Bundle Extractor and select the vanilla version of a texture you just edited. Make sure they have the exact same name. Remember that it must be a Texture2D file type.
Click on the Plugin button and then click Edit. Don’t change any settings in the Edit window. Now click on the Load button and select your custom texture you just created.

Repeat this process for every single texture you wanted to change.
If you want to make some custom textures just for yourself then you’re finished at this point. If you got everything right you’ll see the custom textures ingame now.
But for the case you want to share your texture pack with the community, feel free to read this guide until the end.
Creating the Installer (Part 1)
Now we are finished with the texture part. The only thing left we have to do now is creating the
installer that will copy and implement our custom textures to a vanilla sharedassets0 file.
Open your sharedassets0 file once again with Unity Assets Bundle Extractor and select all
the texture files you replaced with your custom textures (Texture2D files). You find out wether or
not they’re replaced textures if you check the Modified tab. They are marked with a * if you haven’t closed the program while replacing them.
Click on the Export Raw button and save all of your custom raw texture files in a seperate folder.
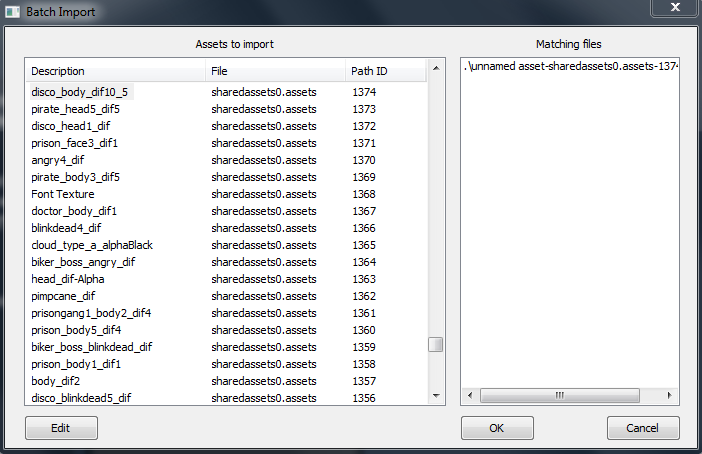
Open a new clean sharedassets0 file that contains all vanilla textures. It’s important that it doesn’t contain any custom textures. Select all Texture2D files as shown in the Extracting the Textures part of the guide. After that click the Import Raw button and select the folder where you saved all the exported raw textures.
Select any texture in the list of the window that just opened. In the Matching files list you’ll see every custom texture that matches the vanilla texture by name. Since you propably only saved one custom texture for every vanilla texture you should see only one file appearing in the list. Click OK.
By finishing this step you can now create the installer from your modified assets file.
Creating the Installer (Part 2)
The only thing left to do now is creating the installer for your custom texture pack.
Make sure the sharedassets0 file you modified in Creating the Installer (Part 1) is located in your PaintTheTownRed_Data folder. This is very important since the installer won’t work for other people if thats not the case.
Start Unity Assets Bundle Extractor and open the sharedassets0 file in your PaintTheTownRed_Data folder.
Click on File > Mod Maker > Create standalone .exe installer
Now give your texture pack a name, credit yourself as the creator and add a discription with optional instructions. If you want you can even choose a custom icon.
- Select the PaintTheTownRed_Data folder as the base folder.
- Make sure the path of the affected assets looks like this:
.sharedassets0.assets
If the path doesn’t look like this then the installer won’t work unless someone has the exact same game path as you. So be sure you make this step with the sharedassets0 file in your PaintTheTownRed_Data folder.

Thats it! If you followed the steps correctly you now have a functioning installer for your texture pack.
Sharing your Texture Pack
You made it! You have created your very own custom texture pack.
If you want to share it with the community, I recently managed it to get the Nexus-mods staff to add Paint the Town Red as a game to their modding database. So now you can upload your texture pack to the official Paint the Town Red Nexus:
Paint the Town Red Nexus mod page[www.nexusmods.com]

But you can also upload and share it where ever you want of course.
Special Thanks

- Eternic and Shaxe, for creating this awesome game.
- Kersher, for helping testing the installer.
- Fleasy, for coming up with the idea of custom textures (He was also the first who managed it to change the ingame textures).
- Hea4yBlade, for helping with the bugs.
- DerPopo, for the Unity Asset Bundle Extractor program.
- The Paint the Town Red Discord community.
Thanks for reading my guide, can’t wait to see the awesome texture packs you all will create in the future.
– Ocean Man