Overview
Like the new Quick-Build feature? Want to make your own prefabs to add to the Quick-Build tab? Then this guide is for you. With this guide I will walk you through how to make your own rooms for easy placement.
Getting Started
Adding your own Quick-Build rooms is not something that’s possible within the actual game. To do this, you need to make a mod. Or, more easily, modify an existing one, like this one:
[link]After subscribing to this mod (or one like it), it will be downloaded to your mods folder. Your mods folder can be found at the following address:
C:Users<YOUR USERNAME>AppDataLocalIntroversionPrison Architectmods
Please note that <YOUR USERNAME> is the username that you log on to your computer with, though it may also just be public.
Your screen should look something like this:
Now you need to find the mod, but all of the folders just have a bunch of numbers. These are the unique IDs of the mods. Each Steam mod has its ID at the end of its URL. The mod above will be in a folder titled “637948672”. Open the folder and you will see some files like below:

Open the data folder. This is where you’ll find all the files in the mod that affect the game. You’ll see a few more files in this folder:

Open prefabs.txt (it may just be called prefabs, the .txt just means it’s a text file), this is where you will make your own room prefabs.

Time to start doing the actual work…
Knowing the Basics
You should now be looking at prefabs.txt, which will look something like this:
Now that you’re where you need to be, it’s time to figure out what all of it means.
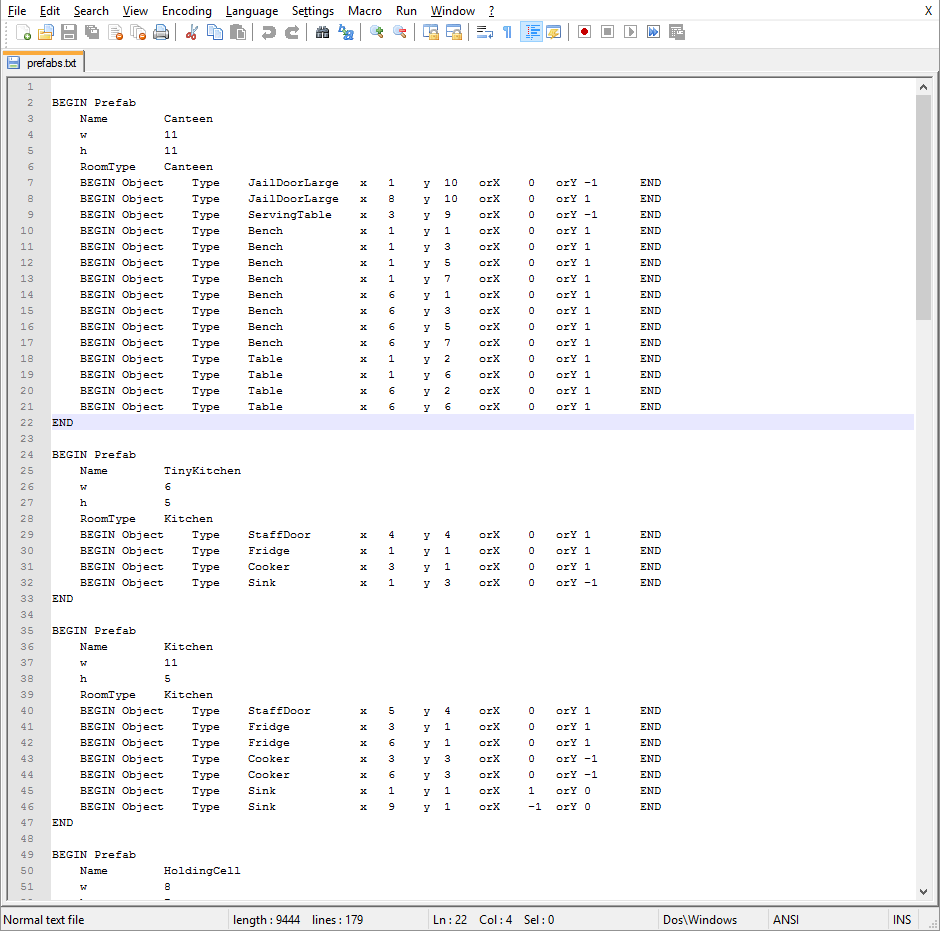
First, we have BEGIN Prefab. This tells the game that a new prefab is being declared. At the end we also have END, which tells the game that you’re done giving information about that prefab. Every prefab will have these two lines.

Next is the name. This is the name that will be referred to within the game’s code, and should not contain any spaces or special characters [*, $, &, !, etc.]. Make sure to give each prefab a unique name, because if you give two prefabs the same name one will overwrite the other. If you’re planning on uploading a set of prefabs, I recommended you take extra care in making the names unique so they don’t conflict with other mods. For example, I put “MPM” in front of every name for my More Room Prefabs mod. The name that actually appears in the game is configured elsewhere, and will be discussed later in this guide.

After that is w and h, which represent width and height, respectively. This determines how long the walls that surround the room are. For example, if you’re making an office, which has minimum size 4×4, you need to make it at least 6×6. As a general rule, you need to add 2 to each dimension to compensate for the walls.

Finally we have the RoomType. This is the type of room that will automatically be placed within the walls once the foundation is finished. Below is a list of the available rooms. The name on the right is the name that appears in the game, while the name on the left is what is used by the game’s code and what you need to use for RoomType. For example, while in the game it is called the Infirmary, for RoomType you must put MedicalWard.

None = None
Cell = Cell
HoldingCell = Holding Cell
Solitary = Solitary
Dormitory = Dormitory
FamilyCell = Family Cell
Canteen = Canteen
Kitchen = Kitchen
Shower = Shower
Yard = Yard
Storage = Storage
Deliveries = Deliveries
Garbage = Garbage
Execution = Execution
Workshop = Workshop
Security = Security
Office = Office
MedicalWard = Infirmary
Morgue = Morgue
CommonRoom = Common Room
Laundry = Laundry
Visitation = Visitation
CleaningCupboard = Cleaning Cupboard
Kennel = Kennel
Armoury = Armoury
Staffroom = Staffroom
Library = Library
Forestry = Forestry
Classroom = Classroom
Exports = Exports
Chapel = Chapel
Intake = Reception
ParoleRoom = Parole
MailRoom = Mail Room
Shop = Shop
Nursery = Nursery
Outdoor rooms such as forestry may not work properly.
That’s it for the basics, now it’s time to find out how to add furniture to your room…
Placing Furniture
Now that you know how to declare a prefab, it’s time to add furniture to it. All those lines between RoomType and END, like in the picture above, are object declarations. Like each prefab, each object starts with BEGIN Object and ends with END. Each one tells the game that you’re adding an object to the room.

Each highlighted area above represents a different property to edit for each object. The first property, Type, tells the game what the object is.

The second property is the location. The prefab is represented here as a coordinate grid, where the top-left corner is x 0 y 0. Every tile to the right means x increases by 1, and every tile downwards means y increases by 1. A 3×4 room will have x ranging from 0-2, and y ranging from 0-3. Since the top-left corner is the corner of the wall around the room, the interior of the room actually starts at x 1 y 1. While most of the furniture will be placed within the walls, don’t forget that doors, windows, and a few other objects are placed on the walls.
The third and final property is the object’s orientation, which direction it is rotated in. It may look confusing but it is actually quite simple. There are four directions objects can face in and so there are four ways to set the orientation.
Down: orX 0 orY 1
Up : orX 0 orY -1
Right: orX 1 orY 0
Left : orX -1 orY 0
Just think of how the numbers change when you go in that direction. When you go right, x increases by 1. When you go down, y increases by 1.
However, there are a few objects, such as the office desk, which face in the opposite direction.
Other objects can only face certain directions or cannot be rotated at all.
Let’s take the first object for an example:
Type JailDoorLarge means I am placing a Large Jail Door.
x 1 y 10 means I am placing it 1 tile to the right of the left wall and 10 tiles below the top wall
(since the height of the room is 11, that means I am placing it directly on the bottom wall)
orX 0 orY -1 means it is facing upwards (the door opens to the right when facing upwards)
Below is a list of every available object (case-sensitive):
Bed = Bed
BunkBed = Bunk Bed
Crib = Crib
Toilet = Toilet
Table = Table
Chair = Chair
Bench = Bench
ElectricChair = Electric Chair
JailDoor = Jail Door
JailDoorLarge = Large Jail Door
Door = Door
SolitaryDoor = Solitary Door
StaffDoor = Staff Door
RemoteDoor = Remote Door
RoadGate = Road Gate
Window = Window
WindowLarge = Large Window
Tree = Tree
Light = Light
Cooker = Cooker
Fridge = Fridge
Bin = Bin
Sink = Sink
ServingTable = Serving Table
ShowerHead = Shower Head
DogCrate = Dog Crate
Bookshelf = Bookshelf
OfficeDesk = Office Desk
FilingCabinet = Filing Cabinet
MedicalBed = Medical Bed
MorgueSlab = Morgue Slab
PowerStation = Power Station
Capacitor = Capacitor
PowerSwitch = Power Switch
LogicCircuit = Logic Circuit
LogicBridge = Logic Bridge
WaterPumpStation = Water Pump Station
PipeValve = Pipe Valve
Drain = Drain
Sprinkler = Sprinkler
MetalDetector = Metal Detector
WeightsBench = Weights Bench
PhoneBooth = Phone Booth
Tv = Tv
PoolTable = Pool Table
Cctv = CCTV
CctvMonitor = CCTV Monitor
LaundryMachine = Laundry Machine
LaundryBasket = Laundry Basket
IroningBoard = Ironing Board
VisitorTable = Visitor Table
VisitorTableSecure = Visitor Booth
WorkshopSaw = Workshop Saw
WorkshopPress = Workshop Press
CarpenterTable = Carpenter Table
GuardLocker = Guard Locker
SofaChairSingle = Sofa
SofaChairDouble = Wide Sofa
DrinkMachine = Drink Machine
Radio = Radio
Radiator = Radiator
LibraryBookshelf = Library Shelf
WeaponRack = Weapon Rack
SchoolDesk = School Desk
DoorControlSystem = Door Control System
PhoneMonitor = Phone Tap
Servo = Door Servo
DoorTimer = Door Timer
PressurePad = Pressure Pad
StatusLight = Status Light
Altar = Altar
Pews = Pews
PrayerMat = Prayer Mat
SortingTable = Sorting Desk
ShopFront = Shop Front
ShopShelf = Shop Shelf
PlayMat = Play Mat
GuardTower = Guard Tower
WaterBoiler = Water Boiler
ElectricalCable = Electrical Cable
Some objects may not work.
Naming Your Prefab
As I mentioned earlier, the name you set for your prefab is what the game will see, but not what the player will see.
If you don’t manually specify the prefab’s name, it will automatically be quickbuild_name. To tell the game what to show, you need to go into the language folder and open base-language.txt.
This file allows you to tell the game what name to show in the Quick-Build tab. On the left side are the “code-names” of the prefabs. On the right is the name you want to be displayed in the game. Every prefab “code-name” will start with quickbuild_ and end with the name you put in prefabs.txt. This is why it was important to give each prefab a unique name.

Conclusion
You should now be on your way to adding your own prefab rooms to the Quick-Build tab. Thank you for reading this guide and good luck!
Want to make your prefabs available on the Steam Workshop? Here’s how to edit the provided mod so it’s ready to be uploaded.


First, you should remove all the prefabs you didn’t make, if they’re still there. Then you need to edit the files manifest.txt and thumbnail.png, shown below:
You should edit manifest.txt to look like this (you shouldn’t have to add anything, only remove or edit what’s already there), replacing “My Prefab Mod” with the name of your mod, “description” with a description of your mod, and “my name” with your name, as shown:
You can either edit thumbnail.png or delete it, but it’s best to have a good thumbnail to make your mod stand out.


You should now be able to upload your prefabs as your own mod by going to Extras from the Main Menu, then into Mods, selecting your mod (which should now show the new name, description, and author), and clicking upload near the bottom-right corner of the menu.