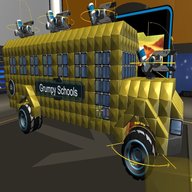
Overview
This guide shows you how to make a realistic Shool Bus
This is how it’s gonna look like

Lets get started
You need about:
- 12 Heavy Cubes (or T10 Cubes)
- 4 Prisms (or T10 prisms)
- 12 T4 Prisms
- 98 T4 Cubes
- 2-300 T7 Cubes
- 40 T7 Prisms
- 6 T7 Inners
- T9 Wheels
- T9 Steering wheels
- 86 Windshield Cubes
- 2 Winshield Inners
- 26 T6 Prisms
- 54 T6 Cubes
- T1 Enemy Radar (or T5)
- T3 Radar Jammer (or T5)
- Some T1-6 Thrustler(s)
- T5 Flipper
- T3 Radar Reciever
PS: You need at least 1200 CPU
Step 1
Place 7 Heavy Cubes on a line and Heavy Prisms on both sides.
Place T7 Cubes on the sides of the line and add 3 T7 Prisms on them.
Step 2
Add 2 Windshields on the sides and Cubes in the middle.
Place Prisms on the top of them.
Step 3
Make a line on the both sides (5 Cubes long) and place Prisms on the top of them.
Do the same on the both sides.
Step 4
Put lights inside (it will give you a cool effect if the lights are behind the windshields)
Step 5
1) Make a 5 blocks wide and 5 blocks long “floor”
Make the bus a bit higer (place a T9 wheel randomly on the side)
3) Add these under it and place the T9 Steering Wheels
(A Cube is in the middle of the 3 Prisms)
Step 6
There’s a small hole from the side of the wheels, cover it with a Prism
Cover the hood with Cubes and also cover the sides of the back:
Step 7
Make lines on the both sides (14 blocks long)
Put these in the back (both sides)

Step 8
Making the front and the sides are easy, try to follow the steps:
Same thing on the other side but there will be 6 windows.
(Be sure the windows are on the same height as the right side ones)
And the back:
Add 2 Windshield Inners:
Step 9
1) Add a wall under the front windshields:
2) Cover the whole “floor”
3) Go under the bus and add the back wheels
(Just like in the front)
4) Cover the roof
Step 10 – Interior
You can skip this if you have low CPU
Follow the pictures:
1)
2)
Make a wall at the end of the second window:
3) Add the same chairs to the back:
(4 chairs in a row)
The final chair will be bigger
As you probably noticed there are holes at the back wheels.
4) To cover the holes remove one Prism on both sides and replace them with Inners.
Place one random cube up so you could place a Prism next to the Inner.
5) Almost done, place 4 Inners to each coner and place Prisms
Final steps
1) Place the Pilot Seat back, enemies will start shooting the front of the bus.
(Unless they are behind you..)
2) If you have a Name Banner and badges then place them here:
3) Place guns:
Tip: To place more guns, make like this
(I personally don’t like making like that)
4) Place the flipper
5) Place the Radar Reciever
How to make it more stable?
Originally posted by Dr. No:It´ll be more stable if you put 4x t2 hover blades (for example) in the corners inside the bus 🙂
Why would you not want this bus?
-It might be a problem getting up the hills if the thrustler(s) aren’t good enough
-It takes time to turn (since its long)
-Teammates will start blocking/shooting you
Why would you want this bus?
-Teammates are trying to protect you
-It uses a lots of CPU (makes it longer to survive in a battle)
-Sometimes even enemies wont shoot you (happened with me only twise)
-Looks cool and easy to make


