Overview
This a guide on how to distract yourself from the real world and also how to draw Hatty Hattington. The steps are pretty short and simple and I hope this helped you in achieving your drawing skills.
The Colors You Will Need
 We are using crayola colored pencils for the colors. Otherwise, just find colors close to what I’m saying. The colors you will be needing for Hatty are Black, Brown, Golden Yellow, and Sky Blue. Also get a pencil to make all the outlines. Get a ruler too because we will be making some sraight lines.
Step 1; The Head
 So what you want to do first, is get your ruler and your pencil, and draw a line across the bttom of the paper that leaves about 1 inch left on the left side of the paper and 2 inches left on the right. Then draw another line at a 90 degree angle on the left side of the line. Next, you want to draw a line that is just a bit slanted down at an 85 degree angle. Then when it lines up with the bottom line draw a line up to connect them together.
Step 2; Make the Head 3D
 This is quick step. On the top of the head make a short line that slants down about 40 degrees. Then on the bottom of the head make a tiny line that slants upward just a little by about 20 degrees until it lies even with the line above it. Then connect them with a line that is parallel to the right side of the head.
Step 3; The Base of the Hat
 On top of Hatty’s head, start on the left and go in about 1/2 an inch and draw a tiny 3/4 inch line going up. Do the same on the right side on the sloped line. Then connect the 2 lines with a long curved line.
Step 4; The Top of the Hat
 Now you want to go in another 1/2 inch into the base of the hat on both sides. There, you want to draw some long curved lines curving into the middle, then out again until you are about 1 inch from the top. Then you want to connect both sides with a line curving up.
Step 5; Designing the Hat
 First you want to make an upside down U on top of the middle of the base of the hat about 2-3 inches tall. Then draw a smaller upside down U inside the bigger one. Next you want to make a curved line that is parallel with the base of the hat’s top line. This line should be starting on the left side about 2-3 inches high. Start drawing the line until it hits the upper half of the upside down U. When the line hits ithe upside down u, just head over to the other side of it and continue drawing the curved line to the edge of the hat as if you never left off.
Step 6; The Eyes
 Now we want to go back to the head. Start on the bottom left. Go to the right about 1/2 and inch then up 2-3 inches. Draw about a 1/2 inch wide circle that doesn’t have any messed up curves. Do the same thing except on the right side of his head. If both the eyes arent the same size and if they are both a perfect circle it will make Hatty look so much better. Now that you have the eyes you want them to have glare. This is optional but if you want, you can draw little crescents in the top rights of both Hatty’s eyes to give them some dimension. Now for the tears. Grab your ruler again and line it up with the left edge of the eye. Draw a line sraight down until it hits the bottom of his face. Then do the same thing to the other side of the eye and the other eye as well.
Step 7; The Mouth
 This step really ties everything together. To make the mouth you want to put your ruler halfway between the eyes, and the bottom of the head. Then draw a straight line that is parallel with the bottom of the head. You can either skip over the tears or draw right through them, it doesn’t really matter.
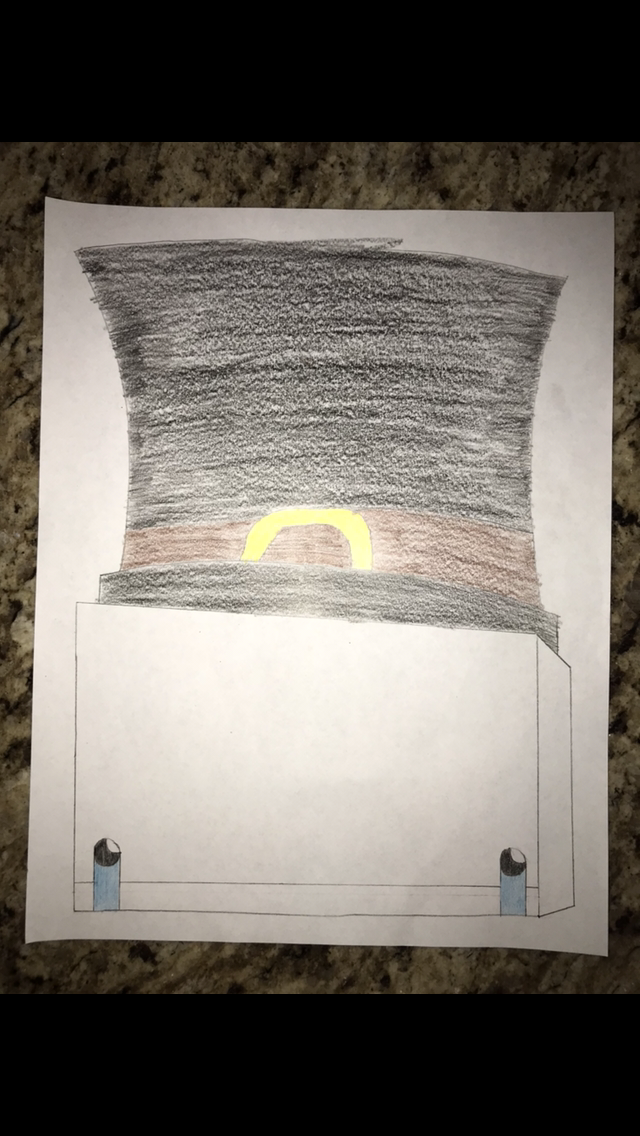
Step 8; Adding the colors
 Now to finsih it off we add the colors. Lets start with black to get the biggest part over with. Grab your black colored pencil and start to sketch in the eyes. If you added the crescents, leave those white. Make sure to only sketch in one direction because it won’t look clean if it’s in all different directions. After coloring in the eyes, take your black colored pencils and color in the base of the hat black. After that, move above the line going through the upside down U and color in that huge area black. After that, you can put the black away. Now get out the sky blue. Just color in the tears by sketching in one direction. Next, grab your golden yellow colored pencil. Color in the upside down U with it but don’t color in the area inside the upside down U. If you don’t have a golden yellow try coloring it in with a yellow colored pencil harder than you normally would so it turns out a bit darker. Then get out your brown and color in the little strip that is above the base of the hat. Also color in the area underneath the upside down U with brown. After that, your Hatty Hattington should be done!
End Card
I was bored so I made this guide. I’m also proud that I made this guide. I did invite somebody to do this with me but they didnt want to commit. They did draw a Hatty Hattington though. If you do decide to use this guide, please link your drawings in the comments because I would love to see your guys’s drawings. Share this to your friends if you liked this guide. Now that you have an awesome picture of Hatty Hattington you should frame it and brag to all your friends about it.