How To Get Gooder (Not a Meme)
Incredibly Important Basics pt.1
Melee Combat Step-by-Step
The first and most important tip I like to give players is this; you have 4 main lines of defense: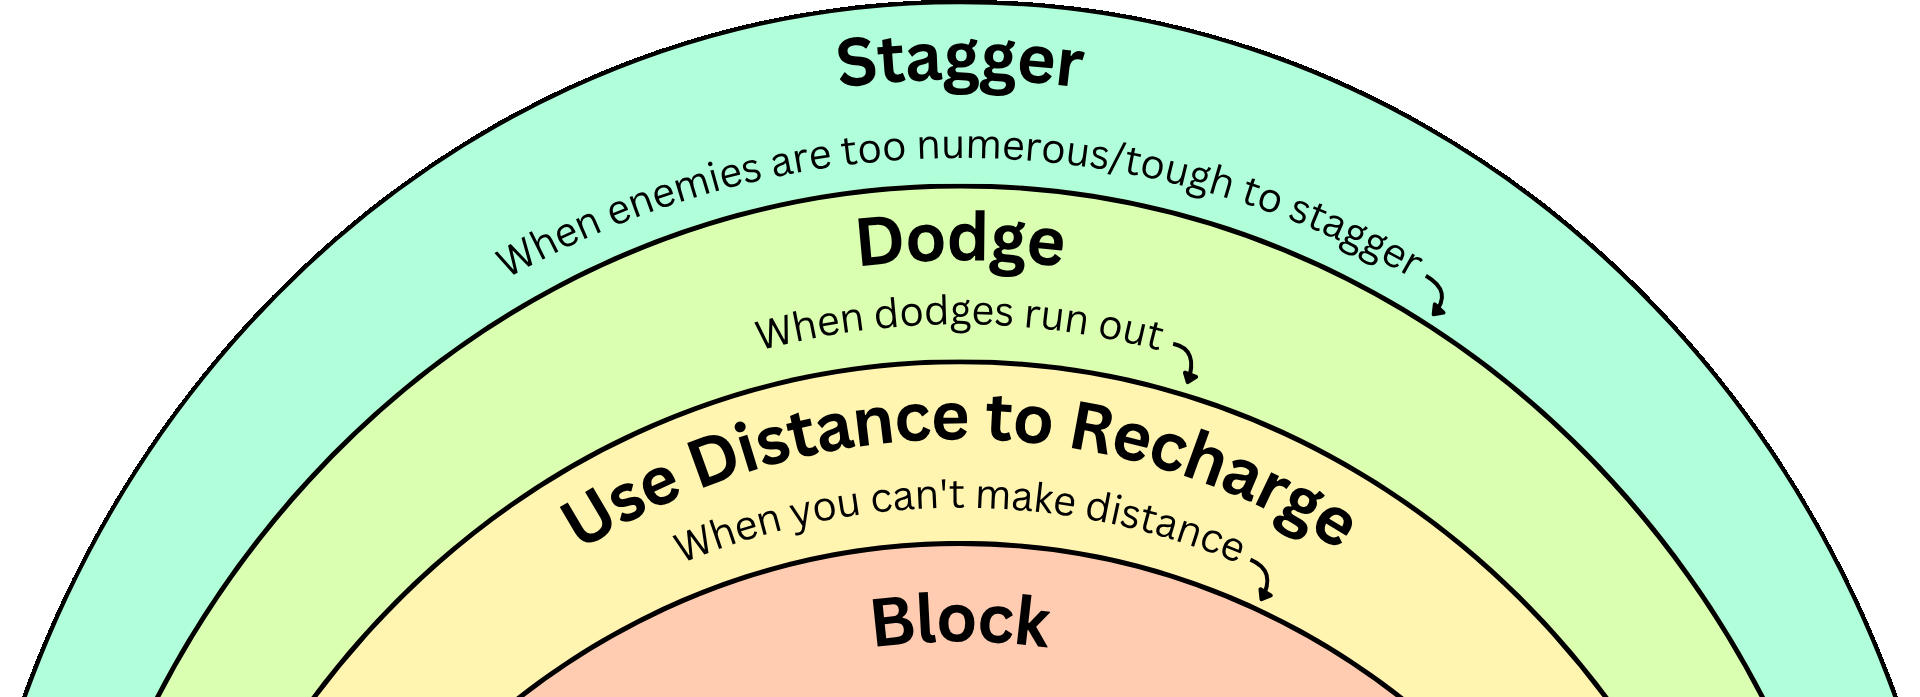
If you suck at staying alive, something here is probably being misused.
Is blocking your primary safety measure instead of the last?
Perhaps you skip the third measure and end up getting overheaded when dodges run out?
Are you forgetting to spam dodges first and foremost when threats show up?
A good rule of thumb is if you never run out of dodges, you aren't dodging enough.
And what do I do against unblockable attacks?
Pray to The Emperor
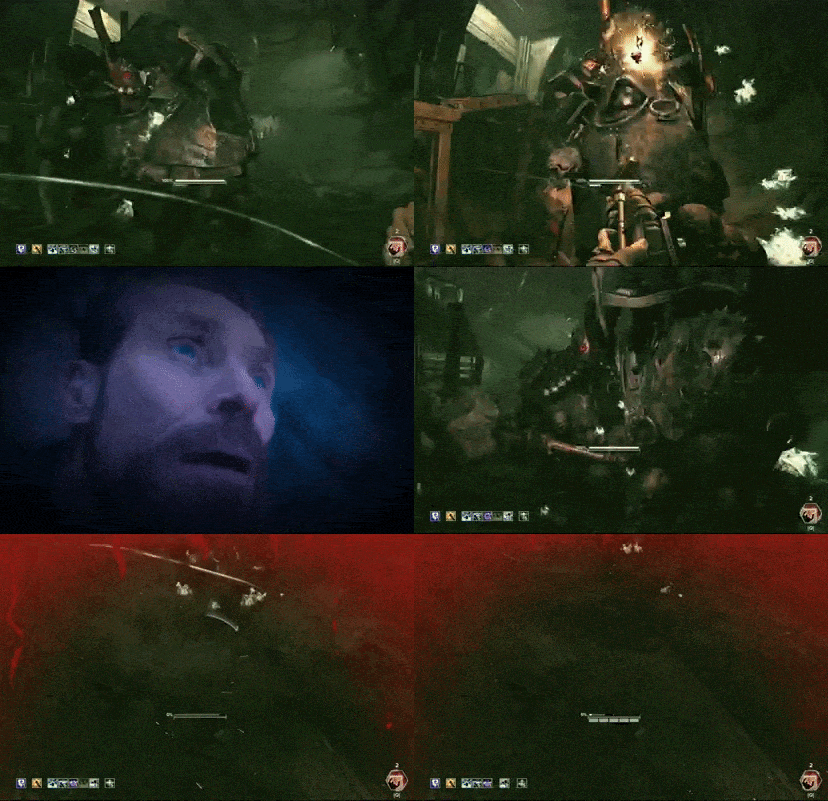
What Your Tools Actually Do
Dodging is so much more than a simple burst of speed and should be used constantly as your primary protection against melee attacks and specials.- Prevents most attacks from locking on to the player ← VERY IMPORTANT
- Severely reduces hitbox size briefly ← ALSO VERY IMPORTANT
- Protects against gunners briefly
- Limited uses before they become slower, fully recharging after roughly 1s of no dodging or sliding
Sliding is your primary protection against gunners & shooters, providing the best protection from them available.
- Protects against gunners and can be spammed
- Breaks lock-on for grabber specials (you can still slide INTO them and get grabbed though)
- Maintains sprint speed while consuming less stamina
- Resets your dodge recharge timer
- Sliding leaves you vulnerable to melee enemies, your only defensive option left being blocking
Sprinting is usually an inferior version of spamming slides, the only time you wouldn’t want to slide too is when you need to recharge your dodges, for which it’s extremely important.
- Protects against gunners as long as you're moving to the side and have stamina remaining
- Does not prevent dodge recharge
Dodge-Sliding is not extremely important like dodging or sliding, but can be handy for getting distance or avoiding bullets while attacking or shooting back.
- Adds extra distance & protection from bullets at the cost of another dodge
- Unlike sprinting, dodge-sliding does not prevent you from attacking or shooting
- Consumes 2 dodges
Toughness has a lot more nuance than just “Shield that protects your health”
- Your survivability (especially against bullets) benefits very heavily from your ability to generate toughness on the fly with your talents
- Some attacks ignore toughness, such as barrel explosions and many sources of corruption
- If toughness is below 100%, melee attacks will punch through and deal small amounts of health damage, more if toughness is lower
- Many melee attacks deal percentage-based damage to your toughness. Ex: the Beast of Nurgle's 'body slam' attack doesn't care if you have 100 toughness or 200, it will set it to 0.
- 'Golden Toughness' granted by Veteran's Voice of Command and Zealot's Chorus has a hidden effect. While above 100% toughness, you become immune to attacks that would otherwise instantly deal health damage, such as crusher/mauler overheads and pox bursters, both will simply break your toughness instead.
Stagger is your first line of defense, some weapons rely on it more than others, but regardless of what you use, it will still be very important.
- What you can stagger and how much things are staggered is determined by the “Impact” stat
- A properly timed push can stagger a hound before it hits you during a pounce
- Quickly drawing your ranged weapon and shooting the trapper or dog can also save you from getting grabbed
Blocking is your final line of defense for when you’re stuck or run out of dodges.
- Blocking is 360* but blocking with your back costs additional stamina
- You automatically start blocking while reviving another player
- You can use blocking to protect against trash while focusing on something else, like dodging a special or just looking around
Cover only becomes mandatory in mid-high Havocs where you can get gunned down in moments.
- Protects against gunners (Who’d have thought?)
- Can force trappers and hounds into melee range for an easy kill
- Using a corner can also protect from pox burster explosions
- You can use cover when facing hordes of ranged enemies to recharge stamina/dodges or even toughness if your build allows it
Incredibly Important Basics pt.2
How To Swing Your Weapon Better
Attack animations are not random, understanding what attack you're about to use makes it easier to land headshots and allows you to choose appropriate attacks given the situation. For example:- Sweepy attacks for hordes
- Armor piercing attacks for crushers & maulers
- Single target attacks for bosses
- Fast attacks for killing specials during chaos
As a general rule, overheads, uppercuts, and stabs have higher single target and armor damage. Meanwhile, horizonal and diagonal swings more typically have higher cleave. This is NOT TRUE of all attacks, but it is for about 85% of them. Make sure to test and try your weapon's attacks in different situations so you can dial in on the optimal choices.
There are many more types of attacks than just lights and heavies:
Pushes (Hold block + tap attack)
- Unlimited cleave, useful for staggering dense hordes.
- Consumes stamina.
- Sometimes combos into unique follow-up lights or heavies.
Push Attacks (Hold block + hold attack)
- The push can be used keep trash off you while the attack damages something you want to damage, very useful for tight situations.
- Consumes stamina.
- Usually combos into potentially useful points in the weapon's light or heavy attack chains, or into unique attacks all together.
Special Attacks (Tap special attack)
- Different for every weapon that has one, effectiveness varies heavily.
- Sometimes combos into unique follow-up lights or heavies.
Sprint Attacks (Sprint + light/heavy attack)
- A couple weapons enter a unique state while sprinting, namely the Relic Blade and Blaze Force Greatsword, both having unique swings when used from a sprint.
Swap Attacks (Swap + light/heavy attack)
- Rarely, weapons will have unique attacks or start at a particular point in its combo if swung immediately after being equiped.
Block Canceling (Tap block)
- Block Canceling is tapping block to end the current combo, this can be extremely useful for weapons that have valuable attacks early in their combo chains, allowing you to reset and use those attacks again and again. The value of block canceling on many weapons cannot be understated.
Stringing together attacks that match the situation are called combos, try to find the ideal combo for each of the circumstances I mentioned above in this section.
Special Specifics
Pox Bursters are at their most dangerous when you have an uncoordinated or oblivious team.Bursters can either be shot or pushed, shooting them works great but you have to be careful no one else steps forward to push it and gets blown up. Pushing them also works great until your teammate decides to shoot it when you step forward, see the problem?
There's a secret third option I want you to always consider; just stand back.
Trappers aren't terribly dangerous on the surface, what can make them hard to deal with is that they can shoot their net through other enemies and pull you into the onslaught.
Your job is to hear the net charge up and time a dodge accordingly purely based on the sound, this can take hundreds of hours of muscle memory to pull off in the heat of battle.
- Trapper nets work the same as melee attacks hitbox wise, they're extremely tiny while dodging and basically can't miss if you aren't dodging or sliding.
Pox Hounds are similar to trappers in that they're at their most dangerous when other enemies are blocking them off.
Unlike trappers, hounds are less a test of "clue in and then time a dodge" and more pure reflex, when you hear the pounce (which ideally you were ready for, but that's not always the case) you have around a third of a second to dodge or push, which depends completely on how far the hound is from you.
- Wacky hound AI can cause them to pounce while at point blank, forcing you to either stagger it or pre-dodge, timing the dodge normally will result in you getting pounced anyway.
- Hounds also have an incredibly annoying "insta-pounce" where they jump immediately from a sprint. They can only use this attack if they have a suitable run up and have been targeting the same player during that run up.
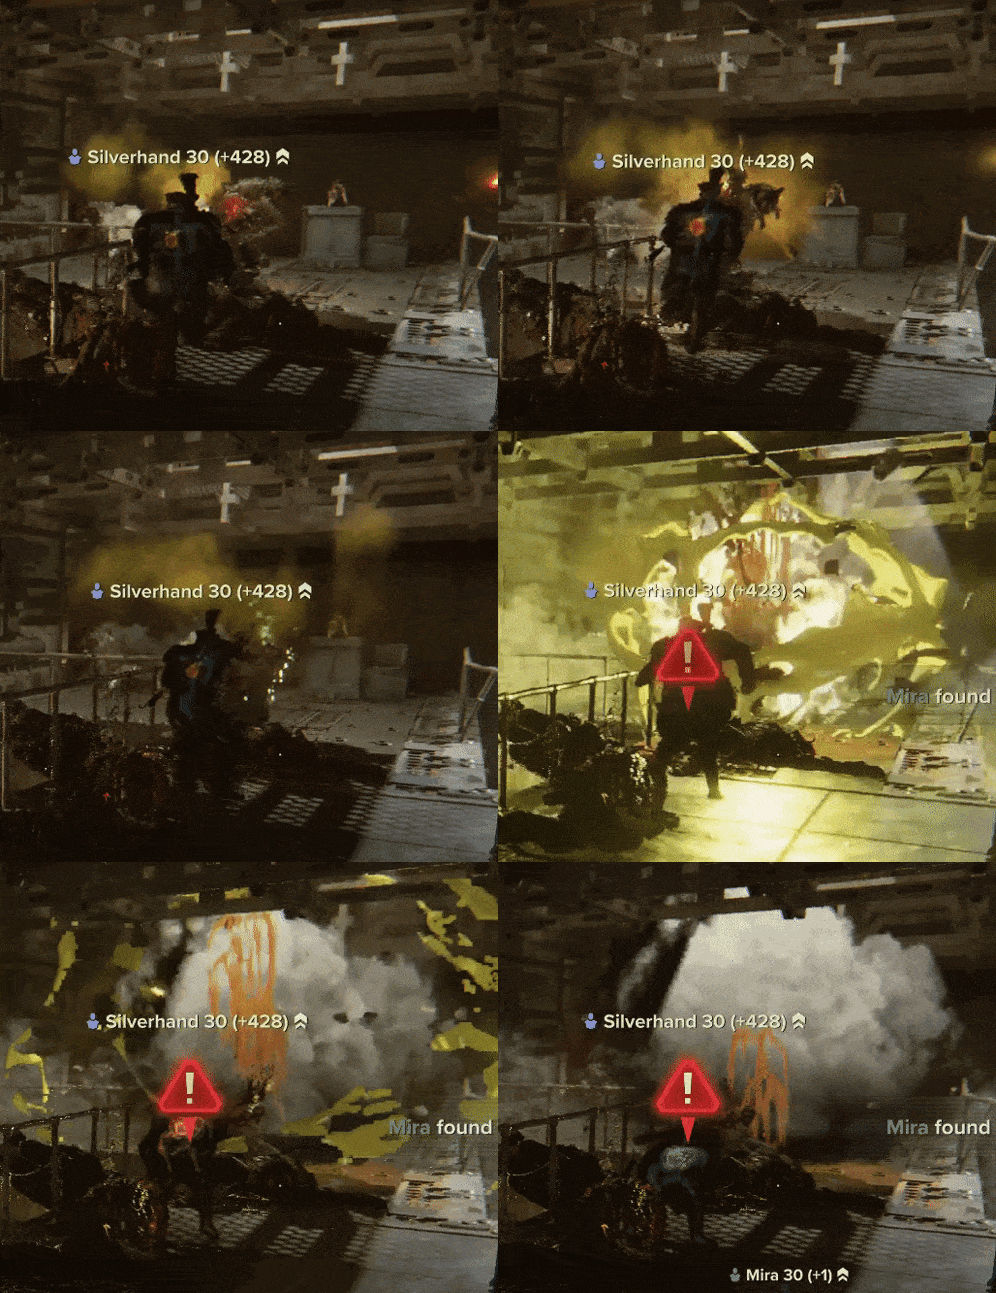
Mutants are the support units of Darktide. Lacking other enemies, mutants deal little damage and are basically useless, but if there's something that can deal damage to grabbed players, they suddenly become the hardest to avoid special while also being just as deadly as Hounds & Trappers.
The reason mutants are the hardest to avoid is because there's no sound cue → timing connection. All you get is a roar and unless you can see it coming, estimating when it'll hit you is difficult.
The following is a generalized list of things that can damage you when a mutant grabs you:
- Bosses & Captains
- Pox Bursters
- Flamers & Tox Flamers
- Any area-of-denial attacks such as bomber fire, tox bomber gas, pox gas, blight pools, beast vomit, etc.
- Any ongoing attacks from elites/regular enemies. Regular enemies don't normally hit grabbed players unless its a trapper net, but if they started the attack prior to the mutant or hound hitting you, their attacks can still land.
- Anything aimed at other players that hits you instead.
Almost Everything Has a Sound Cue
Using your ears is one of the most important things to learn, and there are way more sound cues than you think.- All specials make constant noise
- Grabber specials make extra loud sounds when going for their respective attacks
- There's a "You're about to be backstabbed" sound
- There's a "You're about to be shot in the ass" sound
- Crushers & Maulers have unique overhead sounds
- Bosses all have spawn cues
- Etc, etc
Or at least... This is how it's supposed to work, but this is Darktide, don't be surprised if it completely mutes any threat, for any amount of time, completely randomly!
Settings & Garbage
Make Dodge & Jump Different Keys You Poor Fool!
By default, Darktide puts dodge and jump both on the same button, this is a gaming atrocity. Every single time you panic or accidentally press the dodge key too fast you'll jump, which leaves you completely open for everything to hit you. FIX IT!If You're on PC, Look Into Modding
This game is a QoL nightmare and has several bugs that mods can straight up fix, why haven't they all been implemented? Why must console players suffer? What is the meaning of the universe? We shall never know. But one constant exists; you should look into modding.Required:
Darktide Mod Loader[www.nexusmods.com]
Darktide Mod Framework[www.nexusmods.com]
QoL:
Hub Hotkeys[www.nexusmods.com]
Psych Ward[www.nexusmods.com]
Fixes:
Guarantee Ability Activation[www.nexusmods.com]
Guarantee Weapon Swap[www.nexusmods.com]
If you have terrible ping issues:
Latency Compensation (Fix Lag Ping)[www.nexusmods.com]
Deep Mechanical Insights
Melee Enemies Have Lock-on
In Darktide, enemy melee attacks have 'Lock-on' they use to adjust and hit the player.Sprinting around an enemy in a circle will always result in their attacks landing, no matter how fast you are. The only exception is if you can out pace them. If they're using a standing attack, simply walking backwards at the right moment can be enough, if they use a 'running attack' you will have to be already sprinting away to avoid it.
The only way to break enemy lock-on is by dodging.
The take away here is that your movement speed is mostly irrelivant for dodging attacks, what matters is whether you break lock-on using a dodge, even if your movement speed is extremely high and dodging slows you down, enemies will still lock on and hit you if you don't dodge.
The only time speed is helpful for avoiding melee attacks is if you can use it to straight up run away and leave their reach completely.
Hitbox Sizes Vary Moment to Moment
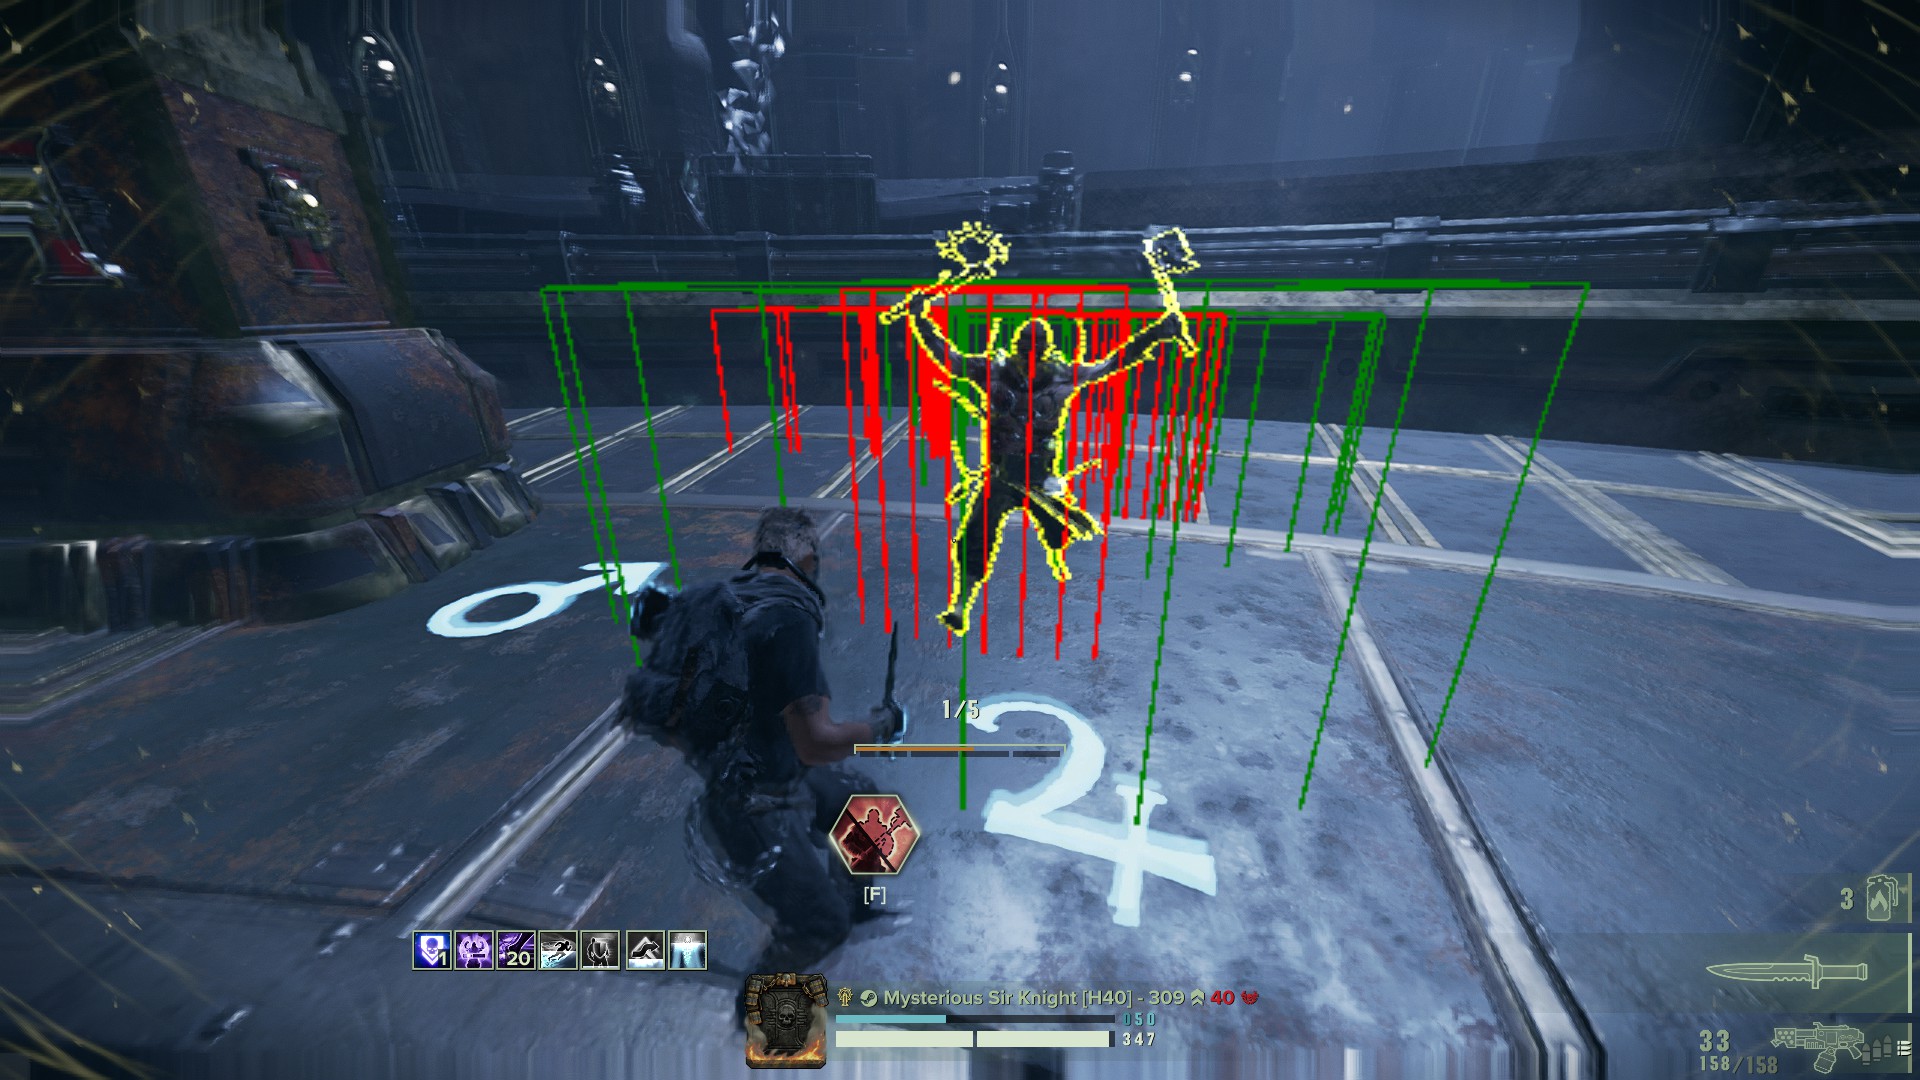
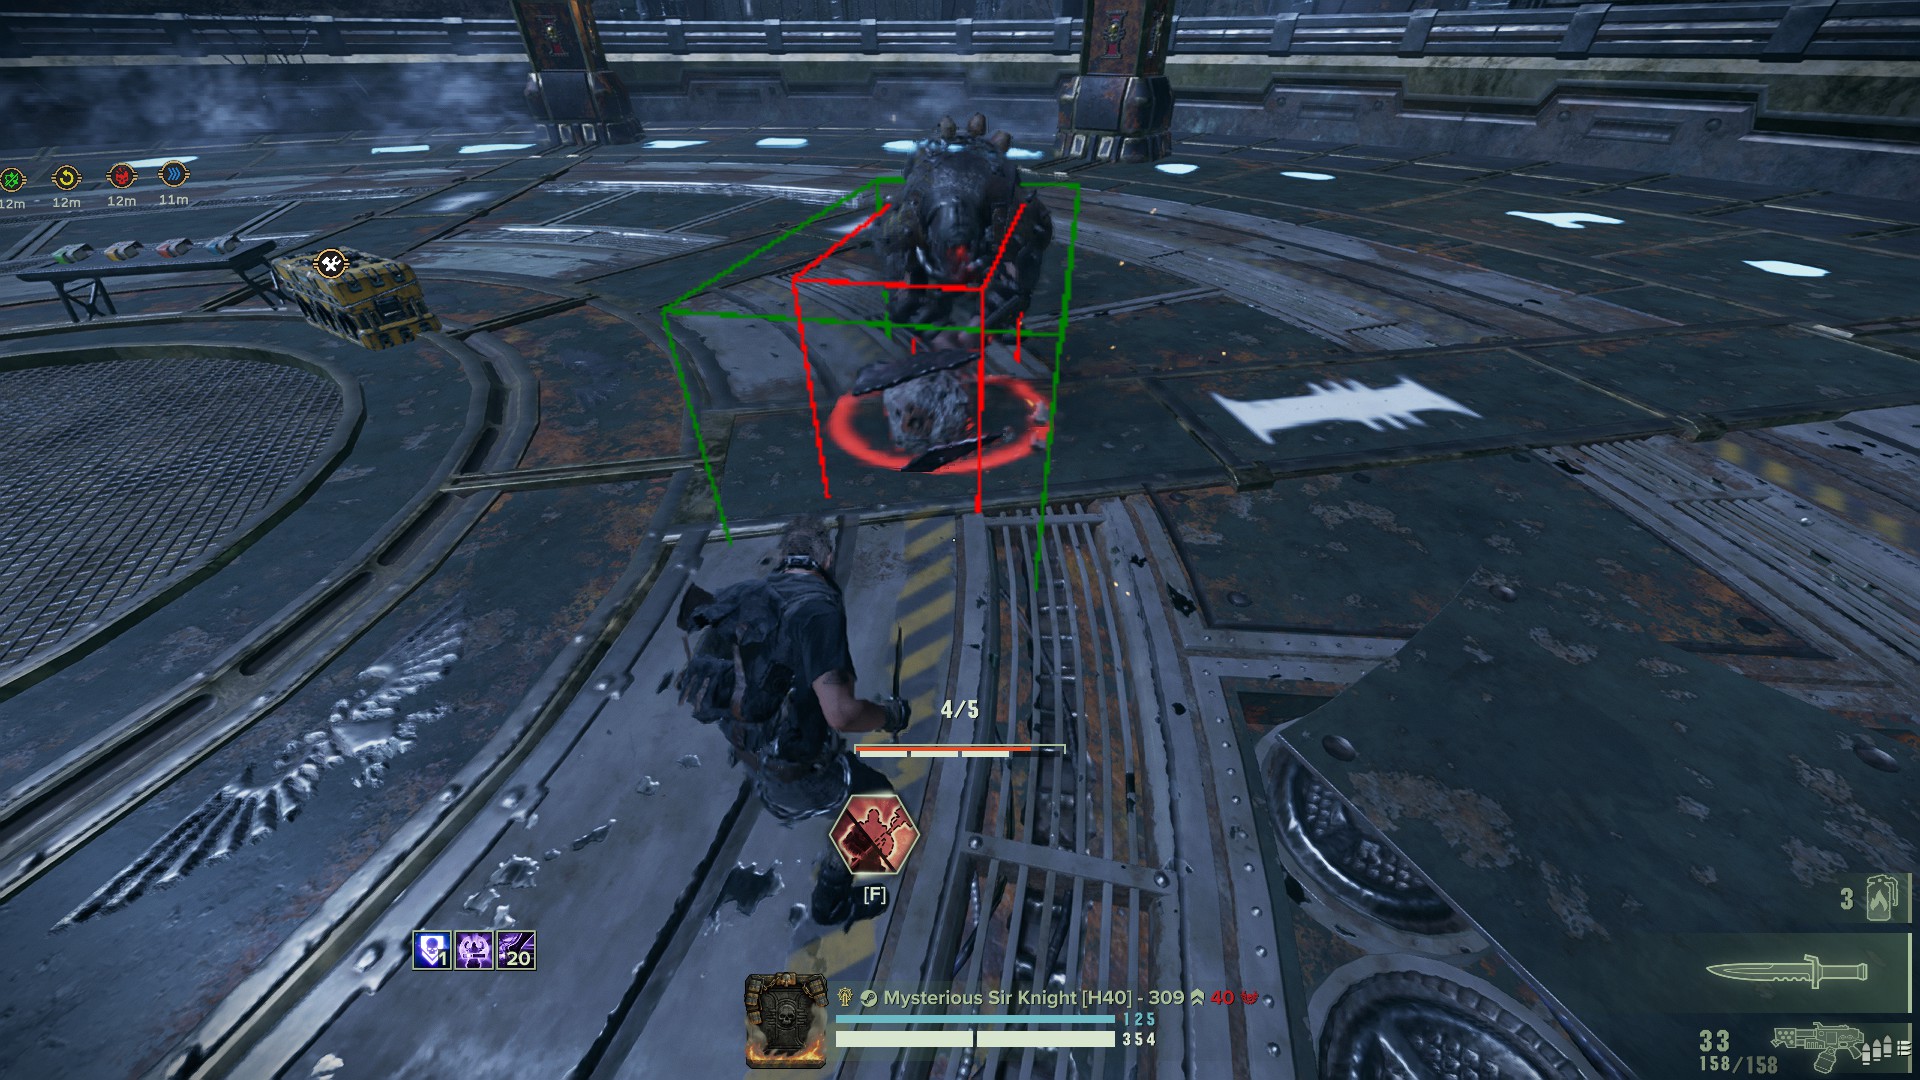
This mechanic is the source of most of those "No way that should've hit me" and "Omg how did I avoid that?" moments.The attacks of enemies like Crushers, Maulers, Bosses, etc all actually have 2 overlapping hitboxes, and the game uses each in different situations.
It uses a tiny, accurate hitbox when the player is dodging.
It uses a large, oversized hitbox when the player is not dodging.
An easier way to visualize it is to imagine your character is suddenly the size of an Ogryn whenever you're not dodging, because that's roughly accurate.
So, every time you're like "How did that overhead reach me??" it's because you had the huge not-dodging hitbox. And when you go "Woah, how did I avoid that despite dodging into a wall?" it's because you dodged at the right moment and had the tiny hitbox.
Green = Normal hitbox
Red = Hitbox while dodging
Safety in Numbers(?)
Some melee enemy types can only hit the target of their attack, while others can hit anyone who gets in the way.Crushers, Maulers, Bosses, etc can all hit anyone with their attacks.
Trash enemies and Ragers can only hit their target, other players are ignored.
This means that fighting ragers & hordes while grouped up is extremely effective.
While fighting bosses or crushers grouped up is extremely dangerous and makes attacks substantially harder to predict.
Sorry Boys, Height Matters
The height you choose for your character has a significant impact on gameplay, tall characters have an easier time hitting Bulwarks in the head overtop their shield, an easier time landing headshots on Plague Ogryns, and an easier time landing headshots from behind crushers.Meanwhile, shorter characters get to enjoy being closer to the ground which makes your movement feel faster. The world is also slightly larger which means bigger heads to shoot/stab. Pick your favorite.
You Do NOT Need to Button Mash!!!
Boat loads of games encourage you to spam the attack button as fast as possible for maximum swing speed with melee weapons.Darktide uses a very clean attack-queuing system to solve this, as soon as your previous attack lands, you can hit the button for your next attack and it will come out at full speed.
You do not need to button mash, just click rhythmically, queuing your next action while your current one plays out, this also gives you more control.
Stats And How They Work
Unbelievably Boring Terminology
Darktide sucks at explaining its terminology, here's all the not completely obvious terminology:- Cleave = Your ability to pierce through multiple enemies with one attack
- Cleave Damage = How much damage you deal to subsequent enemies when cleaving
- Coherency = A radius around each player that regenerates toughness, applies aura buffs, and is augmented by many talents.
- Dodge Duration = The time you're considered immune to ranged attacks and melee lock-on can be broken. (See Melee Lock-on in Deep Mechanical Insights above)
- Finesse = Headshot damage & Crit damage
- Impact = Your ability to stagger and stun enemies
- Peril = The Psyker's 'Overheat' meter
- Power/Strength = Damage + Impact + Cleave
- Rending & Brittleness = Armor Piercing (See Rending & Brittleness below)
- Suppression = Fear factor applied to enemies you shoot near
- Toughness = Your shield bar
- Toughness Regeneration = Toughness regenerated from Coherency (only works when near allies and no enemies are nearby, so basically never when you need it)
- Toughness Replenishment = Toughness recovered from all sources except Coherency
- Wounds & Corruption = How many times you can go down before insta-dying (See Wounds & Corruption below)
Toughness Replenishment is probably what you thought Toughness Regeneration is.
You will almost never notice the effects of Toughness Regeneration or Suppression in practice.
Wound & Corruption Mechanics
If you look at your health bar you will see it's separated into at least 2 segments, these segments are called 'Wounds', every time you go down, 1 wound will be replaced with 'Corruption'. Corruption is purple health that cannot be healed beyond without Medicae or specific talents.Going down while on your last wound results in instant death.
Corruption damage from other sources outside of going down can cause you to drop wounds, meaning if you have 2 wounds and a pox hound pushes your health bar below the center notch with corruption, you will suddenly be in insta-die territory.
Putting extra wounds on your curios is useful for new players learning the ropes as they allow your teammates to revive you more before you die, but on the higher difficulties, players favor extra toughness for its protection from bullets, combined with the fact that securing revives becomes more & more difficult in the situations presented on higher difficulties, meaning you're more likely to die anyway.
How Rending & Brittleness Work
Rending brings your damage a percentage closer to dealing its full damage to armored enemies. If your attack does 20% damage through armor, 10% rending will make it deal 30% damage through armor.Rending is a buff applied to you, Brittleness is a status effect applied to enemies, but they do the same thing to your attacks.
- If the added rending causes your armor damage to exceed 100%, additional rending will increase damage at a 1/4 rate. If your weapon already does full damage to armored enemies, 10% rending will make you deal 2.5% more damage.
- Additional rending cannot exceed 100% (Not to be confused with "armor damage" above, which falls over if pushed beyond 100%)
- Rending doesn't just work on Carapace and Flak, it also works on Unyielding and Maniac armor types, but not Infested or Unarmored.
Dump Stats & Weapon Cards
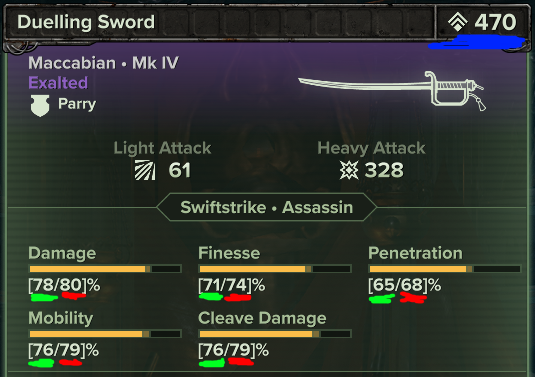
Next we're gonna talk about this stupid thing.
- The numbers underlined in red are the max potential for each stat, ranging from 60-80.
- The numbers underlined in green are the current level of each stat, ranging from 0-80.
- The number underlined in blue is the weapon's power it ranges from 0-500 and increasing it increases the stats, all reaching their max potential (red) at 500 power.
The max potential for the stats on a weapon is always 80 points each -20 points disributed randomly. For example, the dueling sword above has 79 mobility, 79 cleave damage, 74 finesse, and 68 penetration, which adds up to 20 points below each stat being 80.
A dump stat is where you pick the stat you care about the least and then find a weapon that has 60 in that stat and 80 on everything else.
Hyper Optimization
In this section I'm going to explain how to go from walking around like a filthy scrub to flailing your way through the map like an aggressive orangutan.
The best example of this is the Heavy Lazpistol, which is basically just a worse Lazgun until you realize it has the strongest movement profile of almost any ranged weapon. It can be paired with your favorite slow two-handed weapon and used as a mobility tool whenever you have threats to run from, places to be, or even people to kill!
Not only is this useful on ledges, but it can also be used while going down stairs, or even by climbing on a box and then dodging off of it, which in the long run actually increases your speed!
The classic example is using the combat knife, where you get a decent speed boost while charging its heavy attacks, but the rabbit hole goes much, much deeper than this.
When the combat knife's swing actually goes through your speed drops substantially, this is where sliding comes in, if you slide as the attack goes through you'll maintain sprint speed even as the swing slows you down. This creates a "sprint -> charge attack -> slide -> release attack" movement combo that lets you get around at lightning speed compared to just regular sprinting.
Here's what I want you to pull from this example:
#1 Attacks modify your movement speed
#2 Using slides at the right time can be used to cut around the slow parts of attacks and maintain speed while you reset or block cancel
You can reapply this to many other weapons.
However, it doesn't work for weapons that have animations which prevent usage, such as Zealot's Flamer, Veteran's Helbore, and most of Ogryn's arsenal.
The difference is minor in many cases, but can be absolutely huge for some weapons like the Deimos Mk IV, where it can be used to spam its incredibly powerful first light attack, then its even more insane follow up heavy if you're willing to double tap the swap key between EVERY ATTACK!
Weapon Mobility
You probably noticed, but different weapons have different mobility profiles with different movement speeds, sprint speeds, dodge distances, and dodge counts. This means that simply wielding your other weapon can make you move faster and dodge better!The best example of this is the Heavy Lazpistol, which is basically just a worse Lazgun until you realize it has the strongest movement profile of almost any ranged weapon. It can be paired with your favorite slow two-handed weapon and used as a mobility tool whenever you have threats to run from, places to be, or even people to kill!
Ledge Slingshot
Dodging off of a ledge preserves your dodge speed the entire time you're in the air, if you have a good dodge speed, this sends you flying extremely fast.Not only is this useful on ledges, but it can also be used while going down stairs, or even by climbing on a box and then dodging off of it, which in the long run actually increases your speed!
Speed Tech
Darktide's movement is wildly complex and understanding how exactly it works can allow you to manipulate your movement speed.The classic example is using the combat knife, where you get a decent speed boost while charging its heavy attacks, but the rabbit hole goes much, much deeper than this.
When the combat knife's swing actually goes through your speed drops substantially, this is where sliding comes in, if you slide as the attack goes through you'll maintain sprint speed even as the swing slows you down. This creates a "sprint -> charge attack -> slide -> release attack" movement combo that lets you get around at lightning speed compared to just regular sprinting.
Here's what I want you to pull from this example:
#1 Attacks modify your movement speed
#2 Using slides at the right time can be used to cut around the slow parts of attacks and maintain speed while you reset or block cancel
You can reapply this to many other weapons.
QQ Cancelling
This is the final boss of stupid hyper optimization. Is block canceling too clunky and slow for you? Well say hello to QQ Canceling! It functions the exact same as block canceling but it's as instant as you can double tap the swap button, and doesn't reduce movement speed briefly!However, it doesn't work for weapons that have animations which prevent usage, such as Zealot's Flamer, Veteran's Helbore, and most of Ogryn's arsenal.
The difference is minor in many cases, but can be absolutely huge for some weapons like the Deimos Mk IV, where it can be used to spam its incredibly powerful first light attack, then its even more insane follow up heavy if you're willing to double tap the swap key between EVERY ATTACK!
Advanced Tactical Brilliance
Always Have An Exit
I'm going to teach you this lesson with a simple quiz, get ready!This is a quick depiction of a situation you may find yourself in, the 4 blue dots are players.
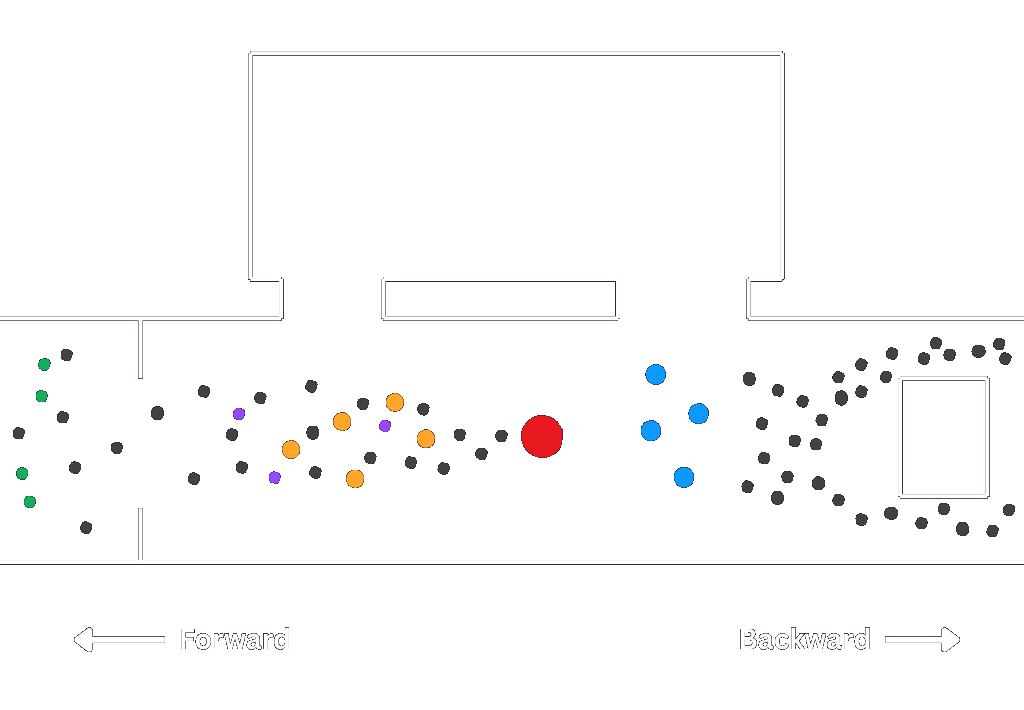 The question is simple, which way should they go?
Option A: Upward into the empty room to hold out.
Option B: Push backward into the horde.
THE ANSWER IS B. The objective of the group in this situation should be to reestablish access to the previous part of the level so that it can be used as safe runway to kite and deal damage without being cornered or surrounded.
Moving upward into the empty room may seem enticing as it gets all the enemies in front of the group instead of surrounding them, but it comes with the downside that if there's too much pressure, the team will get cornered and lose health or die.
The best option will be to push around or through the back horde to reach a truly safe area.
On lower difficulties this isn't really important because all encounters can be brute forced, but on mid to high havocs, having room to back up is vital when 2-3+ bosses & more spawns at once.
However...
We're being very idealistic, in reality you cannot control your team and tell them which way to go in these split second decisions. So say your 3 teammates go upward into the empty room, where should you go? It depends...
If the enemies ahead look like too much pressure to handle from a corner, you should hug a wall and push through the horde to get to safety, it's better to be alone than dead.
If it doesn't look like too much pressure, it's best to just stick together and not risk getting grabbed alone.
The lesson here is always have an exit and if you don't, fight to get one.
Just Stand Back...
Along the same vein as always having an exit is this, there are a significant number of situations where just standing back is unbelievably effective. Such as Pox Bursters, but it works in other situations too.Everyone will be up front and 2 people go down, there's gunfire, trash, elites, specials providing support, it's utter chaos. Then you back up like 10 feet and realize the gunners can't shoot you anymore, you've moved out of the pox gas, and there's only like 2 crushers and a handful of fodder, suddenly what felt like a huge problem feels soloable just because you backed up a little bit.
Stay Close But Not Too Close
Alongside the aforementioned threat of bosses and crushers/maulers being more dangerous and unpredictable against grouped up players, there are other threats like this too!Flamers, pox flamers, fire bombers, pox bombers, and especially trappers because their nets can hit targets they weren't aiming at, they can all cause chaos for teams that are grouped up too tightly.
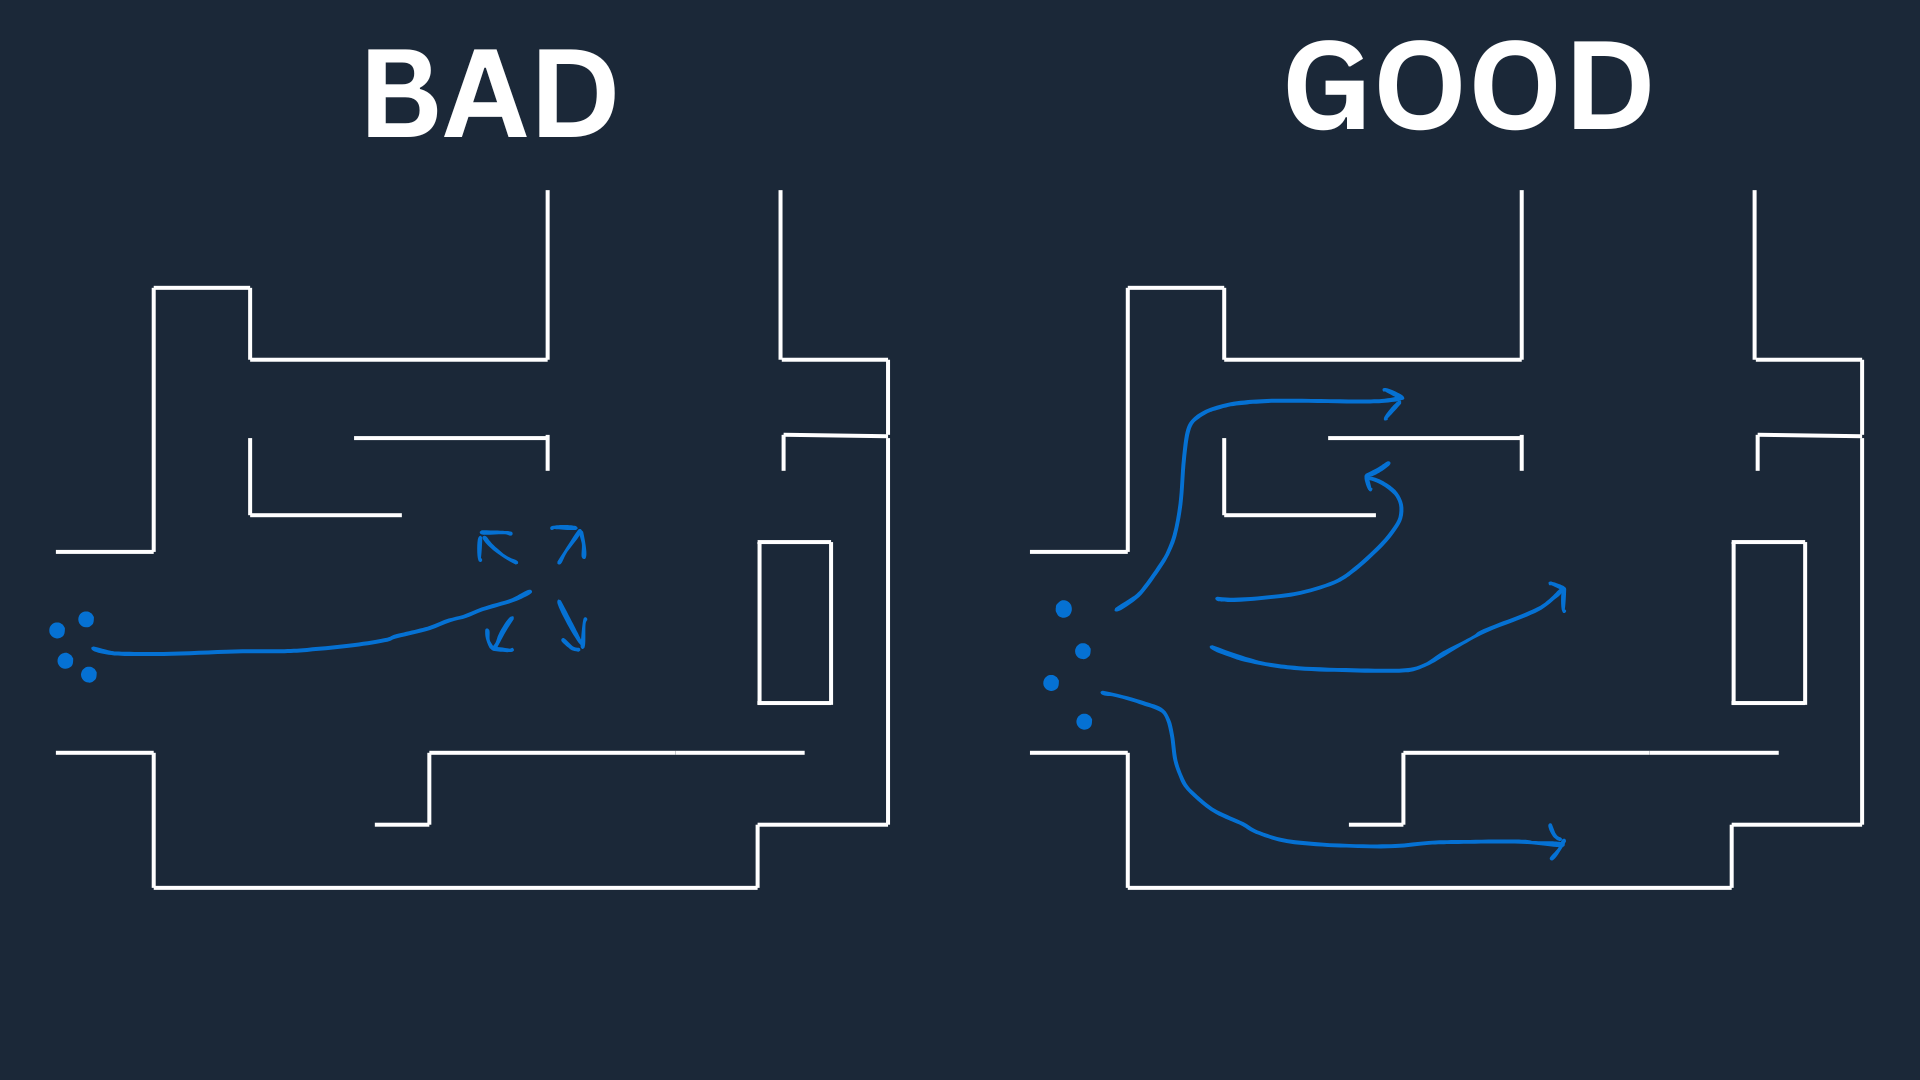
In general, the best teams linger close enough that they can assist each other, but far enough that they're fighting alone around half the time. Here's an example, not in entirely separate parts of the map, but still clearing the large room independantly:
Kiting is Vital
Just watch Reginald's video, he's better at explaining than I could ever be.https://youtu.be/Slhzr6T8woA
Respawn Manipulation
This one requires some teamwide coordination, but it's one of the strongest tactics for helping teams win Havoc 40s.When a player dies, they respawn at the next nearest respawn point ahead of the player furthest into the mission, if everyone backs up through the level when another player dies, you can cause a closer respawn, which saves the group from having to push through ambient enemies, boss triggers, etc while down player(s).
Don't die For a Revive
It's best to air on the side of caution when other players go down, if you don't already feel safe, your goal shouldn't be getting to the downed teammate, it should be getting to safety.1 death is manageable, 2 deaths is dangerous, 3 is usually a wipe.
Let it be 1 death when someone goes down, don't make it into 2 or 3.
It's better to use the above Respawn Manipulation instead unless securing the revive is legitimately safe. If you're already sure someone is doomed, backing up together before they even die can be a very good idea.
Melee Enemy Slots
TLDR: There is a limited number of slots around you where enemies are allowed to stand and attack you, if this limit is exceeded, additional enemies will simply stand back. These slots can be blocked by terrain, reducing the number of melee enemies that can attack you at once. Some tight spaces can force only a single melee enemy to attack you at once.https://youtu.be/lDOKgV69KwM
Spicy Mindset Advice
This is the section where I'm going to detail the
SIGMA-MALE BASED DARKTIDE MINDSET TUTORiAL ADVICE™
Slammed into fire while grabbed by a mutant?
Cornered by a group of crushers?
Everyone is naturally tempted to blame 'luck' in these scenarios but that's how you bottleneck your potential. If you abstain from responsibility for your mistakes, you won't learn from them.
Don't stand in a spot where you can get launched off the map
Don't get grabbed by mutants, especially near things that can damage you during the grab
Don't get cornered!
Using support abilities like Psyker's Bubble and Veteran's Smokes
Pretty much everything that's not shooting a dog off of you or reviving you when it's safe to do so
IS ALL COURTESY
Nobody is required to run Psyker Bubble and use it to protect the team
Nobody is required to keep up with you OR slow down for you
Nobody is required to babysit you through the level under the guise of "MUH TEAMWORK"
If they do, be appreciative, but don't be pissy if they won't.
This is how you become the demanding anti-fun meta-slave, don't be that guy.
SIGMA-MALE BASED DARKTIDE MINDSET TUTORiAL ADVICE™
Luck Is a Lie I Tell Myself
Launched off the map by a barrel?Slammed into fire while grabbed by a mutant?
Cornered by a group of crushers?
Everyone is naturally tempted to blame 'luck' in these scenarios but that's how you bottleneck your potential. If you abstain from responsibility for your mistakes, you won't learn from them.
Don't stand in a spot where you can get launched off the map
Don't get grabbed by mutants, especially near things that can damage you during the grab
Don't get cornered!
No One Owes Me Anything
Looking after teammates and making sure not to leave them behindUsing support abilities like Psyker's Bubble and Veteran's Smokes
Pretty much everything that's not shooting a dog off of you or reviving you when it's safe to do so
IS ALL COURTESY
Nobody is required to run Psyker Bubble and use it to protect the team
Nobody is required to keep up with you OR slow down for you
Nobody is required to babysit you through the level under the guise of "MUH TEAMWORK"
If they do, be appreciative, but don't be pissy if they won't.
This is how you become the demanding anti-fun meta-slave, don't be that guy.
Locational Armor & Enemy Classifications
I noticed there's a crap ton of conflicting information out there, so I tried aggregate it and test the conflicts until I ended up with this, the most accurate outline you'll find:
Unarmored is fun, but most of these enemies die pretty quick regardless
Maniac is best on ranged weapons for sniping annoying trappers & flamers
Infested is mostly worthless
Flak is very general purpose
Unyielding is incredible and helps against all the toughest baddies
Carapace is made good by Maulers & Crushers
"Elites"
"Specialists"
"Monstrosities"
"Groaners & Pox Walkers"
"Gunners"
Armor Reference
At the top is the armor type, and under it is everything you'll deal more damage to if you bring "Damage vs (Armor Type)" perks.Unarmored is fun, but most of these enemies die pretty quick regardless
- Groaner
- Armored Groaner - head, legs, forearms
- Dreg Bruiser - chest, legs, arms
- Dreg Shotgunner - head, fore arms, thighs
- Dreg Gunner - head, arms, thighs, right shin
- Scab Shooter - arms, legs
- Scab Bruiser - head, thighs
- Scab Stalker - arms, legs
- Scab Shotgunner - arms, thighs
- Scab Gunner - legs
- Plasma Gunner - upper arms, thighs
- Fire Bomber - head, arms, thighs
- Tox Bomber
- Sniper
Maniac is best on ranged weapons for sniping annoying trappers & flamers
- Dreg Rager
- Flamer
- Tox Flamer
- Trapper
- Mutant
Infested is mostly worthless
- Pox Walker
- Pox Hound
- Pox Burster
- Crushers during the Rotten Armor modifier
Flak is very general purpose
- Armored Groaner - chest, shoulders
- Scab Shooter - chest, head, hands, feet
- Dreg Bruiser - head
- Scab Bruiser - chest, arms, feet
- Scab Stalker - chest, head
- Dreg Gunner - chest, left shin
- Dreg Shotgunner - chest, shoulders, shins
- Scab Gunner - head, arms, chest, feet
- Scab Shotgunner - chest, head, shins
- Scab Rager - head, arms, legs
- Plasma Gunner - chest, forearms, shins
- Mauler - chest, legs, arms
- Reaper - chest
- Fire Bomber - chest, shins
- Renegade Captains
- Ogryn Pack Master - legs
Unyielding is incredible and helps against all the toughest baddies
- Bulwark - chest, head, thighs, shins
- Reaper - head, thighs, upper arms
- Plague Ogryn
- Chaos Spawn
- Beast of Nurgle
- Daemonhost
- Ogryn Pack Master - chest, right arm
Carapace is made good by Maulers & Crushers
- Scab Rager - chest
- Mauler - head
- Bulwark - arms, feet
- Reaper - right shoulder, forearms
- Crusher
- Ogryn Pack Master - head, left arm, tank on his lower back
Classifications
This is a classification reference for if you bring talents or perks that grant additional damage to 'elites' or 'monstrosities' and don't know what enemies that entails."Elites"
- Dreg Gunner
- Dreg Shotgunner
- Dreg Rager
- Scab Gunner
- Scab Shotgunner
- Scab Rager
- Plasma Gunner
- Mauler
- Bulwark
- Reaper
- Crusher
"Specialists"
- Fire Bomber
- Tox Bomber
- Flamer
- Tox Flamer
- Mutant
- Poxhound
- Trapper
- Sniper
- Pox Burster
"Monstrosities"
- Plague Ogryn
- Chaos Spawn
- Beast of Nurgle
- Daemonhost
- Captains
- Ogryn Pack Master
"Groaners & Pox Walkers"
- Groaner
- Armored Groaner
- Pox Walker
"Gunners"
- Dreg Gunner
- Dreg Shotgunner
- Scab Gunner
- Scab Shotgunner
- Reaper
Gooder Guide?
I've been told pressing these two buttons up top helps more people see the guide.
Thank you for reading!

P.S. If you can think of anything that should be in here which I didn't include, write a comment. If I also think it belongs, I'll add it.
Thank you for reading!
P.S. If you can think of anything that should be in here which I didn't include, write a comment. If I also think it belongs, I'll add it.
More Warhammer 40,000: Darktide guides
- The Ogrynomicon★ 5 (3.1k)62k views6.1k ♥1 minUpdated Apr 25
- Mez's Darktide Mod Pack - Essential Mods to Improve the Darktide Experience★ 5 (712)37k views1.5k ♥41 minUpdated Oct 13, 2025
- The Psyker Atheneum★ 5 (965)36k views2.9k ♥137 minUpdated Mar 26
- 100% Achievement Guide★ 5 (523)29k views1.1k ♥10 minUpdated Apr 12, 2025
- Martyr's Skull Location★ 5 (933)28k views2.2k ♥15 minUpdated Feb 11
- [Устарело] Ультимативная энциклопедия снаряжения★ 5 (581)25k views1k ♥46 minRussianUpdated Mar 17



This guide was created by its original author on the Steam Community. Are you the author and want it removed? Request removal.