
Overview
Ever wanted to learn the dark arts of Mordhau? Search no further….This guide will explore the dichotomy of Offense and Defense; Helping you turn from a mediocre player into a based melee juggernaut.We will take a ground up approach; meaning we will start from the basic concepts and then move into more obscure ones. ~Enjoy~
Introduction
Greetings young Squire,
I take it you’ve become tired of getting abused by players with 1000’s of hours in this genre. You may be confused, frustrated, unsure how to get better…perhaps all of the above.
Mordhau has a steep learning curve due to its intricate combat system. Nothing else has anywhere near the mechanical depth or freedom of control that Mordhau has. This is what makes Mordhau so addicting and unique. The game rewards those that put in the time and effort to master the mechanics; But, on the flipside, many new players quit the game due to frustration & lack of direction/knowledge.
Luckily for you, I have compiled the last 5 years of my melee experience into one guide – full of information from both a practical and competitive persepective – in order to help you get a sense of direction to ‘git gud’.
- I have been playing Mordhau since the closed Alpha (build #1). Much of this information was gleaned from my first 1k hours in Mordhau and combined with previous experience in Chivalry: Medieval Warfare & Slasher (Mordhau Prototype). I also ran a competetive Mordhau clan ‘Vanquish’, which has been around in said titles. & currently am in clan ‘Hydra’.
- In Mordhau, you have rules. Everyone knows them; that’s how the game is built. Everyone agrees on those rules, and they also determine what conditions will end the game. We’re talking about the defined parameters of what makes it a melee game.
- But on the professional level, there is more to the game than simply swinging back and forth. That would be a boring game, perhaps predictable. Professional players, or high level players, do a lot of advanced techniques to actually win. Positioning, footwork, accels, drags, morphs, feints, chambers and mind games. These are the little things that are done to win. Enough of these accumulate and you will succeed. Because of this, you force opponents to respond in kind, either to fight fire with fire by mimicking their play, or by countering with their own effective style. Or else, you will lose.
- There will be unspoken rules and techniques that you will have to learn (the hard way) because secrets give you an edge. This is why entering a competitive environment with no knowledge of metagame can be rough. None of what they do are illegal actions per se, but it is unlikely to be listed in the instruction book. This guide strives to reveal some of those secrets.
- Reading this whole guide is daunting, which is why I suggest you work on one section at a time and read them individually and sequentially. I wrote the sections in order for a reason, to build off each other. Read them, and then work on implementing those specific concepts into your playstyle until you feel you’ve got the muscle memory down. If you get frustrated, analyze the situation that got you killed, acknowledge it, learn from it.
We will focus on mechanics first before we move into specific strategies; because if you learn the mechanics, you can eventually create your own strategies and unique playstyle. Like constructing a house, we build from the ground up.[/list]

- Just as no one has ever learned to ride a bicycle by reading about it, neither will you learn to use these concepts simply by reading these lessons. The key to success, as always, is to practice. Do not be afraid of failure, for it is your best teacher.
Mordhau Armory
Mordhau uses a points based loadout system. You start with a total of 16 points, which you are free to spend on Weapons, Armour, and Perks.
The Mordhau Armory has a wide variety of weapons and armour in its arsenal. The weapons and armour you equip will [usually] influence how you predominantly play. There are general (all purpose) weapons; There are also more specialized weapons for dueling & support roles.
There are 3 slots to equip weapons/utilities.

- The first slot is usually your primary weapon, second slot is secondary, and third slot is tertiary.
The best way to categorize weapons is through their point-cost.
Originally posted by Jax:1-3 point weapons: Side arms & backup weapons, either they lack damage or reach, but can really help out if you just need to land one more hit on someone.
3-5 point weapons: Dueling Weapons. These fill the role of backup or primary; these weapons are usually suited more towards duels, but can be used in teamfights pretty well, especially the longsword and the messer.
6-8 point weapons: Middle-ground weapons. Bardiche, greatsword, poleaxe and battleaxe are pretty great in every situation, especially if you use the alternate modes.
8+ points weapons: Support weapons. These tend to shine in team fights, with great reach and good damage. Eveningstar packs a massive punch but is slow, while something like the spear can get super quick stabs in from crazy far away. Halberd/zwei are awesome cleaving weapons and work best when you don’t stick to a 1v1, instead switching around to get kills on people who are fighting someone else.
- Blunt weapons usually deal the most damage to armored opponents, but can only hit one person at a time due to hitstop. (this does not apply if you kill the opponent, where your swing continues fully through release.) Hitstop helps the player conserve stamina in 1vX situations, because they don’t have to CFTP to protect themselves.
- Sword/Spearlike weapons deal the most damage to unarmoured/light opponents, while remaining fast and being able to cut through multiple enemies, but require more stamina to play in 1vX situations
- Most weapons have an alternate-grip. Pressing ‘R’ will switch to your weapons alternate grip.
- The alternate-grip allows you to wield your weapon at a different range. It usually gives you more speed at the cost of less damage & range (or vice versa). Some examples of Alternate-Grips are
- Mordhau Grip (Longsword/Estoc)
- Half-sword Grip (Greatsword/Zweihänder),
- Choked Grip (Battleaxe/Poleaxe)
- Short/Long Grip (Spear/Halberd)
- If a weapon doesn’t have an alternate-grip (such as most 1-Hander’s); Pressing ‘R’ will throw your weapon.
- This is not a shield focused guide. However, if due to popular request I will make a section on it.
Mordhau offers a variety of throwables you can equip:
- Weapons that don’t have an alternate-grip can be thrown.
- Throwing Knives/Axes are great at both weakening an approaching enemy or finishing off wounded ones that are retreating.
- Oil pots are an AoE attack that causes damage over time. They should be thrown at choke points, large groups of enemies, and used to prevent health regen. The oil pot does 23 damage PER tick, independent of armor. Cannot be blocked.
- Smoke pots can provide a smoke screen to ruin an archers day. They can be thrown directly at the engagement to cause confusion or at the sides to assist your flank.
- Bear-Traps are self-explanatory. Great behind doors, tops of ladders and choke-points.
- Toolbox: can be used to construct fortifications. Use alt mode to switch through the available buildings. Currently has a wall providing cover and a spike wall, which deals damage and can impale people, based on their velocity.
- Repair Hammer: used to repair objects.
- Bandages/Medbags: healing items.
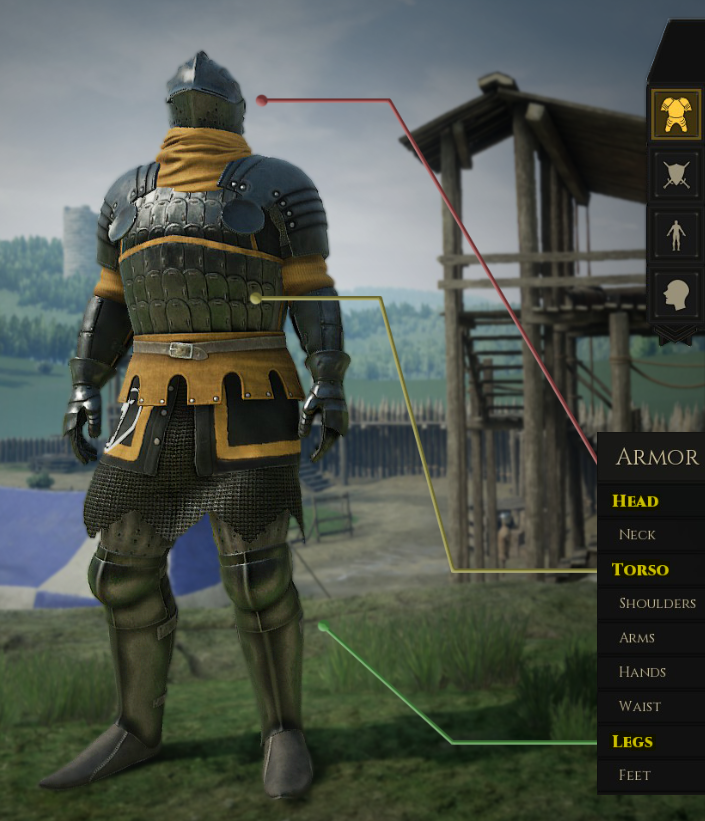
There are 3 slots to equip armour,
- The first slot is your head, second slot is chest, and third slot is legs.
Armour is important, as it will mitigate damage dealt to those parts of your body.
There are 4 tiers of armour in Mordhau…
- Each armour tier has progressing amounts of damage mitigation, at the cost of footspeed.
- Cosmetic/T0 items are purely aesthetic, as their name implies.
- For example, Heavy Armour will slow you down the most but you can take more punishment. You may mix and match armour tiers in your loadout.
- Players commonly refer to their armour loadouts with numerical terms.
- For example, full heavy (head, torso, legs) would be 3/3/3. Mix match would be 2/3/1. No armour would be 0/0/0, etc.
‘Which armour should I use?’- That depends on your playstyle you want for that loadout. 3/3/3 would be the epitome of ‘stand your ground’ playstyle‘. Whereas 0/0/0 would be the ‘run away and bait playstyle‘. A lot of players like to strike a balance between the two with mix matching. Many new players are drawn to using little armour & big weapons (like the Chivalry Vanguard). Beware of this as many weapons can easily cut through Tier 1 & 2 armour. I would recommend at least a Tier 3 chest-piece.
- Also, if you are new, wear a helmet. Good players will identify your weakness and target your head. The helmet and torso/chestpiece are two of the most important pieces of armour.
Player Perks offer unique passive buffs & abilities for your character. Each perk you choose has an associated point cost with it; so you must choose wisely.
Originally posted by Mittsies:1 | Acrobat (Jump Stamina cost reduced by 50%)
1 | Cat (Reduces fall damage by 50%)
1 | Fireproof (Reduces fire damage by 80%)
1 | Friendly (50% Damage reduction to dealt and received team damage)
1 | Scavenger (Killing enemies causes them to drop everything they are carrying, including holstered equipment)
1 | Smith (Repair effectiveness increased 50%)
1 | Wrecker (Melee damage against structures increased 50%)
2 | Brawler (Increases Fist damage)
2 | Fury (Stamina on kill increased 66%)
1 | Tenacious (Passive Health regeneration is 66% faster)
2 | Huntsman (Projectiles deal 200% damage against enemies wearing a quiver)
2 | Ranger (Allows you to move 15% quicker while aiming a bow or crossbow)
2 | Rat (Crouch movement speed increased 10%, Footstep volume reduced 75%)
2 | Second Wind (Gain 3 extra stamina on hit) – great for dueling.
2 | Flesh Wound (Fatal melee and projectile damage, except for headshots, does not kill you immediately, but 5 seconds later. Limb integrity during this time is not guaranteed.)
3 | Rush (Instantly get a movement sprint boost upon killing an enemy)
4 | Dodge (Jumping backward or to the sides will perform a dodge instead of a jump)
5 | Bloodlust (Health on Kill increased 50%)
8 | Peasant (Restricts equipment & wearables to things a peasant would use & allows you to spawn with makeshift weapons)


Mordhau Etiquette
Mordhau is a difficult game to master, often requiring a few hundred hours spent in various game modes. Here are some ways to fast-track your training.

- This is Mordhau’s official duel mode. Matchmaking is responsbile for pairing you against opponents at your skill level. Duels are a great way to develop your individual skill level.
Classic Duels (1v1)
- In the server-browser, these servers show up as FFA and usual run a dueling map. Technically, these are FFA maps; However, these are not actually FFA matches, they are big dueling yards.
If you wish to challenge someone to a duel, bow or flourish (x1) your weapon. Do not attack someone if they do not acknowledge you (poor etiquette).
You will often find competitive players frequenting these servers. These are the best places to master mechanics. Playing against stronger opponents WILL make you a better player, even if it’s frustrating and it doesn’t seem like you’re learning.
- Skirmish mode is an excellent way to test both your individual skill AND teamwork skill. You only get one life per round, so be careful! The first team to win 7 rounds wins the match. Skirmish is a great way to test your 1vX skills as well.
- Frontline/Skirmish mode is very chaotic & if you are new, you will probably die a lot. My advice is to find an experienced player on the battlefield and follow him around, try to guard his back and support him. Watch what they do and try not to hit them with your attacks. If you are humble, you’ll often develop friendships & perhaps a mentor doing this.
- Experienced players tend to ‘play smarter’, meaning they will pick their battles rather than blindly charging into a large fight. Try to think about how and where you can be most effective in a team fight;
- Pick fights you have a chance of winning; you probably can’t win against 4 opponents if you are alone.
- Standing shoulder to shoulder in a team fight may not be the best way; spread out if you can, and try to surround your opponent(s).
- Approach where the enemy isn’t looking (flanking); You’ll often catch people off guard and create a diversion for your troops at the front line. Archers usually hang in the back too.
- Support your team mates by following them, time your attacks rather than blindly throwing out swings and stabs.
- There are many experienced players who are willing to take on new players and train them in all aspects of the game. You can ask in-game; experienced players may be willing to answer questions, though remember that they are also trying to play the game.
- The official forum[mordhau.com] and https://www.reddit.com/r/Mordhau/have many veterans willing to answer questions and people will have more time to answer you.
- Once you’ve become competent with your skills and if you are interested in becoming even better, you may consider joining a competitive clan. Often recognizable by clan tags (shortened clan names) in front of their names, these clans are very well practiced at the game and their members are often considered top-players within Mordhau. You can get some of the best training the game has to offer from their clanmates. If you can perform decently against some of them (this is by their judgement, not necessarily yours), ask them if they are recruiting.
Being chivalrous and honorable is completely optional; but it’s a good way to build up your reputation in the community. Some examples of chivalrous etiquette are;
- Congratulating your opponent, even if you lose (saying GG/GF in chat).
- When you challenge someone to a duel; bow or flourish your weapon first.
- Offering advice to new players and helping them practice.
- Against all-odds; trying to save a fellow team-mate or friend from death.
- Saluting your opponent’s defeat rather than T-bagging him.
The following aren’t necessarily dishonorable, but they are great ways to gain respect.
- When you disarm an opponent; letting him pick up his weapon.
- In Skirmish mode; letting the last guy alive duel – instead of ganging up on him with your teammates.
Mordhau Vehicles
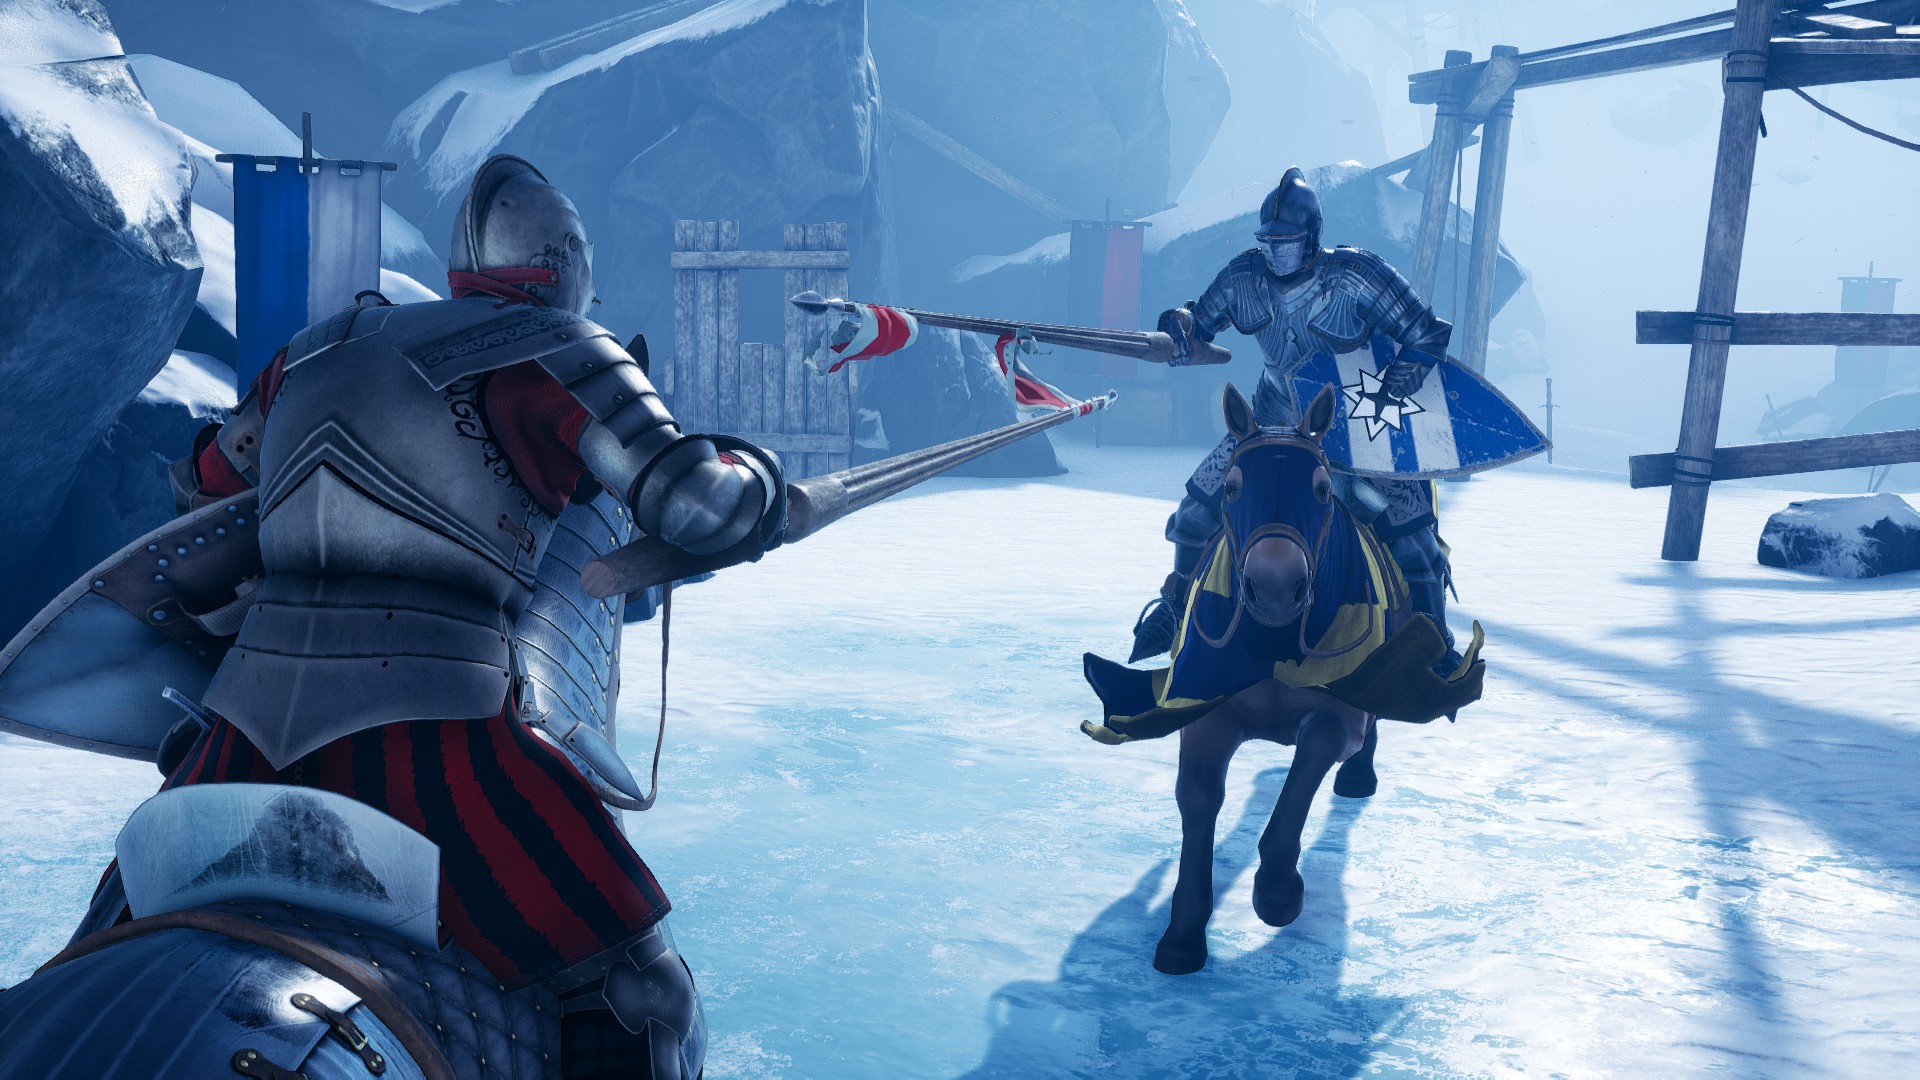
Horses are extemely powerful vehicles located on the battlefield.

Horses have a few purposes.
1. Use it to trample players. If the Horse is traveling fast enough, it will damage and flinch players upon impact (damage depends on speed of horse).
2. Couching – Using a lance or polearm to skewer players along your path.
3. Speed/Traveling – Using the horse to quickly get to a critical objective or location.

You can wield any weapon/shield while on a horse, however, only some of them are couchable, like a lance (or other polearms). Calvary has momentum based damage; The faster you are riding, the more damage you and your enemy will receive from attacks.
Couch: to lower (a weapon) into position for attack
Lances
- You will usually find lances next to stables.
- You can only couch a Lance when you are traveling fast enough.
- You cannot parry with the lance. However, you may perform basic attacks with it.
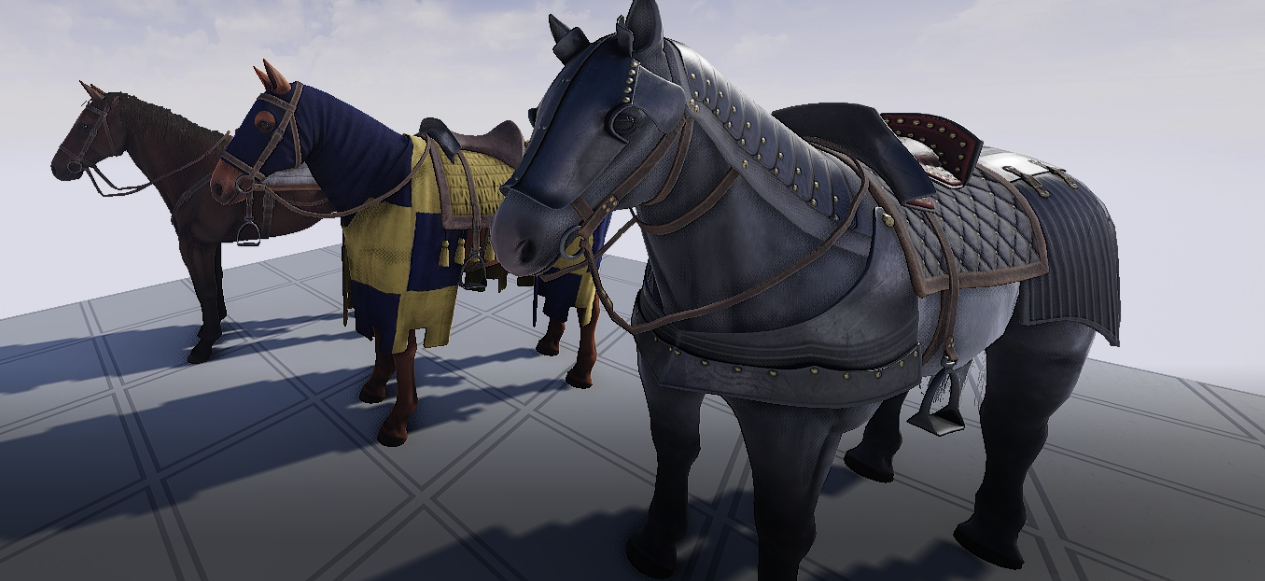
There are 3 types of horses:
- Light Horse:
- Speed: +++
- Protection: +
- Medium Horse:
- Speed: ++
- Protection: ++
- Heavy Horse:
- Speed: +
- Protection: +++
Controls
- ‘E’ to mount/dismount.
- ‘W’ to increase your horse’s speed.
- ‘S’ to decrease your horse’s speed.
- ‘F’ to enter couch mode with lance (or polearm).
Strategy
- Horses are best utilized by making a circuit around the battlefield.
- Horses are extremely powerful if kept alive and used tactically. Horses do not heal, so be careful with them. You do not want to stay in the middle of the engagement/battle while on a horse. This will leave you more vulnerable to getting dismounted; Instead, perform ‘hit & run’ charge tactics on unsuspecting enemies.
- Another strategy is to simply run through the engagement and trample enemies. Just beware of Polearms, as their hits will ‘dismount’ you.
Jousting
- Jousting is a martial game between two horsemen wielding lances.
- Light horses will typically win in jousting due to faster footspeed, thus their lance connecting with you sooner.
- Lances will typically win in jousting due to their length, causing it to hit sooner than the shorter polearms.
Catapult:

- Launches a large rock and causes AoE damage. Anyone within the radius of the impact will die. The best way to use catapults is to shoot them at castle/fort chokepoints such as wall openings, gates & bridges. Once youve ‘dialed’ in the distance to the chokepoints, launch rocks at it. Beware not to hit your allies!
Ballista:
- Launches a large bolt over a great distance. Scoring a hit on an enemy will instantly kill them, but also requires greater accuracy over the catapult. Ballistas are best used for sniping enemies off walls, chokepoints, and taking down horses[gfycat.com].
Ladders:
- You can climb up ladders, for obvious reasons.You may also fight on a ladder by equiping a 1-hander weapon.
Fortifications :
- Fortifications can be built by players with a Toolbox. The Toolbox has a total of 6 ammo. You always start off with 5 ammo, making Ammo Crates an important resource. Press ‘R’ to toggle between the different fortifications.
- Spikes
- Spikes are used to injure players that brush up against them (with momentum based damage). Also a great way to ruin a Horses’ day and lock down choke points.
- Mantlet
- A wood-planked wall with an archer-loop, affording the hard protection of a wooden structure but still being mobile; They can be used to provide individual cover or placed side by side to create a makeshift wall.
- Mini-Ballista:
- A construct-able semi-automatic ballista that launches 5 small bolt’s over a great distance. Ammo recharges over a bit of time. Requires the Toolbox to construct and consumes 6 ammo. Great for locking down choke points.
Mordhau Mechanics 101
It’s important to be familiar with Mordhau terminology. The following are basic terms/concepts you should become familiar with at the very least. Many of these definitions have chapters devoted to explaining them.
Health

- Your health bar (red) has 100 hit points; all players have the same amount of health, but some loadouts have heavier armour than others, Armours have varying resistances to damage. Running out of health will kill[gfycat.com] you.
Stamina

- Your stamina bar (yellow) has 100 points; all players have the same amount of stamina, but some weapons cost more stamina to use than others. Running out of stamina will disarm [gfycat.com]you.
Regen


- Stamina & Health will regenerate if you walk, crouch or stand still after x seconds. Running, damage, or any actions that require the use of stamina will stop the regen.

Attacks
- There are two categories of attacks in Mordhau. Each attack category, has different attack angles.
Strikes: Commonly referred to as a slash/chop/LMB. Horizontal/Vertical attack. Strikes require less accuracy due to its sweeping, arc-like nature. Strikes have six attack angles.
- Overhead/Alt-Overhead (Right/Left upper strike)
- Right/Left Slash (Right/Left strike)
- Right/Left Undercut (Right/Left lower strike)
Stabs: a thrusting attack which requires more accuracy than strikes & are faster. Stabs have two attack angles.
- Right Thrust (Right Stab)
- Left Thrust (Left Stab)
Combo
- You can chain these attacks together into a combo. To perform a combo; Perform an attack and then start another attack before the first one is finished. When you combo attacks, you remove recovery time from your swings, making the subsequent attacks faster.
Morph
- A morph is an attack that changes to another attack during early wind-up. For example, you ‘morph’ a faked overhead windup into a commited stab release. This is used to juke an opponent into parrying/chambering early.
- Morphs can accentuate a drag (extend it).
- Morphs can be combo’d.
- Morphs can be feinted.
- Morphs cost 7 stamina to perform.
Feint
- A way to juke your opponents into parrying ( aka forcing a parry). There are advanced forms of feinting (discussed later). Feints cost stamina. For beginners, I suggest you don’t touch feints until you are more confident in other more base skills.
Flinch
- When you deal damage to someone, you flinch them. This short stun interrupts any action they were currently performing.
Active Parry
This is a term for a special counter-attack which results in parrying any oncoming attack during its windup. An active parry is triggered from a riposte or a chamber. Parrying oncoming attacks via Active Parry does not consume stamina. Useful in 1vX situations.
Hitstop
- When a blunt weapon registers a hit on a player model, it will stop in place rather than ‘go through’. Swords can ‘go through’ player models, making sword combos a bit faster. Hitstops also occur when you hit a team-mate.
Drag/Accel
- These are special attacks that are a product of attack speed manipulation.
- Drags are very long drawn out attacks that hit ‘slower’.
- Accels are very quick accelerated attacks that hit ‘quicker’.

Parrying
- Clicking the RMB in the direction of your enemy’s attack will cause you to block impending damage. This is called a parry. Parries are used as a platform to riposte off of. A parry consumes stamina.
Riposte
- A riposte (pronounced rih-pawst) is a quick counter-attack performed after a successful parry. Cannot be feinted. Cannot be morphed. Cannot be flinched. Triggers hyper-armor Consumes stamina.
Hyper-Armor
- Hyper-Armor is triggered from a riposte. This is a temporary armor-buff which results in 66% damage mitigation vs any oncoming attack during your riposte. Useful in 1vX situations. Does not consume stamina.
Chamber
- Chambers are counter-attacks which act like parries. To chamber an attack, you must mirror the angle of the incoming attack and time your attack during his release. Can be feinted. Can be morphed. Chambers consume [lots of] stamina.
Clashes
- A clash occurs when two attacks collide with each other (during late release). A clash will stop both weapons, but still allow you to combo off of it with a follow-up attack. Clashes don’t consume stamina. They can occur from any atack.
Kick
- Kick is used to push back your opponent if they get too close (face-hug). Also used to reset or gain initiative (ruins the momentum of your opponent). Can be combo’d into, morphed into and feinted. Consumes stamina (moreso if you miss).
- A devastating move used to stun your opponents, by pressing ‘F’. Landing a kick stuns your opponent long enough to combo off it to deal weapon damage to him. The purpose of a kick is used to reset and gain initiative (ruins the momentum of your opponent). It deals X damage & consumes X stamina. You can morph into kicks, feint kicks, parry and clash kicks. Kicks costs stamina, and even moreso if you miss it. The kick can be used both offensively & defensively depending on the situation (which I will explain later). Missing a kick will leave you vulnerable.[/list[/strike]]
Mordhau Mechanics 102

The following info is not necesarilly required to know for new players, but it helps for those desiring technical information.
Stamina Rules
- Attacks do not consume stamina if they strike an enemy.
- Attacks can be performed without any stamina.
- Unsuccessful attacks (misses) will cost you stamina.
- Successful hits will grant you 10 stamina.
- Missing an attack, and comboing it into another miss will result in double stamina penalty.
- If you run out of stamina and parry an attack, you will become disarmed. This will render you vulnerable [but you may quickly swap to a side-arm].
- Parrying an attack will cost you x stamina (depends on weapon).
- Chambering an attack will cost you 20 stamina.
- Morphing will cost you 7 stamina.
- Feinting will cost you 10 stamina.
- Jumping will cost you 12 stamina.
- Kicking will cost you stamina. Missing a kick will cost you even more.
Attack Phases: Windup, Release, Recovery
- Every attack has three main phases (and three minor ones):
- Windup phase, where your weapon ‘pulls back’ (telegraphs). The purpose of the windup animation is to allow the opponent to react to the attack type. You may still parry.
- Early Windup – Feints & Morphs can be performed. If so, stamina is consumed.
- Early Release – Damage isn’t dealt, but can be parried/chambered.
- Release phase, your weapon will deal damage to whoever touches it. Your player performs a grunt during this phase. You may still parry.
- Late Release – Damage is dealt & Clashes can occur.
- Recovery phase, where you are recovering back to an idle position of an attack. You will be unable to perform any actions in this state. If an attack misses, stamina is consumed.
Damage Types
- There are no explicit damage types in Mordhau, like there were in Chivalry.
- Each weapon’s attack causes a universal damage type while every armour has varying resistances to it. The weapon you use will have a predominant attack type (i.e Longsword stabs deal more damage than its strikes/slashes). This concept makes certain attack types more powerful than others on each weapon.
Stabs/Thrusts – most damaging with Sword/Spear-like weapons.
Strikes/Slashes – most damaging with Blunt/Axe-like weapons.
Multipliers
- There are different damage multipliers for where your attacks land on your enemy. Landing an attack on a head multiplies the damage of your swing while landing one on an appendage, such as a leg, will hit at decreased damage.
- The armour you wear in these regions, will mitigate damage dealt to them.
Lunge
- Lunge mechanic temporarily changes your sprint state (for the lunge duration) to a much faster sprint. Basically, it’s a temporary velocity increase when you attack.
Turn Cap
- Turn Cap is a limit placed onto weapon attacks that limit how far or fast a player can manipulate their position through aiming in any direction during the attack. Weapons can have different vertical and horizontal turn caps.
Chase Mechanic
- There is a balance mechanic built into the game that prevents opponents from running away endlessly from you, meaning someone in full plate can catch up to someone in light. This is to encourage you to stand and fight and prevents people from breaking the Duels game mode.To activate the Chase Mechanic, sprint forward and hold your cursor over the opponent who is running. As long as the opponent is just running (not swinging, parrying, dodging, etc.), you will accelerate and eventually overtake them.
Tracers: What are they?
 Tracers can teach you a lot about how to block (and land) attacks. When tracers come into contact with a player model, a collision is detected, thus registering a hit.
- To draw your weapons tracers go into the console (press ~) and enter this command: m.drawtracer 1. Now as you swing, your attack will be traced and colour-coded. Notice the different coloured lines.
- Red lines indicate hit tracers (your parry zones).
- Blue lines indicate where the weapon is held.
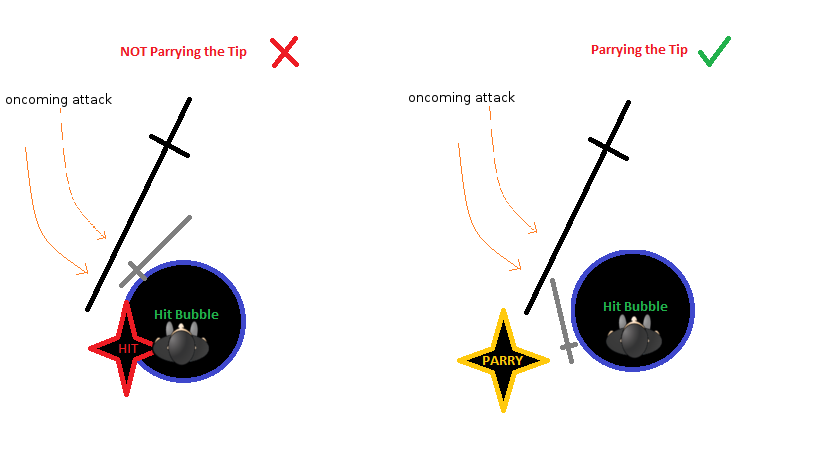
This is why you must parry the TIP of their weapon when you’re up close. So, if you’re fighting someone and they keep getting around your parries, they are manipulating their weapon’s tip to ‘wrap’ around your parry. We will talk more about how to defend against (and execute) these kind of attacks in Offense 102.
[/list]
Ping refers to the network latency between a player’s client and the game server as measured with the ping utility (in milliseconds). Since Mordhau uses’s server-side functions for registering critical mechanics (like Parry); The clients at a higher ping will be at a slight disadvantage because their input takes longer to the get to the server than the lower ping client. This is what results in faster-than-normal animations and Red-Parries (meaning you inputted parry at the right time, but that input didn’t make it to the server in time to actually register it, thus your parry not working) at high-ping.
To see if you experience a red parry
type m.debugnetworkparry 1 into the console
I have personally found that anything >= 70 ping is going to be noticeable against a good player. The lower the ping the better. Seriously, Do yourself a favor and only play in your timezone; don’t subject yourself to anything greater than this if you plan on hard-reading attacks/playing serious
Advanced Mordhau Lingo
Before we go any further, I would like to introduce 3 terms you will encounter in Mordhau.
Timing: One of the key elements of Mordhau combat is timing. Waiting for an opponent to panic parry; there is a brief period of time where he will be defenseless – this is the best opportunity to strike. Time your attack and punish them as they lower their guard & thus granting you initiative.
Initiative can be though of as momentum after you land an attack; You use this momentum to control the tempo of the fight (usually through combos). I will expound on initiative more later in later game sections, but for now this definition will do.
Gamble: a term used to explain an attack without any forethought involved. An example of this would be a player stabbing out of panic, regardless of the reaction of the opponent.
Offense 101: Attack Basics

There are two schools of thought in regards to attacking.
- 240 system
- Binds
In the old days, we only had binds (bound attack angles). So a lot of Chivalry: Medieval Warfare veterans, including myself, are used to those. Mordhau introduced the new 240 system, where the attack angle input is determined by the direction you move your mouse prior to clicking.
The 240 system offers fluidity & is intuitive, whereas, binds offer [input] speed & consistency. Some people swear by the 240 system, others by binds. It is up to you on which method you choose to use to attack with. In my experience, chambering attacks are easier with binds.

By default, 240 system (strike) is bound to LMB.
By default, Thrust is bound to [Scroll Wheel Up].
- Below is a diagram of all the default controls to Mordhau, and briefly explains how the 240 system works.
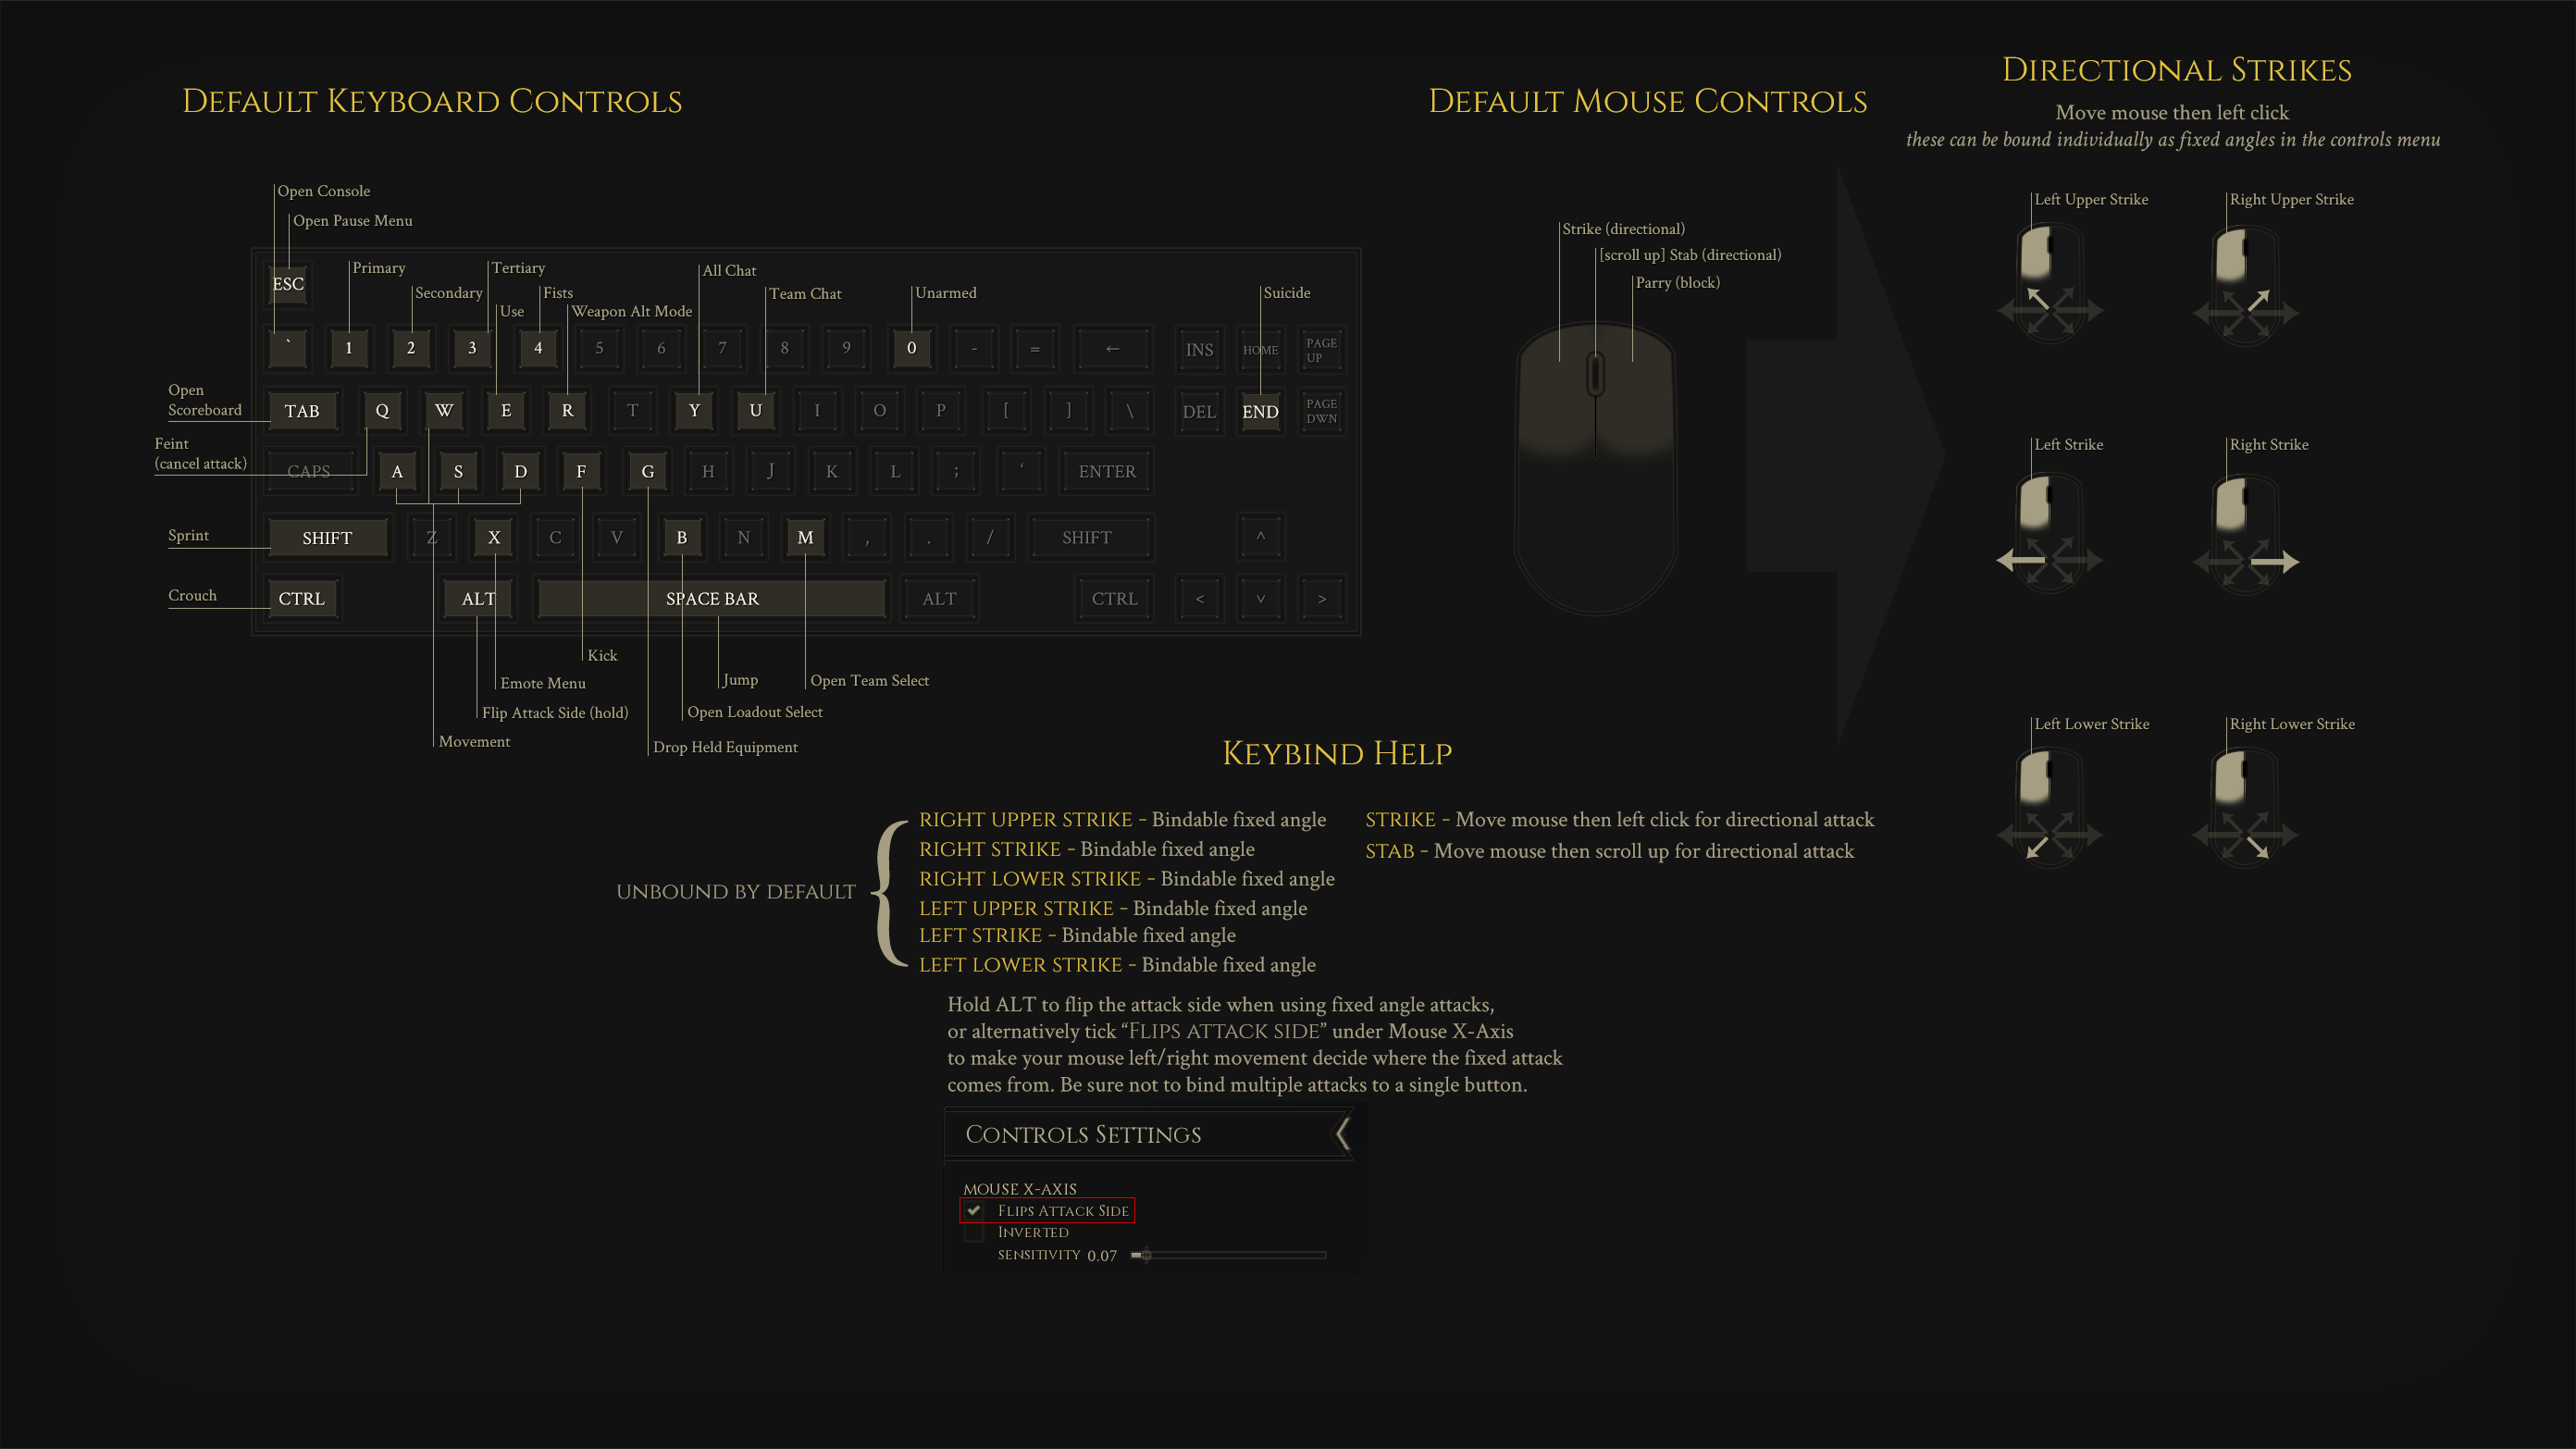
- I personally use the following binds. They feel the most efficient and easiest to chamber with. The downside is they take a bit of time to master.
- Strikes – (strike) bound to [LMB].
- Overhead (Right upper strike) – bound to [Scroll Wheel Down].
- Alt-Overhead (Left upper strike) – bound to [Scroll Wheel Button].
- Right/Left Slash (Right/Left strike) – bound to two [Optional Side Mouse Buttons].
- Right/Left Undercut (Right/Left lower strike) – bound to two [Optional Side Mouse Buttons].
- Stabs –
- Right Stab – bound to [Scroll Wheel Up].
- Left Stab – not bound [Optional].
What exactly is footwork?
In short it is W,A,S,D keys. But that is putting it lightly. Good footwork depends on -how- and -when- you use those WASD keys in conjunction to your mouse movement.
- You use footwork to position yourself in range of your opponent and you use it to position yourself out of your opponents range.
- You can use footwork to help parry attacks. You use footwork to manipulate when and where your drags & combos land. You use it to accelerate or de-accelerate an attack (dragging).
- You use footwork to transition between offensive and defensive positions.
- You use it to bait your opponent & play mind games.
Good footwork technique means that you know how to keep yourself out of the opponent’s range when he is most likely to strike, and close in for a counter. Using footwork, you can strafe around while keeping your eye on the opponent (aka Kiting), then suddenly move in with a rapid blow before he manages to perform his next move.
Defense 101: Parrying

The purpose of a parry is to prevent an opponent’s attack from landing.
Consistently parrying attacks relies on three main elements. Angles, Timing and Distance.
Let’s explore how to parry properly.
- To consistently parry attacks, you must aim the parry at the tip of the attacking weapon. Parrying the tip prevents your opponents weapon tracers from wrapping around your parry and connecting with your hit box, thus registering as a hit (even when it looks like you blocked it).
- Generally, it is harder to parry the tip at facehugging range, since you have to turn into the attack more. This is where a high field of view (FOV) comes in handy, so you have to put less effort into turning into the tip. I would recommend FOV= 101 120 and Camera Distance= -15.
- Parrying at the -last second- is key, especially when parrying drags.The most common mistakes result from
- Panic Parries
- Poorly Timed Parries (Early Parries)
- Panic Parries
Usually the most popular means to death for rookies is the dreaded panic parry. New players typically panic parry when they lack confidence and don’t know what to expect.
The key to not Panic Parrying is to –react– to an attack, instead of –guessing– when to parry.Learning not to panic parry is done only through practice and a calm mind. Useful tips:
- Get in the habit of only parrying at the point you need to.
- Staying calm.
- Learning the range of weapons (Done through time and practice).
- Poorly Timed Parries (Early Parries)
If your opponent performs a drag and you parry early, your parry animation will end by the time his blade connects. This wasn’t a panic parry, but a poorly timed parry.The reason you parry at the last second is to prevent early parries, as well as utilizing the time of your parry animation efficiently because when you parry, your turncap speed is drastically decreased. Therefore, you aim first, then parry. Instead of parry first, then aim. Some tips:
- Just going to re-emphasize, parry at the last second, only when you need to.
- Rather than parrying at the windup, parry when it transitions to release (Opponent Grunts).
- Pay attention to your opponents body orientation, it can tell you which drag he might perform.
Cool Tip: Crouching on parries reduces your models ‘hitbox’ near your feet. Useful when fighting drag lords.
Expect to die a lot before you get better. Let each death be a learning experience and think about the situation that got you killed. In time you will hone your reflexes.
If you are struggling with Parrying & Chambering, Distance is your friend.
The more distance you have, the more time you have to -react- to an attack. You have a better chance at blocking that “tip” when you have a clearer fov of the weapon’s full swing trajectory. This same concept applies to chambering/parrying something as well.
To gain more distance parrying/chambering, utilize footwork to compliment them; Backpedal (S) on a parry. Additionally, you can also Backpedal + Strafe (A+S / D+S) to gain more distance depending on the direction of an attack.This kind of footwork leads to matrixing.
Eventually through time and experience, you wont have to rely on as much distance, because your reactions & confidence will improve during close engagements.
There are two ways to deal with feints.
- Reading Feints (hard-read)
- Chambering Feints
- Reading Feints[gfycat.com]
- Reading a properly executed feint is challenging for beginners/intermediates, but the skill will develop if you put in enough time to learning the animations and phases of an attack..
- Feinting can be best read by not parrying an attack still being wound up, but instead after the attack is swinging. Also, listen for the opponent’s grunt. This indicates his blade is entering release, thus a commited attack.
- With that said, I find it easier to read feints from a distance. The more space between you and your opponent, the more time you have to react to the validity of the attack. Pay attention to the weapon as a whole, not any specific part of it.
- Chambering Feints
- Now, there is an alternative to ‘reading feints’ and that is chambering them. Chambering is a soft counter to feints, because you punish their bluff with a committed counter-attack of your own. We will explore chambering in Defense 103. I recommend you prioritize parries first.
Parries are also used as a platform to riposte off of.
Defense 102: Ripostes

- A riposte is simply a counter-attack immediately following a successful parry. A riposte is classified as a defensive counter-attack, because it depends on a parry. A riposte speeds up early windup phase. Thus, making it quicker than a basic attack.
The purpose of the riposte is to
- Counter-aggress your opponent
- Regain initiative.
- Trigger Hyper-Armor.
The trick to performing ripostes is to attack -during- the parry animation. If you miss the riposte window, then it is not a riposte.
- Try practicing a simple stab riposte. Right when you parry their attack and see the animation, immediately scroll your mouse wheel forward and watch how much faster your counter-attack is.
Let’s go into the purpose behind why you want to riposte.
- Counter-aggress your opponent
Mordhau has designed the game to reward offensive players (offensive meta). Meaning, if all you do is parry attacks and not counter-attack, then you will become disarmed and most likely die. This is why you should predominantly riposte. - Regain Initiative
Initiative is when you land an attack and use the first attacks momentum to set up another attack [into a combo]. Initiative is lost when you parry but don’t riposte. This is why we want to counter-aggress by riposting. Initiative is a meta game concept we will explore in great detail later. - Triggers Hyper-Armor
This is a term for a special armor-buff which results in reducing any oncoming attack damage by 66%. Hyper-Armor is triggered from a riposte. Hyper-Armor itself not consume stamina and remains active until your riposte has finished. This is what makes it useful in 1vX situations. Therefore, you want to riposte in 1vX situations. I will explain 1vX tips eventually.
Offense 102: Attack Speed Manipulation

You might hear the words drags or accels being thrown around a lot. These are a by-product of Mordhau’s real time combat system. They are not going away; So you need to learn how to execute/deal with them.
How do people’s attacks hit me so quick or slow? How does this work?
- Accelerations: The term for attacks you manipulate to hit -quicker- than it would normally.
- The purpose of an Acceleration is to hit your opponent before he has time to react.
- De-Acceleration/Drag: The term for attacks you manipulate to hit -slower- than it would normally.
- The purpose of a Drag is to punish your opponent for reacting too soon, registering a hit by the time his parry ends
- In very basic terms; You can either turn in the direction of a swing to increase impact time, or turn the opposite direction and slow it down.
- I find that the best drags are combined with footwork (WASD keys)– and that most rookies get so caught up in the mouse/torso movement that they forget about also using their movement keys (footwork). For this reason, I will go into detail on how to perform certain drags & accelerations.When you accel someone – you shouldn’t just be in a straight square line with them. Instead, footwork your accels & angling your body to make sure your windup starts in them already (especially on ripostes. This is what people term as ‘insiders’ because they [nearly] begin in side your body.
- You are Accelerating attacks by speeding up where the release phase –begins–
- Accelerated Overheads[gfycat.com]: Look straight down while performing an overhead. I see a lot of noobish players stare at the ground (called ‘groundsniffing’) which indicates an accel is about to be performed, thus defeating the entire purpose of the accel. Rather than ‘groundsniffing’ before an accel, perform your look-down near the end of windup. This way, you will be more subtle about it.
- Accelerated Slashes[gfycat.com]: The same concept applies here as it did to overhead. Position yourself to where the beginning of your slashes release phase is. You are aligning yourself horizontally (rather than you would vertically for an overhead). Remember, try to orientate your body for the accel at the end of windup.
- Accelerated Underhands[gfycat.com]. Identical concept to Slashe accels. I don’t need to repeat myself.
- Accelerated Stabs: Due to the linear nature of stabs, there really is no way to ‘accel’ it like you would with strike drags. I think the best way to ‘accel’ a stab are riposte stabs.
Cool tip: Sprinting fowards (Shift+W) while acceling – maximizes the range and speed of your weapon. Thus, slightly speeding up your accel’s first tracer hit. #Footwork
- You are Dragging (De-accelerating) attacks by slowing down where the release phase –ends–
- Overhead Footdrag[gfycat.com]: Start your right overhead like you would an accel, at the end of windup move the mouse 90 degrees right. During release press S+A to ensure the footdrag connects. For alt-overhead; Same concept as above, except your moving 90 degrees to the left and using S+D footwork.
POV[gfycat.com]- Overhead Headdrag[gfycat.com]: Start your right overhead like you would an accel, at the end of windup, move your mouse 45 degres upwards. POV[gfycat.com].
- Strike Drag[gfycat.com]: Start your slash like you’re going to accel your opponent, and then at the end of windup look 90 degrees to the right so the end of release connects (barely) offscreen. You can use footwork to manipulate it further by pressing S+A. For left strike drags; Same concept as above, except you’re moving 90 degrees to the left and using S+D footwork.
POV[gfycat.com] - Underhand Drag: Similar concept to Strike Drag. Start your underhand like your going to accel your opponent. At the end of windup, look 90 degrees to the right and footwork it in by pressing S+A. For left underhand drags; Same concept as above, except you’re moving 90 degrees to the left and using S+D footwork.
POV[gfycat.com] - Stab Drag[gfycat.com]: You start your stab windup as you normally would, facing your opponent. Right at the end of windup phase, and beginning of release, you move your mouse ~90 degrees right (or left), dragging it out and then arcing it back into the opponent. Imagine like you’re arcing the sword into their side rather than into their chest.
By combining attack manipulation (accels & drags) with ripostes, we can greatly enhance the riposte into a more powerful offensive move.
Here are examples of riposte-drags.[gfycat.com]
Here is an example of riposte-accel.
- Note: You must be moving (footwork) in order to take full advantage of attack speed manipulation. It is less effective if you are stationary. #footwork
Defense 103: Chambering

Chambering[gfycat.com] is another method of Parrying an attack, but it’s also slightly harder to perform because there is more input required than parry. Chambers can also be used as a platform for defensive or offensive purposes. Imagine a chamber like a riposte, however, a more robust & expensive riposte. Be careful, chambering depletes stamina quickly (20 per chamber).
The purpose of a Chamber is a reactionary counter-attack. Its goals are to:
- Punish Feints.
- Gain Initiative.
- Just like parrying, the key elements to successfully chambering are angles and timing and distance.
- Chambering attacks is a two-step process.
- Determine the angle of attack from opponent’s windup (Angle)
- Time its execution right before your opponent’s attack hits you. (Timing)
- Angles in the context of Chambering are not the same as parrying (aiming your parry at the ‘tip’). Angles here are in relation to the type of attack [windup] being performed. How you aim your mouse is not as relevant as it was with parrying.
- You are reacting to your opponents windup to determine your chamber ANGLE.
- For example,
- To chamber your opponents right overhead (right upper strike) – you must mirror his attack with a left overhead (left upper strike) of your own.
- To chamber your opponents left slash (left strike) – you must mirror his attack with a right slash (right strike) of your own.
The only time this rule does not apply are stabs, where the stab angle does not matter – only timing. Stab chambers are the easiest to perform.
- Timing with chambering is conceptually similar to how it was with parrying.Chambering at the -last second- is key, especially when chambering drags.
- Tip: When your opponent ‘grunts‘ – that’s a queue for when he is entering release phase. This can help you determine how to time your chambers.
- Through practice you will develop the mechanical skills & intuition necessary for timing your chambers. If you feel your chamber will fail, then you must resort to a parry.
Now, there is a third factor here that I didn’t discuss earlier because it’s not necessary, but it helps immensely when playing defensively & that is distance.
- If you are struggling with Parrying & Chambering, Distance is your friend.
- The more distance you have, the more time you have to -react- to an attack. You have a better chance at blocking that “tip” when you have a clearer fov of the weapon’s full swing trajectory. This same concept applies to chambering/parrying something as well.
- To gain more distance parrying/chambering, utilize footwork to compliment them; Backpedal (S) on a parry. Additionally, you can also Backpedal + Strafe (A+S / D+S) to gain more distance depending on the direction of an attack.This kind of footwork leads to matrixing.
- Eventually through time and experience, you wont have to rely on as much distance, because your reactions & confidence will improve during close engagements.
- You might be thinking
Beware of the flashiness of chambers & don’t be a chamber-bot (a player that overuses chamber). It’s a bad habit. Good players WILL use it against you.
- You should prioritize parry over chamber for a rew reasons.
- Parry costs less stamina. So you’ll win the stam game.
- Reading feints (as opposed to chambering them) takes more skill.
- Riposte depends on a parry, which subsequentially means Hyper-Armor does too.
- Now, even though parry is superior to chambers – it doesn’t mean chambers don’t serve a useful purpose. My advice is to treat chambers as a utility, not a crutch (for reading).
- One of the best ways to use Chambers is as a utility is for forcing parries and gaining initiative, which I will talk about more in the next section & Fancy Jukes.
A good player will view chamber as an offensive tool NOT a defensive crutch.
Offense 103: Forcing Parries

One of the key elements of Mordhau combat is timing. Waiting for an opponent to panic parry; there is a brief period of time where he will be defenseless – this is the best opportunity to strike. Time your attack and punish them as they lower their guard & thus granting you initiative.
Initiative can be though of as momentum after you land an attack; You use this momentum to control the tempo of the fight (usually through combos). I will expound on initiative more later in the Meta game section, but for now this definition will do.
There are a 3 main methods of forcing someone to panic parry. There are various forms within each method, giving you alot of variety.
- Morphs
- Feints
- Bodyfeinting
A morph is an attack that changes to another attack during early wind-up. Much like a feint, a morph can be used to juke your opponent into parrying early.
Morphs can achieve a few things.
- Force an early parry.[gfycat.com]
- Force an early chamber.
- Conceal an accel.
- Accentuate a drag.
- Fantastic for target switching during a team fight.
A morph has a lot of utility behind it for the low cost of X stamina. It prevents easy chambers, can force a panic block, and this switch up can throw off an opponent mid swing forcing a FTP. A morph is the most effective drag due to the extended wind up. You can not morph during release, and you cannot morph during a combo.
Feints are simply “windup” phase animations. By pressing Q (Default key) while your weapon is ♥♥♥♥♥♥ back (during a wind up), you can cancel out the attack, potentially tricking the enemy into parrying or chambering early, thus giving you a chance to get a hit in.
- Micro-feint: a short and less pronounced feint. Quick windup animation.
- Macro-feint: a longer and more pronounced feint. Longer windup animation.
Micro vs Macro POV illustration here.[gfycat.com]
–
That is up to you. Feinting can be incorporated into your playstyle, but I suggest you practice the “basics” before fixiating on feints. (Positioning, Parrying, Ripostes, Stamina Management, etc.)
Also, by constantly feinting in a pattern you risk your feints becoming more readable and less effective. Constant feinting/morphing exhausts stamina quickly.
Great times to feint include:
- Finishers: Your opponent is on the brink of death and you know one more hit will kill him. Feints are great finishers. Remember, dead people can’t feint you back 😉
- Defensive Players: Your opponent is playing defensively by backpeddling and/or you can’t get past his parries (This was what the feint was designed for).
- Chamber Baiting: Used when you know your opponent likes to chamber and you anticipate he will. Throw out a feint, and then chamber-feint (or kick) his chamber. This works quite frequently.
- You can also chamber bait using a non-feint attack. Feint has a chance to force a panic parry, however, making it a better option.
–
- Accel feints are hardest to read.
- Only feint within facehugging range, as feints are harder to read up close; your opponent has less time to react.
- Macro-feints are more convincing because the longer you wait to feint in the windup phase, the more it looks like an attack. Sometimes micro-feints are so quick that the opponent actually misses the feint animation.
- Use body movements[gfycat.com] with your feint. By using body movements with your feints, they are more convincing; thus making them more difficult to read.
- Combo-Feint (combo feint to parry):
Using the feinting mechanics, you can really throw off your opponent by landing a successful hit, preparing a second combo strike, feinting it and striking your opponent after his parry.
If you manage to land a hit on your first combo strike, you can use their “flinch” as momentum to feint the next. Super effective, because there is a short window after flinch where your opponent CANNOT chamber, making him more prone to falling for feints.- The majority of newer players have a natural reaction to parry late after being flinched. The mid-combo flinch makes them even more inclined to do so. Exploit this.
- Morph Feints
These are the best forms of feinting. By combining everything said above into a morph, you will most likely force a parry. These are the hardest moves to hard-read; Even the Mordhau vets struggle with these. - Chamber Feints:
Chamber Feints are much more effective than simple feints in my opinion. Just like regular feints; You can tie in the concept of macro-feints & body feints into a chamber feint, making it more convincing. - Chamber-Morph Feints:
Chamber-Morph Feints are even more effective than chamber feints. Applying macro-feints and body feints into a chamber-morph feint is the most effective way of feinting. Beware though, this is a very expensive move. Doesn’t work well against spammer/gamblers.
- Bodyfeinting: Making sharp and sudden movements after a parry (Jerking up and down). The goal is to make it look like you’re going to riposte after a parry, but instead, you body feint. This is a much more efficient way of “feinting” and most rookies fall for it. You can be very creative with body feints.
- Jumping: Jumping while in facehugging range usually is enough movement to force a parry. Mix this with a body feint and profit. Jump + stabs can also be effective.
- Crouching: Like a jump, a quick crouch can also force a panic.
- Kicking: Kicking is great (when it works) because it ruins the momentum of your opponent. It can break parries/blocks as well as interrupt windups and combos. Furthermore, it produces short stuns. If used tactfully, it can push your enemy into traps.
You can potentiallly tie all three concepts in this section together with the following example:
Stab Chamber -> Morph -> Overhead Feint (with bodyfeint).The combination of all of these can make your attacks very difficult to react to.
Fancy Jukes: Advanced Moves & Drags

The following moves are great ‘situational’ moves to surpise your opponent with. Spamming these moves could make them lose their suprise value.
- Excellent against heavy strike chamber playstyle. Similar to how you waterfalled in Chivalry. It may be performed with a regular overhead (right upper strike) or an alt-overhead (left upper strike)
- Overhead Waterfall: Start as an accel, during the grunt – drag it to the left and arc it back into your opponent. Footwork W+A. Emphasize on A.
- Alt-Overhead Waterfall: Start as an accel, during the grunt – drag it to right and arc it back into your opponent. Footwork W+D. Emphasize on D.
- Example (with riposte)[giant.gfycat.com]
- Here is some duel footage[gfycat.com] of waterfalls being used against an opponent.
- Waterfalls also works pretty well against shields.
- Excellent vs heavy stab chamber playstyle.A unique circular stab. You start the right stab at the waistline, drag it up their body and around their head, arcing it into their neck. The entire motion looks like a windmill turning. The drag motion is exactly how you dragged a Zweihander stab back in Chivalry. Credit to Maul Cop & Krieger.
- A fancy underhand drag you can perform. Start off like you are underhand accelling – Right before the grunt, you drag it down and imagine the blade arcing into their head. Footwork is similar to footdrags. Footwork and timing is key to making sure the blade connects to the blade. I’ve personally found these easier to implement via ripostes. Credit to Stauxie.
- Chamber Baiting
- If you know your opponent likes to chamber or chamber feint alot; Throw out an easily chamberable attack so you can be ready to punish his chamber/chamber feint with a chamber/chamber feint of your own. Usually catches people off guard. You can also Feint to bait chambers. Feinting might be even better because it can force a parry.
- Feint -> Kick chamber-bait
- Good against opponents that purposely try to facehug + chamber all your attacks [to gain initiative]. By the time he reacts to your feint with a chamber, your kick lands. Make sure you sprint and facehug during this move, or else you can miss your kick. Most effective with lighter armour loadouts.
- One of the best ways to use Chambers is as a utility is for forcing parries and gaining initiative.
- As I have stated before, its is important to prioritize parries over chambers. This will always hold true, but I would like to introduce you to a more advanced use of chambers by soft-reading attacks with chambers, by feinting your opponent’s windup (or feinting a feint!). Basically if you learn to hard read an attack, read a feint, and then feint his feint, you can really ruin your opponent.If this sounds complex, watch the link below.
- Here is an example of forcing a parry with a chamber[gfycat.com].In this example, I feint by chamber-feinting his feint, which forces a parry, I land a hit, which grants me initiative and thus use combo’s to retain the initiative.
This offensive chamber tactic also falls within the scope of chamber-baiting. Both are very similar.
- Matrixing is occasionally useful and frequently risky, where you manipulate your torso (mouse movement) in combination to footwork to avoid attacks. Matrixing can also give you more distance+time to chamber/parry an attack. There are a few methods of matrixing.
- Ducking[gfycat.com]
Duck by pressing [Control+Looking down]. This can be useful to duck under the all-too-frequent horizontal swings. The Ducking clip shown above is an example of a ‘Chamber Bait‘ duck.
Furthermore, if you panic from an opponent’s LMB feint, you can duck out of it[gfycat.com].
Just be aware; If your opponent hits you while you’re crouched, it’s very likely he will hit your head. - Backwards bend[gfycat.com]
Similar to Ducking, but rather than looking down, you look high up. [Control+Look up]. This will make your character bend his upper body backwards into a weird matrix like position; you can dodge some stabs and strikes aimed at your head.
- An example of a Matrix (Backwards Bend) followed up with a stab[gfycat.com]. Backwards Bend is a viable stratey against shorter weapons like dagger & short-sword. This is a common strategy against short stab spam weapons.
- Mercy: Embarrass your opponent by disarming them, but don’t kill them when they are at your mercy. Further humiliate them by laughing or feinting them.
- Nonchalant: This playstyle portrays you exerting little to no effort while casually destroying your opponent. Sometimes just standing there and just staring at your opponent makes them uneasy OR become too comfortable, letting their guard down. Stabbing through wind.
- Further disrespect your enemy by killing them with a Feder/Lute.
Playstyles
I only mention these as you will eventually see derivations of these playstyles in the wild.
Not everyone is so cookie-cutter, but categorizing playstyles like this can help you devise strategies against said playstyle when you encounter it.
Gambler: Basically, this player is a walking casino, a player that usually plays without any forethought by over-aggressively spamming constant attacks, to constantly gain initiative. This is usually a less cerebral method of playing the game – but it can be effective in some situations. Usually weak to chamber-feint’s. You wanna wait & be patiently defensive until you can steal initiative away from these guys.
Rat: This player enjoys killing you in clever ways. They are the epitome of ‘run away and bait’ playstyle. They wear very light to no armour & want you to chase them – to perhaps lead you into a trap.
I advise you not to play into the game unless you are confident you can catch up to him. They’ll typically use firepots and bear traps to ruin your day. Stand your ground against Rats, they will usually buckle up close.
Cerebral: This kind of player will usually stand their ground and try to identify your weakness & hard read attacks. They use a lot of forethought about your attacks & usually they are either very passive/cautious but know when to be aggressive. These can be the most dangerous players. Gambling usually triggers them, as it is a direct contradiction to their playstyle. You’ll have to fight fire with fire with these guys or resort to brainless gambling.
By profiling players into categories – it will help you develop certain strategies to defeat opponents
Meta Game
Congratulations, you’ve made it to the advanced stuff. You [should] understand Mordhau mechanically, but you are still a little rough around the edges and lack finesse necessary to defeat the battle hardened Mordhau veterans.
To progress further, we need to understand some meta-game concepts such as positioning, Initiative, & duel anatomy.
Pay close attention to the following sections; They’re the foundation for learning how to think ahead & manipulating your opponent.
- I’m going to teach you the Two Positions. I’m trying to beat this Two Position (Offense & Defense) thing into your head because it’s a structure I’ve developed to help rookies learn how to position themselves. Eventually, through time & practice- it will become second nature and muscle memory. You wont have to [explicitly] think about it.
There are two basic positions that are uniform across all playstyles:
- Position 1 (Defense): You position yourself out of range (or edge of range) – Reacting to your opponent’s attacks from a distance. Backpeddle from opponent. You are trying to regain initiative (via baiting).
- Position 2 (Offense): You position yourself in range – while attacking your opponent and pressing him offensively. Sprint into your opponent while attacking. You have/contesting initiative.
I will explain the two positions in depth, shortly.
We need to talk about the anatomy of a duel (how offense and defense change during a fight).
It’s important to know this because you want to know when you should attack and when you shouldn’t.
To grasp how positioning works, lets analyze the 4 main components of a duel.
- Sizing up your opponent.
- Attacking Advantage
- Controlling the Initiative (Tempo)
- Recovering the Initiative
- The short moment preceding the duel can provide valuable information about an opponent. After playing Mordhau for a while, you begin to learn to differentiate between the different types of players and can almost predict what kind of bull**** they are going to pull off. By analyzing your opponent, you can adjust your tactics, making you more unpredictable and dynamic. To do this, start off using position #1, our defensive playstyle. By positioning yourself out of his range and dancing with him via footwork, you can simultaneously:
- Analyze your opponents and gauge their playstyle, safely.
- Bait your opponent & lead them.
- Gain the attacking advantage (transitioning into offense, position #2)
…is where each player tries to grab offense for themselves.
The beginning of a duel is one of the most important times in terms of offense and defense because thats when each player tries to grab offense for themselves.
When you know your opponent will miss, and go on the offensive, you gain the attacking advantage. Also, every time your opponent parries, he loses the advantage because there is a short window after a parry, where his guard is down, leaving him open to attack.
Gaining the attacking advantage is advantageous for a few reasons; It puts you in control of the the duels tempo as well as
- Chance to deal damage first.
- If parried, gives you the stamina advantage. (Important against skilled parry’ers.)
- If damage is dealt, chance to push the attack, aka the initiative.
…you gain the initiative by landing an attack.
Once you deal damage to your opponent, you have the choice to push ‘the initiative’, (aka offense). Pushing the initiative is where you use your first attacks momentum and continue pressuring your opponent by facehugging him, (position #2), and utilizing your first attacks flinch to execute a combo / combo-feint-to-parry. Most people are more prone to panic parries while you are pressing the attack, as it is a natural reaction to want to parry after you take damage. Basically, you are exploiting your opponents “oh sh*t” moment.
…you lose the initiative when you get hit by an opponents attack, parry, or fail a counter-attack.
Keep in mind that continuing your attacking advantage can drain your stamina quickly if your opponent has good defenses & counter-aggress’s you succesfully. In this case you must regain initiative.
A common error many people make is over extending their aggression while they push initiative, in order to keep it. Thus, lowering their focus on defense, and losing initiative.
If your opponent lands an attack and you lose initiative, stay calm and try to chamber/parry-riposte his following attack (combo attack) to regain initiative.
The following will regain the initiative:
- Landing a Riposte
- Landing a Chamber
- Forcing a parry (feinting/chamber-feinting, bodyfeinting, etc.)
Disengaging to position #1 helps you perform these.
After you regain initiative, assume position #2 and go back on the offensive.
If your stamina is too low, disengage (sacrifice initiative) to recover stam to prevent being disarmed. If you are always changing how much ground you are covering then it becomes all that much harder for your opponent to close the distance and predict your movement.
Positioning 101: Defense (Gaining Initiative)

keeping proper distance; When they attack –
riposte or chamber/chamber-feint them. Disengage again, rinse and repeat until dead.
- The reason to use this position is that it’s very safe, stamina efficient and useful for analyzing and reacting to your opponents playstyle.
- New players can be deceived into thinking you are within range and carelessly swing at you, but since you position yourself on the edge of his weapon range; you can easily backpeddle (footwork) out of it and make them miss. Then, quickly go in range to land an attack when they are stuck in recovery. This position works really well against mindless noobs.
- The silver lining in this position, is that it also works on skilled players to regain initiative. As I explained earlier, Initiative is when someone attacks you, and controls the tempo of the fight using the first attacks momentum.
- Against skilled opponents, you don’t want to remain in this position forever. You use it more as stepping stone to position #2 (aggressing your opponent) when you grab initiative. When you have initiative, transition to position #2 and push the offensive.
Positioning 102: Offense (Controlling Initiative)
The closer you are, the more uncomfortable your opponent is.
Facehugging is an offensive technique used by “aggressive” players by constantly pressuring your opponent with offensive attacks, and therefore retaining the initiative (controlling the tempo). This is usually done through a combo.

By positioning yourself so close – you are making your opponent uncomfortable in the hopes of forcing error(s).
Successfully facehugging someone is dependent on your ability to maintain a balance between offense and defense, being able to aggress your opponent while simultaneously parry/chambering all his counter-attacks.
Why this playstyle?
- If your opponent is skilled, you will both constantly be contesting each other and using the same tactics to force errors upon each other. The defensive playstyle I spoke of earlier doesn’t work alone against advanced players because they keep “closing the gap” (as they should) and throwing attacks back at you. Facehugging really is a mind game, in the sense of pressuring your opponent to ‘slip up’ by constantly pressuring them. This is why you must learn how to counter-agress your opponent.
- As a new “facehugger”, you may also be uncomfortable while being so close to your opponent. You must condition yourself to break out of that mindset and become confident in this position. This is why I encourage you to become confident in your defense (parrying & chambering)
Thought process while facehugging?
- In terms of offense:
The goal is to force a parry (i.e. panic parries), After you land your first attack, you’re going to combo the second attack. The second attack in the combo can be anything you want (Drag/Accel/Feint/).
- Basic attacks are too easy to defend against when you’re facing a skilled opponent, they will most likely chamber-feint it and use it against you. This is why you should use Drags and Accels predominantly.
- You want to use Drags & Accels together in your combos, but make them sporadic. For example, don’t only use drags in your combo. Mix it up with irregular intervals of drags & accels.
- Basically, you are overwhelming them with accels & drags in your combo to keep them in a constant state of guessing & hesitation. This is you controlling the tempo of the fight.
- In terms of defense:
As a general rule, when facehugging, keep your crosshair aimed at their head (or slightly above) so you can see the full swing domain of overheads, slashes, and stabs. Always return your crosshair to their head in case his next attack comes from the opposite side.- You should be watching your opponents weapon. I don’t focus on any specific part of it, but look at it as a whole. You’ll notice it’s hard to fight longer weapons up close, because you have to turn more to parry the “tip” of the attacking weapon (this is why a high FOV helps).
Also, pay close attention to your opponents body orientation, as it will define where an attack may start if he tries to accelerate & drag his attacks. - Be prepared for your opponent to counter-aggress you. Remember, that chambers and ripostes can be used to regain initiative.
- If you’re too low on stamina, disengage & revert back to position #1. Once you have enough, push the offensive again. Rinse and repeat until dead.
- You should be watching your opponents weapon. I don’t focus on any specific part of it, but look at it as a whole. You’ll notice it’s hard to fight longer weapons up close, because you have to turn more to parry the “tip” of the attacking weapon (this is why a high FOV helps).
Facehugging Tips
- There are a few simple things you can do to help make facehugging easier.
- High FOV helps you parry close range attacks in this position. Anything >= 120 (and -15 camera distance) is adequate. Set your FOV to 101 to increase your peripheral vision.
- Mouse sensitivity should be set at your discretion. You should tailor it to whatever is most responsive for you in real-time. Quality mice with a high dpi really help with response.
-
. High FPS makes your overall game smoother.
- Monitors with a high refresh rate[www.amazon.com] (120/144hz monitors make reading quick animations easier).
Update: After purchasing a 144hz monitor, I have to say this is one of the greatest investments I have made for gaming. More frames == more animation readabilityTo see FPS: Open the console in the game and enter STAT FPS
Mind Games
The key to Juking (aka Mind Games) – figuring out what your opponents go-to “panic-parry” is, and cleverly exploiting him with it.
Originally posted by Naleaus:Cause in the end that’s really all either game comes down to. Scare your opponent into parrying by making your attack look hideous.
When it comes to mind games always keep in mind distance and intention. The goal is to always think one-step ahead of your opponent. If you’re diligent and are constantly changing between preventing them from doing what they want, and making it easy for them to do what they want (but leading them into a trap), it makes it incredibly difficult and confusing for your opponent to develop an offensive game against you. They never feel safe. Every time they think they’ve ‘won’ the moment and manage to make an unchallenged preparation, it seems like it was a trap all along – Thus, ruining your opponent’s confidence. To do this, lets explore some mind game concepts.
In Mordhau, you have soft counters. For example, notice how drags counter chambers. This was intentional to make it so you (or your opponent) can’t expect to easily chamber everything. It’s technically possible to chamber a footdrag, but the window is so small, that it acts as a soft-counter. This should not discourage you from practicing chambering drags/accels. Below is an illustration of how you should adapt to your opponent’s tactics based on the photo above.

Parry heavy playstyle (opponent) —–> Feint heavy playstyle (you).
Feint heavy playstyle (opponent) —–> Chamber heavy playstyle (you).
Chamber heavy playstyle (opponent) —-> Drag/Accel heavy playstyle (you).
Drag/Accel heavy playstyle (opponent) —-> Parry heavy playstyle (you).
To expound on this illustration,
- Take for example a new player. It is most likely he won’t know how to chamber (or read) feints. He will typically fall for feints and panic parry. Therefore, you react to his playstyle by feinting him more often than you do others.
Furthermore,
- If you were facing a player who feints you often, you will approach the fight with a chamber-heavy mindset. Likewise, if you are facing a chamber-heavy opponent, then you need to use drag and accel mixups to throw off his chamber timing.
Use these soft counters to adjust your playstyle on the fly. Being dynamic like this makes it difficult for your opponent to remain confident in a specific playstyle and strategy against you. This is also why position #1 is useful for analyzing & adapting to your opponents playstyle.
Now, when you are facing a ‘god’/professional, who is aware of all of these tactics, then it comes down to who has the most fortitude (death by attrition). These are the hardest fights. Mental endurance and confidence is key to not buckling under pressure. This is where intention comes in handy.
The concept of intention will condition your mind to remain confident and not hesitate whilst under pressure. Its goal is to exploit your opponent’s hesitation.
- In order to stay ahead of your opponent, you need to stay confident and commit to your moves. This is done through intention. Remember what I said earlier about distance and intention – The trick is to think ahead while in your current position. Whether you’re in facehugging range (position 2) and pushing the initiative, or gaining distance (position 1) and trying to regain it, always try to think ahead.
- I personally like to have a mental queue of the next attack I am about to perform. Try to think about your next attack whilst performing your current one.
For example,
- When you accel someone and land a hit, simultaneously think about dragging the next attack into a combo.
Another example of intention is during the beginning of a duel,
- When you let your opponent have the opening attack first, but chamber-feint it, forcing him to panic-parry and thus giving you first-blood and the attacking advantage.
Another example is during the middle of a duel,
- When you know your opponent will chamber-feint your attack, you throw out an easily chamberable attack, he chamber-feints it, and you punish his chamber-feint with a chamber of your own.
You can even use Intention with your positioning,
- You can play a little mind game with disengaging (backpeddling) by leading your opponent into a false sense of security; He thinks you are retreating in panic, but you are really going to surprise him with a sprint forward + accel attack after backpeddling a bit. You’d be surprised how often this works.
Intention also comes into play when you pattern-break.
One way to trip up any opponent is to create a pattern and then break it.
- Tougher and more skilled opponents will not easily fall prey to simple positioning, drags, accels and ripostes. When you are dealing with players at this skill level, this requires you to be a bit more cunning than usual.
For example,
- Create pattern by always riposting after a successful parry.
- Maintain pattern by continually riposting into your opponent, so he thinks you will always riposte after a parry.
- Break pattern by NOT riposting. Profit.
- There is a chance that your opponent will panic parry at step 3.
To expound on the above pattern:
- Riposte Accel
- Riposte Accel
- Riposte Drag
The same pattern-concept applies to Chambers:
- Chamber Drag
- Chamber Drag
- Chamber Accel
….and also applies to Morphs & Feints:
- Morph Overhead Feint
- Morph Overhead Feint
- Morph Overhead Accel
- Notice how you can be creative with pattern-breaking. You don’t have to do it in 3-steps. The number/attacks are arbitrary. The point I’m trying to illustrate is you need to be sporadic with breaking your patterns. Pattern-Breaking is effective because they THINK you’re crutching on one move, but you catch them off guard by switching it up with a polar opposite attack. Furthermore, sporadically transitioning between offense (position 2) and defense (position 1) while pattern-breaking.
Pattern breaking using Timestops is also an excellent way of tripping up your opponent.
- Timestops are a method of confusing your opponent by stopping all actions.The goal behind timestops (delaying a counterattack) is to build a pattern by always performing a counter attack and then you break the pattern by not counter attacking. You can deceive your opponent this way and punish them with a well timed accel or drag.
- This makes your actions more unpredictable because you tricked your opponent into thinking you would always immediatley perform an action.
- You’d be suprised at how often this tactic works by just staring at someone for half a second, and watching to see if they panic parry. This tactic also works vs opponents who try to read your playstyle, making you more unpredictable.
Positioning 103: 1vX Situations
[UNDER CONSTRUCTION]
- Fighting in a 1 versus 2 situation requires you to fall back on all of the knowledge and skill of everything provided in this guide to be done well. You will rely on parries, ripostes, chambers, morphing, footwork and exceptional positioning. I will cover three methods to help you stay alive during 1vX situation’s and devise strategies on how to dispatch opponents.
Target-switching
Prioritization
Positioning (Kiting)
- Defined as you parrying one opponent and riposting your counter-attack into another opponent.There are various forms of target switching, but the most essential one to learn is using riposte!The goal is to parry one opponent (known as ‘feeding’) and you use that to riposte transfer into their partner. This tactic is essential in fighting off multiple opponents as well as utilizing Hyper-Armor
- Hyper-Armor is one of your most reliable tools for keeping you alive in a 1vX. As we explained earlier; Hyper-Armor is activated is when you riposte an attack and grants you damage-mitigation during the Wind-Up of your riposte.
- In a 1 versus 2 situation you are going to need to identify the weaker opponent [in regards to Hp]. The weaker or less experienced opponent usually won’t be as aware of target switches or techniques. The reason you want to identify the latter is because with one well-timed target switch, you can dispatch this opponent quickly – hence evening the odds.
- Keeping a superior position on your opponents is by far the most important part of a successful 1vX. The most optimal position for a 1vX is with them stuck in front/behind one another and not allowing your opponents to get on both sides of you (sandwich)You are treating the opponent closest to you as a central point orbiting him. As the second player attempts to go around, flank/ get around you. You run the opposite direction to keep them in line. So if your opponent is running clockwise to get you, you run clockwise with him to prevent him from ever reaching you. This is also known as Kiting your opponents.
Chamber-Morph-Switch
Chamber-Switch
Chamber Feints- This can be an incredibly useful tactic to psych out both of your opponents when done right. Your goal is to chamberfeint and get both of your opponents to panic parry at the same time for a hit on each of your opponents in one strike. In order to get this to work you need to position yourself where it looks like you could hit both opponents with the same riposte.
Here is some footage of me in 1vX situations. Pay attention to how I Kite (position myself) and target-switch.
Conclusion
Originally posted by flakes:What makes great players truly great is their deviation from standard play. If everyone did what you’d expect them to do, every duel would be predictable, deviation from standard play and steering toward unpredictable actions is what scores you hits in a duel. The more dynamic your tactics are, the more unpredictable you are. The best kind of players adapt their strategies to their opponents playstyle. This is how you will win duels.
I hope you enjoyed this guide, as it took a long time to write.
Special Thanks to Blink, my loyal comrade, for helping me with the guide’s content.
Special Thanks to Krieger for being my target dummy aka Squire.
Special Thanks to MonoXtr for helping me edit and proofread the guide.
Special Thanks to Stauxie for his photography skills & various feedback.
Thanks to Jax, I copied his ideas for Mordhau Weapons.
Thanks to Mittsies, I copied his perks post.
Thanks to Tim_Fragmagnet, I copied some of his post from The Mordhau Masterthread.
Thanks to Trixx, for the beautiful Jousting Screenshot.
Thanks to Naleaus, for the words of wisdom.
Thanks to Reithur’s guide on Chivalrous Etiquette; I copied many of his ideas for Mordhau Etiquette.
If you have any questions or feedback, Please feel free to comment. We will try to respond to you.
