Overview
This guide will show you how you can host your own wargame server at little to no cost to you!**NOTE**: This guide is several years old. Back then I had limited knowledge of how to do this. If you know what you are doing with virtual machines, port forwarding and command line for linux then take what I said on the subject as a noob’s suggestion.
Overview
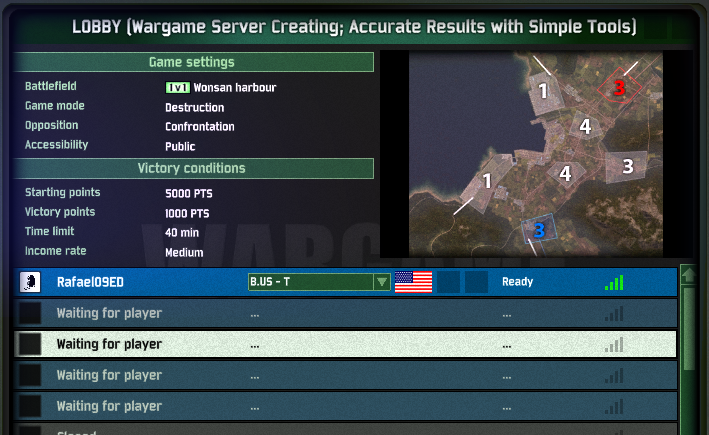
This guide will show you how to create a Wargame: Red Dragon Server, enabling you to host your own 10v10 server.

In this guide I will be using only one computer that be running a virtual instance of Debian 7.
I am assuming that you do not have a 2nd computer to run it on, and that you are using Windows.
Someone told be about this guide after I finished writing this.
[link]
I do not represent the creators of any of the software I use in this guide.
I do not take any responsibility for anything that you do or don’t do to your computer
I do not work for any organization related to any of the software I use in this guide.
Software / Requirements
The Eugen System team has set the following requirements to host a dedicated server :
- The server must have a fixed IPv4 visible from the outside
- The server must run with Linux with Debian 7 (Wheezy) distribution
Source : [link]
In this Guide I will use the following programs:
- Windows 8.1 (Windows 7 + should be fine)
- Debian* 7 32 bit : [link]
- Oracle VirtualBox: [link]
- Wolfs Wargame RCON : [link]
* – Someone told me that you can use Ubuntu as well, and that’s how they have their setup.
I do not have access to my router to port-forward, So I use this program :
- PortMapper – 1.9.5 : [link]
You and Eugen
In order to host a dedicated Wargame server you must send Eugen Support an email requesting to host a Wargame Server.
Your message must include your EugNet login without you password.
Example Email:
I would like to be able to host a dedicated server for Wargame: Red Dragon.
My login is [YOUR LOGIN HERE].
After they get your email and approve it, they will give you:
- Your personal dedicated server key
- A link to download the dedicated server
I will not give you the link, you will have to get it yourself.
The link might say “Your connection is not private” but it is fine. Click Advance, then click proceed.
You will have to download the file “wargame3_server.tar.bz2” but you will have to do that at a later step in Debian.
Wargame3 is Wargame: Red Dragon, While wargame2 refers to Wargame : Airland Battle
The Linux Machine
One of the requirements to host a server is to be running “Linux with Debian 7 (Wheezy) distribution”.
In order to do that we will be creating a virtual machine that will run Debian 7.
You can use any Virtual Machine software you wish, but I will be using Oracle’s VirtualBox.
You also have to download Debian7 32 bit, 64 bit will not work (if it does, then it would require extra changes to be done to debian).
Once you have Debian downloaded and VirtualBox installed, You must create a new virtual machine, and install Debian to it.
If I get around to it / people request it, I will do my own tutorial but untill then: [link]
Just make sure that with this link you do Debian 32 bit. Also Diban UI is different so install with a GUI.
If that is not good enough, ask in the comments for me to do it. But until I do it : LMGTFY[lmgtfy.com]
When you can, shutdown your virtual machine. While it’s shut down go to your Virtual Machine settings, go to network, and change Adapter 1 to a Bridged Adapter.
Setting up the Server
Now we have to set up the server inside of Linux.
Inside of Debian, download the “wargame3_server.tar.bz2” file from the link the Eugen Support sent you. Double click on it, and extract it to your downloads folder.
The path should be “/home/[Your User Name]/Downloads/wargame3_server”
Some of the information that follows can be read in the install.txt file.
Inside of Login.ini, Insert your EugNet Login, and personal dedicated key into the log, inside of the quotation marks. Save the file.
Inside of variables.ini, change the server name to whatever you want, that is appropriate. Eugen gives you a dedicated key, linked with your account for a reason.
The following file is not necessary, but helps you keep track of how to launch it:
Create a file called Launch.txt. This is where you will store the launch parameters for the server.
Open the file, and paste
./wargame3-server +port XXXX +port_mms 10804 +ip YY.YY.YY.YY
Open your web browser inside of Debian. Go to Google and search “IP”
It will say
[Your IP Adress]
Your public IP address
Copy the IP address, and replace the “YY.YY.YY.YY” with it.
Pick a port >10000 (I chose 10803) and replace XXXX with it.
If you have access to your router, you can port forward that port. You can skip the “EXTRA: Port Forwarding” section.
If you do not, the “EXTRA: Port Forwarding” section is for you.
Port Forwarding
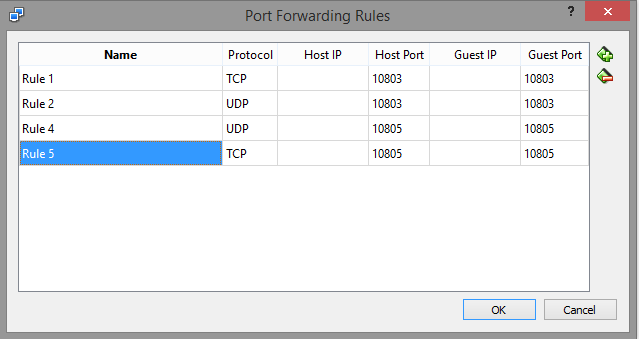
Go to your Virtual Machine settings and then to Network. Under Adapter 1, change it to NAT.
Click on Port Forwarding. Add the port that you choose in the launch parameters.
In order for people to access your server you must port forward the required ports through your router.
There are two ways to do this:
- Logging into your router
- Using an application
Using an application does not always work, and requires you to be on the router that has your external IP address.
Logging into your router is the normal way to do it. Once you log in, Look for a feature called Port Forwarding.
Under that feature you will be able add the ports you picked in the launch parameters. Make sure to allow inbound and outbound for those ports.
EXTRA: Port Forwarding w/ UPnP
This section is if your router supports UPnP and you want to port forward with that. Otherwise, please skip this section and port forward normally.
Download PortMapper – 1.9.5. This program will allow you to forward ports without access to your router.
Run PortMapper and click on connect in the middle left.
There is a section to the right of it called “Port Mapping presets”.
Click on create.
Type in a description like “Wargame RD Server 1”
Under ports, Add your port you put in the launch parameters for TCP and UDP.

Click Save.
While the preset is selected, click on use.
Those ports are forwarded after it finishes.
Shutdown your Debian virtual machine.
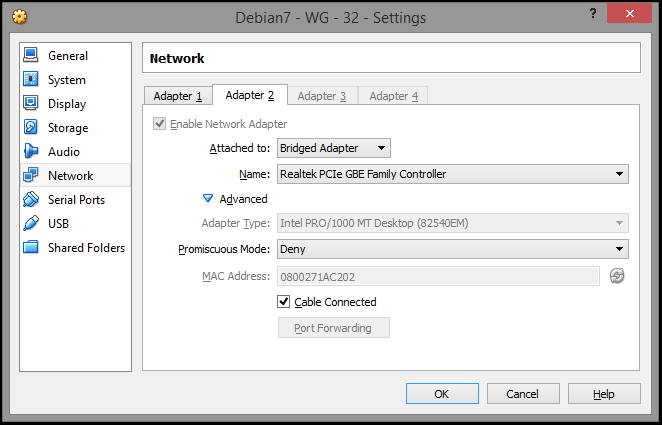
Go to your Virtual Machine settings and then to Network.
Go to Adapter 2 and change it to Bridged Adapter.
This will allow RCON to use your local IP address for sending server commands, and your server to go though PortMapper.
Follow the “Controlling the server” section, and then return here.
If it does not work, add RCON’s ports to PortMapper under the wargame RD preset, and then hit use. If it still does not work, try adding it to your virtual machine’s NAT port forwarding.
Launching the Server
In order to launch the server, you have to open the terminal under Applications -> Accessories -> Terminal.
If you kept the file directory the same, type in : cd Downloads/wargame3_server/
You can hit tab to auto complete. Once you type it in, hit enter.
The new line should say “[Your Account Name]@[Your Computer Name]:~/Downloads/wargame3_server$”
Now you can type in or paste your launch parameters
Controlling the Server
You have your server set up, but it’s not dynamically controllable. You can stop here if you want, or you can continue and download Wolfs Wargame RCON.
If you have access to your router continue.
If you don’t, Read the section above called “EXTRA: Port Forwarding”.
Run Wolf’s Wargame RCON.
We now need to get your local IP address for Debian.
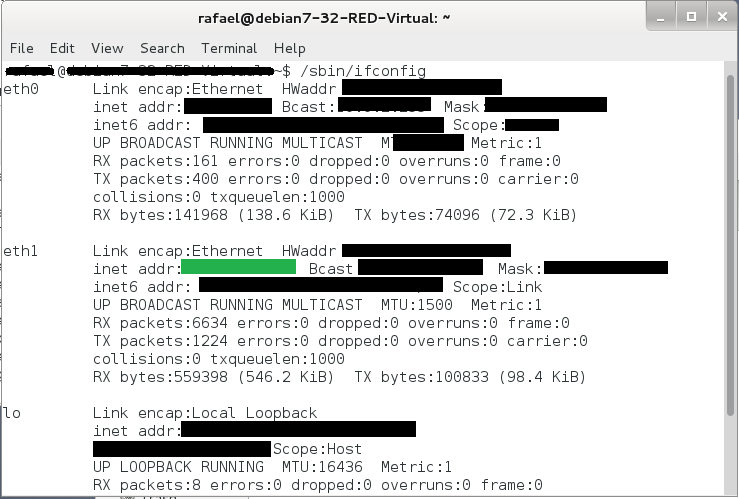
Go into Debian, and open a new terminal. Type in :
Earlier you set your one of your network adapters to bridged connection.
Depending on if it was Adapter 1 or Adapter 2, get the IP from either eth0 or eth1 respectively.
The IP is formatted
We now need to pick an RCON port, and a RCON password.
Go back to your launch parameter text document and add the line
Replace XXXX with a port of your choosing (I chose 10805).
Copy the port and password into their respective boxes in Wolfs Wargame RCON.
Once your server is launched with the new parameters in the terminal, click connect.